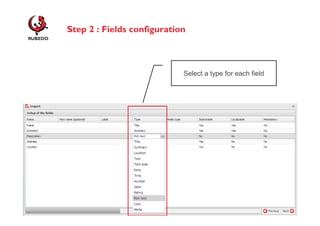
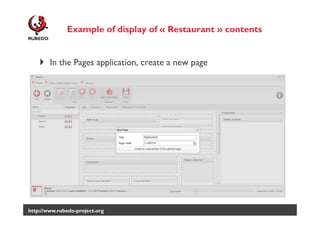
RUBEDO CMS
http://www.rubedo-project.org

Automatic content import
02/12/2013
Rubedo CMS : Automatic content import

Since Rubedo v1.3, you can import contents automatically
from a CSV file.
This feature allows you to :
– Select the file containing contents
– Select the fields you want to import
– Define the function of each field (taxonomy or content).

Prerequisite : Taxonomy & Content Types concepts

http://www.rubedo-project.org
Rubedo CMS : Automatic content import

The Import feature will automatically create:
– A taxonomy: the keywords / tags associated to your contents will
be added in the Taxonomy application. Some rules can also be set (for
example: mandatory or not),
– A content type: a new content type will be created, based on the
fields you have selected (title, summary, location…). The above
keywords will be associated with this content type,
– Contents: they will automatically be added to the content repository.
They will be « classified » with the keywords.

http://www.rubedo-project.org
Automatic content import

Step 2 :
Click on
Import

Step 1 :
Open the
Rubedo menu
Administration

http://www.rubedo-project.org
Step 1 : select a file

Select the CSV file on
your computer

Example of CSV file
Step 1 : select a file
The list of the available
fields of your file is
displayed in this
column.

The goal of this step is to define the
fields you want to import and their
function.

Just drag & drop the file in the
different columns
Step 1 : select fields to import
The columns can be imported as fields or as taxonomies.
– Imported as a field : these fields will be used to create the Content
Type
– Imported as a taxonomy : these fields are used to create new
vocabularies in the taxonomy
Step 1 : select fields to import

Example with multilingual contents
Step 2 : Fields configuration
For each field, some options are available:
– New name (« technical » name of the field)
– Label (label of the field, displayed when you will create a new content
of this type)
• Example :
– Name of the field : Media
– Label of the field for the contributors: Image

– Type : to define the function of each field.
• For example the field « Name » will correspond to the Title of the
content.

– Media Type : to define if the media is an image, a video, a document,
an audio file… (only for « Media » fields)
http://www.rubedo-project.org
Step 2 : Fields configuration
For each fields, some options are available:
– Searchable: to define if this field can be indexed by Rubedo search
engine. « Yes » means the content of this field can be searched with
the search engine.
– Localizable: in a multilingual site, this option allows you to translate
each field in the different languages of the platform.
– Mandatory: to define if this field is mandatory when you publish a new
content.

http://www.rubedo-project.org
Step 2 : Fields configuration

Select a type for each field
Step 3 : taxonomy configuration

Define the options for taxonomy fields :
– Mandatory: if « Yes », the contributor will have to choose one of the
terms of the taxonomy when he will create a content
– New name: to give the taxonomy a different name

http://www.rubedo-project.org
Step 4 : Translation configuration
When the contents you want to import are available in
different languages, a 4th step will let you associate translations
– For each field, define its translation and the language in which it is
translated.
• In a multilingual website, contents will be imported in the working language.

http://www.rubedo-project.org
Step 5 : Finalization and import

Enter the name of the
content type and specify
its rights

A notification popup displays the result of
the import.
http://www.rubedo-project.org
Automatic content import

Once the import is finished, you may notice:
– A new Content Type is available in the Content Types application

http://www.rubedo-project.org
Automatic content import
– New contents are now available in the repository. These contents can
be modified.

http://www.rubedo-project.org
Automatic content import
– New taxonomy vocabularies are now available, along with new terms.

http://www.rubedo-project.org
Example of display of « Restaurant » contents

In the Pages application, create a new page

http://www.rubedo-project.org
Example of display of « Restaurant » contents

Select an area in the page and add the Google Maps block

http://www.rubedo-project.org
Example of display of « Restaurant » contents

Settings of the bloc :
– Constrain to site : if the imported
contents are confined to this website
– Facets: select « Restaurant » content
type
– Geolocation :
• If this option is active, the map will be
centered on the location of the
visitor.
• Otherwise you can center the map
on a specific address
Example of display of « Restaurant » contents

On the website, restaurants are displayed on a map.

http://www.rubedo-project.org
Automatic content import

To sum up :
– This feature allows you to import monolingual and multilingual
contents
– Content types, taxonomies and contents are automatically created.
– Imported contents can be displayed on the website(s) thanks to the
different blocks (list, Google maps, calendar, …)

More tutorials are available on the website www.rubedoproject.org

http://www.rubedo-project.org
Documentation and tutorials :
http://www.rubedo-project.org/accueil/ressourcesrubedo/documentation

@Rubedo_project

http://www.rubedo-project.org

Rubedo CMS : Tutorial Content import

  • 1.
  • 2.
    Rubedo CMS :Automatic content import Since Rubedo v1.3, you can import contents automatically from a CSV file. This feature allows you to : – Select the file containing contents – Select the fields you want to import – Define the function of each field (taxonomy or content). Prerequisite : Taxonomy & Content Types concepts http://www.rubedo-project.org
  • 3.
    Rubedo CMS :Automatic content import The Import feature will automatically create: – A taxonomy: the keywords / tags associated to your contents will be added in the Taxonomy application. Some rules can also be set (for example: mandatory or not), – A content type: a new content type will be created, based on the fields you have selected (title, summary, location…). The above keywords will be associated with this content type, – Contents: they will automatically be added to the content repository. They will be « classified » with the keywords. http://www.rubedo-project.org
  • 4.
    Automatic content import Step2 : Click on Import Step 1 : Open the Rubedo menu Administration http://www.rubedo-project.org
  • 5.
    Step 1 :select a file Select the CSV file on your computer Example of CSV file
  • 6.
    Step 1 :select a file The list of the available fields of your file is displayed in this column. The goal of this step is to define the fields you want to import and their function. Just drag & drop the file in the different columns
  • 7.
    Step 1 :select fields to import The columns can be imported as fields or as taxonomies. – Imported as a field : these fields will be used to create the Content Type – Imported as a taxonomy : these fields are used to create new vocabularies in the taxonomy
  • 8.
    Step 1 :select fields to import Example with multilingual contents
  • 9.
    Step 2 :Fields configuration For each field, some options are available: – New name (« technical » name of the field) – Label (label of the field, displayed when you will create a new content of this type) • Example : – Name of the field : Media – Label of the field for the contributors: Image – Type : to define the function of each field. • For example the field « Name » will correspond to the Title of the content. – Media Type : to define if the media is an image, a video, a document, an audio file… (only for « Media » fields) http://www.rubedo-project.org
  • 10.
    Step 2 :Fields configuration For each fields, some options are available: – Searchable: to define if this field can be indexed by Rubedo search engine. « Yes » means the content of this field can be searched with the search engine. – Localizable: in a multilingual site, this option allows you to translate each field in the different languages of the platform. – Mandatory: to define if this field is mandatory when you publish a new content. http://www.rubedo-project.org
  • 11.
    Step 2 :Fields configuration Select a type for each field
  • 12.
    Step 3 :taxonomy configuration Define the options for taxonomy fields : – Mandatory: if « Yes », the contributor will have to choose one of the terms of the taxonomy when he will create a content – New name: to give the taxonomy a different name http://www.rubedo-project.org
  • 13.
    Step 4 :Translation configuration When the contents you want to import are available in different languages, a 4th step will let you associate translations – For each field, define its translation and the language in which it is translated. • In a multilingual website, contents will be imported in the working language. http://www.rubedo-project.org
  • 14.
    Step 5 :Finalization and import Enter the name of the content type and specify its rights A notification popup displays the result of the import. http://www.rubedo-project.org
  • 15.
    Automatic content import Oncethe import is finished, you may notice: – A new Content Type is available in the Content Types application http://www.rubedo-project.org
  • 16.
    Automatic content import –New contents are now available in the repository. These contents can be modified. http://www.rubedo-project.org
  • 17.
    Automatic content import –New taxonomy vocabularies are now available, along with new terms. http://www.rubedo-project.org
  • 18.
    Example of displayof « Restaurant » contents In the Pages application, create a new page http://www.rubedo-project.org
  • 19.
    Example of displayof « Restaurant » contents Select an area in the page and add the Google Maps block http://www.rubedo-project.org
  • 20.
    Example of displayof « Restaurant » contents Settings of the bloc : – Constrain to site : if the imported contents are confined to this website – Facets: select « Restaurant » content type – Geolocation : • If this option is active, the map will be centered on the location of the visitor. • Otherwise you can center the map on a specific address
  • 21.
    Example of displayof « Restaurant » contents On the website, restaurants are displayed on a map. http://www.rubedo-project.org
  • 22.
    Automatic content import Tosum up : – This feature allows you to import monolingual and multilingual contents – Content types, taxonomies and contents are automatically created. – Imported contents can be displayed on the website(s) thanks to the different blocks (list, Google maps, calendar, …) More tutorials are available on the website www.rubedoproject.org http://www.rubedo-project.org
  • 23.
    Documentation and tutorials: http://www.rubedo-project.org/accueil/ressourcesrubedo/documentation @Rubedo_project http://www.rubedo-project.org