Compound Microscope –Detailed Notes for B.Sc. MLT Students
Author: Dr. Jagroop Sidhu
Introduction
A compound microscope is an essential optical instrument used in medical
laboratories to observe tiny objects such as cells, microorganisms, and tissue
sections that cannot be seen with the naked eye.
It is called compound because it uses two sets of lenses — the objective lens and
the eyepiece lens — to achieve high magnification.
Principle
The compound microscope works on the principle of magnification by
refraction of light.
1. Light rays from the specimen pass through the objective lens, which forms
a real, inverted, and magnified image inside the body tube.
2. This image is then magnified again by the eyepiece (ocular lens) to form
a virtual, enlarged image seen by the observer.
Total Magnification = Objective lens × Eyepiece lens
Example:
If the objective lens is 40x and the eyepiece is 10x,
Total magnification = 40 × 10 = 400x
Construction of a Compound Microscope
1. Mechanical Parts
Part Function
Base Supports the entire microscope and keeps it stable.
Arm
Connects the base and body; used to carry the
microscope.
Stage
Flat platform where the glass slide is placed; it has stage
clips to hold it in position.
2.
Part Function
Body Tube
Holdsthe eyepiece and objective lenses at proper
distance.
Nosepiece (Revolving
Turret)
Holds 2–4 objective lenses and can be rotated to change
magnification.
Coarse Adjustment
Knob
Moves the stage up and down quickly for rough
focusing under low power.
Fine Adjustment
Knob
Moves the stage slightly for fine, sharp focus under high
power or oil immersion.
Inclination Joint
Allows the microscope to be tilted for comfortable
viewing.
2. Optical Parts
Part Function
Eyepiece
(Ocular Lens)
Usually 10x or 15x magnification; magnifies the image
formed by the objective lens.
Objective
Lenses
Provide different magnifications — typically 4x (scanner),
10x (low power), 40x (high power), and 100x (oil immersion).
Condenser
Focuses light onto the specimen to improve clarity and
contrast.
Iris Diaphragm Regulates the amount of light entering the condenser.
Mirror / Light
Source
Reflects or provides light to illuminate the specimen. Modern
microscopes have built-in LED lamps.
Working of a Compound Microscope
1. Placement
o Place the microscope on a flat, stable surface.
o Plug in the light source or adjust the mirror for natural light.
3.
2. Preparation
o Placethe prepared slide on the stage and fix it with clips.
o Start with the low power objective (10x).
3. Focusing
o Bring the objective close to the slide using the coarse adjustment
knob while watching from the side.
o Then look through the eyepiece and slowly move the stage down
until the image appears.
o Use the fine adjustment knob to sharpen the image.
4. Illumination
o Adjust the mirror or light source, condenser, and iris diaphragm
for proper brightness and contrast.
5. High Power Viewing
o Rotate the nosepiece to bring the high power (40x) objective into
position.
o Focus gently using the fine adjustment knob only.
6. Oil Immersion Use (100x)
o Place a drop of immersion oil on the slide.
o Rotate the oil immersion lens into place.
o Focus carefully using fine adjustment only.
o After observation, wipe off the oil immediately.
Care, Cleaning, and Maintenance
Before Use
• Ensure lenses are clean.
• Always start with a low-power objective.
• Adjust the mirror or lamp for proper light.
During Use
• Do not force knobs or rotate objectives roughly.
4.
• Never usecoarse adjustment under high power or oil immersion.
• Adjust the diaphragm to control brightness.
After Use
• Remove the slide carefully.
• Clean the oil immersion lens immediately using lens paper.
• Lower the stage and set low power in position.
• Switch off the light and cover the microscope with a dust cover.
Storage
• Keep in a dry, dust-free cabinet.
• Avoid moisture and direct sunlight.
• Occasionally lubricate the mechanical parts for smooth movement.
Cleaning of Lenses
• Use lens paper or soft, lint-free cloth.
• Never use tissue paper or cloth with dust.
• If grease or oil is present, use a small amount of xylene or lens cleaner.
• Do not touch lenses with fingers.
Precautions
1. Carry microscope with both hands — one on the arm and one under the
base.
2. Never use coarse adjustment with high-power lenses.
3. Keep lenses free from oil and dust.
4. Always remove immersion oil after use.
5. Do not keep the microscope in damp places.
6. Use proper illumination to avoid eye strain.
5.
Applications in MedicalLaboratory
• Hematology: Examination of blood films, RBC and WBC morphology.
• Microbiology: Study of bacteria, fungi, and parasites.
• Histopathology: Observation of tissue sections.
• Urine Analysis: Study of urinary sediments.
• Cytology: Examination of cells for abnormalities.
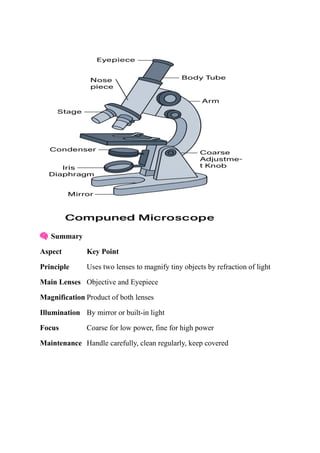
Diagram (Labelled Parts)
Include or draw a simple labelled figure showing:
• Eyepiece
• Body tube
• Nosepiece
• Objective lenses (4x, 10x, 40x, 100x)
• Stage and stage clips
• Condenser
• Diaphragm
• Mirror or light source
• Coarse & fine adjustment knobs
• Arm
• Base
6.
Summary
Aspect Key Point
PrincipleUses two lenses to magnify tiny objects by refraction of light
Main Lenses Objective and Eyepiece
Magnification Product of both lenses
Illumination By mirror or built-in light
Focus Coarse for low power, fine for high power
Maintenance Handle carefully, clean regularly, keep covered