Downloaded 99 times
![888© 2009 Cisco Learning Institute.
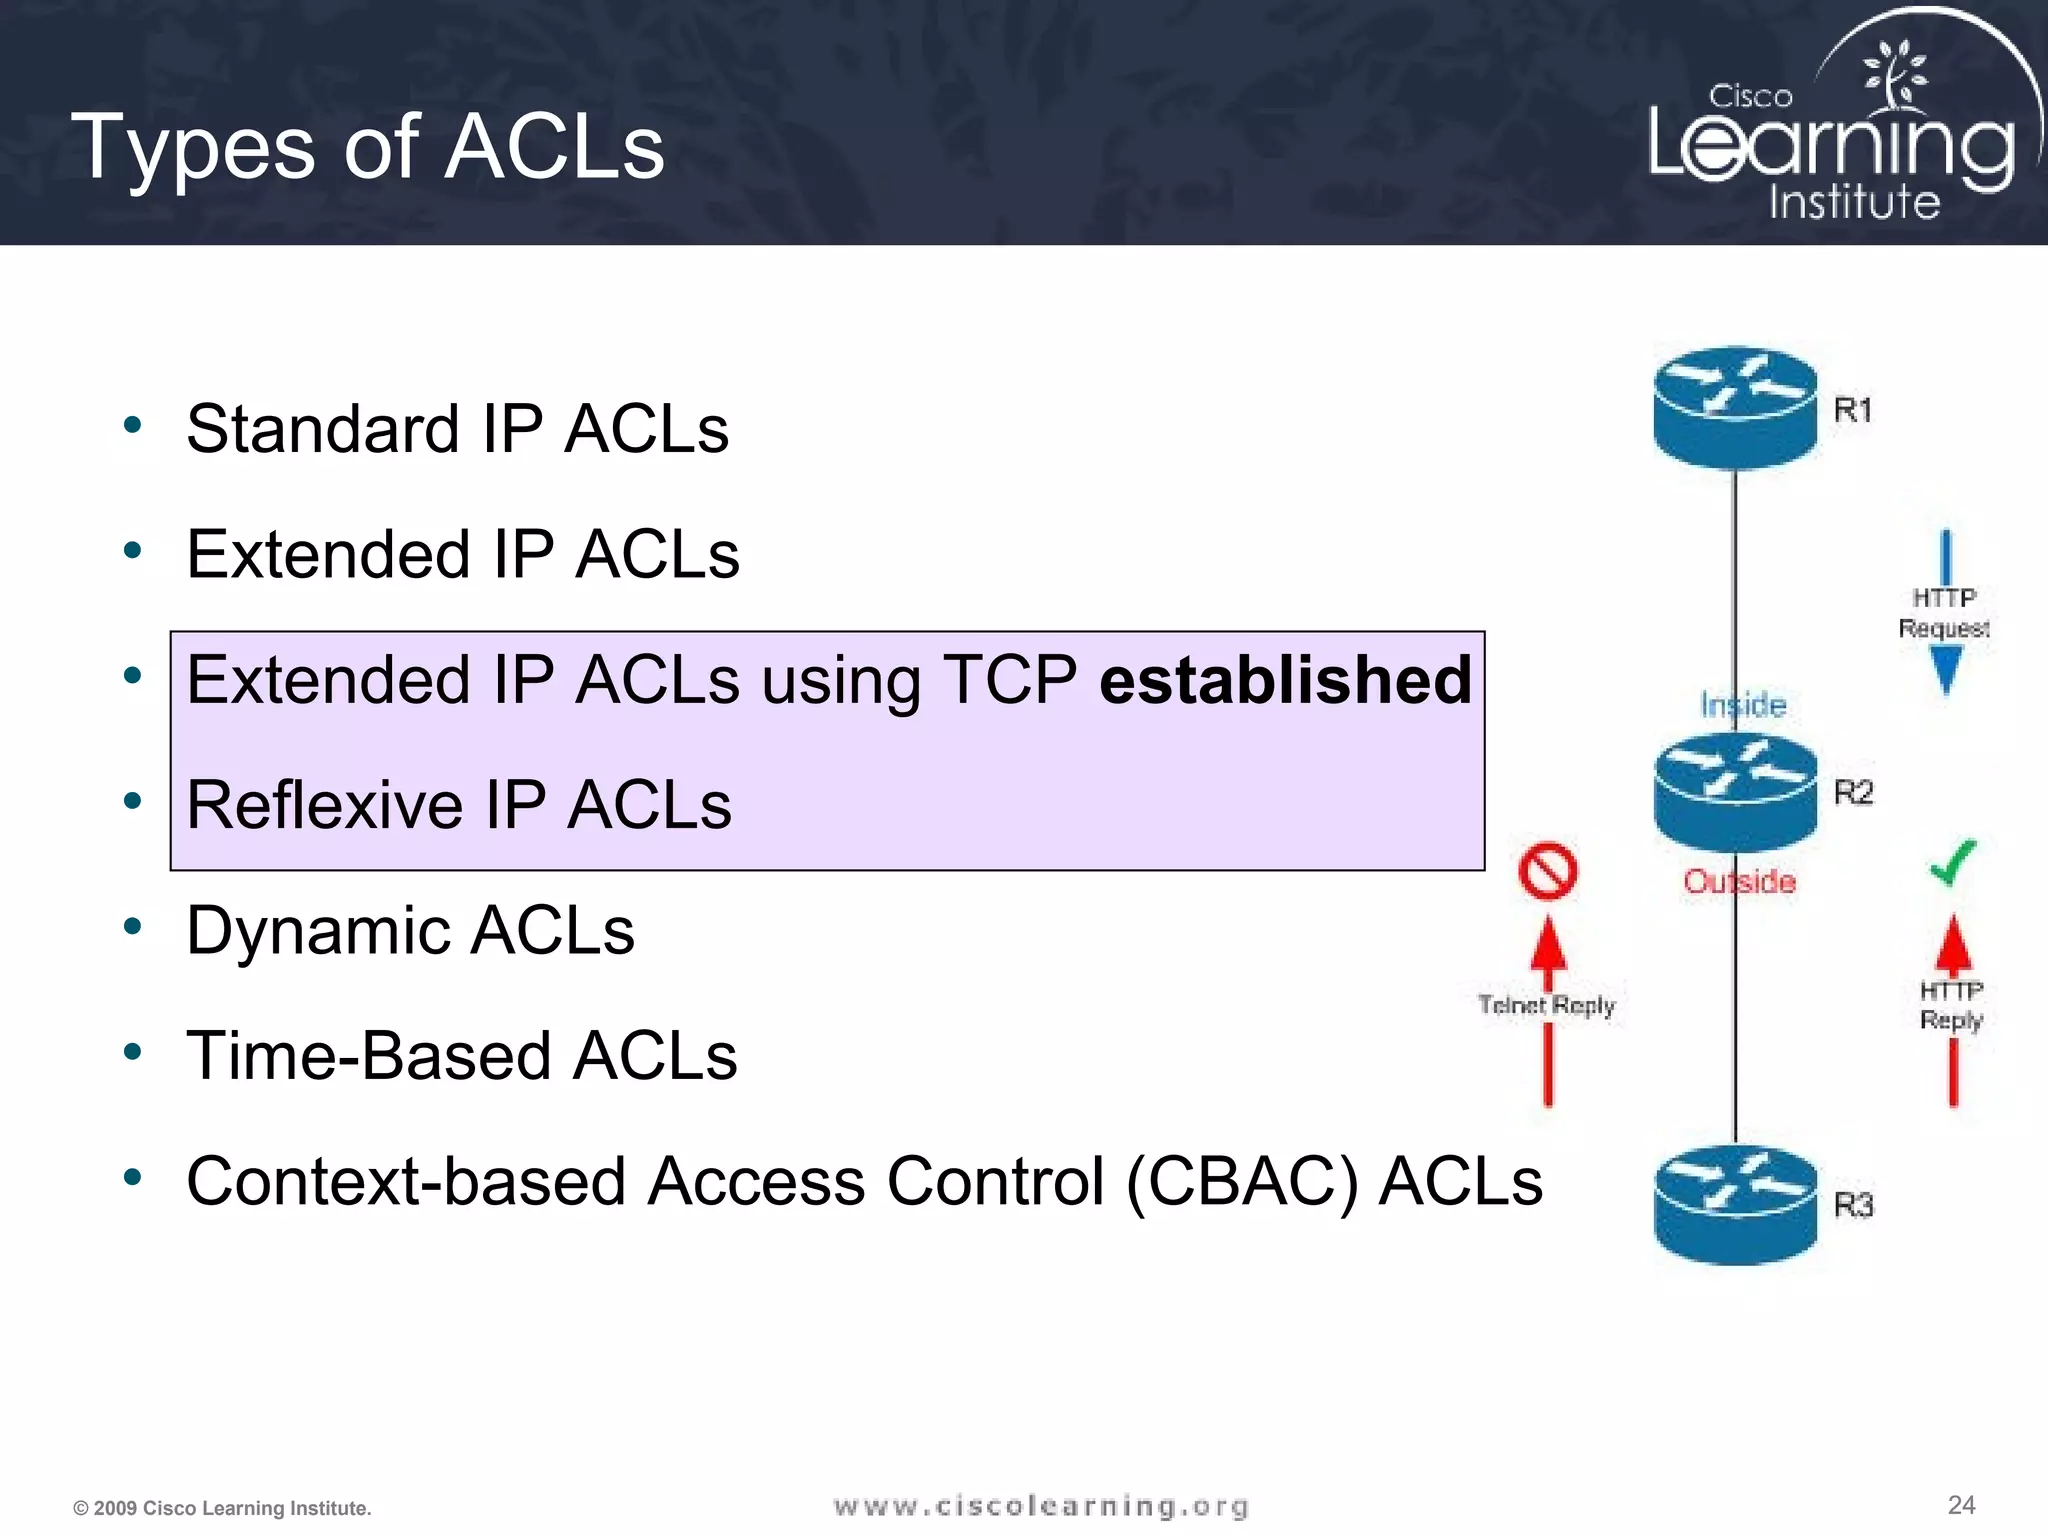
Standard Numbered IP ACLs
• The first value specifies the ACL number
• The second value specifies whether to permit or deny the configured
source IP address traffic
• The third value is the source IP address that must be matched
• The fourth value is the wildcard mask to be applied to the previously
configured IP address to indicate the range
• All ACLs assume an implicit deny statement at the end of the ACL6+
• At least one permit statement should be included or all traffic will be
dropped once that ACL is applied to an interface
Router(config)# access-list {1-99} {permit | deny}
source-addr [source-mask]](https://image.slidesharecdn.com/chapter4overview-140618114250-phpapp01/75/Chapter-4-overview-8-2048.jpg)
![999© 2009 Cisco Learning Institute.
Extended Numbered IP ACLs
• The first value specifies the ACL number
• The second value specifies whether to permit or deny accordingly
• The third value indicates protocol type
• The source IP address and wildcard mask determine where traffic
originates. The destination IP address and wildcard mask are used
to indicate the final destination of the network traffic
• The command to apply the standard or extended numbered ACL:
Router(config)# access-list {100-199} {permit | deny}
protocol source-addr [source-mask] [operator operand]
destination-addr [destination-mask] [operator operand]
[established]
Router(config-if)# ip access-group number {in | out}](https://image.slidesharecdn.com/chapter4overview-140618114250-phpapp01/75/Chapter-4-overview-9-2048.jpg)


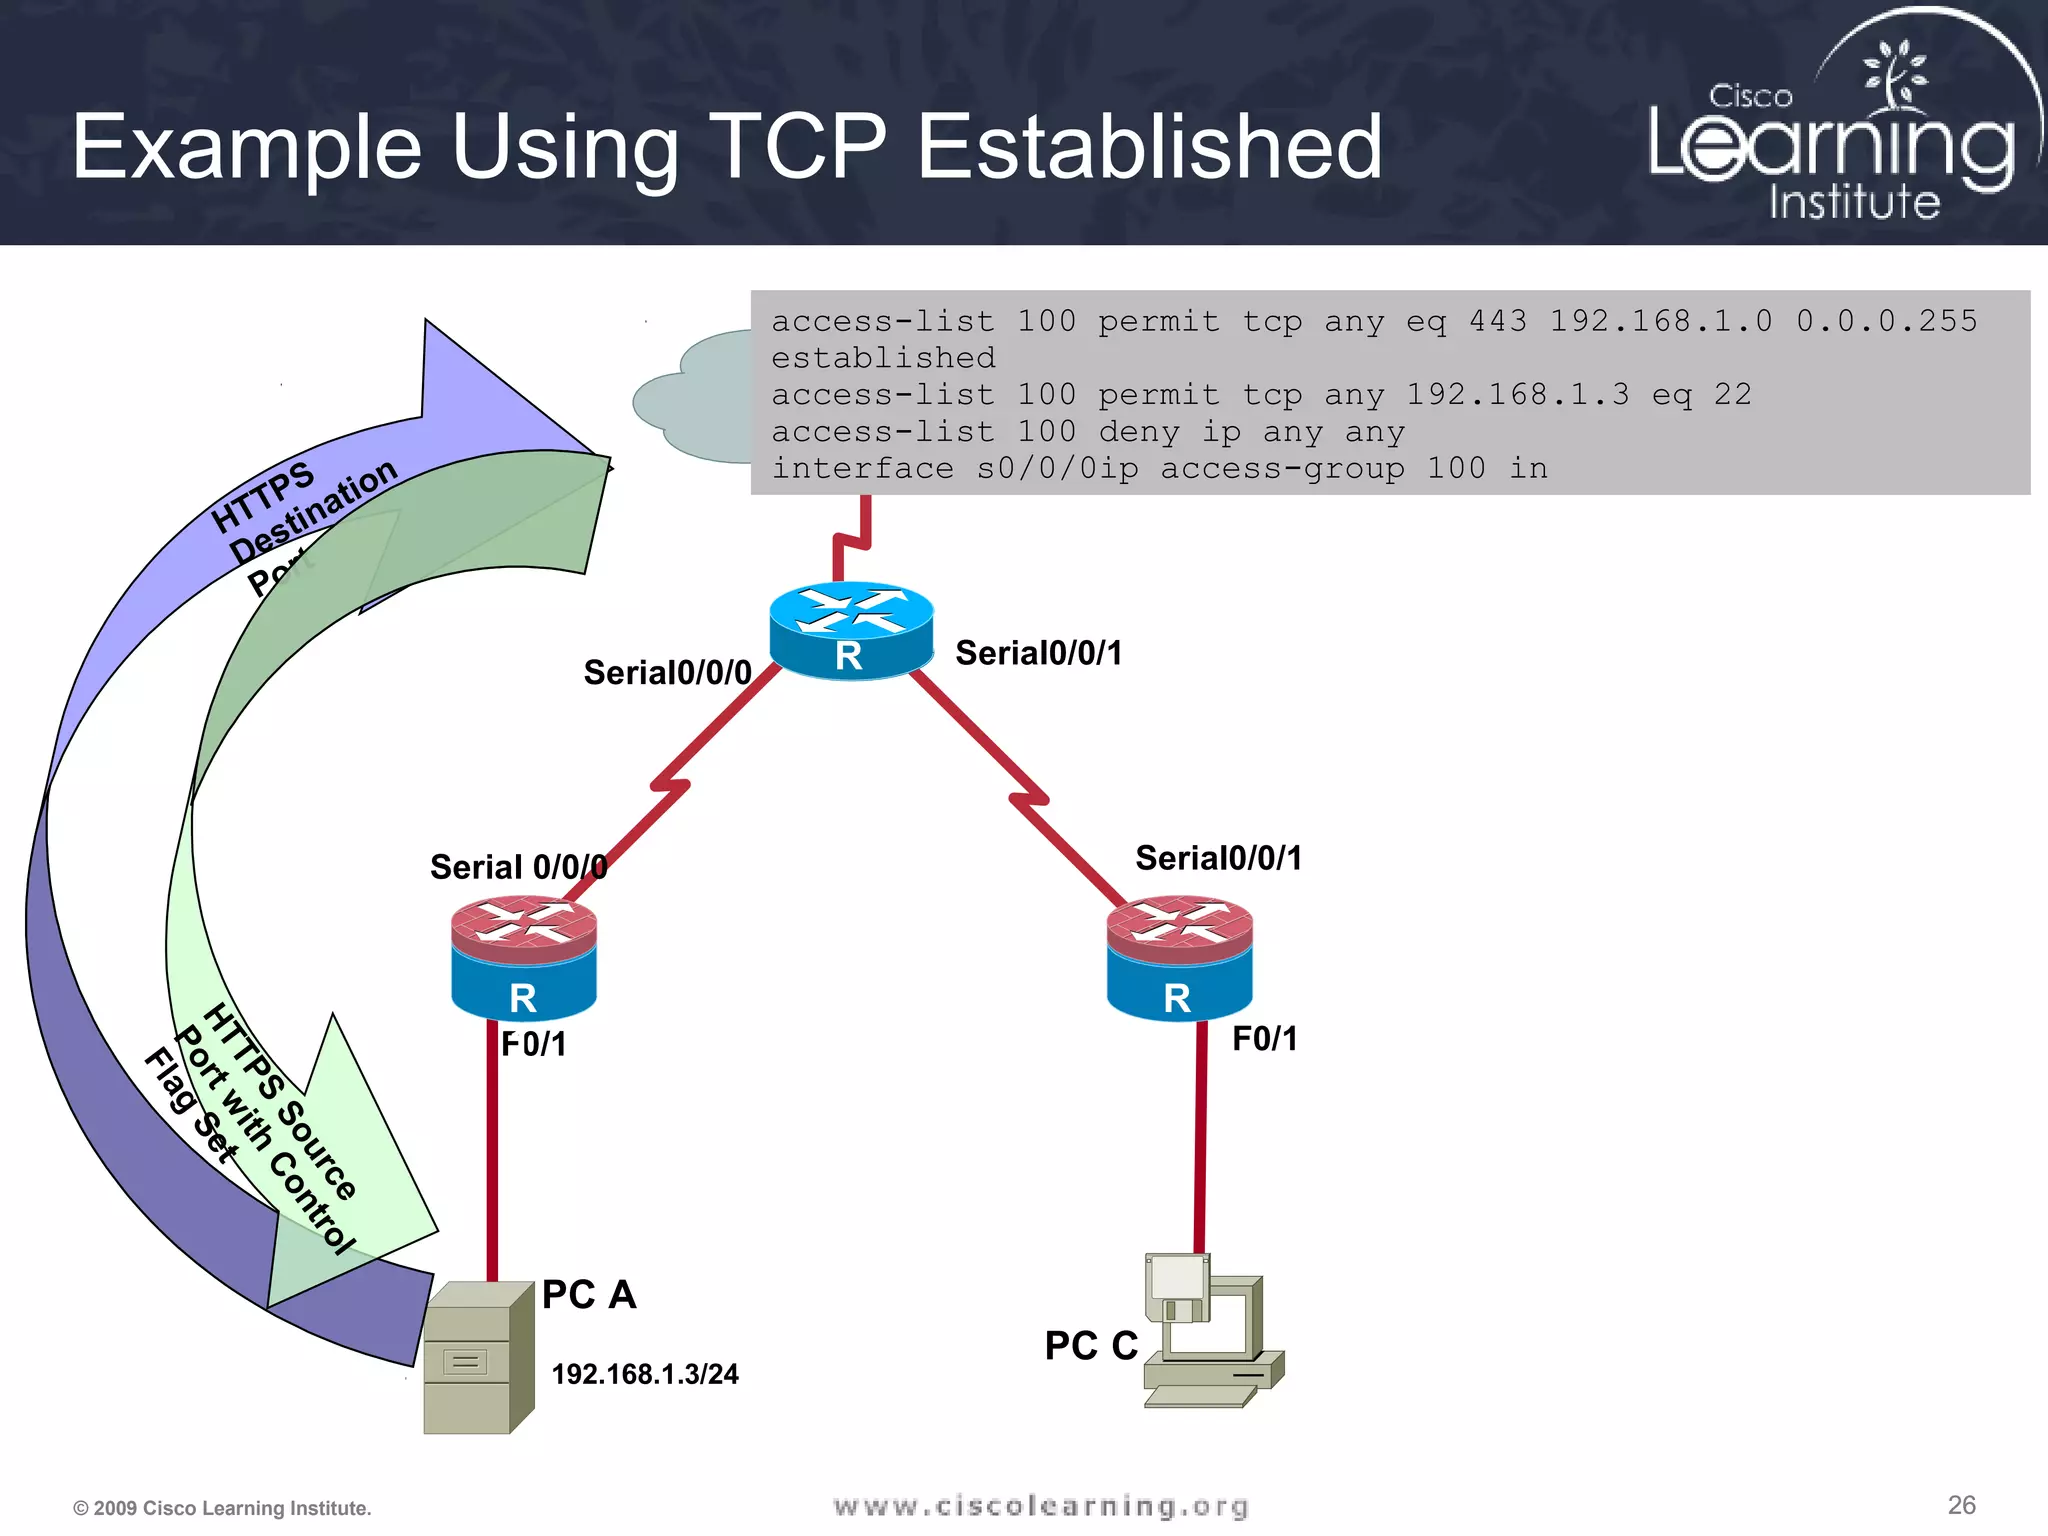
![252525© 2009 Cisco Learning Institute.
Syntax for TCP Established
The established keyword:
• Forces a check by the routers to see if the ACK, FIN,
PSH, RST, SYN or URG TCP control flags are set. If flag
is set, the TCP traffic is allowed in.
• Does not implement a stateful firewall on a router
• Hackers can take advantage of the open hole
• Option does not apply to UDP or ICMP traffic
Router(config)# access-list access-list-number
{permit | deny} protocol source source-wildcard
[operator port] destination destination-wildcard
[operator port] [established]](https://image.slidesharecdn.com/chapter4overview-140618114250-phpapp01/75/Chapter-4-overview-25-2048.jpg)
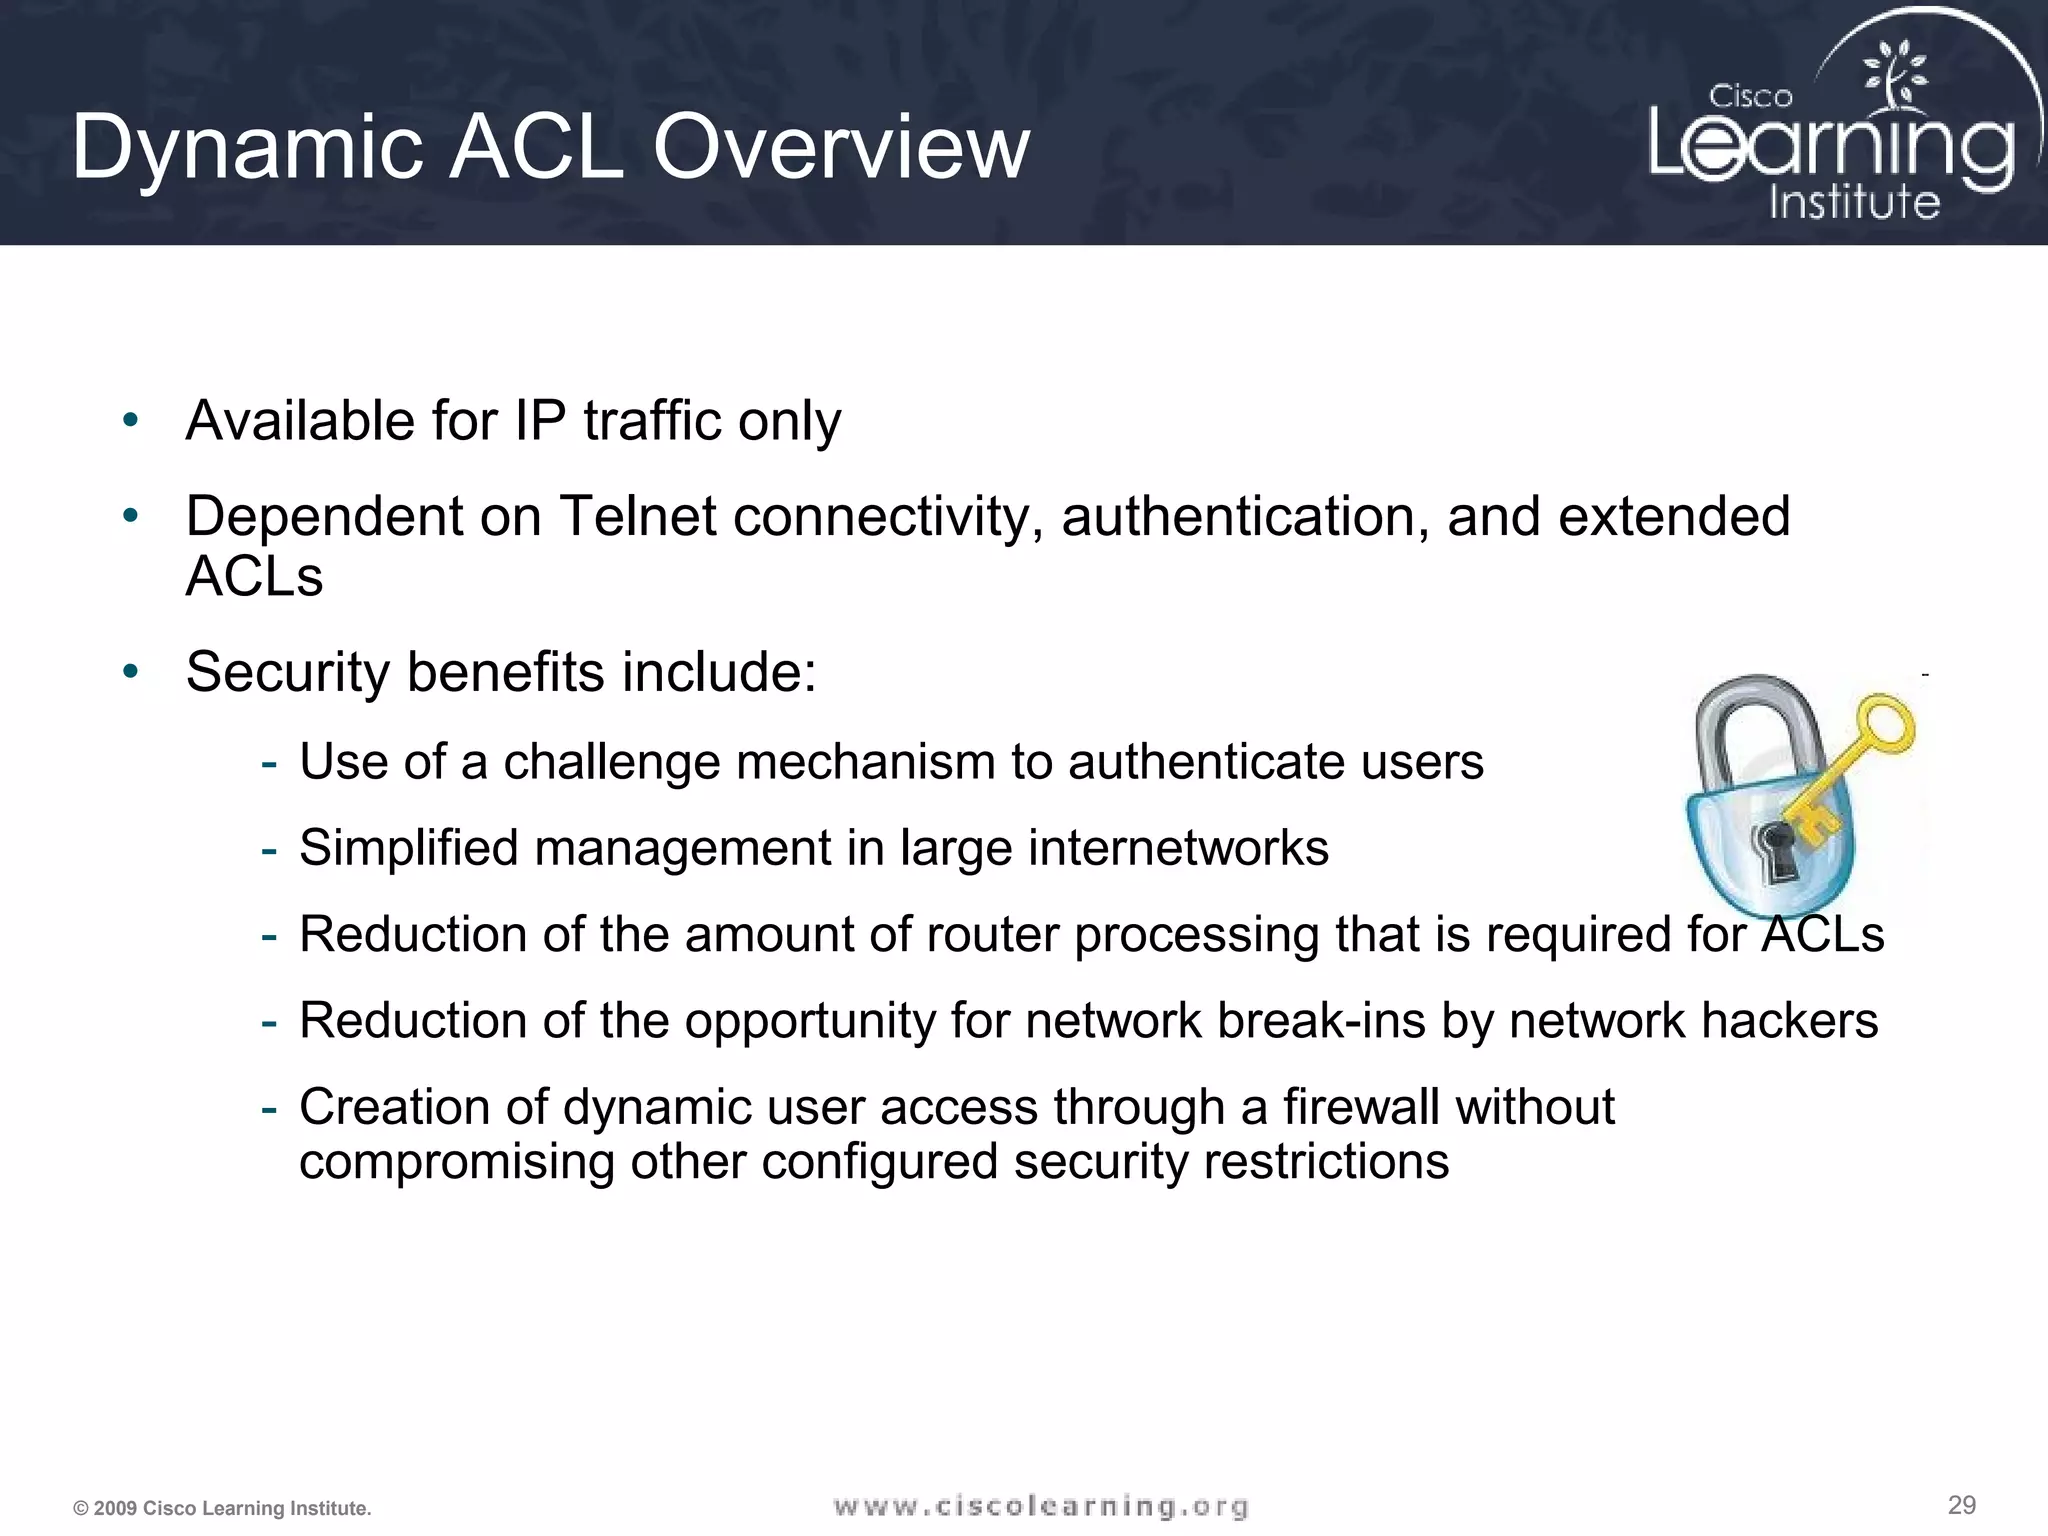
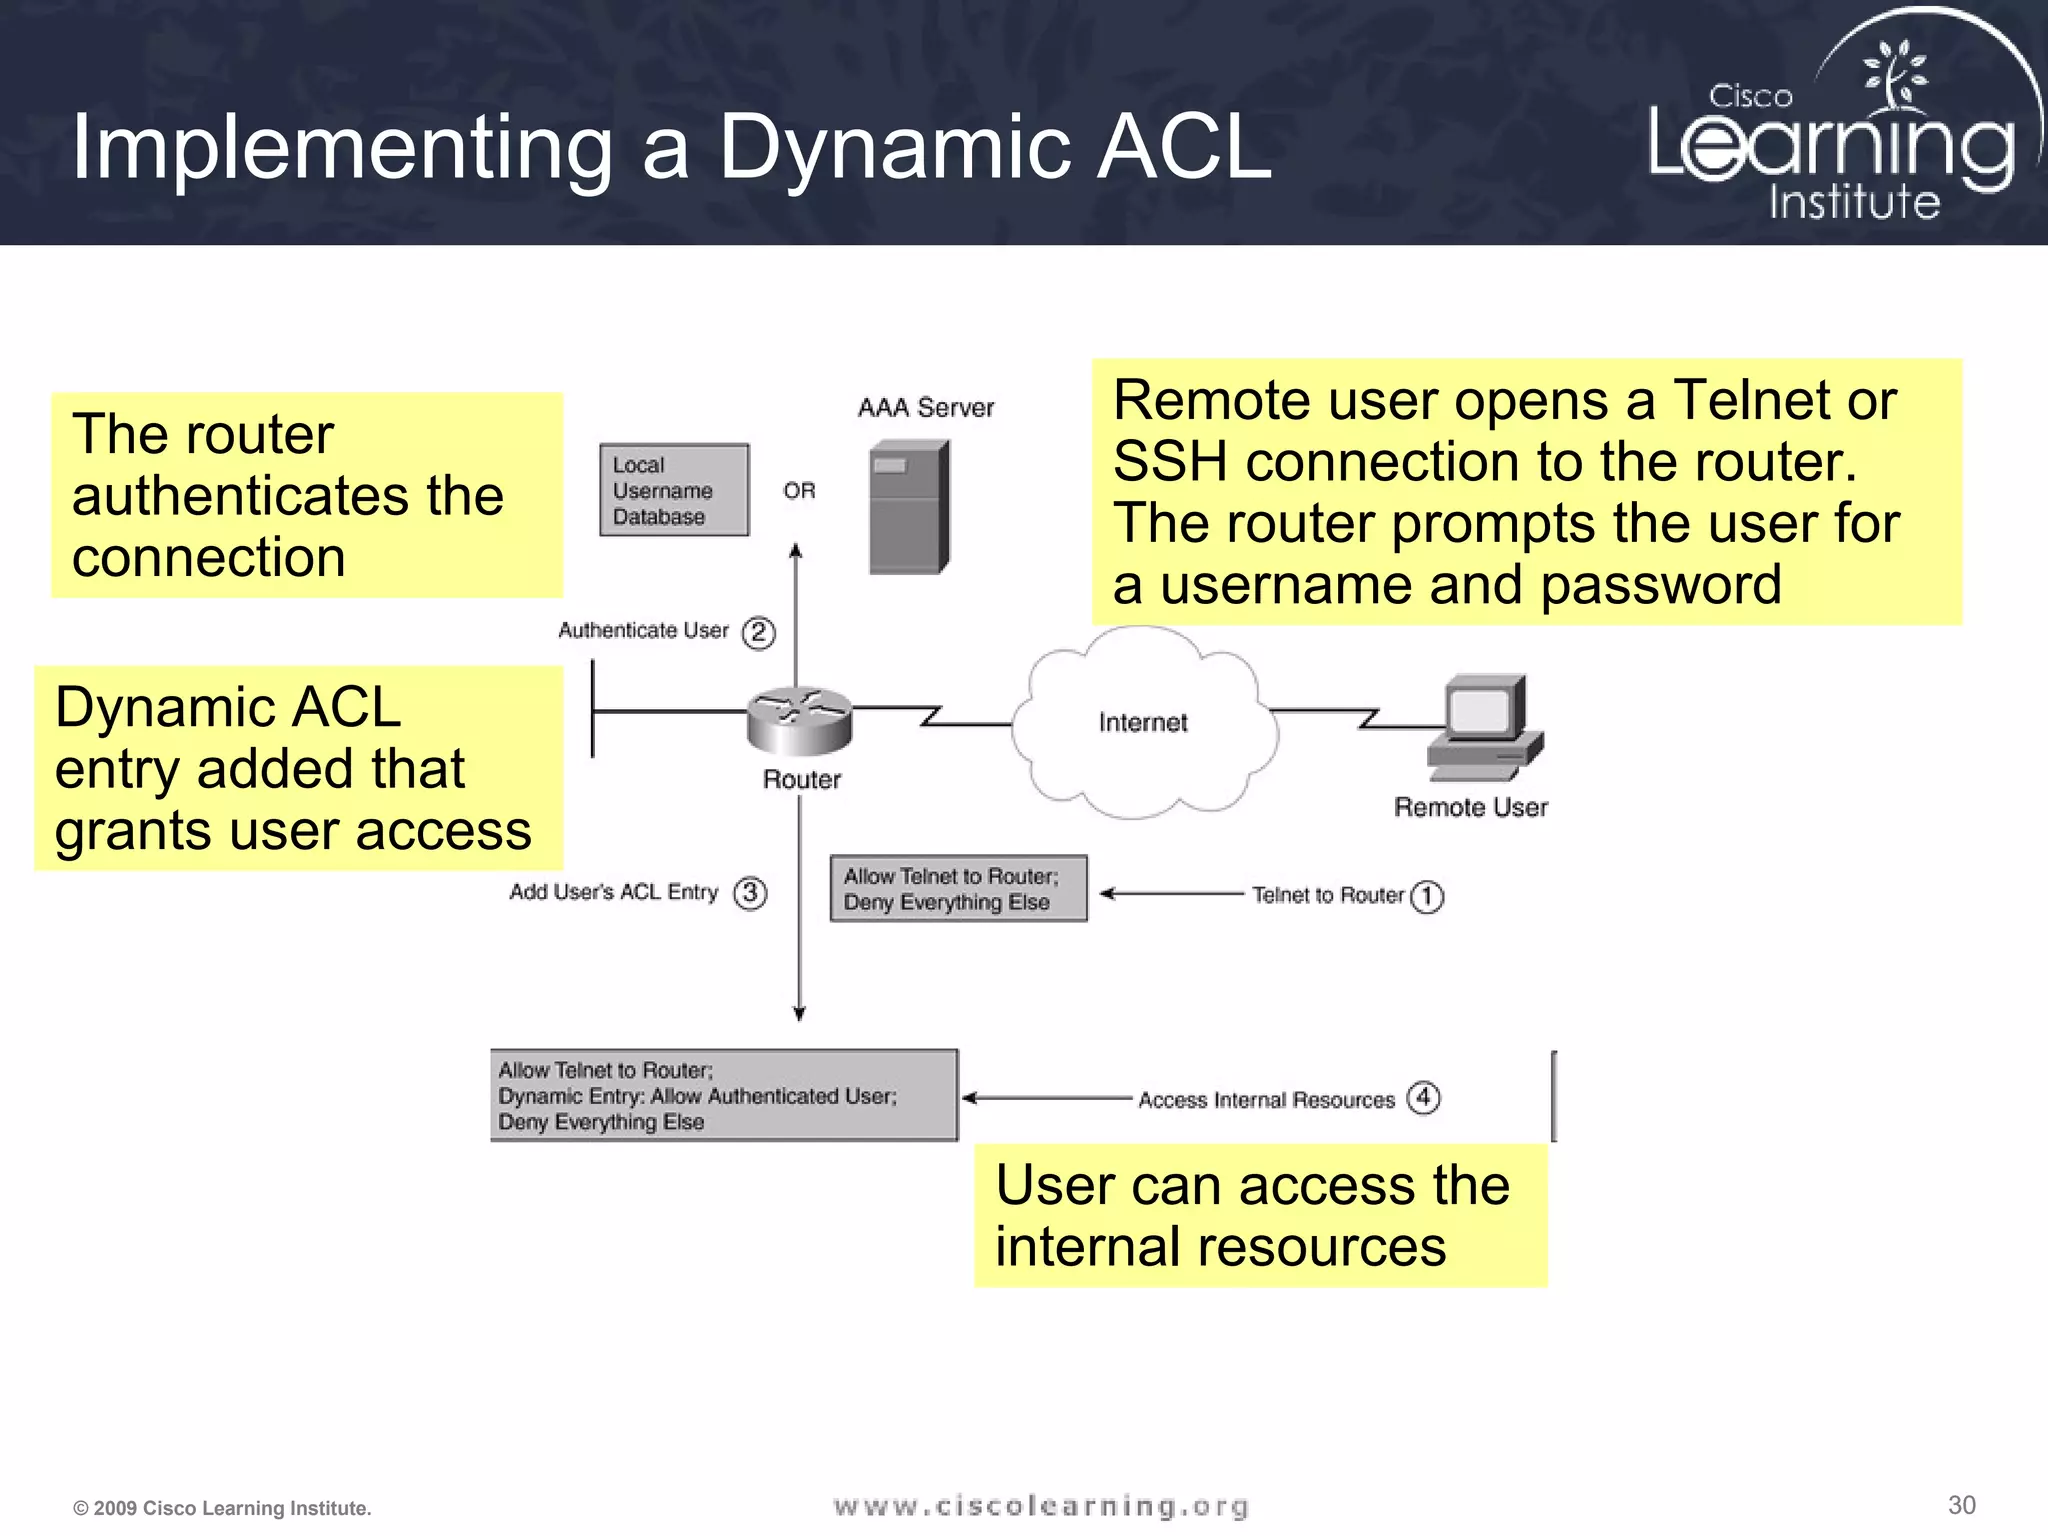
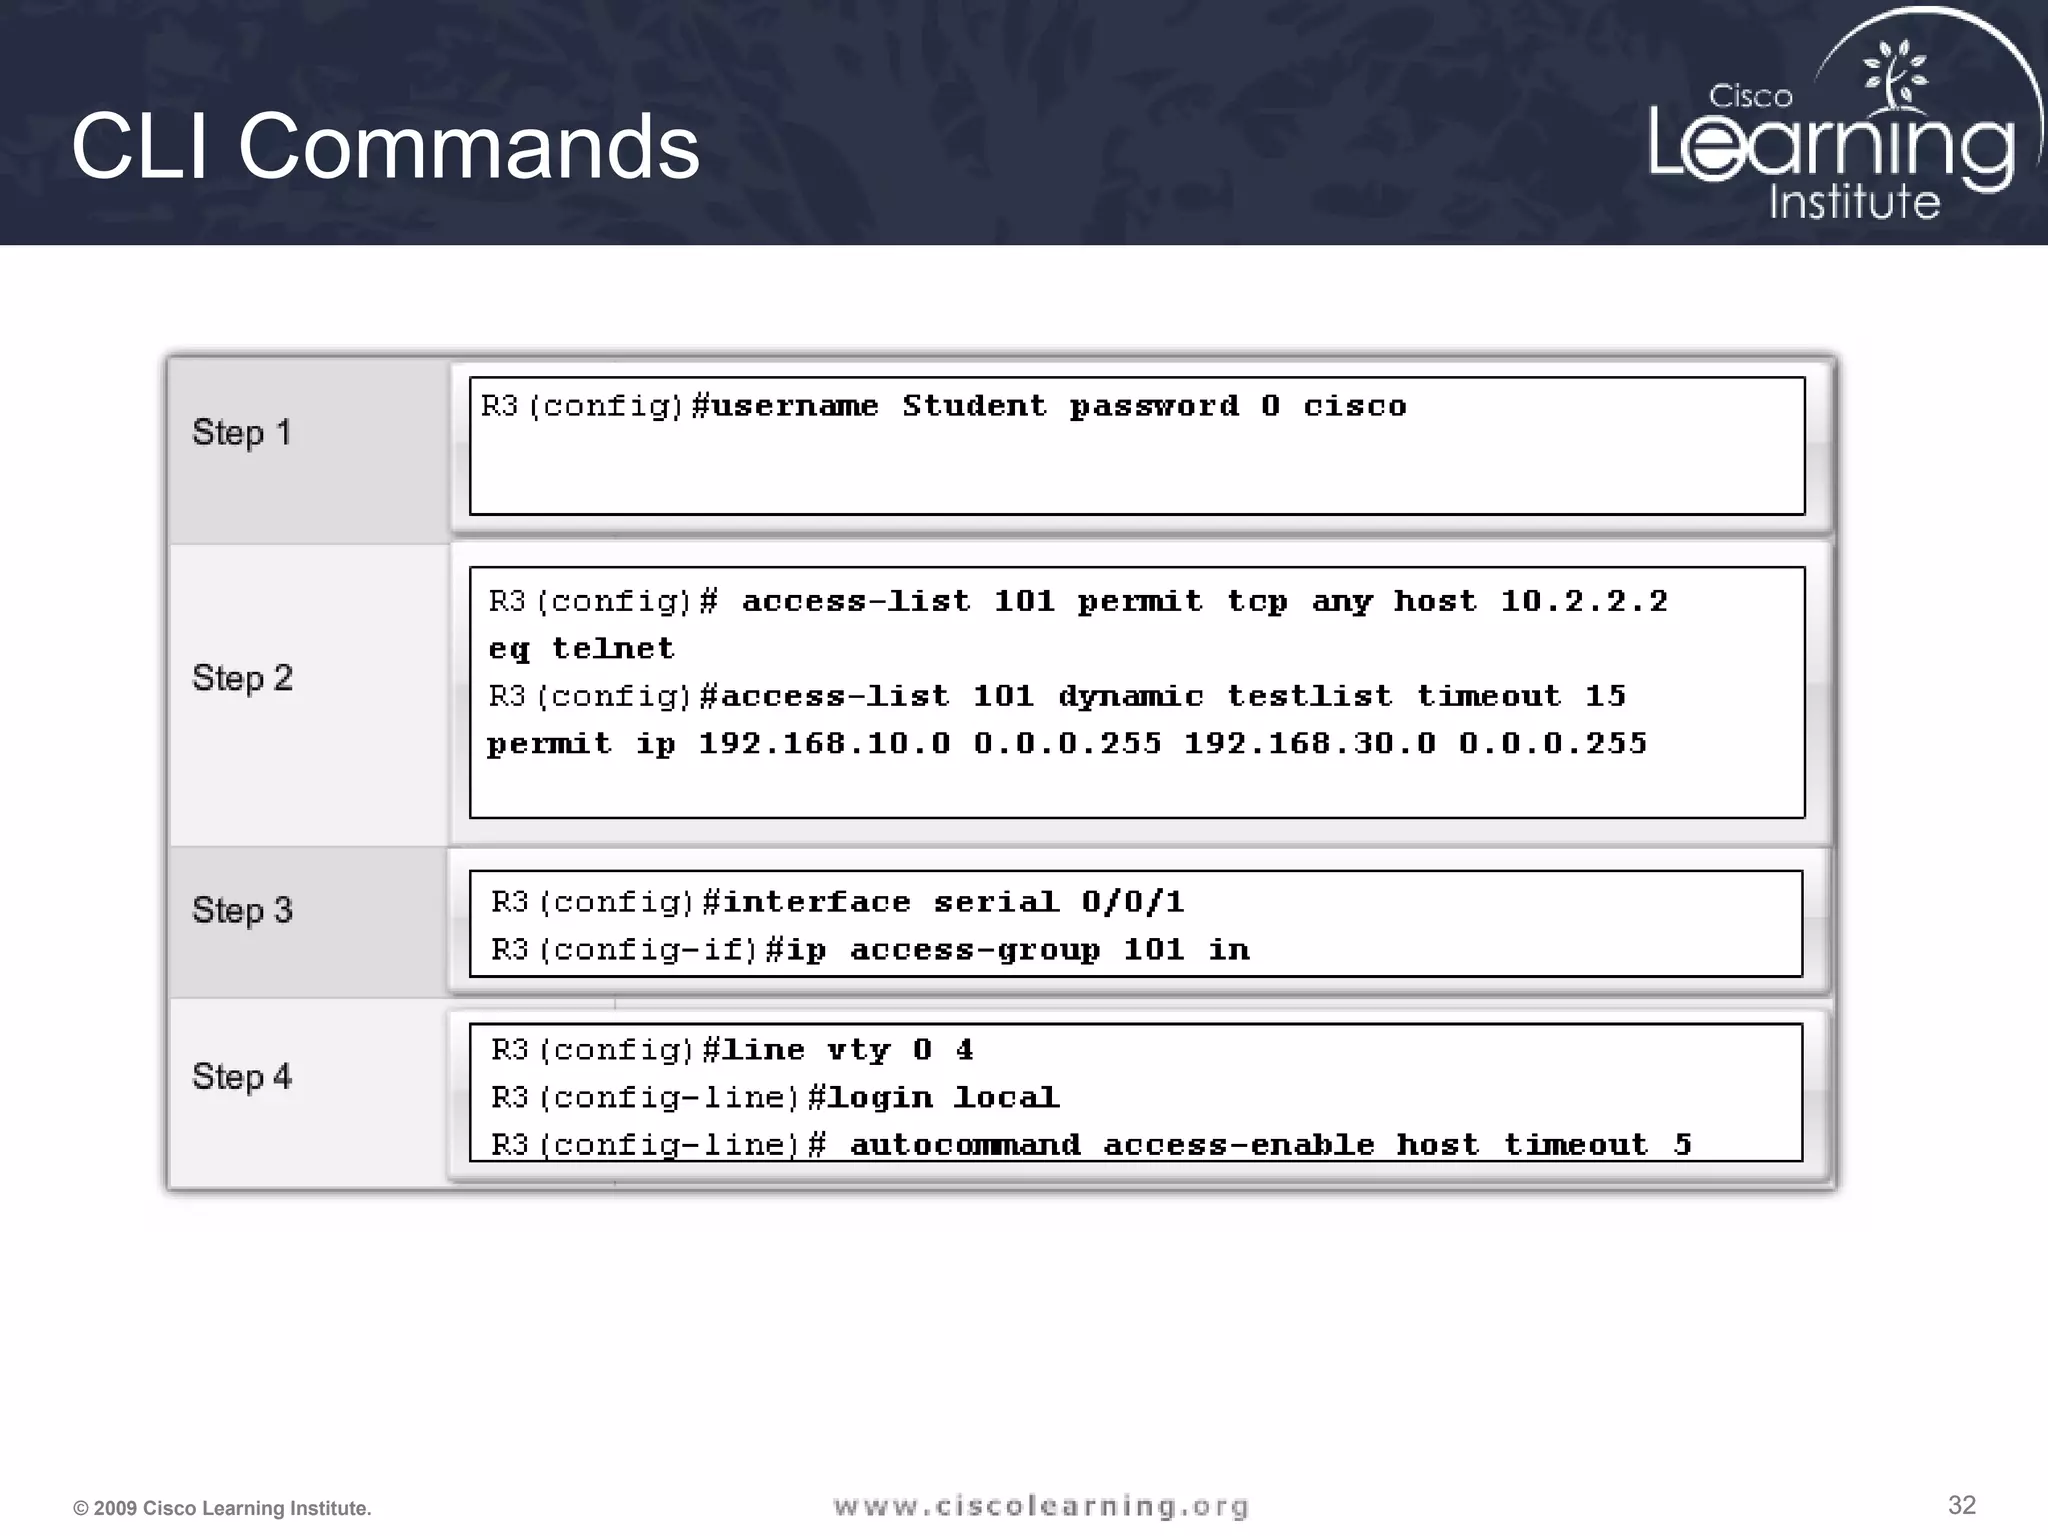
![313131© 2009 Cisco Learning Institute.
Setting up a Dynamic ACL
Router(config)# access-list ACL_# dynamic dynamic_ACL_name [timeout
minutes] {deny | permit} IP_protocol source_IP_address src_wildcard_mask
destination_IP_address dst_wildcard_mask [established] [log]](https://image.slidesharecdn.com/chapter4overview-140618114250-phpapp01/75/Chapter-4-overview-31-2048.jpg)
![363636© 2009 Cisco Learning Institute.
The ACLs are
implemented.
Now it is time to
verify that they
are working
properly.
F0/1 F0/1
Serial 0/0/0
Serial0/0/0
Serial0/0/1
Serial0/0/1
R
1
R
3
R
2
PC C
R
1
Router# show access-lists [access-list-number |
access-list-name]
Verifying ACL Configuration](https://image.slidesharecdn.com/chapter4overview-140618114250-phpapp01/75/Chapter-4-overview-36-2048.jpg)

![666666© 2009 Cisco Learning Institute.
Step 3: Define Inspection Rules
ip inspect name inspection_name protocol [alert {on | off}] [audit-trail
{on | off}] [timeout seconds]
Router(config)#](https://image.slidesharecdn.com/chapter4overview-140618114250-phpapp01/75/Chapter-4-overview-66-2048.jpg)
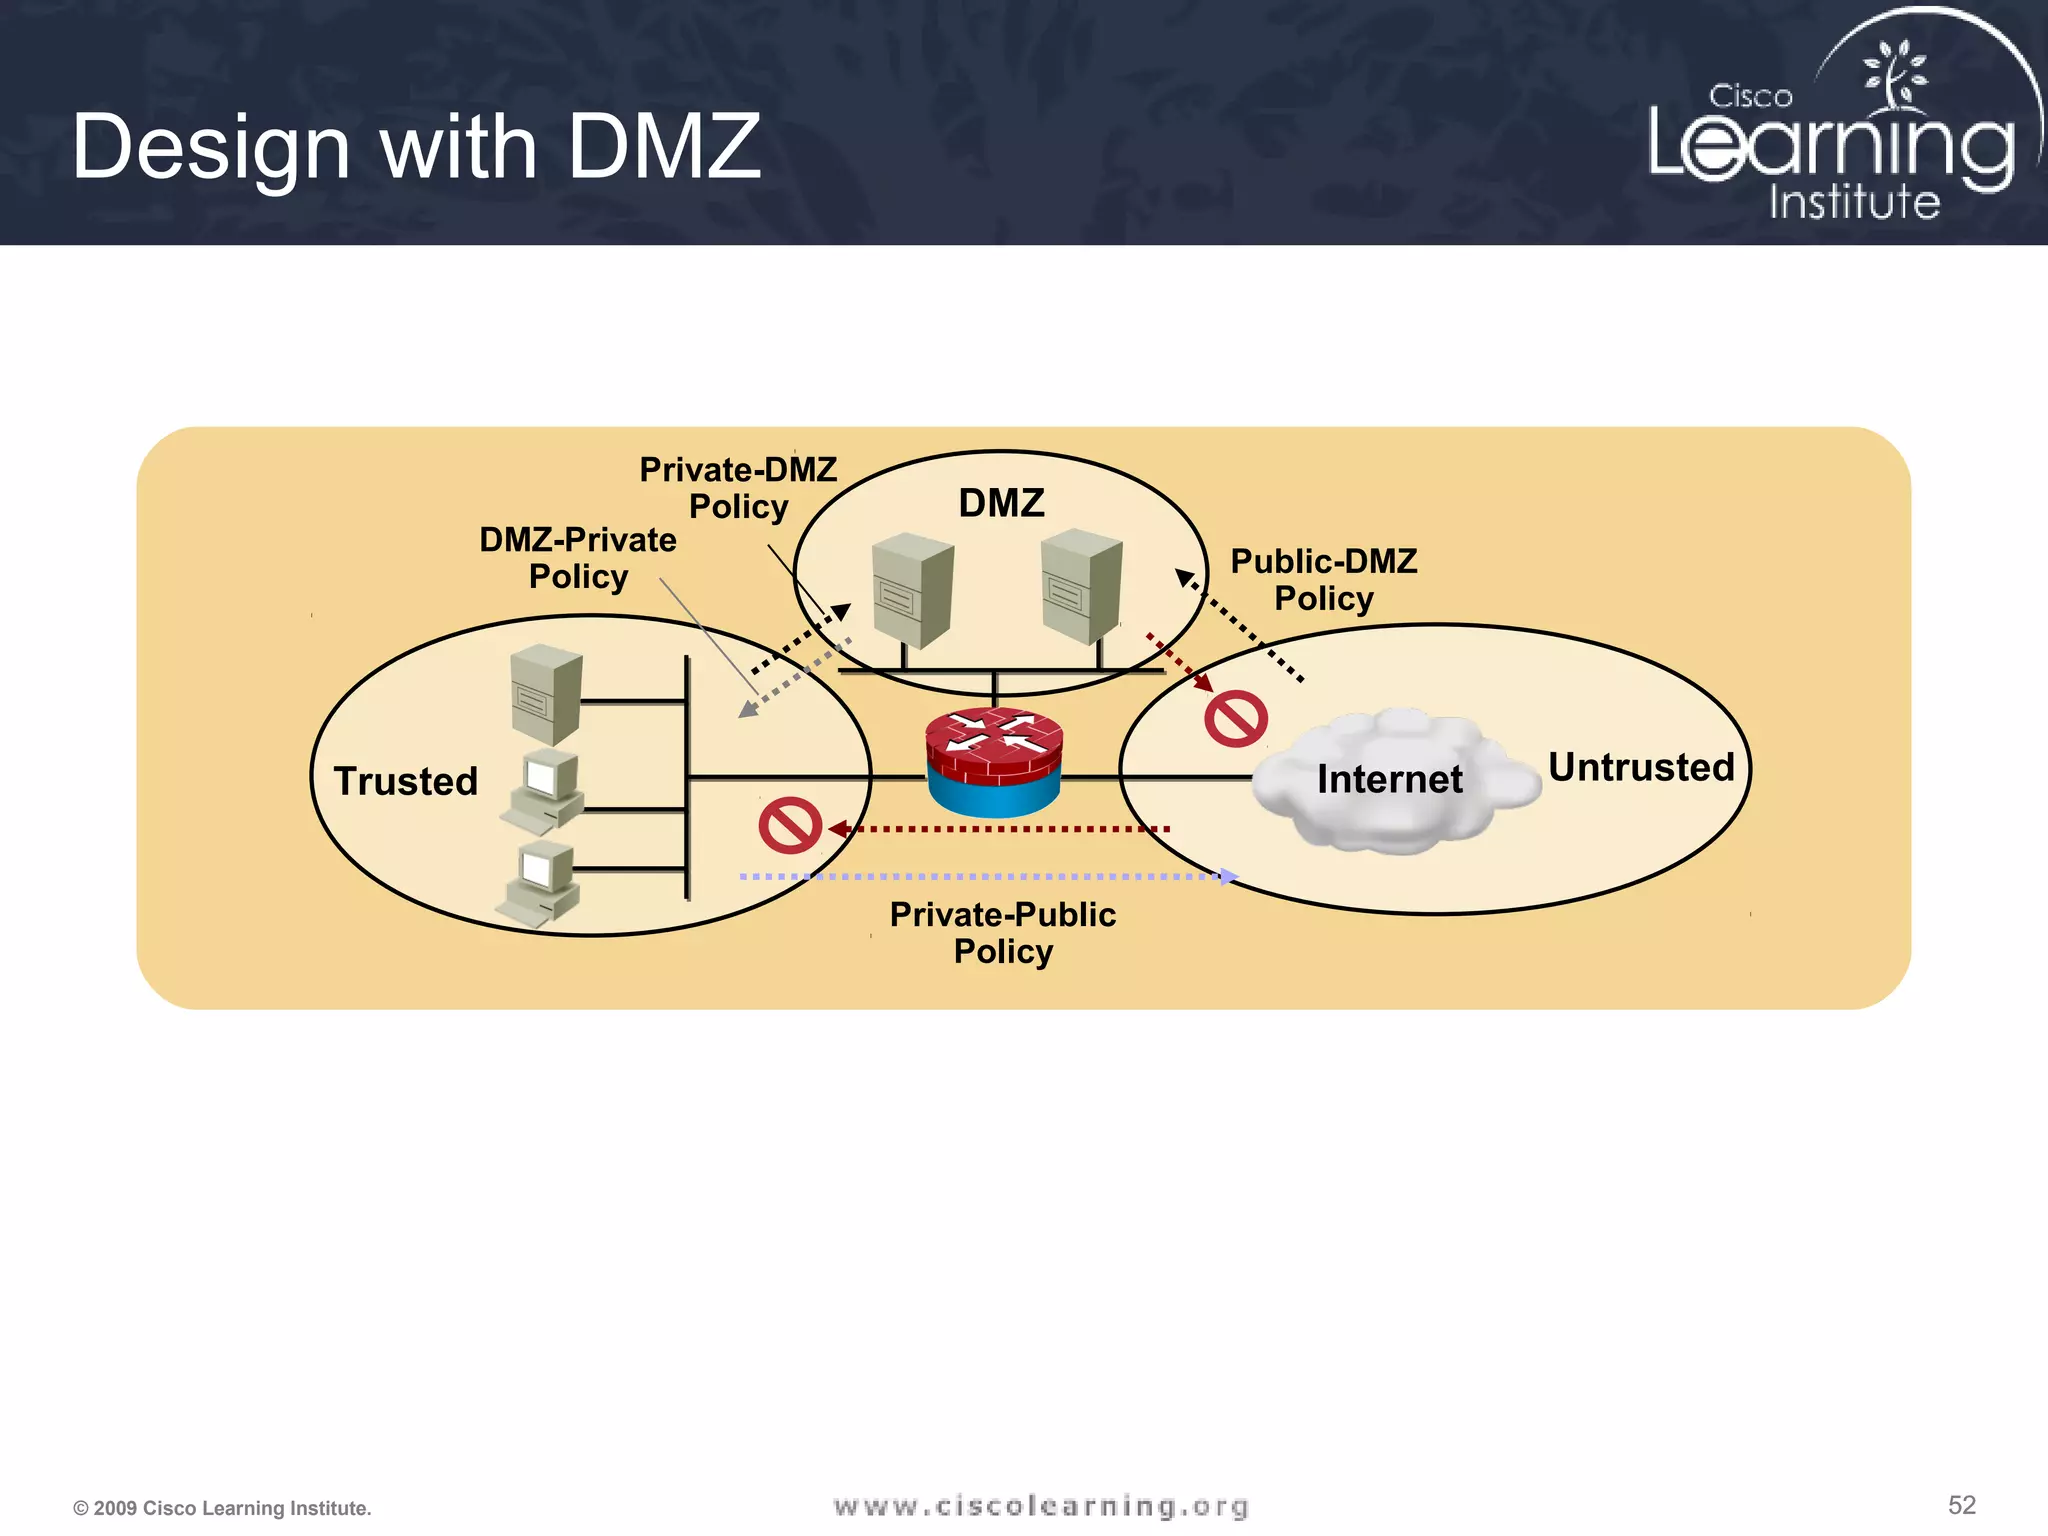
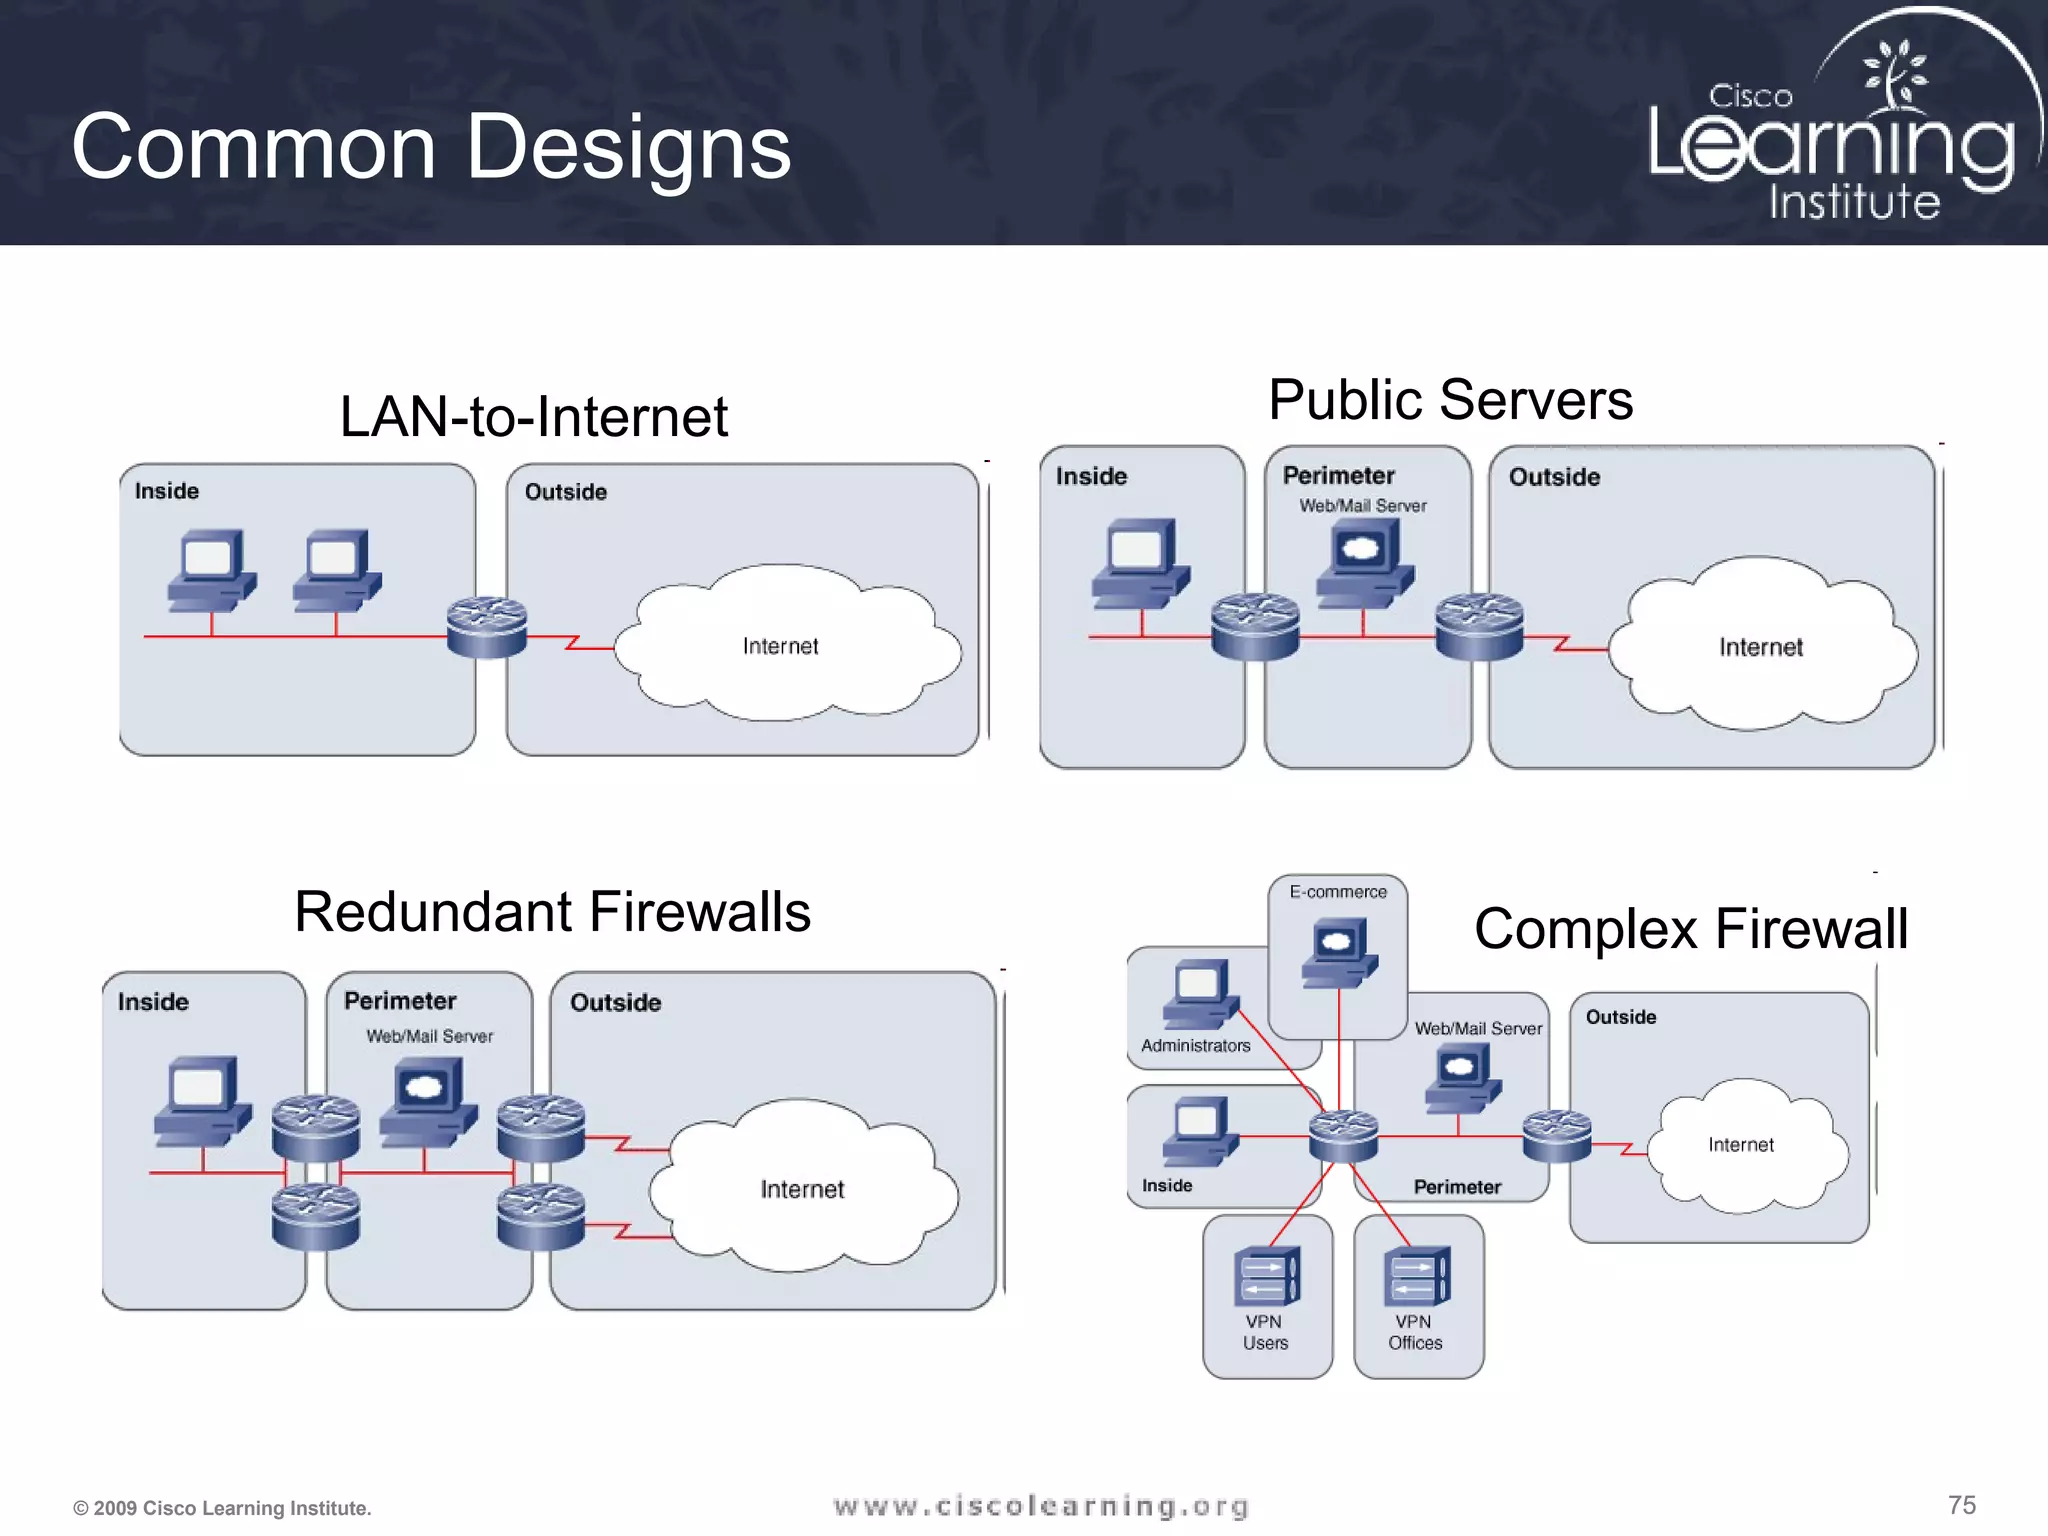
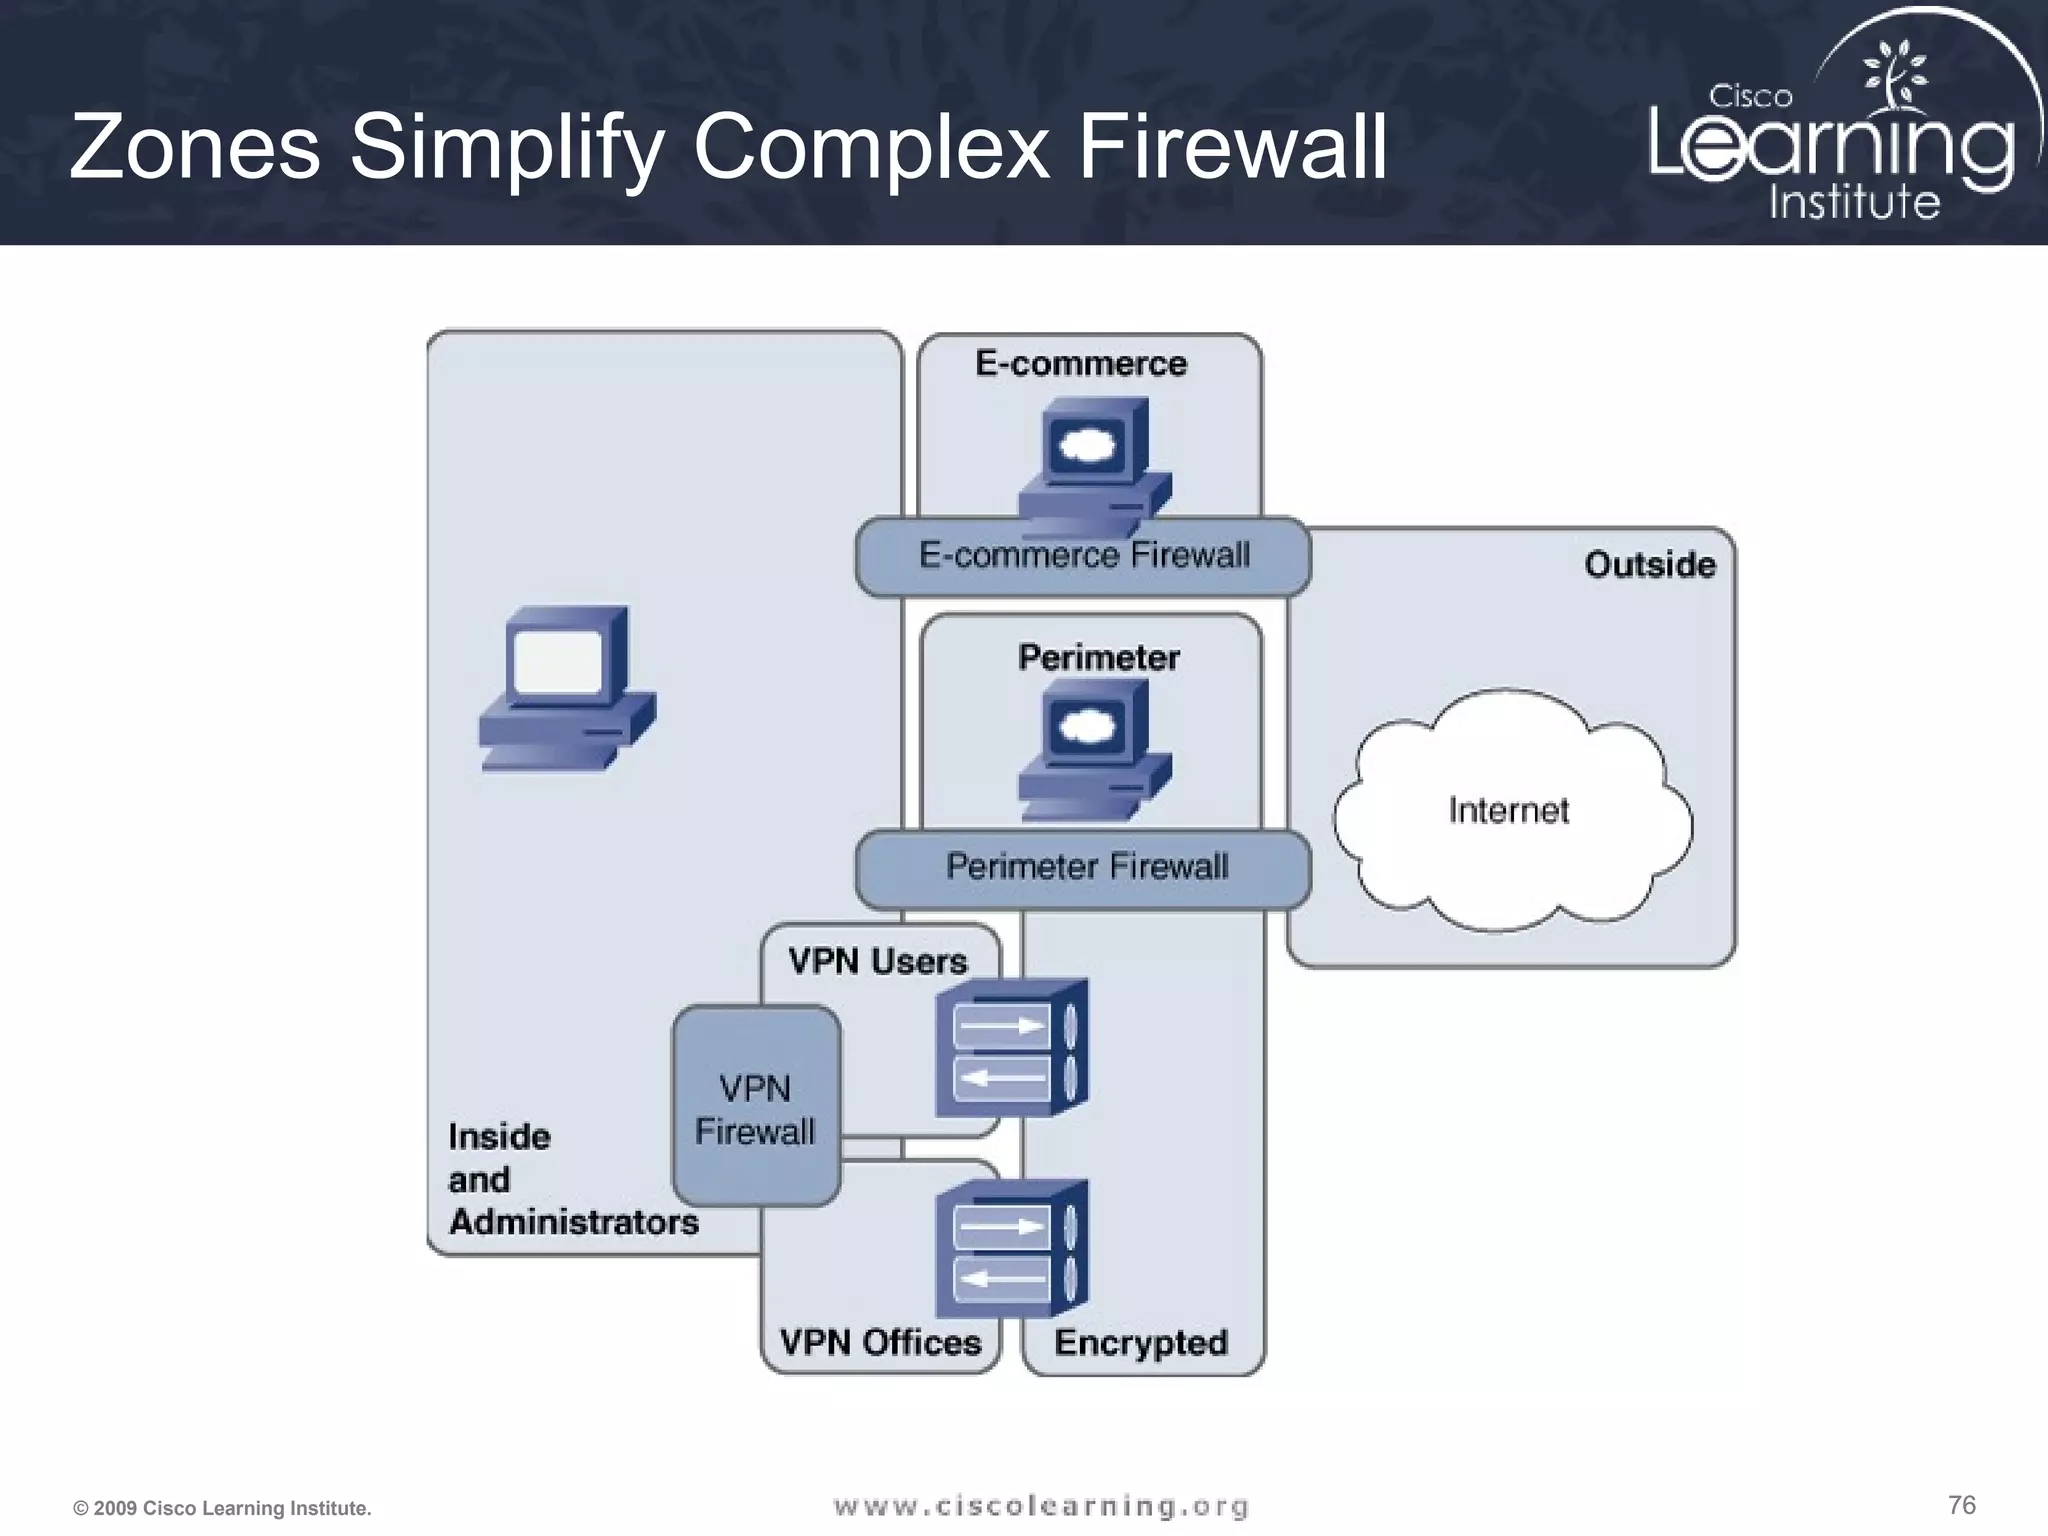
![747474© 2009 Cisco Learning Institute.
The Design Process
1. Internetworking infrastructure under consideration is split into well-
documented separate zones with various security levels
2. For each pair of source-destination zones, the sessions that clients
in source zones are allowed to open to servers in destination zones
are defined. For traffic that is not based on the concept of sessions
(for example, IPsec Encapsulating Security Payload [ESP]), the
administrator must define unidirectional traffic flows from source to
destination and vice versa.
3. The administrator must design the physical infrastructure.
4. For each firewall device in the design, the administrator must
identify zone subsets connected to its interfaces and merge the
traffic requirements for those zones, resulting in a device-specific
interzone policy.](https://image.slidesharecdn.com/chapter4overview-140618114250-phpapp01/75/Chapter-4-overview-74-2048.jpg)


This document provides information about implementing firewall technologies in Cisco devices. It includes details on configuring and applying access control lists (ACLs) using both the command line interface and the Security Device Manager. Standard and extended ACLs are described, as well as techniques such as reflexive ACLs, dynamic ACLs, time-based ACLs, and Context-Based Access Control. The document provides configuration examples and guidelines for applying different types of ACLs in network devices.