Download to read offline
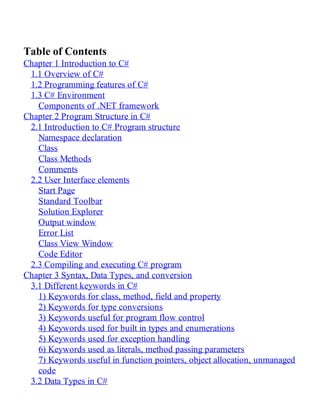
![Chapter 2 Program Structure in C#
2.1 Introduction to C# Program structure
C# Program consists of various parts. We shall explore all the components needed for a
C# program.
Consider the code demonstrating the C# program.
Example 1:
using System;
namespace welcome
public class WelcomeUser
{
static void Main( string[] args)
{
Console.WriteLine("WelcomeUser");
Console.Read();
}
}
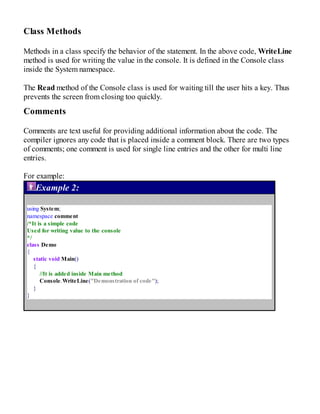
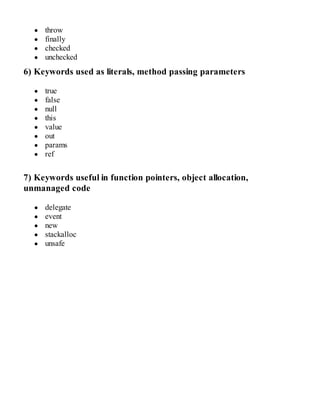
The code consists of several parts. They are as mentioned below:
Namespace declaration
The namespace consists of collection of classes used in programming. The using
keyword is used for adding the System namespace. The System class consists of classes
and methods useful for the user.
In the above code, namespace welcome is added.
Class
The class consists of data and method definitions used by the program. The class can
have one or many methods. Every class must have a Main method, which is the first
method run in the code. In the above code, WelcomeUser class is declared.](https://image.slidesharecdn.com/ccforbeginnerscrashcoursemastercprogrammingfastandeasytoday-181124224132/85/C-c-for-beginners-crash-course-master-c-programming-fast-and-easy-today-12-320.jpg)
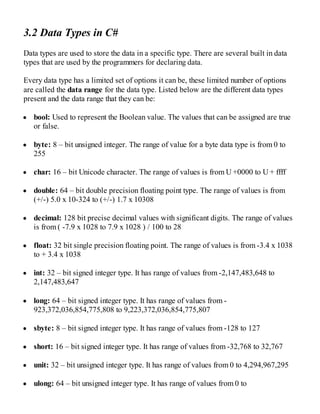

![3.3 Type conversion in C#
Type conversion is useful when the programmer needs to convert from one data type to
another. The type conversion is also known as type casting. There are two types of type
casting in C#. They are implicit type conversion and explicit type conversion.
Implicit type conversion
The implicit keyword is used for implicit conversions. They do not need any casting
operator. These conversions include small to large integral type, from derived class to
base class.
Explicit type conversion
The explicit conversions are done explicitly by users through the use of the pre-defined
functions. In these conversions, a cast operator is needed.
Example 3:
using System;
namespace TypeConversion
{
class Conversion
{
static void Main(string[ ] args)
{
double d=10.243;
int i;
i = int (d);
Console.WriteLine(i);
Console.Read();
}
}
}
C# consists of type conversion methods that are useful for users.
The following list shows the type conversion methods.](https://image.slidesharecdn.com/ccforbeginnerscrashcoursemastercprogrammingfastandeasytoday-181124224132/85/C-c-for-beginners-crash-course-master-c-programming-fast-and-easy-today-24-320.jpg)
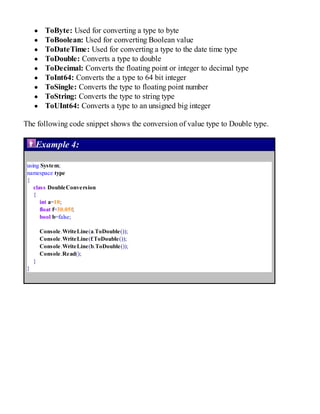
![variable_name = value;
The variables can be initialized in the declaration. The general form for initializing the
variable is:
<data_type> <variable_name> = value;
Examples of variable initialization are:
int a = 4;
char z=’z’;
double y = 12.145;
Example for demonstrating variable types:
Example 5:
using System;
namespace VariableDeclare
class Program
{
static void Main(string[] args)
{
int a;
short s;
double d;
/*initializing variables*/
a=20;
s=5;
d=a+s;
Console.WriteLine("a={0},b={1},d={2}",a,s,d);
Console.Read();
}
}
Accepting values from user
The Console class present in the System namespace provides ReadLine() function.](https://image.slidesharecdn.com/ccforbeginnerscrashcoursemastercprogrammingfastandeasytoday-181124224132/85/C-c-for-beginners-crash-course-master-c-programming-fast-and-easy-today-27-320.jpg)
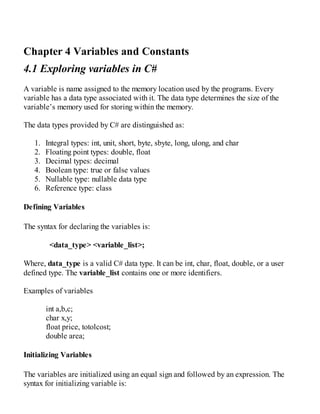
![4.2 Constants and literals in C#
Constant is a class member that represents a fixed value. Constant value can be
computed at compile time but cannot be modified. Constants are declared using the
const keyword.
Syntax:
const<data_type> <constant_name> = value;
Example of Constant:
Example 6:
using System;
namespace constc
class Program
{
static void Main(string[] args)
{
const int i=3;
int x;
Console.WriteLine("The value for x is");
x=Convert.ToInt(Console.ReadLine());
int mult = x*i;
Console.WriteLine("Value of multiplication is:{0}",mult);
Console.ReadLine();
}
}
Literals
A literal is a source code representation of a value. There are different types of literals
in C#.
Integer Literals
Integer literal is used to write values of type int, long, unit, and ulong. It can be
represented as decimal, octal, or hexadecimal constant. The base or radix is specified
by the prefix. The value 0x or 0X represents the hexadecimal, 0 defines octal and](https://image.slidesharecdn.com/ccforbeginnerscrashcoursemastercprogrammingfastandeasytoday-181124224132/85/C-c-for-beginners-crash-course-master-c-programming-fast-and-easy-today-29-320.jpg)


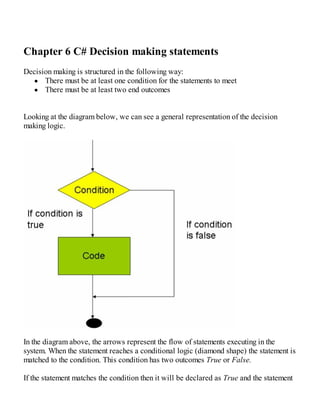
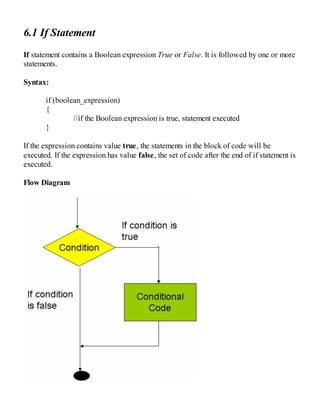
![Example of if statement
Example 7:
using System;
namespace decision
{
class Program
{
static void Main(string[] args)
{
/*local variables*/
int i = 15;
/*boolean condition is checked*/
if(i < 15)
{
Console.WriteLine("The value of i is less than 15");
}
Console.WriteLine("Value of i is{0}",i);
Console.Read();
}
}
}
In this code example we can see that the condition is if(i<15). So here the variable i must
meet the condition to be less than 15 for the condition to be True or else it is False.](https://image.slidesharecdn.com/ccforbeginnerscrashcoursemastercprogrammingfastandeasytoday-181124224132/85/C-c-for-beginners-crash-course-master-c-programming-fast-and-easy-today-42-320.jpg)
![Example of if else statement:
Example 8:
using System;
namespace ifelseconstruct
class User
{
static void Main(string[] args)
{
int age;
Console.WriteLine("Enter the age of the user");
age=Convert.ToInt32(Console.ReadLine());
if(age < 18)
{
Console.WriteLine("Not an adult");
}
else
{
Console.WriteLine("User is an adult");
}
}
}
In the code example, the condition ( age < 18 ) is specified. So here the variable age
must meet the condition less than 18 for the condition to be True, otherwise the else
block is executed.
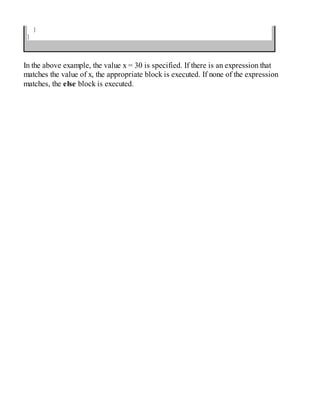
The else if else statement
An if statement is also followed by an else if else construct. Many conditions can be
checked using if else if statement.
Syntax
if (boolean_expression 1)
{
/*If the Boolean expression 1 is true, the statement is executed*/
}
else if(boolean_expression 2)](https://image.slidesharecdn.com/ccforbeginnerscrashcoursemastercprogrammingfastandeasytoday-181124224132/85/C-c-for-beginners-crash-course-master-c-programming-fast-and-easy-today-44-320.jpg)
![{
/* If the Boolean expression 2 is true, the statement is executed*/
}
else if(boolean_expression 3)
{
/* If the Boolean expression 3 is true, the statement is executed*/
}
else
{
/* executes if none of the condition is true*/
}
Example of else if else statement
Example 8:
using System;
namespace ifelse
{
class Program
{
static void Main(string[] args)
{
int x = 30;
if(x == 100)
{
Console.WriteLine("The value is 100");
}
else if(x == 20)
{
Console.WriteLine("The value is 20");
}
else if(x == 10)
{
Console.WriteLine("The value is 10");
}
else
{
Console.WriteLine("No matching value found");
}
Console.WriteLine("Value of x is:{0}",x);
Console.Read();
}](https://image.slidesharecdn.com/ccforbeginnerscrashcoursemastercprogrammingfastandeasytoday-181124224132/85/C-c-for-beginners-crash-course-master-c-programming-fast-and-easy-today-45-320.jpg)
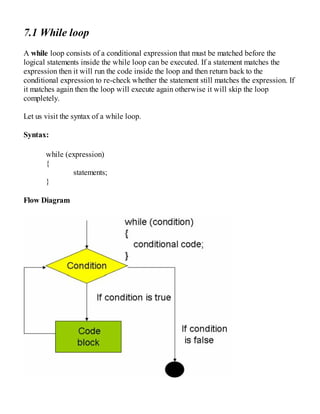
![6.3 Nested if statement
The nested if statement contains one if or else if statement inside another if or else
statement.
Syntax for nested if statement
if(boolean_expression1)
{
/*If the expression 1 is true, statement is executed*/
if(boolean_expression2)
{
/*If the expression 2 is true, statement is executed*/
}
}
Example for nested if statement
Example 9:
using System;
namespace nestedif
{
class Program
{
static void Main(string[] args)
{
int x = 20;
int y = 40;
if(x == 20)
{
if(y == 40)
{
Console.WriteLine("Value of x is 20 and y is 40");
}
}
Console.WriteLine("Value of x is:{0}",x);
Console.WriteLine("Value of y is:{0}",y);
Console.Read();
}
}
}](https://image.slidesharecdn.com/ccforbeginnerscrashcoursemastercprogrammingfastandeasytoday-181124224132/85/C-c-for-beginners-crash-course-master-c-programming-fast-and-easy-today-47-320.jpg)

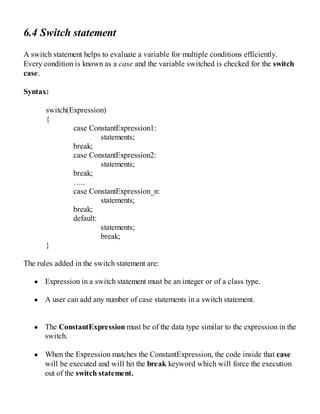
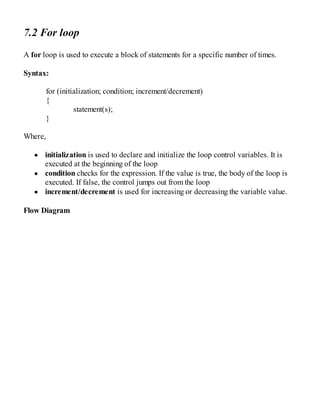
![Every case does not need a break keyword.
The optional default case appears at the end of the switch and acts as a backup
in case the expression does not match any of the ConstantExpressions.
Flow Diagram
Example of switch statement
Example 10:
using System;
namespace switchcase
{
class Program
{
static void Main(string[] args)
{
char grade ='A+';](https://image.slidesharecdn.com/ccforbeginnerscrashcoursemastercprogrammingfastandeasytoday-181124224132/85/C-c-for-beginners-crash-course-master-c-programming-fast-and-easy-today-50-320.jpg)
![6.5 Nested switch statement
User can switch part of the statement sequence of the outer switch. The common values
in the switches do not conflict.
Syntax:
switch(c1)
{
case ‘A’:
Console.WriteLine(“A is the part of outer switch”);
break;
switch(c2)
{
case ‘A’:
Console.WriteLine(“ A is the part of inner switch”);
break;
case ‘B’:
}
break;
case ‘B’:
}
Example of nested switch statement
Example 11:
using System;
namespace switchcase
{
class Program
{
static void Main(string[] args)
{
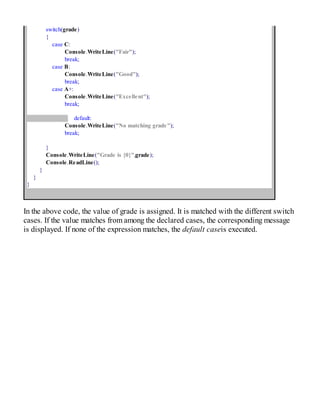
char grade ='A+';
switch(grade)
{
case C:
Console.WriteLine("Fair");
break;
case B:](https://image.slidesharecdn.com/ccforbeginnerscrashcoursemastercprogrammingfastandeasytoday-181124224132/85/C-c-for-beginners-crash-course-master-c-programming-fast-and-easy-today-52-320.jpg)
![Console.WriteLine("Good");
break;
case A+:
Console.WriteLine("Excellent");
break;
default:
Console.WriteLine("No matching grade");
break;
}
Console.WriteLine("Grade is {0}",grade);
Console.ReadLine();
}
}
}
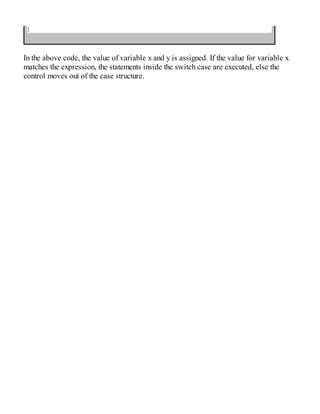
Example 12:
using System;
namespace nestedswitch
{
class Program
{
static void Main(string[] args)
{
int x = 20;
int y = 40;
switch(x)
{
case 20:
Console.WriteLine("Part of outer switch");
switch(y)
{
case 40:
Console.WriteLine("Part of inner switch");
break;
}
break;
}
Console.WriteLine("Value of x is :{0}",x);
Console.WriteLine("Value of y is: {0}",y);
Console.Read();
}
}](https://image.slidesharecdn.com/ccforbeginnerscrashcoursemastercprogrammingfastandeasytoday-181124224132/85/C-c-for-beginners-crash-course-master-c-programming-fast-and-easy-today-53-320.jpg)
![Example of while loop
Example 13:
using System;
namespace whileloop
{
class Program
{
static void Main(string[] args)
{
int var;
var=50;
while(var<150)
{
Console.WriteLine("Value of variable is:{0}",var);
var=var+10;
}
}
}
}
In the preceding code, the variable var is initialized with value 50. The while loop
checks for the condition. If the condition is less than 150, the statements inside the loop
are executed. If false, the control does not enter the while loop.](https://image.slidesharecdn.com/ccforbeginnerscrashcoursemastercprogrammingfastandeasytoday-181124224132/85/C-c-for-beginners-crash-course-master-c-programming-fast-and-easy-today-57-320.jpg)
![Example of for loop
Example 14:
using System;
namespace forloop
{
class Program
{
static void Main(string[] args)
{
int i;
for(int i=1;i<=10;i++)
{
Console.WriteLine("Value of variable is:{0}",i);
}
}](https://image.slidesharecdn.com/ccforbeginnerscrashcoursemastercprogrammingfastandeasytoday-181124224132/85/C-c-for-beginners-crash-course-master-c-programming-fast-and-easy-today-59-320.jpg)
![using System;
namespace dowhile
{
class Program
{
static void Main(string[] args)
{
int x=1;
do
{
Console.WriteLine("Value of x is:{0}",x);
x=x+1;
}while(i<10);
Console.ReadLine();
}
}
}
In the above code, the variable x is assigned with value 1. The do loop prints the
statements inside the block. Once the condition in the while loop is false, the statements
in the do while loop will not be executed.](https://image.slidesharecdn.com/ccforbeginnerscrashcoursemastercprogrammingfastandeasytoday-181124224132/85/C-c-for-beginners-crash-course-master-c-programming-fast-and-easy-today-62-320.jpg)
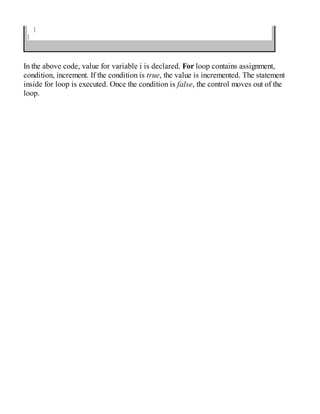
![7.4 Break statement
The break statement is used to exit from the loop. When this statement is encountered,
the loop is terminated, the control resumes to the next statement following loop.
Syntax:
break;
Flow Diagram
Example of break statement
Example 16:
using System;
namespace break;
{
class Program
{
static void Main(string[] args)](https://image.slidesharecdn.com/ccforbeginnerscrashcoursemastercprogrammingfastandeasytoday-181124224132/85/C-c-for-beginners-crash-course-master-c-programming-fast-and-easy-today-63-320.jpg)
![}
Access specifiers define the level of contact for other methods and members to
be able to interact with methods and members of the given class. If no access
specifier is specified, the default access specifier is private.
The date type specifies the variable type and the return type is used to state what
type of data is returned from the method, although it should be noted that a
method does not need to always return anything.
The dot(.) operator is used for accessing the class member
The dot operator is used to link the object name and member name
Example to demonstrate class
Example 18:
using System;
namespace demo
{
class Calculate
{
public int len;
public int bread;
}
class Program
{
static void Main(string[] args)
{
Calculate c1 = new Calculate();
Calculate c2 = new Calculate();
int area = 0;
int area1 = 0;
c1.len = 10;
c1.bread = 5;
c2.len = 15;
c2.bread = 10;
area = c1.len*c1.bread;
Console.WriteLine("area of rectangle1 is:{0}",area);
area1 = c2.len*c2.bread;
Console.WriteLine("area of rectangle2 is:{0}",area1)
Console.ReadLine();
}
}](https://image.slidesharecdn.com/ccforbeginnerscrashcoursemastercprogrammingfastandeasytoday-181124224132/85/C-c-for-beginners-crash-course-master-c-programming-fast-and-easy-today-68-320.jpg)

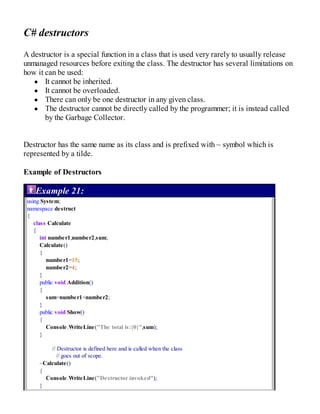
![C# constructors
A constructor is a special type of method invoked automatically when the instance of the
class is created. The members of the class are initialized inside the constructors. The
constructor has to have the same name as the class itself.
Example of Constructor
Example 19:
using System;
namespace construct
{
class Calculate
{
int number1,number2,sum;
Calculate()
{
number1 = 20;
number2 = 40;
}
public void Addition()
{
sum = number1+number2;
}
public void Show()
{
Console.WriteLine("The total is:{0}",sum);
}
public static void Main(string[] args)
{
Calculate c1 = new Calculate();
c1.Addition();
c1.Show();
}
}
}
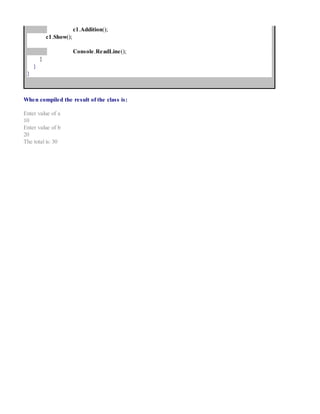
When compiled the result of this class will be:
The total is: 60
In the example above every time the class Calculate is instantiated, the constructor
manually assigns a fixed value to number1 and number2 . However what if you wanted to](https://image.slidesharecdn.com/ccforbeginnerscrashcoursemastercprogrammingfastandeasytoday-181124224132/85/C-c-for-beginners-crash-course-master-c-programming-fast-and-easy-today-70-320.jpg)
![make the values of number1 and number2 different and dynamic? How would this be
achieved?
Well this is where a concept of a parameterized constructor comes in. Essentially
what this fancy term means is that we pass in parameters directly in to the constructor,
this allows us to pass in values at the point of instantiation of the class. Lets look at an
example:
Example of parameterized constructor
Example 20:
using System;
namespace construct
{
class Calculate
{
int number1,number2,sum;
// Parameters are added in to here inside the constructor
Calculate(int num1,int num2)
{
// We assign the parameters to the class variables
number1 = num1;
number2 = num2;
}
public void Addition()
{
sum=number1+number2;
}
public void Show()
{
Console.WriteLine("The total is:{0}",sum);
}
public static void Main(string[] args)
{
int a,b;
Console.WriteLine("Enter value of a");
a = Convert.ToInt32(Console.ReadLine());
Console.WriteLine("Enter the value of b");
b = Convert.ToInt32(Console.ReadLine());
// a and b are passed through to the class constructor
Calculate c1 = new Calculate(a,b);](https://image.slidesharecdn.com/ccforbeginnerscrashcoursemastercprogrammingfastandeasytoday-181124224132/85/C-c-for-beginners-crash-course-master-c-programming-fast-and-easy-today-71-320.jpg)
![public static void Main(string[] args)
{
Calculate c1=new Calculate();
c1.Addition();
c1.Show();
}
}
}
When compiled the result of the class will be:
The total is: 19](https://image.slidesharecdn.com/ccforbeginnerscrashcoursemastercprogrammingfastandeasytoday-181124224132/85/C-c-for-beginners-crash-course-master-c-programming-fast-and-easy-today-74-320.jpg)

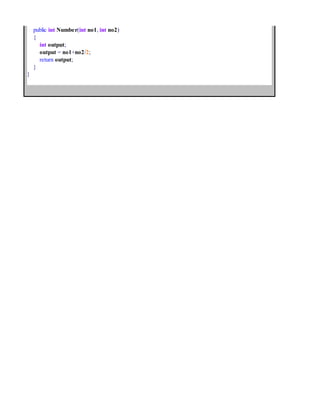
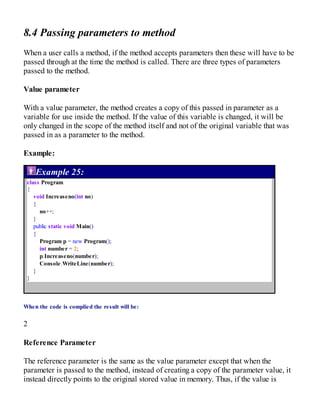
![8.3 Calling methods
Once the method is defined, a user can call the method using the method name. The
method name is followed by the parentheses.
Example:
Example 23:
using System;
class Average
{
public int Number(int no1, int no2)
{
int output;
output = no1+no2/2;
return output;
}
static void Main(string[] args)
{
Average a = new Average();
// calling method Number from object class a
int value = a.Number(20,30);
Console.WriteLine("The result is {0}",value);
}
}
When the code is compiled the result is:
The result is 25](https://image.slidesharecdn.com/ccforbeginnerscrashcoursemastercprogrammingfastandeasytoday-181124224132/85/C-c-for-beginners-crash-course-master-c-programming-fast-and-easy-today-77-320.jpg)
![8.5 Recursive method call
A method can call itself this is known as recursion.
Example 24:
using System;
namespace recursive
{
class recursivecall
{
public int factorial(int no)
{
int result;
if(no == 1)
{
return 1;
}
else
{
result = factorial(no-1)*no;
return result;
}
}
static void Main(string[] args)
{
recursivecall r = new recursivecall();
Console.WriteLine("Factorial of no is {0}",n.factorial(2));
Console.WriteLine("Factorial of no is {0}",n.factorial(3));
Console.Read();
}
}
}
When the code is complied the result will be:
Factorial of no is 2
Factorial of no is 6](https://image.slidesharecdn.com/ccforbeginnerscrashcoursemastercprogrammingfastandeasytoday-181124224132/85/C-c-for-beginners-crash-course-master-c-programming-fast-and-easy-today-78-320.jpg)
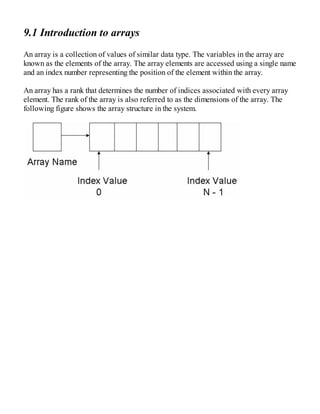
![9.2 Arrays declaration
An array is declared before it is used in any program. The following syntax is used to
declare an array.
datatype[ ] ArrayName;
The syntax of an array involves the components mentioned below:
datatype: Used for specifying the data type for elements. It will be stored in an
array.
[ ] : Specify the size of the array and is referred to as rank.
ArrayName: States the name of the array.](https://image.slidesharecdn.com/ccforbeginnerscrashcoursemastercprogrammingfastandeasytoday-181124224132/85/C-c-for-beginners-crash-course-master-c-programming-fast-and-easy-today-84-320.jpg)
![9.3 Initializing and adding values
The new keyword is used to create an instance of the array. The size of array is
specified when it is initialized. The following code snippet is used to initialize the
array.
int [ ] x ;
x = new int [15];
The array can be initialized by combining the two statements and is written as:
int [ ] x = new int [15];
Assigning values to an array
The values can be assigned to each element of the array using the index number. It is
also known as subscript of the element. The following code snippet is used for
assigning the values to an array.
int [ ] amount = new int [5];
int [0] = 50;
The array can be created and initialized using the following code:
int [ ] amount = { 40,60,70,80};
The size of an array can be removed.
int [ ] age = new int[ ] { 21,31,40};
When a user copies the data from one array into another, the source and target array
refer to same location. The following code snippet shows the copying of one array to
another.
int [ ] age = new int[ ] { 12,14,15,16};
int [ ] amount = age;
The two arrays as age and amount are created. They point to same memory location.](https://image.slidesharecdn.com/ccforbeginnerscrashcoursemastercprogrammingfastandeasytoday-181124224132/85/C-c-for-beginners-crash-course-master-c-programming-fast-and-easy-today-85-320.jpg)
![9.4 Accessing array elements
To access an element in an array, you will need to use an index. An index is the number
that represents the position of elements in the array. Indexes always start from zero, so
to access the first element in an array we would do so in this format:
array_name[index]
In this case the value of index will be zero.
Example:
Example 28:
using System;
namespace arraydeclare
{
class Arraydemo
{
static void Main(string[] args)
{
int [] a = new int[5];
int x,y;
for(int x = 0;x <5;x++)
{
a[x]=x + 10;
}
for(y = 0;y < 5;y++)
{
Console.WriteLine("Element [{0}]={1}",y,a[y]);
}
Console.ReadLine();
}
}
}
When the code is compiled and executed, the output is:
Element [0] = 10
Element [1] = 11
Element [2] = 12
Element [3] = 13
Element [4] = 14](https://image.slidesharecdn.com/ccforbeginnerscrashcoursemastercprogrammingfastandeasytoday-181124224132/85/C-c-for-beginners-crash-course-master-c-programming-fast-and-easy-today-86-320.jpg)
![9.5 Foreach loop
This loop is specifically designed to iterate through all elements of an array. It is great
for retrieving elements of an array efficiently.
Syntax:
foreach(type identifier in expression)
statement – block
Example:
Example 29:
using System;
namespace arraydeclare
{
class Arraydemo
{
static void Main(string[] args)
{
int [] a = new int[5];
for(int x = 0;x < 5;x++)
{
a[x] = x + 10;
}
foreach(int y in a)
{
int x = y - 10;
Console.WriteLine("Element[{0}]",x,y);
x++;
}
Console.ReadLine();
}
}
}
The code is compiled and executed, the output is:
Element [0] = 10
Element [1] = 11
Element [2] = 12](https://image.slidesharecdn.com/ccforbeginnerscrashcoursemastercprogrammingfastandeasytoday-181124224132/85/C-c-for-beginners-crash-course-master-c-programming-fast-and-easy-today-87-320.jpg)
![Element [3] = 13
Element [4] = 14](https://image.slidesharecdn.com/ccforbeginnerscrashcoursemastercprogrammingfastandeasytoday-181124224132/85/C-c-for-beginners-crash-course-master-c-programming-fast-and-easy-today-88-320.jpg)
![9.6 Different C# arrays
The following are various types of C# arrays that are used for developing code.
Multi-dimensional arrays
A multi-dimensional array stores data in more than one row dimension. It is also
known as rectangular array. User can declare two-dimensional array of integer as:
int [ , ] no;
A two-dimensional array can be considered as table. It has x rows and y columns. A
two-dimensional array contains 2 rows and 4 columns.
Initializing two dimensional arrays
The following array has 3 rows and 3 columns.
int [ , ] x = int [ 3, 3] = {
{1, 2, 3},
{4, 5, 6},
{7, 8, 9}
};
Accessing elements of multidimensional array
An element from the multi dimensional array can be accessed using the subscripts. They
are row and column index of the array.
Example:](https://image.slidesharecdn.com/ccforbeginnerscrashcoursemastercprogrammingfastandeasytoday-181124224132/85/C-c-for-beginners-crash-course-master-c-programming-fast-and-easy-today-89-320.jpg)
![int output = a [1, 2];
In the above statement, the element from second row and third column is accessed.
Example:
Example 30:
using System;
namespace twodimension
{
class multiarray
{
static void Main(string[] args)
{
int [ , ] x = new int[3,2]{{1,1},{2,2},{3,3}};
int a,b;
for(a = 0;a < 3;a++)
{
for(b = 0;b < 2;b++)
{
Console.WriteLine("x[{0},{1}={2}",a,b,x[a,b]);
}
}
Console.ReadLine();
}
}
}
The code is compiled and executed, the output is:
x[0,0] = 1
x[0,1] = 1
x[1,0] = 2
x[1,1] = 2
x[2,0] = 3
x[2,1] = 3
Jagged Array
A jagged array is an array of arrays. The jagged array of int type is declared as:
int [ ] [ ] marks;](https://image.slidesharecdn.com/ccforbeginnerscrashcoursemastercprogrammingfastandeasytoday-181124224132/85/C-c-for-beginners-crash-course-master-c-programming-fast-and-easy-today-90-320.jpg)
![An array can be initialized as:
int [ ] [ ] marks = new int [3] [ ] { new int [ ] {45,57,78}, new int [ ] { 60, 75,
86,45,35}};
The marks array is of two arrays of integers as marks[0] with 3 integers and marks[1]
with 5 integers.
Example:
Example 31:
using System;
namespace Jaggedarray
{
class jagged
{
static void Main(string[] args)
{
int[][] x = new int[][]{
new int[]{0,0},
new int[]{2,2},
new int[]{3,4},
new int[]{4,2},
new int[]{1,3}};
int a,b;
for(a = 0;a < 5;a++)
{
for(b = 0;b < 2;b++)
{
Console.WriteLine("x[{0},{1}]={2}",a,b,x[a][b]);
}
}
Console.ReadLine();
}
}
}
The code is compiled and executed, the output is:
x[0,0] = 0](https://image.slidesharecdn.com/ccforbeginnerscrashcoursemastercprogrammingfastandeasytoday-181124224132/85/C-c-for-beginners-crash-course-master-c-programming-fast-and-easy-today-91-320.jpg)
![x[0,1] = 0
x[1,0] = 2
x[1,1] = 2
x[2,0] = 3
x[2,1] = 4
x[3,0] = 4
x[3,1] = 2
x[4,0] = 1
x[4,1] = 3
Param Arrays
When a method is declared, the number of arguments to be passed as parameter is not
decided. The Param array is used.
Example:
Example 32:
using System;
namespace ParamArray
{
class ParamArray
{
public int AddValues(params int[] data)
{
int total = 0;
foreach(int a in data)
{
total+ = a;
}
return total;
}
}
class Test
{
static void Main(string[] args)
{
ParamArray pa = new ParamArray();
int total=pa.AddValues(2,3,4,5,6);
Console.WriteLine("The sum is {0}",total);
Console.Read();
}
}
}](https://image.slidesharecdn.com/ccforbeginnerscrashcoursemastercprogrammingfastandeasytoday-181124224132/85/C-c-for-beginners-crash-course-master-c-programming-fast-and-easy-today-92-320.jpg)
![When the code is compiled and executed, the output is:
The sum is 20
Array Class
The array class is the base class for all arrays in C#. The System namespace contains
the array class. There are various properties and methods used in the array class.
Properties of Array class
Length: The total number of items in all dimensions of an array are returned
Rank: It returns the rank of an array
IsFixedSize: It is a value indicating an array has fixed size or not
IsReadOnly: Value stating the array is read only or not
Methods of Array class
Sort: The sort operation on an array passed to it as a parameter
Clear: It removes all the items in an array and sets range of items to 0
GetLength: The number of items in an array are returned
GetValue: The value of the specified item in an array
IndexOf: The index of the first occurrence of a value in one dimensional array is
returned
Reverse: It reverses the sequence of elements in the array
Example:
Example 33:
using System;
namespace Array
{
class Array1
{
static void Main(string[] args)
{
int[] item = {12,34,23,55,64};
int[] value = item;
Console.Write(“Original Array:”);
foreach(int x in item)
{](https://image.slidesharecdn.com/ccforbeginnerscrashcoursemastercprogrammingfastandeasytoday-181124224132/85/C-c-for-beginners-crash-course-master-c-programming-fast-and-easy-today-93-320.jpg)
![10.1 Creation of string
A string in C# is an array of characters. The string keyword is used for declaring the
variable. The keyword is an alias for System.String class.
String Object creation
There are various methods used for string creation. They are:
Retrieving a property or calling a method returning a string
Use of string class constructor
Use of string concatenation operator (+)
Calling formatted method for converting a value or an object to the string
representation
Assigning a string literal to the string variable
Example:
Example 34:
using System;
namespace StringType
{
class Program
{
static void Main(string[] args)
{
//string literal and concatenation
string name,location;
name = "Harry";
location = "USA";
string value = name + location;
Console.WriteLine("The value is:{0}",value);
//string constructor
char[] vowels = {'a','e','i','o','u'};
string item = new string(vowels);
Console.WriteLine("The item contains values:{0}",item);
//formatting method for value conversion
DateTime dt = new DateTime(2014,12,10,15,34,1);
string msg = string.Format("Message sent at {0:t} on {0:D}",dt);
//method returning value](https://image.slidesharecdn.com/ccforbeginnerscrashcoursemastercprogrammingfastandeasytoday-181124224132/85/C-c-for-beginners-crash-course-master-c-programming-fast-and-easy-today-96-320.jpg)
![string[] array = {"Welcome","User"};
string result = String.Join("",array);
Console.WriteLine("Message is:{0}",result);
}
}
}
When the code is compiled and executed, the output is:
The value is: Harry USA
The item contains values: aeiou
Message sent at 2.30 PM on Tuesday, June 02, 2015
Message is: Welcome User](https://image.slidesharecdn.com/ccforbeginnerscrashcoursemastercprogrammingfastandeasytoday-181124224132/85/C-c-for-beginners-crash-course-master-c-programming-fast-and-easy-today-97-320.jpg)
![10.2 Properties and methods of string class
Properties of string class
Chars: Gets the Char object at specific position in the String object
Length: Gets the number of characters in the String object
Methods of string class
public bool Equals(string value)
Checks whether the current String object and the specified object have same
value
public string Insert(int startIndex, string value)
Returns a new string in which the specified one is inserted at a specific index
position
public string Replace(char oldchar, string newValue)
All the occurrences of a specific character in the string object are replaced with
Unicode character and a new string is returned.
public int LastIndexOf(string value)
The zero based index position of the last occurrence of the Unicode character in
the string object is returned
public string Trim()
All leading and trailing white space characters from the object are returned.
public static Compare(string str1, string str2, bool IgnoreCase)
Compares the two strings and an integer value stating the relative position in sort
order
public static string Concat(string str1, string str2)
Concatenates the two string objects
public string[] Split (char[] separator, int count)
A string array containing the substrings in the current string object is returned. It
is delimited by the elements of a specific Unicode character array. The number
of substrings returned is specified by the int parameter.
public bool Contains(string value)
Returns value stating the specified string object occurs in the string
public static string Copy(string str)
Creates a new String object with the same value as the specified string
public string ToUpper()
Copy of the string converted into uppercase is returned
public int IndexOf(string value)](https://image.slidesharecdn.com/ccforbeginnerscrashcoursemastercprogrammingfastandeasytoday-181124224132/85/C-c-for-beginners-crash-course-master-c-programming-fast-and-easy-today-98-320.jpg)
![Returns the zero – based index of the first occurrence of the specified string in
the instance
public string Remove(int startindex)
It removes the characters in the current instance, beginning at the specified
position and moving to the last one. It returns a string.
public char[] ToCharArray()
A Unicode character array with all the characters in the current string object is
returned
public string ToLower()
Copy of the string converted into lowercase is returned](https://image.slidesharecdn.com/ccforbeginnerscrashcoursemastercprogrammingfastandeasytoday-181124224132/85/C-c-for-beginners-crash-course-master-c-programming-fast-and-easy-today-99-320.jpg)
![10.3 Examples demonstrating the string functionality
String Comparison
Example 35:
using System;
namespace string1
{
class Program
{
static void Main(string[] args)
{
string string1 = "A string named as string1";
string string2 = "A string named as string2";
if(String.Compare(string1,string2) == 0)
{
Console.WriteLine(string1+"and"+string2+"equal");
}
else
{
Console.WriteLine(string1+"and"+string2+" not equal");
}
Console.Read();
}
}
}
When the code is compiled and executed, the output is:
A string named as string1 and A string named as string2 are not equal
Joining strings
Example 36:
using System;
namespace string1
{
class Program
{
static void Main(string[] args)
{
string[] str1 = new string[]{"Set your aims high",
"Rome was not built in a day",](https://image.slidesharecdn.com/ccforbeginnerscrashcoursemastercprogrammingfastandeasytoday-181124224132/85/C-c-for-beginners-crash-course-master-c-programming-fast-and-easy-today-100-320.jpg)
!["Save Time"};
string str = String.Join("n",str1);
Console.WriteLine(str);
Console.Read();
}
}
}
When the code is compiled and executed, the output is:
Set your aims high
Rome was not built in a day
Save Time
String containing value
Example 37:
using System;
namespace string1
{
class Program
{
static void Main(string[] args)
{
string str = "A new user";
if(str.Contains("user"))
{
Console.WriteLine("The value 'user' is present");
}
Console.Read();
}
}
}
When the code is compiled and executed, the output is:
The value 'user' is present”](https://image.slidesharecdn.com/ccforbeginnerscrashcoursemastercprogrammingfastandeasytoday-181124224132/85/C-c-for-beginners-crash-course-master-c-programming-fast-and-easy-today-101-320.jpg)
![Console.WriteLine("User name is:{0}",name);
Console.WriteLine("Age is:{0}",age);
}
}
class Program
{
static void Main(string[] args)
{
User u = new User();
u.AddValue();
u.Show();
Console.Read();
}
}
}
When the code is compiled and executed, the output is:
Enter the user name:
Mark
Enter the age:
20
User name is: Mark
Age is: 20
Private Access Specifier
The private access specifier allows the user to hide classes’ member variables and
functions from other class objects and functions. The private members are not visible
from outside the class. Only the class functions based within the class itself can access
the private entity. Objects or instances of the class cannot access any private variables
or functions as they are declared as external to the class.
Example:
Example 39:
using System;
namespace private1
{
class Student
{
//member variables](https://image.slidesharecdn.com/ccforbeginnerscrashcoursemastercprogrammingfastandeasytoday-181124224132/85/C-c-for-beginners-crash-course-master-c-programming-fast-and-easy-today-105-320.jpg)
![private string name;
private int age;
public void AddValue()
{
Console.WriteLine("Enter the student name:");
name = Console.ReadLine();
Console.WriteLine("Enter the age:");
age = Convert.ToInt32(Console.ReadLine());
}
public void Show()
{
Console.WriteLine("Student name is:{0}",name);
Console.WriteLine("Age is:{0}",age);
}
}
class Program
{
static void Main(string[] args)
{
Student s = new Student();
s.AddValue();
s.Show();
Console.Read();
}
}
}
When the code is compiled and executed, the output is:
Enter the student name:
Harry
Enter the age:
15
Student name is: Harry
Enter the age: 15
Protected access specifier
Protected access specifier allows the class to hide the member variables and functions
from other class objects and functions, except from child classes. The specifier is useful
during the implementation of inheritance.
Example:](https://image.slidesharecdn.com/ccforbeginnerscrashcoursemastercprogrammingfastandeasytoday-181124224132/85/C-c-for-beginners-crash-course-master-c-programming-fast-and-easy-today-106-320.jpg)
![Example 40:
using System;
namespace protected1
{
class Employee
{
//member variables
protected string name;
public void AddValue()
{
Console.WriteLine("Enter the employee name:");
name = Console.ReadLine();
}
public void Show()
{
Console.WriteLine("Employee name is:{0}",name);
}
}
class Program
{
static void Main(string[] args)
{
Employee e = new Employee();
e.AddValue();
e.Show();
Console.Read();
}
}
}
When the code is compiled and executed, the output is:
Enter the employee name:
Ajay
Employee name is: Ajay
Internal access specifier
Internal access specifier allows a class to expose its member functions and variables
to the containing child classes or classes within the same application.
Example:](https://image.slidesharecdn.com/ccforbeginnerscrashcoursemastercprogrammingfastandeasytoday-181124224132/85/C-c-for-beginners-crash-course-master-c-programming-fast-and-easy-today-107-320.jpg)
![Example 41:
using System;
namespace internal1
{
class Location
{
//member variables
internal string city;
public void AddValue()
{
Console.WriteLine("Enter the city name:");
name = Console.ReadLine();
}
public void Show()
{
Console.WriteLine("City name is:{0}",name);
}
}
class Program
{
static void Main(string[] args)
{
Location l = new Location();
l.AddValue();
l.Show();
Console.Read();
}
}
}
When the code is compiled and executed, the output is:
Enter the city name:
London
City name is: London
Protected Internal access specifier
The protected internal access specifier allows a class to expose the member functions
and variables to the containing class, child class, or classes in same application. The
access to the derived classes outside the application is allowed.](https://image.slidesharecdn.com/ccforbeginnerscrashcoursemastercprogrammingfastandeasytoday-181124224132/85/C-c-for-beginners-crash-course-master-c-programming-fast-and-easy-today-108-320.jpg)
![Example:
Example 42:
using System;
namespace protectedinternal1
{
class number
{
//member variables
protected internal int no;
public void AddValue()
{
Console.WriteLine("Enter the number:");
no = Convert.ToInt32(Console.ReadLine());
}
public void Show()
{
Console.WriteLine("Number is:{0}",no);
}
}
class Program
{
static void Main(string[] args)
{
number n = new number();
n.AddValue();
n.Show();
Console.Read();
}
}
}
When the code is compiled and executed, the output is:
Enter the number:
10
Number is: 10](https://image.slidesharecdn.com/ccforbeginnerscrashcoursemastercprogrammingfastandeasytoday-181124224132/85/C-c-for-beginners-crash-course-master-c-programming-fast-and-easy-today-109-320.jpg)
![}
class Program
{
static void Main(string[] args)
{
Program p = new Program();
Console.WriteLine("Minimum value is:{0}",p.Min(3,4));
Console.WriteLine("Minimum value is:{0}", p.Min(3.2F,1.2F));
Console.ReadLine();
}
}
}
}
When the code is compiled and executed, the output is:
Minimum value is: 3
Minimum value is: 1.2](https://image.slidesharecdn.com/ccforbeginnerscrashcoursemastercprogrammingfastandeasytoday-181124224132/85/C-c-for-beginners-crash-course-master-c-programming-fast-and-easy-today-112-320.jpg)
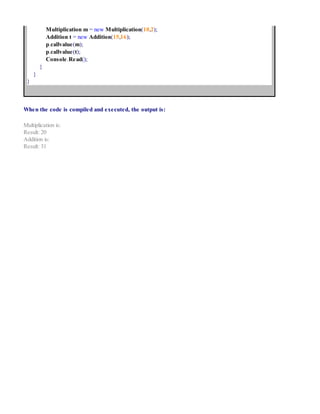
![}
public override int average()
{
Console.WriteLine("The average is:");
return (x + y / 2);
}
}
class Program
{
static void Main(string[] args)
{
Data d = new Data(30, 70);
int a = d.average();
Console.WriteLine("Average:{0}",a);
Console.Read();
}
}
}
When the code is compiled and executed, the output is:
The average is:
Average: 50
Virtual Functions
If you need a function that is defined in a class and needs to be implemented by an
inherited class, the virtual function is used. The inherited class modifies the
functionality of the inherited class depending on the requirement. The call to method is
at runtime.
The virtual keyword is used before the return type of the function.
Example:
Example 45:
using System;
namespace virtual1
{
class Calculate
{
protected int x, y;](https://image.slidesharecdn.com/ccforbeginnerscrashcoursemastercprogrammingfastandeasytoday-181124224132/85/C-c-for-beginners-crash-course-master-c-programming-fast-and-easy-today-114-320.jpg)
![public Calculate(int l = 0, int m = 0)
{
x = l;
y = m;
}
public virtual int operation
{
return 0;
}
}
class Multiplication : Calculate
{
public Multiplication (int l = 0, int m = 0):base(l,m)
{
}
public override int operation()
{
Console.WriteLine("Multiplication is:");
return x * y;
}
}
class Addition : Calculate
{
public Addition (int l = 0, int m = 0):base(l,m)
{
}
public override int operation()
{
Console.WriteLine("Addition is:");
return x + y;
}
}
class call
{
public void callvalue(Calculate c)
{
int z;
z = c.operation();
Console.WriteLine("Result:{0}",z);
}
}
class Program
{
static void Main(string[] args)
{
call p = new call();](https://image.slidesharecdn.com/ccforbeginnerscrashcoursemastercprogrammingfastandeasytoday-181124224132/85/C-c-for-beginners-crash-course-master-c-programming-fast-and-easy-today-115-320.jpg)
![}
Example:
Example 46:
using System;
namespace inheritance1
{
class Demo
{
public void side(int s)
{
side = s;
}
protected int side;
}
//Derived class
class Area : Demo
{
public int getAreaOfSquare()
{
return s * s;
}
}
clas Program
{
static void Main(string[] args)
{
Area a = new Area();
a.side(4);
//Display the area of square
Console.WriteLine("Area is: {0}",a.getAreaOfSquare());
Console.Read();
}
}
}
When the code is compiled and executed, the output is:
Area is: 16](https://image.slidesharecdn.com/ccforbeginnerscrashcoursemastercprogrammingfastandeasytoday-181124224132/85/C-c-for-beginners-crash-course-master-c-programming-fast-and-easy-today-120-320.jpg)
![}
public void Show()
{
base.Show();
Console.WriteLine("Total amount is:{0}",Totalamount());
}
}
class Program
{
static void Main(string[] args)
{
Paint p = new Paint(7);
p.Show();
Console.Read();
}
}
}
When the code is compiled and executed, the output is:
The value of side is: 3
Area is: 9
Total amount is: 450](https://image.slidesharecdn.com/ccforbeginnerscrashcoursemastercprogrammingfastandeasytoday-181124224132/85/C-c-for-beginners-crash-course-master-c-programming-fast-and-easy-today-122-320.jpg)
![name = "";
subject = "";
}
public StudentInfo(int s, string n, string b)
{
srno = s;
name = n;
subject = b;
}
public void ShowData()
{
Console.WriteLine("Student no is:{0}",srno);
Console.WriteLine("Student name is:{0}",name);
Console.WriteLine("Subject is:{0}",subject);
}
}
class Program
{
static void Main(string[] args)
{
StudentInfo s = new StudentInfo(10,"Alex","Maths");
StudentInfo s1 = new StudentInfo(20,"Adam","Science");
s.ShowData();
s1.ShowData();
Console.Read();
}
}
}
When the code is compiled and executed, the output is:
Student no is: 10
Student name is: Alex
Subject is: Maths
Student no is: 20
Student name is: Adam
Subject is: Science](https://image.slidesharecdn.com/ccforbeginnerscrashcoursemastercprogrammingfastandeasytoday-181124224132/85/C-c-for-beginners-crash-course-master-c-programming-fast-and-easy-today-124-320.jpg)
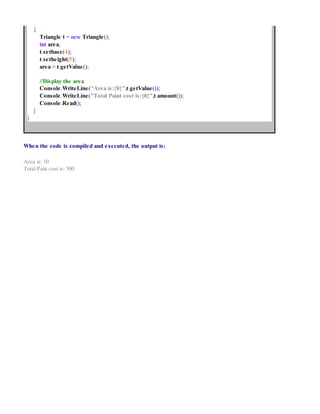
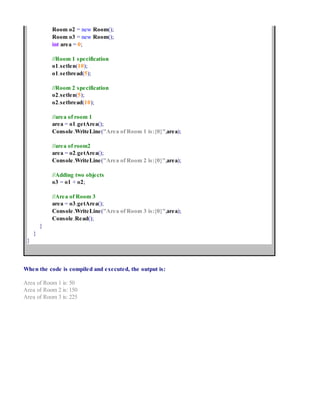
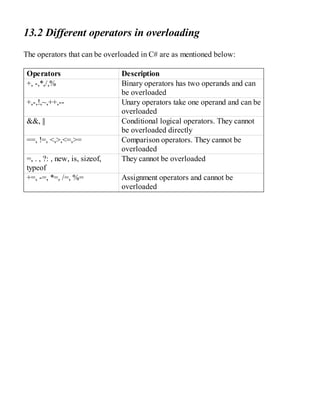
![13.1 Introduction to Operator Overloading
The built in operators can be redefined or overloaded in C#. The overloaded operators
are functions having an operator keyword. It is followed by the symbol for the operator
to be defined. The overloaded operator has a return type and a parameter list.
Example:
Example 50:
using System;
namespace operator1
{
class Room
{
private int length;
private int breadth;
public int getArea()
{
return length * breadth;
}
public void setlen (int len)
{
length = len;
}
public void setbread(int bread)
{
breadth = bread;
}
//+ operator is overloaded
public static Room operator + (Room r, Room s)
{
Room o = new Room();
o.length = r.length + s.length;
o.breadth = r.bread + s.bread;
return o;
}
}
class Program
{
public static void Main(string[] args)
{
Room o1 = new Room();](https://image.slidesharecdn.com/ccforbeginnerscrashcoursemastercprogrammingfastandeasytoday-181124224132/85/C-c-for-beginners-crash-course-master-c-programming-fast-and-easy-today-128-320.jpg)

![13.5 Exception handling
The structured solution in the form of try and catch block is provided by C#. The core
program statements are divided from the error handling statements. The finally block is
used to handle errors.
Example:
Example 51:
using System;
namespace DivNumbers
{
class Divide
{
int output;
Divide()
{
output = 0;
}
public void division(int no1, int no2)
{
try
{
output = no1 / no2;
}
catch(DivideByZeroException e)
{
Console.WriteLine("Exception handled:{0}",e);
}
finally
{
Console.WriteLine("Output is:{0}",output);
}
}
public static void Main(string[] args)
{
Divide d = new Divide();
d.division(5,0);
Console.Read();
}
}
}](https://image.slidesharecdn.com/ccforbeginnerscrashcoursemastercprogrammingfastandeasytoday-181124224132/85/C-c-for-beginners-crash-course-master-c-programming-fast-and-easy-today-134-320.jpg)

![13.6 User defined exceptions
Users can create their own exception classes when the situation arises where the user
needs to handle an exception in a special way using custom code. These exceptions are
known as user defined exceptions.
The user defined exceptions classes are derived from the ApplicationException class.
Example 52:
using System;
namespace userdefined
{
class Average
{
static void Main(string[] args)
{
Perform p = new Perform();
try
{
p.CalAverage();
}
catch(CountZeroException e)
{
Console.WriteLine("CountZeroException: {0}",e.Message);
}
Console.Read();
}
}
}
public class CountZeroException:ApplicationException
{
public CountZeroException(string message):base(message)
{
}
}
public class Perform
{
int no1 = 0;
int count = 0;
float average;
public void CalAverage()
{
if(count == 0)
{
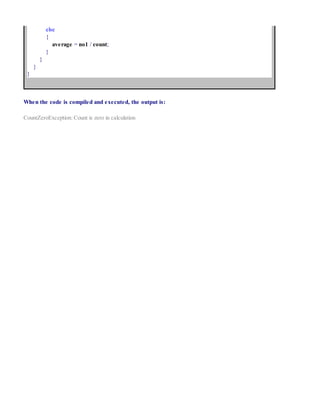
throw(new CountZeroException("Count is zero in calculation"));](https://image.slidesharecdn.com/ccforbeginnerscrashcoursemastercprogrammingfastandeasytoday-181124224132/85/C-c-for-beginners-crash-course-master-c-programming-fast-and-easy-today-136-320.jpg)
![14.3 Main thread
The System.Threading.Thread class is used for working with threads. The main thread
is created as soon as program starts execution. The Thread class is used for creating
threads. They are known as child threads. The user can access the main thread by using
the CurrentThread property of the Thread class.
Example:
Example 53:
using System;
namespace thread
{
class MainThread
{
static void Main(string[] args)
{
Thread t1 = new Thread();
t1.Name="Thread1";
Console.WriteLine("Thread is:{0}",t1.Name);
Console.Read();
}
}
}
When the code is compiled and executed, the output is:
Thread is: Thread1](https://image.slidesharecdn.com/ccforbeginnerscrashcoursemastercprogrammingfastandeasytoday-181124224132/85/C-c-for-beginners-crash-course-master-c-programming-fast-and-easy-today-141-320.jpg)
![14.5 Creating and managing threads
The extended thread class creates a thread. The extended thread class calls the Start()
method to start the child thread execution.
Example:
Example 54:
using System;
using System.Threading;
namespace MultipleThread
{
class ThreadProgram
{
public static void CallChild()
{
Console.WriteLine("Start child thread");
}
static void Main(string[] args)
{
ThreadStart child1 = new ThreadStart(CallChild);
Console.WriteLine("Creating child thread");
Thread child2 = new Thread(child1);
child2.Start();
Console.Read();
}
}
}
When the code is compiled and executed, the output is:
Start child thread
Creating child thread
Managing Threads
When there is a need to pause a thread for a period of time so that another thread can
execute, the Thread.Sleep() method is used. The method takes a single argument stating
time in milliseconds.
Example:](https://image.slidesharecdn.com/ccforbeginnerscrashcoursemastercprogrammingfastandeasytoday-181124224132/85/C-c-for-beginners-crash-course-master-c-programming-fast-and-easy-today-143-320.jpg)
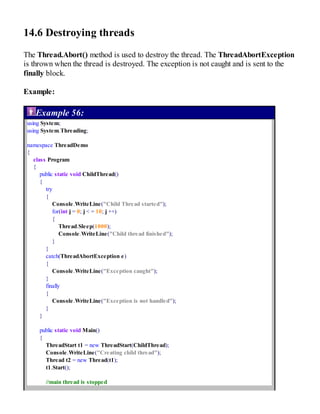
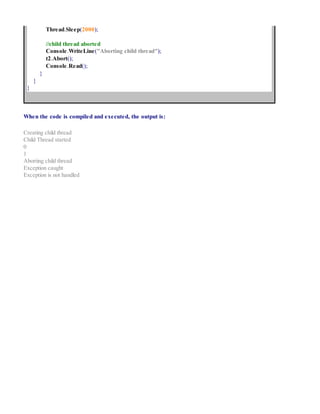

The document provides an overview and table of contents for a book on learning C# programming for beginners. It covers 14 chapters that introduce C# concepts like program structure, syntax, data types, variables, operators, decision making statements, loops, classes, methods, arrays, strings, encapsulation, inheritance, interfaces, exception handling, and multithreading. The book is aimed at helping readers master C# programming quickly and easily through explanations and examples in each chapter.