SlideShare a Scribd company logo
1 of 2
Download to read offline
Chapter #2: Properly Setting Up a Missouri A.V. for Collection

This heavy-duty gum rubber collection boot/liner is designed to be encased into the leather and/or the Next
Generation Insulated Cover. This protective carrying case is designed to perform the following functions:
•
•

Gives the collection liner, the rigidity needed to properly collect a stallion.
Temporarily maintains your pre-selected temperature prior to collection

Filling the Artificial Vagina Liner with Water
1.
2.
3.
4.
5.

Remove the brass pin and black plastic ring from the two-way valve and set aside
Bring the water to the specific temperature best suited for your stallion.
Using the Quick-Temp Digital Thermometer makes this procedure, a very easy task.
Hold the funnel under the waterspout and begin filling the liner.
Once the liner is about half full, begin to pull up on the vinyl tubing which will allow the air
bubbles in the liner to escape or “burp” out.
6. As the filling process continues, the water will begin to back fill up the tubing, when this level
reaches half way up the tubing, this will be your signal to stop the filling process.
7. Pull up on the vinyl tubing which will allow the water back into the liner.
8. Grasp the base of the brass pin/air valve assembly with your thumb and index finger and turn the
A.V. Fill Kit off.
9. While holding the base, quickly turn in the brass pin/air valve stem finger tight. Keep a close
watch on the temperature, the inside liner temperature should be 40c to 52o C (105oF to 125oF),
with this in mind, you’ll need to make sure that the water filling temperature is 45oC to 55oC
(112oF to 130oF).
10. Weigh the A.V. so that a specific weigh is maintained for each collection on each stallion.
Note: the temperature of the A.V. will immediately begin to cool depending upon the outside temperature of
your breeding and/or collection area. The length of time between filling the A.V. and the actual time of your
collection of your stallion is crucial. After the A.V. Liner is filled, wipe off any excess water and place the liner
in the leather and/or insulated cover, push down the leather stabilizer onto the air valve and screw on the black
plastic ring which increases the rigidity of the entire A.V. Then tighten the leather and/or Velcro straps.
A consistent weight & temperature of the A.V. can overt potential breeding vices in the future.

© Exodus Breeders Corporation 2009
Chapter #2: How to fill a Missouri Artificial Vagina (A.V.)
Option #1
The Next Generation™ A.V. Fill Kit:
a. Place the liner, valve side up in the bottom of the sink, using the Next Generation™ A.V. Fill Kit.
b. Screw out the brass air valve and black plastic ring out of the filling assembly and lay aside.
c. Using the A.V. Fill Kit; screw the brass fitting onto the external threads of the brass air valve
assembly and turn the brass fitting no more than finger tight.
i. You are now ready to fill the Artificial Vagina Liner.
ii. You should already know the water temperature that works best for your stallion.
iii. Begin at 115 F or 46 C and Do Not Exceed 131 F or 55 C
d. Each stallion is different and will require some preparation prior to the breeding season, in order to
define which temperature will be most productive for him.
e. Once your water is to the desired temperature, begin to fill the A.V., as the A.V. begins to fill, pull
up on the funnel so that the excess air begins to “burp” out of the bladder. This assures an even fill
with limited air bubbles; air bubbles can induce hyper-extending, thinning and/or delaminating of the
glued areas of the A.V., This is not covered by the 1 year warranty.
f. Once the water lever is consistently half way up the clear vinyl tubing;
g. Stop the filling process as the weight will be between 12 – 15 pounds
h. Pull up on the bottom of the funnel thus drawing the water into the bladder.
i. Grasp the base of the air valve and pulling up on the A.V.; the water should draw back into the
bladder.
j. Spin off the A.V. Fill device and set aside.
k. Replace the brass pin finger tight, wipe off the excess water, and weigh the A.V. for a uniform
pressure to your stallions liking. The A.V. bladder should not exceed 15 lbs w/o cover.
l. Lay the fill valve into the hole in the leather A.V. Cover and/or the Insulated A.V. Cover.
m. Taking the A.V. Leather Stabilizer disc, press down & onto the brass pin and screw the black ring
finger tight thus locking the A.V. into the cover
n. Roll over and either buckle and/or tighten the Velcro straps so that the unit becomes one.
Option #2
Air-valve fill system:
a. This will fill the liner much quicker, although, it exposes the gum rubber liner to severe
hyperextension and thus exposes the liner to delaminating, dry rot and an overall dramatic loss of
life; we do not recommend this and the manufacturer will not warrant any damage claims.
b. Place the liner, valve side up in the bottom of the sink.
c. Using the Air Stem Valve you’ll need to either dedicate a water faucet exclusively for this filling
device or place a “Quick Release” hook up which will distort the water pressure.
d. Using the air stem water valve actually works best on a several stallion breeding operation, although,
it is more costly. Simply follow steps g – n as stated above in option #1
Option #3
Direct Fill system
a. Follow steps a – d from Option #2 and instead of using an Air Stem Valve, a rubber hose is installed
with no end that snuggly fits over the open fill valve, thus filling accordingly.
b. Follow steps g – n as stated above in option #1

© Exodus Breeders Corporation 2009

More Related Content

Similar to Bajina artificial equino

Plumbing care and repair
Plumbing care and repairPlumbing care and repair
Plumbing care and repairZulaiha Amaria
 
PMB - Latest Developments in Wine Filling Technologies
PMB - Latest Developments in Wine Filling TechnologiesPMB - Latest Developments in Wine Filling Technologies
PMB - Latest Developments in Wine Filling TechnologiesThomas Jordan
 
Most common source of humidifier leaks
Most common source of humidifier leaksMost common source of humidifier leaks
Most common source of humidifier leaks21 Handshake
 
Colorado Water Purification US Water Fusion Backwashing Filter Manual 1110 8 14
Colorado Water Purification US Water Fusion Backwashing Filter Manual 1110 8 14Colorado Water Purification US Water Fusion Backwashing Filter Manual 1110 8 14
Colorado Water Purification US Water Fusion Backwashing Filter Manual 1110 8 14Water Works
 
Keraflo KAX Type Float Valve Installation Guide
Keraflo KAX Type Float Valve Installation GuideKeraflo KAX Type Float Valve Installation Guide
Keraflo KAX Type Float Valve Installation GuideThorne & Derrick UK
 
MangOX Air Charger 2510 iron Filter Installation and Start-up Guide
MangOX Air Charger 2510 iron Filter Installation and Start-up GuideMangOX Air Charger 2510 iron Filter Installation and Start-up Guide
MangOX Air Charger 2510 iron Filter Installation and Start-up GuideClean Water Systems
 
MangOX Air Charger 2510 Iron Filter Installation and Start-up Guide
MangOX Air Charger 2510 Iron Filter Installation and Start-up GuideMangOX Air Charger 2510 Iron Filter Installation and Start-up Guide
MangOX Air Charger 2510 Iron Filter Installation and Start-up GuideClean Water Systems
 
A guide for firetube boiler testes
A guide for firetube boiler   testesA guide for firetube boiler   testes
A guide for firetube boiler testesederpitapeva
 

Similar to Bajina artificial equino (20)

Plumbing care and repair
Plumbing care and repairPlumbing care and repair
Plumbing care and repair
 
PMB - Latest Developments in Wine Filling Technologies
PMB - Latest Developments in Wine Filling TechnologiesPMB - Latest Developments in Wine Filling Technologies
PMB - Latest Developments in Wine Filling Technologies
 
Air Lift Article
Air Lift ArticleAir Lift Article
Air Lift Article
 
Multi desaturator cell
Multi desaturator cellMulti desaturator cell
Multi desaturator cell
 
Most common source of humidifier leaks
Most common source of humidifier leaksMost common source of humidifier leaks
Most common source of humidifier leaks
 
STORAGE: Key factors in bin usage
STORAGE: Key factors in bin usageSTORAGE: Key factors in bin usage
STORAGE: Key factors in bin usage
 
Colorado Water Purification US Water Fusion Backwashing Filter Manual 1110 8 14
Colorado Water Purification US Water Fusion Backwashing Filter Manual 1110 8 14Colorado Water Purification US Water Fusion Backwashing Filter Manual 1110 8 14
Colorado Water Purification US Water Fusion Backwashing Filter Manual 1110 8 14
 
Water Heater booklet
Water Heater bookletWater Heater booklet
Water Heater booklet
 
Pressurized mud-balance2
Pressurized mud-balance2Pressurized mud-balance2
Pressurized mud-balance2
 
Keraflo KAX Type Float Valve Installation Guide
Keraflo KAX Type Float Valve Installation GuideKeraflo KAX Type Float Valve Installation Guide
Keraflo KAX Type Float Valve Installation Guide
 
Wellheads and Flow Lines.pdf
Wellheads and Flow Lines.pdfWellheads and Flow Lines.pdf
Wellheads and Flow Lines.pdf
 
Epic V7 Manual
Epic V7 ManualEpic V7 Manual
Epic V7 Manual
 
EZYFIX Modern Lever Install Guide
EZYFIX Modern Lever Install GuideEZYFIX Modern Lever Install Guide
EZYFIX Modern Lever Install Guide
 
Incubation
IncubationIncubation
Incubation
 
MangOX Air Charger 2510 iron Filter Installation and Start-up Guide
MangOX Air Charger 2510 iron Filter Installation and Start-up GuideMangOX Air Charger 2510 iron Filter Installation and Start-up Guide
MangOX Air Charger 2510 iron Filter Installation and Start-up Guide
 
MangOX Air Charger 2510 Iron Filter Installation and Start-up Guide
MangOX Air Charger 2510 Iron Filter Installation and Start-up GuideMangOX Air Charger 2510 Iron Filter Installation and Start-up Guide
MangOX Air Charger 2510 Iron Filter Installation and Start-up Guide
 
A guide for firetube boiler testes
A guide for firetube boiler   testesA guide for firetube boiler   testes
A guide for firetube boiler testes
 
pond filters
pond filterspond filters
pond filters
 
089414 2
089414 2089414 2
089414 2
 
I hydro 7500-film test
I hydro 7500-film test I hydro 7500-film test
I hydro 7500-film test
 

Bajina artificial equino

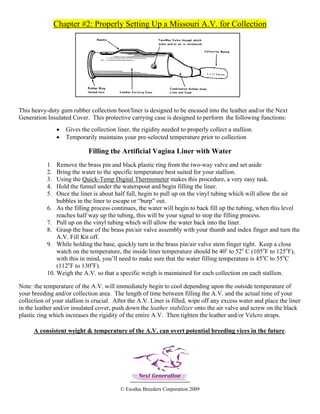
  • 1. Chapter #2: Properly Setting Up a Missouri A.V. for Collection This heavy-duty gum rubber collection boot/liner is designed to be encased into the leather and/or the Next Generation Insulated Cover. This protective carrying case is designed to perform the following functions: • • Gives the collection liner, the rigidity needed to properly collect a stallion. Temporarily maintains your pre-selected temperature prior to collection Filling the Artificial Vagina Liner with Water 1. 2. 3. 4. 5. Remove the brass pin and black plastic ring from the two-way valve and set aside Bring the water to the specific temperature best suited for your stallion. Using the Quick-Temp Digital Thermometer makes this procedure, a very easy task. Hold the funnel under the waterspout and begin filling the liner. Once the liner is about half full, begin to pull up on the vinyl tubing which will allow the air bubbles in the liner to escape or “burp” out. 6. As the filling process continues, the water will begin to back fill up the tubing, when this level reaches half way up the tubing, this will be your signal to stop the filling process. 7. Pull up on the vinyl tubing which will allow the water back into the liner. 8. Grasp the base of the brass pin/air valve assembly with your thumb and index finger and turn the A.V. Fill Kit off. 9. While holding the base, quickly turn in the brass pin/air valve stem finger tight. Keep a close watch on the temperature, the inside liner temperature should be 40c to 52o C (105oF to 125oF), with this in mind, you’ll need to make sure that the water filling temperature is 45oC to 55oC (112oF to 130oF). 10. Weigh the A.V. so that a specific weigh is maintained for each collection on each stallion. Note: the temperature of the A.V. will immediately begin to cool depending upon the outside temperature of your breeding and/or collection area. The length of time between filling the A.V. and the actual time of your collection of your stallion is crucial. After the A.V. Liner is filled, wipe off any excess water and place the liner in the leather and/or insulated cover, push down the leather stabilizer onto the air valve and screw on the black plastic ring which increases the rigidity of the entire A.V. Then tighten the leather and/or Velcro straps. A consistent weight & temperature of the A.V. can overt potential breeding vices in the future. © Exodus Breeders Corporation 2009
  • 2. Chapter #2: How to fill a Missouri Artificial Vagina (A.V.) Option #1 The Next Generation™ A.V. Fill Kit: a. Place the liner, valve side up in the bottom of the sink, using the Next Generation™ A.V. Fill Kit. b. Screw out the brass air valve and black plastic ring out of the filling assembly and lay aside. c. Using the A.V. Fill Kit; screw the brass fitting onto the external threads of the brass air valve assembly and turn the brass fitting no more than finger tight. i. You are now ready to fill the Artificial Vagina Liner. ii. You should already know the water temperature that works best for your stallion. iii. Begin at 115 F or 46 C and Do Not Exceed 131 F or 55 C d. Each stallion is different and will require some preparation prior to the breeding season, in order to define which temperature will be most productive for him. e. Once your water is to the desired temperature, begin to fill the A.V., as the A.V. begins to fill, pull up on the funnel so that the excess air begins to “burp” out of the bladder. This assures an even fill with limited air bubbles; air bubbles can induce hyper-extending, thinning and/or delaminating of the glued areas of the A.V., This is not covered by the 1 year warranty. f. Once the water lever is consistently half way up the clear vinyl tubing; g. Stop the filling process as the weight will be between 12 – 15 pounds h. Pull up on the bottom of the funnel thus drawing the water into the bladder. i. Grasp the base of the air valve and pulling up on the A.V.; the water should draw back into the bladder. j. Spin off the A.V. Fill device and set aside. k. Replace the brass pin finger tight, wipe off the excess water, and weigh the A.V. for a uniform pressure to your stallions liking. The A.V. bladder should not exceed 15 lbs w/o cover. l. Lay the fill valve into the hole in the leather A.V. Cover and/or the Insulated A.V. Cover. m. Taking the A.V. Leather Stabilizer disc, press down & onto the brass pin and screw the black ring finger tight thus locking the A.V. into the cover n. Roll over and either buckle and/or tighten the Velcro straps so that the unit becomes one. Option #2 Air-valve fill system: a. This will fill the liner much quicker, although, it exposes the gum rubber liner to severe hyperextension and thus exposes the liner to delaminating, dry rot and an overall dramatic loss of life; we do not recommend this and the manufacturer will not warrant any damage claims. b. Place the liner, valve side up in the bottom of the sink. c. Using the Air Stem Valve you’ll need to either dedicate a water faucet exclusively for this filling device or place a “Quick Release” hook up which will distort the water pressure. d. Using the air stem water valve actually works best on a several stallion breeding operation, although, it is more costly. Simply follow steps g – n as stated above in option #1 Option #3 Direct Fill system a. Follow steps a – d from Option #2 and instead of using an Air Stem Valve, a rubber hose is installed with no end that snuggly fits over the open fill valve, thus filling accordingly. b. Follow steps g – n as stated above in option #1 © Exodus Breeders Corporation 2009