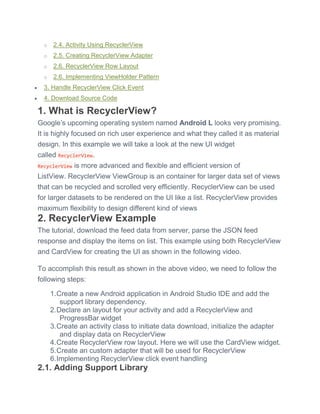
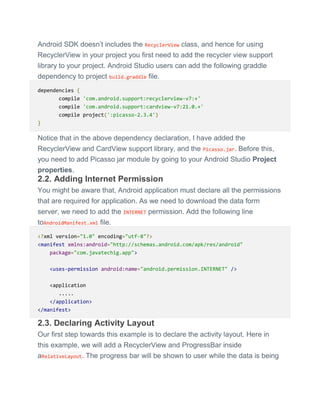
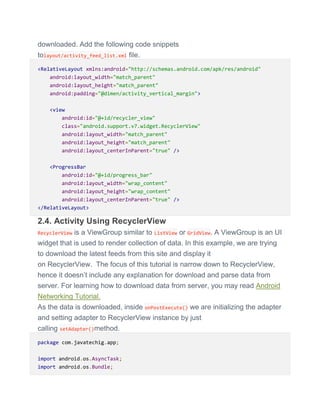
Download to read offline

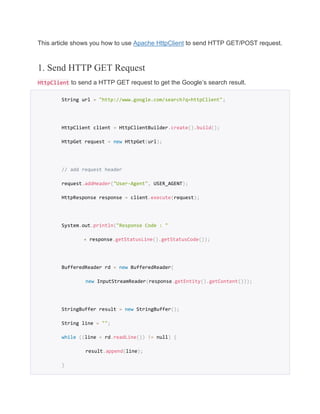
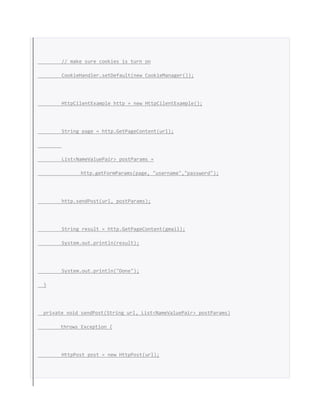
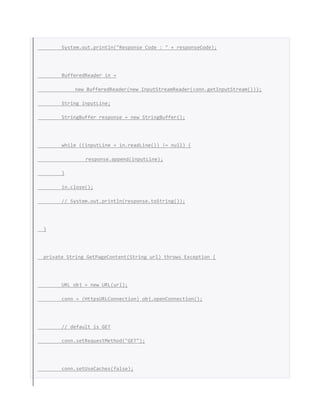
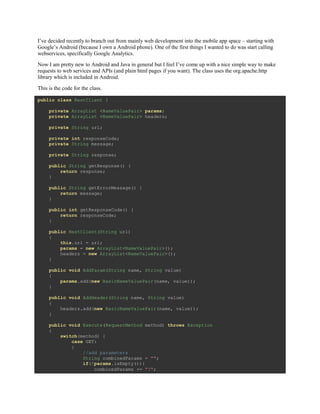
![private final String USER_AGENT = "Mozilla/5.0";
public static void main(String[] args) throws Exception {
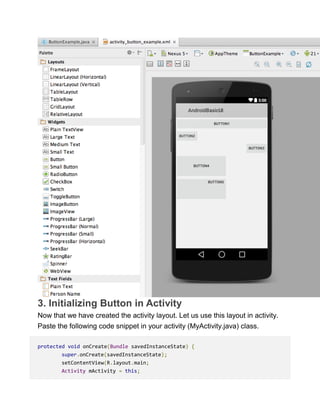
String url = "https://accounts.google.com/ServiceLoginAuth";
String gmail = "https://mail.google.com/mail/";
HttpUrlConnectionExample http = new HttpUrlConnectionExample();
// make sure cookies is turn on
CookieHandler.setDefault(new CookieManager());
// 1. Send a "GET" request, so that you can extract the form's data.
String page = http.GetPageContent(url);
String postParams = http.getFormParams(page, "username@gmail.com",
"password");
// 2. Construct above post's content and then send a POST request for
// authentication
http.sendPost(url, postParams);
// 3. success then go to gmail.
String result = http.GetPageContent(gmail);
System.out.println(result);](https://image.slidesharecdn.com/androiduilayoutscntlswebservicesexamplescodes-150925070453-lva1-app6892/85/Android-ui-layouts-cntls-webservices-examples-codes-4-320.jpg)
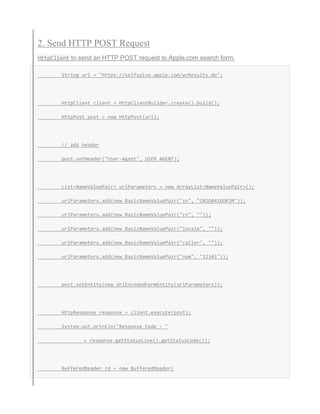
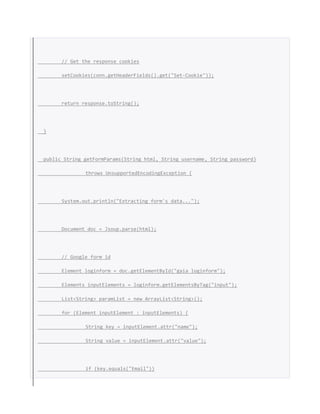
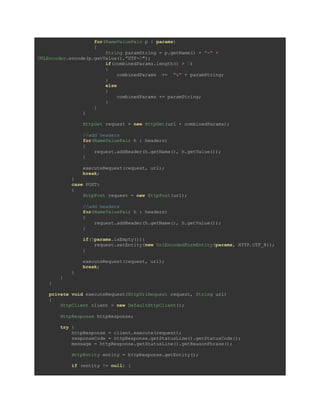
![}
private void sendPost(String url, String postParams) throws Exception {
URL obj = new URL(url);
conn = (HttpsURLConnection) obj.openConnection();
// Acts like a browser
conn.setUseCaches(false);
conn.setRequestMethod("POST");
conn.setRequestProperty("Host", "accounts.google.com");
conn.setRequestProperty("User-Agent", USER_AGENT);
conn.setRequestProperty("Accept",
"text/html,application/xhtml+xml,application/xml;q=0.9,*/*;q=0.8");
conn.setRequestProperty("Accept-Language", "en-US,en;q=0.5");
for (String cookie : this.cookies) {
conn.addRequestProperty("Cookie", cookie.split(";", 1)[0]);
}
conn.setRequestProperty("Connection", "keep-alive");
conn.setRequestProperty("Referer",
"https://accounts.google.com/ServiceLoginAuth");
conn.setRequestProperty("Content-Type", "application/x-www-form-
urlencoded");
conn.setRequestProperty("Content-Length",
Integer.toString(postParams.length()));](https://image.slidesharecdn.com/androiduilayoutscntlswebservicesexamplescodes-150925070453-lva1-app6892/85/Android-ui-layouts-cntls-webservices-examples-codes-5-320.jpg)
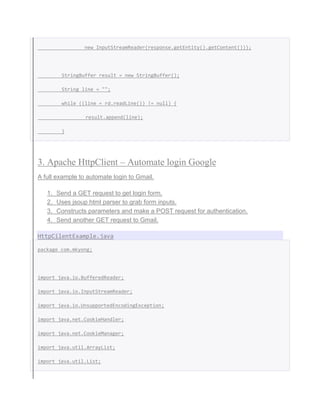
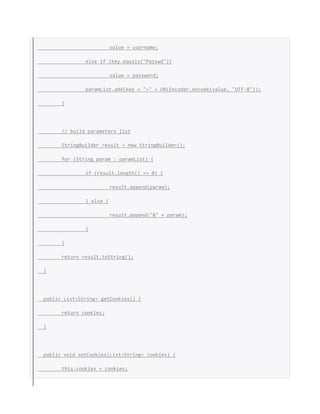
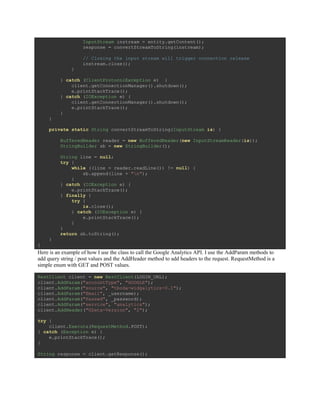
![}
private String GetPageContent(String url) throws Exception {
URL obj = new URL(url);
conn = (HttpsURLConnection) obj.openConnection();
// default is GET
conn.setRequestMethod("GET");
conn.setUseCaches(false);
// act like a browser
conn.setRequestProperty("User-Agent", USER_AGENT);
conn.setRequestProperty("Accept",
"text/html,application/xhtml+xml,application/xml;q=0.9,*/*;q=0.8");
conn.setRequestProperty("Accept-Language", "en-US,en;q=0.5");
if (cookies != null) {
for (String cookie : this.cookies) {
conn.addRequestProperty("Cookie", cookie.split(";", 1)[0]);
}
}
int responseCode = conn.getResponseCode();](https://image.slidesharecdn.com/androiduilayoutscntlswebservicesexamplescodes-150925070453-lva1-app6892/85/Android-ui-layouts-cntls-webservices-examples-codes-7-320.jpg)


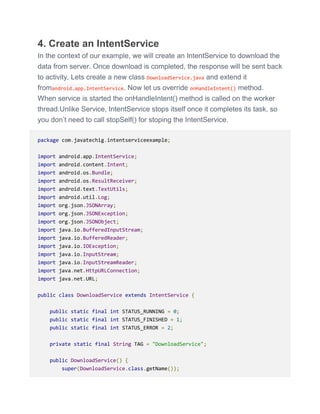
![}
@Override
protected void onHandleIntent(Intent intent) {
Log.d(TAG, "Service Started!");
final ResultReceiver receiver = intent.getParcelableExtra("receiver");
String url = intent.getStringExtra("url");
Bundle bundle = new Bundle();
if (!TextUtils.isEmpty(url)) {
/* Update UI: Download Service is Running */
receiver.send(STATUS_RUNNING, Bundle.EMPTY);
try {
String[] results = downloadData(url);
/* Sending result back to activity */
if (null != results && results.length > 0) {
bundle.putStringArray("result", results);
receiver.send(STATUS_FINISHED, bundle);
}
} catch (Exception e) {
/* Sending error message back to activity */
bundle.putString(Intent.EXTRA_TEXT, e.toString());
receiver.send(STATUS_ERROR, bundle);
}
}
Log.d(TAG, "Service Stopping!");
this.stopSelf();
}
private String[] downloadData(String requestUrl) throws IOException, Download
Exception {
InputStream inputStream = null;
HttpURLConnection urlConnection = null;](https://image.slidesharecdn.com/androiduilayoutscntlswebservicesexamplescodes-150925070453-lva1-app6892/85/Android-ui-layouts-cntls-webservices-examples-codes-37-320.jpg)
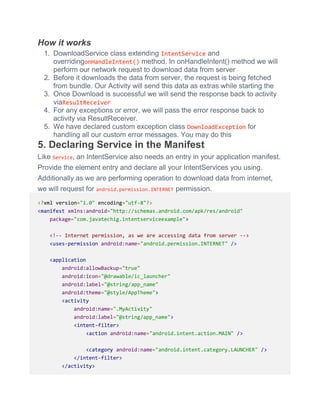
![/* forming th java.net.URL object */
URL url = new URL(requestUrl);
urlConnection = (HttpURLConnection) url.openConnection();
/* optional request header */
urlConnection.setRequestProperty("Content-Type", "application/json");
/* optional request header */
urlConnection.setRequestProperty("Accept", "application/json");
/* for Get request */
urlConnection.setRequestMethod("GET");
int statusCode = urlConnection.getResponseCode();
/* 200 represents HTTP OK */
if (statusCode == 200) {
inputStream = new BufferedInputStream(urlConnection.getInputStream())
;
String response = convertInputStreamToString(inputStream);
String[] results = parseResult(response);
return results;
} else {
throw new DownloadException("Failed to fetch data!!");
}
}
private String convertInputStreamToString(InputStream inputStream) throws IOE
xception {
BufferedReader bufferedReader = new BufferedReader(new InputStreamReader(
inputStream));
String line = "";
String result = "";
while ((line = bufferedReader.readLine()) != null) {
result += line;
}
/* Close Stream */
if (null != inputStream) {](https://image.slidesharecdn.com/androiduilayoutscntlswebservicesexamplescodes-150925070453-lva1-app6892/85/Android-ui-layouts-cntls-webservices-examples-codes-38-320.jpg)
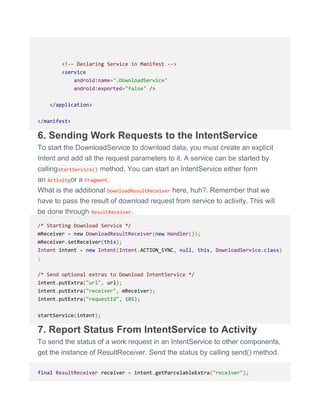
![inputStream.close();
}
return result;
}
private String[] parseResult(String result) {
String[] blogTitles = null;
try {
JSONObject response = new JSONObject(result);
JSONArray posts = response.optJSONArray("posts");
blogTitles = new String[posts.length()];
for (int i = 0; i < posts.length(); i++) {
JSONObject post = posts.optJSONObject(i);
String title = post.optString("title");
blogTitles[i] = title;
}
} catch (JSONException e) {
e.printStackTrace();
}
return blogTitles;
}
public class DownloadException extends Exception {
public DownloadException(String message) {
super(message);
}
public DownloadException(String message, Throwable cause) {
super(message, cause);
}
}
}](https://image.slidesharecdn.com/androiduilayoutscntlswebservicesexamplescodes-150925070453-lva1-app6892/85/Android-ui-layouts-cntls-webservices-examples-codes-39-320.jpg)
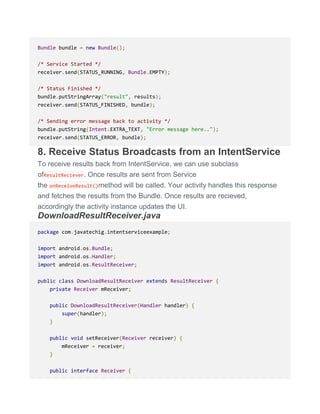
![public void onReceiveResult(int resultCode, Bundle resultData);
}
@Override
protected void onReceiveResult(int resultCode, Bundle resultData) {
if (mReceiver != null) {
mReceiver.onReceiveResult(resultCode, resultData);
}
}
}
MainActivity.java
@Override
public void onReceiveResult(int resultCode, Bundle resultData) {
switch (resultCode) {
case DownloadService.STATUS_RUNNING:
setProgressBarIndeterminateVisibility(true);
break;
case DownloadService.STATUS_FINISHED:
/* Hide progress & extract result from bundle */
setProgressBarIndeterminateVisibility(false);
String[] results = resultData.getStringArray("result");
/* Update ListView with result */
arrayAdapter = new ArrayAdapter(MyActivity.this, android.R.layout
.simple_list_item_2, results);
listView.setAdapter(arrayAdapter);
break;
case DownloadService.STATUS_ERROR:
/* Handle the error */
String error = resultData.getString(Intent.EXTRA_TEXT);
Toast.makeText(this, error, Toast.LENGTH_LONG).show();
break;
}
}
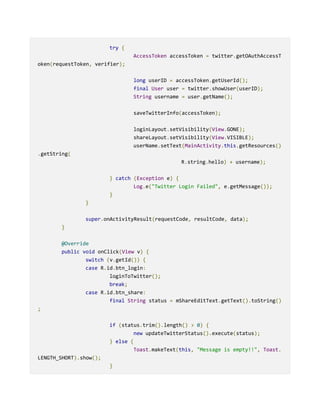
9. Output](https://image.slidesharecdn.com/androiduilayoutscntlswebservicesexamplescodes-150925070453-lva1-app6892/85/Android-ui-layouts-cntls-webservices-examples-codes-43-320.jpg)


![3.The doInBackground() method contains the code which needs to be
executed in background, here in doInBackground we can send results
to multiple times to event thread by publishProgress() method, to notify
background processing has been completed we can return results
simply.
4.The onProgressUpdate() method receives progress updates from
doInBackground method, which is published via publishProgress
method, and this method can use this progress update to update event
thread
5.The onPostExecute() method handles results returned by doInBackground
method.
6.If an async task not using any types, then it can be marked as Void type.
7.An running async task can be cancelled by calling cancel() method.
The generic types used by AsyncTask are
Params, the type of the parameters sent to the task upon execution
Progress, the type of the progress units published during the
background computation.
Result, the type of the result of the background computation.
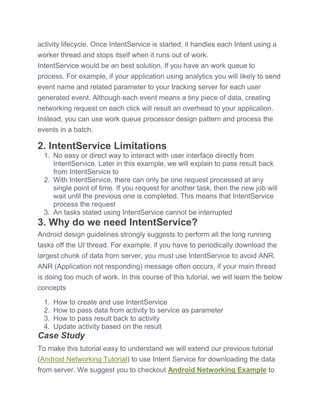
3. Downloading image using AsyncTask
We had learnt the basics of AsyncTask. Let us take a glance at how to use it
practically for downloading image asynchronously from web. To achieve this,
let us create a new class and name it as ImageDownloaderTask.
The following code snippet expects the url of image as an parameter
and initiate download image download request. Once download is over, it
displays the bitmap on the image view.
class ImageDownloaderTask extends AsyncTask<String, Void, Bitmap> {
private final WeakReference<ImageView> imageViewReference;
public ImageDownloaderTask(ImageView imageView) {
imageViewReference = new WeakReference<ImageView>(imageView);
}
@Override
protected Bitmap doInBackground(String... params) {
return downloadBitmap(params[0]);](https://image.slidesharecdn.com/androiduilayoutscntlswebservicesexamplescodes-150925070453-lva1-app6892/85/Android-ui-layouts-cntls-webservices-examples-codes-51-320.jpg)
![String[] images = getResources().getStringArray(R.array.images_array);
String[] headlines = getResources().getStringArray(R.array.headline_array
);
for (int i = 0; i < images.length; i++) {
ListItem newsData = new ListItem();
newsData.setUrl(images[i]);
newsData.setHeadline(headlines[i]);
newsData.setReporterName("Pankaj Gupta");
newsData.setDate("May 26, 2013, 13:35");
listMockData.add(newsData);
}
return listMockData;
}
}
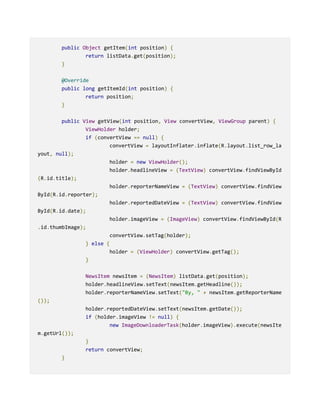
Notice that, getListData() method in the activity is used to create some dummy
list data for the list view. To make this example simple, we are using the string
arrays defined in the strings.xml resource file. But in realtime you might
download the data from server or get it from any other sources.
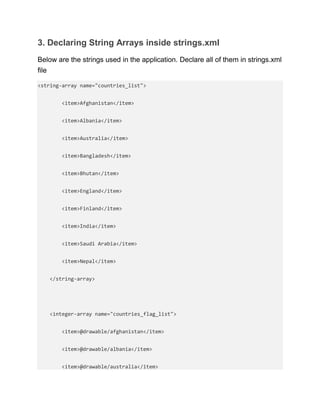
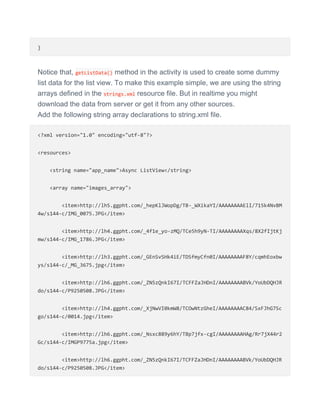
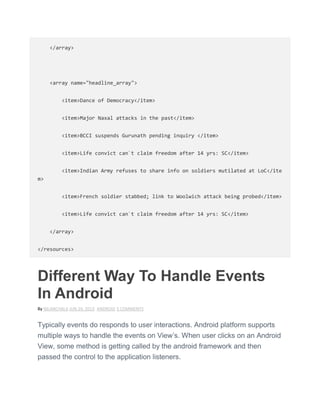
Add the following string array declarations to string.xml file.
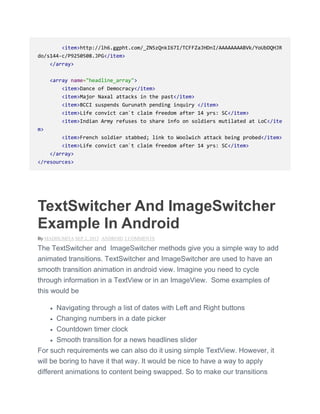
<?xml version="1.0" encoding="utf-8"?>
<resources>
<string name="app_name">Async ListView</string>
<array name="images_array">
<item>http://lh5.ggpht.com/_hepKlJWopDg/TB-_WXikaYI/AAAAAAAAElI/715k4NvBM
4w/s144-c/IMG_0075.JPG</item>
<item>http://lh4.ggpht.com/_4f1e_yo-zMQ/TCe5h9yN-TI/AAAAAAAAXqs/8X2fIjtKj
mw/s144-c/IMG_1786.JPG</item>
<item>http://lh3.ggpht.com/_GEnSvSHk4iE/TDSfmyCfn0I/AAAAAAAAF8Y/cqmhEoxbw
ys/s144-c/_MG_3675.jpg</item>
<item>http://lh6.ggpht.com/_ZN5zQnkI67I/TCFFZaJHDnI/AAAAAAAABVk/YoUbDQHJR
do/s144-c/P9250508.JPG</item>
<item>http://lh4.ggpht.com/_XjNwVI0kmW8/TCOwNtzGheI/AAAAAAAAC84/SxFJhG7Sc
go/s144-c/0014.jpg</item>
<item>http://lh6.ggpht.com/_Nsxc889y6hY/TBp7jfx-cgI/AAAAAAAAHAg/Rr7jX44r2
Gc/s144-c/IMGP9775a.jpg</item>](https://image.slidesharecdn.com/androiduilayoutscntlswebservicesexamplescodes-150925070453-lva1-app6892/85/Android-ui-layouts-cntls-webservices-examples-codes-58-320.jpg)

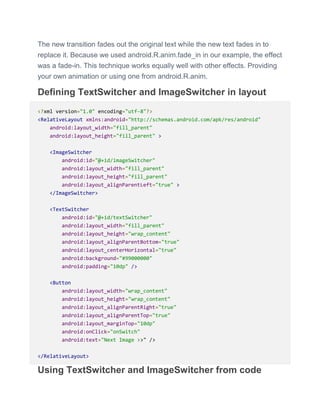
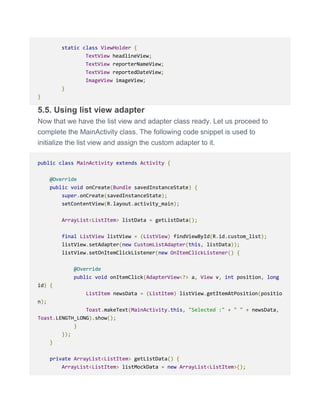
![package com.javatechig.ui;
import android.app.Activity;
import android.os.Bundle;
import android.view.Gravity;
import android.view.View;
import android.widget.ImageSwitcher;
import android.widget.ImageView;
import android.widget.TextSwitcher;
import android.widget.TextView;
import android.widget.ViewSwitcher.ViewFactory;
public class MainActivity extends Activity {
private static final String[] TEXTS = { "Image #1", "Image #2", "Image #3
" };
private static final int[] IMAGES = { R.drawable.mf1, R.drawable.mf2,
R.drawable.mf3 };
private int mPosition = 0;
private TextSwitcher mTextSwitcher;
private ImageSwitcher mImageSwitcher;
@Override
public void onCreate(Bundle savedInstanceState) {
super.onCreate(savedInstanceState);
setContentView(R.layout.main);
mTextSwitcher = (TextSwitcher) findViewById(R.id.textSwitcher);
mTextSwitcher.setFactory(new ViewFactory() {
@Override
public View makeView() {
TextView textView = new TextView(MainActivity.thi
s);
textView.setGravity(Gravity.CENTER);
return textView;
}
});
mTextSwitcher.setInAnimation(this, android.R.anim.fade_in);
mTextSwitcher.setOutAnimation(this, android.R.anim.fade_out);](https://image.slidesharecdn.com/androiduilayoutscntlswebservicesexamplescodes-150925070453-lva1-app6892/85/Android-ui-layouts-cntls-webservices-examples-codes-62-320.jpg)
![mImageSwitcher = (ImageSwitcher) findViewById(R.id.imageSwitcher)
;
mImageSwitcher.setFactory(new ViewFactory() {
@Override
public View makeView() {
ImageView imageView = new ImageView(MainActivity.
this);
return imageView;
}
});
mImageSwitcher.setInAnimation(this, android.R.anim.slide_in_left)
;
mImageSwitcher.setOutAnimation(this, android.R.anim.slide_out_rig
ht);
onSwitch(null);
}
public void onSwitch(View view) {
mTextSwitcher.setText(TEXTS[mPosition]);
mImageSwitcher.setBackgroundResource(IMAGES[mPosition]);
mPosition = (mPosition + 1) % TEXTS.length;
}
}
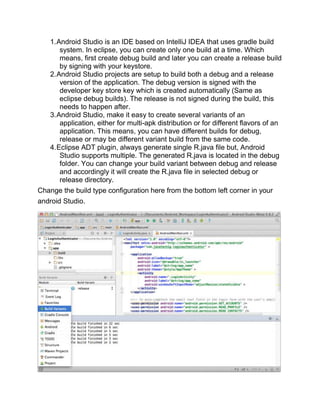
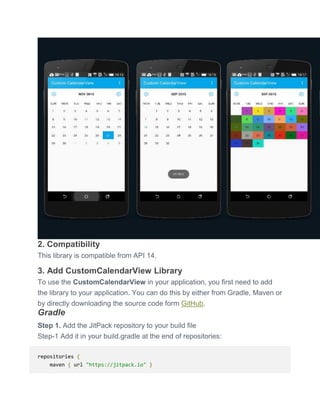
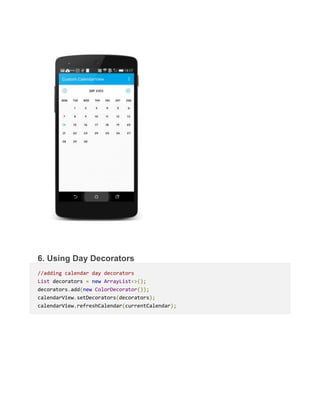
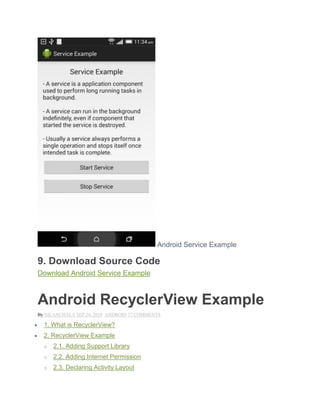
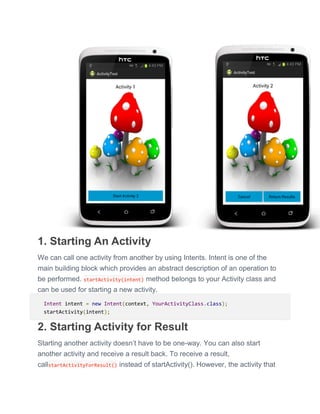
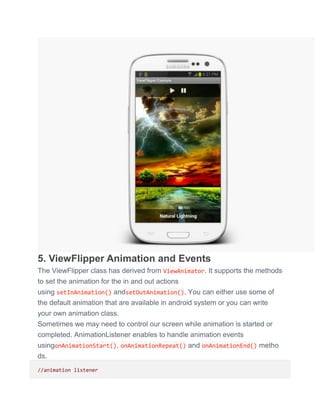
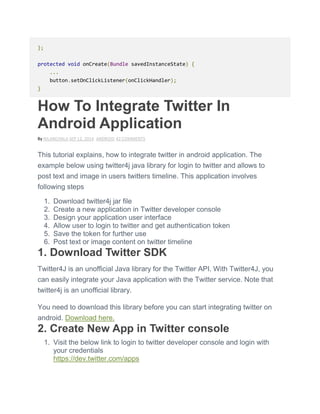
Custom Calendar View Library In
Android
By NILANCHALA SEP 15, 2015 ANDROID
The CustomCalendarView provides an easy and customizable option to
create a Calendar. It displays the days of a month in a grid layout and allows
navigating between months.
1. Features
2. Compatibility](https://image.slidesharecdn.com/androiduilayoutscntlswebservicesexamplescodes-150925070453-lva1-app6892/85/Android-ui-layouts-cntls-webservices-examples-codes-63-320.jpg)


![4. Application Manifest Permissions
As our application is connecting to remote server, we have to provide internet
permission. Just add the below line of code in your application manifest. This
should be a direct child of <manifest> element.
<uses-permission android:name="android.permission.INTERNET"/>
5. Downloading Data Using HttpGet
Downloading data is an long running task and it is recommended that all the
long running task should be performed off the UI thread. And in this example
we will create a simple downloader asynchronous task that performs the feed
download action.
What is AsyncTask?
Async task enables you to implement multi threading without get hands dirty
into threads. AsyncTask enables proper and easy use methods that allows
performing background operations and passing the results back to the UI
thread. Learn more about android AsyncTask from below links
* Handler and AsyncTask in Android
AsyncHttpTask.java
public class AsyncHttpTask extends AsyncTask<String, Void, Integer> {
@Override
protected Integer doInBackground(String... params) {
InputStream inputStream = null;
Integer result = 0;
try {
/* create Apache HttpClient */
HttpClient httpclient = new DefaultHttpClient();
/* HttpGet Method */
HttpGet httpGet = new HttpGet(params[0]);
/* optional request header */
httpGet.setHeader("Content-Type", "application/json");](https://image.slidesharecdn.com/androiduilayoutscntlswebservicesexamplescodes-150925070453-lva1-app6892/85/Android-ui-layouts-cntls-webservices-examples-codes-74-320.jpg)

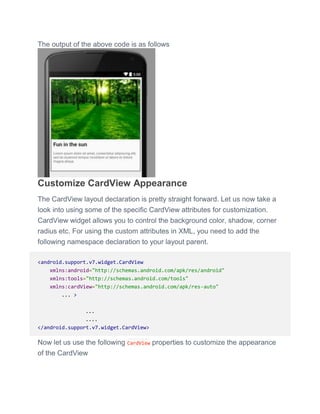
![Note: The focus of this tutorial is more on explaining network connections in
android and not focused towards explaining the json parser. If you are looking
for some help on JSON parsing, you may read the below post
* JSON Feed Reader in Android
private void parseResult(String result) {
try{
JSONObject response = new JSONObject(result);
JSONArray posts = response.optJSONArray("posts");
blogTitles = new String[posts.length()];
for(int i=0; i< posts.length();i++ ){
JSONObject post = posts.optJSONObject(i);
String title = post.optString("title");
blogTitles[i] = title;
}
}catch (JSONException e){
e.printStackTrace();
}
}
8. Using AsyncHttpTask From Activity
As discussed earlier, our ui contains a simple ListView and uses
basicArrayAdapter. You may customise your ListView of the kind you want.
Need guide on building custom list? Checkout our below tutorial.
* Android ListView Tutorial
* ListView with Section Header in Android
Activity layout (activity_my.xml)
<RelativeLayout xmlns:android="http://schemas.android.com/apk/res/android"
xmlns:tools="http://schemas.android.com/tools"
android:layout_width="match_parent"
android:layout_height="match_parent"
android:paddingLeft="@dimen/activity_horizontal_margin"
android:paddingRight="@dimen/activity_horizontal_margin"
android:paddingTop="@dimen/activity_vertical_margin"
android:paddingBottom="@dimen/activity_vertical_margin"
tools:context=".MyActivity">](https://image.slidesharecdn.com/androiduilayoutscntlswebservicesexamplescodes-150925070453-lva1-app6892/85/Android-ui-layouts-cntls-webservices-examples-codes-77-320.jpg)
![<ListView
android:layout_width="wrap_content"
android:layout_height="wrap_content"
android:id="@+id/listView"
android:layout_alignParentLeft="true"
android:layout_alignParentStart="true"
android:choiceMode="singleChoice" />
</RelativeLayout>
Activity Java class
Let us have a look into Activity onCreate() method
@Override
protected void onCreate(Bundle savedInstanceState) {
super.onCreate(savedInstanceState);
setContentView(R.layout.activity_my);
listView = (ListView) findViewById(R.id.listView);
final String url = "http://javatechig.com/api/get_category_posts/?dev=1&s
lug=android";
new AsyncHttpTask().execute(url);
}
9. Android Networking Using HttpURLConnection
In the above example, we have used Apache HttpClient to connect to server
and download data. Now let us use HttpURLConnection in the same example. The
only place we need to change is inside doInBackgrond() method of
AsyncHttpTask class.
@Override
protected Integer doInBackground(String... params) {
InputStream inputStream = null;
HttpURLConnection urlConnection = null;
Integer result = 0;
try {
/* forming th java.net.URL object */
URL url = new URL(params[0]);
urlConnection = (HttpURLConnection) url.openConnection();](https://image.slidesharecdn.com/androiduilayoutscntlswebservicesexamplescodes-150925070453-lva1-app6892/85/Android-ui-layouts-cntls-webservices-examples-codes-78-320.jpg)

![}
public class AsyncHttpTask extends AsyncTask<String, Void, Integer> {
@Override
protected void onPreExecute() {
setProgressBarIndeterminateVisibility(true);
}
@Override
protected Integer doInBackground(String... params) {
Integer result = 0;
HttpURLConnection urlConnection;
try {
URL url = new URL(params[0]);
urlConnection = (HttpURLConnection) url.openConnection();
int statusCode = urlConnection.getResponseCode();
// 200 represents HTTP OK
if (statusCode == 200) {
BufferedReader r = new BufferedReader(new InputStreamReader(u
rlConnection.getInputStream()));
StringBuilder response = new StringBuilder();
String line;
while ((line = r.readLine()) != null) {
response.append(line);
}
parseResult(response.toString());
result = 1; // Successful
} else {
result = 0; //"Failed to fetch data!";
}
} catch (Exception e) {
Log.d(TAG, e.getLocalizedMessage());
}
return result; //"Failed to fetch data!";
}
@Override
protected void onPostExecute(Integer result) {](https://image.slidesharecdn.com/androiduilayoutscntlswebservicesexamplescodes-150925070453-lva1-app6892/85/Android-ui-layouts-cntls-webservices-examples-codes-97-320.jpg)


![public void onItemClick(AdapterView<?> parent, View v, int position, long id)
{
GridItem item = (GridItem) parent.getItemAtPosition(position);
ImageView imageView = (ImageView) v.findViewById(R.id.grid_item_image);
Intent intent = new Intent(GridViewActivity.this, DetailsActivity.class);
int[] screenLocation = new int[2];
imageView.getLocationOnScreen(screenLocation);
//Pass the image title and url to DetailsActivity
intent.putExtra("left", screenLocation[0]).
putExtra("top", screenLocation[1]).
putExtra("width", imageView.getWidth()).
putExtra("height", imageView.getHeight()).
putExtra("title", item.getTitle()).
putExtra("image", item.getImage());
startActivity(intent);
}
});
2. Read bundle data passed form intent
This is straight forward. Just read all the bundle data passed form GridView
activity.
//retrieves the thumbnail data
Bundle bundle = getIntent().getExtras();
thumbnailTop = bundle.getInt("top");
thumbnailLeft = bundle.getInt("left");
thumbnailWidth = bundle.getInt("width");
thumbnailHeight = bundle.getInt("height");
String title = bundle.getString("title");
String image = bundle.getString("image");
3. Make DetailsActivity window transparent](https://image.slidesharecdn.com/androiduilayoutscntlswebservicesexamplescodes-150925070453-lva1-app6892/85/Android-ui-layouts-cntls-webservices-examples-codes-138-320.jpg)
![int[] screenLocation = new int[2];
imageView.getLocationOnScreen(screenLocation);
mLeftDelta = thumbnailLeft - screenLocation[0];
mTopDelta = thumbnailTop - screenLocation[1];
// Scale factors to make the large version the same size as the thumb
nail
mWidthScale = (float) thumbnailWidth / imageView.getWidth();
mHeightScale = (float) thumbnailHeight / imageView.getHeight();
enterAnimation();
return true;
}
});
}
6. Create custom enter and exit animation
The enter animation scales the picture in from its previous
thumbnail size/location. In parallel, the background of the activity is fading in.
public void enterAnimation() {
imageView.setPivotX(0);
imageView.setPivotY(0);
imageView.setScaleX(mWidthScale);
imageView.setScaleY(mHeightScale);
imageView.setTranslationX(mLeftDelta);
imageView.setTranslationY(mTopDelta);
// interpolator where the rate of change starts out quickly and then decelera
tes.
TimeInterpolator sDecelerator = new DecelerateInterpolator();
// Animate scale and translation to go from thumbnail to full size
imageView.animate().setDuration(ANIM_DURATION).scaleX(1).scaleY(1).
translationX(0).translationY(0).setInterpolator(sDecelerator);
// Fade in the black background
ObjectAnimator bgAnim = ObjectAnimator.ofInt(colorDrawable, "alpha", 0, 255);](https://image.slidesharecdn.com/androiduilayoutscntlswebservicesexamplescodes-150925070453-lva1-app6892/85/Android-ui-layouts-cntls-webservices-examples-codes-140-320.jpg)
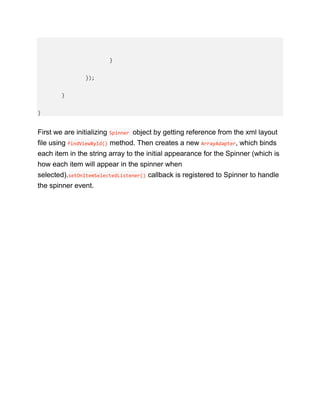
![import android.widget.ImageView;
import android.widget.Spinner;
public class MainActivity extends Activity {
private ImageView image;
private String[] states;
private Spinner spinner;
private TypedArray imgs;
@Override
protected void onCreate(Bundle savedInstanceState) {
super.onCreate(savedInstanceState);
setContentView(R.layout.activity_main);
states = getResources().getStringArray(R.array.countries_list);
imgs = getResources().obtainTypedArray(R.array.countries_flag_lis
t);
image = (ImageView) findViewById(R.id.country_image);](https://image.slidesharecdn.com/androiduilayoutscntlswebservicesexamplescodes-150925070453-lva1-app6892/85/Android-ui-layouts-cntls-webservices-examples-codes-146-320.jpg)


![}
@Override
protected Void doInBackground(String... params) {
String url = params[0];
// getting JSON string from URL
JSONObject json = getJSONFromUrl(url);
//parsing json data
parseJson(json);
return null;
}
}
Downloading JSON from server
As downloading of feed data from JavatechIG is a long running task, we are
doing it inside doInBackground method. Once we have the data downloaded
and parsed, then we can update the ListView with appropriate updated data.
public JSONObject getJSONFromUrl(String url) {
InputStream is = null;
JSONObject jObj = null;
String json = null;
// Making HTTP request
try {
// defaultHttpClient
DefaultHttpClient httpClient = new DefaultHttpClient();
HttpPost httpPost = new HttpPost(url);
HttpResponse httpResponse = httpClient.execute(httpPost);
HttpEntity httpEntity = httpResponse.getEntity();
is = httpEntity.getContent();
BufferedReader reader = new BufferedReader(new InputStrea
mReader(
is, "iso-8859-1"), 8);
StringBuilder sb = new StringBuilder();](https://image.slidesharecdn.com/androiduilayoutscntlswebservicesexamplescodes-150925070453-lva1-app6892/85/Android-ui-layouts-cntls-webservices-examples-codes-172-320.jpg)
!["type": "post",
"slug": "asynchronous-image-loader-in-android-listview",
"url": "http://javatechig.com/android/asynchronous-image-loader-in-andro
id-listview/",
"status": "publish",
"title": "Asynchronous Image Loader in Android ListView",
"date": "2013-06-01 19:31:07",
"attachments": [
{
"id": 2402,
"url": "http://javatechig.com/wp-content/uploads/2013/06/Async_Lis
tView.png",
"slug": "async_listview",
"title": "Async_ListView",
"description": "",
"caption": "",
"parent": 2398,
"mime_type": "image/png",
"images": []
}
],
"comment_count": 3
}
]
}
From this above structure we will be needing the title, date, url and attachment
url. check out the code snippet below for json parsing.
public void parseJson(JSONObject json) {
try {
// parsing json object
if (json.getString("status").equalsIgnoreCase("ok")) {
JSONArray posts = json.getJSONArray("posts");
feedList = new ArrayList();
for (int i = 0; i < posts.length(); i++) {
JSONObject post = (JSONObject) posts.getJSONObject(i);](https://image.slidesharecdn.com/androiduilayoutscntlswebservicesexamplescodes-150925070453-lva1-app6892/85/Android-ui-layouts-cntls-webservices-examples-codes-174-320.jpg)

![}
@Override
protected Bitmap doInBackground(String... params) {
return downloadBitmap(params[0]);
}
@Override
protected void onPostExecute(Bitmap bitmap) {
if (isCancelled()) {
bitmap = null;
}
if (imageViewReference != null) {
ImageView imageView = imageViewReference.get();
if (imageView != null) {
if (bitmap != null) {
imageView.setImageBitmap(bitmap);
} else {](https://image.slidesharecdn.com/androiduilayoutscntlswebservicesexamplescodes-150925070453-lva1-app6892/85/Android-ui-layouts-cntls-webservices-examples-codes-180-320.jpg)
![});
}
private ArrayList<ListItem> getListData() {
ArrayList<ListItem> listMockData = new ArrayList<ListItem>();
String[] images = getResources().getStringArray(R.array.images_array);
String[] headlines = getResources().getStringArray(R.array.headline_array
);
for (int i = 0; i < images.length; i++) {
ListItem newsData = new ListItem();
newsData.setUrl(images[i]);
newsData.setHeadline(headlines[i]);
newsData.setReporterName("Pankaj Gupta");
newsData.setDate("May 26, 2013, 13:35");
listMockData.add(newsData);
}
return listMockData;
}](https://image.slidesharecdn.com/androiduilayoutscntlswebservicesexamplescodes-150925070453-lva1-app6892/85/Android-ui-layouts-cntls-webservices-examples-codes-191-320.jpg)

![break;
}
}
class updateTwitterStatus extends AsyncTask<String, String, Void> {
@Override
protected void onPreExecute() {
super.onPreExecute();
pDialog = new ProgressDialog(MainActivity.this);
pDialog.setMessage("Posting to twitter...");
pDialog.setIndeterminate(false);
pDialog.setCancelable(false);
pDialog.show();
}
protected Void doInBackground(String... args) {
String status = args[0];
try {
ConfigurationBuilder builder = new ConfigurationB
uilder();
builder.setOAuthConsumerKey(consumerKey);
builder.setOAuthConsumerSecret(consumerSecret);
// Access Token
String access_token = mSharedPreferences.getStrin
g(PREF_KEY_OAUTH_TOKEN, "");
// Access Token Secret
String access_token_secret = mSharedPreferences.g
etString(PREF_KEY_OAUTH_SECRET, "");
AccessToken accessToken = new AccessToken(access_
token, access_token_secret);
Twitter twitter = new TwitterFactory(builder.buil
d()).getInstance(accessToken);
// Update status
StatusUpdate statusUpdate = new StatusUpdate(stat
us);](https://image.slidesharecdn.com/androiduilayoutscntlswebservicesexamplescodes-150925070453-lva1-app6892/85/Android-ui-layouts-cntls-webservices-examples-codes-210-320.jpg)


![# locations of various tools
CURL=/usr/bin/curl
ZIP=/usr/bin/zip
KEYTOOL=/usr/bin/keytool
ZIPALIGN=/Applications/adt-bundle-mac-x86_64-20130917/sdk/build-tools/19.1.0/zipa
lign
JARSIGNER=/usr/bin/jarsigner
SERVER_ENDPOINT=http://app.testfairy.com
usage() {
echo "Usage: testfairy-upload.sh bin/TennisTV.apk"
echo
}
verify_tools() {
# Windows users: this script requires zip, curl and sed. If not installed
please get from http://cygwin.com/
# Check 'zip' tool
${ZIP} -h >/dev/null
if [ $? -ne 0 ]; then
echo "Could not run zip tool, please check settings"
exit 1
fi
# Check 'curl' tool
${CURL} --help >/dev/null
if [ $? -ne 0 ]; then
echo "Could not run curl tool, please check settings"
exit 1
fi
OUTPUT=$( ${JARSIGNER} -help 2>&1 | grep "verify" )
if [ $? -ne 0 ]; then
echo "Could not run jarsigner tool, please check settings"
exit 1
fi](https://image.slidesharecdn.com/androiduilayoutscntlswebservicesexamplescodes-150925070453-lva1-app6892/85/Android-ui-layouts-cntls-webservices-examples-codes-217-320.jpg)
![# Check 'zipalign' tool
OUTPUT=$( ${ZIPALIGN} 2>&1 | grep -i "Zip alignment" )
if [ $? -ne 0 ]; then
echo "Could not run zipalign tool, please check settings"
exit 1
fi
OUTPUT=$( ${KEYTOOL} -help 2>&1 | grep "keypasswd" )
if [ $? -ne 0 ]; then
echo "Could not run keytool tool, please check settings"
exit 1
fi
}
verify_settings() {
if [ -z "${TESTFAIRY_API_KEY}" ]; then
usage
echo "Please update API_KEY with your private API key, as noted i
n the Settings page"
exit 1
fi
if [ -z "${KEYSTORE}" -o -z "${STOREPASS}" -o -z "{$ALIAS}" ]; then
usage
echo "Please update KEYSTORE, STOREPASS and ALIAS with your jar s
igning credentials"
exit 1
fi
# verify KEYSTORE, STOREPASS and ALIAS at once
OUTPUT=$( ${KEYTOOL} -list -keystore "${KEYSTORE}" -storepass "${STOREPAS
S}" -alias "${ALIAS}" 2>&1 )
if [ $? -ne 0 ]; then
usage
echo "Please check keystore credentials; keytool failed to verify
storepass and alias"
exit 1
fi
}](https://image.slidesharecdn.com/androiduilayoutscntlswebservicesexamplescodes-150925070453-lva1-app6892/85/Android-ui-layouts-cntls-webservices-examples-codes-218-320.jpg)
![if [ $# -ne 2 ]; then
usage
exit 1
fi
# before even going on, make sure all tools work
verify_tools
verify_settings
APK_FILENAME=$1
if [ ! -f "${APK_FILENAME}" ]; then
usage
echo "Can't find file: ${APK_FILENAME}"
exit 2
fi
COMMENT=$2
# temporary file paths
DATE=`date`
TMP_FILENAME=.testfairy.upload.apk
ZIPALIGNED_FILENAME=.testfairy.zipalign.apk
rm -f "${TMP_FILENAME}" "${ZIPALIGNED_FILENAME}"
/bin/echo -n "Uploading ${APK_FILENAME} to TestFairy.. "
JSON=$( ${CURL} -s ${SERVER_ENDPOINT}/api/upload -F api_key=${TESTFAIRY_API_KEY}
-F apk_file="@${APK_FILENAME}" -F icon-watermark="${ICON_WATERMARK}" -F video="${
VIDEO}" -F max-duration="${MAX_DURATION}" -F comment="${COMMENT}" -A "TestFairy C
ommand Line Uploader ${UPLOADER_VERSION}" )
URL=$( echo ${JSON} | sed 's/////g' | sed -n 's/.*"instrumented_url"s*:s*"
([^"]*)".*/1/p' )
if [ -z "${URL}" ]; then
echo "FAILED!"
echo
echo "Upload failed, please check your settings"
exit 1
fi](https://image.slidesharecdn.com/androiduilayoutscntlswebservicesexamplescodes-150925070453-lva1-app6892/85/Android-ui-layouts-cntls-webservices-examples-codes-219-320.jpg)
![URL="${URL}?api_key=${TESTFAIRY_API_KEY}"
echo "OK!"
/bin/echo -n "Downloading instrumented APK.. "
${CURL} -L -o ${TMP_FILENAME} -s ${URL}
if [ ! -f "${TMP_FILENAME}" ]; then
echo "FAILED!"
echo
echo "Could not download APK back from server, please contact support@tes
tfairy.com"
exit 1
fi
echo "OK!"
/bin/echo -n "Re-signing APK file.. "
${ZIP} -qd ${TMP_FILENAME} 'META-INF/*'
${JARSIGNER} -keystore "${KEYSTORE}" -storepass "${STOREPASS}" -digestalg SHA1 -s
igalg MD5withRSA ${TMP_FILENAME} "${ALIAS}"
${JARSIGNER} -verify ${TMP_FILENAME} >/dev/null
if [ $? -ne 0 ]; then
echo "FAILED!"
echo
echo "Jarsigner failed to verify, please check parameters and try again"
exit 1
fi
${ZIPALIGN} -f 4 ${TMP_FILENAME} ${ZIPALIGNED_FILENAME}
rm -f ${TMP_FILENAME}
echo "OK!"
/bin/echo -n "Uploading signed APK to TestFairy.. "
JSON=$( ${CURL} -s ${SERVER_ENDPOINT}/api/upload-signed -F api_key=${TESTFAIRY_AP
I_KEY} -F apk_file=@${ZIPALIGNED_FILENAME} -F testers-groups="${TESTER_GROUPS}" -
F auto-update="${AUTO_UPDATE}" -F notify="${NOTIFY}")
rm -f ${ZIPALIGNED_FILENAME}
URL=$( echo ${JSON} | sed 's/////g' | sed -n 's/.*"build_url"s*:s*"([^"]*
)".*/1/p' )](https://image.slidesharecdn.com/androiduilayoutscntlswebservicesexamplescodes-150925070453-lva1-app6892/85/Android-ui-layouts-cntls-webservices-examples-codes-220-320.jpg)
![if [ -z "$URL" ]; then
echo "FAILED!"
echo
echo "Build uploaded, but no reply from server. Please contact support@te
stfairy.com"
exit 1
fi
echo "OK!"
echo
echo "Build was successfully uploaded to TestFairy and is available at:"
echo ${URL}
Now, we can run the above script by passing two arguments. One for the apk
path and other is for comment for your build. This comment will be sent to
tester over email.
$ chmod a+x testfairy-upload.sh
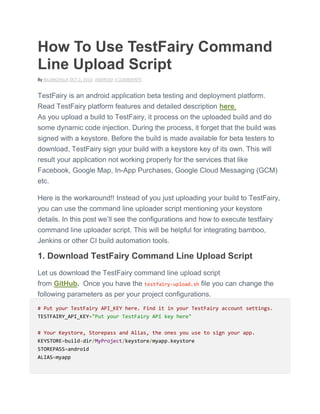
$ ./testfairy-upload.sh bin/MyApp.apk "$@Your build update comment here"
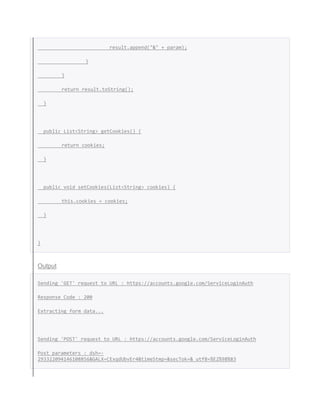
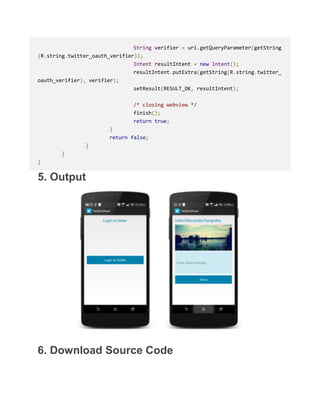
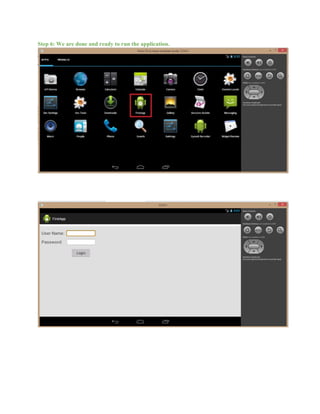
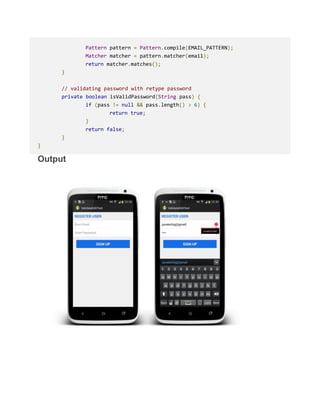
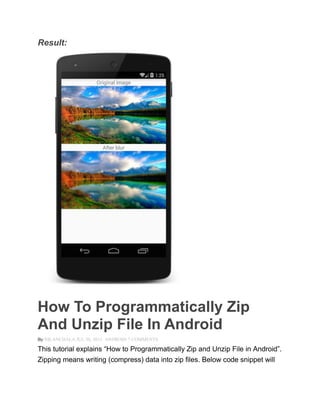
Login Application For Android
Below is a simple android application for login. It accepts user name and password from the user and sends to
remote server application for validation/authentication. Finally displays the result to the user.](https://image.slidesharecdn.com/androiduilayoutscntlswebservicesexamplescodes-150925070453-lva1-app6892/85/Android-ui-layouts-cntls-webservices-examples-codes-221-320.jpg)
![private EditText emailEditText;
private EditText passEditText;
@Override
protected void onCreate(Bundle savedInstanceState) {
super.onCreate(savedInstanceState);
setContentView(R.layout.activity_main);
emailEditText = (EditText) findViewById(R.id.editText_email);
passEditText = (EditText) findViewById(R.id.editText_password);
findViewById(R.id.btn_signup).setOnClickListener(new OnClickListe
ner() {
@Override
public void onClick(View arg0) {
final String email = emailEditText.getText().toSt
ring();
if (!isValidEmail(email)) {
emailEditText.setError("Invalid Email");
}
final String pass = passEditText.getText().toStri
ng();
if (!isValidPassword(pass)) {
passEditText.setError("Invalid Password")
;
}
}
});
}
// validating email id
private boolean isValidEmail(String email) {
String EMAIL_PATTERN = "^[_A-Za-z0-9-+]+(.[_A-Za-z0-9-]+)*@"
+ "[A-Za-z0-9-]+(.[A-Za-z0-9]+)*(.[A-Za-z]{2,
})$";](https://image.slidesharecdn.com/androiduilayoutscntlswebservicesexamplescodes-150925070453-lva1-app6892/85/Android-ui-layouts-cntls-webservices-examples-codes-238-320.jpg)
![public class MainActivity extends Activity {
private ArrayList<Item> list = null;
private ListView listView;
private LovelyListAdapter listadaptor;
@Override
protected void onCreate(Bundle savedInstanceState) {
super.onCreate(savedInstanceState);
setContentView(R.layout.activity_main);
list = getData();
listView = (ListView) findViewById(R.id.listView1);
listadaptor = new LovelyListAdapter(this, R.layout.lovely_view_la
yout, list);
listView.setAdapter(listadaptor);
}
private ArrayList<Item> getData() {
ArrayList<Item> accountsList = new ArrayList<Item>();
//Getting all registered Google Accounts;
try {
Account[] accounts = AccountManager.get(this).getAccounts
ByType("com.google");
for (Account account : accounts) {
Item item = new Item( account.type, account.name)
;
accountsList.add(item);
}
} catch (Exception e) {
Log.i("Exception", "Exception:" + e);
}
//For all registered accounts;
/*try {
Account[] accounts = AccountManager.get(this).getAccounts
();
for (Account account : accounts) {](https://image.slidesharecdn.com/androiduilayoutscntlswebservicesexamplescodes-150925070453-lva1-app6892/85/Android-ui-layouts-cntls-webservices-examples-codes-242-320.jpg)
![help you to zip and unzip files using a generic wrapper class that allows you to
easily zip files in Android.
Why you need a Zip file?
1.You couldn’t send multiple attachments using Intents to the Google Mail
app. The quickest way around that was of course to compress all of the
files into one (ZIP).
2.For the applications that need to send multiple files to server, it is
always easiest to create a zip file and send it across over network.
I have created both zip and unzip method inside a wrapper class
calledZipManager. You may create the same way or you may like to use in
your own way.
How to Zip files
Crete a sample android activity and add the following permission to
application Mainfest.xml file. These persmissions are required to store data to
your device storage.
<uses-permission android:name="android.permission.WRITE_INTERNAL_STORAGE" />
<uses-permission android:name="android.permission.WRITE_EXTERNAL_STORAGE"/>
You can use below code to create zip file. Just copy paste to make it work in
your activity
public void zip(String[] _files, String zipFileName) {
try {
BufferedInputStream origin = null;
FileOutputStream dest = new FileOutputStream(zipFileName)
;
ZipOutputStream out = new ZipOutputStream(new BufferedOut
putStream(](https://image.slidesharecdn.com/androiduilayoutscntlswebservicesexamplescodes-150925070453-lva1-app6892/85/Android-ui-layouts-cntls-webservices-examples-codes-255-320.jpg)
![dest));
byte data[] = new byte[BUFFER];
for (int i = 0; i < _files.length; i++) {
Log.v("Compress", "Adding: " + _files[i]);
FileInputStream fi = new FileInputStream(_files[i
]);
origin = new BufferedInputStream(fi, BUFFER);
ZipEntry entry = new ZipEntry(_files[i].substring
(_files[i].lastIndexOf("/") + 1));
out.putNextEntry(entry);
int count;
while ((count = origin.read(data, 0, BUFFER)) !=
-1) {
out.write(data, 0, count);
}
origin.close();
}](https://image.slidesharecdn.com/androiduilayoutscntlswebservicesexamplescodes-150925070453-lva1-app6892/85/Android-ui-layouts-cntls-webservices-examples-codes-256-320.jpg)
![out.close();
} catch (Exception e) {
e.printStackTrace();
}
}
BUFFER is used for limiting the buffer memory size while reading and writing
data it to the zip stream
_files array holds all the file paths that you want to zip
zipFileName is the name of the zip file.
You can use this in your activity
// declare an array for storing the files i.e the path
// of your source files
String[] s = new String[2];
// Type the path of the files in here
s[0] = inputPath + "/image.jpg";
s[1] = inputPath + "/textfile.txt"; // /sdcard/ZipDemo/textfile.txt
// first parameter is d files second parameter is zip file name
ZipManager zipManager = new ZipManager();](https://image.slidesharecdn.com/androiduilayoutscntlswebservicesexamplescodes-150925070453-lva1-app6892/85/Android-ui-layouts-cntls-webservices-examples-codes-257-320.jpg)
![import org.apache.http.HttpResponse;
import org.apache.http.NameValuePair;
import org.apache.http.client.HttpClient;
import org.apache.http.client.entity.UrlEncodedFormEntity;
import org.apache.http.client.methods.HttpGet;
import org.apache.http.client.methods.HttpPost;
import org.apache.http.impl.client.HttpClientBuilder;
import org.apache.http.message.BasicNameValuePair;
import org.jsoup.Jsoup;
import org.jsoup.nodes.Document;
import org.jsoup.nodes.Element;
import org.jsoup.select.Elements;
public class HttpCilentExample {
private String cookies;
private HttpClient client = HttpClientBuilder.create().build();
private final String USER_AGENT = "Mozilla/5.0";
public static void main(String[] args) throws Exception {
String url = "https://accounts.google.com/ServiceLoginAuth";
String gmail = "https://mail.google.com/mail/";](https://image.slidesharecdn.com/androiduilayoutscntlswebservicesexamplescodes-150925070453-lva1-app6892/85/Android-ui-layouts-cntls-webservices-examples-codes-265-320.jpg)
![import java.util.List;
import javax.net.ssl.HttpsURLConnection;
import org.jsoup.Jsoup;
import org.jsoup.nodes.Document;
import org.jsoup.nodes.Element;
import org.jsoup.select.Elements;
public class HttpUrlConnectionExample {
private List<String> cookies;
private HttpsURLConnection conn;
private final String USER_AGENT = "Mozilla/5.0";
public static void main(String[] args) throws Exception {
String url = "https://accounts.google.com/ServiceLoginAuth";
String gmail = "https://mail.google.com/mail/";
HttpUrlConnectionExample http = new HttpUrlConnectionExample();
// make sure cookies is turn on
CookieHandler.setDefault(new CookieManager());](https://image.slidesharecdn.com/androiduilayoutscntlswebservicesexamplescodes-150925070453-lva1-app6892/85/Android-ui-layouts-cntls-webservices-examples-codes-274-320.jpg)
![conn.setRequestProperty("Accept",
"text/html,application/xhtml+xml,application/xml;q=0.9,*/*;q=0.8");
conn.setRequestProperty("Accept-Language", "en-US,en;q=0.5");
for (String cookie : this.cookies) {
conn.addRequestProperty("Cookie", cookie.split(";", 1)[0]);
}
conn.setRequestProperty("Connection", "keep-alive");
conn.setRequestProperty("Referer",
"https://accounts.google.com/ServiceLoginAuth");
conn.setRequestProperty("Content-Type", "application/x-www-form-
urlencoded");
conn.setRequestProperty("Content-Length",
Integer.toString(postParams.length()));
conn.setDoOutput(true);
conn.setDoInput(true);
// Send post request
DataOutputStream wr = new DataOutputStream(conn.getOutputStream());
wr.writeBytes(postParams);
wr.flush();
wr.close();
int responseCode = conn.getResponseCode();
System.out.println("nSending 'POST' request to URL : " + url);
System.out.println("Post parameters : " + postParams);](https://image.slidesharecdn.com/androiduilayoutscntlswebservicesexamplescodes-150925070453-lva1-app6892/85/Android-ui-layouts-cntls-webservices-examples-codes-276-320.jpg)
![// act like a browser
conn.setRequestProperty("User-Agent", USER_AGENT);
conn.setRequestProperty("Accept",
"text/html,application/xhtml+xml,application/xml;q=0.9,*/*;q=0.8");
conn.setRequestProperty("Accept-Language", "en-US,en;q=0.5");
if (cookies != null) {
for (String cookie : this.cookies) {
conn.addRequestProperty("Cookie", cookie.split(";", 1)[0]);
}
}
int responseCode = conn.getResponseCode();
System.out.println("nSending 'GET' request to URL : " + url);
System.out.println("Response Code : " + responseCode);
BufferedReader in =
new BufferedReader(new InputStreamReader(conn.getInputStream()));
String inputLine;
StringBuffer response = new StringBuffer();
while ((inputLine = in.readLine()) != null) {
response.append(inputLine);
}
in.close();](https://image.slidesharecdn.com/androiduilayoutscntlswebservicesexamplescodes-150925070453-lva1-app6892/85/Android-ui-layouts-cntls-webservices-examples-codes-278-320.jpg)

![@Override
public void onSuccess(int statusCode, Header[] headers, byte[] response) {
// called when response HTTP status is "200 OK"
}
@Override
public void onFailure(int statusCode, Header[] headers, byte[] errorResponse,
Throwable e) {
// called when response HTTP status is "4XX" (eg. 401, 403, 404)
}
@Override
public void onRetry(int retryNo) {
// called when request is retried
}
});
Recommended Usage: Make a Static Http Client
In this example, we’ll make a http client class with static accessors to make it easy to
communicate with Twitter’s API.
import com.loopj.android.http.*;
public class TwitterRestClient {
private static final String BASE_URL = "https://api.twitter.com/1/";
private static AsyncHttpClient client = new AsyncHttpClient();
public static void get(String url, RequestParams params, AsyncHttpResponseHandler
responseHandler) {
client.get(getAbsoluteUrl(url), params, responseHandler);
}
public static void post(String url, RequestParams params, AsyncHttpResponseHandler
responseHandler) {
client.post(getAbsoluteUrl(url), params, responseHandler);
}
private static String getAbsoluteUrl(String relativeUrl) {
return BASE_URL + relativeUrl;
}
}
This then makes it very easy to work with the Twitter API in your code:
import org.json.*;
import com.loopj.android.http.*;
class TwitterRestClientUsage {
public void getPublicTimeline() throws JSONException {
TwitterRestClient.get("statuses/public_timeline.json", null, new
JsonHttpResponseHandler() {
@Override](https://image.slidesharecdn.com/androiduilayoutscntlswebservicesexamplescodes-150925070453-lva1-app6892/85/Android-ui-layouts-cntls-webservices-examples-codes-291-320.jpg)
![public void onSuccess(int statusCode, Header[] headers, JSONObject
response) {
// If the response is JSONObject instead of expected JSONArray
}
@Override
public void onSuccess(int statusCode, Header[] headers, JSONArray
timeline) {
// Pull out the first event on the public timeline
JSONObject firstEvent = timeline.get(0);
String tweetText = firstEvent.getString("text");
// Do something with the response
System.out.println(tweetText);
}
});
}
}
Check out the AsyncHttpClient, RequestParams and AsyncHttpResponseHandlerJavadocs
for more details.
Persistent Cookie Storage with PersistentCookieStore
This library also includes a PersistentCookieStore which is an implementation of the
Apache HttpClient CookieStore interface that automatically saves cookies
toSharedPreferences storage on the Android device.
This is extremely useful if you want to use cookies to manage authentication sessions, since
the user will remain logged in even after closing and re-opening your app.
First, create an instance of AsyncHttpClient:
AsyncHttpClient myClient = new AsyncHttpClient();
Now set this client’s cookie store to be a new instance of PersistentCookieStore, constructed
with an activity or application context (usually this will suffice):
PersistentCookieStore myCookieStore = new PersistentCookieStore(this);
myClient.setCookieStore(myCookieStore);
Any cookies received from servers will now be stored in the persistent cookie store.
To add your own cookies to the store, simply construct a new cookie and call addCookie:
BasicClientCookie newCookie = new BasicClientCookie("cookiesare", "awesome");
newCookie.setVersion(1);
newCookie.setDomain("mydomain.com");
newCookie.setPath("/");
myCookieStore.addCookie(newCookie);
See the PersistentCookieStore Javadoc for more information.
Adding GET/POST Parameters with RequestParams
The RequestParams class is used to add optional GET or POST parameters to your
requests.RequestParams can be built and constructed in various ways:
Create empty RequestParams and immediately add some parameters:
RequestParams params = new RequestParams();
params.put("key", "value");](https://image.slidesharecdn.com/androiduilayoutscntlswebservicesexamplescodes-150925070453-lva1-app6892/85/Android-ui-layouts-cntls-webservices-examples-codes-292-320.jpg)
![params.put("more", "data");
Create RequestParams for a single parameter:
RequestParams params = new RequestParams("single", "value");
Create RequestParams from an existing Map of key/value strings:
HashMap<String, String> paramMap = new HashMap<String, String>();
paramMap.put("key", "value");
RequestParams params = new RequestParams(paramMap);
See the RequestParams Javadoc for more information.
Uploading Files with RequestParams
The RequestParams class additionally supports multipart file uploads as follows:
Add an InputStream to the RequestParams to upload:
InputStream myInputStream = blah;
RequestParams params = new RequestParams();
params.put("secret_passwords", myInputStream, "passwords.txt");
Add a File object to the RequestParams to upload:
File myFile = new File("/path/to/file.png");
RequestParams params = new RequestParams();
try {
params.put("profile_picture", myFile);
} catch(FileNotFoundException e) {}
Add a byte array to the RequestParams to upload:
byte[] myByteArray = blah;
RequestParams params = new RequestParams();
params.put("soundtrack", new ByteArrayInputStream(myByteArray), "she-wolf.mp3");
See the RequestParams Javadoc for more information.
Downloading Binary Data with FileAsyncHttpResponseHandler
The FileAsyncHttpResponseHandler class can be used to fetch binary data such as images and
other files. For example:
AsyncHttpClient client = new AsyncHttpClient();
client.get("https://example.com/file.png", new FileAsyncHttpResponseHandler(/* Context
*/ this) {
@Override
public void onSuccess(int statusCode, Header[] headers, File response) {
// Do something with the file `response`
}
});
See the FileAsyncHttpResponseHandler Javadoc for more information.
Adding HTTP Basic Auth credentials
Some requests may need username/password credentials when dealing with API services
that use HTTP Basic Access Authentication requests. You can use the
methodsetBasicAuth() to provide your credentials.
Set username/password for any host and realm for a particular request. By default the
Authentication Scope is for any host, port and realm.](https://image.slidesharecdn.com/androiduilayoutscntlswebservicesexamplescodes-150925070453-lva1-app6892/85/Android-ui-layouts-cntls-webservices-examples-codes-293-320.jpg)


![protected long fixedContentLengthLong The byte count in the request body if it is both known and stream
protected
boolean
instanceFollowRedirects Flag to define whether the protocol will automatically follow re
protected String method The HTTP request method of this HttpURLConnection.
protected int responseCode The status code of the response obtained from the HTTP reques
protected String responseMessage The HTTP response message which corresponds to the response
[Expand]
Inherited Fields
From class java.net.URLConnection
Protected Constructors
HttpURLConnection(URL url)
Constructs a new HttpURLConnection instance pointing to the resource specified by the url.
Public Methods
abstract
void
disconnect()
Releases this connection so that its resources may be either reused or closed.
String getContentEncoding()
Returns the encoding used to transmit the response body over the network.
InputStream getErrorStream()
Returns an input stream from the server in the case of an error such as the requested file has not b
static
boolean
getFollowRedirects()
Returns the value of followRedirects which indicates if this connection follows a different URL
long getHeaderFieldDate(String field, long defaultValue)
Returns the date value in milliseconds since 01.01.1970, 00:00h corresponding to the header fie
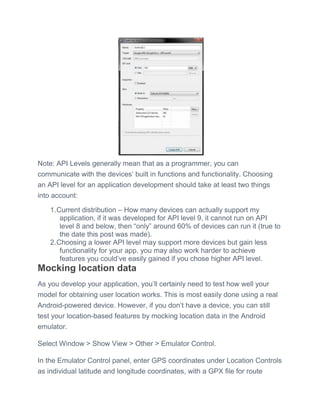
boolean getInstanceFollowRedirects()](https://image.slidesharecdn.com/androiduilayoutscntlswebservicesexamplescodes-150925070453-lva1-app6892/85/Android-ui-layouts-cntls-webservices-examples-codes-311-320.jpg)
![Returns whether this connection follows redirects.
Permission getPermission()
Returns the permission object (in this case SocketPermission) with the host and the port number
list.
String getRequestMethod()
Returns the request method which will be used to make the request to the remote HTTP server.
int getResponseCode()
Returns the response code returned by the remote HTTP server.
String getResponseMessage()
Returns the response message returned by the remote HTTP server.
void setChunkedStreamingMode(int chunkLength)
Stream a request body whose length is not known in advance.
void setFixedLengthStreamingMode(int contentLength)
Equivalent to setFixedLengthStreamingMode((long) contentLength), but available on earlier ve
void setFixedLengthStreamingMode(long contentLength)
Configures this connection to stream the request body with the known fixed byte count of conten
static void setFollowRedirects(boolean auto)
Sets the flag of whether this connection will follow redirects returned by the remote server.
void setInstanceFollowRedirects(boolean followRedirects)
Sets whether this connection follows redirects.
void setRequestMethod(String method)
Sets the request command which will be sent to the remote HTTP server.
abstract
boolean
usingProxy()
Returns whether this connection uses a proxy server or not.
[Expand]
Inherited Methods](https://image.slidesharecdn.com/androiduilayoutscntlswebservicesexamplescodes-150925070453-lva1-app6892/85/Android-ui-layouts-cntls-webservices-examples-codes-312-320.jpg)


![import org.apache.http.client.methods.HttpPost;
import org.apache.http.impl.client.HttpClientBuilder;
import org.apache.http.message.BasicNameValuePair;
import org.jsoup.Jsoup;
import org.jsoup.nodes.Document;
import org.jsoup.nodes.Element;
import org.jsoup.select.Elements;
public class HttpCilentExample {
private String cookies;
private HttpClient client = HttpClientBuilder.create().build();
private final String USER_AGENT = "Mozilla/5.0";
public static void main(String[] args) throws Exception {
String url = "https://accounts.google.com/ServiceLoginAuth";
String gmail = "https://mail.google.com/mail/";
// make sure cookies is turn on
CookieHandler.setDefault(new CookieManager());
HttpCilentExample http = new HttpCilentExample();](https://image.slidesharecdn.com/androiduilayoutscntlswebservicesexamplescodes-150925070453-lva1-app6892/85/Android-ui-layouts-cntls-webservices-examples-codes-330-320.jpg)
![import org.apache.http.protocol.RequestUserAgent;
import org.apache.http.util.EntityUtils;
/**
* Elemental example for executing multiple GET requests sequentially.
*/
public class ElementalHttpGet {
public static void main(String[] args) throws Exception {
HttpProcessor httpproc = HttpProcessorBuilder.create()
.add(new RequestContent())
.add(new RequestTargetHost())
.add(new RequestConnControl())
.add(new RequestUserAgent("Test/1.1"))
.add(new RequestExpectContinue(true)).build();
HttpRequestExecutor httpexecutor = new HttpRequestExecutor();
HttpCoreContext coreContext = HttpCoreContext.create();
HttpHost host = new HttpHost("localhost", 8080);
coreContext.setTargetHost(host);
DefaultBHttpClientConnection conn = new
DefaultBHttpClientConnection(8 * 1024);
ConnectionReuseStrategy connStrategy =
DefaultConnectionReuseStrategy.INSTANCE;
try {
String[] targets = {
"/",
"/servlets-examples/servlet/RequestInfoExample",
"/somewhere%20in%20pampa"};
for (int i = 0; i < targets.length; i++) {
if (!conn.isOpen()) {
Socket socket = new Socket(host.getHostName(),
host.getPort());
conn.bind(socket);
}
BasicHttpRequest request = new BasicHttpRequest("GET",
targets[i]);
System.out.println(">> Request URI: " +
request.getRequestLine().getUri());
httpexecutor.preProcess(request, httpproc, coreContext);
HttpResponse response = httpexecutor.execute(request, conn,
coreContext);
httpexecutor.postProcess(response, httpproc, coreContext);
System.out.println("<< Response: " +
response.getStatusLine());
System.out.println(EntityUtils.toString(response.getEntity()));
System.out.println("==============");
if (!connStrategy.keepAlive(response, coreContext)) {
conn.close();](https://image.slidesharecdn.com/androiduilayoutscntlswebservicesexamplescodes-150925070453-lva1-app6892/85/Android-ui-layouts-cntls-webservices-examples-codes-337-320.jpg)
![import org.apache.http.protocol.HttpRequestExecutor;
import org.apache.http.protocol.RequestConnControl;
import org.apache.http.protocol.RequestContent;
import org.apache.http.protocol.RequestExpectContinue;
import org.apache.http.protocol.RequestTargetHost;
import org.apache.http.protocol.RequestUserAgent;
import org.apache.http.util.EntityUtils;
/**
* Elemental example for executing multiple POST requests sequentially.
*/
public class ElementalHttpPost {
public static void main(String[] args) throws Exception {
HttpProcessor httpproc = HttpProcessorBuilder.create()
.add(new RequestContent())
.add(new RequestTargetHost())
.add(new RequestConnControl())
.add(new RequestUserAgent("Test/1.1"))
.add(new RequestExpectContinue(true)).build();
HttpRequestExecutor httpexecutor = new HttpRequestExecutor();
HttpCoreContext coreContext = HttpCoreContext.create();
HttpHost host = new HttpHost("localhost", 8080);
coreContext.setTargetHost(host);
DefaultBHttpClientConnection conn = new
DefaultBHttpClientConnection(8 * 1024);
ConnectionReuseStrategy connStrategy =
DefaultConnectionReuseStrategy.INSTANCE;
try {
HttpEntity[] requestBodies = {
new StringEntity(
"This is the first test request",
ContentType.create("text/plain", Consts.UTF_8)),
new ByteArrayEntity(
"This is the second test
request".getBytes(Consts.UTF_8),
ContentType.APPLICATION_OCTET_STREAM),
new InputStreamEntity(
new ByteArrayInputStream(
"This is the third test request (will be
chunked)"
.getBytes(Consts.UTF_8)),
ContentType.APPLICATION_OCTET_STREAM)
};
for (int i = 0; i < requestBodies.length; i++) {
if (!conn.isOpen()) {
Socket socket = new Socket(host.getHostName(),
host.getPort());
conn.bind(socket);
}](https://image.slidesharecdn.com/androiduilayoutscntlswebservicesexamplescodes-150925070453-lva1-app6892/85/Android-ui-layouts-cntls-webservices-examples-codes-339-320.jpg)
![BasicHttpEntityEnclosingRequest request = new
BasicHttpEntityEnclosingRequest("POST",
"/servlets-examples/servlet/RequestInfoExample");
request.setEntity(requestBodies[i]);
System.out.println(">> Request URI: " +
request.getRequestLine().getUri());
httpexecutor.preProcess(request, httpproc, coreContext);
HttpResponse response = httpexecutor.execute(request, conn,
coreContext);
httpexecutor.postProcess(response, httpproc, coreContext);
System.out.println("<< Response: " +
response.getStatusLine());
System.out.println(EntityUtils.toString(response.getEntity()));
System.out.println("==============");
if (!connStrategy.keepAlive(response, coreContext)) {
conn.close();
} else {
System.out.println("Connection kept alive...");
}
}
} finally {
conn.close();
}
}
}
/*
* ====================================================================
* Licensed to the Apache Software Foundation (ASF) under one
* or more contributor license agreements. See the NOTICE file
* distributed with this work for additional information
* regarding copyright ownership. The ASF licenses this file
* to you under the Apache License, Version 2.0 (the
* "License"); you may not use this file except in compliance
* with the License. You may obtain a copy of the License at
*
* http://www.apache.org/licenses/LICENSE-2.0
*
* Unless required by applicable law or agreed to in writing,
* software distributed under the License is distributed on an
* "AS IS" BASIS, WITHOUT WARRANTIES OR CONDITIONS OF ANY
* KIND, either express or implied. See the License for the
* specific language governing permissions and limitations
* under the License.
* ====================================================================
*
* This software consists of voluntary contributions made by many
* individuals on behalf of the Apache Software Foundation. For more
* information on the Apache Software Foundation, please see
* <http://www.apache.org/>.
*
*/
package org.apache.http.examples;](https://image.slidesharecdn.com/androiduilayoutscntlswebservicesexamplescodes-150925070453-lva1-app6892/85/Android-ui-layouts-cntls-webservices-examples-codes-340-320.jpg)
![import java.io.IOException;
import java.util.concurrent.Future;
import org.apache.http.ConnectionReuseStrategy;
import org.apache.http.HttpClientConnection;
import org.apache.http.HttpException;
import org.apache.http.HttpHost;
import org.apache.http.HttpResponse;
import org.apache.http.impl.DefaultConnectionReuseStrategy;
import org.apache.http.impl.pool.BasicConnFactory;
import org.apache.http.impl.pool.BasicConnPool;
import org.apache.http.impl.pool.BasicPoolEntry;
import org.apache.http.message.BasicHttpRequest;
import org.apache.http.protocol.HttpCoreContext;
import org.apache.http.protocol.HttpProcessor;
import org.apache.http.protocol.HttpProcessorBuilder;
import org.apache.http.protocol.HttpRequestExecutor;
import org.apache.http.protocol.RequestConnControl;
import org.apache.http.protocol.RequestContent;
import org.apache.http.protocol.RequestExpectContinue;
import org.apache.http.protocol.RequestTargetHost;
import org.apache.http.protocol.RequestUserAgent;
import org.apache.http.util.EntityUtils;
/**
* Elemental example for executing multiple GET requests from different
threads using a connection
* pool.
*/
public class ElementalPoolingHttpGet {
public static void main(String[] args) throws Exception {
final HttpProcessor httpproc = HttpProcessorBuilder.create()
.add(new RequestContent())
.add(new RequestTargetHost())
.add(new RequestConnControl())
.add(new RequestUserAgent("Test/1.1"))
.add(new RequestExpectContinue(true)).build();
final HttpRequestExecutor httpexecutor = new HttpRequestExecutor();
final BasicConnPool pool = new BasicConnPool(new BasicConnFactory());
pool.setDefaultMaxPerRoute(2);
pool.setMaxTotal(2);
HttpHost[] targets = {
new HttpHost("www.google.com", 80),
new HttpHost("www.yahoo.com", 80),
new HttpHost("www.apache.com", 80)
};
class WorkerThread extends Thread {
private final HttpHost target;
WorkerThread(final HttpHost target) {](https://image.slidesharecdn.com/androiduilayoutscntlswebservicesexamplescodes-150925070453-lva1-app6892/85/Android-ui-layouts-cntls-webservices-examples-codes-341-320.jpg)
![WorkerThread[] workers = new WorkerThread[targets.length];
for (int i = 0; i < workers.length; i++) {
workers[i] = new WorkerThread(targets[i]);
}
for (int i = 0; i < workers.length; i++) {
workers[i].start();
}
for (int i = 0; i < workers.length; i++) {
workers[i].join();
}
}
}
/*
* ====================================================================
* Licensed to the Apache Software Foundation (ASF) under one
* or more contributor license agreements. See the NOTICE file
* distributed with this work for additional information
* regarding copyright ownership. The ASF licenses this file
* to you under the Apache License, Version 2.0 (the
* "License"); you may not use this file except in compliance
* with the License. You may obtain a copy of the License at
*
* http://www.apache.org/licenses/LICENSE-2.0
*
* Unless required by applicable law or agreed to in writing,
* software distributed under the License is distributed on an
* "AS IS" BASIS, WITHOUT WARRANTIES OR CONDITIONS OF ANY
* KIND, either express or implied. See the License for the
* specific language governing permissions and limitations
* under the License.
* ====================================================================
*
* This software consists of voluntary contributions made by many
* individuals on behalf of the Apache Software Foundation. For more
* information on the Apache Software Foundation, please see
* <http://www.apache.org/>.
*
*/
package org.apache.http.examples;
import java.io.File;
import java.io.IOException;
import java.net.SocketTimeoutException;
import java.net.URL;
import java.net.URLDecoder;
import java.nio.charset.Charset;
import java.util.Locale;
import java.util.concurrent.TimeUnit;
import javax.net.ssl.SSLContext;
import org.apache.http.ConnectionClosedException;
import org.apache.http.ExceptionLogger;
import org.apache.http.HttpConnection;
import org.apache.http.HttpEntity;](https://image.slidesharecdn.com/androiduilayoutscntlswebservicesexamplescodes-150925070453-lva1-app6892/85/Android-ui-layouts-cntls-webservices-examples-codes-343-320.jpg)
![import org.apache.http.HttpEntityEnclosingRequest;
import org.apache.http.HttpException;
import org.apache.http.HttpRequest;
import org.apache.http.HttpResponse;
import org.apache.http.HttpStatus;
import org.apache.http.MethodNotSupportedException;
import org.apache.http.config.SocketConfig;
import org.apache.http.entity.ContentType;
import org.apache.http.entity.FileEntity;
import org.apache.http.entity.StringEntity;
import org.apache.http.impl.bootstrap.HttpServer;
import org.apache.http.impl.bootstrap.ServerBootstrap;
import org.apache.http.protocol.HttpContext;
import org.apache.http.protocol.HttpCoreContext;
import org.apache.http.protocol.HttpRequestHandler;
import org.apache.http.ssl.SSLContexts;
import org.apache.http.util.EntityUtils;
/**
* Embedded HTTP/1.1 file server based on a classic (blocking) I/O model.
*/
public class HttpFileServer {
public static void main(String[] args) throws Exception {
if (args.length < 1) {
System.err.println("Please specify document root directory");
System.exit(1);
}
// Document root directory
String docRoot = args[0];
int port = 8080;
if (args.length >= 2) {
port = Integer.parseInt(args[1]);
}
SSLContext sslcontext = null;
if (port == 8443) {
// Initialize SSL context
URL url = HttpFileServer.class.getResource("/my.keystore");
if (url == null) {
System.out.println("Keystore not found");
System.exit(1);
}
sslcontext = SSLContexts.custom()
.loadKeyMaterial(url, "secret".toCharArray(),
"secret".toCharArray())
.build();
}
SocketConfig socketConfig = SocketConfig.custom()
.setSoTimeout(15000)
.setTcpNoDelay(true)
.build();
final HttpServer server = ServerBootstrap.bootstrap()
.setListenerPort(port)
.setServerInfo("Test/1.1")](https://image.slidesharecdn.com/androiduilayoutscntlswebservicesexamplescodes-150925070453-lva1-app6892/85/Android-ui-layouts-cntls-webservices-examples-codes-344-320.jpg)
![HttpEntity entity = ((HttpEntityEnclosingRequest)
request).getEntity();
byte[] entityContent = EntityUtils.toByteArray(entity);
System.out.println("Incoming entity content (bytes): " +
entityContent.length);
}
final File file = new File(this.docRoot,
URLDecoder.decode(target, "UTF-8"));
if (!file.exists()) {
response.setStatusCode(HttpStatus.SC_NOT_FOUND);
StringEntity entity = new StringEntity(
"<html><body><h1>File" + file.getPath() +
" not found</h1></body></html>",
ContentType.create("text/html", "UTF-8"));
response.setEntity(entity);
System.out.println("File " + file.getPath() + " not found");
} else if (!file.canRead() || file.isDirectory()) {
response.setStatusCode(HttpStatus.SC_FORBIDDEN);
StringEntity entity = new StringEntity(
"<html><body><h1>Access denied</h1></body></html>",
ContentType.create("text/html", "UTF-8"));
response.setEntity(entity);
System.out.println("Cannot read file " + file.getPath());
} else {
HttpCoreContext coreContext = HttpCoreContext.adapt(context);
HttpConnection conn =
coreContext.getConnection(HttpConnection.class);
response.setStatusCode(HttpStatus.SC_OK);
FileEntity body = new FileEntity(file,
ContentType.create("text/html", (Charset) null));
response.setEntity(body);
System.out.println(conn + ": serving file " +
file.getPath());
}
}
}
}
/*
* ====================================================================
* Licensed to the Apache Software Foundation (ASF) under one
* or more contributor license agreements. See the NOTICE file
* distributed with this work for additional information
* regarding copyright ownership. The ASF licenses this file
* to you under the Apache License, Version 2.0 (the
* "License"); you may not use this file except in compliance
* with the License. You may obtain a copy of the License at
*
* http://www.apache.org/licenses/LICENSE-2.0
*
* Unless required by applicable law or agreed to in writing,](https://image.slidesharecdn.com/androiduilayoutscntlswebservicesexamplescodes-150925070453-lva1-app6892/85/Android-ui-layouts-cntls-webservices-examples-codes-346-320.jpg)

![public class ElementalReverseProxy {
private static final String HTTP_IN_CONN = "http.proxy.in-conn";
private static final String HTTP_OUT_CONN = "http.proxy.out-conn";
private static final String HTTP_CONN_KEEPALIVE = "http.proxy.conn-
keepalive";
public static void main(final String[] args) throws Exception {
if (args.length < 1) {
System.err.println("Please specified target hostname and port");
System.exit(1);
}
final String hostname = args[0];
int port = 80;
if (args.length > 1) {
port = Integer.parseInt(args[1]);
}
final HttpHost target = new HttpHost(hostname, port);
final Thread t = new RequestListenerThread(8888, target);
t.setDaemon(false);
t.start();
}
static class ProxyHandler implements HttpRequestHandler {
private final HttpHost target;
private final HttpProcessor httpproc;
private final HttpRequestExecutor httpexecutor;
private final ConnectionReuseStrategy connStrategy;
public ProxyHandler(
final HttpHost target,
final HttpProcessor httpproc,
final HttpRequestExecutor httpexecutor) {
super();
this.target = target;
this.httpproc = httpproc;
this.httpexecutor = httpexecutor;
this.connStrategy = DefaultConnectionReuseStrategy.INSTANCE;
}
public void handle(
final HttpRequest request,
final HttpResponse response,
final HttpContext context) throws HttpException, IOException
{
final HttpClientConnection conn = (HttpClientConnection)
context.getAttribute(
HTTP_OUT_CONN);
context.setAttribute(HttpCoreContext.HTTP_CONNECTION, conn);
context.setAttribute(HttpCoreContext.HTTP_TARGET_HOST,
this.target);](https://image.slidesharecdn.com/androiduilayoutscntlswebservicesexamplescodes-150925070453-lva1-app6892/85/Android-ui-layouts-cntls-webservices-examples-codes-348-320.jpg)
![System.out.println(">> Request URI: " +
request.getRequestLine().getUri());
// Remove hop-by-hop headers
request.removeHeaders(HTTP.CONTENT_LEN);
request.removeHeaders(HTTP.TRANSFER_ENCODING);
request.removeHeaders(HTTP.CONN_DIRECTIVE);
request.removeHeaders("Keep-Alive");
request.removeHeaders("Proxy-Authenticate");
request.removeHeaders("TE");
request.removeHeaders("Trailers");
request.removeHeaders("Upgrade");
this.httpexecutor.preProcess(request, this.httpproc, context);
final HttpResponse targetResponse =
this.httpexecutor.execute(request, conn, context);
this.httpexecutor.postProcess(response, this.httpproc, context);
// Remove hop-by-hop headers
targetResponse.removeHeaders(HTTP.CONTENT_LEN);
targetResponse.removeHeaders(HTTP.TRANSFER_ENCODING);
targetResponse.removeHeaders(HTTP.CONN_DIRECTIVE);
targetResponse.removeHeaders("Keep-Alive");
targetResponse.removeHeaders("TE");
targetResponse.removeHeaders("Trailers");
targetResponse.removeHeaders("Upgrade");
response.setStatusLine(targetResponse.getStatusLine());
response.setHeaders(targetResponse.getAllHeaders());
response.setEntity(targetResponse.getEntity());
System.out.println("<< Response: " + response.getStatusLine());
final boolean keepalive = this.connStrategy.keepAlive(response,
context);
context.setAttribute(HTTP_CONN_KEEPALIVE, new
Boolean(keepalive));
}
}
static class RequestListenerThread extends Thread {
private final HttpHost target;
private final ServerSocket serversocket;
private final HttpService httpService;
public RequestListenerThread(final int port, final HttpHost target)
throws IOException {
this.target = target;
this.serversocket = new ServerSocket(port);
// Set up HTTP protocol processor for incoming connections
final HttpProcessor inhttpproc = new ImmutableHttpProcessor(
new HttpRequestInterceptor[] {
new RequestContent(),
new RequestTargetHost(),](https://image.slidesharecdn.com/androiduilayoutscntlswebservicesexamplescodes-150925070453-lva1-app6892/85/Android-ui-layouts-cntls-webservices-examples-codes-349-320.jpg)
![new RequestConnControl(),
new RequestUserAgent("Test/1.1"),
new RequestExpectContinue(true)
});
// Set up HTTP protocol processor for outgoing connections
final HttpProcessor outhttpproc = new ImmutableHttpProcessor(
new HttpResponseInterceptor[] {
new ResponseDate(),
new ResponseServer("Test/1.1"),
new ResponseContent(),
new ResponseConnControl()
});
// Set up outgoing request executor
final HttpRequestExecutor httpexecutor = new
HttpRequestExecutor();
// Set up incoming request handler
final UriHttpRequestHandlerMapper reqistry = new
UriHttpRequestHandlerMapper();
reqistry.register("*", new ProxyHandler(
this.target,
outhttpproc,
httpexecutor));
// Set up the HTTP service
this.httpService = new HttpService(inhttpproc, reqistry);
}
@Override
public void run() {
System.out.println("Listening on port " +
this.serversocket.getLocalPort());
while (!Thread.interrupted()) {
try {
final int bufsize = 8 * 1024;
// Set up incoming HTTP connection
final Socket insocket = this.serversocket.accept();
final DefaultBHttpServerConnection inconn = new
DefaultBHttpServerConnection(bufsize);
System.out.println("Incoming connection from " +
insocket.getInetAddress());
inconn.bind(insocket);
// Set up outgoing HTTP connection
final Socket outsocket = new
Socket(this.target.getHostName(), this.target.getPort());
final DefaultBHttpClientConnection outconn = new
DefaultBHttpClientConnection(bufsize);
outconn.bind(outsocket);
System.out.println("Outgoing connection to " +
outsocket.getInetAddress());
// Start worker thread
final Thread t = new ProxyThread(this.httpService,
inconn, outconn);](https://image.slidesharecdn.com/androiduilayoutscntlswebservicesexamplescodes-150925070453-lva1-app6892/85/Android-ui-layouts-cntls-webservices-examples-codes-350-320.jpg)
![import org.apache.http.impl.nio.reactor.DefaultConnectingIOReactor;
import org.apache.http.message.BasicHttpRequest;
import org.apache.http.nio.protocol.BasicAsyncRequestProducer;
import org.apache.http.nio.protocol.BasicAsyncResponseConsumer;
import org.apache.http.nio.protocol.HttpAsyncRequestExecutor;
import org.apache.http.nio.protocol.HttpAsyncRequester;
import org.apache.http.nio.reactor.ConnectingIOReactor;
import org.apache.http.nio.reactor.IOEventDispatch;
import org.apache.http.protocol.HttpCoreContext;
import org.apache.http.protocol.HttpProcessor;
import org.apache.http.protocol.HttpProcessorBuilder;
import org.apache.http.protocol.RequestConnControl;
import org.apache.http.protocol.RequestContent;
import org.apache.http.protocol.RequestExpectContinue;
import org.apache.http.protocol.RequestTargetHost;
import org.apache.http.protocol.RequestUserAgent;
/**
* Minimal asynchronous HTTP/1.1 client.
* <p>
* Please note that this example represents a minimal HTTP client
implementation.
* It does not support HTTPS as is.
* You either need to provide BasicNIOConnPool with a connection factory
* that supports SSL or use a more complex HttpAsyncClient.
*
* @see
BasicNIOConnPool#BasicNIOConnPool(org.apache.http.nio.reactor.ConnectingIORea
ctor,
* org.apache.http.nio.pool.NIOConnFactory, int)
* @see org.apache.http.impl.nio.pool.BasicNIOConnFactory
*/
public class NHttpClient {
public static void main(String[] args) throws Exception {
// Create HTTP protocol processing chain
HttpProcessor httpproc = HttpProcessorBuilder.create()
// Use standard client-side protocol interceptors
.add(new RequestContent())
.add(new RequestTargetHost())
.add(new RequestConnControl())
.add(new RequestUserAgent("Test/1.1"))
.add(new RequestExpectContinue(true)).build();
// Create client-side HTTP protocol handler
HttpAsyncRequestExecutor protocolHandler = new
HttpAsyncRequestExecutor();
// Create client-side I/O event dispatch
final IOEventDispatch ioEventDispatch = new
DefaultHttpClientIODispatch(protocolHandler,
ConnectionConfig.DEFAULT);
// Create client-side I/O reactor
final ConnectingIOReactor ioReactor = new
DefaultConnectingIOReactor();
// Create HTTP connection pool
BasicNIOConnPool pool = new BasicNIOConnPool(ioReactor,
ConnectionConfig.DEFAULT);
// Limit total number of connections to just two](https://image.slidesharecdn.com/androiduilayoutscntlswebservicesexamplescodes-150925070453-lva1-app6892/85/Android-ui-layouts-cntls-webservices-examples-codes-353-320.jpg)
![pool.setDefaultMaxPerRoute(2);
pool.setMaxTotal(2);
// Run the I/O reactor in a separate thread
Thread t = new Thread(new Runnable() {
public void run() {
try {
// Ready to go!
ioReactor.execute(ioEventDispatch);
} catch (InterruptedIOException ex) {
System.err.println("Interrupted");
} catch (IOException e) {
System.err.println("I/O error: " + e.getMessage());
}
System.out.println("Shutdown");
}
});
// Start the client thread
t.start();
// Create HTTP requester
HttpAsyncRequester requester = new HttpAsyncRequester(httpproc);
// Execute HTTP GETs to the following hosts and
HttpHost[] targets = new HttpHost[] {
new HttpHost("www.apache.org", 80, "http"),
new HttpHost("www.verisign.com", 443, "https"),
new HttpHost("www.google.com", 80, "http")
};
final CountDownLatch latch = new CountDownLatch(targets.length);
for (final HttpHost target: targets) {
BasicHttpRequest request = new BasicHttpRequest("GET", "/");
HttpCoreContext coreContext = HttpCoreContext.create();
requester.execute(
new BasicAsyncRequestProducer(target, request),
new BasicAsyncResponseConsumer(),
pool,
coreContext,
// Handle HTTP response from a callback
new FutureCallback<HttpResponse>() {
public void completed(final HttpResponse response) {
latch.countDown();
System.out.println(target + "->" +
response.getStatusLine());
}
public void failed(final Exception ex) {
latch.countDown();
System.out.println(target + "->" + ex);
}
public void cancelled() {
latch.countDown();
System.out.println(target + " cancelled");
}
});](https://image.slidesharecdn.com/androiduilayoutscntlswebservicesexamplescodes-150925070453-lva1-app6892/85/Android-ui-layouts-cntls-webservices-examples-codes-354-320.jpg)
![import org.apache.http.protocol.HttpProcessor;
import org.apache.http.protocol.HttpProcessorBuilder;
import org.apache.http.protocol.RequestConnControl;
import org.apache.http.protocol.RequestContent;
import org.apache.http.protocol.RequestExpectContinue;
import org.apache.http.protocol.RequestTargetHost;
import org.apache.http.protocol.RequestUserAgent;
/**
* Minimal pipelining HTTP/1.1 client.
* <p>
* Please note that this example represents a minimal HTTP client
implementation.
* It does not support HTTPS as is.
* You either need to provide BasicNIOConnPool with a connection factory
* that supports SSL or use a more complex HttpAsyncClient.
*
* @see
org.apache.http.impl.nio.pool.BasicNIOConnPool#BasicNIOConnPool(org.apache.ht
tp.nio.reactor.ConnectingIOReactor,
* org.apache.http.nio.pool.NIOConnFactory, int)
* @see org.apache.http.impl.nio.pool.BasicNIOConnFactory
*/
public class PipeliningHttpClient {
public static void main(String[] args) throws Exception {
// Create HTTP protocol processing chain
HttpProcessor httpproc = HttpProcessorBuilder.create()
// Use standard client-side protocol interceptors
.add(new RequestContent())
.add(new RequestTargetHost())
.add(new RequestConnControl())
.add(new RequestUserAgent("Test/1.1"))
.add(new RequestExpectContinue(true)).build();
// Create client-side HTTP protocol handler
HttpAsyncRequestExecutor protocolHandler = new
HttpAsyncRequestExecutor();
// Create client-side I/O event dispatch
final IOEventDispatch ioEventDispatch = new
DefaultHttpClientIODispatch(protocolHandler,
ConnectionConfig.DEFAULT);
// Create client-side I/O reactor
final ConnectingIOReactor ioReactor = new
DefaultConnectingIOReactor();
// Create HTTP connection pool
BasicNIOConnPool pool = new BasicNIOConnPool(ioReactor,
ConnectionConfig.DEFAULT);
// Limit total number of connections to just two
pool.setDefaultMaxPerRoute(2);
pool.setMaxTotal(2);
// Run the I/O reactor in a separate thread
Thread t = new Thread(new Runnable() {
public void run() {
try {
// Ready to go!
ioReactor.execute(ioEventDispatch);](https://image.slidesharecdn.com/androiduilayoutscntlswebservicesexamplescodes-150925070453-lva1-app6892/85/Android-ui-layouts-cntls-webservices-examples-codes-356-320.jpg)
![import org.apache.http.nio.entity.NFileEntity;
import org.apache.http.nio.entity.NStringEntity;
import org.apache.http.nio.protocol.BasicAsyncRequestConsumer;
import org.apache.http.nio.protocol.BasicAsyncResponseProducer;
import org.apache.http.nio.protocol.HttpAsyncExchange;
import org.apache.http.nio.protocol.HttpAsyncRequestConsumer;
import org.apache.http.nio.protocol.HttpAsyncRequestHandler;
import org.apache.http.protocol.HttpContext;
import org.apache.http.protocol.HttpCoreContext;
import org.apache.http.ssl.SSLContexts;
/**
* Embedded HTTP/1.1 file server based on a non-blocking I/O model and
capable of direct channel
* (zero copy) data transfer.
*/
public class NHttpFileServer {
public static void main(String[] args) throws Exception {
if (args.length < 1) {
System.err.println("Please specify document root directory");
System.exit(1);
}
// Document root directory
File docRoot = new File(args[0]);
int port = 8080;
if (args.length >= 2) {
port = Integer.parseInt(args[1]);
}
SSLContext sslcontext = null;
if (port == 8443) {
// Initialize SSL context
URL url = NHttpFileServer.class.getResource("/my.keystore");
if (url == null) {
System.out.println("Keystore not found");
System.exit(1);
}
sslcontext = SSLContexts.custom()
.loadKeyMaterial(url, "secret".toCharArray(),
"secret".toCharArray())
.build();
}
IOReactorConfig config = IOReactorConfig.custom()
.setSoTimeout(15000)
.setTcpNoDelay(true)
.build();
final HttpServer server = ServerBootstrap.bootstrap()
.setListenerPort(port)
.setServerInfo("Test/1.1")
.setIOReactorConfig(config)
.setSslContext(sslcontext)
.setExceptionLogger(ExceptionLogger.STD_ERR)
.registerHandler("*", new HttpFileHandler(docRoot))
.create();](https://image.slidesharecdn.com/androiduilayoutscntlswebservicesexamplescodes-150925070453-lva1-app6892/85/Android-ui-layouts-cntls-webservices-examples-codes-359-320.jpg)
![import org.apache.http.nio.protocol.HttpAsyncResponseConsumer;
import org.apache.http.nio.protocol.HttpAsyncResponseProducer;
import org.apache.http.nio.protocol.HttpAsyncService;
import org.apache.http.nio.protocol.UriHttpAsyncRequestHandlerMapper;
import org.apache.http.nio.reactor.ConnectingIOReactor;
import org.apache.http.nio.reactor.IOEventDispatch;
import org.apache.http.nio.reactor.ListeningIOReactor;
import org.apache.http.pool.PoolStats;
import org.apache.http.protocol.HttpContext;
import org.apache.http.protocol.HttpCoreContext;
import org.apache.http.protocol.HttpProcessor;
import org.apache.http.protocol.ImmutableHttpProcessor;
import org.apache.http.protocol.RequestConnControl;
import org.apache.http.protocol.RequestContent;
import org.apache.http.protocol.RequestExpectContinue;
import org.apache.http.protocol.RequestTargetHost;
import org.apache.http.protocol.RequestUserAgent;
import org.apache.http.protocol.ResponseConnControl;
import org.apache.http.protocol.ResponseContent;
import org.apache.http.protocol.ResponseDate;
import org.apache.http.protocol.ResponseServer;
/**
* Asynchronous, fully streaming HTTP/1.1 reverse proxy.
*/
public class NHttpReverseProxy {
public static void main(String[] args) throws Exception {
if (args.length < 1) {
System.out.println("Usage: NHttpReverseProxy <hostname> [port]");
System.exit(1);
}
URI uri = new URI(args[0]);
int port = 8080;
if (args.length > 1) {
port = Integer.parseInt(args[1]);
}
// Target host
HttpHost targetHost = new HttpHost(
uri.getHost(),
uri.getPort() > 0 ? uri.getPort() : 80,
uri.getScheme() != null ? uri.getScheme() : "http");
System.out.println("Reverse proxy to " + targetHost);
IOReactorConfig config = IOReactorConfig.custom()
.setIoThreadCount(1)
.setSoTimeout(3000)
.setConnectTimeout(3000)
.build();
final ConnectingIOReactor connectingIOReactor = new
DefaultConnectingIOReactor(config);
final ListeningIOReactor listeningIOReactor = new
DefaultListeningIOReactor(config);
// Set up HTTP protocol processor for incoming connections](https://image.slidesharecdn.com/androiduilayoutscntlswebservicesexamplescodes-150925070453-lva1-app6892/85/Android-ui-layouts-cntls-webservices-examples-codes-363-320.jpg)
![HttpProcessor inhttpproc = new ImmutableHttpProcessor(
new HttpResponseInterceptor[] {
new ResponseDate(),
new ResponseServer("Test/1.1"),
new ResponseContent(),
new ResponseConnControl()
});
// Set up HTTP protocol processor for outgoing connections
HttpProcessor outhttpproc = new ImmutableHttpProcessor(
new HttpRequestInterceptor[] {
new RequestContent(),
new RequestTargetHost(),
new RequestConnControl(),
new RequestUserAgent("Test/1.1"),
new RequestExpectContinue(true)
});
ProxyClientProtocolHandler clientHandler = new
ProxyClientProtocolHandler();
HttpAsyncRequester executor = new HttpAsyncRequester(
outhttpproc, new ProxyOutgoingConnectionReuseStrategy());
ProxyConnPool connPool = new ProxyConnPool(connectingIOReactor,
ConnectionConfig.DEFAULT);
connPool.setMaxTotal(100);
connPool.setDefaultMaxPerRoute(20);
UriHttpAsyncRequestHandlerMapper handlerRegistry = new
UriHttpAsyncRequestHandlerMapper();
handlerRegistry.register("*", new ProxyRequestHandler(targetHost,
executor, connPool));
ProxyServiceHandler serviceHandler = new ProxyServiceHandler(
inhttpproc,
new ProxyIncomingConnectionReuseStrategy(),
handlerRegistry);
final IOEventDispatch connectingEventDispatch = new
DefaultHttpClientIODispatch(
clientHandler, ConnectionConfig.DEFAULT);
final IOEventDispatch listeningEventDispatch = new
DefaultHttpServerIODispatch(
serviceHandler, ConnectionConfig.DEFAULT);
Thread t = new Thread(new Runnable() {
public void run() {
try {
connectingIOReactor.execute(connectingEventDispatch);
} catch (InterruptedIOException ex) {
System.err.println("Interrupted");
} catch (IOException ex) {
ex.printStackTrace();
} finally {
try {](https://image.slidesharecdn.com/androiduilayoutscntlswebservicesexamplescodes-150925070453-lva1-app6892/85/Android-ui-layouts-cntls-webservices-examples-codes-364-320.jpg)
![public HttpAsyncRequestConsumer<ProxyHttpExchange> processRequest(
final HttpRequest request,
final HttpContext context) {
ProxyHttpExchange httpExchange = (ProxyHttpExchange)
context.getAttribute("http-exchange");
if (httpExchange == null) {
httpExchange = new ProxyHttpExchange();
context.setAttribute("http-exchange", httpExchange);
}
synchronized (httpExchange) {
httpExchange.reset();
String id = String.format("%08X",
this.counter.getAndIncrement());
httpExchange.setId(id);
httpExchange.setTarget(this.target);
return new ProxyRequestConsumer(httpExchange, this.executor,
this.connPool);
}
}
public void handle(
final ProxyHttpExchange httpExchange,
final HttpAsyncExchange responseTrigger,
final HttpContext context) throws HttpException, IOException
{
synchronized (httpExchange) {
Exception ex = httpExchange.getException();
if (ex != null) {
System.out.println("[client<-proxy] " +
httpExchange.getId() + " " + ex);
int status = HttpStatus.SC_INTERNAL_SERVER_ERROR;
HttpResponse response = new
BasicHttpResponse(HttpVersion.HTTP_1_0, status,
EnglishReasonPhraseCatalog.INSTANCE.getReason(status, Locale.US));
String message = ex.getMessage();
if (message == null) {
message = "Unexpected error";
}
response.setEntity(new NStringEntity(message,
ContentType.DEFAULT_TEXT));
responseTrigger.submitResponse(new
BasicAsyncResponseProducer(response));
System.out.println("[client<-proxy] " +
httpExchange.getId() + " error response triggered");
}
HttpResponse response = httpExchange.getResponse();
if (response != null) {
responseTrigger.submitResponse(new
ProxyResponseProducer(httpExchange));
System.out.println("[client<-proxy] " +
httpExchange.getId() + " response triggered");
}
// No response yet.
httpExchange.setResponseTrigger(responseTrigger);
}](https://image.slidesharecdn.com/androiduilayoutscntlswebservicesexamplescodes-150925070453-lva1-app6892/85/Android-ui-layouts-cntls-webservices-examples-codes-368-320.jpg)
![}
}
static class ProxyRequestConsumer implements
HttpAsyncRequestConsumer<ProxyHttpExchange> {
private final ProxyHttpExchange httpExchange;
private final HttpAsyncRequester executor;
private final BasicNIOConnPool connPool;
private volatile boolean completed;
public ProxyRequestConsumer(
final ProxyHttpExchange httpExchange,
final HttpAsyncRequester executor,
final BasicNIOConnPool connPool) {
super();
this.httpExchange = httpExchange;
this.executor = executor;
this.connPool = connPool;
}
public void close() throws IOException {
}
public void requestReceived(final HttpRequest request) {
synchronized (this.httpExchange) {
System.out.println("[client->proxy] " +
this.httpExchange.getId() + " " + request.getRequestLine());
this.httpExchange.setRequest(request);
this.executor.execute(
new ProxyRequestProducer(this.httpExchange),
new ProxyResponseConsumer(this.httpExchange),
this.connPool);
}
}
public void consumeContent(
final ContentDecoder decoder, final IOControl ioctrl) throws
IOException {
synchronized (this.httpExchange) {
this.httpExchange.setClientIOControl(ioctrl);
// Receive data from the client
ByteBuffer buf = this.httpExchange.getInBuffer();
int n = decoder.read(buf);
System.out.println("[client->proxy] " +
this.httpExchange.getId() + " " + n + " bytes read");
if (decoder.isCompleted()) {
System.out.println("[client->proxy] " +
this.httpExchange.getId() + " content fully read");
}
// If the buffer is full, suspend client input until there is
free
// space in the buffer
if (!buf.hasRemaining()) {
ioctrl.suspendInput();](https://image.slidesharecdn.com/androiduilayoutscntlswebservicesexamplescodes-150925070453-lva1-app6892/85/Android-ui-layouts-cntls-webservices-examples-codes-369-320.jpg)
![System.out.println("[client->proxy] " +
this.httpExchange.getId() + " suspend client input");
}
// If there is some content in the input buffer make sure
origin
// output is active
if (buf.position() > 0) {
if (this.httpExchange.getOriginIOControl() != null) {
this.httpExchange.getOriginIOControl().requestOutput();
System.out.println("[client->proxy] " +
this.httpExchange.getId() + " request origin output");
}
}
}
}
public void requestCompleted(final HttpContext context) {
synchronized (this.httpExchange) {
this.completed = true;;
System.out.println("[client->proxy] " +
this.httpExchange.getId() + " request completed");
this.httpExchange.setRequestReceived();
if (this.httpExchange.getOriginIOControl() != null) {
this.httpExchange.getOriginIOControl().requestOutput();
System.out.println("[client->proxy] " +
this.httpExchange.getId() + " request origin output");
}
}
}
public Exception getException() {
return null;
}
public ProxyHttpExchange getResult() {
return this.httpExchange;
}
public boolean isDone() {
return this.completed;
}
public void failed(final Exception ex) {
System.out.println("[client->proxy] " + ex.toString());
}
}
static class ProxyRequestProducer implements HttpAsyncRequestProducer {
private final ProxyHttpExchange httpExchange;
public ProxyRequestProducer(final ProxyHttpExchange httpExchange) {
super();
this.httpExchange = httpExchange;
}](https://image.slidesharecdn.com/androiduilayoutscntlswebservicesexamplescodes-150925070453-lva1-app6892/85/Android-ui-layouts-cntls-webservices-examples-codes-370-320.jpg)
![public void close() throws IOException {
}
public HttpHost getTarget() {
synchronized (this.httpExchange) {
return this.httpExchange.getTarget();
}
}
public HttpRequest generateRequest() {
synchronized (this.httpExchange) {
HttpRequest request = this.httpExchange.getRequest();
System.out.println("[proxy->origin] " +
this.httpExchange.getId() + " " + request.getRequestLine());
// Rewrite request!!!!
if (request instanceof HttpEntityEnclosingRequest) {
BasicHttpEntityEnclosingRequest r = new
BasicHttpEntityEnclosingRequest(
request.getRequestLine());
r.setEntity(((HttpEntityEnclosingRequest)
request).getEntity());
return r;
} else {
return new BasicHttpRequest(request.getRequestLine());
}
}
}
public void produceContent(
final ContentEncoder encoder, final IOControl ioctrl) throws
IOException {
synchronized (this.httpExchange) {
this.httpExchange.setOriginIOControl(ioctrl);
// Send data to the origin server
ByteBuffer buf = this.httpExchange.getInBuffer();
buf.flip();
int n = encoder.write(buf);
buf.compact();
System.out.println("[proxy->origin] " +
this.httpExchange.getId() + " " + n + " bytes written");
// If there is space in the buffer and the message has not
been
// transferred, make sure the client is sending more data
if (buf.hasRemaining() &&
!this.httpExchange.isRequestReceived()) {
if (this.httpExchange.getClientIOControl() != null) {
this.httpExchange.getClientIOControl().requestInput();
System.out.println("[proxy->origin] " +
this.httpExchange.getId() + " request client input");
}
}
if (buf.position() == 0) {
if (this.httpExchange.isRequestReceived()) {
encoder.complete();](https://image.slidesharecdn.com/androiduilayoutscntlswebservicesexamplescodes-150925070453-lva1-app6892/85/Android-ui-layouts-cntls-webservices-examples-codes-371-320.jpg)
![System.out.println("[proxy->origin] " +
this.httpExchange.getId() + " content fully written");
} else {
// Input buffer is empty. Wait until the client fills
up
// the buffer
ioctrl.suspendOutput();
System.out.println("[proxy->origin] " +
this.httpExchange.getId() + " suspend origin output");
}
}
}
}
public void requestCompleted(final HttpContext context) {
synchronized (this.httpExchange) {
System.out.println("[proxy->origin] " +
this.httpExchange.getId() + " request completed");
}
}
public boolean isRepeatable() {
return false;
}
public void resetRequest() {
}
public void failed(final Exception ex) {
System.out.println("[proxy->origin] " + ex.toString());
}
}
static class ProxyResponseConsumer implements
HttpAsyncResponseConsumer<ProxyHttpExchange> {
private final ProxyHttpExchange httpExchange;
private volatile boolean completed;
public ProxyResponseConsumer(final ProxyHttpExchange httpExchange) {
super();
this.httpExchange = httpExchange;
}
public void close() throws IOException {
}
public void responseReceived(final HttpResponse response) {
synchronized (this.httpExchange) {
System.out.println("[proxy<-origin] " +
this.httpExchange.getId() + " " + response.getStatusLine());
this.httpExchange.setResponse(response);
HttpAsyncExchange responseTrigger =
this.httpExchange.getResponseTrigger();](https://image.slidesharecdn.com/androiduilayoutscntlswebservicesexamplescodes-150925070453-lva1-app6892/85/Android-ui-layouts-cntls-webservices-examples-codes-372-320.jpg)
![if (responseTrigger != null &&
!responseTrigger.isCompleted()) {
System.out.println("[client<-proxy] " +
this.httpExchange.getId() + " response triggered");
responseTrigger.submitResponse(new
ProxyResponseProducer(this.httpExchange));
}
}
}
public void consumeContent(
final ContentDecoder decoder, final IOControl ioctrl) throws
IOException {
synchronized (this.httpExchange) {
this.httpExchange.setOriginIOControl(ioctrl);
// Receive data from the origin
ByteBuffer buf = this.httpExchange.getOutBuffer();
int n = decoder.read(buf);
System.out.println("[proxy<-origin] " +
this.httpExchange.getId() + " " + n + " bytes read");
if (decoder.isCompleted()) {
System.out.println("[proxy<-origin] " +
this.httpExchange.getId() + " content fully read");
}
// If the buffer is full, suspend origin input until there is
free
// space in the buffer
if (!buf.hasRemaining()) {
ioctrl.suspendInput();
System.out.println("[proxy<-origin] " +
this.httpExchange.getId() + " suspend origin input");
}
// If there is some content in the input buffer make sure
client
// output is active
if (buf.position() > 0) {
if (this.httpExchange.getClientIOControl() != null) {
this.httpExchange.getClientIOControl().requestOutput();
System.out.println("[proxy<-origin] " +
this.httpExchange.getId() + " request client output");
}
}
}
}
public void responseCompleted(final HttpContext context) {
synchronized (this.httpExchange) {
if (this.completed) {
return;
}
this.completed = true;
System.out.println("[proxy<-origin] " +
this.httpExchange.getId() + " response completed");
this.httpExchange.setResponseReceived();
if (this.httpExchange.getClientIOControl() != null) {
this.httpExchange.getClientIOControl().requestOutput();](https://image.slidesharecdn.com/androiduilayoutscntlswebservicesexamplescodes-150925070453-lva1-app6892/85/Android-ui-layouts-cntls-webservices-examples-codes-373-320.jpg)
![System.out.println("[proxy<-origin] " +
this.httpExchange.getId() + " request client output");
}
}
}
public void failed(final Exception ex) {
synchronized (this.httpExchange) {
if (this.completed) {
return;
}
this.completed = true;
this.httpExchange.setException(ex);
HttpAsyncExchange responseTrigger =
this.httpExchange.getResponseTrigger();
if (responseTrigger != null &&
!responseTrigger.isCompleted()) {
System.out.println("[client<-proxy] " +
this.httpExchange.getId() + " " + ex);
int status = HttpStatus.SC_INTERNAL_SERVER_ERROR;
HttpResponse response = new
BasicHttpResponse(HttpVersion.HTTP_1_0, status,
EnglishReasonPhraseCatalog.INSTANCE.getReason(status, Locale.US));
String message = ex.getMessage();
if (message == null) {
message = "Unexpected error";
}
response.setEntity(new NStringEntity(message,
ContentType.DEFAULT_TEXT));
responseTrigger.submitResponse(new
BasicAsyncResponseProducer(response));
}
}
}
public boolean cancel() {
synchronized (this.httpExchange) {
if (this.completed) {
return false;
}
failed(new InterruptedIOException("Cancelled"));
return true;
}
}
public ProxyHttpExchange getResult() {
return this.httpExchange;
}
public Exception getException() {
return null;
}
public boolean isDone() {
return this.completed;
}](https://image.slidesharecdn.com/androiduilayoutscntlswebservicesexamplescodes-150925070453-lva1-app6892/85/Android-ui-layouts-cntls-webservices-examples-codes-374-320.jpg)
![}
static class ProxyResponseProducer implements HttpAsyncResponseProducer {
private final ProxyHttpExchange httpExchange;
public ProxyResponseProducer(final ProxyHttpExchange httpExchange) {
super();
this.httpExchange = httpExchange;
}
public void close() throws IOException {
this.httpExchange.reset();
}
public HttpResponse generateResponse() {
synchronized (this.httpExchange) {
HttpResponse response = this.httpExchange.getResponse();
System.out.println("[client<-proxy] " +
this.httpExchange.getId() + " " + response.getStatusLine());
// Rewrite response!!!!
BasicHttpResponse r = new
BasicHttpResponse(response.getStatusLine());
r.setEntity(response.getEntity());
return r;
}
}
public void produceContent(
final ContentEncoder encoder, final IOControl ioctrl) throws
IOException {
synchronized (this.httpExchange) {
this.httpExchange.setClientIOControl(ioctrl);
// Send data to the client
ByteBuffer buf = this.httpExchange.getOutBuffer();
buf.flip();
int n = encoder.write(buf);
buf.compact();
System.out.println("[client<-proxy] " +
this.httpExchange.getId() + " " + n + " bytes written");
// If there is space in the buffer and the message has not
been
// transferred, make sure the origin is sending more data
if (buf.hasRemaining() &&
!this.httpExchange.isResponseReceived()) {
if (this.httpExchange.getOriginIOControl() != null) {
this.httpExchange.getOriginIOControl().requestInput();
System.out.println("[client<-proxy] " +
this.httpExchange.getId() + " request origin input");
}
}
if (buf.position() == 0) {
if (this.httpExchange.isResponseReceived()) {
encoder.complete();](https://image.slidesharecdn.com/androiduilayoutscntlswebservicesexamplescodes-150925070453-lva1-app6892/85/Android-ui-layouts-cntls-webservices-examples-codes-375-320.jpg)
![System.out.println("[client<-proxy] " +
this.httpExchange.getId() + " content fully written");
} else {
// Input buffer is empty. Wait until the origin fills
up
// the buffer
ioctrl.suspendOutput();
System.out.println("[client<-proxy] " +
this.httpExchange.getId() + " suspend client output");
}
}
}
}
public void responseCompleted(final HttpContext context) {
synchronized (this.httpExchange) {
System.out.println("[client<-proxy] " +
this.httpExchange.getId() + " response completed");
}
}
public void failed(final Exception ex) {
System.out.println("[client<-proxy] " + ex.toString());
}
}
static class ProxyIncomingConnectionReuseStrategy extends
DefaultConnectionReuseStrategy {
@Override
public boolean keepAlive(final HttpResponse response, final
HttpContext context) {
NHttpConnection conn = (NHttpConnection) context.getAttribute(
HttpCoreContext.HTTP_CONNECTION);
boolean keepAlive = super.keepAlive(response, context);
if (keepAlive) {
System.out.println("[client->proxy] connection kept alive " +
conn);
}
return keepAlive;
}
};
static class ProxyOutgoingConnectionReuseStrategy extends
DefaultConnectionReuseStrategy {
@Override
public boolean keepAlive(final HttpResponse response, final
HttpContext context) {
NHttpConnection conn = (NHttpConnection) context.getAttribute(
HttpCoreContext.HTTP_CONNECTION);
boolean keepAlive = super.keepAlive(response, context);
if (keepAlive) {
System.out.println("[proxy->origin] connection kept alive " +
conn);](https://image.slidesharecdn.com/androiduilayoutscntlswebservicesexamplescodes-150925070453-lva1-app6892/85/Android-ui-layouts-cntls-webservices-examples-codes-376-320.jpg)
![}
return keepAlive;
}
};
static class ProxyServiceHandler extends HttpAsyncService {
public ProxyServiceHandler(
final HttpProcessor httpProcessor,
final ConnectionReuseStrategy reuseStrategy,
final HttpAsyncRequestHandlerMapper handlerResolver) {
super(httpProcessor, reuseStrategy, null, handlerResolver, null);
}
@Override
protected void log(final Exception ex) {
ex.printStackTrace();
}
@Override
public void connected(final NHttpServerConnection conn) {
System.out.println("[client->proxy] connection open " + conn);
super.connected(conn);
}
@Override
public void closed(final NHttpServerConnection conn) {
System.out.println("[client->proxy] connection closed " + conn);
super.closed(conn);
}
}
static class ProxyClientProtocolHandler extends HttpAsyncRequestExecutor
{
public ProxyClientProtocolHandler() {
super();
}
@Override
protected void log(final Exception ex) {
ex.printStackTrace();
}
@Override
public void connected(final NHttpClientConnection conn,
final Object attachment) throws IOException, HttpException {
System.out.println("[proxy->origin] connection open " + conn);
super.connected(conn, attachment);
}
@Override
public void closed(final NHttpClientConnection conn) {
System.out.println("[proxy->origin] connection closed " + conn);
super.closed(conn);](https://image.slidesharecdn.com/androiduilayoutscntlswebservicesexamplescodes-150925070453-lva1-app6892/85/Android-ui-layouts-cntls-webservices-examples-codes-377-320.jpg)
![}
}
static class ProxyConnPool extends BasicNIOConnPool {
public ProxyConnPool(
final ConnectingIOReactor ioreactor,
final ConnectionConfig config) {
super(ioreactor, config);
}
public ProxyConnPool(
final ConnectingIOReactor ioreactor,
final NIOConnFactory<HttpHost, NHttpClientConnection>
connFactory,
final int connectTimeout) {
super(ioreactor, connFactory, connectTimeout);
}
@Override
public void release(final BasicNIOPoolEntry entry, boolean reusable)
{
System.out.println("[proxy->origin] connection released " +
entry.getConnection());
super.release(entry, reusable);
StringBuilder buf = new StringBuilder();
PoolStats totals = getTotalStats();
buf.append("[total kept alive:
").append(totals.getAvailable()).append("; ");
buf.append("total allocated: ").append(totals.getLeased() +
totals.getAvailable());
buf.append(" of ").append(totals.getMax()).append("]");
System.out.println("[proxy->origin] " + buf.toString());
}
}
}
For further readings
Refer](https://image.slidesharecdn.com/androiduilayoutscntlswebservicesexamplescodes-150925070453-lva1-app6892/85/Android-ui-layouts-cntls-webservices-examples-codes-378-320.jpg)
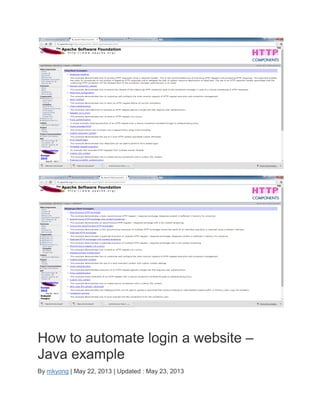
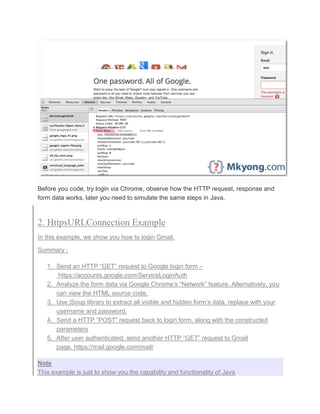
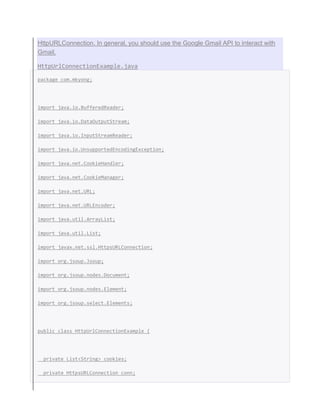
![private final String USER_AGENT = "Mozilla/5.0";
public static void main(String[] args) throws Exception {
String url = "https://accounts.google.com/ServiceLoginAuth";
String gmail = "https://mail.google.com/mail/";
HttpUrlConnectionExample http = new HttpUrlConnectionExample();
// make sure cookies is turn on
CookieHandler.setDefault(new CookieManager());
// 1. Send a "GET" request, so that you can extract the form's data.
String page = http.GetPageContent(url);
String postParams = http.getFormParams(page, "username@gmail.com",
"password");
// 2. Construct above post's content and then send a POST request for
// authentication
http.sendPost(url, postParams);
// 3. success then go to gmail.
String result = http.GetPageContent(gmail);](https://image.slidesharecdn.com/androiduilayoutscntlswebservicesexamplescodes-150925070453-lva1-app6892/85/Android-ui-layouts-cntls-webservices-examples-codes-383-320.jpg)
![System.out.println(result);
}
private void sendPost(String url, String postParams) throws Exception {
URL obj = new URL(url);
conn = (HttpsURLConnection) obj.openConnection();
// Acts like a browser
conn.setUseCaches(false);
conn.setRequestMethod("POST");
conn.setRequestProperty("Host", "accounts.google.com");
conn.setRequestProperty("User-Agent", USER_AGENT);
conn.setRequestProperty("Accept",
"text/html,application/xhtml+xml,application/xml;q=0.9,*/*;q=0.8");
conn.setRequestProperty("Accept-Language", "en-US,en;q=0.5");
for (String cookie : this.cookies) {
conn.addRequestProperty("Cookie", cookie.split(";", 1)[0]);
}
conn.setRequestProperty("Connection", "keep-alive");
conn.setRequestProperty("Referer",
"https://accounts.google.com/ServiceLoginAuth");
conn.setRequestProperty("Content-Type", "application/x-www-form-
urlencoded");
conn.setRequestProperty("Content-Length",
Integer.toString(postParams.length()));](https://image.slidesharecdn.com/androiduilayoutscntlswebservicesexamplescodes-150925070453-lva1-app6892/85/Android-ui-layouts-cntls-webservices-examples-codes-384-320.jpg)
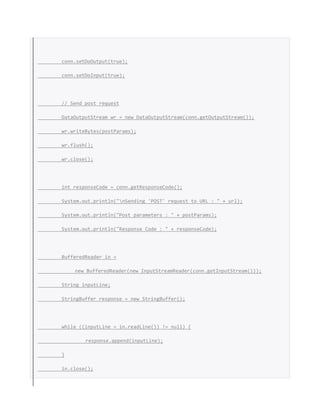
![// System.out.println(response.toString());
}
private String GetPageContent(String url) throws Exception {
URL obj = new URL(url);
conn = (HttpsURLConnection) obj.openConnection();
// default is GET
conn.setRequestMethod("GET");
conn.setUseCaches(false);
// act like a browser
conn.setRequestProperty("User-Agent", USER_AGENT);
conn.setRequestProperty("Accept",
"text/html,application/xhtml+xml,application/xml;q=0.9,*/*;q=0.8");
conn.setRequestProperty("Accept-Language", "en-US,en;q=0.5");
if (cookies != null) {
for (String cookie : this.cookies) {
conn.addRequestProperty("Cookie", cookie.split(";", 1)[0]);
}
}](https://image.slidesharecdn.com/androiduilayoutscntlswebservicesexamplescodes-150925070453-lva1-app6892/85/Android-ui-layouts-cntls-webservices-examples-codes-386-320.jpg)
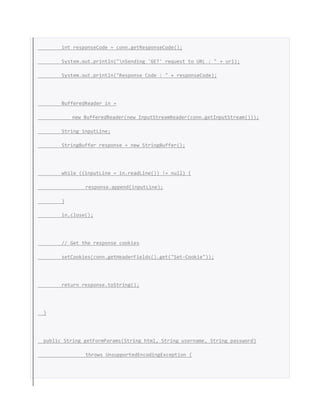

1. The document describes how to build an image gallery using an Android GridView. It involves adding a GridView to the layout, defining the grid item layout with an ImageView and TextView, creating a GridView adapter, setting the adapter, and handling clicks to open a detail activity. 2. Key aspects are using a GridView with attributes like numColumns, stretchMode, and verticalSpacing, and an adapter to populate each grid item from data. Clicking a grid item navigates to a details page. 3. The example builds the UI, handles clicks, and customizes the GridView style to display images and text in a grid.