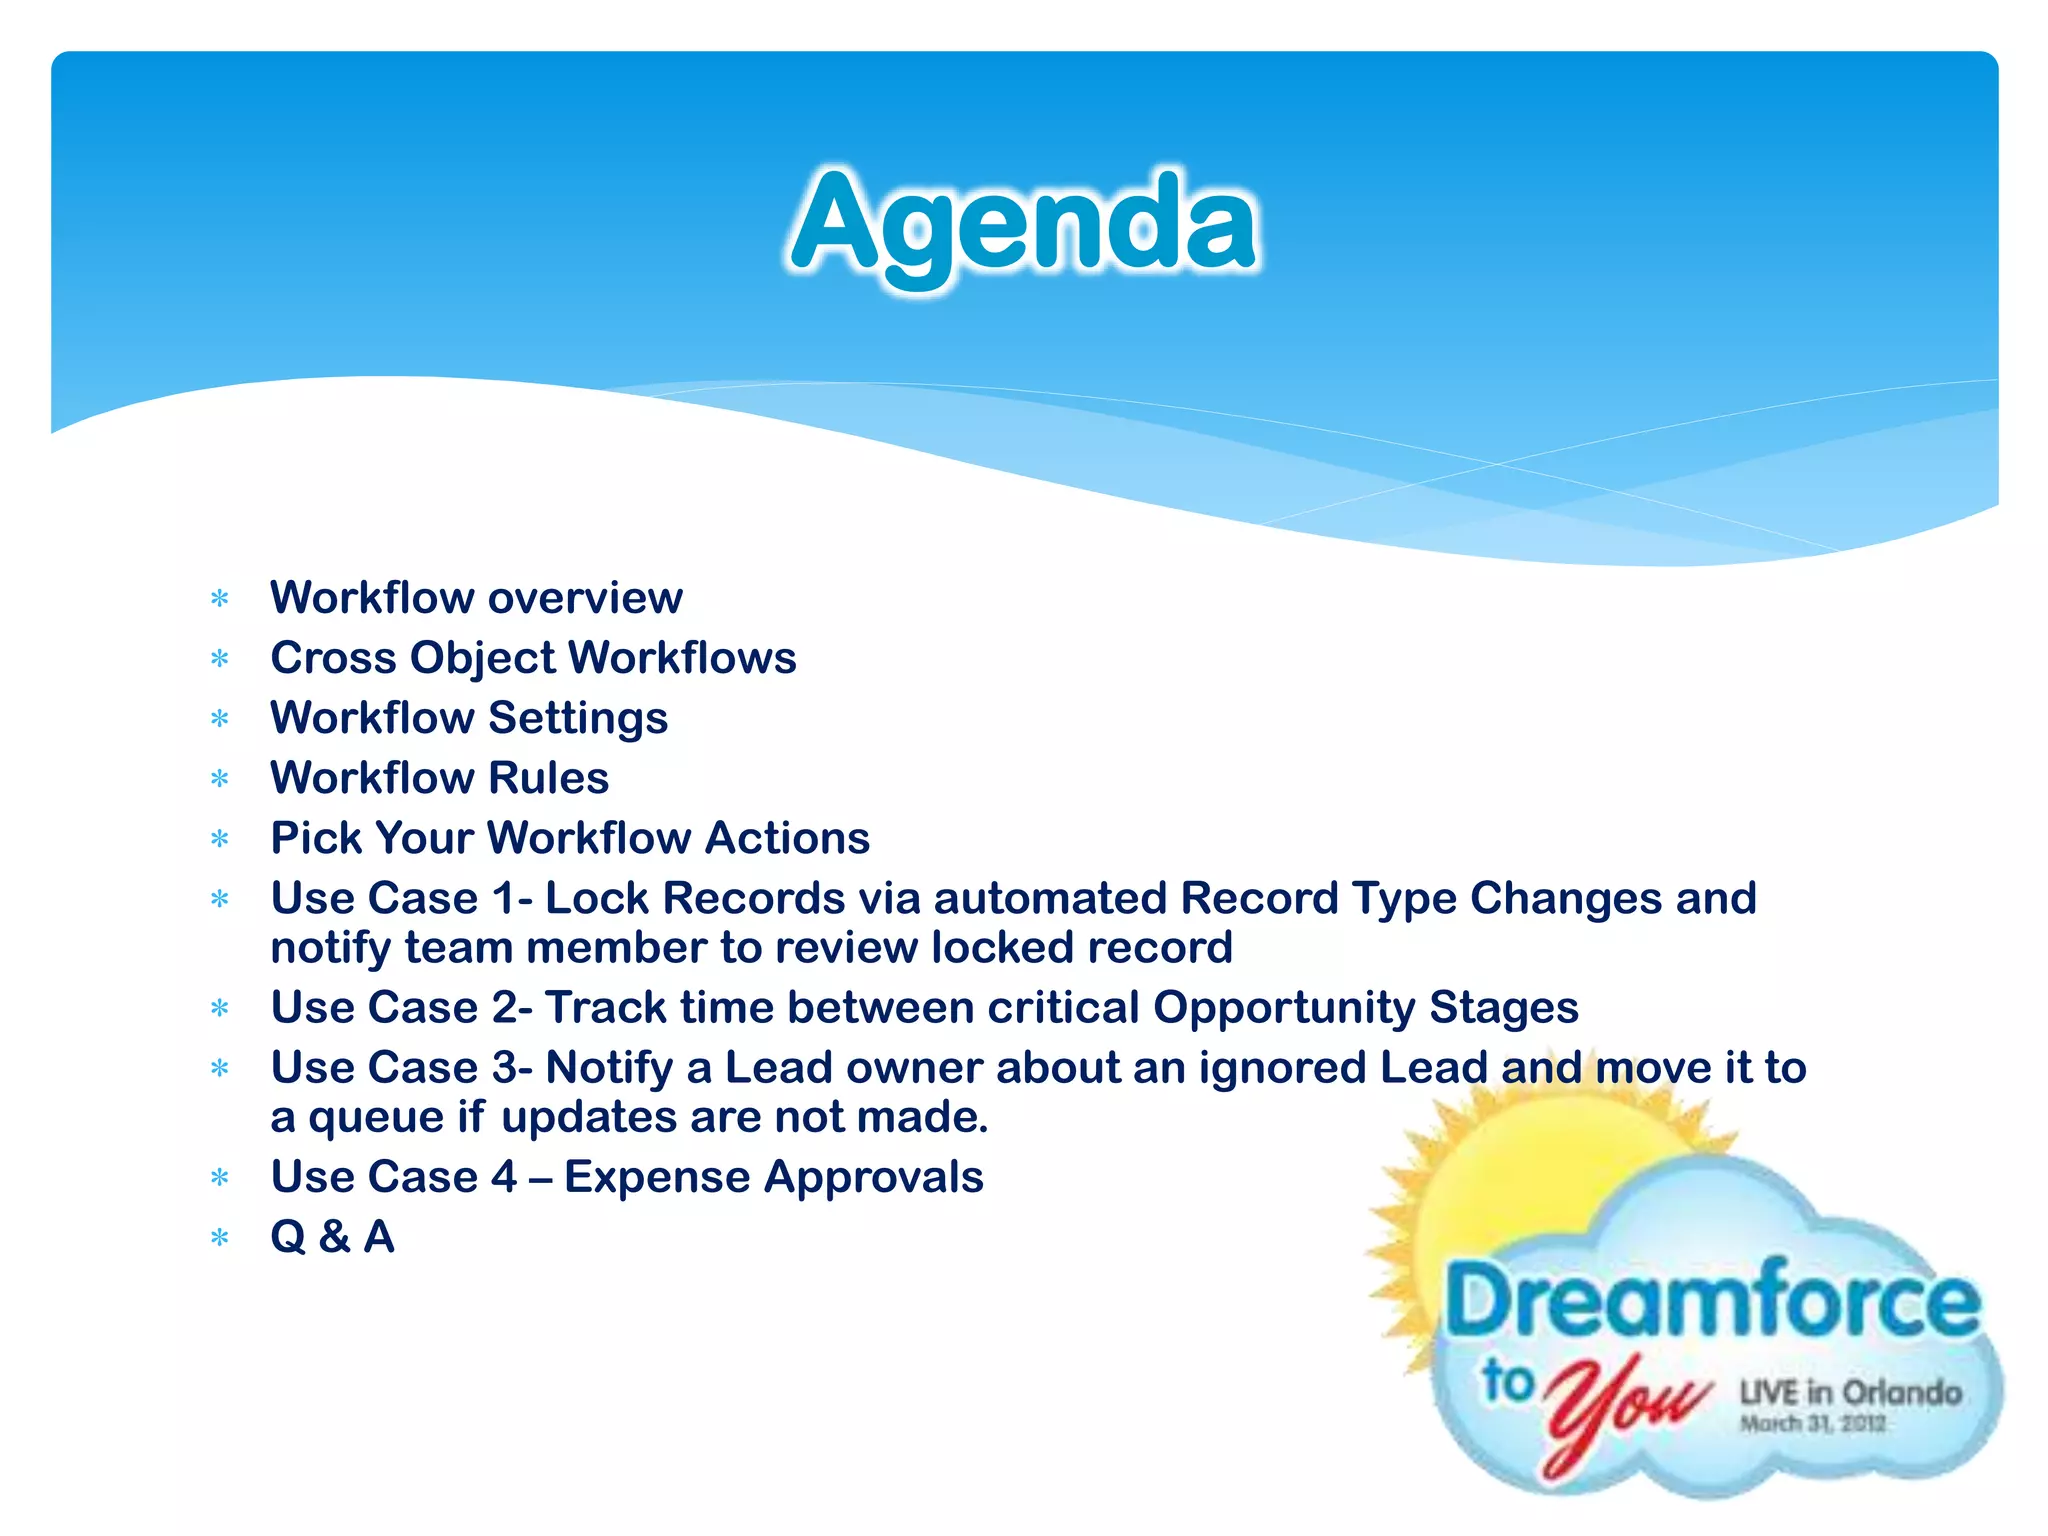
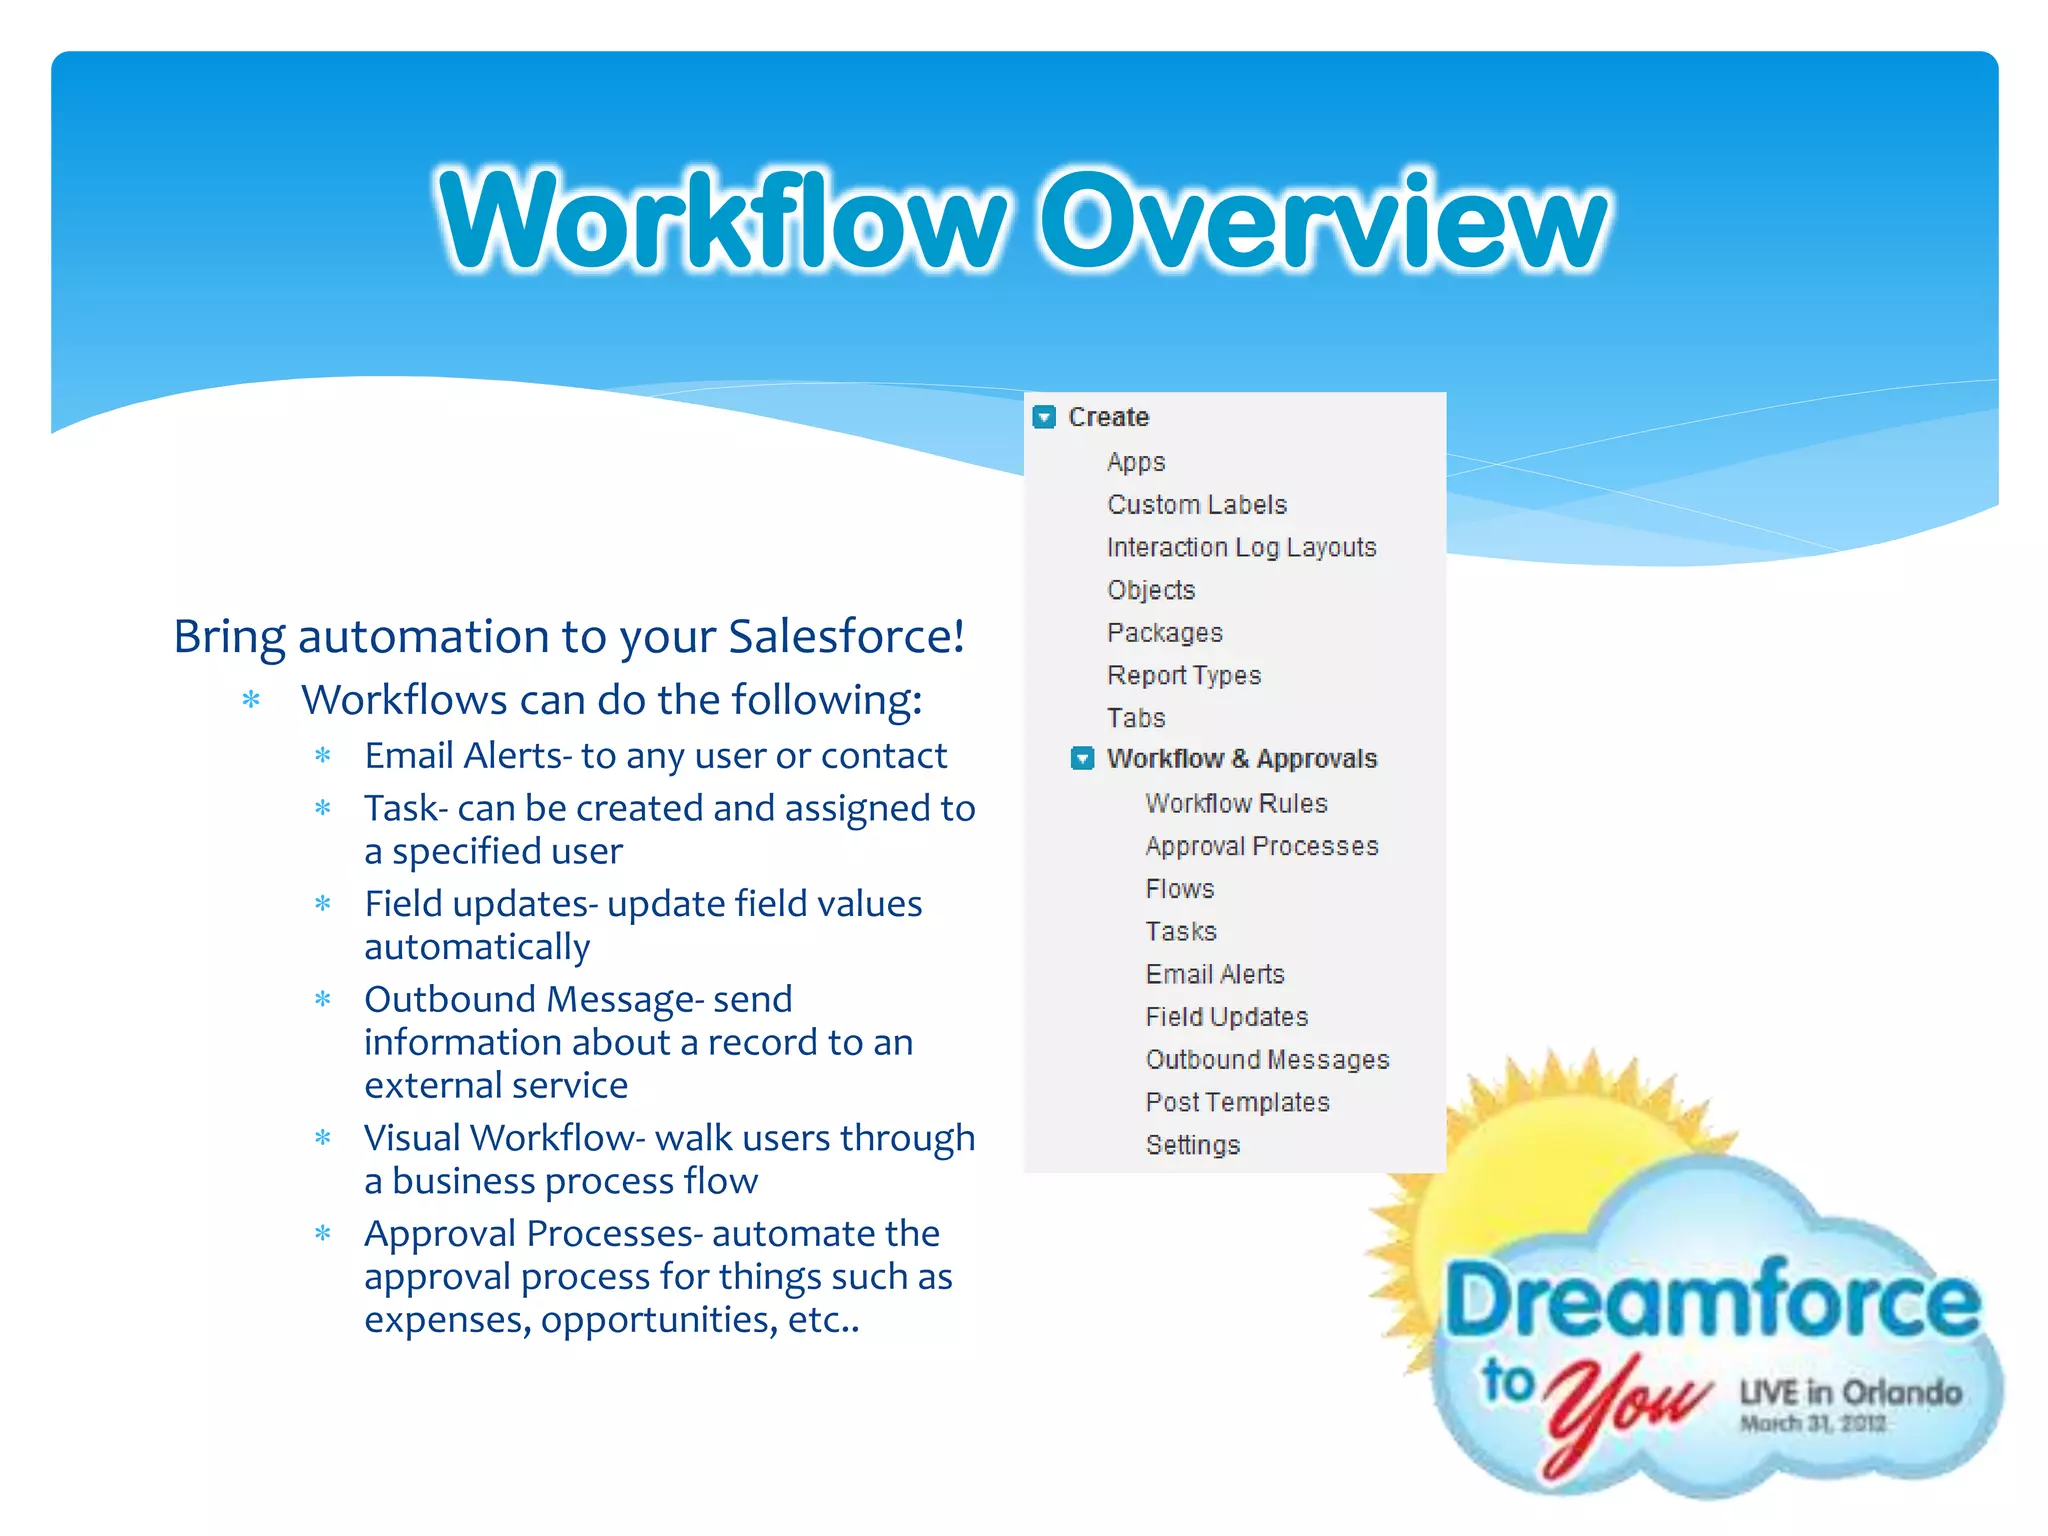
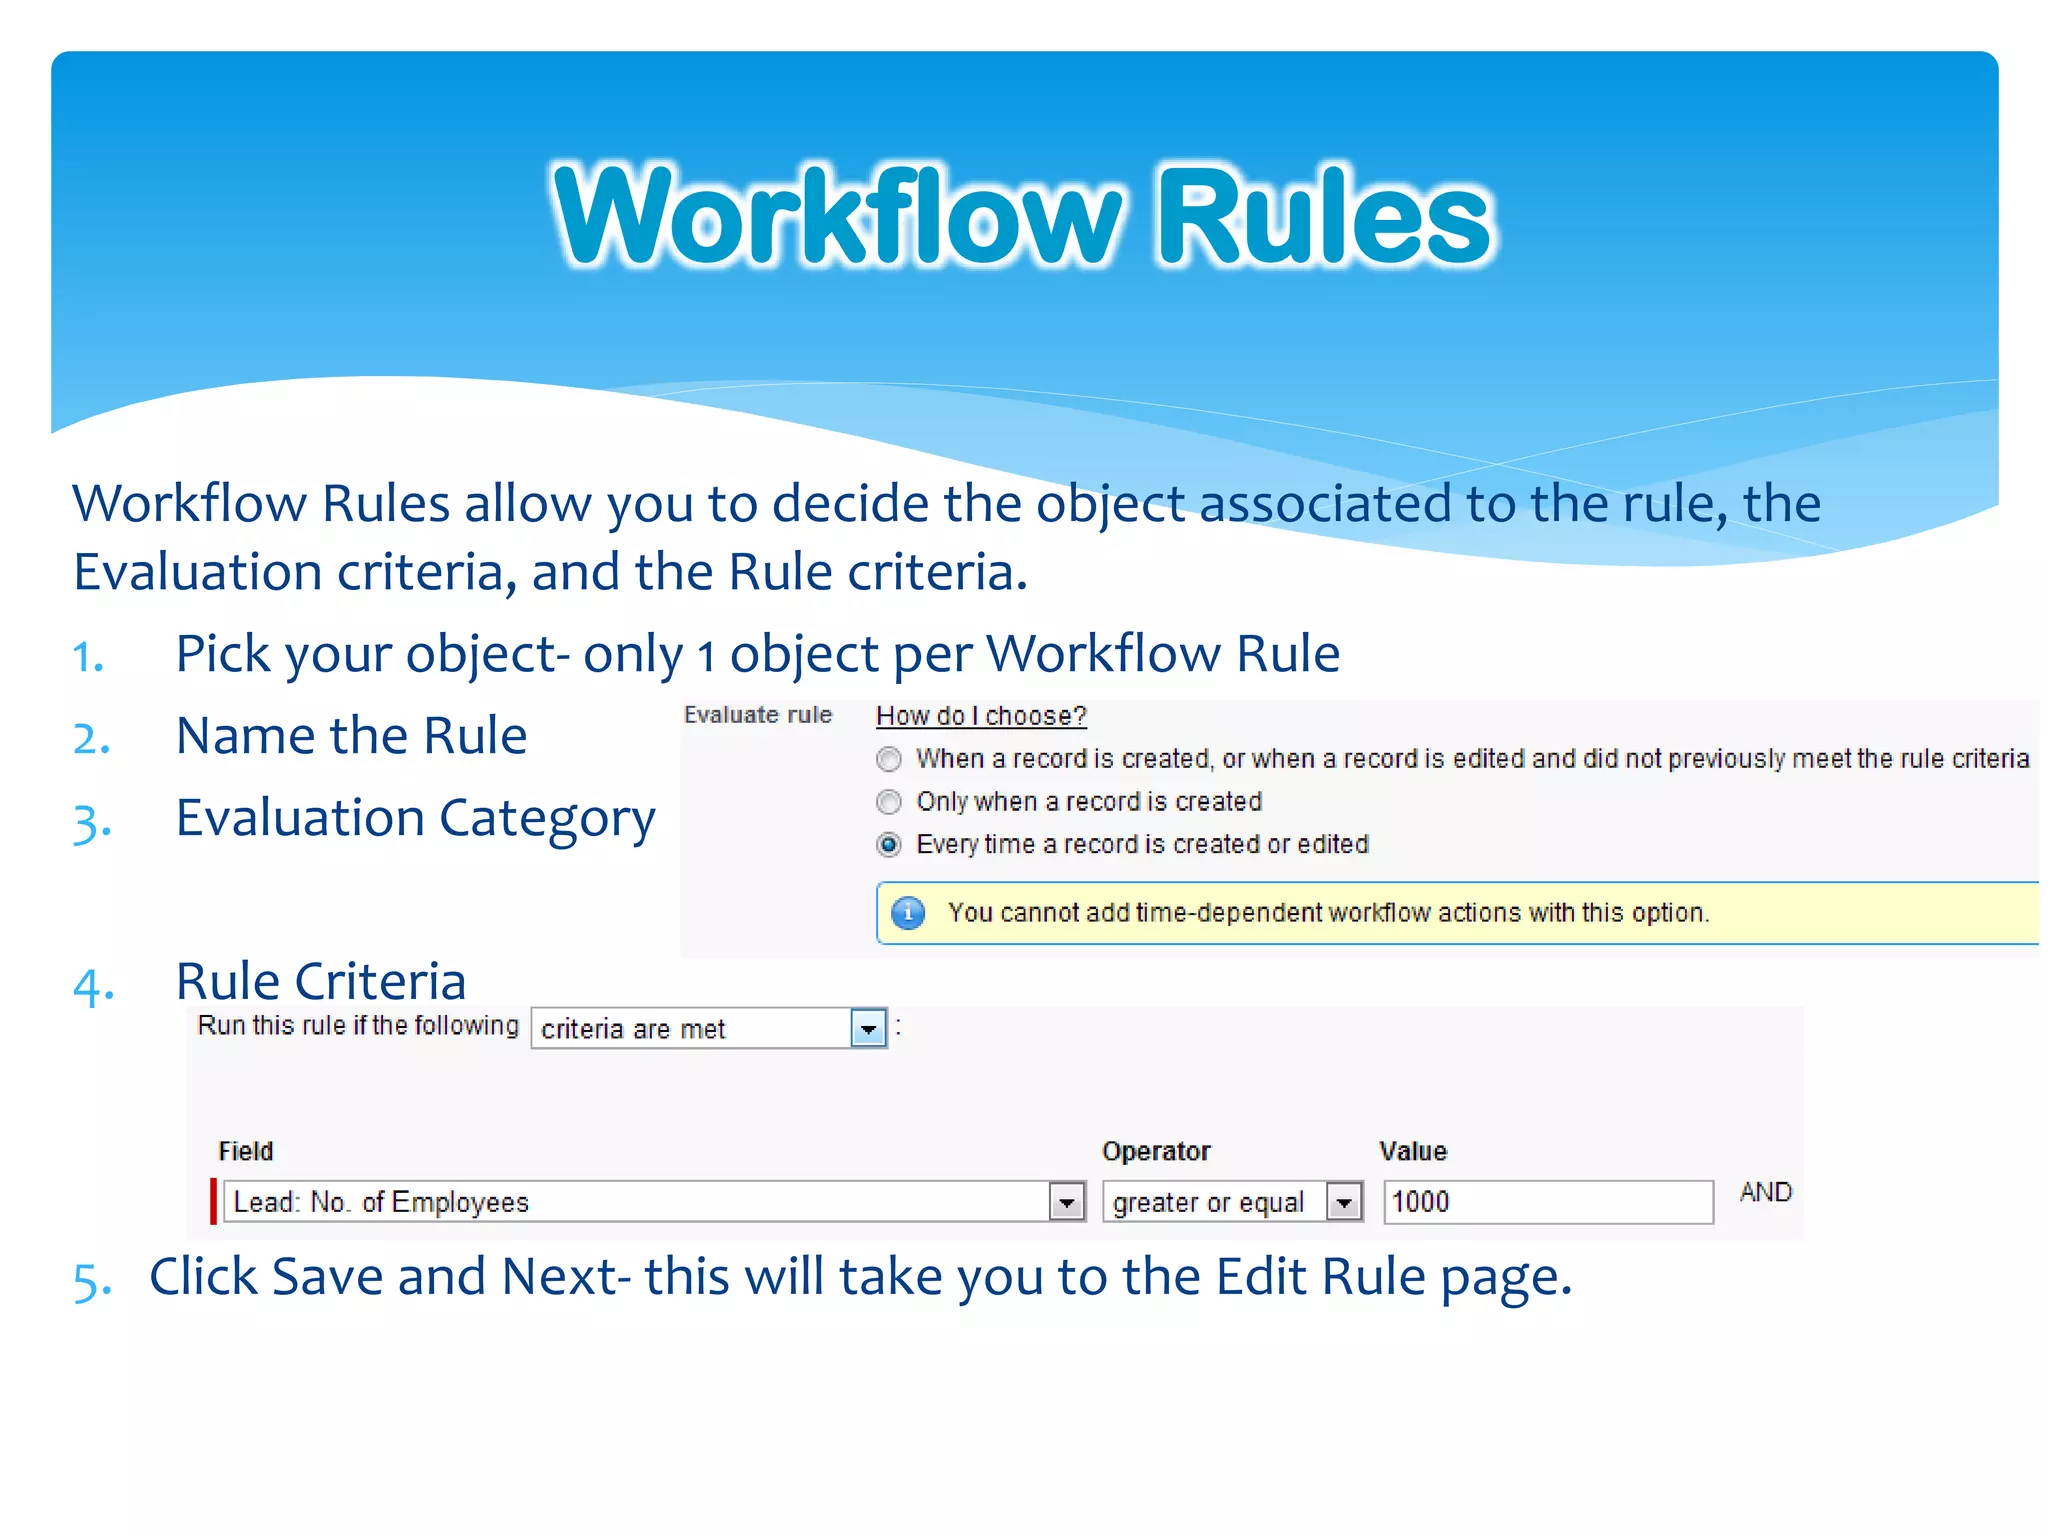
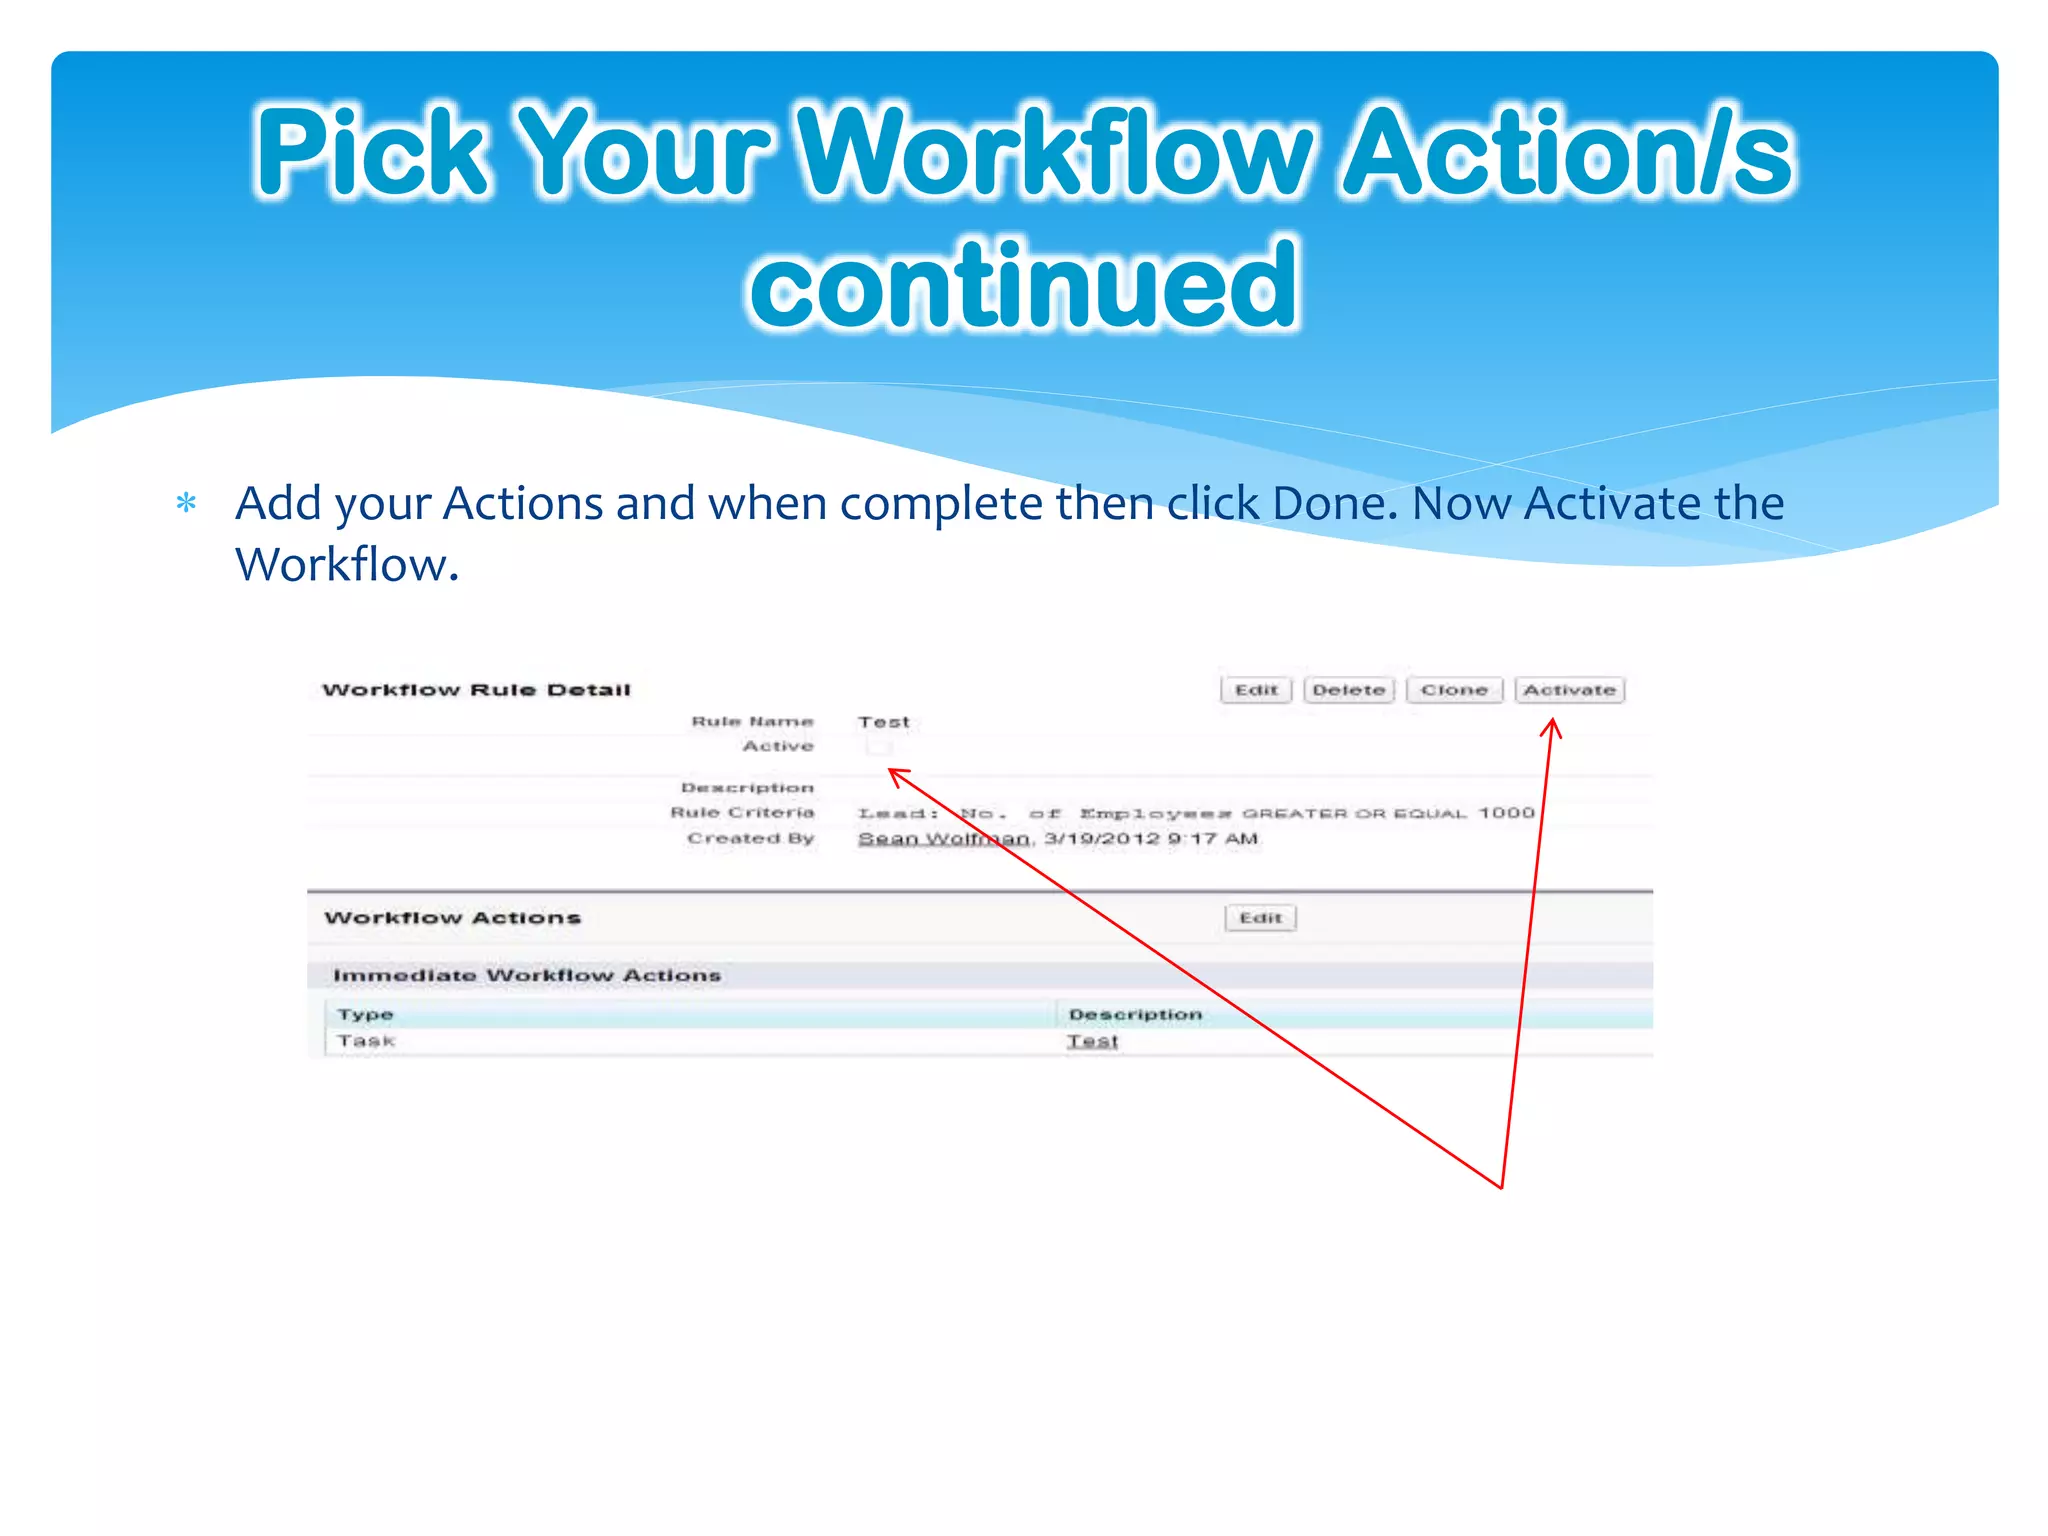
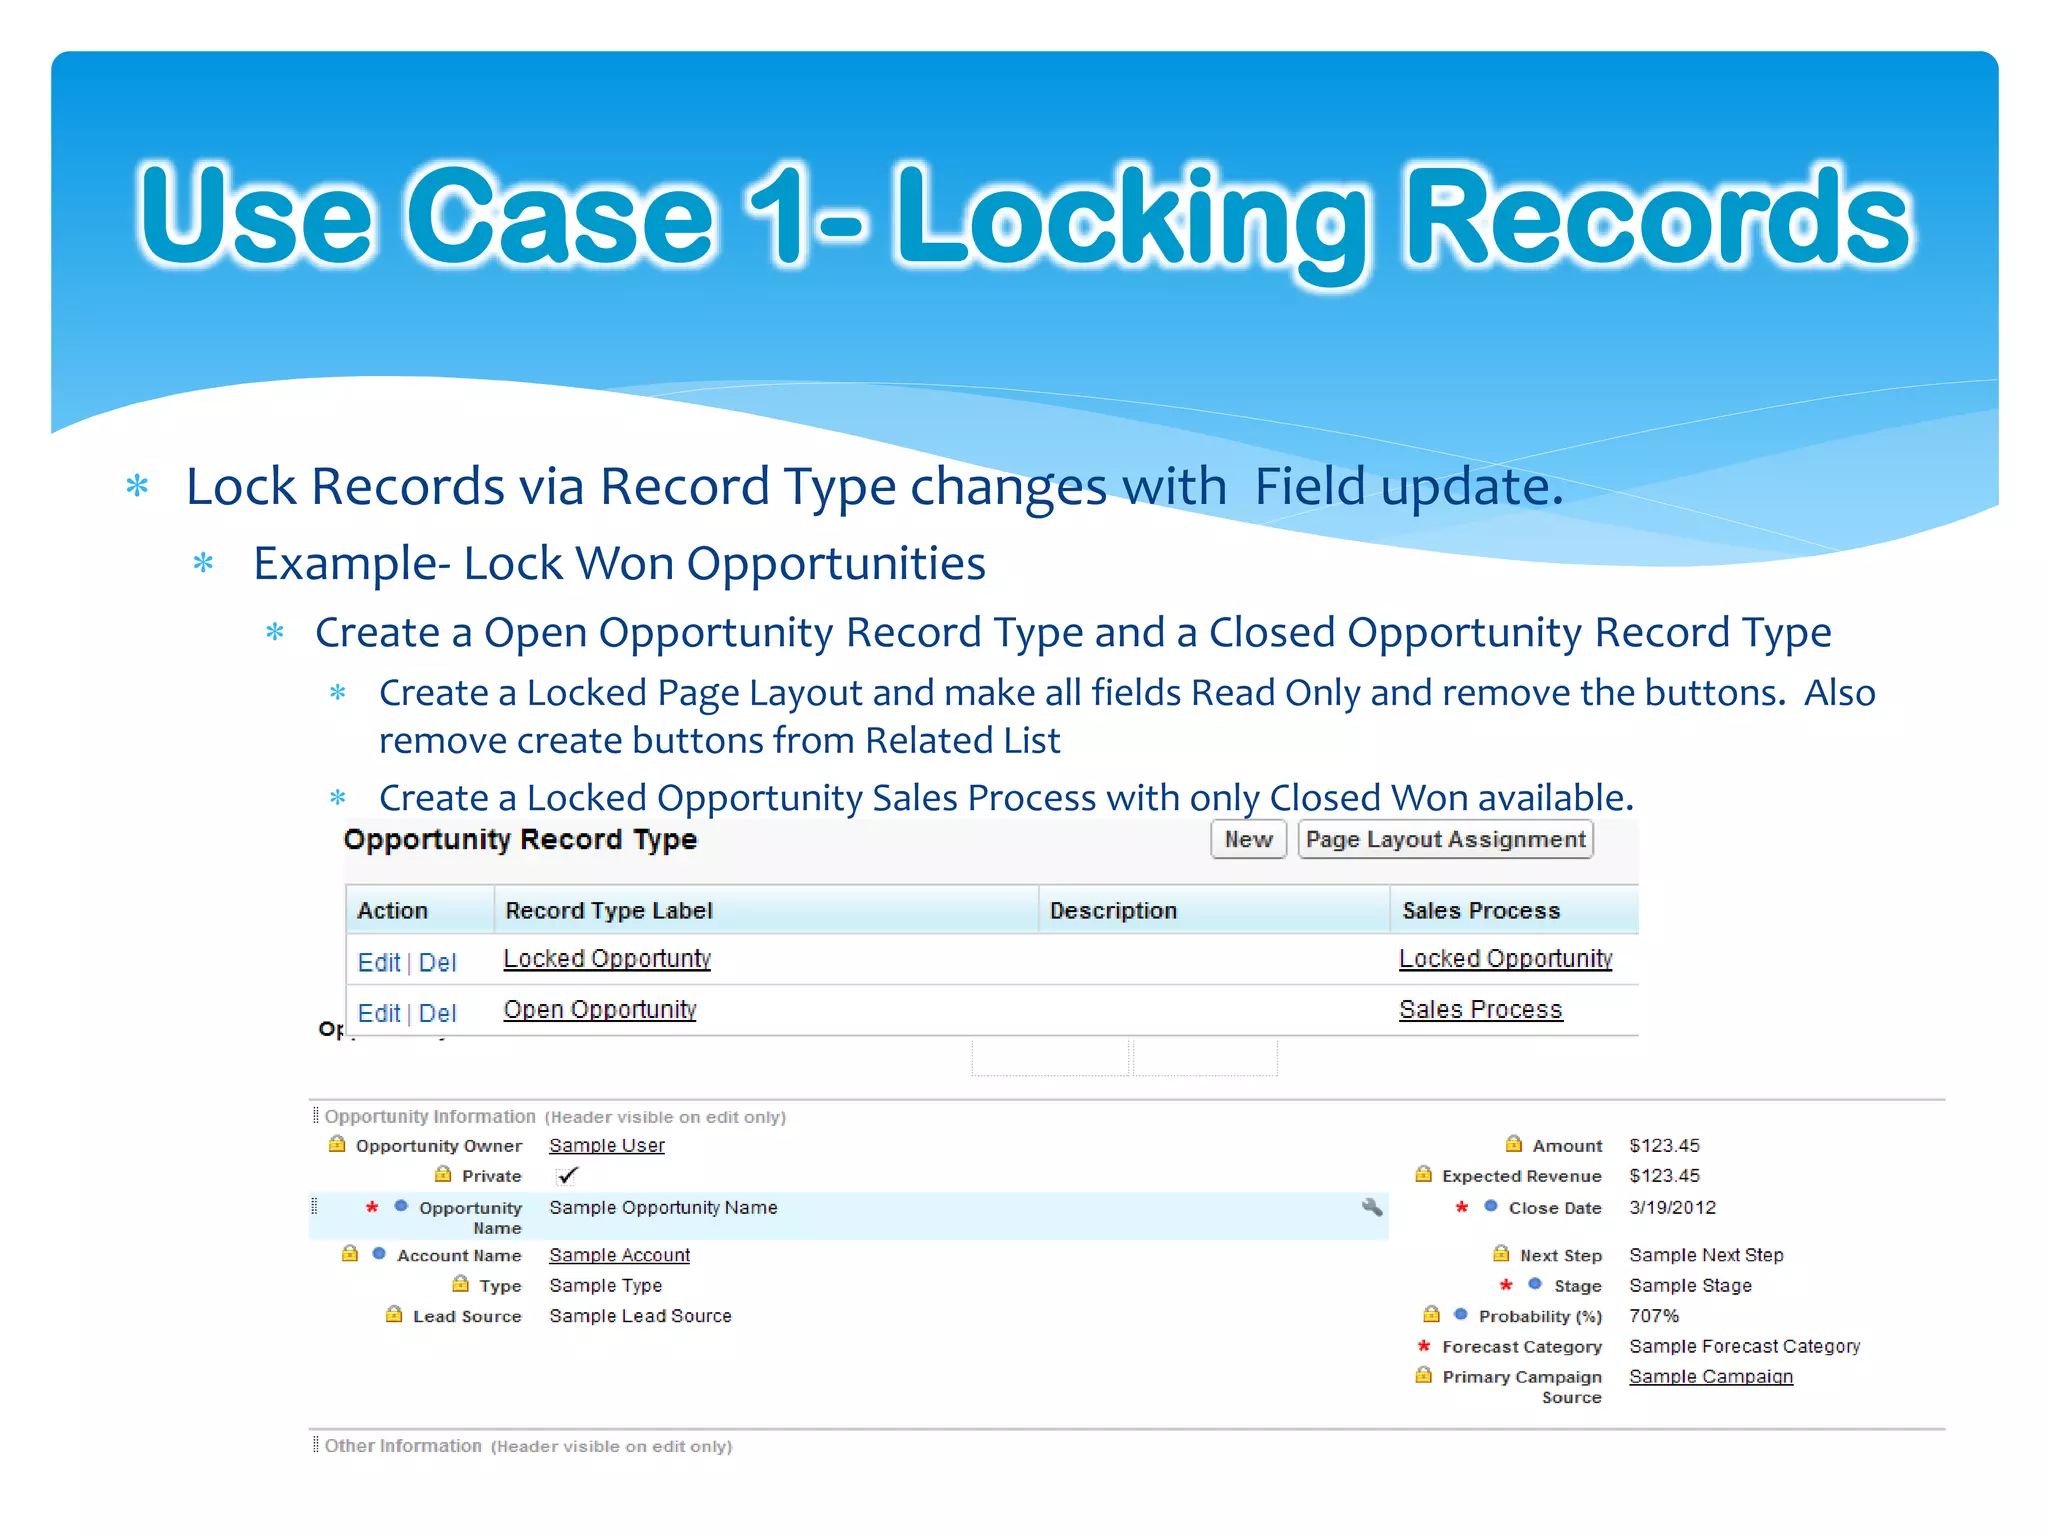
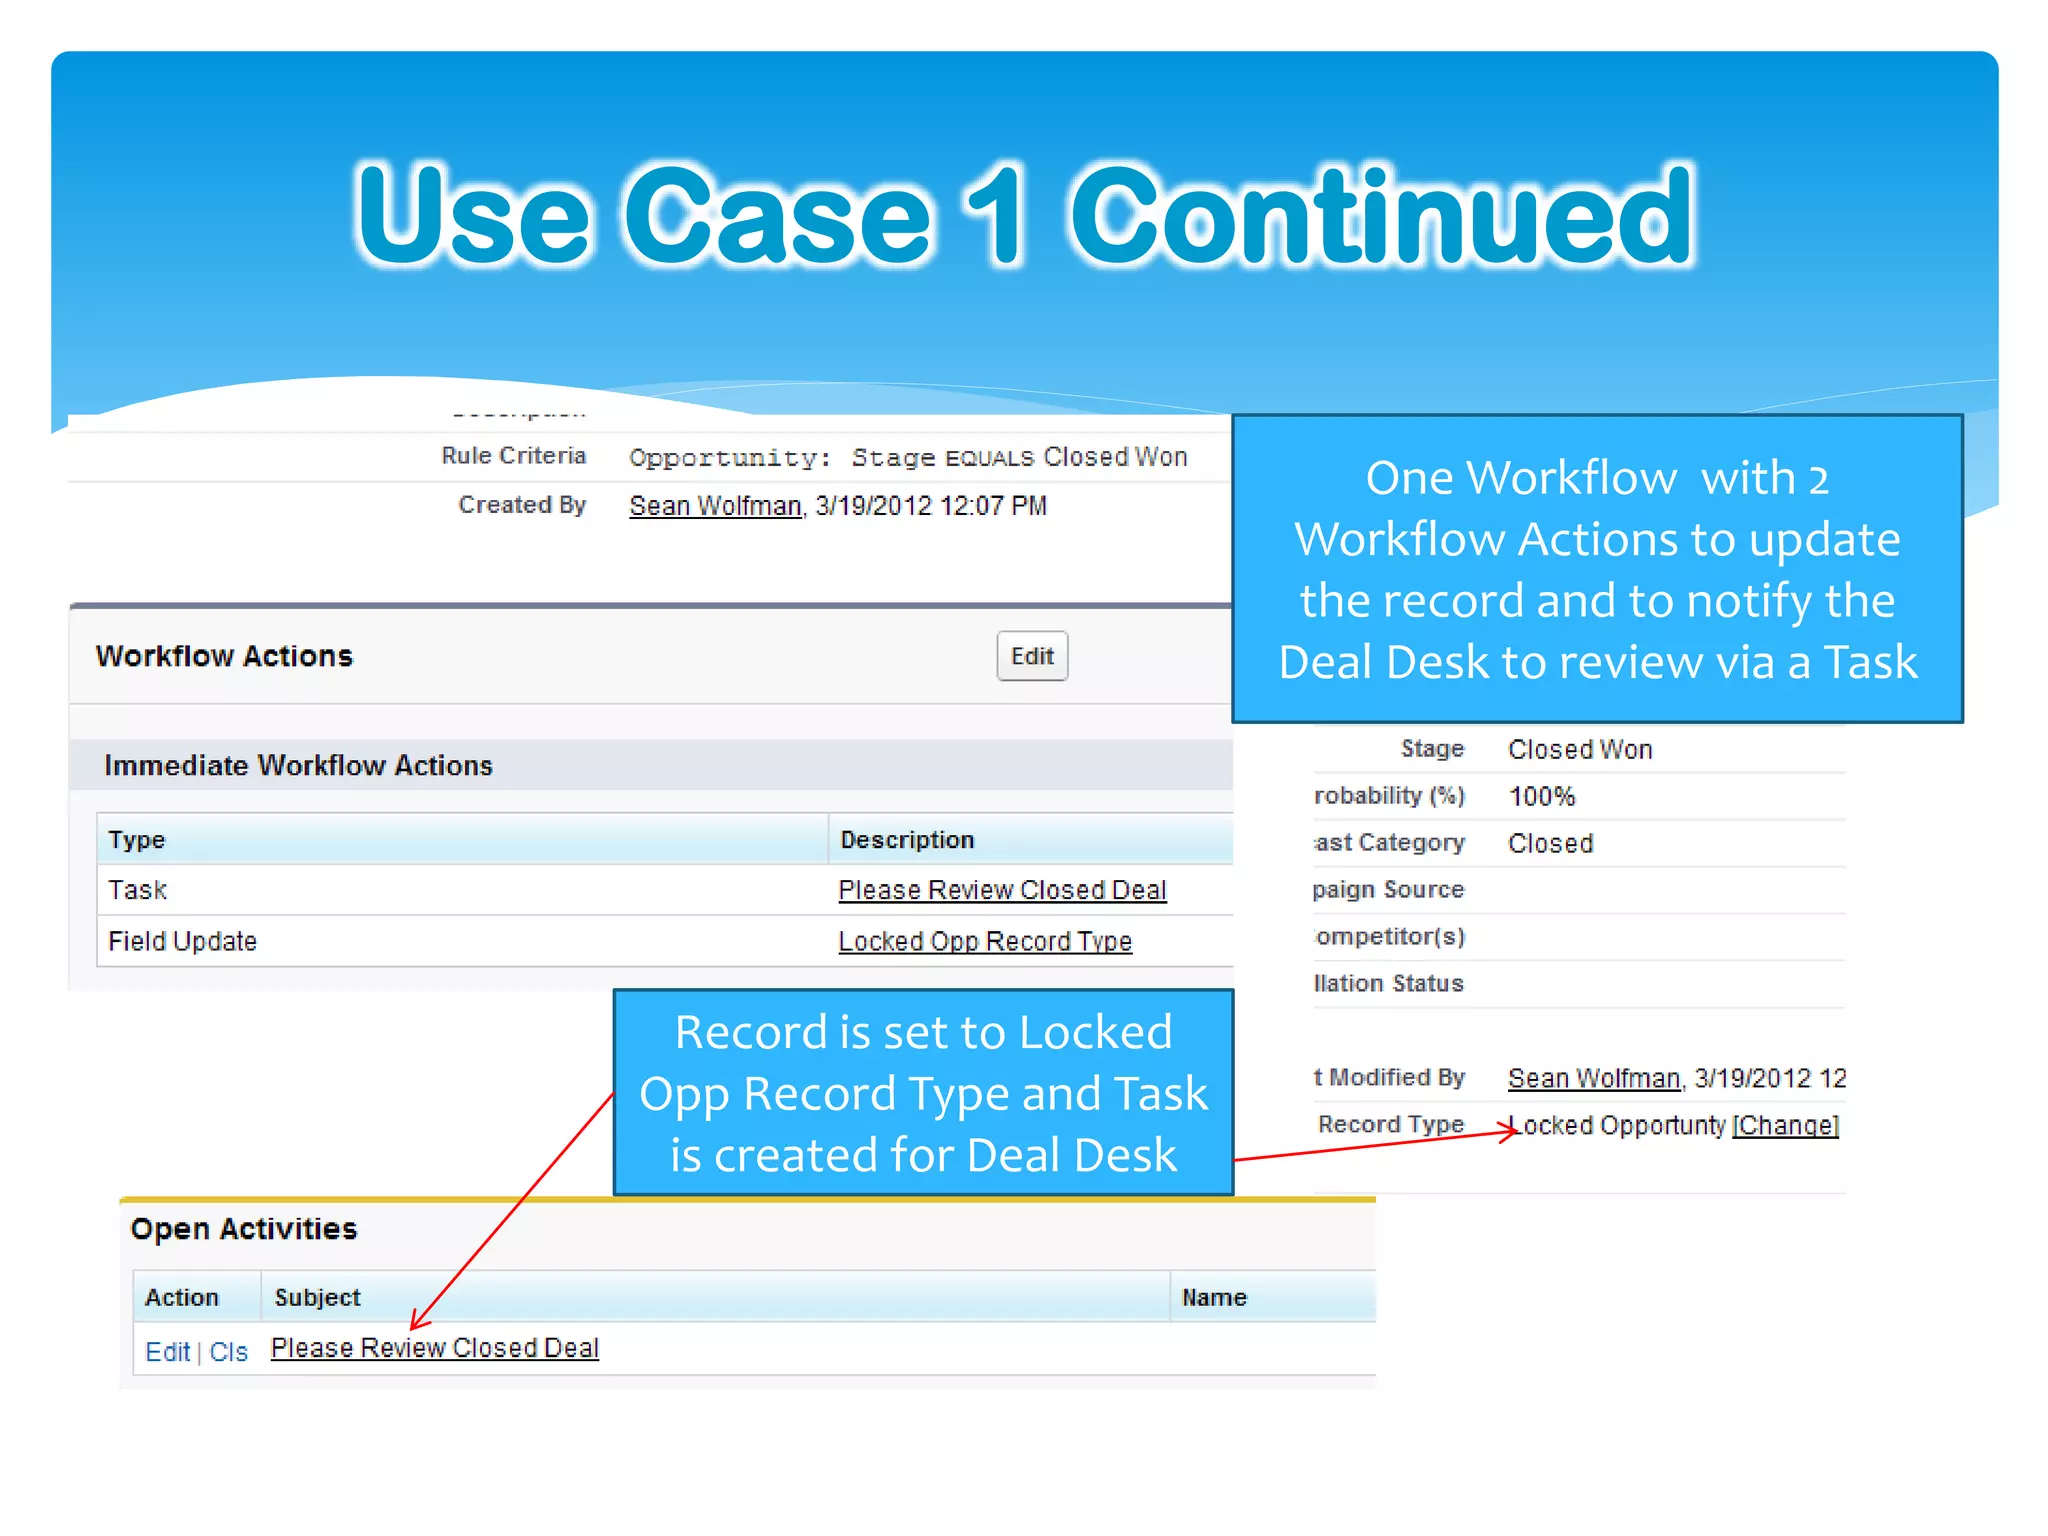
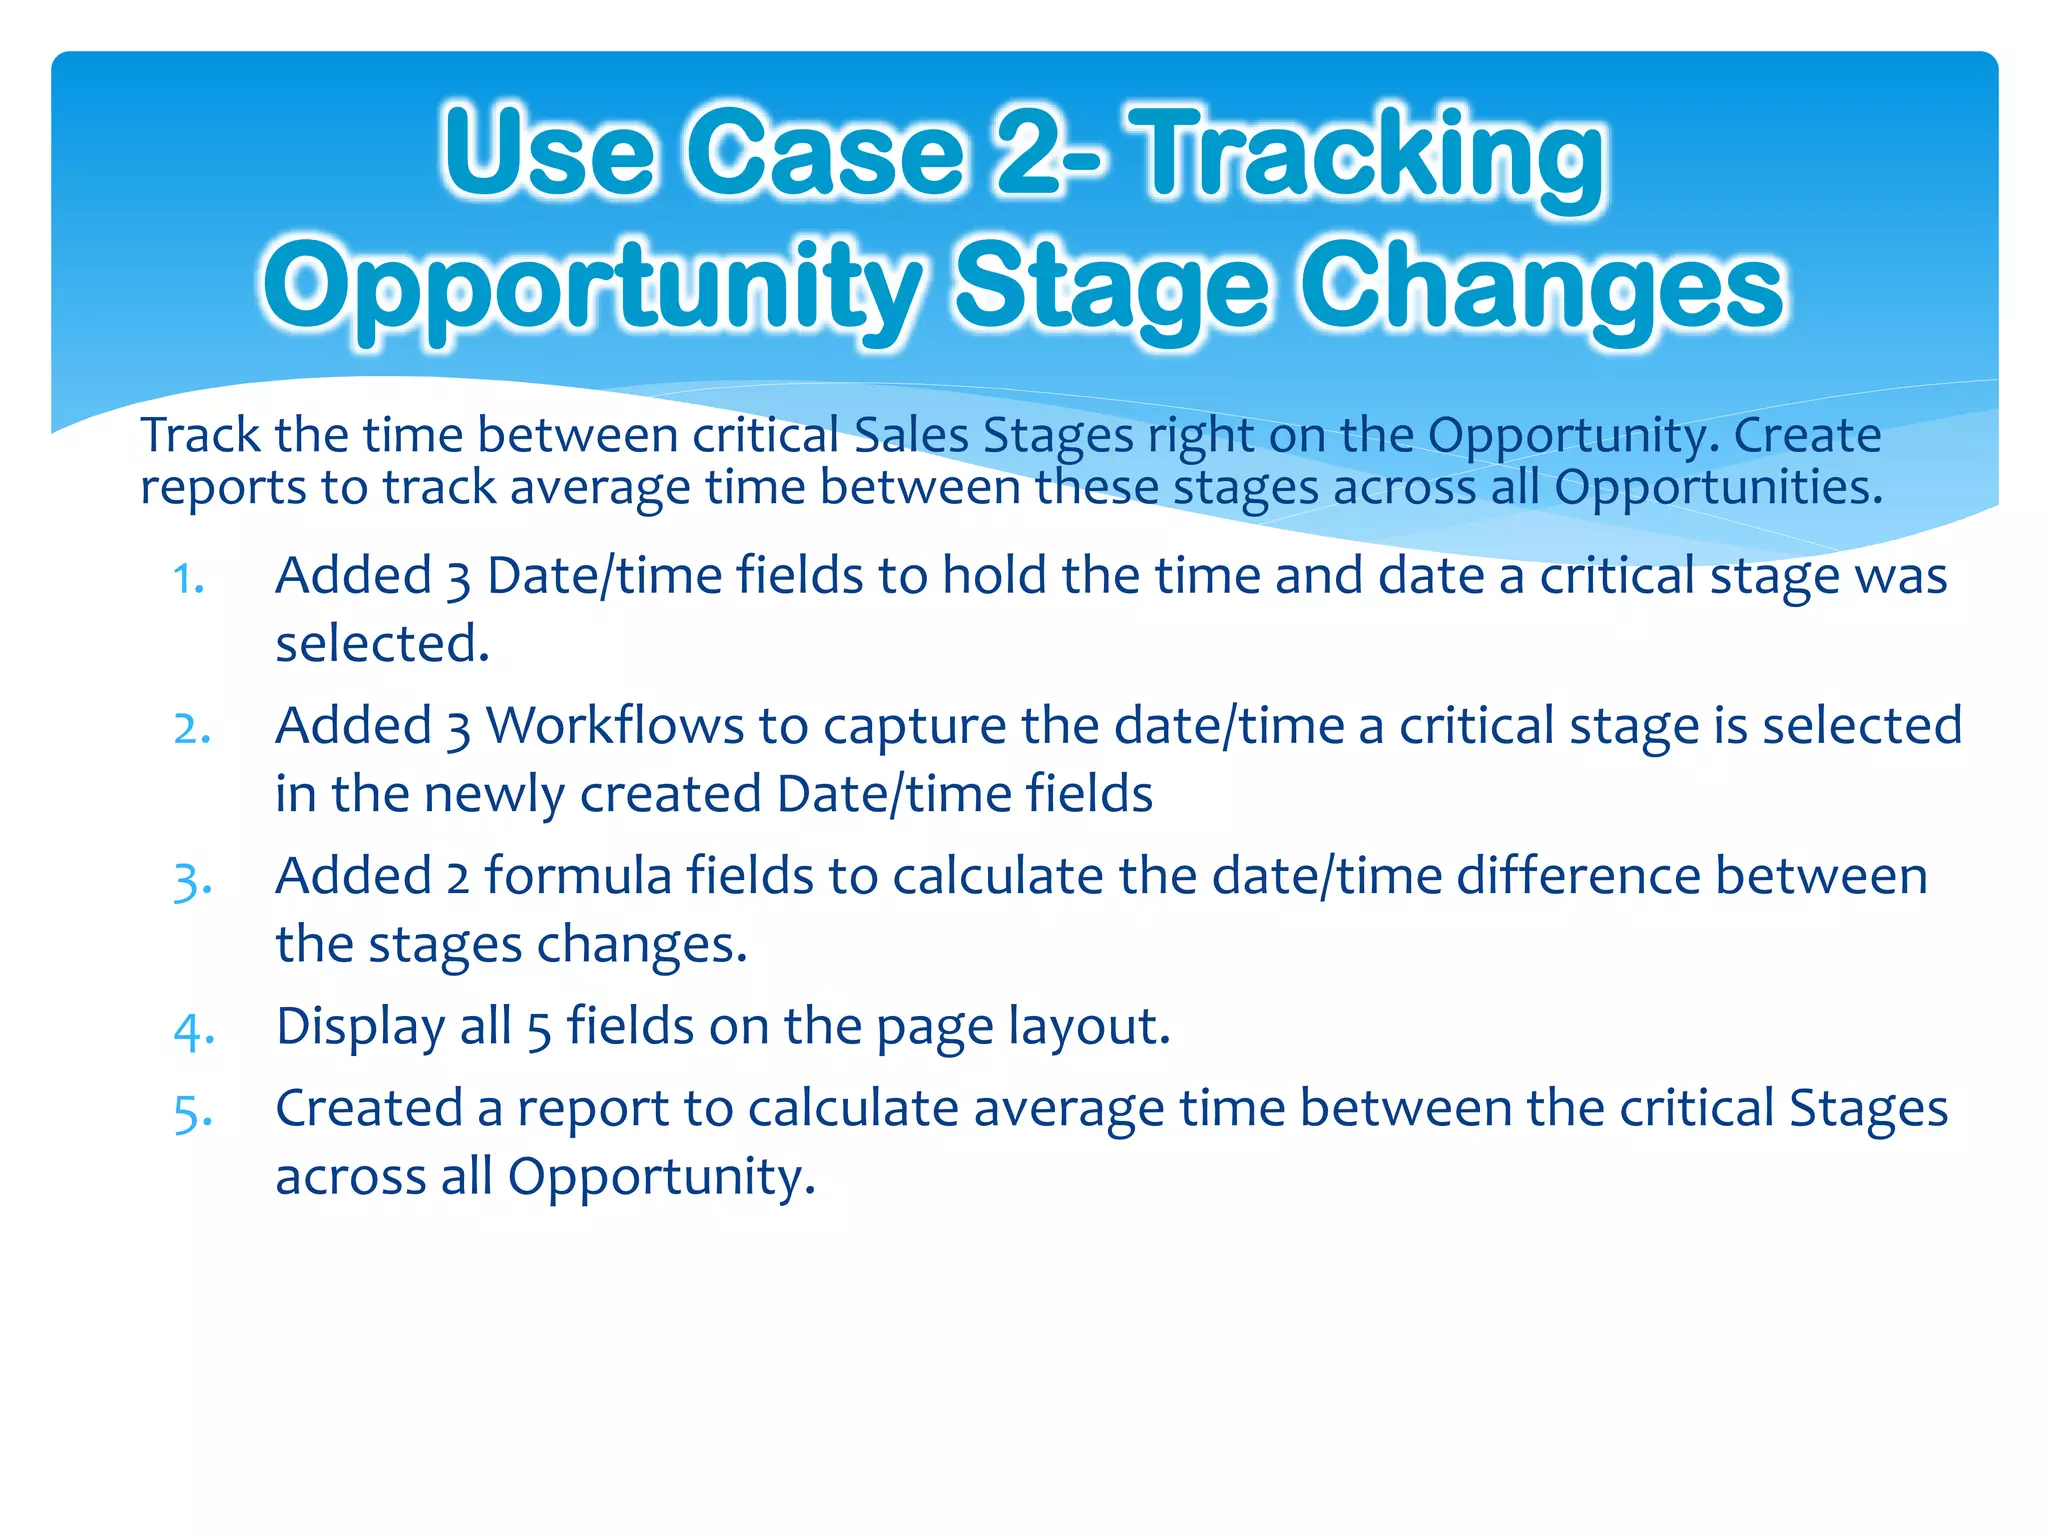
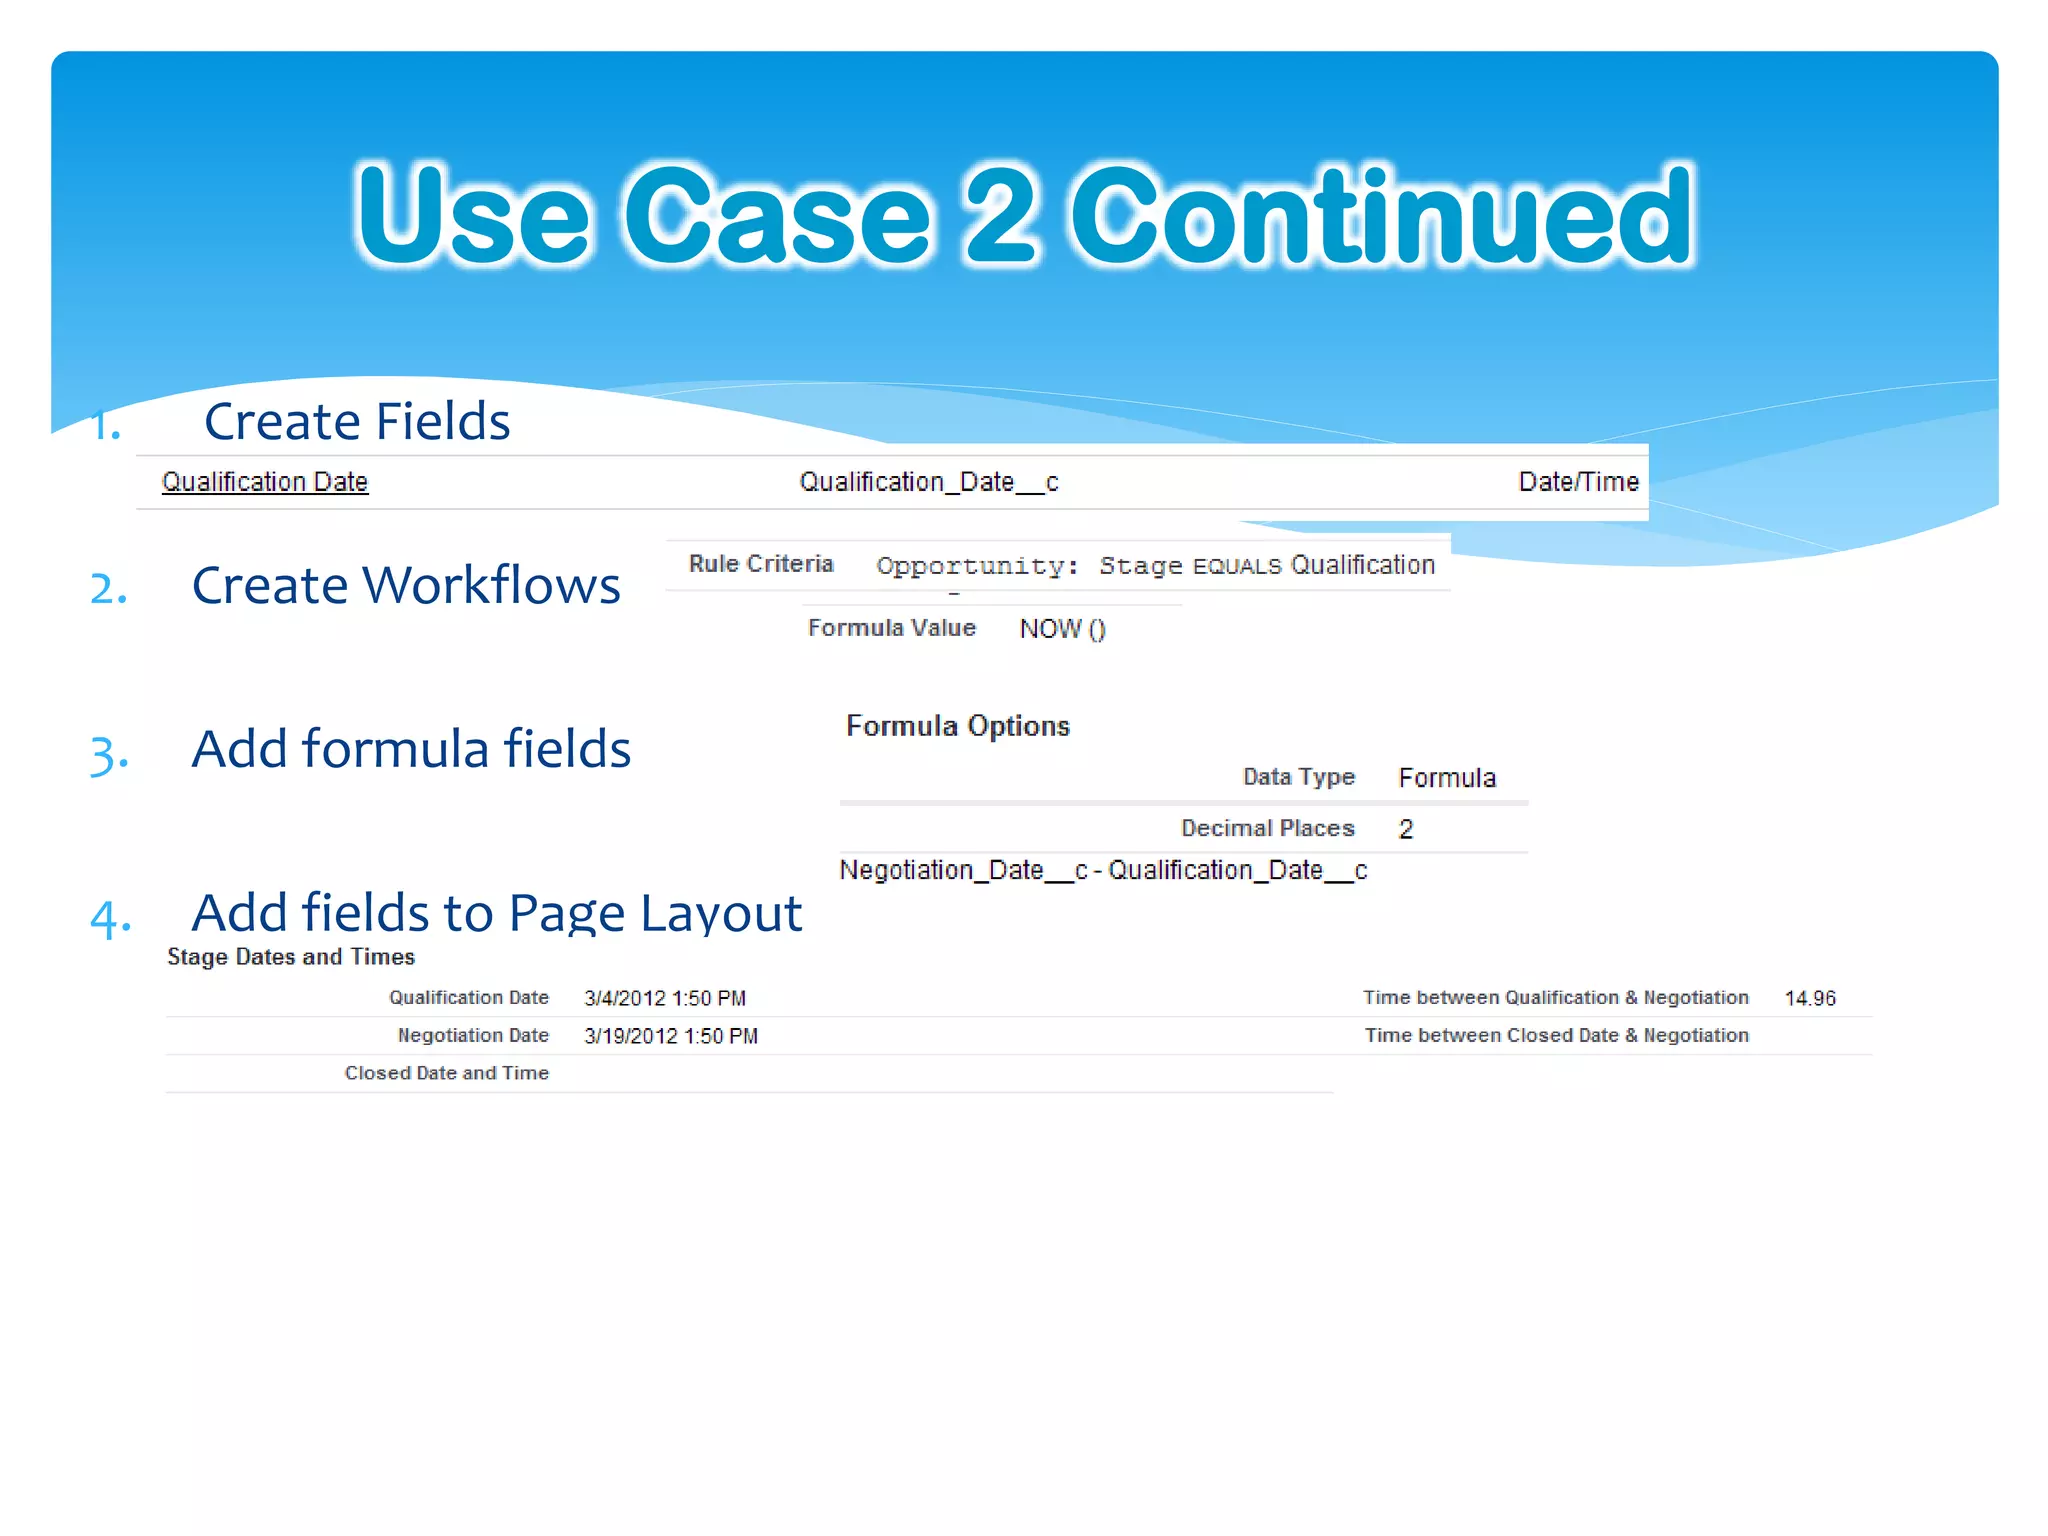
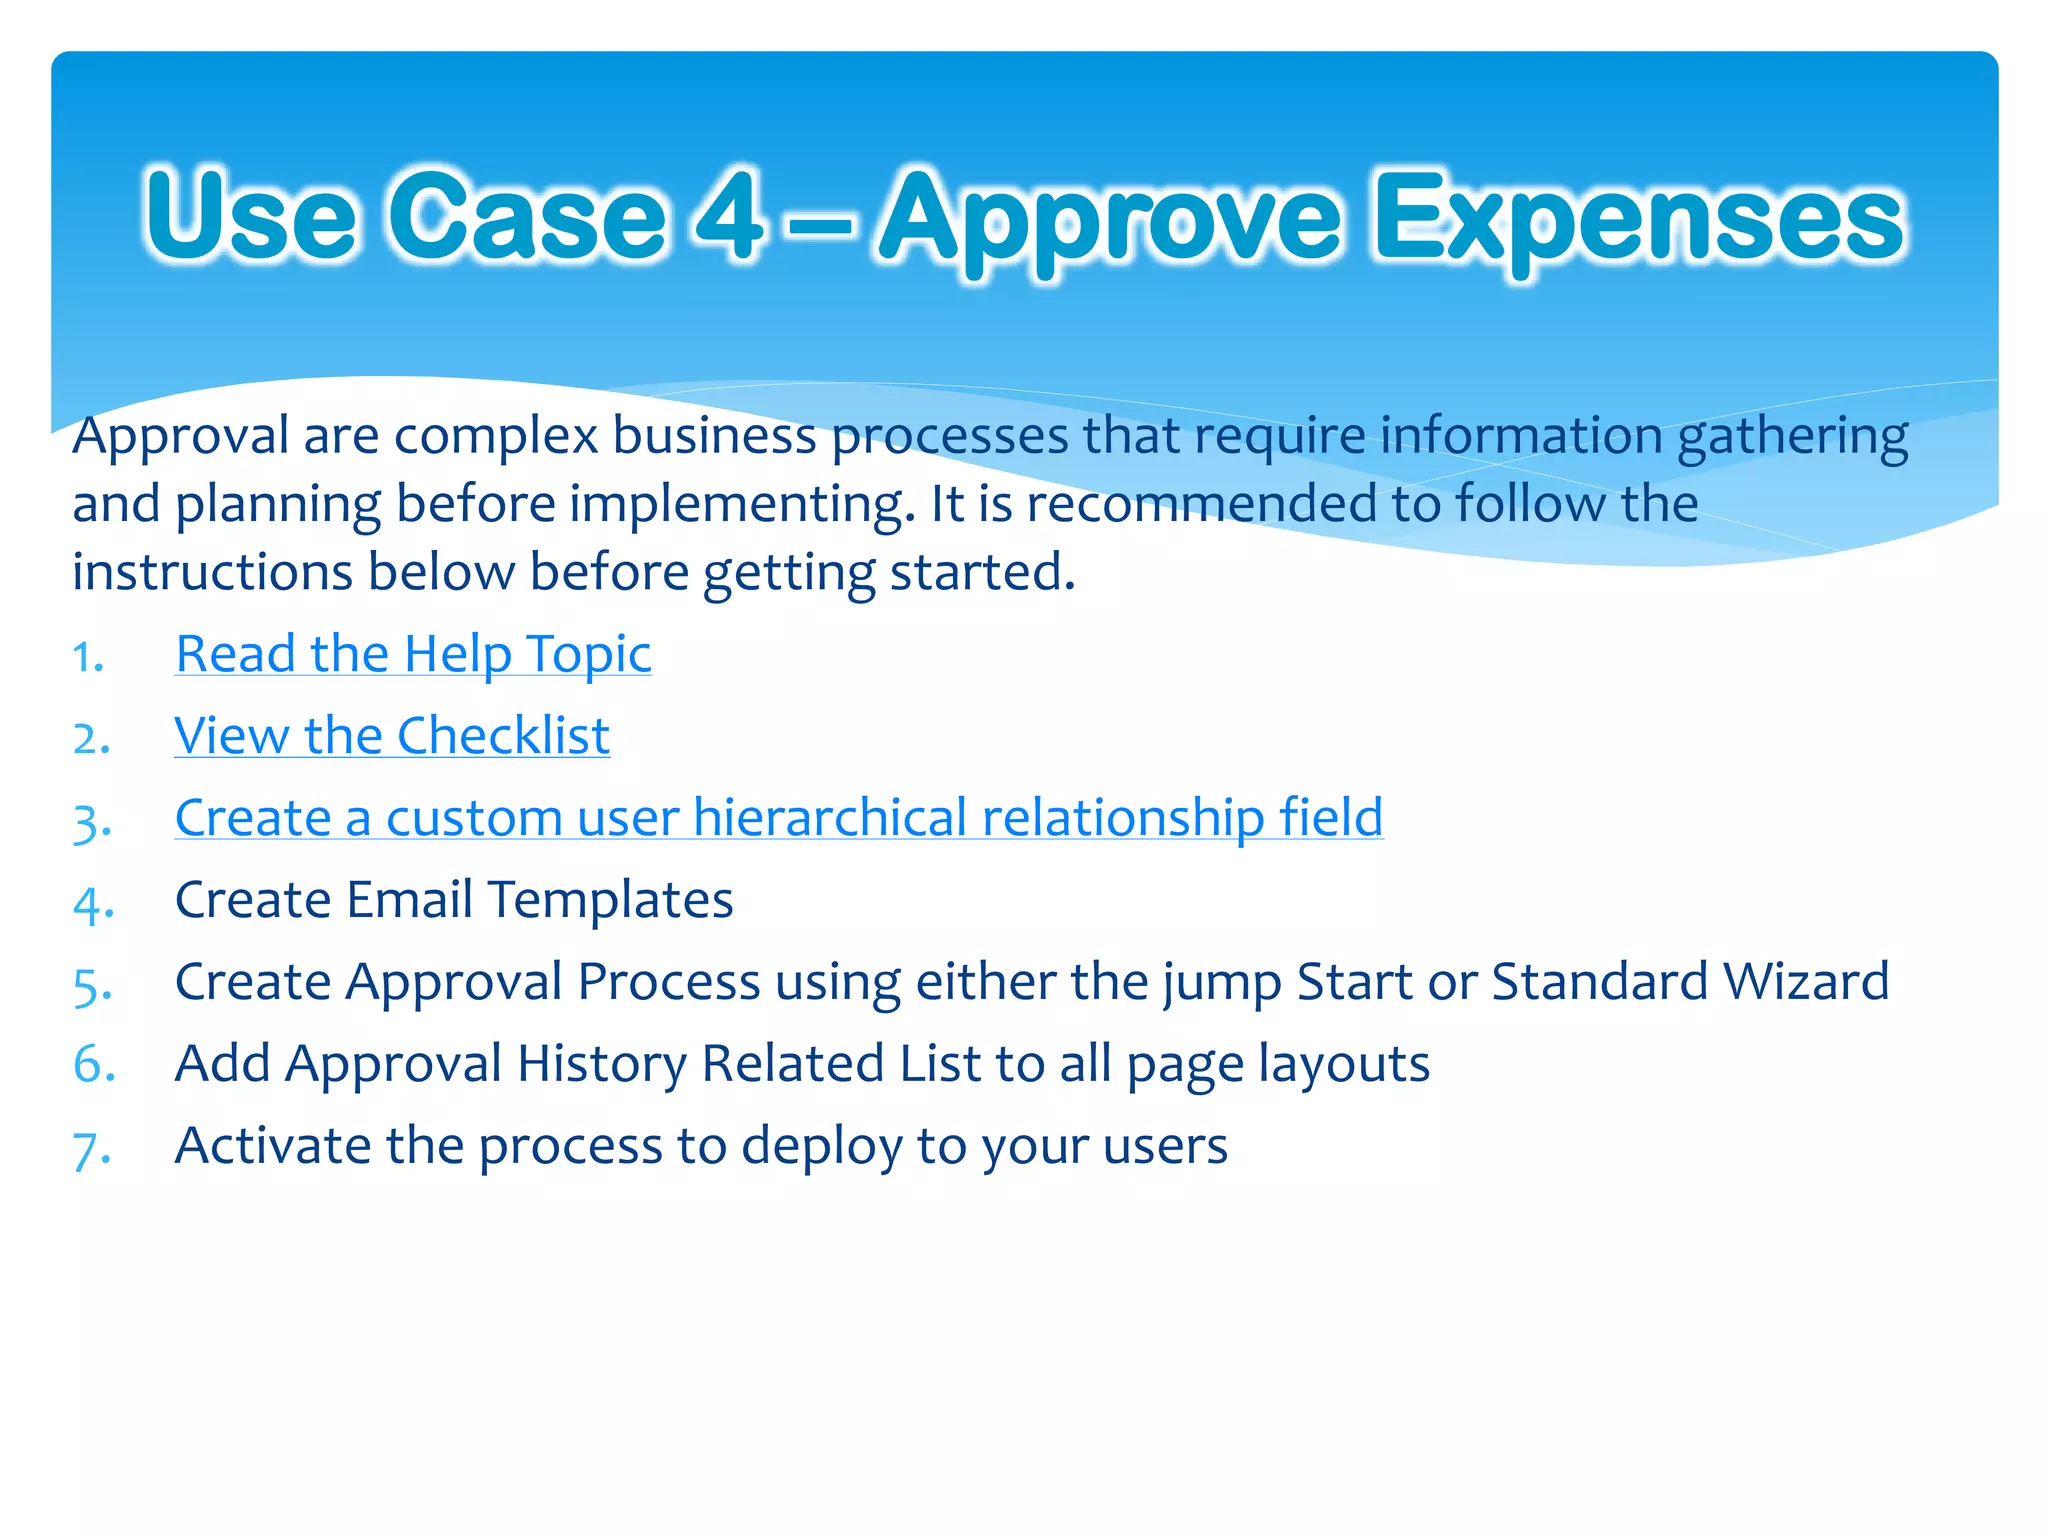
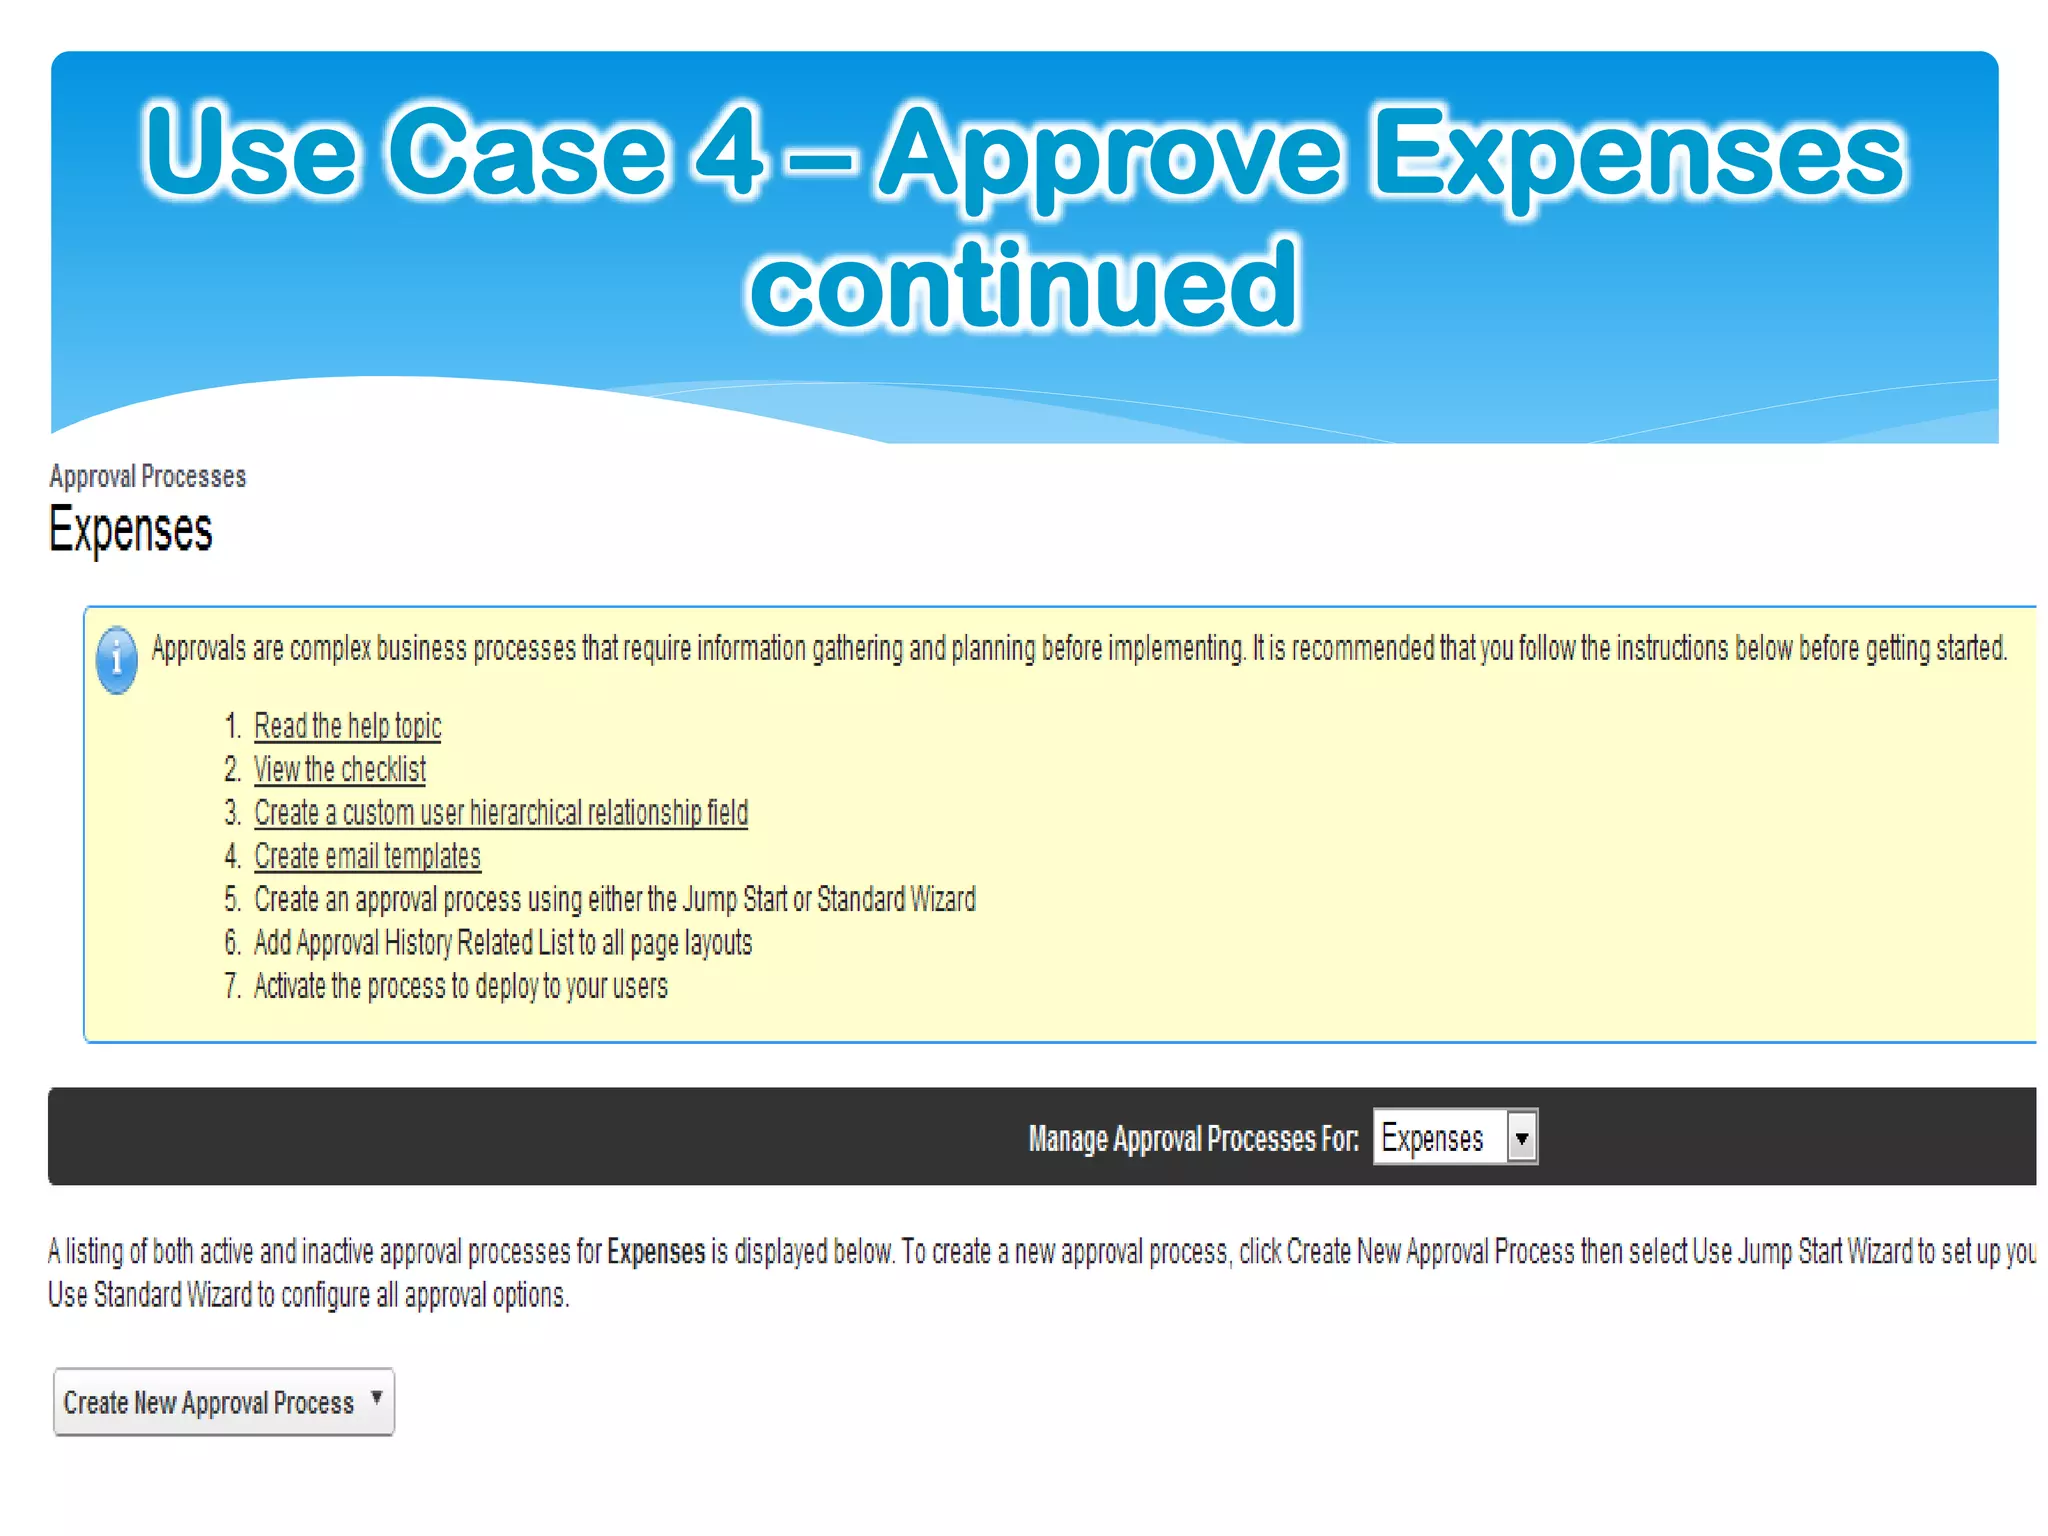
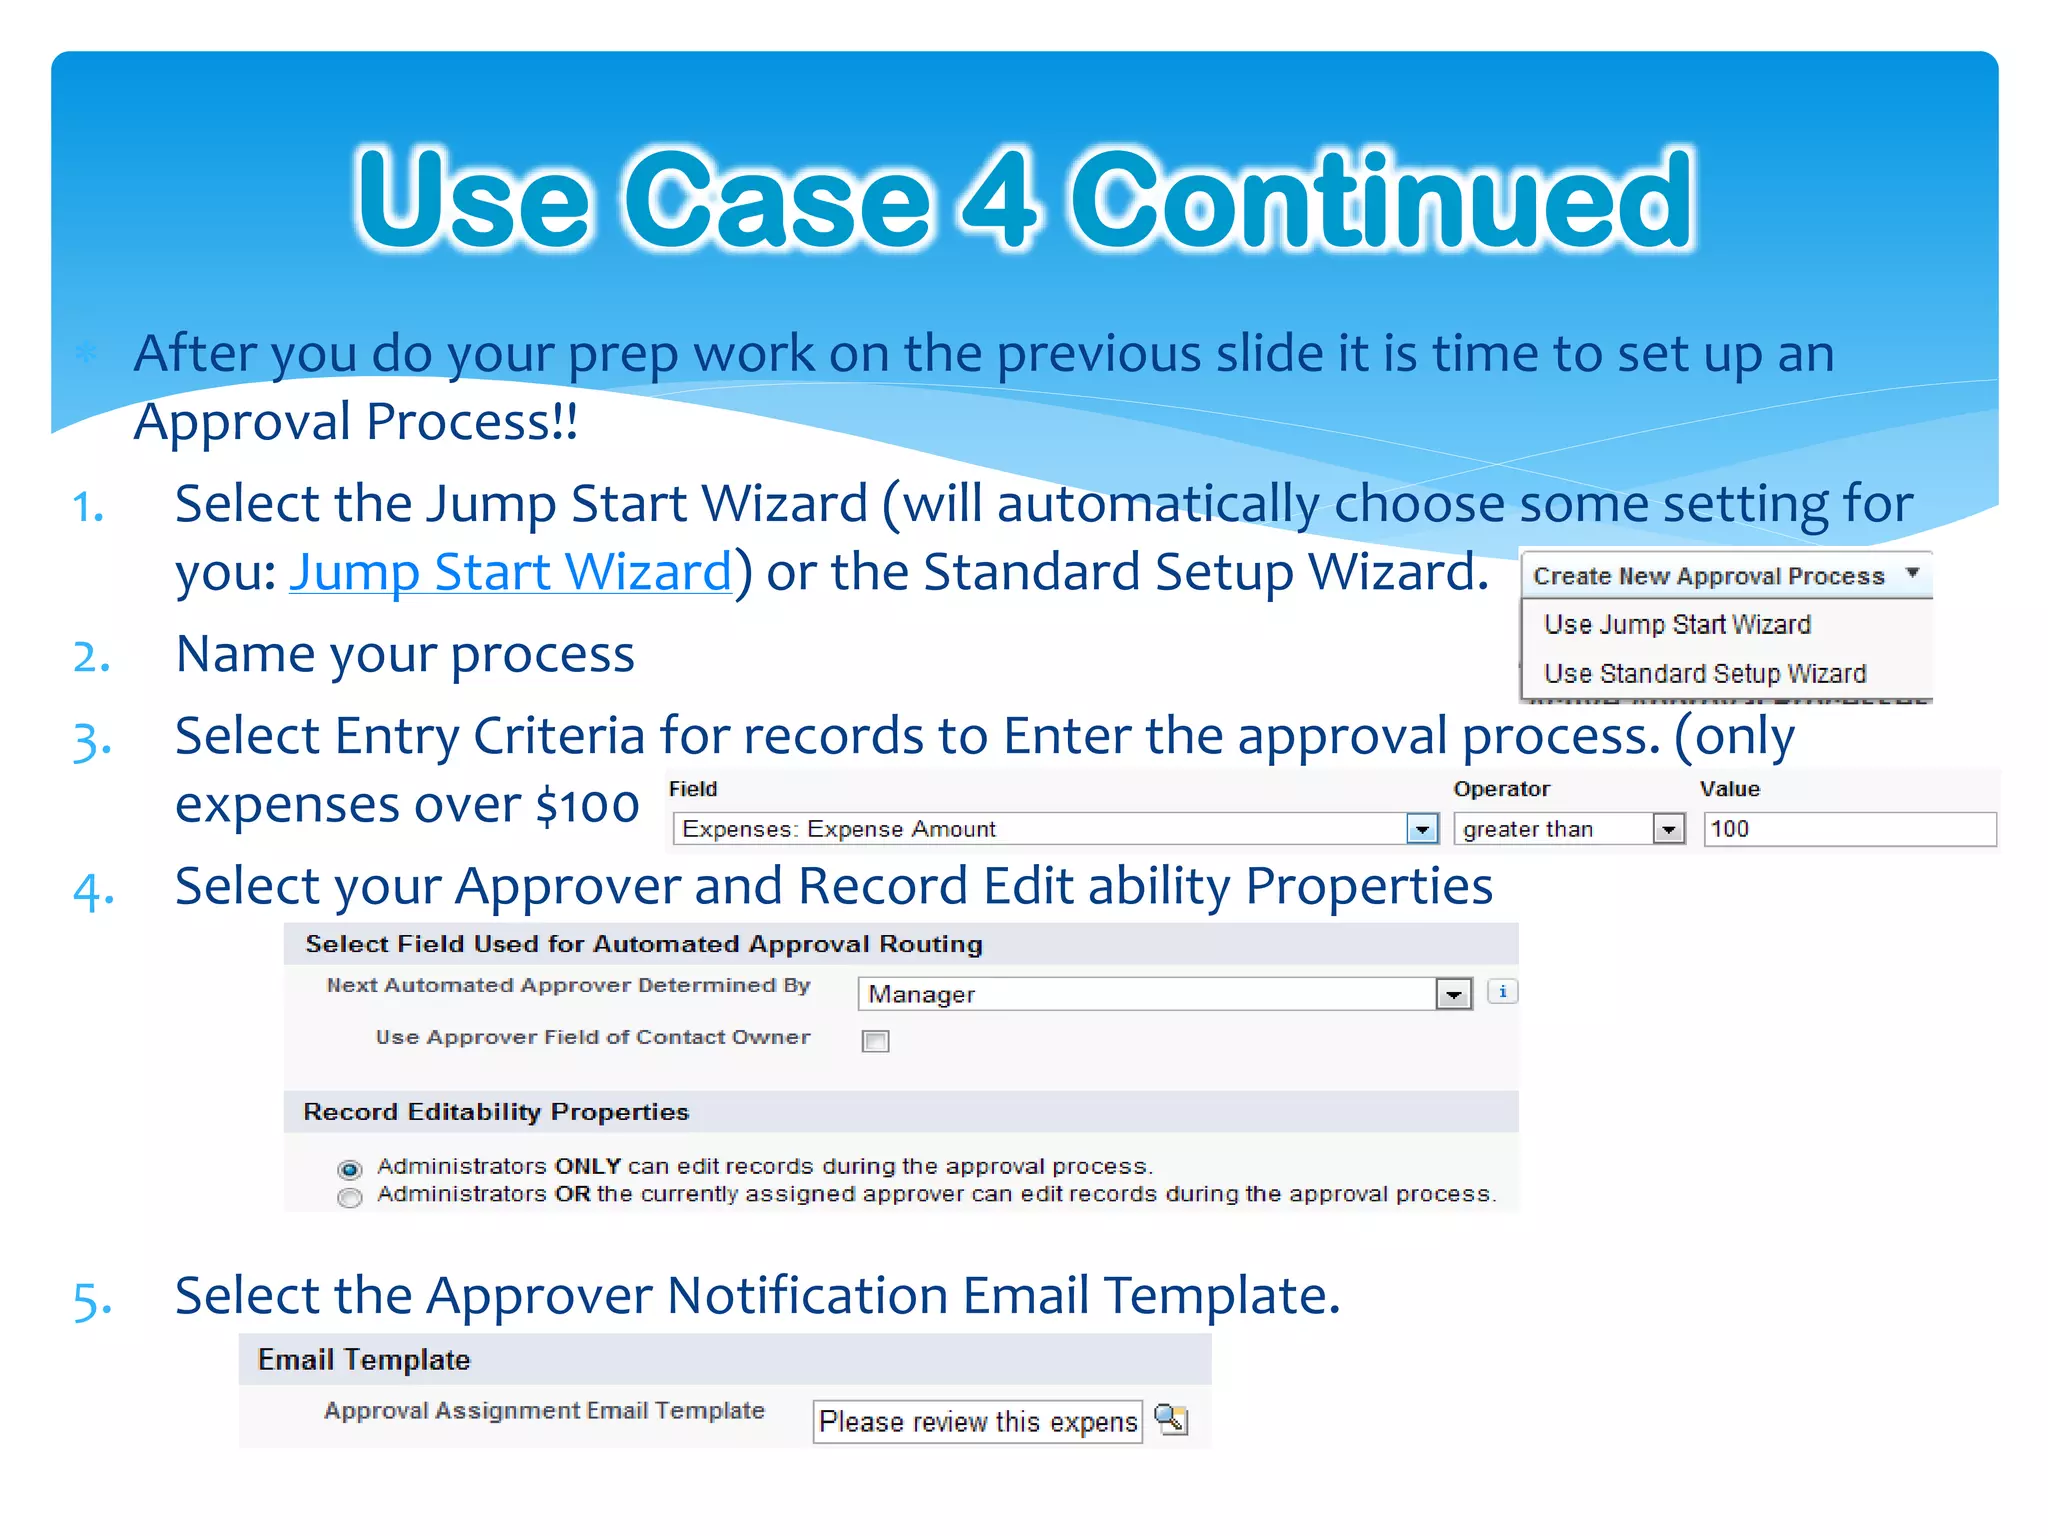
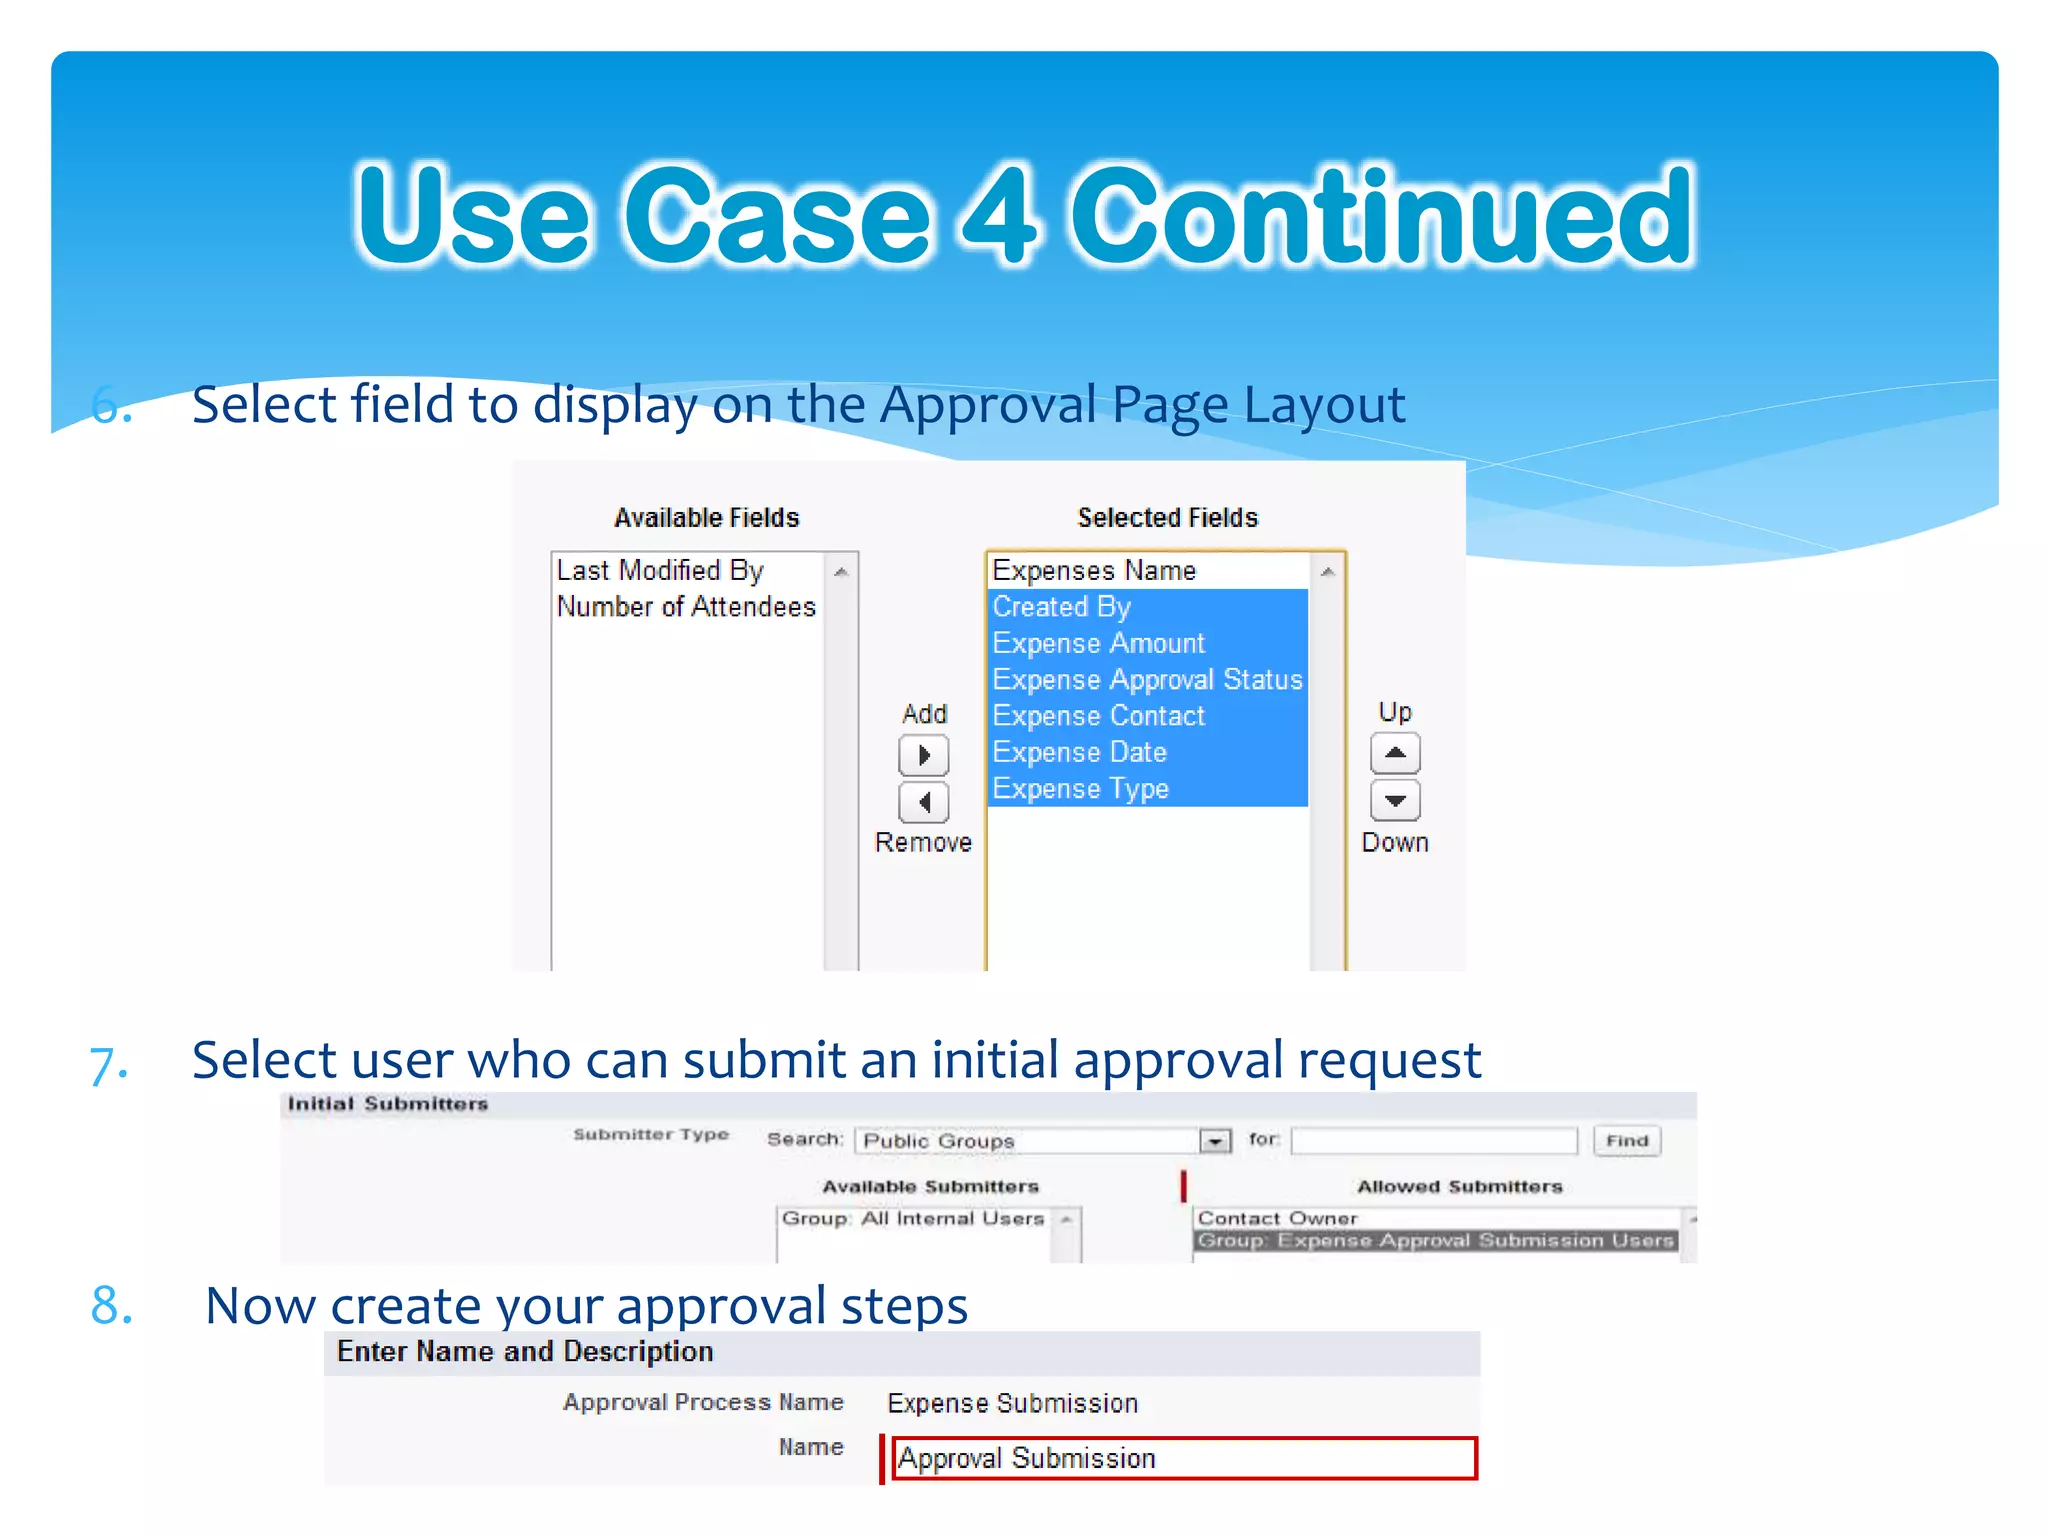
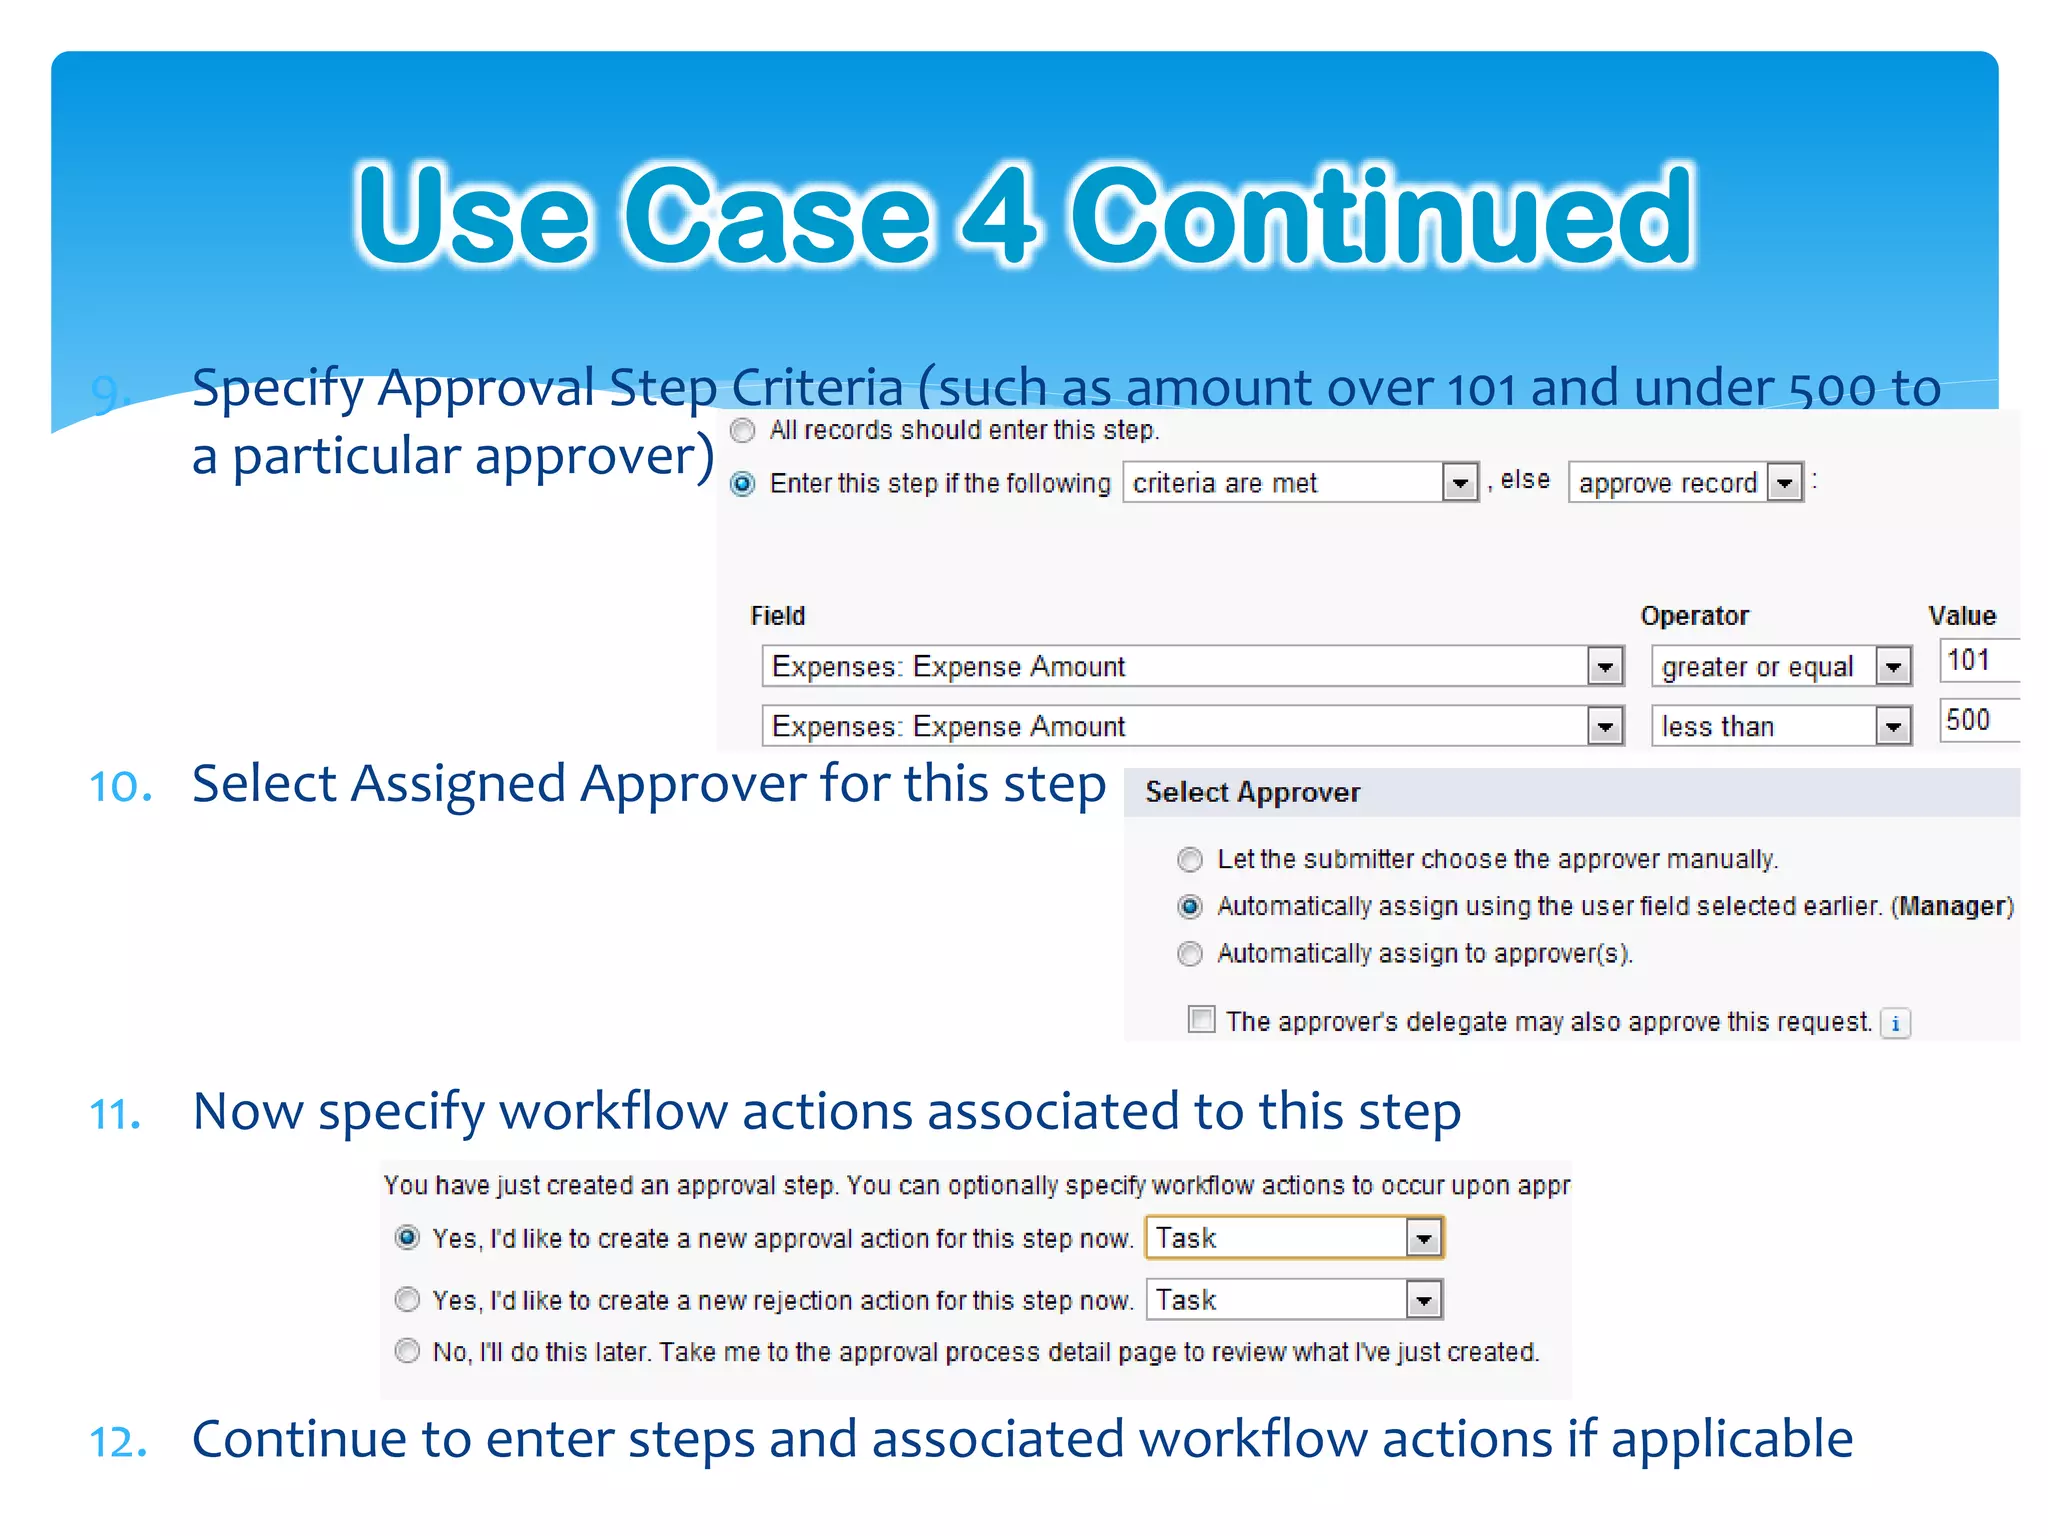
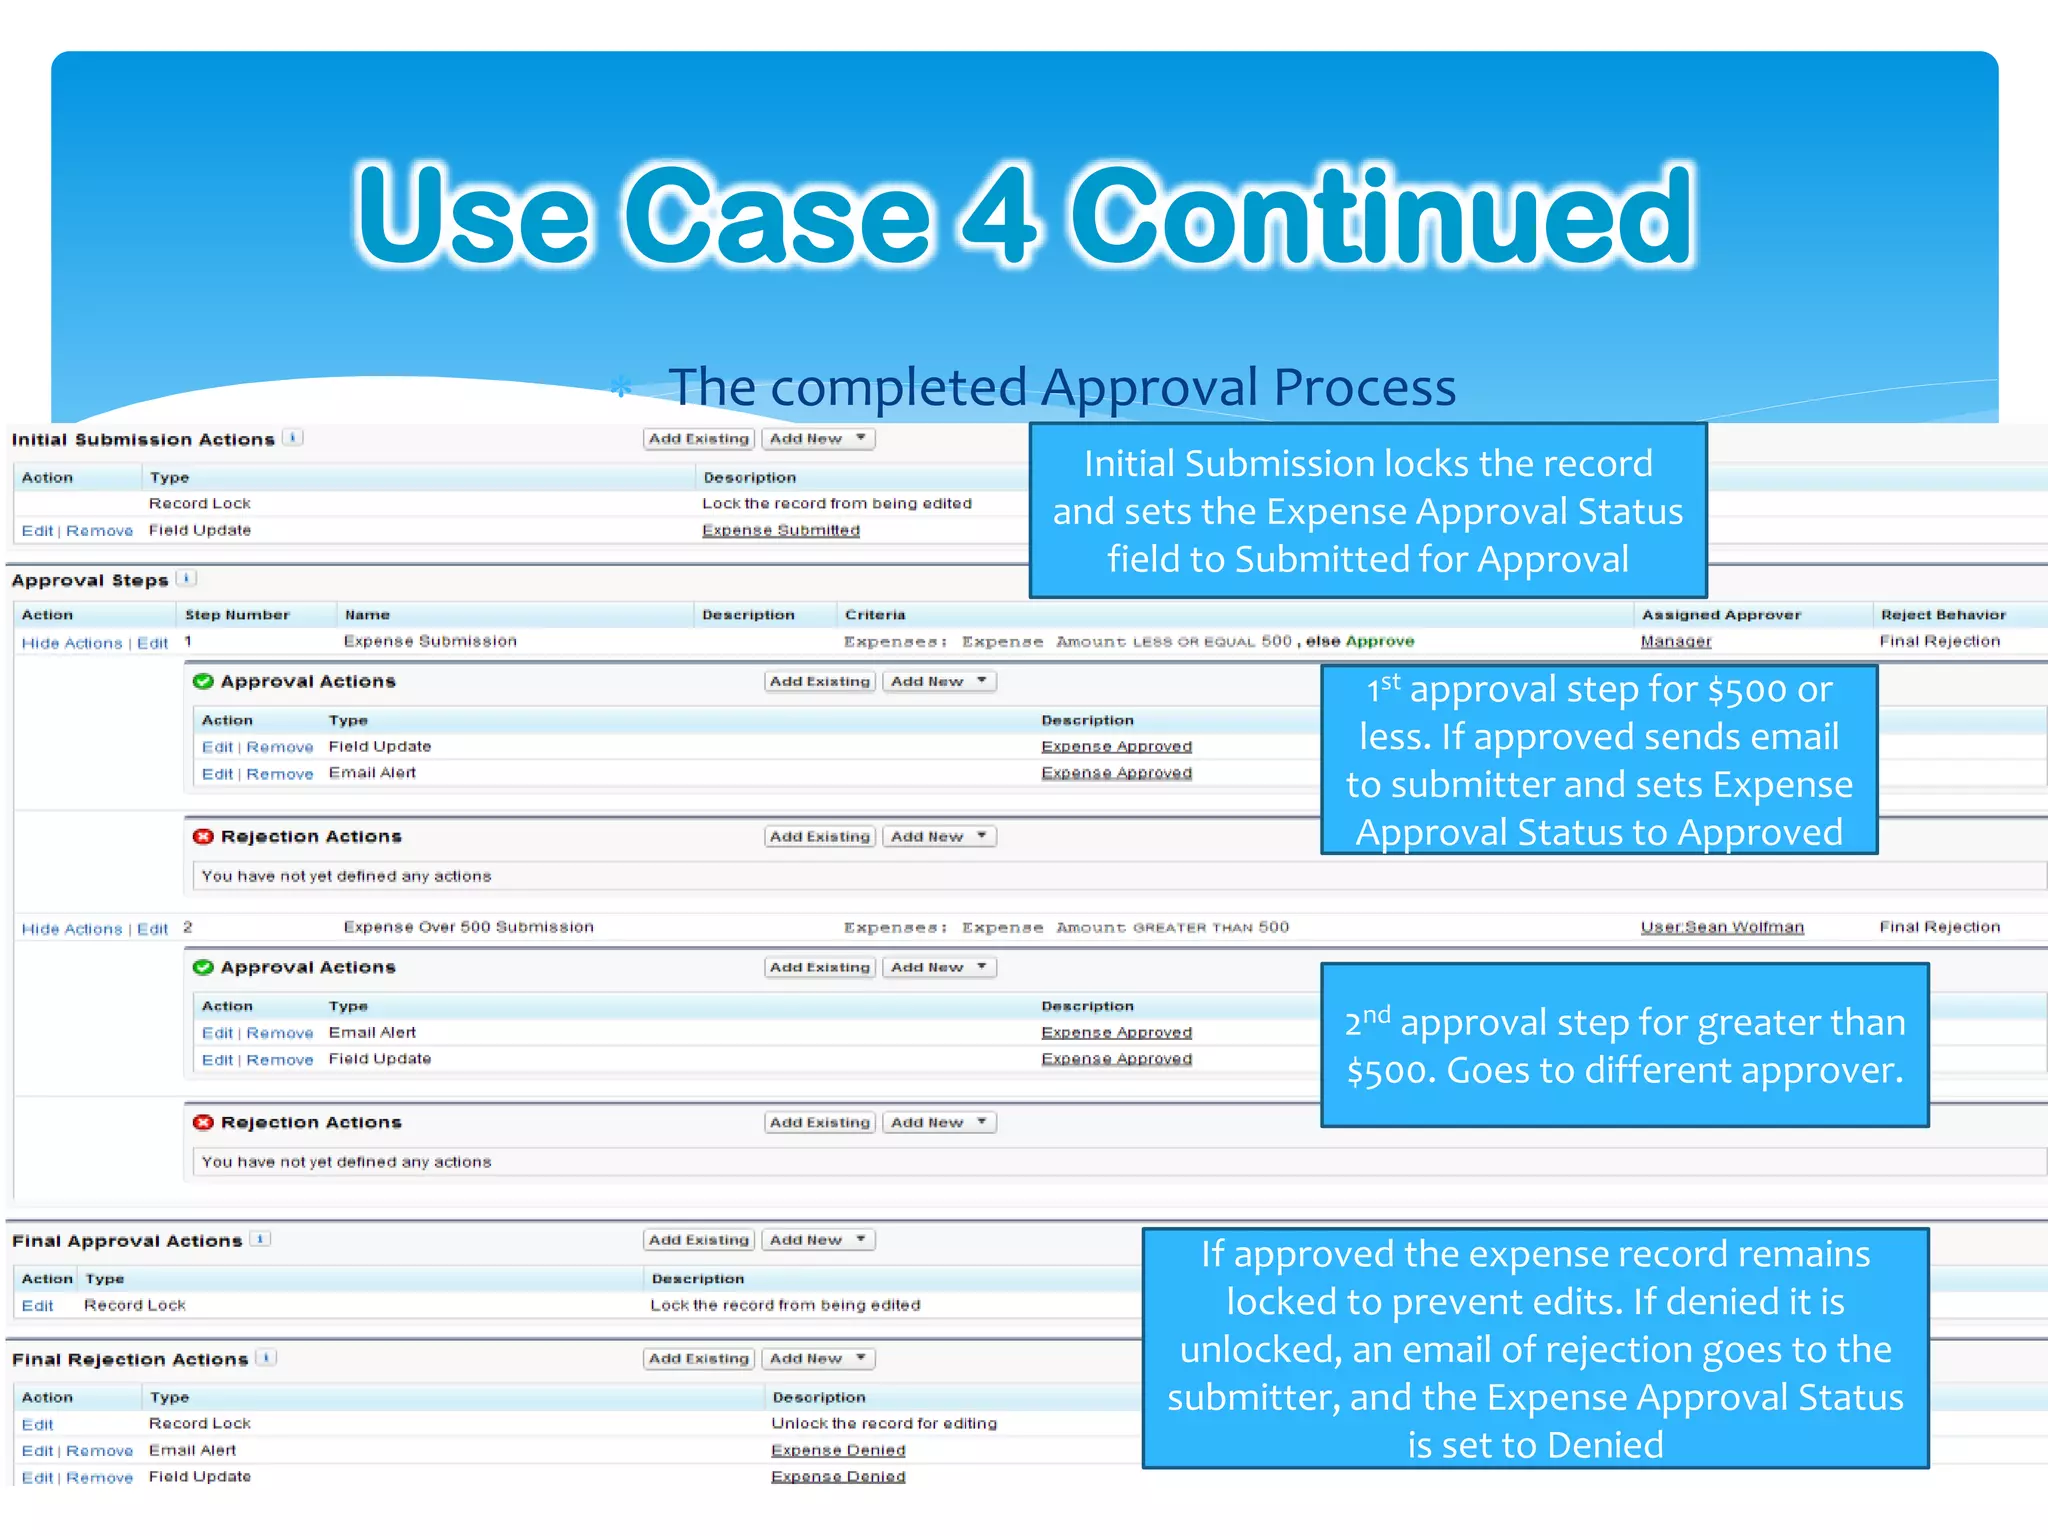
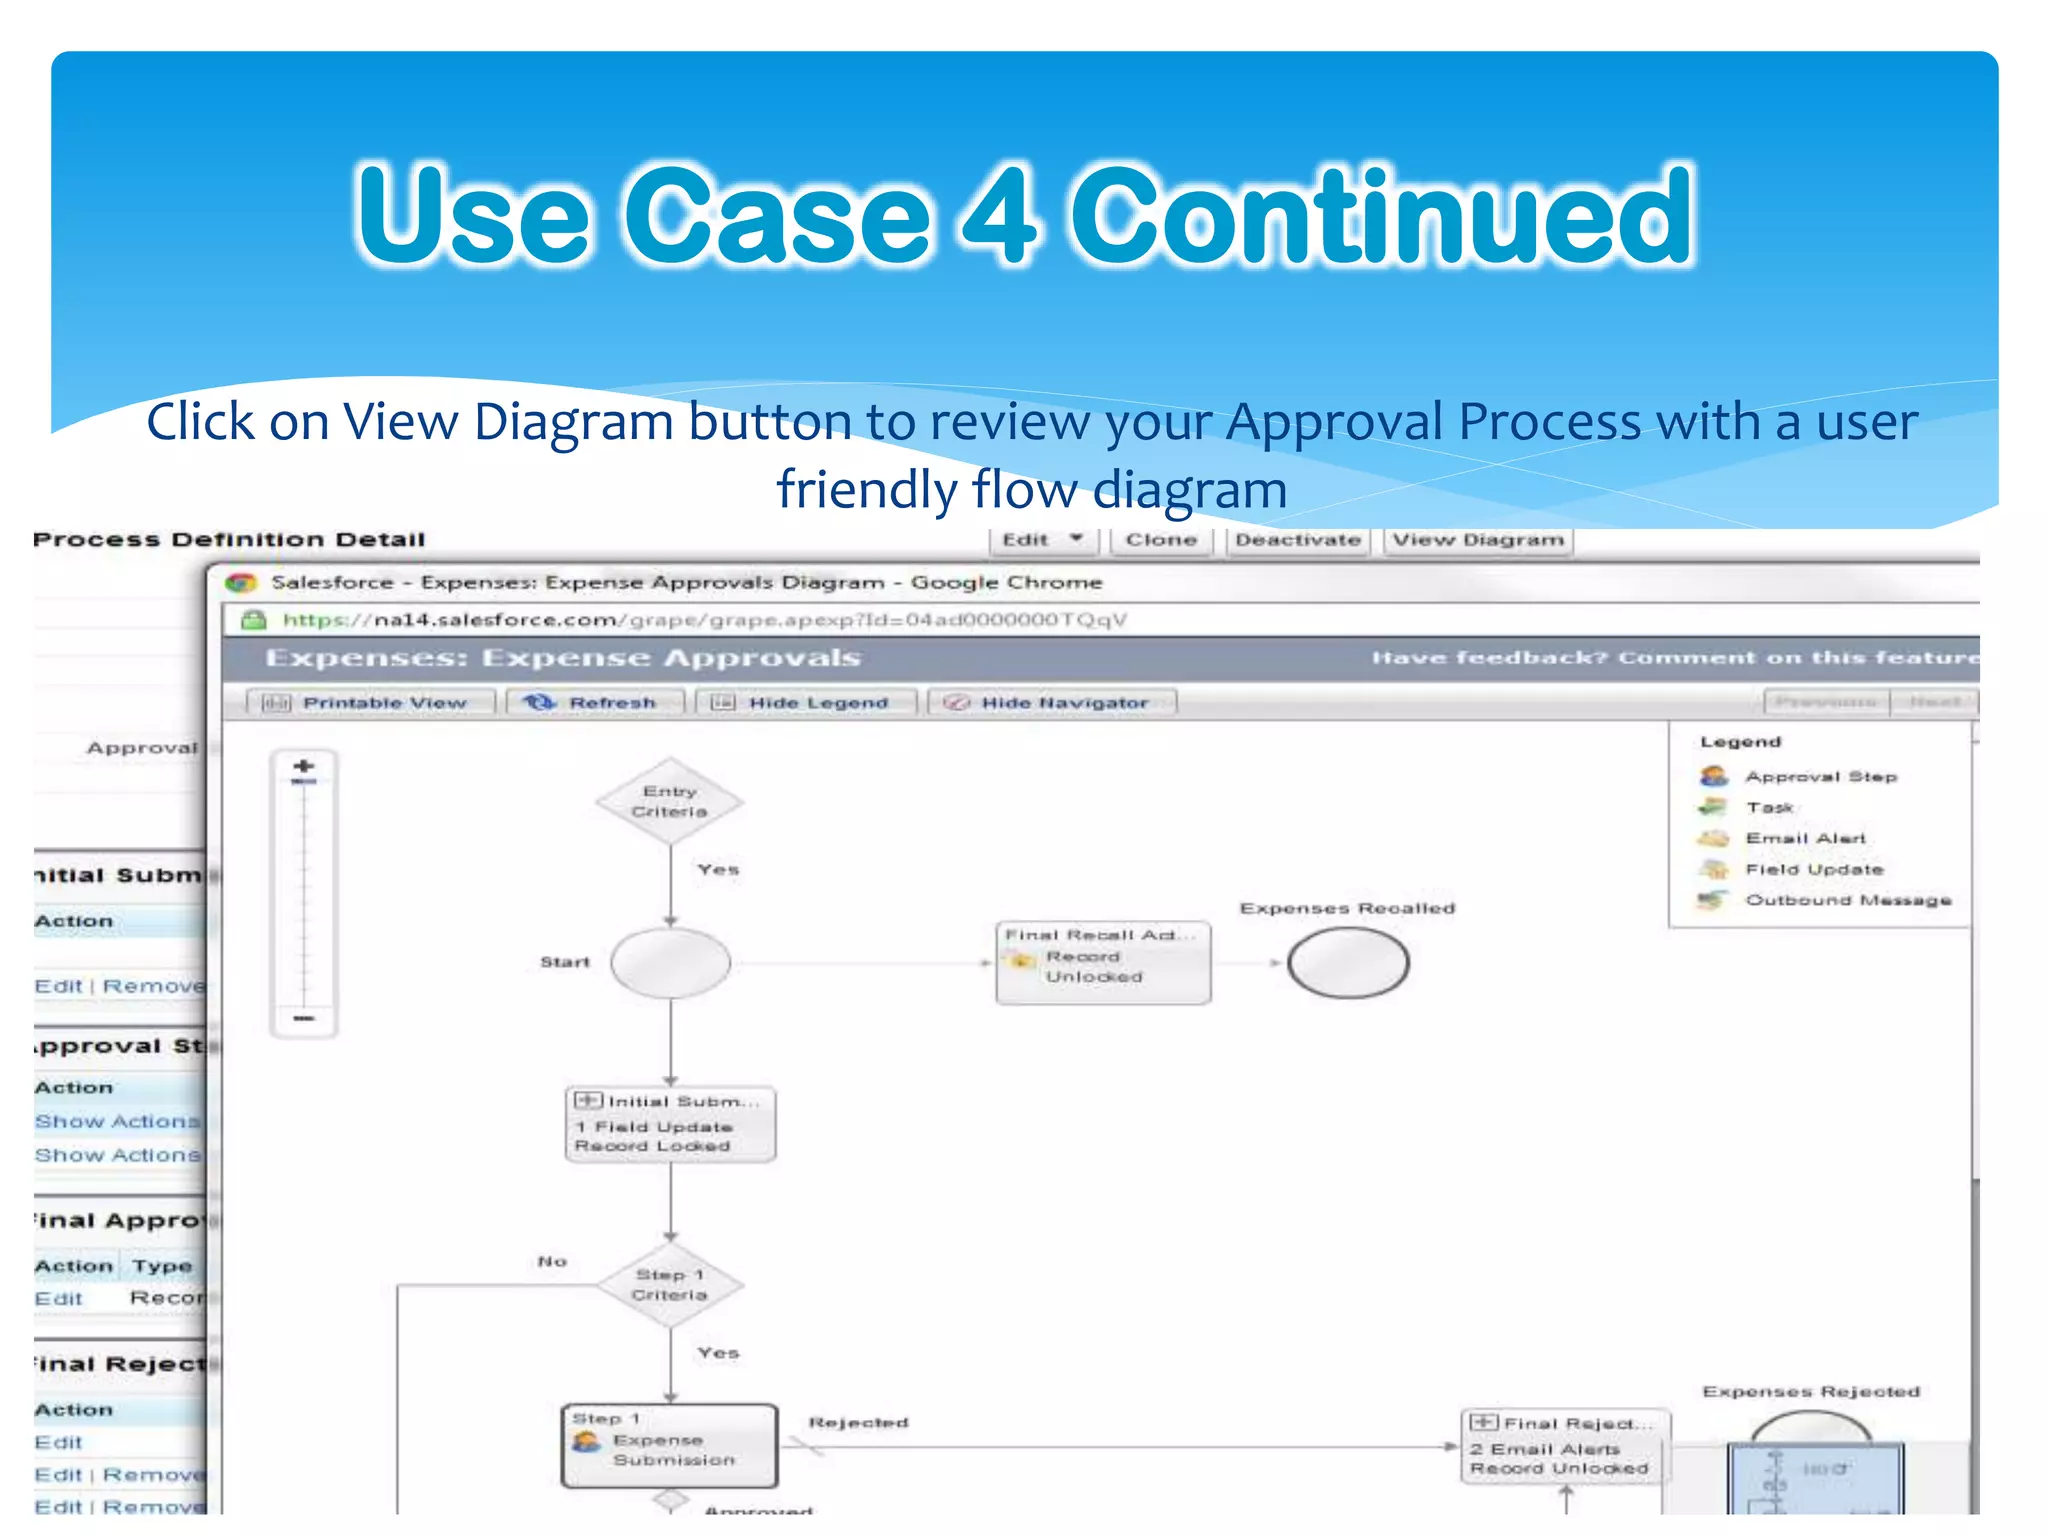
Workflows
Native Salesforce.com Functionality
Sean Wolfman

CloudTrigger
Agenda

   Workflow overview
   Cross Object Workflows
   Workflow Settings
   Workflow Rules
   Pick Your Workflow Actions
   Use Case 1- Lock Records via automated Record Type Changes and
    notify team member to review locked record
   Use Case 2- Track time between critical Opportunity Stages
   Use Case 3- Notify a Lead owner about an ignored Lead and move it to
    a queue if updates are not made.
   Use Case 4 – Expense Approvals
   Q&A
Workflow Overview


Bring automation to your Salesforce!
    Workflows can do the following:
       Email Alerts- to any user or contact
       Task- can be created and assigned to
        a specified user
       Field updates- update field values
        automatically
       Outbound Message- send
        information about a record to an
        external service
       Visual Workflow- walk users through
        a business process flow
       Approval Processes- automate the
        approval process for things such as
        expenses, opportunities, etc..
Cross -object Workflow

 Cross object field updates types:
      Custom object to Custom object
      Custom object to Standard object
          Account, Asset, Campaign, Case,
           Contact, Contract, Contract Line
           Item, Entitlement, Opportunity, Order,
           Question, Quote, Service Contract,        Cross-object field updates now
           Solution                                   support cross object field updates
      Standard object to Standard object             for standard objects as of Spring
          Case Comments updating Case,
           Email updating Case, Opportunity           ‘12
           Product updating Opportunity,
           Opportunity updating Account


 Master-detail relationship must
  exist in order to do a Cross -object
  field update
Workflow Settings

Go to Workflow & Approval Settings
   Add Default Workflow User- required for Time based Workflows


   Enable Email Approval Process- users can approve or reject approval request
    via email response
Workflow Rules

Workflow Rules allow you to decide the object associated to the rule, the
Evaluation criteria, and the Rule criteria.
1. Pick your object- only 1 object per Workflow Rule
2. Name the Rule
3. Evaluation Category

4.   Rule Criteria


5. Click Save and Next- this will take you to the Edit Rule page.
Pick Your Workflow Action/s

 Now select a Workflow action
   You can select many actions for one Workflow Rule
   You can use both Immediate Workflow or Time-Dependent Workflow actions or a
    mix
Pick Your Workflow Action/s
            continued
 Add your Actions and when complete then click Done. Now Activate the
  Workflow.
Use Case 1- Locking Records

Have you ever been looking for a way to lock a Salesforce record from being
edited when a certain status or milestone is reached??
   Are users making changes to an Opportunity after is it set to Close Won?

   Are Cases being changed post resolution?

   Are Contracts being altered after the deal is signed?


This use case will walk you through a simple and easy way to use Workflow to
lock records from being edited except by those with the authorization to do
so!
Use Case 1- Locking Records
 Lock Records via Record Type changes with Field update.
   Example- Lock Won Opportunities
      Create a Open Opportunity Record Type and a Closed Opportunity Record Type
         Create a Locked Page Layout and make all fields Read Only and remove the buttons. Also
          remove create buttons from Related List
         Create a Locked Opportunity Sales Process with only Closed Won available.
Use Case 1 Continued
                                    One Workflow with 2
                                 Workflow Actions to update
                                 the record and to notify the
                                Deal Desk to review via a Task


     Record is set to Locked
    Opp Record Type and Task
     is created for Deal Desk
Use Case 2- Tracking
    Opportunity Stage Changes
Have you ever wanted a simple solution to see how much time the Sales Reps
are spending on each Stage of the Sales Process?
   Couldn’t you use this information to streamline your Sales Process so you can
   remove the roadblocks in front of the Sales Team?
    Perhaps the Approval Stage on deals is taking too long and hindering the closure
     of Sales!

Would analyzing the average time spent on each step of the Lead qualification
process be useful?
   Maybe there are too many steps and one needs to be removed.

While Salesforce can provide some of this data for Opportunities via the Stage
Duration report this simple Workflow solution will allow you to see average
time spent per Stage. (or Lead Status) Not just the overall average across all of
the Stages on Opportunities .
Use Case 2- Tracking
      Opportunity Stage Changes
Track the time between critical Sales Stages right on the Opportunity. Create
reports to track average time between these stages across all Opportunities.
 1.   Added 3 Date/time fields to hold the time and date a critical stage was
      selected.
 2.   Added 3 Workflows to capture the date/time a critical stage is selected
      in the newly created Date/time fields
 3.   Added 2 formula fields to calculate the date/time difference between
      the stages changes.
 4.   Display all 5 fields on the page layout.
 5.   Created a report to calculate average time between the critical Stages
      across all Opportunity.
Use Case 2 Continued
1.   Create Fields

2.   Create Workflows

3.   Add formula fields

4.   Add fields to Page Layout
Use Case 2 Continued
5.   Create report to show average time between critical stages
Use Case 3 – Notify User and
       Reassign Ignored Leads

Are Leads being claimed by some members of your team and then being
ignored??

Are potential “Hot” Leads languishing away as an overburdened rep forgets
about them??

Potential revenue can be slipping through your company’s fingers!!

This simple workflow solution will remind reps about the Leads they may have
forgotten about plus automate the process of recycling those Leads that have
been left behind to other team members.
Use Case 3 – Notify User and
    Reassign Ignored Leads
Automatically notify users they will lose Leads that have not been
Contacted for 10 days. If the user update the Status at 12 days reassign
the Lead to a queue.
1. Create a Workflow Rule on Leads with a Status of Open –Not
    Contacted
2. Add a time-based Workflow Action for 10 days after the trigger date
    to send them an email to note they need to update status in next
    two days or the lead will be reassigned.
3. Add a time-based Workflow Action for 12 after the trigger date to
    change the owner of Leads still in Open- Not Contacted Status to a
    queue.
4. Monitor your time-based workflows under Administration Setup,
    Monitoring, Time-Based Workflows.
Use Case 3 Continued
1.   Create the Workflow Rule
2.   Create 10 day email notification Workflow Action to Lead owner


3.   Create 12 day field change Workflow Action to change the owner to the
     queue


4.   Monitor Time-based Workflows in the monitoring queue.
Use Case 4 – Approve Expenses

Wouldn’t it be nice to automate your company’s Expense Approval process
for easy tracking??
  No more questions as to the status of the expense!!


Manage the flow of approvals for discounts on Opportunities based on the
percentage of discount so that they automatically route to the proper
approver!
  No more forwarding approval request emails until it gets to the proper approver!!


Take control of all of your company’s approval processes with ease using
Salesforce!
Use Case 4 – Approve Expenses
Approval are complex business processes that require information gathering
and planning before implementing. It is recommended to follow the
instructions below before getting started.
1. Read the Help Topic
2. View the Checklist
3. Create a custom user hierarchical relationship field
4. Create Email Templates
5. Create Approval Process using either the jump Start or Standard Wizard
6. Add Approval History Related List to all page layouts
7. Activate the process to deploy to your users
Use Case 4 – Approve Expenses
          continued
Use Case 4 Continued
 After you do your prep work on the previous slide it is time to set up an
  Approval Process!!
1. Select the Jump Start Wizard (will automatically choose some setting for
   you: Jump Start Wizard) or the Standard Setup Wizard.
2. Name your process
3. Select Entry Criteria for records to Enter the approval process. (only
   expenses over $100
4. Select your Approver and Record Edit ability Properties


5.   Select the Approver Notification Email Template.
Use Case 4 Continued
6. Select field to display on the Approval Page Layout


7.   Select user who can submit an initial approval request


8.   Now create your approval steps
Use Case 4 Continued
9. Specify Approval Step Criteria (such as amount over 101 and under 500 to
   a particular approver)


10. Select Assigned Approver for this step


11. Now specify workflow actions associated to this step


12. Continue to enter steps and associated workflow actions if applicable
Use Case 4 Continued
    The completed Approval Process
                     Initial Submission locks the record
                   and sets the Expense Approval Status
                       field to Submitted for Approval


                                      1st approval step for $500 or
                                     less. If approved sends email
                                    to submitter and sets Expense
                                     Approval Status to Approved


                                    2nd approval step for greater than
                                    $500. Goes to different approver.


                           If approved the expense record remains
                             locked to prevent edits. If denied it is
                          unlocked, an email of rejection goes to the
                         submitter, and the Expense Approval Status
                                        is set to Denied
Use Case 4 Continued
Click on View Diagram button to review your Approval Process with a user
                         friendly flow diagram
Q&A
Questions??
Sean Wolfman
Director of Services at
CloudTrigger
sean.wolfman@cloudtrigger.com
CloudTrigger delivers cloud-based solutions that power your business insight
Services & Solutions for the “Social Enterprise”
   CRM Optimization /Service Cloud / Custom Cloud                    World-Class Cloud Partners
   Data experts for complex migrations & integration
   Custom development/ AppExchange / Mobile
   Change Management /Cloud Consulting / Training
       Rich Geo-location and          Enterprise Class Business
        analytics with your             Intelligence and Data
          Salesforce data             Warehouse for Salesforce


         iPad enabled

                         Key Industries and Representative Clients
       Media &          Technolog                      Financial   Business    Biotech/Pharm
    Communications
                                    Manufacturing                  Services
                            y                          Services                      a
Thank YOU!

DF2UFL 2012: Workflows: Making the MOST of Salesforce.com Native Functionality

  • 1.
  • 2.
  • 3.
    Agenda  Workflow overview  Cross Object Workflows  Workflow Settings  Workflow Rules  Pick Your Workflow Actions  Use Case 1- Lock Records via automated Record Type Changes and notify team member to review locked record  Use Case 2- Track time between critical Opportunity Stages  Use Case 3- Notify a Lead owner about an ignored Lead and move it to a queue if updates are not made.  Use Case 4 – Expense Approvals  Q&A
  • 4.
    Workflow Overview Bring automationto your Salesforce!  Workflows can do the following:  Email Alerts- to any user or contact  Task- can be created and assigned to a specified user  Field updates- update field values automatically  Outbound Message- send information about a record to an external service  Visual Workflow- walk users through a business process flow  Approval Processes- automate the approval process for things such as expenses, opportunities, etc..
  • 5.
    Cross -object Workflow Cross object field updates types:  Custom object to Custom object  Custom object to Standard object  Account, Asset, Campaign, Case, Contact, Contract, Contract Line Item, Entitlement, Opportunity, Order, Question, Quote, Service Contract,  Cross-object field updates now Solution support cross object field updates  Standard object to Standard object for standard objects as of Spring  Case Comments updating Case, Email updating Case, Opportunity ‘12 Product updating Opportunity, Opportunity updating Account  Master-detail relationship must exist in order to do a Cross -object field update
  • 6.
    Workflow Settings Go toWorkflow & Approval Settings  Add Default Workflow User- required for Time based Workflows  Enable Email Approval Process- users can approve or reject approval request via email response
  • 7.
    Workflow Rules Workflow Rulesallow you to decide the object associated to the rule, the Evaluation criteria, and the Rule criteria. 1. Pick your object- only 1 object per Workflow Rule 2. Name the Rule 3. Evaluation Category 4. Rule Criteria 5. Click Save and Next- this will take you to the Edit Rule page.
  • 8.
    Pick Your WorkflowAction/s  Now select a Workflow action  You can select many actions for one Workflow Rule  You can use both Immediate Workflow or Time-Dependent Workflow actions or a mix
  • 9.
    Pick Your WorkflowAction/s continued  Add your Actions and when complete then click Done. Now Activate the Workflow.
  • 10.
    Use Case 1-Locking Records Have you ever been looking for a way to lock a Salesforce record from being edited when a certain status or milestone is reached??  Are users making changes to an Opportunity after is it set to Close Won?  Are Cases being changed post resolution?  Are Contracts being altered after the deal is signed? This use case will walk you through a simple and easy way to use Workflow to lock records from being edited except by those with the authorization to do so!
  • 11.
    Use Case 1-Locking Records  Lock Records via Record Type changes with Field update.  Example- Lock Won Opportunities  Create a Open Opportunity Record Type and a Closed Opportunity Record Type  Create a Locked Page Layout and make all fields Read Only and remove the buttons. Also remove create buttons from Related List  Create a Locked Opportunity Sales Process with only Closed Won available.
  • 12.
    Use Case 1Continued One Workflow with 2 Workflow Actions to update the record and to notify the Deal Desk to review via a Task Record is set to Locked Opp Record Type and Task is created for Deal Desk
  • 13.
    Use Case 2-Tracking Opportunity Stage Changes Have you ever wanted a simple solution to see how much time the Sales Reps are spending on each Stage of the Sales Process? Couldn’t you use this information to streamline your Sales Process so you can remove the roadblocks in front of the Sales Team?  Perhaps the Approval Stage on deals is taking too long and hindering the closure of Sales! Would analyzing the average time spent on each step of the Lead qualification process be useful? Maybe there are too many steps and one needs to be removed. While Salesforce can provide some of this data for Opportunities via the Stage Duration report this simple Workflow solution will allow you to see average time spent per Stage. (or Lead Status) Not just the overall average across all of the Stages on Opportunities .
  • 14.
    Use Case 2-Tracking Opportunity Stage Changes Track the time between critical Sales Stages right on the Opportunity. Create reports to track average time between these stages across all Opportunities. 1. Added 3 Date/time fields to hold the time and date a critical stage was selected. 2. Added 3 Workflows to capture the date/time a critical stage is selected in the newly created Date/time fields 3. Added 2 formula fields to calculate the date/time difference between the stages changes. 4. Display all 5 fields on the page layout. 5. Created a report to calculate average time between the critical Stages across all Opportunity.
  • 15.
    Use Case 2Continued 1. Create Fields 2. Create Workflows 3. Add formula fields 4. Add fields to Page Layout
  • 16.
    Use Case 2Continued 5. Create report to show average time between critical stages
  • 17.
    Use Case 3– Notify User and Reassign Ignored Leads Are Leads being claimed by some members of your team and then being ignored?? Are potential “Hot” Leads languishing away as an overburdened rep forgets about them?? Potential revenue can be slipping through your company’s fingers!! This simple workflow solution will remind reps about the Leads they may have forgotten about plus automate the process of recycling those Leads that have been left behind to other team members.
  • 18.
    Use Case 3– Notify User and Reassign Ignored Leads Automatically notify users they will lose Leads that have not been Contacted for 10 days. If the user update the Status at 12 days reassign the Lead to a queue. 1. Create a Workflow Rule on Leads with a Status of Open –Not Contacted 2. Add a time-based Workflow Action for 10 days after the trigger date to send them an email to note they need to update status in next two days or the lead will be reassigned. 3. Add a time-based Workflow Action for 12 after the trigger date to change the owner of Leads still in Open- Not Contacted Status to a queue. 4. Monitor your time-based workflows under Administration Setup, Monitoring, Time-Based Workflows.
  • 19.
    Use Case 3Continued 1. Create the Workflow Rule 2. Create 10 day email notification Workflow Action to Lead owner 3. Create 12 day field change Workflow Action to change the owner to the queue 4. Monitor Time-based Workflows in the monitoring queue.
  • 20.
    Use Case 4– Approve Expenses Wouldn’t it be nice to automate your company’s Expense Approval process for easy tracking?? No more questions as to the status of the expense!! Manage the flow of approvals for discounts on Opportunities based on the percentage of discount so that they automatically route to the proper approver! No more forwarding approval request emails until it gets to the proper approver!! Take control of all of your company’s approval processes with ease using Salesforce!
  • 21.
    Use Case 4– Approve Expenses Approval are complex business processes that require information gathering and planning before implementing. It is recommended to follow the instructions below before getting started. 1. Read the Help Topic 2. View the Checklist 3. Create a custom user hierarchical relationship field 4. Create Email Templates 5. Create Approval Process using either the jump Start or Standard Wizard 6. Add Approval History Related List to all page layouts 7. Activate the process to deploy to your users
  • 22.
    Use Case 4– Approve Expenses continued
  • 23.
    Use Case 4Continued  After you do your prep work on the previous slide it is time to set up an Approval Process!! 1. Select the Jump Start Wizard (will automatically choose some setting for you: Jump Start Wizard) or the Standard Setup Wizard. 2. Name your process 3. Select Entry Criteria for records to Enter the approval process. (only expenses over $100 4. Select your Approver and Record Edit ability Properties 5. Select the Approver Notification Email Template.
  • 24.
    Use Case 4Continued 6. Select field to display on the Approval Page Layout 7. Select user who can submit an initial approval request 8. Now create your approval steps
  • 25.
    Use Case 4Continued 9. Specify Approval Step Criteria (such as amount over 101 and under 500 to a particular approver) 10. Select Assigned Approver for this step 11. Now specify workflow actions associated to this step 12. Continue to enter steps and associated workflow actions if applicable
  • 26.
    Use Case 4Continued  The completed Approval Process Initial Submission locks the record and sets the Expense Approval Status field to Submitted for Approval 1st approval step for $500 or less. If approved sends email to submitter and sets Expense Approval Status to Approved 2nd approval step for greater than $500. Goes to different approver. If approved the expense record remains locked to prevent edits. If denied it is unlocked, an email of rejection goes to the submitter, and the Expense Approval Status is set to Denied
  • 27.
    Use Case 4Continued Click on View Diagram button to review your Approval Process with a user friendly flow diagram
  • 28.
  • 29.
    Sean Wolfman Director ofServices at CloudTrigger sean.wolfman@cloudtrigger.com
  • 30.
    CloudTrigger delivers cloud-basedsolutions that power your business insight Services & Solutions for the “Social Enterprise”  CRM Optimization /Service Cloud / Custom Cloud World-Class Cloud Partners  Data experts for complex migrations & integration  Custom development/ AppExchange / Mobile  Change Management /Cloud Consulting / Training Rich Geo-location and Enterprise Class Business analytics with your Intelligence and Data Salesforce data Warehouse for Salesforce iPad enabled Key Industries and Representative Clients Media & Technolog Financial Business Biotech/Pharm Communications Manufacturing Services y Services a
  • 31.