This is the Highly Detailed factory service repair manual for the1993 YAMAHA VENTURE VT480 SNOWMOBILE , this Service Manual has detailed illustrations as well as step by step instructions,It is 100 percents complete and intact. they are specifically written for the do-it-yourself-er as well as the experienced mechanic.1993 YAMAHA VENTURE VT480 SNOWMOBILE Service Repair Workshop Manual provides step-by-step instructions based on the complete dis-assembly of the machine. It is this level of detail, along with hundreds of photos and illustrations, that guide the reader through each service and repair procedure. Complete download comes in pdf format which can work under all PC based windows operating system and Mac also, All pages are printable. Using this repair manual is an inexpensive way to keep your vehicle working properly.
Service Repair Manual Covers:
General Information
Periodic Inspection and Adjustment
Chassis
Power Train
Engine Overhaul
Carburetion
Electrical
Appendices
File Format: PDF
Compatible: All Versions of Windows & Mac
Language: English
Requirements: Adobe PDF Reader
NO waiting, Buy from responsible seller and get INSTANT DOWNLOAD, Without wasting your hard-owned money on uncertainty or surprise! All pages are is great to have1993 YAMAHA VENTURE VT480 SNOWMOBILE Service Repair Workshop Manual.
Looking for some other Service Repair Manual,please check:
https://www.aservicemanualpdf.com/
Thanks for visiting!
8
1991 YAMAHA VENTURE VT480 SNOWMOBILE Service Repair Manualjksemkdmm
This is the Highly Detailed factory service repair manual for the1991 YAMAHA VENTURE VT480 SNOWMOBILE, this Service Manual has detailed illustrations as well as step by step instructions,It is 100 percents complete and intact. they are specifically written for the do-it-yourself-er as well as the experienced mechanic.1991 YAMAHA VENTURE VT480 SNOWMOBILE Service Repair Workshop Manual provides step-by-step instructions based on the complete dis-assembly of the machine. It is this level of detail, along with hundreds of photos and illustrations, that guide the reader through each service and repair procedure. Complete download comes in pdf format which can work under all PC based windows operating system and Mac also, All pages are printable. Using this repair manual is an inexpensive way to keep your vehicle working properly.
Service Repair Manual Covers:
General Information
Periodic Inspection and Adjustment
Chassis
Power Train
Engine Overhaul
Carburetion
Electrical
Appendices
File Format: PDF
Compatible: All Versions of Windows & Mac
Language: English
Requirements: Adobe PDF Reader
NO waiting, Buy from responsible seller and get INSTANT DOWNLOAD, Without wasting your hard-owned money on uncertainty or surprise! All pages are is great to have1991 YAMAHA VENTURE VT480 SNOWMOBILE Service Repair Workshop Manual.
Looking for some other Service Repair Manual,please check:
https://www.aservicemanualpdf.com/
Thanks for visiting!
8
1997 YAMAHA VENTURE VT480 SNOWMOBILE Service Repair Manualjkksemd yeuyhd
This is the Highly Detailed factory service repair manual for the1997 YAMAHA VENTURE VT480 SNOWMOBILE, this Service Manual has detailed illustrations as well as step by step instructions,It is 100 percents complete and intact. they are specifically written for the do-it-yourself-er as well as the experienced mechanic.1997 YAMAHA VENTURE VT480 SNOWMOBILE Service Repair Workshop Manual provides step-by-step instructions based on the complete dis-assembly of the machine. It is this level of detail, along with hundreds of photos and illustrations, that guide the reader through each service and repair procedure. Complete download comes in pdf format which can work under all PC based windows operating system and Mac also, All pages are printable. Using this repair manual is an inexpensive way to keep your vehicle working properly.
Service Repair Manual Covers:
General Information
Periodic Inspection and Adjustment
Chassis
Power Train
Engine Overhaul
Carburetion
Electrical
Appendices
File Format: PDF
Compatible: All Versions of Windows & Mac
Language: English
Requirements: Adobe PDF Reader
NO waiting, Buy from responsible seller and get INSTANT DOWNLOAD, Without wasting your hard-owned money on uncertainty or surprise! All pages are is great to have1997 YAMAHA VENTURE VT480 SNOWMOBILE Service Repair Workshop Manual.
Looking for some other Service Repair Manual,please check:
https://www.aservicemanualpdf.com/
Thanks for visiting!
8
1994 YAMAHA VENTURE VT480 SNOWMOBILE Service Repair Manualhjskejdm
This is the Highly Detailed factory service repair manual for the1994 YAMAHA VENTURE VT480 SNOWMOBILE , this Service Manual has detailed illustrations as well as step by step instructions,It is 100 percents complete and intact. they are specifically written for the do-it-yourself-er as well as the experienced mechanic.1994 YAMAHA VENTURE VT480 SNOWMOBILE Service Repair Workshop Manual provides step-by-step instructions based on the complete dis-assembly of the machine. It is this level of detail, along with hundreds of photos and illustrations, that guide the reader through each service and repair procedure. Complete download comes in pdf format which can work under all PC based windows operating system and Mac also, All pages are printable. Using this repair manual is an inexpensive way to keep your vehicle working properly.
Service Repair Manual Covers:
General Information
Periodic Inspection and Adjustment
Chassis
Power Train
Engine Overhaul
Carburetion
Electrical
Appendices
File Format: PDF
Compatible: All Versions of Windows & Mac
Language: English
Requirements: Adobe PDF Reader
NO waiting, Buy from responsible seller and get INSTANT DOWNLOAD, Without wasting your hard-owned money on uncertainty or surprise! All pages are is great to have1994 YAMAHA VENTURE VT480 SNOWMOBILE Service Repair Workshop Manual.
Looking for some other Service Repair Manual,please check:
https://www.aservicemanualpdf.com/
Thanks for visiting!
8
1996 YAMAHA VENTURE VT480 SNOWMOBILE Service Repair Manualjkksejkdm
This is the Highly Detailed factory service repair manual for the1996 YAMAHA VENTURE VT480 SNOWMOBILE, this Service Manual has detailed illustrations as well as step by step instructions,It is 100 percents complete and intact. they are specifically written for the do-it-yourself-er as well as the experienced mechanic.1996 YAMAHA VENTURE VT480 SNOWMOBILE Service Repair Workshop Manual provides step-by-step instructions based on the complete dis-assembly of the machine. It is this level of detail, along with hundreds of photos and illustrations, that guide the reader through each service and repair procedure. Complete download comes in pdf format which can work under all PC based windows operating system and Mac also, All pages are printable. Using this repair manual is an inexpensive way to keep your vehicle working properly.
Service Repair Manual Covers:
General Information
Periodic Inspection and Adjustment
Chassis
Power Train
Engine Overhaul
Carburetion
Electrical
Appendices
File Format: PDF
Compatible: All Versions of Windows & Mac
Language: English
Requirements: Adobe PDF Reader
NO waiting, Buy from responsible seller and get INSTANT DOWNLOAD, Without wasting your hard-owned money on uncertainty or surprise! All pages are is great to have1996 YAMAHA VENTURE VT480 SNOWMOBILE Service Repair Workshop Manual.
Looking for some other Service Repair Manual,please check:
https://www.aservicemanualpdf.com/
Thanks for visiting!
8
1995 YAMAHA VENTURE VT480 SNOWMOBILE Service Repair Manualhkksejkdmm
This is the Highly Detailed factory service repair manual for the1995 YAMAHA VENTURE VT480 SNOWMOBILE, this Service Manual has detailed illustrations as well as step by step instructions,It is 100 percents complete and intact. they are specifically written for the do-it-yourself-er as well as the experienced mechanic.1995 YAMAHA VENTURE VT480 SNOWMOBILE Service Repair Workshop Manual provides step-by-step instructions based on the complete dis-assembly of the machine. It is this level of detail, along with hundreds of photos and illustrations, that guide the reader through each service and repair procedure. Complete download comes in pdf format which can work under all PC based windows operating system and Mac also, All pages are printable. Using this repair manual is an inexpensive way to keep your vehicle working properly.
Service Repair Manual Covers:
General Information
Periodic Inspection and Adjustment
Chassis
Power Train
Engine Overhaul
Carburetion
Electrical
Appendices
File Format: PDF
Compatible: All Versions of Windows & Mac
Language: English
Requirements: Adobe PDF Reader
NO waiting, Buy from responsible seller and get INSTANT DOWNLOAD, Without wasting your hard-owned money on uncertainty or surprise! All pages are is great to have1995 YAMAHA VENTURE VT480 SNOWMOBILE Service Repair Workshop Manual.
Looking for some other Service Repair Manual,please check:
https://www.aservicemanualpdf.com/
Thanks for visiting!
8
Toyota 42-6FGU25 Forklift Service Repair Manualjkksemd yeuyhd
This is the Highly Detailed factory service repair manual for theTOYOTA 42-6FGU25 FORKLIFT , this Service Manual has detailed illustrations as well as step by step instructions,It is 100 percents complete and intact. they are specifically written for the do-it-yourself-er as well as the experienced mechanic.TOYOTA 42-6FGU25 FORKLIFT Service Repair Workshop Manual provides step-by-step instructions based on the complete dis-assembly of the machine. It is this level of detail, along with hundreds of photos and illustrations, that guide the reader through each service and repair procedure. Complete download comes in pdf format which can work under all PC based windows operating system and Mac also, All pages are printable. Using this repair manual is an inexpensive way to keep your vehicle working properly.
Service Repair Manual Covers:
Foreword
Section Index
General
Engine
Torque Converter
Propeller Shaft
Differential
Front Axle
Rear Axle
Steering
Brake
Body
Material Handling System
Mast
Cylinder
Oil Pump
Oil Control Valve
Appendix
Wire Diagrams
File Format: PDF
Compatible: All Versions of Windows & Mac
Language: English
Requirements: Adobe PDF Reader
NO waiting, Buy from responsible seller and get INSTANT DOWNLOAD, Without wasting your hard-owned money on uncertainty or surprise! All pages are is great to haveTOYOTA 42-6FGU25 FORKLIFT Service Repair Workshop Manual.
Looking for some other Service Repair Manual,please check:
https://www.aservicemanualpdf.com/
Thanks for visiting!
8
El técnico con conocimientos en Mecánica Automotriz necesita que cuente a la mano con los datos técnicos de los fabricantes de los diferentes modelos con los ajustes a debe aplicar a los motores,
2008 TOYOTA COROLLA Service Repair Manualfujjsekfkekmd
This is the Highly Detailed factory service repair manual for the2008 TOYOTA COROLLA, this Service Manual has detailed illustrations as well as step by step instructions,It is 100 percents complete and intact. they are specifically written for the do-it-yourself-er as well as the experienced mechanic.2008 TOYOTA COROLLA Service Repair Workshop Manual provides step-by-step instructions based on the complete dis-assembly of the machine. It is this level of detail, along with hundreds of photos and illustrations, that guide the reader through each service and repair procedure. Complete download comes in pdf format which can work under all PC based windows operating system and Mac also, All pages are printable. Using this repair manual is an inexpensive way to keep your vehicle working properly.
Service Repair Manual Covers:
Introduction
Preparation
Service Specifications
Diagnostics
Engine Control System
Fuel
Emission Control
Intake
Engine Mechanical
Exhaust
Cooling
Lubrication
Ignition
Starting and Charging
Front Suspension
Rear Suspension
Tire
Wheel
Drive Shaft
Propeller Shaft
Brake
Parking Brake
Automatic Transmission
Manual Transmission
Clutch
Steering Column
Power Steering
Heater and Air Conditioner
Supplemental Restraint System
Seat Belt
Lighting
Wiper and Washer
Audio and Visual System
Wiring
Communication System
Windshield
Window Glass
Instrument Panel
Meter
Seat
Theft Defferent
Door Lock
Sliding Roof
Convertible
Engine Hood
Door
Exterior
Interior Trim
Vehicle Control System
Cruise Control
Maintenance
Alphabetical Index
File Format: PDF
Compatible: All Versions of Windows & Mac
Language: English
Requirements: Adobe PDF Reader
NO waiting, Buy from responsible seller and get INSTANT DOWNLOAD, Without wasting your hard-owned money on uncertainty or surprise! All pages are is great to have2008 TOYOTA COROLLA Service Repair Workshop Manual.
Looking for some other Service Repair Manual,please check:
https://www.aservicemanualpdf.com/
Thanks for visiting!
1997-2004 YAMAHA Venture VT700 SNOWMOBILE Service Repair Manualjkmsmd yedkmd
This is the Highly Detailed factory service repair manual for the1997-2004 YAMAHA VENTURE VT700 SNOWMOBILE, this Service Manual has detailed illustrations as well as step by step instructions,It is 100 percents complete and intact. they are specifically written for the do-it-yourself-er as well as the experienced mechanic.1997-2004 YAMAHA VENTURE VT700 SNOWMOBILE Service Repair Workshop Manual provides step-by-step instructions based on the complete dis-assembly of the machine. It is this level of detail, along with hundreds of photos and illustrations, that guide the reader through each service and repair procedure. Complete download comes in pdf format which can work under all PC based windows operating system and Mac also, All pages are printable. Using this repair manual is an inexpensive way to keep your vehicle working properly.
Service Repair Manual Covers:
General Information
Periodic Inspection and Adjustment
Chassis
Power Train
Engine Overhaul
Cooling System
Carburetion
Electrical
Specifications
Optional Kit
File Format: PDF
Compatible: All Versions of Windows & Mac
Language: English
Requirements: Adobe PDF Reader
NO waiting, Buy from responsible seller and get INSTANT DOWNLOAD, Without wasting your hard-owned money on uncertainty or surprise! All pages are is great to have1997-2004 YAMAHA VENTURE VT700 SNOWMOBILE Service Repair Workshop Manual.
Looking for some other Service Repair Manual,please check:
https://www.aservicemanualpdf.com/
Thanks for visiting!
8
1997 1998 1999 Yamaha Venture 500/600 Service Repair Manualqwuikm
This is the Highly Detailed factory service repair manual for the1997 1998 1999 YAMAHA VENTURE 500/600, this Service Manual has detailed illustrations as well as step by step instructions,It is 100 percents complete and intact. they are specifically written for the do-it-yourself-er as well as the experienced mechanic.1997 1998 1999 YAMAHA VENTURE 500/600 Service Repair Workshop Manual provides step-by-step instructions based on the complete dis-assembly of the machine. It is this level of detail, along with hundreds of photos and illustrations, that guide the reader through each service and repair procedure. Complete download comes in pdf format which can work under all PC based windows operating system and Mac also, All pages are printable. Using this repair manual is an inexpensive way to keep your vehicle working properly.
Service Repair Manual Covers:
General Information
Periodic Inspection and Adjustment
Chassis
Power Train
Engine Overhaul
Cooling System
Carburetion
Electrical
Specifications
Optional Kit
File Format: PDF
Compatible: All Versions of Windows & Mac
Language: English
Requirements: Adobe PDF Reader
NO waiting, Buy from responsible seller and get INSTANT DOWNLOAD, Without wasting your hard-owned money on uncertainty or surprise! All pages are is great to have1997 1998 1999 YAMAHA VENTURE 500/600 Service Repair Workshop Manual.
Looking for some other Service Repair Manual,please check:
https://www.aservicemanualpdf.com/
Thanks for visiting!
8
1997 1998 1999 Yamaha VMAX 500/600/700 Service Repair Manualjkmsedol
This is the Highly Detailed factory service repair manual for the1997 1998 1999 YAMAHA VMAX 500/600/700, this Service Manual has detailed illustrations as well as step by step instructions,It is 100 percents complete and intact. they are specifically written for the do-it-yourself-er as well as the experienced mechanic.1997 1998 1999 YAMAHA VMAX 500/600/700 Service Repair Workshop Manual provides step-by-step instructions based on the complete dis-assembly of the machine. It is this level of detail, along with hundreds of photos and illustrations, that guide the reader through each service and repair procedure. Complete download comes in pdf format which can work under all PC based windows operating system and Mac also, All pages are printable. Using this repair manual is an inexpensive way to keep your vehicle working properly.
Service Repair Manual Covers:
General Information
Periodic Inspection and Adjustment
Chassis
Power Train
Engine Overhaul
Cooling System
Carburetion
Electrical
Specifications
Optional Kit
File Format: PDF
Compatible: All Versions of Windows & Mac
Language: English
Requirements: Adobe PDF Reader
NO waiting, Buy from responsible seller and get INSTANT DOWNLOAD, Without wasting your hard-owned money on uncertainty or surprise! All pages are is great to have1997 1998 1999 YAMAHA VMAX 500/600/700 Service Repair Workshop Manual.
Looking for some other Service Repair Manual,please check:
https://www.aservicemanualpdf.com/
Thanks for visiting!
8
1994 Yamaha Viking VK 540 Series Snowmobile Service Repair Manualjkksemd yeuyhd
This is the Highly Detailed factory service repair manual for the1994 YAMAHA VIKING VK 540 SERIES SNOWMOBILE, this Service Manual has detailed illustrations as well as step by step instructions,It is 100 percents complete and intact. they are specifically written for the do-it-yourself-er as well as the experienced mechanic.1994 YAMAHA VIKING VK 540 SERIES SNOWMOBILE Service Repair Workshop Manual provides step-by-step instructions based on the complete dis-assembly of the machine. It is this level of detail, along with hundreds of photos and illustrations, that guide the reader through each service and repair procedure. Complete download comes in pdf format which can work under all PC based windows operating system and Mac also, All pages are printable. Using this repair manual is an inexpensive way to keep your vehicle working properly.
Service Repair Manual Covers:
General Information
Periodic Inspection and Adjustments
Engine Overhaul
Carburetion
Power Train
Chassis
Electrical
Appendices
File Format: PDF
Compatible: All Versions of Windows & Mac
Language: English
Requirements: Adobe PDF Reader
NO waiting, Buy from responsible seller and get INSTANT DOWNLOAD, Without wasting your hard-owned money on uncertainty or surprise! All pages are is great to have1994 YAMAHA VIKING VK 540 SERIES SNOWMOBILE Service Repair Workshop Manual.
Looking for some other Service Repair Manual,please check:
https://www.aservicemanualpdf.com/
Thanks for visiting!
8
1991 Yamaha Viking VK 540 Series Snowmobile Service Repair Manualhjskejdm
This is the Highly Detailed factory service repair manual for the1991 YAMAHA VIKING VK 540 SERIES SNOWMOBILE, this Service Manual has detailed illustrations as well as step by step instructions,It is 100 percents complete and intact. they are specifically written for the do-it-yourself-er as well as the experienced mechanic.1991 YAMAHA VIKING VK 540 SERIES SNOWMOBILE Service Repair Workshop Manual provides step-by-step instructions based on the complete dis-assembly of the machine. It is this level of detail, along with hundreds of photos and illustrations, that guide the reader through each service and repair procedure. Complete download comes in pdf format which can work under all PC based windows operating system and Mac also, All pages are printable. Using this repair manual is an inexpensive way to keep your vehicle working properly.
Service Repair Manual Covers:
General Information
Periodic Inspection and Adjustments
Engine Overhaul
Carburetion
Power Train
Chassis
Electrical
Appendices
File Format: PDF
Compatible: All Versions of Windows & Mac
Language: English
Requirements: Adobe PDF Reader
NO waiting, Buy from responsible seller and get INSTANT DOWNLOAD, Without wasting your hard-owned money on uncertainty or surprise! All pages are is great to have1991 YAMAHA VIKING VK 540 SERIES SNOWMOBILE Service Repair Workshop Manual.
Looking for some other Service Repair Manual,please check:
https://www.aservicemanualpdf.com/
Thanks for visiting!
8
YANMAR 4TNV DIESEL ENGINE Service Repair Manualjksmemmd
This is the Highly Detailed factory service repair manual for theYANMAR 4TNV DIESEL ENGINE, this Service Manual has detailed illustrations as well as step by step instructions,It is 100 percents complete and intact. they are specifically written for the do-it-yourself-er as well as the experienced mechanic.YANMAR 4TNV DIESEL ENGINE Service Repair Workshop Manual provides step-by-step instructions based on the complete dis-assembly of the machine. It is this level of detail, along with hundreds of photos and illustrations, that guide the reader through each service and repair procedure. Complete download comes in pdf format which can work under all PC based windows operating system and Mac also, All pages are printable. Using this repair manual is an inexpensive way to keep your vehicle working properly.
Service Repair Manual Covers:
General
Inspection and adjustment
Troubleshooting
Disassembly, inspection and reassembly of engines
Lubrication system
Cooling system
Fuel injection pump / governor
Turbochager: disassembly, inspection and reassembly
Starting motor
Alternator
Electric wiring
Service standards
Tightening torque for blots and nuts
File Format: PDF
Compatible: All Versions of Windows & Mac
Language: English
Requirements: Adobe PDF Reader
NO waiting, Buy from responsible seller and get INSTANT DOWNLOAD, Without wasting your hard-owned money on uncertainty or surprise! All pages are is great to haveYANMAR 4TNV DIESEL ENGINE Service Repair Workshop Manual.
Looking for some other Service Repair Manual,please check:
https://www.aservicemanualpdf.com/
Thanks for visiting!
8
YANMAR 4TNE106 DIESEL ENGINE Service Repair Manualjksmemmd
This is the Highly Detailed factory service repair manual for theYANMAR 4TNE106 DIESEL ENGINE, this Service Manual has detailed illustrations as well as step by step instructions,It is 100 percents complete and intact. they are specifically written for the do-it-yourself-er as well as the experienced mechanic.YANMAR 4TNE106 DIESEL ENGINE Service Repair Workshop Manual provides step-by-step instructions based on the complete dis-assembly of the machine. It is this level of detail, along with hundreds of photos and illustrations, that guide the reader through each service and repair procedure. Complete download comes in pdf format which can work under all PC based windows operating system and Mac also, All pages are printable. Using this repair manual is an inexpensive way to keep your vehicle working properly.
Service Repair Manual Covers:
General
Troubleshooting
Inspection and adjustment
Engine body
Lubrication system
Cooling system
Fuel injection system / governor
Turbocharger (for 4TNE106T)
Starting motor
Alternator
Special service tools
Service standards
File Format: PDF
Compatible: All Versions of Windows & Mac
Language: English
Requirements: Adobe PDF Reader
NO waiting, Buy from responsible seller and get INSTANT DOWNLOAD, Without wasting your hard-owned money on uncertainty or surprise! All pages are is great to haveYANMAR 4TNE106 DIESEL ENGINE Service Repair Workshop Manual.
Looking for some other Service Repair Manual,please check:
https://www.aservicemanualpdf.com/
Thanks for visiting!
8
YAMAHA F225AET OUTBOARD Service Repair Manual U: 150101-jksmemmd
This is the Highly Detailed factory service repair manual for theYAMAHA F225AET OUTBOARD, this Service Manual has detailed illustrations as well as step by step instructions,It is 100 percents complete and intact. they are specifically written for the do-it-yourself-er as well as the experienced mechanic.YAMAHA F225AET OUTBOARD Service Repair Workshop Manual provides step-by-step instructions based on the complete dis-assembly of the machine. It is this level of detail, along with hundreds of photos and illustrations, that guide the reader through each service and repair procedure. Complete download comes in pdf format which can work under all PC based windows operating system and Mac also, All pages are printable. Using this repair manual is an inexpensive way to keep your vehicle working properly.
Service Repair Manual Covers:
General information
Specifications
Periodic checks and adjustments
Fuel system
Power unit
Lower unit
Bracket unit
Electrical systems
Troubleshooting
Index
File Format: PDF
Compatible: All Versions of Windows & Mac
Language: English
Requirements: Adobe PDF Reader
NO waiting, Buy from responsible seller and get INSTANT DOWNLOAD, Without wasting your hard-owned money on uncertainty or surprise! All pages are is great to haveYAMAHA F225AET OUTBOARD Service Repair Workshop Manual.
Looking for some other Service Repair Manual,please check:
https://www.aservicemanualpdf.com/
Thanks for visiting!
8
Toyota 7FBCU18 Forklift Service Repair Manualjksmemmd
This is the Highly Detailed factory service repair manual for theTOYOTA 7FBCU18 FORKLIFT, this Service Manual has detailed illustrations as well as step by step instructions,It is 100 percents complete and intact. they are specifically written for the do-it-yourself-er as well as the experienced mechanic.TOYOTA 7FBCU18 FORKLIFT Service Repair Workshop Manual provides step-by-step instructions based on the complete dis-assembly of the machine. It is this level of detail, along with hundreds of photos and illustrations, that guide the reader through each service and repair procedure. Complete download comes in pdf format which can work under all PC based windows operating system and Mac also, All pages are printable. Using this repair manual is an inexpensive way to keep your vehicle working properly.
Service Repair Manual Covers:
General
Battery
Control
Multi-Display Functions
Troubleshooting
Motor
Drive Unit
Front Axle
Rear Axle
Steering
Brake
Body
Material Handling System
Mast
Cylinder
Oil Pump
Oil Control Valve
SAS Functions
Appendix
File Format: PDF
Compatible: All Versions of Windows & Mac
Language: English
Requirements: Adobe PDF Reader
NO waiting, Buy from responsible seller and get INSTANT DOWNLOAD, Without wasting your hard-owned money on uncertainty or surprise! All pages are is great to haveTOYOTA 7FBCU18 FORKLIFT Service Repair Workshop Manual.
Looking for some other Service Repair Manual,please check:
https://www.aservicemanualpdf.com/
Thanks for visiting!
8
MITSUBISHI FGC25N HO FORKLIFT TRUCKS CHASSIS, MAST AND OPTIONS Service Repair...jksmemmd
This is the Highly Detailed factory service repair manual for theMITSUBISHI FGC25N HO FORKLIFT TRUCKS CHASSIS, MAST AND OPTIONS, this Service Manual has detailed illustrations as well as step by step instructions,It is 100 percents complete and intact. they are specifically written for the do-it-yourself-er as well as the experienced mechanic.MITSUBISHI FGC25N HO FORKLIFT TRUCKS CHASSIS, MAST AND OPTIONS Service Repair Workshop Manual provides step-by-step instructions based on the complete dis-assembly of the machine. It is this level of detail, along with hundreds of photos and illustrations, that guide the reader through each service and repair procedure. Complete download comes in pdf format which can work under all PC based windows operating system and Mac also, All pages are printable. Using this repair manual is an inexpensive way to keep your vehicle working properly.
Service Repair Manual Covers:
General Information
Cooling System
Electrical System
Controllers
Power Train
Powershift Transmission
Front Axle
Reduction Differential
Rear Axle
Brake System
Steering System
Hydraulic System
Mast and Forks
Service Data
File Format: PDF
Compatible: All Versions of Windows & Mac
Language: English
Requirements: Adobe PDF Reader
NO waiting, Buy from responsible seller and get INSTANT DOWNLOAD, Without wasting your hard-owned money on uncertainty or surprise! All pages are is great to haveMITSUBISHI FGC25N HO FORKLIFT TRUCKS CHASSIS, MAST AND OPTIONS Service Repair Workshop Manual.
Looking for some other Service Repair Manual,please check:
https://www.aservicemanualpdf.com/
Thanks for visiting!
8
MASSEY FERGUSON MF375 TRACTOR Service Repair Manualjksmemmd
This is the Highly Detailed factory service repair manual for theMASSEY FERGUSON MF375 TRACTOR, this Service Manual has detailed illustrations as well as step by step instructions,It is 100 percents complete and intact. they are specifically written for the do-it-yourself-er as well as the experienced mechanic.MASSEY FERGUSON MF375 TRACTOR Service Repair Workshop Manual provides step-by-step instructions based on the complete dis-assembly of the machine. It is this level of detail, along with hundreds of photos and illustrations, that guide the reader through each service and repair procedure. Complete download comes in pdf format which can work under all PC based windows operating system and Mac also, All pages are printable. Using this repair manual is an inexpensive way to keep your vehicle working properly.
Service Repair Manual Covers:
Brakes
Clutch (Engine)
Diesel Fuel System
Electrical System
Engine
Front Axle System
Front Wheel Drive
Hydraulic System
Independent Power Take-Off
Live Power Take-Off
Main Drive Bevel Drive Gears and Differential
Rear Axle and Final Drive
Steering System
Transmission
Turbocharger
File Format: PDF
Compatible: All Versions of Windows & Mac
Language: English
Requirements: Adobe PDF Reader
NO waiting, Buy from responsible seller and get INSTANT DOWNLOAD, Without wasting your hard-owned money on uncertainty or surprise! All pages are is great to haveMASSEY FERGUSON MF375 TRACTOR Service Repair Workshop Manual.
Looking for some other Service Repair Manual,please check:
https://www.aservicemanualpdf.com/
Thanks for visiting!
8
LIEBHERR R954C LITRONIC HYDRAULIC EXCAVATOR Service Repair Manualjksmemmd
This is the Highly Detailed factory service repair manual for theLIEBHERR R954C LITRONIC HYDRAULIC EXCAVATOR, this Service Manual has detailed illustrations as well as step by step instructions,It is 100 percents complete and intact. they are specifically written for the do-it-yourself-er as well as the experienced mechanic.LIEBHERR R954C LITRONIC HYDRAULIC EXCAVATOR Service Repair Workshop Manual provides step-by-step instructions based on the complete dis-assembly of the machine. It is this level of detail, along with hundreds of photos and illustrations, that guide the reader through each service and repair procedure. Complete download comes in pdf format which can work under all PC based windows operating system and Mac also, All pages are printable. Using this repair manual is an inexpensive way to keep your vehicle working properly.
Service Repair Manual Covers:
General Information
Tools
Technical Data / Maintenance Guidelines
Engine
Coupling / Splitterbox
Hydraulic Sytem
Hydraulic System – A3 Schematics
Hydraulic Components
Hydraulic Components – A3 Schematics
Electrical System
Electrical System – A3 Schematics
Swing Gear
Swing Ring
Travel Gear / Two Speed Gear Box
Track Components / Axles
Pressure Air System
Central Lubrication
Special Attachments / Additional Hydraulic Installations
Special Attachments / Additional Hydraulic Installations – A3 Schematics
Cab Heater / Air Conditioning System
File Format: PDF
Compatible: All Versions of Windows & Mac
Language: English
Requirements: Adobe PDF Reader
NO waiting, Buy from responsible seller and get INSTANT DOWNLOAD, Without wasting your hard-owned money on uncertainty or surprise! All pages are is great to haveLIEBHERR R954C LITRONIC HYDRAULIC EXCAVATOR Service Repair Workshop Manual.
Looking for some other Service Repair Manual,please check:
https://www.aservicemanualpdf.com/
Thanks for visiting!
8
LIEBHERR PR722 SERIES 2 LITRONIC CRAWLER DOZER Service Repair Manualjksmemmd
This is the Highly Detailed factory service repair manual for theLIEBHERR PR722 SERIES 2 LITRONIC CRAWLER DOZER, this Service Manual has detailed illustrations as well as step by step instructions,It is 100 percents complete and intact. they are specifically written for the do-it-yourself-er as well as the experienced mechanic.LIEBHERR PR722 SERIES 2 LITRONIC CRAWLER DOZER Service Repair Workshop Manual provides step-by-step instructions based on the complete dis-assembly of the machine. It is this level of detail, along with hundreds of photos and illustrations, that guide the reader through each service and repair procedure. Complete download comes in pdf format which can work under all PC based windows operating system and Mac also, All pages are printable. Using this repair manual is an inexpensive way to keep your vehicle working properly.
Service Repair Manual Covers:
General Information
Special Tools and Application Guidelines
Technical Data-Maintenance Guidelines
Engine
Coupling and Splitter Box
Travel Hydraulic
Working Hydraulic
Hydraulic Components
Electrical System
Electronic Control
Travel Gear
Track Components
Attachments-Front
Attachments-Rear
Main Frame-Add On Components
Tank Installation's
Operator's Platform, Heater, Air Conditioning System
Special Attachments
Miscellaneous Informations
File Format: PDF
Compatible: All Versions of Windows & Mac
Language: English
Requirements: Adobe PDF Reader
NO waiting, Buy from responsible seller and get INSTANT DOWNLOAD, Without wasting your hard-owned money on uncertainty or surprise! All pages are is great to haveLIEBHERR PR722 SERIES 2 LITRONIC CRAWLER DOZER Service Repair Workshop Manual.
Looking for some other Service Repair Manual,please check:
https://www.aservicemanualpdf.com/
Thanks for visiting!
8
HITACHI ZAXIS 210 EXCAVATOR Service Repair Manualjksmemmd
This is the Highly Detailed factory service repair manual for theHITACHI ZAXIS 210 EXCAVATOR, this Service Manual has detailed illustrations as well as step by step instructions,It is 100 percents complete and intact. they are specifically written for the do-it-yourself-er as well as the experienced mechanic.HITACHI ZAXIS 210 EXCAVATOR Service Repair Workshop Manual provides step-by-step instructions based on the complete dis-assembly of the machine. It is this level of detail, along with hundreds of photos and illustrations, that guide the reader through each service and repair procedure. Complete download comes in pdf format which can work under all PC based windows operating system and Mac also, All pages are printable. Using this repair manual is an inexpensive way to keep your vehicle working properly.
Service Manual Consists of the following separate Part No:
Technical Manual (Operational Principle) Vol. No. TO178-E
Technical Manual (Troubleshooting) Vol.No. TT178-E
Workshop Manual Vol.No. W178-E
Electrical Circuit Diagram
Workshop Manual Covers:
Safety
General Information
Upperstructure
Undercarriage
Front Attachment
Engine
Technical Manual (Operational Principle) Covers:
General
System
Component Operation
Technical Manual (Troubleshooting) Covers:
Operational Performance Test
Troubleshooting
File Format: PDF
Compatible: All Versions of Windows & Mac
Language: English
Requirements: Adobe PDF Reader
NO waiting, Buy from responsible seller and get INSTANT DOWNLOAD, Without wasting your hard-owned money on uncertainty or surprise! All pages are is great to haveHITACHI ZAXIS 210 EXCAVATOR Service Repair Workshop Manual.
Looking for some other Service Repair Manual,please check:
https://www.aservicemanualpdf.com/
Thanks for visiting!
8
HITACHI EX1900-6 HYDRAULIC EXCAVATOR Service Repair Manualjksmemmd
This is the Highly Detailed factory service repair manual for theHITACHI EX1900-6 HYDRAULIC EXCAVATOR, this Service Manual has detailed illustrations as well as step by step instructions,It is 100 percents complete and intact. they are specifically written for the do-it-yourself-er as well as the experienced mechanic.HITACHI EX1900-6 HYDRAULIC EXCAVATOR Service Repair Workshop Manual provides step-by-step instructions based on the complete dis-assembly of the machine. It is this level of detail, along with hundreds of photos and illustrations, that guide the reader through each service and repair procedure. Complete download comes in pdf format which can work under all PC based windows operating system and Mac also, All pages are printable. Using this repair manual is an inexpensive way to keep your vehicle working properly.
Service Manual Consists of the following separate Part No:
Technical Manual (Operational Principle) Vol.No. TO18K-E
Technical Manual (Troubleshooting) Vol.No. TT18K-E
Workshop Manual Vol.No. W18K-E
Electrical Circuit Diagram
Workshop Manual Covers:
Safety
General Information
Upperstructure
Undercarriage
Front Attachment
Technical Manual (Operational Principle) Covers:
General
System
Component Operation
Technical Manual (Troubleshooting) Covers:
Operational Performance Test
Troubleshooting
File Format: PDF
Compatible: All Versions of Windows & Mac
Language: English
Requirements: Adobe PDF Reader
NO waiting, Buy from responsible seller and get INSTANT DOWNLOAD, Without wasting your hard-owned money on uncertainty or surprise! All pages are is great to haveHITACHI EX1900-6 HYDRAULIC EXCAVATOR Service Repair Workshop Manual.
Looking for some other Service Repair Manual,please check:
https://www.aservicemanualpdf.com/
Thanks for visiting!
8
This is the Highly Detailed factory service repair manual for the2007 HONDA ODYSSEY, this Service Manual has detailed illustrations as well as step by step instructions,It is 100 percents complete and intact. they are specifically written for the do-it-yourself-er as well as the experienced mechanic.2007 HONDA ODYSSEY Service Repair Workshop Manual provides step-by-step instructions based on the complete dis-assembly of the machine. It is this level of detail, along with hundreds of photos and illustrations, that guide the reader through each service and repair procedure. Complete download comes in pdf format which can work under all PC based windows operating system and Mac also, All pages are printable. Using this repair manual is an inexpensive way to keep your vehicle working properly.
Service Repair Manual Covers:
Maintenance
Engine
Control System
Mechanical
Fuel Service Specifications
Emission Control
Intake Exhaust Cooling
Lube
Ignition Starting Charging
Auto Transmission Clutch
Manual Transmission
Transfer Propeller Shaft
Drive Shaft
Differential
Axle Suspension
Tire & Wheel
Brake Control
Brake
Parking Brake
Steering Column
Power Steering
Air Condition
Suppl Restraint System
Seat Belt
Engine Immobilizer
Cruise Control
Wiper & Washer
Door Lock
Meter Audio/Visual
Horn
Windshield/Glass Mirror
Instrument Panel
Seat
Engine Hood/ Door
Exterior & Interior
Electrical
Multiplex/ Can Communication
And much more
File Format: PDF
Compatible: All Versions of Windows & Mac
Language: English
Requirements: Adobe PDF Reader
NO waiting, Buy from responsible seller and get INSTANT DOWNLOAD, Without wasting your hard-owned money on uncertainty or surprise! All pages are is great to have2007 HONDA ODYSSEY Service Repair Workshop Manual.
Looking for some other Service Repair Manual,please check:
https://www.aservicemanualpdf.com/
Thanks for visiting!
8
This is the Highly Detailed factory service repair manual for the2005 HONDA ACCORD, this Service Manual has detailed illustrations as well as step by step instructions,It is 100 percents complete and intact. they are specifically written for the do-it-yourself-er as well as the experienced mechanic.2005 HONDA ACCORD Service Repair Workshop Manual provides step-by-step instructions based on the complete dis-assembly of the machine. It is this level of detail, along with hundreds of photos and illustrations, that guide the reader through each service and repair procedure. Complete download comes in pdf format which can work under all PC based windows operating system and Mac also, All pages are printable. Using this repair manual is an inexpensive way to keep your vehicle working properly.
Service Repair Manual Covers:
Maintenance
Engine
Control System
Mechanical
Fuel Service Specifications
Emission Control
Intake Exhaust Cooling
Lube
Ignition Starting Charging
Auto Transmission Clutch
Manual Transmission
Transfer Propeller Shaft
Drive Shaft
Differential
Axle Suspension
Tire & Wheel
Brake Control
Brake
Parking Brake
Steering Column
Power Steering
Air Condition
Suppl Restraint System
Seat Belt
Engine Immobilizer
Cruise Control
Wiper & Washer
Door Lock
Meter Audio/Visual
Horn
Windshield/Glass Mirror
Instrument Panel
Seat
Engine Hood/ Door
Exterior & Interior
Electrical
Multiplex/ Can Communication
And much more
File Format: PDF
Compatible: All Versions of Windows & Mac
Language: English
Requirements: Adobe PDF Reader
NO waiting, Buy from responsible seller and get INSTANT DOWNLOAD, Without wasting your hard-owned money on uncertainty or surprise! All pages are is great to have2005 HONDA ACCORD Service Repair Workshop Manual.
Looking for some other Service Repair Manual,please check:
https://www.aservicemanualpdf.com/
Thanks for visiting!
8
This is the Highly Detailed factory service repair manual for the2002 HONDA CRV, this Service Manual has detailed illustrations as well as step by step instructions,It is 100 percents complete and intact. they are specifically written for the do-it-yourself-er as well as the experienced mechanic.2002 HONDA CRV Service Repair Workshop Manual provides step-by-step instructions based on the complete dis-assembly of the machine. It is this level of detail, along with hundreds of photos and illustrations, that guide the reader through each service and repair procedure. Complete download comes in pdf format which can work under all PC based windows operating system and Mac also, All pages are printable. Using this repair manual is an inexpensive way to keep your vehicle working properly.
Service Repair Manual Covers:
General Information
Specifications
Maintenance
Engine Electrical
Engine
Cooling
Fuel and Emissions
Transaxle
Steering
Suspension
Brakes
Body
Heating, Ventilation and Air Conditioning
Body Electrical
Restrains
File Format: PDF
Compatible: All Versions of Windows & Mac
Language: English
Requirements: Adobe PDF Reader
NO waiting, Buy from responsible seller and get INSTANT DOWNLOAD, Without wasting your hard-owned money on uncertainty or surprise! All pages are is great to have2002 HONDA CRV Service Repair Workshop Manual.
Looking for some other Service Repair Manual,please check:
https://www.aservicemanualpdf.com/
Thanks for visiting!
8
This is the Highly Detailed factory service repair manual for the2001 HONDA ODYSSEY, this Service Manual has detailed illustrations as well as step by step instructions,It is 100 percents complete and intact. they are specifically written for the do-it-yourself-er as well as the experienced mechanic.2001 HONDA ODYSSEY Service Repair Workshop Manual provides step-by-step instructions based on the complete dis-assembly of the machine. It is this level of detail, along with hundreds of photos and illustrations, that guide the reader through each service and repair procedure. Complete download comes in pdf format which can work under all PC based windows operating system and Mac also, All pages are printable. Using this repair manual is an inexpensive way to keep your vehicle working properly.
Service Repair Manual Covers:
Maintenance
Engine
Control System
Mechanical
Fuel Service Specifications
Emission Control
Intake Exhaust Cooling
Lube
Ignition Starting Charging
Auto Transmission Clutch
Manual Transmission
Transfer Propeller Shaft
Drive Shaft
Differential
Axle Suspension
Tire & Wheel
Brake Control
Brake
Parking Brake
Steering Column
Power Steering
Air Condition
Suppl Restraint System
Seat Belt
Engine Immobilizer
Cruise Control
Wiper & Washer
Door Lock
Meter Audio/Visual
Horn
Windshield/Glass Mirror
Instrument Panel
Seat
Engine Hood/ Door
Exterior & Interior
Electrical
Multiplex/ Can Communication
And much more
File Format: PDF
Compatible: All Versions of Windows & Mac
Language: English
Requirements: Adobe PDF Reader
NO waiting, Buy from responsible seller and get INSTANT DOWNLOAD, Without wasting your hard-owned money on uncertainty or surprise! All pages are is great to have2001 HONDA ODYSSEY Service Repair Workshop Manual.
Looking for some other Service Repair Manual,please check:
https://www.aservicemanualpdf.com/
Thanks for visiting!
8
1995 JEEP CHEROKEE, JEEP WRANGLE Service Repair Manualjksmemmd
This is the Highly Detailed factory service repair manual for the1995 JEEP CHEROKEE, JEEP WRANGLE, this Service Manual has detailed illustrations as well as step by step instructions,It is 100 percents complete and intact. they are specifically written for the do-it-yourself-er as well as the experienced mechanic.1995 JEEP CHEROKEE, JEEP WRANGLE Service Repair Workshop Manual provides step-by-step instructions based on the complete dis-assembly of the machine. It is this level of detail, along with hundreds of photos and illustrations, that guide the reader through each service and repair procedure. Complete download comes in pdf format which can work under all PC based windows operating system and Mac also, All pages are printable. Using this repair manual is an inexpensive way to keep your vehicle working properly.
Service Repair Manual Covers:
Introduction
Lubrication and Maintenance
Front Suspension and Axle
Rear Suspension and Axles
Brakes
Clutch
Cooling System
Electrical
Engines
Exhaust System and Intake Manifold
Frame and Bumpers
Fuel System
Propeller Shafts
Steering
Transmission and Transfer Cases
Wheels and Tires
Body Components
Heating and Air Conditioning
Emission Control Systems
Index
File Format: PDF
Compatible: All Versions of Windows & Mac
Language: English
Requirements: Adobe PDF Reader
NO waiting, Buy from responsible seller and get INSTANT DOWNLOAD, Without wasting your hard-owned money on uncertainty or surprise! All pages are is great to have1995 JEEP CHEROKEE, JEEP WRANGLE Service Repair Workshop Manual.
Looking for some other Service Repair Manual,please check:
https://www.aservicemanualpdf.com/
Thanks for visiting!
8
Symptoms like intermittent starting and key recognition errors signal potential problems with your Mercedes’ EIS. Use diagnostic steps like error code checks and spare key tests. Professional diagnosis and solutions like EIS replacement ensure safe driving. Consult a qualified technician for accurate diagnosis and repair.
In this presentation, we have discussed a very important feature of BMW X5 cars… the Comfort Access. Things that can significantly limit its functionality. And things that you can try to restore the functionality of such a convenient feature of your vehicle.
𝘼𝙣𝙩𝙞𝙦𝙪𝙚 𝙋𝙡𝙖𝙨𝙩𝙞𝙘 𝙏𝙧𝙖𝙙𝙚𝙧𝙨 𝙞𝙨 𝙫𝙚𝙧𝙮 𝙛𝙖𝙢𝙤𝙪𝙨 𝙛𝙤𝙧 𝙢𝙖𝙣𝙪𝙛𝙖𝙘𝙩𝙪𝙧𝙞𝙣𝙜 𝙩𝙝𝙚𝙞𝙧 𝙥𝙧𝙤𝙙𝙪𝙘𝙩𝙨. 𝙒𝙚 𝙝𝙖𝙫𝙚 𝙖𝙡𝙡 𝙩𝙝𝙚 𝙥𝙡𝙖𝙨𝙩𝙞𝙘 𝙜𝙧𝙖𝙣𝙪𝙡𝙚𝙨 𝙪𝙨𝙚𝙙 𝙞𝙣 𝙖𝙪𝙩𝙤𝙢𝙤𝙩𝙞𝙫𝙚 𝙖𝙣𝙙 𝙖𝙪𝙩𝙤 𝙥𝙖𝙧𝙩𝙨 𝙖𝙣𝙙 𝙖𝙡𝙡 𝙩𝙝𝙚 𝙛𝙖𝙢𝙤𝙪𝙨 𝙘𝙤𝙢𝙥𝙖𝙣𝙞𝙚𝙨 𝙗𝙪𝙮 𝙩𝙝𝙚 𝙜𝙧𝙖𝙣𝙪𝙡𝙚𝙨 𝙛𝙧𝙤𝙢 𝙪𝙨.
Over the 10 years, we have gained a strong foothold in the market due to our range's high quality, competitive prices, and time-lined delivery schedules.
Fleet management these days is next to impossible without connected vehicle solutions. Why? Well, fleet trackers and accompanying connected vehicle management solutions tend to offer quite a few hard-to-ignore benefits to fleet managers and businesses alike. Let’s check them out!
Comprehensive program for Agricultural Finance, the Automotive Sector, and Empowerment . We will define the full scope and provide a detailed two-week plan for identifying strategic partners in each area within Limpopo, including target areas.:
1. Agricultural : Supporting Primary and Secondary Agriculture
• Scope: Provide support solutions to enhance agricultural productivity and sustainability.
• Target Areas: Polokwane, Tzaneen, Thohoyandou, Makhado, and Giyani.
2. Automotive Sector: Partnerships with Mechanics and Panel Beater Shops
• Scope: Develop collaborations with automotive service providers to improve service quality and business operations.
• Target Areas: Polokwane, Lephalale, Mokopane, Phalaborwa, and Bela-Bela.
3. Empowerment : Focusing on Women Empowerment
• Scope: Provide business support support and training to women-owned businesses, promoting economic inclusion.
• Target Areas: Polokwane, Thohoyandou, Musina, Burgersfort, and Louis Trichardt.
We will also prioritize Industrial Economic Zone areas and their priorities.
Sign up on https://profilesmes.online/welcome/
To be eligible:
1. You must have a registered business and operate in Limpopo
2. Generate revenue
3. Sectors : Agriculture ( primary and secondary) and Automative
Women and Youth are encouraged to apply even if you don't fall in those sectors.
"Trans Failsafe Prog" on your BMW X5 indicates potential transmission issues requiring immediate action. This safety feature activates in response to abnormalities like low fluid levels, leaks, faulty sensors, electrical or mechanical failures, and overheating.
Why Is Your BMW X3 Hood Not Responding To Release CommandsDart Auto
Experiencing difficulty opening your BMW X3's hood? This guide explores potential issues like mechanical obstruction, hood release mechanism failure, electrical problems, and emergency release malfunctions. Troubleshooting tips include basic checks, clearing obstructions, applying pressure, and using the emergency release.
Core technology of Hyundai Motor Group's EV platform 'E-GMP'Hyundai Motor Group
What’s the force behind Hyundai Motor Group's EV performance and quality?
Maximized driving performance and quick charging time through high-density battery pack and fast charging technology and applicable to various vehicle types!
Discover more about Hyundai Motor Group’s EV platform ‘E-GMP’!
Ever been troubled by the blinking sign and didn’t know what to do?
Here’s a handy guide to dashboard symbols so that you’ll never be confused again!
Save them for later and save the trouble!
What Does the PARKTRONIC Inoperative, See Owner's Manual Message Mean for You...Autohaus Service and Sales
Learn what "PARKTRONIC Inoperative, See Owner's Manual" means for your Mercedes-Benz. This message indicates a malfunction in the parking assistance system, potentially due to sensor issues or electrical faults. Prompt attention is crucial to ensure safety and functionality. Follow steps outlined for diagnosis and repair in the owner's manual.
5 Warning Signs Your BMW's Intelligent Battery Sensor Needs AttentionBertini's German Motors
IBS monitors and manages your BMW’s battery performance. If it malfunctions, you will have to deal with an array of electrical issues in your vehicle. Recognize warning signs like dimming headlights, frequent battery replacements, and electrical malfunctions to address potential IBS issues promptly.
What Exactly Is The Common Rail Direct Injection System & How Does It WorkMotor Cars International
Learn about Common Rail Direct Injection (CRDi) - the revolutionary technology that has made diesel engines more efficient. Explore its workings, advantages like enhanced fuel efficiency and increased power output, along with drawbacks such as complexity and higher initial cost. Compare CRDi with traditional diesel engines and discover why it's the preferred choice for modern engines.
2. Q) ®
I~EF~I~I Irgjl~1
® @
ICHASI~ I~141
® ®
IENGIJiI ICARSI'I
(J) ®
IElECIiiii I IAPPXI~'1
®
~
@
~(jJ)
~
@
~
@
§ ®
[ml
@
1
@
1
@
1
m Gl Gl
@ @) @
~ ~ ~
®
A @a @a
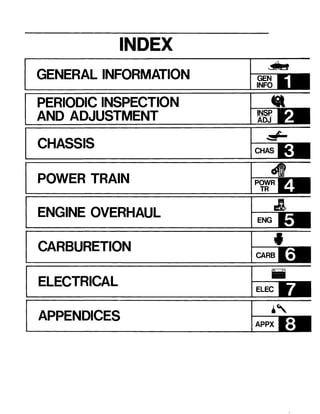
ILLUSTRATED SYMBOLS
(Refer to the illustration)
Illustrated symbols Q) to ® are designed as
thumb tabs to indicate the chapter's number and
content.
Q) General information
® Periodic inspection and adjustment
® Chassis
@ Power train
® Engine
® Carburetion
(J) Electrical
® Appendices
Illustrated symbols ® to ® are used to identify
the specifications which appear.
® Filling fluid
@ Lubricant
(jJ) Tightening
@ Wear limit, clearance
@ Engine speed
® Q,V,A
Illustrated symbols @ to ® in the exploded
diagrams indicate the grade of lubricant and the
location of lubrication points.
@ Apply engine oil
@ Apply gear oil
@ Apply molybdenum disulfide oil
@ Apply low-temperature lithium-soap base grease
@) Apply wheel bearing grease
(Esso-Beacon 325 grease or Aero Shell grease #7)
® Apply molybdenum disulfide grease
Illustrated symbols ® to @ in the exploded
diagrams indicate the grade of sealing or locking
agent and the location of application points.
® Apply locking agent (LOCTITE®)
@ Apply Yamabond No. 4®
@ Apply Yamabond No.5®
3. _______________I~1=~I..1
CHAPTER 1.
GENERAL INFORMATION
MACHINE IDENTIFICATION ............................. 1-1
FRAME SERIAL NUMBER ........................... 1-1
ENGINE SERIAL NUMBER ......................... 1-1
IMPORTANT INFORMATION ........................... 1-2
ALL REPLACEMENT PARTS ....................... 1-2
GASKETS, OIL SEALS, AND a-RINGS ...... 1-2
BEARINGS AND OIL SEALS ....................... 1-2
CIRCLlPS ...................................................... 1-2
SPECIAL TOOLS ............................................... 1-3
FOR TUNE UP .............................................. 1-3
FOR ENGINE SERVICE ................................ 1-4
FOR POWER TRAIN SERVICE .................... 1-4
FOR ELECTRICAL SERVICE ........................ 1-6
4. ----
MACHINE IDENTIFICATION I~EF~I~I
GENERAL
1-1
INFORMATION
MACHINE IDENTIFICATION
FRAME SERIAL NUMBER
The frame serial number CD is located on the
right-hand side of the frame (just below the
front of the seat).
ENGINE SERIAL NUMBER (Primary I.D.l
The engine serial number CD is located on the
right-hand side of the crankcase.
NOTE: _________________________
The first three digits of these numbers are for
model identification; the remaining digits are the
unit production number.
Starting Serial Number
VT480R ........................88T-000101
NOTE: ______________________
Designs and specifications are subject to change
without notice.
5. IMPORTANT INFORMATION I~Ej:~IdtsI
IMPORTANT INFORMATION
300-002
300-003
300-001
'-2
ALL REPLACEMENT PARTS
1. We recommend the use of Yamaha genuine
parts for all replacements. Use oil and/or
grease recommended by Yamaha for assem-
bly and adjustment.
GASKETS, OIL SEALS, AND O-RINGS
1. All gaskets, seals, and O-rings should be re-
placed when an engine is overhauled. All
gasket surfaces, oil seal lips, and O-rings
must be cleaned.
2. Properly oil all mating parts and bearings
during reassembly. Apply grease to the oil
seal lips.
BEARINGS AND OIL SEALS
1. Install the bearing(s) CD and oil seal(s) <ID
with their manufacturer's marks or numbers
facing outward. (In other words, the
stamped letters must be on the side exposed
to view.) When installing oil seal(s), apply a
light coating of light-weight lithium base
grease to the seal lip(s). Oil the bearings
liberally when installing.
Do not use compressed air to spin the bearings
dry. This causes damage to the surface of the
bearings.
CIRCLlPS
1. All circlips should be inspected carefully be-
fore reassembly. Always replace piston pin
clips after one use. Replace misshapen
circlips. When installing a circlip CD , make
sure that the sharp edged corner <ID is
positioned opposite the thrust ® it receives.
See the sectional view.
@ Shaft
6. 1-3
SPECIAL TOOLS I~EF~IJiMI
SPECIAL TOOLS
Some special tools are necessary for complete
accurate tune-up and assembly. Using the correct
special tool will help prevent damage that can be
caused by the use of improper tools or improvised
techniques.
NOTE: ________________________
Be sure to use the correct part number when
ordering the tool, since the part number differs
according to the destination as shown below. The
first part number is for Europe and the other
number is for the U.S.A. and Canada.
e.g. 90890-****, YU-****
FORTUNE UP
1. Vacuum Gauge
@P/N YS-33275
®Sealing Plug
PIN YU-91035-3 (2 required)
This tool is used for carburetor synchronization.
2. Sheave Gauge
PIN 90890-01702, YS-91047
This gauge is used to measure sheave distance
and for offset adjustment.
3. Dial Gauge
P/N-90890-03097, YU-03097
This gauge is used for ignition timing adjustment.
7. 1-4
SPECIAL TOOLS I~~~I~I
FOR ENGINE SERVICE
1. Piston Pin Puller
P/N-90890-01304, YU-01304
This tool is used to remove the piston pin.
2. Universal Rotor Holder
P/N-90890-01235, YU-01235
This tool is used to hold the CDI magneto.
3. Rotor Puller
P/N-90890-01362, YU-33270
This tool is used to remove the magneto rotor.
FOR POWER TRAIN SERVICE
1. Primary Sheave Holder
P/N-90890-01701, YU-01880
This tool is used to hold the primary sheave.
2. Primary Sheave Puller (18 mm)
P/N-90890-01898, YS-01882-A
This tool is used for removing the primary
sheave.
8. 1-5
SPECIAL TOOLS I~EF~lA!!I3. Sheave Compressor
P/N-90890-01712, YS-28891
This tool is used when disassembling and
assembling the sheave.
4. Clutch Spider Separator
P/N-90890-01711, YS-28890-B
This tools are used when disassembling and
assembling the primary sheave.
5. Clutch Separator Adapter
P/N-90890-01740, YS-34480
This tool is used when disassembling and
assembling the primary sheave.
6. Eccentric Bearing Installer
P/N-90890-01721, YS-91 045
This tool is used when removing and installing
the front axle.
9. 1-6
SPECIAL TOOLS Ig.EF~I~1
FOR ELECTRICAL SERVICE
1. Pocket Tester
P/N-90890-03112, YU-03112
This instrument is necessary for checking the elec-
trical components.
2. Electra Tester
P/N-90890-03021, YU-33260
This instrument is used to check the electrical sys-
tem.
11. INTRODUCTION/IINSP I~ IPERIODIC MAINTENANCE TABLE ADJ ~
PERIODIC INSPECTIONS AND ADJUSTMENTS
INTRODUCTION
This chapter includes all ofthe information necessary to perform recommended inspections and adjust-
ments. These preventive maintenance procedures, if followed, will ensure more reliable machine
operation and a longer service life. In addition, the need for costly overhaul work will be greatly reduced.
This information applies to machines already in service as well as new machinesthat are being prepared
for sale. All service technicians should be familiar with this entire chapter.
PERIODIC MAINTENANCE TABLE
First Every
Pre- Month Season
No. Item Remarks operation or or
check first 800 km 3,200 km
(Daily) (500 Mi) (2,000 Mi)
(40 hr) (160 hr)
Check condition, adjust the gap and
1 Spark Plug clean.
•Replace if necessary.
Check oil level.
•2 Engine Oil
*Air bleed the oil pump if necessary.
•3 Fuel Check fuel level. •
4 *Fuel Filter
Check condition.
•Replace if necessary.
Check fuel hose for cracks or dam-
S *Fuel Line age.
•Replace if necessary.
6 *Oil Line
Check oil hose for cracks or damage.
•Replace if necessary.
Check throttle lever operation. •7 Carburetor Whenever operating conditions
*Adjust the jets.
(elevation/temperature) are changed.
Check wear and damage.
•8 *Fan Belt Replace if necessary.
Adjust fan belt if necessary. •
9 Manual Starter Check operation and rope damage.
•*Replace if necessary.
10 Engine Stop Switch Check operation
•*Repair if necessary.
11 Throttle Override Check operation.
•System *Repair if necessary.
12 Throttle Lever Check operation.
•*Repair if necessary.
Check for leakage.
13 *Exhaust System Retighten or replace gasket if •necessary.
14 *Decarbonization More frequently if necessary. •
15 Drive V-belt Guard Check for cracks, bending or damage.
•*Replace if necessary.
16 Drive V-belt Check wear and damage.
•Replace if necessary.
*: It is recommended that these items be serviced by a Yamaha dealer or other qualified mechanic.
**: Perform after 1 Month or 50 Km (31 Mi) (2 hr) and every 1 Month or 400 Km (250 Mi).
2-1
12. PERIODIC MAINTENANCE TABLE Ir~1-.1First Every
Pre- Month Season
No. Item Remarks operation or or
check first 800 km 3,200 km
(Daily) (500 Mi) (2,000 Mi)
(40 hr) (160hr)
Drive Track/Idler
Check for deflection, wear and dam-
**.17 Wheels
age. •*Adjust/replace if necessary.
Check for wear and damage. •18 Slide Runner
*Replace if necessary. •Check operation. •19
Brake/
*Adjust free play and/or replaceParking Brake
•pads if necessary.
Check oil level. •20 *Drive Chain Oil
Replace. •
21 *Drive Chain
Check for deflection.
**.Adjust if necessary.
Check for wear and damage.
•22 Ski/Ski Runner
*Replace if necessary. •Check operation.
•23 Steering System
*Adjust toe-out if necessary. •
24 Lights Check operation.
•Replace bulbs if necessary.
Check fluid level.
•25 Battery *Check specific gravity and breather
pipe operation.
•Charge/Correct if necessary.
Check engagement and shift speed.
•Adjust if necessary. Whenever operating elevation is changed.
26 *Primary Sheave Check for wear and damage.
Replace if necessary. •
Lubricate with specified grease.
•
*Secondary Sheave
Lubricate with specified grease.
•27
Adjust if necessary. Whenever operating elevation is changed.
28 *Steering Column Lubricate with specified grease.
•Bearing
29 *Ski and Front Suspen- Lubricate with specified grease.
•sion
30 *Suspention Compo- Lubricate with specified grease.
•nent
*Brake Cable End and Lubricate with specified grease.
•31 Lever EndIThrottle Check for cable damage.
Cable End Replace if necessary. •
32 Shroud Latches Make sure the shroud latches are
•hooked.
33 Fittings/Fasteners Check tightness.
•*Repair if necessary.
34 Service Tools/Spare Check proper placement.
•Parts
*: It is recommended that these items be serviced by a Yamaha dealer or other qualified mechanic.
**: Perform after 1 Month or 50 Km (31 Mi) and every month or 400 Km (250 Mi).
2-2
13. SPARK PLUG/FUEL FILTER INSPECTION 1r.r1_I
(~Jl
377-004
2-3
ENGINE
SPARK PLUG
1. Remove:
• Spark plug
2. Inspect:
• Electrode CD
Wear/Damage ~ Replace.
• Insulator color ®
3. Measure:
• Plug gap@
Out of specification ~ Regap.
Use a Wire Gauge of Feeler Gauge.
Spark plug gap:
0.7 - 0.8 mm (0.028 - 0.032 in)
Clean the plug with a spark plug cleaner if
necessary.
Standard spark plug:
BR9ES (NGK)
Before installing a spark plug, clean the
gasket surface and plug surface.
4. Tighten:
• Spark plug
Spark plug:
28 Nm (2.8 m • kg, 20 ft • Ib)
NOTE: ________________________
Finger-tightenCDthe spark plug before torquing ®
to specification.
FUEL FILTER INSPECTION
1. Remove:
• Seat
2. Disconnect:
• Tail/Brake light coupler
14. FUEL LINE INSPECTION/ENGINE OIL LINE INSPECTION Ir~1.1
2-4
3. Remove:
• Spring bands CD
• Cap®
• Fuel filter ®
4. Inspect:
• Fuel filter CD
Contamination ---+ Replace.
Recommended replacement interval:
Every season
FUEL LINE INSPECTION
1. Inspect:
• Fuel hoses
• Fuel delivery hoses
Cracks/Damage ---+ Replace.
ENGINE OIL LINE INSPECTION
1. Inspect:
• Oil hoses CD
• Oil delivery hoses ®
Cracks/Damage ---+ Replace.
15. THROTTLE OVERRIDE SYSTEM (T.O.R.S.) CHECK/IINSP I ~ I
THROTTLE CABLE FREE PLAY ADJUSTMENT. ADJ . ~ .
)
2-5
THROTTLE OVERRIDE SYSTEM (T.O.R.S.)
CHECK
AWARNING
When checking T.O.R.S.:
• Be sure the parking brake is applied.
• Be sure the throttle lever moves smoothly.
• Do not run the engine up to clutch engagement
rpm. Otherwise, the machine could start mov-
ing forward unexpectedly, which could cause
an accident.
1. Start the engine.
NOTE:____________
Refer to STARTING THE ENGINE.
2. Hold the pivot point ofthe throttle lever away
from the throttle switch CD .
3. Press ID the throttle lever gradually. The
engine should stop immediately.
If the engine does not stop - Replace the
T.O.R.S. (See page 7-31, 32)
THROTTLE CABLE FREE PLAY ADJUST-
MENT
NOTE: ________________
Before adjusting the throttle cable free play,
the engine idle speed should be adjusted.
1. Measure:
• Throttle cable free play @
Out of specification --. Adjust.
Throttle cable free play:
1.0 - 2.0 mm (0.04 - 0.08 in)
16. CARBURETOR SYNCHRONIZATION IrCf1.1
2-6
2.Adjust:
• Throttle cable free play
Adjustment steps:
• Open the shroud.
Refer to the SHROUD OPENING section.
• Loosen the locknut CD .
• Turn the adjuster CV in or out until the
specified free play is obtained.
Turning in Free play is increased.
Turning out Free play is decreased.
• Tighten the locknut.
• Reset the shroud.
CARBURETOR SYNCHRONIZATION
1. Remove:
• Air chamber CD
2. Plug the holes CD in the carburetor joint with
sealing bulbs (See page 1-3).
NOTE: _____________
Be sure the pieces are securely installed.
3. Remove:
• Rubber caps (vacuum plug) CV
17. CARBURETOR SYNCHRONIZATIONIrgjItill
2-7
4. Attach:
• Vacuum gauge CD
(to vacuum plugs on left and right
carburetor)
Adaptor
YU-91 035-3
Vacuum gauge:
YS-33275
5. Start the engine and let it warm up.
AWARNING
Do not move the throttle enough to reach the
following engagement speed. The snowmobile
could accidentally start to move forward.
Engine revolutions: 3,000 r/min
6. Adjust:
• Carburetor synchronization
Adjustment steps:
• Synchronize the carburetor (left) with the
carburetor (right) by turning synchronizing
screw CD until both gauges show the same
reading.
• Race the engine, two or three times (for less
than a second each time), and check the syn-
chronization again.
7. Remove:
• Vacuum gauge
• Sealing plugs CD
18. ENGINE IDLE SPEED ADJUSTMENTIr8fI§ill
2-8
8. Inspect:
• Rubber caps (vacuum plug) CD
Wear/Damage -- Replace.
• Air chamber ®
Cracks/Damage ..~ Replace.
9. Install:
• When reassembling the air chamber, re-
verse the removal steps.
• Check the idle speed, adjust if necessary.
ENGINE IDLE SPEED ADJUSTMENT
NOTE: ________________________
Be sure the carburetor synchronization has been
set before making the idle speed adjustment.
1. Adjust:
• Engine idle speed
Adjustment steps:
• Turn in the pilot screws CD on the left and
right carburetor until they are lightly seated.
• Turn out the pilot screws for the specified
number of turns.
Pilot screw:
1-1/2 counterclockwise turns
• Start the engine and let it warm up.
• Turn the throttle stop screw ® until the idle
speed is in the specified range. Use the Induc-
tive tachometer.
Turning in Idle speed becomes higher.
Turning out Idle speed becomes lower.
Ifb Inductive tachometer:
PIN. 90890-08036, VU-08036
~ Engine idle speed:
1,500 - 1,700 rlmin
• Turnthe pilotscrewsCDin orout by increments
of 1/8 turn to achieve the highest speed with
just the pilot screws.
• Once again, turn the throttle stop screw ®
to obtain the specified idle speed.
NOTE:
After adjusting the engine idle speed, the
throttle cable free play should be adjusted.
19. EXHAUST SYSTEM/ IINSPI~ ISTARTER CABLE FREE PLAY ADJUSTMENT ADJ •
1-'+---+ ®
2-9
EXHAUST SYSTEM
1. Inspect:
• Exhaust pipe gasket(s) CD
Damage -7 Replace.
Exhaust gas leakage -- Repair.
Tighten the nuts
• Joint pipe exhaust gas leakage ®
Tension spring ® -7 Replace.
Muffler nut:
20 Nm (2,0 m • kg, 14.5 ft· Ib)
STARTER CABLE FREE PLAY ADJUSTMENT
1. Pull the outer tube of starter cable CD upward.
2. Measure:
• Starter cable free play ®
Out of specification- Adjust.
Free play ®:
0.5 - 1.5 mm (0.02 - 0.06 in)
3. Adjust:
• Starter cable free play
Adjustment steps:
• Loosen the locknut CD .
• Turn the adjuster®in or out until the specified
free play is obtained.
Turning in Free play is increased.
Turning out Free play is decreased.
• Tighten the locknut and push in the adjuster
cover.
20. O'LPUMpl~I_IOIL PUMP
• Air Bleeding
The oil pump and delivery line must be bled on
the following occasions:
2-10
• When any portion of the oil system has been
disconnected.
• When the machine has been turned on its side.
• Whenever the oil tank has been run empty.
• Before predelivery.
1. Remove:
• Drive V-belt
• Secondary sheave assembly
• Carburetor assembly (See page 6-4)
2. Bleeding the air
• Bleed screw CD (with gasket)
Loosen the bleed screw at the oil pump. Oil
should begin to flow through the line. Keep
the bleed screw open until all air has left the
oil line and oil pump. Tighten the bleed
screw.
3. Install:
• Carburetors
• Secondary sheave assembly
• Drive V-belt/guard
Reverse removal steps
4.Adjust
• Oil pump cable free play
Adjustment steps:
• Loosen the locknut CD .
• Turn the adjuster®in or out until the specified
free play is obtained.
~
Free play ®:
21 - 23 mm (0.83 - 0.91 in)
Turning in Free play is increased.
Turning out Free play is decreased.
• Tighten the locknut and push in the adjuster
cover.
21. COOLING FAN BELT IrgrIillCOOLING FAN BELT
1. Remove:
• Air duct (cooling fan) CD
• Cover (cooling fan) ®
2. Inspect:
• Fan belt
Wear/Cracks/Damage ~ Replace.
3. Remove:
• Recoil starter assembly CD
4. Remove:
• Drive pulley (fan belt) CD
NOTE: __________________________
Use the universal rotor holder®to hold the drive
pulley (fan belt).
Universal rotor holder:
90880-01235, VU-01235
• Fan belt ®
5. Install:
• Fan belt ®
• Drive pulley (fan belt) CD
NOTE: ________________________
2-11
Hold the drive pulley (fan belt) using the universal
rotor holder ® to tighten the bolts.
22. COOLING FAN BELT TENSION ADJUSTMENT Imr1.1
2-12
COOLING FAN BELT TENSION ADJUST-
MENT
1.Adjust:
• Fan belt deflection ®
Pushed at belt center by a force of 4 - 6
kg (8.8 - 13.2 Ib).
Out of specification - Adjust.
Fan belt deflection:
8 mm (0.31 in)1
4 - 6 kg, (8.8 - 13.2 Ib)
2. Adjust:
• Fan belt deflection.
Adjustment steps:
• Remove the recoil starter assembly, drive pul-
ley and fan belt.
• Refer to the COWLING FAN BELT INSPEC-
TION section.
• Remove the driven pulley (outer half) D and
shim(s)® .
• Adjust the drive belt tension by adding or
removing a shim(s) ® .
NOTE:
Install the removed shim (s) on the outside of
the driven pulley. Do not dispose of the
removed shim (s).
Adding shim Belt tension decreases.
Removing shim Belt tension increases.
Shim size
Part Number Thickness
90214-17017 0.5 mm (0.02 in)
90214-17018 1.0 mm (0.04in)
• Tighten the driven pulley nut ® .
!~
Nut (driven pulley):
42 Nm (4.2 m • kg, 30.3 ft • Ib)
• Install the fan belt @ and drive pulley CID .
I~
Bolt (drive pulley-fan belt):
23 Nm (2.3 m • kg, 16.6 ft· Ib)
23. SHEAVE DISTANCE AND OFFSET ADJUSTMENT Ir8~IQ I
2-13
• Recheck the fan belt deflection.
If out of the specification, repeat the above
steps.
If within the specification, install the recoil
starter assembly ® .
Bolt (recoil starter assembly):
6 Nm (0.6 m • kg, 4.3 ft • Ib)
3. Install:
• Cover (cooling fan)
• Air duct (cooling fan)
Reverse removal steps
SHEAVE DISTANCE AND OFFSET ADJUST-
MENT
1. Remove:
• Drive V-belt guard
• Drive V-belt
2. Measure:
• Sheave distance ®
Use the Sheave Gauge.
Out of specification Adjust.
Sheave gauge:
90890-01702, VS-91047
Sheave distance ® :
267 - 270 mm (10.5 - 10.6 in)
3. Adjust:
• Sheave distance ®
Adjustment steps:
• Check the engine mounting bracket, dampers
and frame for bending, cracks and weather-
ing. Replace as needed.
• Loosen the engine mounting nuts CD , ® .
24. SHEAVE DISTANCE AND OFFSET ADJUSTMENT' ~8r,.,
2-14
• Adjust the position of the engine so that the
sheave distance is within the specification.
• Tighten the engine mounting nuts CD, ®.
Mounting nut:
40 Nm (4.0 m . kg, 29 ft . Ib)
4. Measure:
• Sheave offset QV
Use the Sheave Gauge.
Out of specification --+ Adjust.
Sheave offset QV :
10.5 - 12.5 mm (0.41 - 0.49 in)
Sheave gauge:
YS-91047
5. Adjust:
• Sheave offset QV
Adjustment steps:
• Apply the brake to lock the secondary
sheave.
• Remove the bolt CD (secondary sheave)
washer ® and secondary sheave ® .
• Adjust the sheave offset by adding or
removing a shim (s) @ .
Adding shim Offset is increased.
Removing shim Offset is decreased.
Shim size
Part Number Thickness
90201-252F1 0.5 mm (0.02 in)
90201-25527 1.0 mm (0.04 in)
90201-25526 2.0 mm (0.08 in)
• Install the secondary sheave and bolt (secon-
dary sheave).
I® Bolt (secondary sheave):
60 Nm (6.0 m • kg, 43 ft • Ib)
• Recheck the sheave offset. If out of specifica-
tion, repeat the above steps.
26. 2
~II
2mm (O.079mm)
1
~I
POWER TRAIN
DRIVE V-BELT
AWARNING
• Be sure there is a 2.0 mm (0.79 in) gap between
the secondary sheaves (fixed CD and sliding ®)
when installing a NEW belt.
Ifthere is no gap, the clutch engagement speed
will be reduced. The machine may move unex-
pectedly when the engine is started.
• The spacer of the secondary sheave should be
adjusted. (See page 4-14)
To ensure proper clutch performance, the
spacers in the secondary clutch must be
repositioned as the V-belt wears.
2-16
V-belt Width CD Number
of Shims
A
31.6 mm (1.24 in)
2 spacers
or more
B 30.6 mm (1.20 in) 1 spacer
C 29.6 mm (1.17 in) No spacer
28 mm (1.10 in) Replace
or less the V-belt
1. Remove:
• Side cowling (left)
• Bolt (drive V-belt guard) CD
• Drive V-belt guard ®
NOTE: _________________________
Press the holding pin @ all the way in until it
releases from the hook@, then reverse it 90· and
pull it out.
2. Remove:
• Drive V-belt
NOTE: ________________________
Apply the parking brake before replacement.
27. ®
2-17
DRIVE V-BELT IrgfI'itI
Removal steps:
• Rotate the secondary sliding sheave clock-
wiseCDand push CVit so that it separates from
the fixed sheave.
• Pull the belt up over the secondary fixed
sheave.
• Remove the belt ® from the secondary and
primary sheaves.
3. Inspect:
• Drive V-belt
Crack/Wear/Damage --- Replace.
Oil or grease on the V-belt --- Check the
primary and secondary sheaves.
4. Inspect:
• Primary sheave CD
• Secondary sheave CV
Oil or grease on the primary and secondary
sheaves --- Remove the oil or grease using a
rag soaked in lacquer, thinner or solvent.
Check the primary and secondary sheaves.
5. Measure:
• Drive V-belt length ®
Out of specification -7 Replace.
Drive V-belt length:
1,099 mm (43.3 in)
28. ENGAGEMENT SPEED CHECK/BRAKE PAD INSPECTION I~8rIMI6. Install
• Drive V-belt
Installation steps:
• Install the new belt over the primary sheave.
• Rotate the secondary sliding sheave clock-
wiseCDand push ®it so that it separates from
the fixed sheave.
• Install the belt ® between the secondary
sliding and fixed sheaves.
• Install the drive V-belt guard.
ENGAGEMENT SPEED CHECK
2-18
1. Place the machine on a level place in hard
packed snow.
2. Check:
• Clutch engagement speed
Checking steps:
• Start the engine, and open the throttle lever
gradually.
• Check the engine speed when the machine
starts moving forward.
Out of specification- - Adjust the primary
sheave. (See page 4-4)
C) Engagement speed:
Approx. 3300 r/min
BRAKE PAD INSPECTION
1. Apply the brake lever.
2. Measure:
• Brake pad thickness ®
Out of specification - Replace brake pad
as a set. (See page 4-35)
~ Wear limit:
9.5 mm 10.37 1nl
29. BRAKE ADJUSTMENT/IINSP I ~ I
DRIVE CHAIN HOUSING OIL LEVEL INSPECTION ADJ •
BRAKE ADJUSTMENT
NOTE: _________________________
Adjust brake every 40 hours of operation, or
whenever the brake lever becomes loose during
operation.
2-19
1. Measure:
• Distance L
Out of specification --+ Adjust.
Distance l
44 - 47.5 mm (1.73 - 1.87 in)
2. Adjust:
• Distance L
Adjustment steps:
• Loosen the locknut CD .
• Turn the adjuster CV in or out until specified
distance is obtained.
Turning in Distance l is increased.
Turning out Distance l is decreased.
• Tighten the locknut CD .
DRIVE CHAIN HOUSING OIL LEVEL
INSPECTION
1. Place the machine on a level place and open
the shroud.
NOTE: _________________________
Be sure the machine is positioned straight up
when inspecting the oil level.
30. DRIVE CHAIN TENSION ADJUSTMENTIt'8fIg,I
1. Check
• Oil level
CDUpper level
®Lower level
NOTE: __________________________
Rest the filler cap on the case threads when
measuring oil level. Do not screw in the filler cap.
2. Oil replacement
• Warm up the engine for several minutes.
• Place a receptacle under the chain case.
• Remove the drain plug ®
Be sure no foreign material enters the chain
housing case.
2-20
Recommended oil:
Gear oil API GL-3 SAE #75 or #SO
Oil capacity:
250 cm3 (S.S Imp OZ, S.5 US oz)
DRIVE CHAIN TENSION ADJUSTMENT
1. Adjust
• Drive chain adjustment
Adjustment steps:
• Loosen the locknut CD
• Shift the shift lever to FORWARD position
• Turn the secondary sheave one turn counter-
clockwise.
• Turn in the adjusting bolt ® , until it lightly
the contacts tensioner, then turn in the adjust-
ing bolt ® 1/2 to 2/3 turn more.
• Tighten the locknut CD.
31. 10 kg (22 Ib)
~I'~
TRACK TENSION ADJUSTMENTI rgr1.1
2-21
TRACK TENSION ADJUSTMENT
AWARNING
A broken track, track fittings, or debris thrown
upward by the track could be dangerous to the
operator or bystanders. Observe the following
pre-cautions.
1. Do not allow anyone to stand directly
behind the machine when starting forward.
2. When the engine is running and the track
is engaged with the machine on its side, do
not allow anyone to stand behind or on the
track side of the machine. The operator must
stay near on the seat front.
3. Never lift the rear of the machine to allow the
track to turn while the engine is running. Stop
the engine and prop up the rear with a
suitable stand. Never stand behind a machine
when the track is spinning.
4. Never install studs (cleats) any closer than
three inches from the edge of the track.
5. Replace any track that is damaged to the
depth where the fabric reinforcement
material is visible. Inspect the track condition
frequently.
1. Lift the rear of the machine onto a suitable
stand to raise the track off the ground.
2. Turn the track several times by running the
engine.
3. Place the machine with the right side facing
down.
Block the right side front suspension using a
suitable block of wood as shown to prevent the
machine from turning over.
@ 25.4 mm(1.0 in) @ 114.3 mm(4.5 in)
4. Measure:
• Track tension @
Pull at the track center window by a force
of 10 kg (22 Ib) using a spring scale.
Out of specification - Adjust.
Track tension:
25 - 30 mm/10 kg
(0.98- 1.18 in/22Ib)
33. [e
819-002
SLIDE RUNNER INSPECTIONIrgfIQ I
2-23
SLIDE RUNNER INSPECTION
1. Inspect:
• Slide runner CD
Cracks/Damage/Wear ~.~ Replace.
2. Measure:
• Slide runner thickness CD
Out of specification --+ Replace. (See page
4-45)
~ Wear limit:
10 mm 10.40 ;1
CHASSIS
SKI/SKI RUNNER
1. Check:
• Ski CD
• Ski runner Cl)
• Mounting bolt ®
• Collar@
• Ski stopper ®
Wear/Damage ~ Replace.
Ski runner wear limit ® :
4.5 mm (0.18 in)
STEERING SYSTEM
Free play check
1. Check:
• Steering system free play
Push the handlebar up and down and back
and forth.
Turn the handlebar slightly to the right and
left.
36. BRAKE LEVER AND BRAKE CABLE END LUBRICATION IrgrI_I
~ aL~
~CDT
r-----' ~ b
,
a b
2-26
• Be sure the small gap CD side of the holder
faces forward.
• Install the handlebar covers (rear) CD .
LUBRICATION
Brake lever
1. Lubricate the brake lever pivot and brake
cable end.
~ Esso Beacon 325 Grease.
AWARNING
Do not apply grease between the outer cable
and inner cable.
37. HEADLIGHT BULB REPLACEMENT Ir8jI~I
2-27
ELECTRICAL
HEADLIGHT BULB REPLACEMENT
1. Remove:
• Cover CD (bulb holder)
• Bulb holder (ID
• Bulb (defective) ®
NOTE: ________________________
While pushing the bulb holder (ID , turn it
counterclockwise.
AWARNING
Keep flammable products (and your hands) away
from the bulb while it is on, it will be hot. Do
not touch the bulb until it cools down.
2. Install:
• Bulb (new)
Avoid touching the glass part of the bulb. Keep it
free from oil; otherwise, the transparency of the
glass, life of the bulb and flux will be adversely
affected. If oil gets on the bulb, thoroughly clean
it with a cloth moistened with alcohol or lacquer
thinner.
3. Install:
• Bulb holder CD
NOTE: __________________________
• Install the bulb holder so that the TOPmark@
faces upward.
• While pushing the bulb holder CD , turn it
clockwise.
4. Install:
• Cover (bulb holder) CD
NOTE: _________________________
Install the bulb holder cover so that the TOP
mark @ faces upward.
5.Adjust:
• Headlight beam (See page 2-28)
38. HEADLIGHT BEAM ADJUSTMENT/IINSP I~ ITAIL/BRAKE LIGHT BULB REPLACEMENT ADJ ~
2-28
HEADLIGHT BEAM ADJUSTMENT
1. Place the machine on a level place.
2. Inspect:
• Headlight beam direction
The high beam should be directed down-
ward at an angle of 1/20
to the horizontal
line. If not, adjust the direction.
L 3.0 m (10 ft) 7.6 m (25 ft)
H 26 mm (1.0 in) 66 mm (2.6 in)
3. Adjust:
• Headlight beam direction
Adjust the headlight beam by tightening or
loosening the adjusters CD .
TAIL/BRAKE LIGHT BULB REPLACEMENT
1. Remove:
• Tail/Brake light lens CD
2. Remove:
• Bulb (defective) CD
NOTE: ____________
While pushing the bulb CD , turn it counter
clockwise.
BATTERV INSPECTION
1. Remove:
• Protector plate (battery) CD
• Battery
39. --?:':I---®
:oiiiiII--~
----1
367 003
BATIERV INSPECTION Ir8fIQ I
2-29
2. Inspect:
• Battery fluid level
Fluid level should be between upper CD and
lower CV level marks.
Incorrect --+ Refill.
Refill with distilled water only; tap water contains
minerals harmful to a battery.
3. Check:
• Specific gravity
Less than 1.280 --+ Recharge battery.
Charging current:
1.4 amps/10 hrs
Specific gravity:
1.280 at 20°C (68°F)
Replace the battery if:
• Battery voltage will not rise to a specific
value or if bubbles fail to rise even after many
hours of charging.
• Sulfation of one or more cells occurs, as
indicated by the plates turning white, or if an
accumulation of material exists in the bottom
of the cell.
• Specific gravity readings after a long, slow
charge indicate one cell to be lower than the
rest.
• Warpage or buckling of plates or insulators
is evident.
Always charge a new battery before using it to
ensure maximum performance.
4. Install:
• Fit the breather hose CD to the battery CV .
• Install the battery in the battery box.
• Fit the battery plate ®bracket CID and heater
plateQ)to the battery the nuts@and screws
@.
40. BATTERY INSPECTION/FUSE INSPECTION
367-009
2-30
NOTE: _________________________
• Make sure the main switch is turned off.
• Be sure to tighten the screws@aftertightening
the nuts @ .
• First, connectthe positive cable@, and then
the negative cable ® to the battery as
shown.
AWARNING
Battery electrolyte is dangerous; it contains
sulfuric acid and therefore is poisonous and
highly caustic.
Always follow these preventive measures:
• Avoid bodily contact with electrolyte as it can
cause severe burns or permanent eye injury.
• Wear protective eye gear when handling or
working near batteries.
Antidote (EXTERNAL):
• SKIN - Flush with water.
• EYES - Flush with water for 15 minutes and
get immediate medical attention.
Antidote (INTERNAL):
• Drink large quantities of water or milk, and
follow with milk of magnesia, beaten egg, or
vegetable oil. Get immediate medical attention.
Batteries also generate explosive hydrogen gas,
therefore you should always follow these
preventive measures:
• Charge batteries in a well-ventilated area.
• Keep batteries away from fire, sparks, or
open flames (e.g., welding equipment, lighted
cigarettes, etc.)
• DO NOT SMOKE when charging or handling
batteries.
KEEP BATTERIES AND ELECTROLYTE OUT OF
REACH OF CHILDREN.
FUSE INSPECTION
1. Remove:
• Fuse CD
• Spare fuse ®
41. ~
~@±
J.....
2-31
FUSE INSPECTION
2. Inspect:
• Fuse
Inspection:
• Connect a pocket tester to the fuse and check
it for continuity.
NOTE:
Set the tester selector to n x 1 position.
~
Pocket tester:
YU-03112
• If the tester indicates 00 the fuse is blown.
It must be replaced.
3. Replace:
• Blown fuse
Replacement steps:
• Turn off the ignition and the circuit.
• Install a new fuse of proper amperage.
• Turn on the switches to verify operation of
the electrical device.
• Ifthe fuse blows again immediately, check the
circuit in question.
NOTE: _______________________
Install new fuses of proper amperage.
Description Amperage Quantity
Main 10A 1
Spare 10A 1
AWARNING
Do not use fuses of higher amperage rating than
that which is recommended. Extensive electrical
system damage and fire could result from the
substitution of a fuse of improper amperage.
42. CARBURETOR TUNINGI~rItillTUNING
2-32
CARBURETOR TUNING
The carburetor is set at the factory to run at
temperatures of ooe - -20oe (32°F - -4°F) at
sea level. If the machine has to be operated
under conditions other than those specified
above, the carburetor must be reset as required.
Special care should be taken when setting the
carburetor so that the piston will not be damaged
or seized.
In this model, the engine oil is mixed with the
fuel just before the fuel enters the intake
manifold, so it is not always possible to supply
the optimum mixture depending on the throttle
opening.Therefore, after the carburetor is tuned
up or maintained, or after the float chamber is
removed for cleaning or jet replacement, be sure
to idle the engine for about three minutes in
order to avoid engine trouble.
Before tuning the carburetor, make sure that the
conditions for the following items are correct.
• Engine idle speed adjustment
• Throttle cable free play adjustment
• Carburetor synchronization
• Starter cable adjustment
• Oil pump cable free play adjustment
Carburetor Tuning Data
1. Standard specifications
Model B38-32 x 2
Manufacturer MIKUNI
1.0. Mark
(L) 8V003
(R)80L03
Main jet (M.J.) #143.8
Pilot jet (P.J.) #95
Pilot air jet
00.5
(P.A.J.)
Pilot screw
1-1/2 turns out
(P.S.)
Throttle valve
#120
(Th.V)
Float height
9.5 -13.5 mm
(0.37 - 0.53 in)
Idle speed 1,500 - 1,700 r/min
43. CARBURETOR TUNING Ir8~IQ I
2-33
Middle-Range and High Speed Tuning
No adjustment is normally required, but adjust-
ments may sometimes be necessary, depending
on temperatures and/or altitude.
Middle-range speed and high speed tuning (from
1/4 to full-throttle) can be done by adjusting the
main jet.
The engine should never be run without the air
intake silencer and air chamber installed; severe
engine damage may result.
1. Start the engine and operate the machine
under normal condition to make sure the en-
gine operates smoothly. Then stop the engine.
2.Remove:
• Spark plugs.
3. Check:
• Spark plug insulator CD color
A medium to lighttan color indicates normal
conditions.
Distinctly different color.. Replace
main jet.
4. The main jet should be adjusted on the basis of
the following Main jet selection chart.
NOTE: __________________________
By checking the condition of the spark plugs
currently being used, it is easy to get some idea
of the engine condition and catch areas that may
cause problems before they are too far advanced.
44. CARBURETOR TUNING Ir~r IQ I
5. High altitude tuning
A guide to the main jet setting according to
variations in elevation and temperature.
CARBURETOR SEnlNG CHART
ELEVATION
oto
300 It
TEMP
- 300C - 200C -10°C OnC
-22°F - 4°F 14°F 32°F
---MJ #150 - - - -
MJ#152.5- ~ MJ #143.8 (STD)
MJ = Main Jet PS = Idle Mixture Screw
-~I
2-34
} 0-2000 FT. DRIVE LINE SETTINGS
} 2OOQ.6OO() FT. DRIVE LINE SETTINGS
} ABOVE 6000 FT. DRIVE LINE SETTINGS
CD Main jet (M.J.)
® Main jet holder
46. Spark plug color
Light tan or gray.
Dry black or fluffy
deposits.
White or light gray.
White or gray insulator
with small black or gray
brown spots and with a
bluish-burnt appearance
of electrodes.
Melted electrodes and
possibly blistered
insulator.
Metallic deposits on
insulator.
CARBURETOR TUNING
NOTE: _________________________
• The smaller the main jet size, the leaner the
mixture.
• During warm weather or in high altitudes,
a smaller main jet should be used.
• puring periods of excessively cold weather,
a larger main jet should be used.
• Too lean a mixture can cause overheating and
possible engine failure.
• Too rich a mixture can cause poor perform-
ance and excessive carbon formation with
accompanying shorter spark plug life.
Standard Main Jet: #143.8
AWARNING
Never remove the main jet cover while the engine
is hot. Fuel will flow out of the float chamber, and
this could ignite and cause damage to the
snowmobile and possible injury to the mechanic.
Place a rag under the carburetor so fuel does not
spread. Place the main jet cover in a clean place.
Keep it away from fire. After assembling the
carburetor, firmly tighten the intake silencer joint
clamps and intake manifold clamps. Make sure
the throttle cable is in place, and that it operates
smoothly. Clean the carburetor, and allow it to
dry.
Main jet selection chart
Check up Remedy
Carburetor is tuned properly.
Mixture is too rich. Replace main jet with the next smaller size.
Mixture is too lean. Replace main jet with the next larger size.
Due to too lean a mixture, the
Replace the piston and spark plug.
Tune the carburetor again, starting with low-
piston is damaged or seized.
speed tuning.
Check the piston for holes or seizure.
Check the cooling system, gasoline octane rating
Due to too lean a mixture, the and ignition timing. After replacing the spark plug
spark plug melts. with a colder type, tune the carburetor again
starting with low-speed tuning.
2-36
47. ,o
3
CARBURETOR TUNING
2-37
7. Replace:
• Main jet
Replacement steps:
• Remove the carburetor assembly.
Refer to the CARBURETOR - REMOVAL
section in the CHAPTER 6.
• Place a rag under the carburetor.
• Drain the fuel from the float chamber by
removing the drain plug CD and gasket CV .
• Replace the main jet@tothe proper sized jet.
• Check the gasket CV of the drain plug.
If damaged, replace it.
• When reassembling, reverse the above steps.
• Recheck the engine (spark plug insulator
color) condition.
If the engine shows poor performance and
spark plug color is bad, perform the above
steps again.
48. CARBURETOR TUNING I~IMITroubleshooting
Trouble Check point Remedy Adjustment
Hard starting Insufficient fuel Add gasoline ....~ ; J
Excessive use of starter Clean spark plug Return starter level to its
(Excessively opened seated position.
choke)
Fuel passage is clogged Clean Parts other than air carburetor.
or frozen • Clogged fuel tank air vent,
clogged fuel fifter, or
clogged fuel passage
Carburetor
• Clogged or frozen airvent, or
clogged valve.
• If water collects in float
chamber, clean.
(Also check for ice)
Overflow Correct
Poor idling Improper idling speed Bottom the pilot screw lightly,
adjustment and back it out to specification.
(Related troubles) • Pilot screw Adjust idling speed Start the engine and turn pilot
• Poor performance screw in and out 1/4 turn each
at low speeds time. When the engine runs
• Poor acceleration faster, back out throttle stop
• Slow response to screw so the engine idles at
throttle specified speed.
• Engine tends to Tightened too much - Engine
stall speed is higher.
• Throttle stop screw Adjust Backed out too much -
Engine does not idle.
Damaged pilot screw Replace pilot screw
Clogged bypass hole Clean
Clogged or loose pilot Clean and retighten Remove pilot jet, and blow it
jet out with compressed air.
Air leaking into carbure- Retighten bend
tor joint screw
Defective starter valve Clean or replace
seat
Overflow Correct
Poor performance at Clogged or loose pilot Clean and retighten Remove pilot jet, and blow it
mid-range speeds jet out with compressed air.
(Related troubles)
• Momentary slow
response to throttle
• Poor acceleration Lean mixtures Overhaul carburetor
Poor performance at Clogged air vent Clean Remove the air vent pipe, and
normal speeds clean.
(Related troubles) Clogged or loose main Clean and retighten Remove main jet, and blow it
• Excess fuel con- jet out with compressed air.
sumption
Overflow Check float and float• Poor acceleration
valve and clean
2-38
49. CARBURETOR TUNING I~jI~I
Trouble Check point Remedy Adjustment
Poor performance at Starter valve is left Fully close valve Return starter lever to its
high speeds open home position.
(Related troubles) Clogged air vent Remove and clean
• Power loss
Clogged or loose main Clean and retighten Remove main jet and clean
• Poor acceleration
jet with compressed air, then
install.
Clogged fuel pipe Clean or replace
Dirty fuel tank Clean fuel tank
Air leaking into fuel Check joint and re-
line tighten
Low fuel pump per- Repair pump or re-
formance place
Clogged fuel filter Replace
Clogged intake Check for and
removeice
Abnormal combus- Lean mixtures Clean carburetor
tion and adjust
(Mainly backfire) Dirty carburetor Clean carburetor
Dirty or clogged fuel Clean or replace fuel
pipe pipe
Overflow Clogged air vent Clean
(Related troubles) Clogged float valve Disassemble and Clean while taking care not to
• Power idling clean scratch valve seat.
• Poor performance
Scratched or unevenlyat low, mid-range, Clean or replace float Valve seat is press-fitted to
and high speeds worn float valve or valve and valve seat body.
• Excessive fuel con- valve seat The body must be replaced if
sumption seat is damaged.
• Hard starting Broken float Replace float
• Power loss Incorrect float level If not within the
• Poor acceleration specified range,
check the following
parts and replace
any defective part.
• Worn float tang • Replace float Replace float assembly.
• Worn pin • Replace arm pin
• Deformed float arm • Replace float
2-39
50. Engine speed
Clutch
shifting speed
Clutch
engagement
speed
t Good condition
CLUTCH TUNING Ir8!IQ I
CLUTCH TUNING
The clutch may require tuning depending upon
the area of operation and desired handling charac-
teristics. The clutch can be tuned by changing
engagement and shifting speed. Clutch engage-
ment speed is defined as the engine speed where
the machine first begins to move from a complete
stop.
Shifting speed is the engine speed when the
machine passes a point 200 - 300 m (650 - 1,000
ft) from the starting position after the machine has
been started at full-throttle from a dead stop.
Normally, when a machine reaches shift speed,
the vehicle speed increases but the engine speed
remains nearly constant. Under unfavorable con-
ditions (wet snow, icy snow, hills, or rough terrain)
however, engine speed may decrease after the
shifting speed has been reached.
Engine speed
Clutch
shifting speed
Clutch
engagement
speed
t
Bad condition
- Travelled distance
Travelled
- distance
Starting position Starting position
200 - 300 mm (650 - 1, 00 ft) 200 - 300 mm (650 - 1,000 ft)
2-40
51. Clutch Setting Data
Item
Engagement speed
Shifting speed
Weight
O'ty
Part No.
Part No.
Primary spring Preload
Spring Rate
Color
Part No.
Secondary spring Twist angle
Color
GEARING SELECTION 1r~1Q.IHigh Altitude Tuning
High altitude specifications should be applied for
operation at an altitude of more than 600 meters
(2,000 ft).
2000 ft/600 m (STD) 2000 ft - 6000 ft (HA) 6000 ft/1800 m (HA)
Approx. 3300 rpm ~ Approx. 3400 rpm
Approx. 6850 rpm f- f-
3 pcs f- f-
8VO-W176A-OO 85L-W176A-00 f-
90501-50543 90501-55559 90501-554G6
20 kg-1.4 kg/mm 17.4 kg 27.5 kg
1.4 kg/mm
Green-Green
90508-50571
50°
Pink
2-41
3.0 kg/mm f-
Blue Yellow-Yellow
f- f-
f- f-
f- f-
GEARING SELECTION
The reduction ratio of driven gear to drive gear
must be set according to the snow conditions. For
many rough surfaces or unfavorable snow condi-
tions, the drive/driven gear ratio should be made
larger.lfthere are few rough surfaces orfavorable
snow conditions, the ratio should be made
smaller.
Gear Ratio Chart
The following drive and driven gears and chains
are available as options. The figures in the upper
lines represent the driven and drive gear ratios,
while those in the lower lines represent the num-
ber of chain links.
CD Drive gear
CV Driven gear
CID Reverse gear
®Chain
52. Gearing Data
Item
Secondary Gear Ratio
Part No.
Drive gear
Teeth
Part No.
Driven gear
Teeth
Part No.
Chain
Links
Chain guide adjustment
GEARING SELECTION , r~'fil'
2000 ft/600 m (STD) 2000 ft - 6000 ft 6000 ft/1800 m
19/33 (1.74) 19/35 (1.84) 19/38 (2.0)
88T-17682-01 ~ ~
19T (STD) ~ ~
88T-47548-00 88T-47548-10 88T-47548-20
33T (STD) 35T 38T
90880-07076 ~ 90880-07.078
76T (STD)
1
, ,
1
2-42
~ 78T
1) Align the stationary markCDwith the following
chain guide mark A B C.
Chain guide mark A B C
Drive sprocket teeth 33T 35T 38T
2) Tighten the chain guide bolt.
Tightening Torque
20 Nm (2.0 m • kg, 9.4 ft • Ib)
53. HIGH ALTITUDE TUNING 1~I_IHIGH ALTITUDE TUNING
To attain the best performance in high altitude conditions, carefully tune the snowmobile as outlined
below.
Confirm STD settings
• Carburetor (Page 6-10)
• Spark plug (Page 2-3)
+Adjust main jet size according to the
chart (Page 2-34)
Test main jet size
Not OK Adjust main jet size -(Performance plug color)
I •OK
Re-test
OK Not OK
Not OK OK------------~
OK Not OK
Not OK OK-----------r----~
Adjust gearing as required
(Page 2-42)
Decide if problem is pilot jet
and adjust accordingly
NotOK OK ------------'
Not OK
OK
Check engagement speed and
shift performance
Not OK
Not OK OK---.......~ High altitude
tuning OK
Adjust primary clutch as re-
quired (Page 4-3)
Not OK
Adjust secondary clutch as required
(Page 2-16)
2-43
OK
OK:
54. D
E
A'
SLIDE RAIL SUSPENSION TUNING Ir8f1.1SLIDE RAIL SUSPENSION TUNING
./
(
''-..
2-44
Spring Preload Adjustment
NOTE: _________________________
The spring preload is a determining factor in
machine stability. Consider the course conditions
and the rider's weight when setting the spring pre-
load. The suspension should be set as soft as
possible without impairing the stability of the
machine.
1. Adjust:
• Spring preload.
Adjustment steps:
• Turn the adjuster CD in or out.
Adjuster position
[AJ.
Adjuster position
ffil·
Adjuster position
~.
Increase the spring
preload.
Middle setting position.
Decrease the spring
preload.
Standard Setting
Front [Q] ffil
Rear [El: [AJ
AWARNING
Always adjust both spring preloads (left and
right) to the same setting. Uneven adjustment
can cause poor handling and loss of stability.
2. Adjust:
• Stopper band length
NOTE:------------____________
This adjustment will affect the stability and
maneuverability of the machine.
Adjustment steps.
• Remove the stopper band CD securing bolt CID
and washers.
• Adjust the length of stopper band.
Standard Setting:
Front [AJ : No. 1 hole
Rear ffil : No. 1 hole
55. A
B
SLIDE RAIL SUSPENSION TUNING I~I.1
No.5
No.4
No.3
No.2
No.1 (STD)
Front IAl :
Hole Maneu-
Straight Starting
No. verability
running acceleration
performance performance
No.1 Less Less Better
1
(Normal) (Normal) (Normal)
t t tNo.5 Better Better Less
Rear [ffi:
Hole No. Riding comfort Stability
No.1 Better Less
1
(Normal) (Normal)
t tNo.4 Less Better
• Tighen the bolt (stopper band).
~
Nut (stopper band):
4 Nm (0.4 m • kg, 2.9 ft • Ib)
2-45
58. ________________~_E_E_R_IN_G_~H~I~ I
3-2
REMOVAL
1. Remove:
• Handlebar cover (rear) CD
2. Disconnect:
• Leads CD
• Band ®
3. Remove:
• Holder (throttle cable) CD
4. Disconnect:
• Throttle cable ®
(from throttle lever)
5. Remove:
• Brake cable
Removal steps:
• Loosen the locknut CD .
• Turn in the adjuster fully ® .
• Disconnect the brake cable end ® from the
brake lever.
6. Remove:
• Handlebar holders (upper) CD
• Handlebar ®
• Handlebar holders (lower) ®
59. ________________S_T_EE_R_IN_G_lcHASI...:! I
3-3
7. Remove:
• Main switch holding nut CD
• STARTER lever holding nut 00
• Center cover ®
8. Remove
• Carburetors (See page 6-4)
• Engine assembly (See page 5-1)
• Duct (intake silencer)
• Intake silencer (See page 6-2)
9. Remove:
• Nuts CD
• Bolts 00
• Lock washers
• Bearing holders ®
• Bearings@
• Steering column CID
NOTE: ____________
When removing the relay rod from the steering
column, the relay rod end@needsto be held fixed
in order to facilitate the lock nut removal.
10. Remove:
• Cotter pins CD
[AJ Left side
rnJ Right side
60. _________________ST_E_E_R_IN_G_lcHASI..=l
..
L.,~..........................~
3-4
11.Remove:
• Relay rod CD
• Tie rod CV
INSPECTION
1. Inspect:
• Handlebar CD
• Steering column CV
Bending/Cracks/Damage - Replace.
AWARNING
Do not attempt to straighten a bent column.
This may dangerously weaken the column.
2. Inspect:
• Bearings (steering column) CD
Wear/Damage Replace.
• Steering column CV (bearing contact
surfaces)
Scratches/Wear/Damage Replace.
3. Inspect:
• Relay rod CD
• Tie-rod CV
Bending/Cracks/Damage ~ Replace.
AWARNING
Do not attempt to straighten a bent rod.
This may dangerously weaken the rod.
61. ________________S_TE_E_R_IN_G_lcHASI..#
Si)
e___-t.L.___..
~
3-5
4. Check:
• Tie-rod end movement
Tie-rod end free play exists --- Replace.
Tie-rod end turns roughly --- Replace.
INSTALLATION
Reverse the REMOVAL procedure.
Note the following points.
1. Install:
• Tie-rod CD
• Relay rod CID
NOTE: _________________________
• Install the rod end @ with left-hand threads
onto the tie-rod on the right side.
• The threads on both rod-ends must be the
same length.
Lock Nut (tie-rod end):
25 Nm (2.5 m • kg, 18 ft· Ib)
LOCTITE@
Nut (suspension bracket-tie-rod):
25 Nm (2.5 kg, 18 ft • Ib)
2. Install:
• Cotter pins
3.Apply
• Low temperature lithium soap base grease
(to bearing inner surface)
4. Install:
• Bearings CD
• Bearing holders CID
• Lock washers @
• Bolts
• Nuts
[A] Upper
[ID Lower
AWARNING
Always use a new lockwasher and newcotter pin.
62. _________________ST_E_E_R_IN_G_lcHASI..#
---~~b
,
3-6
Bolt (bearing holder)
27 Nm (2.7 m • kg, 20 ft· Ib)
Nut (steering column relay rod):
27 Nm (2.7 m • kg, 20 ft • Ib)
5. Install:
• Intake silencer CD
• Duct (intake silencer) CID
(See page 6-2)
6. Install:
• Engine assembly
• Carburetors
• Handlebar
NOTE: _________________________
• The upper handlebar holder should be installed
with the punched mark CD forward.
• Align the punched marks CID with the handlebar
holder gaps respectively.
• Tighten the bolts to specification so that the
front clearance a is smaller than rear clear-
ance b.
Bolt (handlebar holder):
15 Nm (1.5 m· kg, 11 ft ·Ib)
• Be sure the small gap @ side of the holder
faces forward.
63. ________________~s~~~H~I~1
SKI
CD Bushing
CV Collar
® Ski stopper
@Ski
® Ski runner
C USE NEW ONE
Recommended grease:
ESSO Beacon 325 grease or
Aeroshell grease #7A
Fit the stopper with its arrow
mark positioned in front.
143 Nm (4.3 m - kg, 31 ft - Ib) 1
121 Nm (2.1 m - kg, 1Sft-lb)
4
B Be careful not to reverse the mounting
positions of the left and right ski assembly.
3-7
64. ----;;~~~-==----~S~KIICHASI..# IREMOVAL
~.':
~'J 1
®---O
~/ ',;;C 'iX,' 0 -
~~ ~ =-
3-8
a sUlta le stand1. Elevate the ski by placl·ng . b
under the chassis.
2. Remove:
• Cotter pin CD
• Mounting bolt
• Nut CV
3. Remove:
• Ski CD
• Washers CV
• Collar ®
4. Remove:
• Ski stopper CD
• Ski runner nut CV
INSPECTION
1.lnspect:
• Ski CD
• Ski runner CV
Excessive wear/Cracks/Damage Replace.
(See page 2-23)
2. Inspect:
• Mounting bolt CD
• Collar CV
Wear/Damage Replace.
65. __________________SK_I~H~I~I
®--:: •
~ I--@®--o
3-9
INSTALLATION
Reverse the REMOVAL procedure.
Note the following points.
1. Install:
• Ski runner CD
Nut (ski runner):
21 Nm (2.1 m· kg, 15 ft ·Ib)
2. Install:
• Ski stopper CD
NOTE:____________
• Fit the stopper with its arrow mark ® posi-
tioned in front.
• Be careful not to reverse the mounting posi-
tions of the left and right ski assemblies.
3. Lubricate:
• Collar CD
• Washers CV
• Mounting bolt ®
Recommended grease:
4. Install:
• Ski
ESSO Beacon 325 grease or
Aeroshell grease #7A
5. Tighten:
• Mounting bolt
• Nut (ski) CD
Nut (ski):
43 Nm (4.3 m • kg, 31 ft • Ib)
6. Install:
• Cotter pin CV
AWARNING
Always use a new cotter pin.
66. FRONT SUSPENSION
CD Absorber holder
CV Spacer collar
@ Flange plate
@ Spring seat (upper)
@ Bump rubber
® Spring
(j) Spring seat (lower)
® Shock absorber
® Circlip
@Washer
(jJ) Oil seal
@ Suspension arm
@ Collar
@ Bushing
@ Bushing
@ Front arm (upper)
@ Front arm (lower)
@ Suspension bracket
@Setscrew
C USE NEW ONE
Icl USE NEW ONE
43Nm
(4.3 m • kg, 31 ft· Ib)
FRONT SUSPENSION ICHASI...:!
Recommended grease:
ESSO Beacon 325 grease or
Aeroshell grease #7A
5Nm
2 Nm (0.2 m· kg, 1.4 ft· Ib) (0.5 m • kg, 3.6 ft • Ib)
21 Nm (2.1 m· kg, 15 ft· Ib)
3-10
67. Thank you very much
for your reading.
Please Click Here
Then Get More
Information.