African violet
•
0 likes•141 views

This document provides instructions for making an African Violet amigurumi, including a pot, dirt, leaves, and flowers. It lists the materials needed, gives measurements for the finished project, and provides step-by-step directions and illustrations for completing each component through multiple rounds of crocheting with different colors and stitch types. Copyright information is provided at the beginning noting the pattern cannot be copied or shared without permission.

Recommended
More Related Content
What's hot
Similar to African violet
Similar to African violet (20)
More from Autonoma
More from Autonoma (20)
Recently uploaded
Recently uploaded (20)
African violet
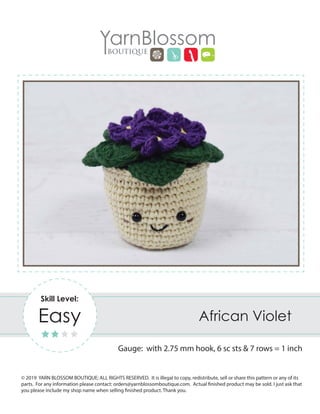
- 1. © 2019 YARN BLOSSOM BOUTIQUE; ALL RIGHTS RESERVED. It is illegal to copy, redistribute, sell or share this pattern or any of its parts. For any information please contact: orders@yarnblossomboutique.com. Actual finished product may be sold. I just ask that you please include my shop name when selling finished product. Thank you. African Violet Gauge: with 2.75 mm hook, 6 sc sts & 7 rows = 1 inch Skill Level: Easy
- 2. Notes: -The ( ) at the end of each round states the total number of stitches that should be completed for that round. -Tension is not critical for this project. You can use any yarn to make this amigurumi. For example, if you use a larger hook and a suitable yarn, the amigurumi will be bigger while maintaining the same proportions. Abbreviations: BLO- back loops only ch(s)- chain(s) dc- double crochet FLO- front loops only hdc- half double crochet rnd- round rpt- repeat sc- single crochet sc2tog- single crochet 2 stitches together sk- skip sl st- slip stitch st(s)- stitch(es) tr- treble crochet yo- yarn over Pot: Materials Needed: Worsted weight / #4 yarn in colors Cream, Dark Green, and Dark Brown DK weight / #3 yarn in colors Dark Purple, and Yellow 3.25 and 2.75 mm hooks Fiber fill stuffing Yarn needle Stitch marker (2) 7 mm safety eyes Hot glue gun Measurements: 4 inches tall by 3 inches wide Page 2 with 3.25 mm hook, and Worsted weight cream yarn, ch 2 Beginning at the bottom of the pot Rnd 1: 6 sc in 2nd ch from hook (6 total sts) Rnd 2: 2 sc in each st around (12 total sts) Rnd 3: *2 sc in next st, sc in next st, rpt from * until end of rnd (18 total sts) Rnd 4: *2 sc in next st, sc in next 2 sts, rpt from * until end of rnd (24 total sts) Rnd 5: *2 sc in next st, sc in next 3 sts, rpt from * until end of rnd (30 total sts) Rnd 6: *2 sc in next st, sc in next 4 sts, rpt from * until end of rnd (36 total sts) Rnd 7: working in BLO, Sc in each st around (36 total sts) Rnd 8-11: sc in each st around (36 total sts) Rnd 12: *2 sc in next st, sc in next 5 sts, rpt from * until end of rnd (42 total sts) Rnd 13-15: sc in each st around (42 total sts) Do not cut yarn. Insert 7 mm safety eyes between rounds 11 and 12 with 4 stitches in between. With yarn needle stitch on mouth and cheeks. See picture 1. Suff pot with fiber fill. Make the dirt before continuing on to rnd 16. Rnd 16: Place dirt inside pot and line up stitches from rnd 15 of pot and rnd 7 of dirt. With the yarn used to make the pot, sc around the pot working in both loops of both pieces to join them together.
- 3. Page 3 1 Rnd 17: ch 1, sc in each st around, join with sl st in first st (42 total sts) Rnd 18: sl st in each st around (42 total sts) Finish off and weave in ends. See picture 2. 2 Dirt: with 3.25 mm hook, and Worsted weight brown yarn, ch 2 Rnd 1: 6 sc in 2nd ch from hook (6 total sts) Rnd 2: 2 sc in each st around (12 total sts) Rnd 3: *2 sc in next st, sc in next st, rpt from * until end of rnd (18 total sts) Rnd 4: *2 sc in next st, sc in next 2 sts, rpt from * until end of rnd (24 total sts) Rnd 5: *2 sc in next st, sc in next 3 sts, rpt from * until end of rnd (30 total sts) Rnd 6: *2 sc in next st, sc in next 4 sts, rpt from * until end of rnd (36 total sts) Rnd 7: *2 sc in next st, sc in next 5 sts, rpt from * until end of rnd (42 total sts) Finish off and weave in ends. Leaf: with 3.25 mm hook and Worsted weight green yarn, ch 2 Rnd 1: 6 sc in 2nd ch from hook (6 total sts) Rnd 2: 2 sc in each st around (12 total sts) Rnd 3: sc in next 2 sts, 2 sc in next 2 sts, 2 hdc in next 2 sts, ch 1, 2 hdc in next 2 sts, 2 sc in next 2 sts, sc in next 2 sts (21 total sts) Rnd 4: sl st in each st around (21 total sts) Finish off and weave in ends. Make a total of 8 leaves. Attach leaves to the dirt. See picture 3. 3
- 4. Flower: with 2.75 mm hook and DK weight yellow yarn, ch 2 Rnd 1: 5 sc in 2nd ch from hook (5 total sts) Rnd 2: change to purple yarn, *(sl st, ch 3, 3 dc, ch 3, sl st) in next st, rpt from * 5 times total (5 petals total) Finish off and weave in ends. Make a total of 6 flowers. Attach flowers to the leaves. See picture 4. Page 4 4 Notes: