SlideShare a Scribd company logo
1 of 44
Download to read offline
YOU'LL LEARN:
• where to start
• construction
• how to apply
anatomy: how to
draw heads
by mitch leeuwe
3
2
Copyright © 2019 by Mitch Leeuwe
All rights reserved. This book or any portion thereof
may not be reproduced or used in any manner whatsoever
without the express written permission of the publisher
except for the use of brief quotations in a book review.
For personal use only
mitchleeuwe.nl
Printed in the Netherlands
First Printing, 2020
Graphic design: Harmke Leeuwe
harmke.com
Copy editor: Yessica Claire Baeten
yessicabaeten.com
anatomy: how to
draw heads
by mitch leeuwe
5
4
Hi there! Let me introduce myself. I’m Mitch Leeuwe and am
an illustrator from the Netherlands.Thank you for
purchasing my book about anatomy. Back in the days
when I wanted to learn about anatomy, I found it very
overwhelming. So, my goal with this book is to make
learning anatomy understandable and accessible for
you.
I started out by trying to learn every muscle and bone
and I really began to memorize all those different
parts. But after a while I noticed I forgot a lot of their
names and in the end, I always had to look it up for
reference.
That’s when I started to look for tutorials about
anatomy for animation. I found examples where
the anatomy was simplified and broken down in
understandable formulas and shapes. This made it
way more fun and easier to learn. So, I started making
this book with the idea of putting everything together.
7
6
You can use this book to learn from or use it for reference
when you are drawing a difficult pose. If you are just
starting out, the best way to learn is to take small steps.
It’s okay to start by copying the drawings in this book and
try to examine all different body parts.
Once you get comfortable with copying these drawings,
you could start looking for photos of people in which you
can see the structure of their muscles. Like a photo from a
boxer or a ballerina in a strong pose. Draw the characters
first, then add muscles on top, try to see how the muscles
work and where they are connected. It takes a lot of time
to learn anatomy, so don’t get discouraged if it takes a
while to get the hang of it.
Be patient, try to have fun and enjoy the process. Start by
doing thirty minutes every day, instead of doing a couple
of hours in one go and get frustrated with it. Doing a bit
every day will make a big difference after some period
of time. When you have difficulty drawing shapes, start
practicing drawing cubes, spheres and cylinders. When
you can comfortably draw shapes on paper in 3D, you
can basically draw anything. By mixing up those shapes
you can build any object you want.
I mostly draw cartoon characters,
which are not hyper realistic. And
because of that I’m always focused
on simple shapes first. But even if
you want to draw realistic anatomy,
I think this book can be very helpful.
Because these simple shapes will
form a solid foundation before adding
all details and muscles on top.
how to use
this book
9
8
The basics
Construction, line of action
and combining them
11
10
study tips
Fill a page with different shapes,
try to see their direction. Now add
perspective lines, is the direction
more clear now?
Construction is like the foundation of your character. With
a good construction you can create a strong and solid
character. To get started, follow these steps:
1. For drawing, I always use three kind of shapes. A
sphere, a cylinder and cube. I use these shapes
because you can build anything with them and they
are easy to rotate in 3D. You can stretch and distort
these shapes or combine them to make variations.
2. When I draw characters I always use a line of action.
You could also call this the character’s gesture. Here
you can also see the benefit of using 3D shapes when
you allow them to follow an action line. This is also a
great way to practice it. First draw a line shaped like
an S and let the shape follow the action line. This
way you get a nice sense of flow and depth in your
characters.
3. Here you can see how I use spheres, cylinders and
cubes to draw a character. Drawing your character
like this helps you to understand how it moves the
3D world. When you first draw your character like this
you can add its anatomy on top of it. Starting like this
is way easier and lets you focus first on getting the
basices right, like pose, overlap and depth, before you
start adding the details.
Here I’m going more in-depth about
drawing the basic shapes. Spheres
are great to build your character
with, but without perspective lines
you can’t see the direction. With
a cylinder, you can see direction
because it has three surfaces.
With a cube it’s really clear what
the direction is, because it has six
surfaces. If the direction and the
volume of a shape aren’t clear, you
could add perspective guides.
construction
13
12
The line of action is a tool to give your character
a strong pose. It’s an imaginary line you can draw
through your character. Without it, your character
looks stiff. So, whenever your character’s pose looks
stiff, check the line of action first.
A line of action gives your character force, makes
it more readable and it will look more dynamic.
When I start drawing a character I always start by
deciding what I want to draw. The story behind the
drawing. For example: a baseball player is going
to hit the ball. Based on that one sentence you can
make different action lines that depict the desired
movement in the most fundamental way.
Line of action
& gesture
study tips
Look up some photos of people
doing sports or people in other types
of motion. Practise to catch their
pose by drawing one single line. This
is called the action line.
15
14
Here, I’m showing an example of
how to practice drawing shapes
that follow a line of action. This
exercise will help you understand
the relationship between lines of
action and construction. With this,
you give shapes a gesture. When
you don’t use a line of action, your
characters will look stiff and when
you aren’t using construction,
your characters won’t look solid.
If you want to learn more about this, look for gesture drawing classes or tutorials. Doing gesture drawings is a great
warm-up. In short: gesture drawing is making figure drawings by focusing on the gesture of the pose.
study tips
Draw a swirling line and draw shapes
that follow that line. This gives the
shapes a flowing direction and
interconnects them.
17
16
There are a bunch of rules you could apply to improve your drawings. Of course, these are rules and you can decide
for yourself if you want to follow them or not. I do assess my drawings occasionally by these rules to see if I can find
something to improve. This book is about anatomy and not so much about drawing principles as such, but they can help
you with drawing anatomy. Therefore, I wanted to include them in this book.
Drawing fundamentals
Avoid parallel lines by
mixing straight and
curved lines. This will
make your drawing
look more organic and
dynamic.
Give your drawings
more contrast and
guide the eye. The
level of detail attracts
the eye.
If you use a varied
combination of S C and
I shaped line types, it
will make your drawing
look more dynamic
Use contrast in
sizes. Contrast leads
the eye and makes
your drawing more
interesting.
Try to see water
flowing through your
character, or a ball
bouncing between
the walls. Find the
right rythm for a flow.
It can be hard to see
the direction or angle
of an object, using
these lines can help
make that clearer.
An object that is bigger
feels closer by than an
object that is smaller.
By adding a twist to
your design, it will look
more dynamic and
interesting.
When your characters
look flat they don’t
have volume. Volume
adds depth to your
characters.
Tangents don’t often
occur in nature and
in your drawing,
they attract the eye
intentionally.
Avoid parallel lines
to create a rhythm
and direction in your
drawing.
You can combine the
main types of shapes
(circle, triangle and
rectangle) to make
anything you want.
Creates more depth
in your drawing
and gives it a more
dynamic feeling.
An object farther
aways lays higher on
the surface than an
object closer to the
viewer.
By overlapping
different objects you
create depth.
Symmetry looks man-
made and can make
your drawings look stiff.
Due to perspective
you can create the
illusion of one end of
an object appearing
bigger or smaller
compared to the other.
A strong silhouette,
with a nice balance
between negative and
positive space, makes
your character better
readable and clear.
19
18
Head construction
21
20
By combining a sphere, cylinder and/
or cube you can create any shape
you want. Think of it like clay. You
can transform the shapes. Pull,
squash and even cut the shapes in
any way you like.
When drawing the head, I try to
keep it really simple. I break it down
into three shapes. A sphere for the
cranium, a mask for the face/jaw and
a cylinder for the neck.
So, I start with a sphere for the
cranium. I cut off two sides with an
imaginary knife (see image). For the
face, I make a mask that I put on
top of the sphere. And lastly, I use a
cylinder for the neck.
study tips
Try to draw your own shapes from a
cube, cylinder and sphere. See what
you can come up with and try to
combine, morph and slice them up.
basic shapes
23
22
This is another example of basic
steps to create a base for the head.
Try to follow these steps. This is a
basic shape. By making individual
parts either longer of shorter, you
create your own designs .
The proportions in the example
stays resemble those of a realistic
human head, but often I play around
with these shapes to make more
caricature character types.
These are same steps but now from a side profile. See where the neck originates from.
25
24
I really like this approach. You draw a
line from the top of the head straight
down and after that add lines going
from one side of the head to the
other. This makes it very fluid and it
is very easy to draw. In the last step,
you can see I removed a bit at the
back of the skull and behind the jaw.
This approach also makes it easier to
draw the head from different angles,
like in these examples.
study tips
Practice drawing the head from
different angles, following these
steps. You could also copy the heads
from the example, following the
same steps I demonstrated.
angles
27
26
More examples of drawing the head from different angles. A sphere is easy to draw from a weird angle, so if do that
first, you can add shapes afterwards. And that makes it way easier to draw the head from different angles.
Earlier, I mentioned the shape of
the head. I usually start off with a
realistic base and then, I change
it to make my character designs
more caricature-like. You can
squash or stretch the shapes.
study tips
Try to make your own versions with
this basic head construction. Try to
see how far you can go by changing
these shapes.
29
28
Here, I show how I draw the anatomy
for the face. I really try to keep it
simple so it’s easy to remember. So,
breaking down the face in a couple
of shapes like in the image on the
left. You can play around with the
proportions of these shapes to get
variations of the head.
I draw these shapes in a very basic way so they are easy to draw from a different angle. This is hard enough so try to
keep it as simple as possible for yourself.
study tips
First learn to draw the regular ¾
view. Once you have nailed that you
can start practicing by drawing a
head from different angles.
simplified
anatomy
31
30
Here I show some variations of the
heads. If you look closely, you can
see I use those basic shapes and
change the proportions to make
variations.
study tips
Start creating your own characters
with these building blocks. Try
using different proportions to make
a variation of characters. Don’t be
afraid to go too far with this. It’s good
to discover how far you can push this
to create interesting characters.
33
32
These are the steps I take to draw a
head. Using these 1/3 measure steps
makes it easy to remember and to
draw. Using those flow lines in the
second step, when I add the jaw to
the circle, helps to get a nice flow in
the head shape. I’m using simplified
formulas for the head so they are
easy to draw and to understand.
This is great for when you are just
starting or are only drawing stylized
characters. If you want to draw more
realistic characters you can use this
as a foundation to draw on top of.
Here, I’m using the same steps as I showed earlier but then more detailed and more realistic. This shows that you can
make it as complex as you would like. It also shows the importance of thinking in planes/surfaces on the head.
study tips
Draw a realistic head and draw a
grid on top of it so you can see the
planes and surfaces on it.
final steps
35
34
Proportions
Eight seems to be a magic number.
When you divide the head into eight
parts, you will find a number of
makers of the head. Each head is
different, so those markers can be
a bit different, too. My drawing style
isn’t that realistic, so I always play
around with proportions. But still,
dividing the head into eight parts can
be useful, because it gives you a
base to start from.
Typically, the female head is round and has soft edges, whereas the male head is more angular and bones and muscles
stand out more in a male face. When I draw more cartoony characters, I push this more. This doesn’t mean a woman
can’t have an angular face or that a male can’t have a round face. But it’s important to be aware of this, so you know
how to use this when designing your characters. Strong characters often have really angular shapes and friendly ones
tend to be more rounded.
study tips
First draw both a round and an
angular head. And after that, play
around with the space between
the lines. Try subtle changes and
more extreme ones and see what
happens.
37
36
the skull
39
38
Understanding the skull is very
important for a good understanding
of how to draw the head. On some
parts of our head we can even feel
parts of our skull. Like the edge
under your eye or around the jaw.
It’s also good to know how the jaw
opens. When it opens, it moves like
an arch, rather than simply dropping
down.
In cartoon characters, the skull looks different in every character. Some characters have a giant cranium and other
characters have an extremely big jaw.
study tips
study tips
Practice drawing the skull from
different angles and use the steps I
showed on the top of the image.
Try to draw the skulls of some of
your own characters. Is it different
from a realistic skull?
41
40
Here I show different angles of the
skull. I’m using basic shapes again to
make it easier to rotate.
The part of the mouth and teeth isn’t
flat. It can help to draw these parts
as a ball in the skull. This also makes
it easier to draw that part of the skull
from different angles. Later, I’ll show
how to draw the mouth on top of it.
study tips
Draw the skull from different
angles, using a ball shape where
the mouth goes. This will help
you later with drawing the mouth
from different angles.
43
42
facial details
The eyes, the nose, the mouth
and the ears
45
44
Cupcakes
As for drawing eyes, I like to think
of them as cupcakes that I take
from the head. Eyes are located in a
cavity in the skull called the orbit/eye
socket. Eyes are protected by bones
around it. You can see this clearly, if
you look at an actual skull.
The superhero technique
Drawing a mask around the eyes
helps you determine the right
placement for the eyes in the head,
when seen in perspective. Look for
the lines on top of the mask that give
it that 3D shape. Try to understand
how everything wraps around it.
Now that you have a solid construction for your character, the next step is to add facial details so the character can
express himself. On the next pages, I’ll address each element more in-depth.
eyes
study tips
Draw a character with a mask
around the eyes. Make sure you use
the steps I’m showing here, take two
cupcake shapes from the head to
place the eyes properly in the head.
47
46
Drawing the eye from the front
It’s perfect to learn how to draw the eye using these steps. These are basically the same steps you would take if you
would draw it from a different angle.
Construction
There are different ways to draw
the eyes. The simplest way to
draw them is to start with a ball
and draw the eyelids (the upper
and lower one) on top of it. When
you draw the eyelids on top, try to
think how those eyelids follow the
shape of the eyeball.
Use your sketchbook and draw a
couple of eyes until you can draw it
from memory. Once you know how
to do that, you could try drawing
different types of eyes.
study tips
49
48
Eye details
If you would dissect the eye, you’ll
see it is a complex organ. For
drawing, it’s important to understand
a bit of the eye’s anatomy. It’s
especially important to understand
how the light passes the cornea and
reflects on the iris. For example:
when the light comes from above,
the bottom of the iris is lighter.
Invisible on the outside, the eyeball
has multiple muscles attached to it.
They control the movement of the
eye and keep the eyeball in place.
Around the eye socket, there is a
thin layer of muscles, in some places
you can’t even feel it. Carefully feel
the skin around your eye to see if
you can feel the muscles and bone.
51
50
In these three examples I show how you can draw the eye from different perspectives. Notice how little of the actual
eyeball you are able to see. The biggest part is inside the head. Also notice how the eyelids wrap around the curvature
of the eyeball.
study tips
Now ty drawing the eye from different
angles. Always start with a ball. If
you have a hard time with this, you
can use a mirror or look up pictures
online. You can also ask someone
else to model for you and take
pictures from that person’s eye from
different angles.
53
52
Wrap it!
Of course, most of us don’t have
just one eye, but two! And they are
mirrored. Because they are located
inside our skull (think of the cupcake
shape I mentioned earlier) they are
sometimes covered by our nose.
Another thing to consider is that the
face isn’t flat, it’s actually wrapped
around the skull (refer to image).
Around the eye, there are many tiny muscles. I don’t know them all by heart
but I do use this breakdown I’m showing hear. It can be useful to look up some
anatomy illustrations and try to break down the muscles in more basic shapes.
study tips
Fill a whole sketchbook page with
different pairs of eyes and always
start with drawing a ball. Draw a
couple of very simple ones, as well
as more realistic ones.
55
54
You can draw the nose in many
different ways. I try to think of a nose
as an object consisiting of three
parts, as you can see in the example
above. I can play around with green,
red and blue shapes to draw a wide
variety of noses. On the next page, I
will address the diamond or triangle
method I use to draw the nose in
difficult angles.
Here is a collection of noses. You
can draw the nose in endless
different ways, I would advise to try
out different types of construction
so you can discover what suits your
character best.
Simplify it
A few different ways of drawing the
nose. The advantage of starting with
spheres is that it’s easy to rotate
around in 3D, so you can easily use
these steps if you want to depict a
different angle.
NOSE
57
56
Prism
Here, I use the prism shape to draw the nose in difficult angles. Again, this shows why starting off with using geometric
shapes makes drawing characters way easier. Work from big shapes to small details.
Triangles
The nose consists of a lot of
cartilage. That’s soft bone and
makes our nose flexible but still quite
solid. If you draw a triangle around
these nose drawings from different
perspectives, you can clearly see
there’s a triangle shape hidden in
each one of them.
study tips
Draw the nose from different angles
using this prism shape. A great way
to do that is to take pictures of your
own nose or someone else’s and
start drawing those crazy angles.
59
58
As for the placement of the ears: you can align them with
the eyes and place them where the jaws start.
To draw ears, start with a big diamond-like shape. The
next step is to give it rounded edges and after that, you
can add the inner shapes of the ear.
For drawing the back of the ear, you can start with an
S-line and give that volume.
If you can draw the ear from a flat
perspective in a box, you can draw
it from any angle in a box. The only
thing you need to know is how to
draw a box in perspective and in
different angles. In this example, I
show a couple of markers to help you
remember how to draw the ear.
ears
61
60
Look in the mirror, your lips have
volume! If you want to draw realistic
and voluminous lips, you can break
them down into 5 shapes: 3 in the
upper lip and 2 in the lower lip.
Construction
To construct the lips, start with
drawing a line that wraps around the
head. Then build up the lips on top
of that. This will help you to make it
easier to draw a mouth with lips.
Wrap it!
Keep in mind that the mouth is following the shape of the head: it’s wrapped around it. Do you remember the skull
drawing in which the mouth follows a ball shape? In this example, I show how to draw the mouth around a ball and what
kind of effect this has.
the mouth
study tips
First learn how to draw the mouth
from a flat frontal perspective and
after that, start drawing it in different
angles. Start with simple angles and
challenge yourself to go a little bit
further each time.
63
62
The jaws
Here, I show how the mouth opens
and closes. It’s good to realize that
the flesh of the mouth is flexible but
the teeth are not. Also, consider
that the jaw rotates when it opens, it
doesn’t simply drop down.
Squash and stretch
Remember that there is a lot of flesh around the mouth.
For example, your cheeks squash and stretch when you
yell or laugh.
You don’t have to perfectly understand how the muscles
work. You don’t have to learn all the muscles by heart
either. Having a bit of understanding is enough (at least for
me it is). But it’s still good to at least study it roughly, just
enough that you have seen it and are able to recognize it.
So once you’re stuck with a drawing, you can look up the
proper reference and understand how it works.
study tips
Try drawing different types of mouths. Look up some photos (or even better: use a mirror) for different expressions and
see what it does to the mouth and the skin around it.
65
64
Knowing where the hairline is
located is important. It can look
strange when it’s too low or too
high. At the same time, you can
play around with this and decide
what works and what doesn’t.
In this example I’m showing the
hairline from different angles.
When you draw hair, make sure
you draw it on top of the skull. Hair
always has some volume. It grows
from the skull and gets pulled down
by gravity.
In these examples you can see that
I break the hair down into separate
big shapes. So, always start with big
shapes and break them down into
smaller shapes. Hair is not a static
object, it flows. This also means that
hair follows the movement of the
character when it moves.
hair
67
66
The neck
69
68
Attached to the head, there is – of
course – the neck. The neck has a
lot of muscles, many more than I
show here. However, in the example
I’ve grouped the muscles and made
them simpler. You can look up a
medical image of the neck to see
all individual muscles. For these
purposes, these images would
be way too complex to use when
drawing the neck, that’s why I’ve
simplified it.
71
70
Drawing the head
in angles
73
72
Inside the box
When you know how to draw a skull
in a box from a flat side or frontal
perspective, you know how to draw it
in a different angle. I’m trying to show
this with the example image. When
you draw the box in perspective,
you can add markers to the front
and side of the box. Those markers
will help you to create the skull in
perspective.
In this example I show you the head
in different angles and how I apply
the box method. The first step is
drawing the box. In that box I start
drawing the basic shapes and from
there, I work towards the final sketch.
It basically comes doen to combining
the techniques that I have already
mentioned in in this e-book and the
method of drawing a head in a box.
study tips
study tips
First, practice drawing a 2D head
from the front and the side. Once
you know how to do that, you can try
drawing a head in a box like I did in
the example. Simply follow the steps.
First, try to draw the head in the
angle I showed in the example
on this page, so looking up. Once
you’ve done that, try to apply this
method yourself by drawing a head
looking down. You could use the
drawings from the first pages of this
book.
75
74
You can start with a cube like I’ve
done. Or you could start with a
sphere. How you start doesn’t matter
that much, as long as it takes you
where you want to go and isn’t too
complicated.
The advantage of using a cube is
that without any perspective guides
you can still see where it is headed
because it has 6 clear planes.
However, with a circle or sphere you
already have a solid base to build the
skull/head upon.
Drawing heads from different angles
can be difficult. What helps me, is to
draw it from the side first. With a little
help from perspective lines, you will
learn to understand what it looks like
from another angle.
study tips
Try this method yourself. Maybe
with a character you came up with
yourself or use one of the heads I
drew for this book. Start with a frontal
and side view. Then, you could try to
draw a ¾ view (in which you see a
part of the front and a part of the side
of the head).
77
76
extra study material
79
78
Here are some of my head designs.
I drew all of these characters with
the same techniques I’ve mentioned
earlier in this book. It’s not that I
draw the skull and all the guides
every time, but I do keep them in
mind when drawing heads. And that
is the goal - I think- you could try to
achieve.
First, train and learn all those steps with skull, shapes and guides. At one point it will click, don’t stop when you are
frustrated by this because that is part of the learning process. You could start by studying all these heads and copy
them. Don’t just simply copy them but try to break them down with the steps and guides I’ve shown earlier in this book.
81
80
Here is another example of drawing
a head step by step.
83
82
conclusion
& thank you
85
84
Thanks for reading the book. I hope it helped and you
to have a better understanding of how to use and draw
anatomy. All of these things definitely helped me and I’m
still learning.
The thing with drawing is that you are never done learning.
Being an artist is a bit like being a gardener. You always
have to water your garden or it will become dry and
eventually dies. So always keep learning and try to find
water for your garden. With this, I mean it’s important to
always keep studying and learning.
If you have any questions or want to show me some of
your studies, drop me a message on my Instagram!
Best,
Mitch Leeuwe
that's it!
Contact me
Instagram 		 Mitch Leeuwe
Patreon patreon.com/mitchleeuwe
Gumroad gumroad.com/mitchleeuwe
Website mitchleeuwe.nl
86

More Related Content

Similar to Anatomy Heads ebook.pdf

Development pro forma
Development pro formaDevelopment pro forma
Development pro formaJoe Costello
 
Development pro forma
Development pro formaDevelopment pro forma
Development pro formaCoralWelburn
 
Development pro forma
Development pro formaDevelopment pro forma
Development pro formaJamie Mellors
 
Development pro forma
Development pro formaDevelopment pro forma
Development pro formahannahw12
 
Development Pro-Forma Finished
Development Pro-Forma Finished Development Pro-Forma Finished
Development Pro-Forma Finished hannahw12
 
New Media Production Slideshow Project
New Media Production Slideshow ProjectNew Media Production Slideshow Project
New Media Production Slideshow ProjectPaulMar21
 
Development pro forma
Development pro formaDevelopment pro forma
Development pro formaJamie Mellors
 
#6 character design
#6 character design#6 character design
#6 character designkkirschbaum
 
Development pro forma
Development pro formaDevelopment pro forma
Development pro formaCoralWelburn
 
Development pro forma
Development pro formaDevelopment pro forma
Development pro formaCoralWelburn
 
Development pro forma
Development pro formaDevelopment pro forma
Development pro formaCoralWelburn
 
Character Concept Bust
Character Concept BustCharacter Concept Bust
Character Concept BustAmy Watson
 
Development Pro-Forma finished
Development Pro-Forma finished Development Pro-Forma finished
Development Pro-Forma finished hannahw12
 
Digital graphics evaluation pro forma
Digital graphics evaluation pro formaDigital graphics evaluation pro forma
Digital graphics evaluation pro formaSophie Husteden
 
Development pro forma
Development pro formaDevelopment pro forma
Development pro formaAidenHyland
 
Human figure drawing freemium
Human figure drawing freemium Human figure drawing freemium
Human figure drawing freemium Rawan Alwaa
 

Similar to Anatomy Heads ebook.pdf (20)

Development pro forma
Development pro formaDevelopment pro forma
Development pro forma
 
Development pro forma
Development pro formaDevelopment pro forma
Development pro forma
 
Development pro forma
Development pro formaDevelopment pro forma
Development pro forma
 
Development
DevelopmentDevelopment
Development
 
English 1 Project 1
English 1 Project 1English 1 Project 1
English 1 Project 1
 
Development pro forma
Development pro formaDevelopment pro forma
Development pro forma
 
Development Pro-Forma Finished
Development Pro-Forma Finished Development Pro-Forma Finished
Development Pro-Forma Finished
 
New Media Production Slideshow Project
New Media Production Slideshow ProjectNew Media Production Slideshow Project
New Media Production Slideshow Project
 
Presentation1
Presentation1Presentation1
Presentation1
 
Development pro forma
Development pro formaDevelopment pro forma
Development pro forma
 
#6 character design
#6 character design#6 character design
#6 character design
 
Development pro forma
Development pro formaDevelopment pro forma
Development pro forma
 
Development pro forma
Development pro formaDevelopment pro forma
Development pro forma
 
Development pro forma
Development pro formaDevelopment pro forma
Development pro forma
 
Character Concept Bust
Character Concept BustCharacter Concept Bust
Character Concept Bust
 
Development Pro-Forma finished
Development Pro-Forma finished Development Pro-Forma finished
Development Pro-Forma finished
 
Digital graphics evaluation pro forma
Digital graphics evaluation pro formaDigital graphics evaluation pro forma
Digital graphics evaluation pro forma
 
Development pro forma
Development pro formaDevelopment pro forma
Development pro forma
 
Human figure drawing freemium
Human figure drawing freemium Human figure drawing freemium
Human figure drawing freemium
 
Contour line
Contour lineContour line
Contour line
 

Recently uploaded

FULL ENJOY - 9953040155 Call Girls in New Ashok Nagar | Delhi
FULL ENJOY - 9953040155 Call Girls in New Ashok Nagar | DelhiFULL ENJOY - 9953040155 Call Girls in New Ashok Nagar | Delhi
FULL ENJOY - 9953040155 Call Girls in New Ashok Nagar | DelhiMalviyaNagarCallGirl
 
9654467111 Call Girls In Noida Sector 62 Short 1500 Night 6000
9654467111 Call Girls In Noida Sector 62 Short 1500 Night 60009654467111 Call Girls In Noida Sector 62 Short 1500 Night 6000
9654467111 Call Girls In Noida Sector 62 Short 1500 Night 6000Sapana Sha
 
Call Girl Service in Karachi +923081633338 Karachi Call Girls
Call Girl Service in Karachi +923081633338 Karachi Call GirlsCall Girl Service in Karachi +923081633338 Karachi Call Girls
Call Girl Service in Karachi +923081633338 Karachi Call GirlsAyesha Khan
 
The First Date by Daniel Johnson (Inspired By True Events)
The First Date by Daniel Johnson (Inspired By True Events)The First Date by Daniel Johnson (Inspired By True Events)
The First Date by Daniel Johnson (Inspired By True Events)thephillipta
 
Call Girls in Islamabad | 03274100048 | Call Girl Service
Call Girls in Islamabad | 03274100048 | Call Girl ServiceCall Girls in Islamabad | 03274100048 | Call Girl Service
Call Girls in Islamabad | 03274100048 | Call Girl ServiceAyesha Khan
 
MinSheng Gaofeng Estate commercial storyboard
MinSheng Gaofeng Estate commercial storyboardMinSheng Gaofeng Estate commercial storyboard
MinSheng Gaofeng Estate commercial storyboardjessica288382
 
Jagat Puri Call Girls : ☎ 8527673949, Low rate Call Girls
Jagat Puri Call Girls : ☎ 8527673949, Low rate Call GirlsJagat Puri Call Girls : ☎ 8527673949, Low rate Call Girls
Jagat Puri Call Girls : ☎ 8527673949, Low rate Call Girlsashishs7044
 
Faridabad Call Girls : ☎ 8527673949, Low rate Call Girls
Faridabad Call Girls : ☎ 8527673949, Low rate Call GirlsFaridabad Call Girls : ☎ 8527673949, Low rate Call Girls
Faridabad Call Girls : ☎ 8527673949, Low rate Call Girlsashishs7044
 
Greater Noida Call Girls : ☎ 8527673949, Low rate Call Girls
Greater Noida Call Girls : ☎ 8527673949, Low rate Call GirlsGreater Noida Call Girls : ☎ 8527673949, Low rate Call Girls
Greater Noida Call Girls : ☎ 8527673949, Low rate Call Girlsashishs7044
 
Akola Call Girls #9907093804 Contact Number Escorts Service Akola
Akola Call Girls #9907093804 Contact Number Escorts Service AkolaAkola Call Girls #9907093804 Contact Number Escorts Service Akola
Akola Call Girls #9907093804 Contact Number Escorts Service Akolasrsj9000
 
Strip Zagor Extra 322 - Dva ortaka.pdf
Strip   Zagor Extra 322 - Dva ortaka.pdfStrip   Zagor Extra 322 - Dva ortaka.pdf
Strip Zagor Extra 322 - Dva ortaka.pdfStripovizijacom
 
Low Rate Call Girls in Laxmi Nagar Delhi Call 9990771857
Low Rate Call Girls in Laxmi Nagar Delhi Call 9990771857Low Rate Call Girls in Laxmi Nagar Delhi Call 9990771857
Low Rate Call Girls in Laxmi Nagar Delhi Call 9990771857delhimodel235
 
FULL ENJOY - 9953040155 Call Girls in Dwarka Mor | Delhi
FULL ENJOY - 9953040155 Call Girls in Dwarka Mor | DelhiFULL ENJOY - 9953040155 Call Girls in Dwarka Mor | Delhi
FULL ENJOY - 9953040155 Call Girls in Dwarka Mor | DelhiMalviyaNagarCallGirl
 
FULL ENJOY - 9953040155 Call Girls in Moti Nagar | Delhi
FULL ENJOY - 9953040155 Call Girls in Moti Nagar | DelhiFULL ENJOY - 9953040155 Call Girls in Moti Nagar | Delhi
FULL ENJOY - 9953040155 Call Girls in Moti Nagar | DelhiMalviyaNagarCallGirl
 
Roadrunner Lodge, Motel/Residence, Tucumcari NM
Roadrunner Lodge, Motel/Residence, Tucumcari NMRoadrunner Lodge, Motel/Residence, Tucumcari NM
Roadrunner Lodge, Motel/Residence, Tucumcari NMroute66connected
 
SHIVNA SAHITYIKI APRIL JUNE 2024 Magazine
SHIVNA SAHITYIKI APRIL JUNE 2024 MagazineSHIVNA SAHITYIKI APRIL JUNE 2024 Magazine
SHIVNA SAHITYIKI APRIL JUNE 2024 MagazineShivna Prakashan
 
Laxmi Nagar Call Girls : ☎ 8527673949, Low rate Call Girls
Laxmi Nagar Call Girls : ☎ 8527673949, Low rate Call GirlsLaxmi Nagar Call Girls : ☎ 8527673949, Low rate Call Girls
Laxmi Nagar Call Girls : ☎ 8527673949, Low rate Call Girlsashishs7044
 
Islamabad Call Girls # 03091665556 # Call Girls in Islamabad | Islamabad Escorts
Islamabad Call Girls # 03091665556 # Call Girls in Islamabad | Islamabad EscortsIslamabad Call Girls # 03091665556 # Call Girls in Islamabad | Islamabad Escorts
Islamabad Call Girls # 03091665556 # Call Girls in Islamabad | Islamabad Escortswdefrd
 
Turn Lock Take Key Storyboard Daniel Johnson
Turn Lock Take Key Storyboard Daniel JohnsonTurn Lock Take Key Storyboard Daniel Johnson
Turn Lock Take Key Storyboard Daniel Johnsonthephillipta
 
Alex and Chloe by Daniel Johnson Storyboard
Alex and Chloe by Daniel Johnson StoryboardAlex and Chloe by Daniel Johnson Storyboard
Alex and Chloe by Daniel Johnson Storyboardthephillipta
 

Recently uploaded (20)

FULL ENJOY - 9953040155 Call Girls in New Ashok Nagar | Delhi
FULL ENJOY - 9953040155 Call Girls in New Ashok Nagar | DelhiFULL ENJOY - 9953040155 Call Girls in New Ashok Nagar | Delhi
FULL ENJOY - 9953040155 Call Girls in New Ashok Nagar | Delhi
 
9654467111 Call Girls In Noida Sector 62 Short 1500 Night 6000
9654467111 Call Girls In Noida Sector 62 Short 1500 Night 60009654467111 Call Girls In Noida Sector 62 Short 1500 Night 6000
9654467111 Call Girls In Noida Sector 62 Short 1500 Night 6000
 
Call Girl Service in Karachi +923081633338 Karachi Call Girls
Call Girl Service in Karachi +923081633338 Karachi Call GirlsCall Girl Service in Karachi +923081633338 Karachi Call Girls
Call Girl Service in Karachi +923081633338 Karachi Call Girls
 
The First Date by Daniel Johnson (Inspired By True Events)
The First Date by Daniel Johnson (Inspired By True Events)The First Date by Daniel Johnson (Inspired By True Events)
The First Date by Daniel Johnson (Inspired By True Events)
 
Call Girls in Islamabad | 03274100048 | Call Girl Service
Call Girls in Islamabad | 03274100048 | Call Girl ServiceCall Girls in Islamabad | 03274100048 | Call Girl Service
Call Girls in Islamabad | 03274100048 | Call Girl Service
 
MinSheng Gaofeng Estate commercial storyboard
MinSheng Gaofeng Estate commercial storyboardMinSheng Gaofeng Estate commercial storyboard
MinSheng Gaofeng Estate commercial storyboard
 
Jagat Puri Call Girls : ☎ 8527673949, Low rate Call Girls
Jagat Puri Call Girls : ☎ 8527673949, Low rate Call GirlsJagat Puri Call Girls : ☎ 8527673949, Low rate Call Girls
Jagat Puri Call Girls : ☎ 8527673949, Low rate Call Girls
 
Faridabad Call Girls : ☎ 8527673949, Low rate Call Girls
Faridabad Call Girls : ☎ 8527673949, Low rate Call GirlsFaridabad Call Girls : ☎ 8527673949, Low rate Call Girls
Faridabad Call Girls : ☎ 8527673949, Low rate Call Girls
 
Greater Noida Call Girls : ☎ 8527673949, Low rate Call Girls
Greater Noida Call Girls : ☎ 8527673949, Low rate Call GirlsGreater Noida Call Girls : ☎ 8527673949, Low rate Call Girls
Greater Noida Call Girls : ☎ 8527673949, Low rate Call Girls
 
Akola Call Girls #9907093804 Contact Number Escorts Service Akola
Akola Call Girls #9907093804 Contact Number Escorts Service AkolaAkola Call Girls #9907093804 Contact Number Escorts Service Akola
Akola Call Girls #9907093804 Contact Number Escorts Service Akola
 
Strip Zagor Extra 322 - Dva ortaka.pdf
Strip   Zagor Extra 322 - Dva ortaka.pdfStrip   Zagor Extra 322 - Dva ortaka.pdf
Strip Zagor Extra 322 - Dva ortaka.pdf
 
Low Rate Call Girls in Laxmi Nagar Delhi Call 9990771857
Low Rate Call Girls in Laxmi Nagar Delhi Call 9990771857Low Rate Call Girls in Laxmi Nagar Delhi Call 9990771857
Low Rate Call Girls in Laxmi Nagar Delhi Call 9990771857
 
FULL ENJOY - 9953040155 Call Girls in Dwarka Mor | Delhi
FULL ENJOY - 9953040155 Call Girls in Dwarka Mor | DelhiFULL ENJOY - 9953040155 Call Girls in Dwarka Mor | Delhi
FULL ENJOY - 9953040155 Call Girls in Dwarka Mor | Delhi
 
FULL ENJOY - 9953040155 Call Girls in Moti Nagar | Delhi
FULL ENJOY - 9953040155 Call Girls in Moti Nagar | DelhiFULL ENJOY - 9953040155 Call Girls in Moti Nagar | Delhi
FULL ENJOY - 9953040155 Call Girls in Moti Nagar | Delhi
 
Roadrunner Lodge, Motel/Residence, Tucumcari NM
Roadrunner Lodge, Motel/Residence, Tucumcari NMRoadrunner Lodge, Motel/Residence, Tucumcari NM
Roadrunner Lodge, Motel/Residence, Tucumcari NM
 
SHIVNA SAHITYIKI APRIL JUNE 2024 Magazine
SHIVNA SAHITYIKI APRIL JUNE 2024 MagazineSHIVNA SAHITYIKI APRIL JUNE 2024 Magazine
SHIVNA SAHITYIKI APRIL JUNE 2024 Magazine
 
Laxmi Nagar Call Girls : ☎ 8527673949, Low rate Call Girls
Laxmi Nagar Call Girls : ☎ 8527673949, Low rate Call GirlsLaxmi Nagar Call Girls : ☎ 8527673949, Low rate Call Girls
Laxmi Nagar Call Girls : ☎ 8527673949, Low rate Call Girls
 
Islamabad Call Girls # 03091665556 # Call Girls in Islamabad | Islamabad Escorts
Islamabad Call Girls # 03091665556 # Call Girls in Islamabad | Islamabad EscortsIslamabad Call Girls # 03091665556 # Call Girls in Islamabad | Islamabad Escorts
Islamabad Call Girls # 03091665556 # Call Girls in Islamabad | Islamabad Escorts
 
Turn Lock Take Key Storyboard Daniel Johnson
Turn Lock Take Key Storyboard Daniel JohnsonTurn Lock Take Key Storyboard Daniel Johnson
Turn Lock Take Key Storyboard Daniel Johnson
 
Alex and Chloe by Daniel Johnson Storyboard
Alex and Chloe by Daniel Johnson StoryboardAlex and Chloe by Daniel Johnson Storyboard
Alex and Chloe by Daniel Johnson Storyboard
 

Anatomy Heads ebook.pdf

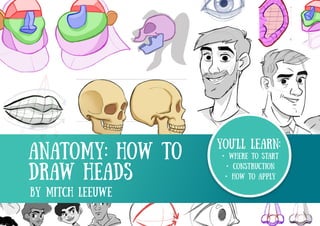
  • 1. YOU'LL LEARN: • where to start • construction • how to apply anatomy: how to draw heads by mitch leeuwe
  • 2. 3 2 Copyright © 2019 by Mitch Leeuwe All rights reserved. This book or any portion thereof may not be reproduced or used in any manner whatsoever without the express written permission of the publisher except for the use of brief quotations in a book review. For personal use only mitchleeuwe.nl Printed in the Netherlands First Printing, 2020 Graphic design: Harmke Leeuwe harmke.com Copy editor: Yessica Claire Baeten yessicabaeten.com anatomy: how to draw heads by mitch leeuwe
  • 3. 5 4 Hi there! Let me introduce myself. I’m Mitch Leeuwe and am an illustrator from the Netherlands.Thank you for purchasing my book about anatomy. Back in the days when I wanted to learn about anatomy, I found it very overwhelming. So, my goal with this book is to make learning anatomy understandable and accessible for you. I started out by trying to learn every muscle and bone and I really began to memorize all those different parts. But after a while I noticed I forgot a lot of their names and in the end, I always had to look it up for reference. That’s when I started to look for tutorials about anatomy for animation. I found examples where the anatomy was simplified and broken down in understandable formulas and shapes. This made it way more fun and easier to learn. So, I started making this book with the idea of putting everything together.
  • 4. 7 6 You can use this book to learn from or use it for reference when you are drawing a difficult pose. If you are just starting out, the best way to learn is to take small steps. It’s okay to start by copying the drawings in this book and try to examine all different body parts. Once you get comfortable with copying these drawings, you could start looking for photos of people in which you can see the structure of their muscles. Like a photo from a boxer or a ballerina in a strong pose. Draw the characters first, then add muscles on top, try to see how the muscles work and where they are connected. It takes a lot of time to learn anatomy, so don’t get discouraged if it takes a while to get the hang of it. Be patient, try to have fun and enjoy the process. Start by doing thirty minutes every day, instead of doing a couple of hours in one go and get frustrated with it. Doing a bit every day will make a big difference after some period of time. When you have difficulty drawing shapes, start practicing drawing cubes, spheres and cylinders. When you can comfortably draw shapes on paper in 3D, you can basically draw anything. By mixing up those shapes you can build any object you want. I mostly draw cartoon characters, which are not hyper realistic. And because of that I’m always focused on simple shapes first. But even if you want to draw realistic anatomy, I think this book can be very helpful. Because these simple shapes will form a solid foundation before adding all details and muscles on top. how to use this book
  • 5. 9 8 The basics Construction, line of action and combining them
  • 6. 11 10 study tips Fill a page with different shapes, try to see their direction. Now add perspective lines, is the direction more clear now? Construction is like the foundation of your character. With a good construction you can create a strong and solid character. To get started, follow these steps: 1. For drawing, I always use three kind of shapes. A sphere, a cylinder and cube. I use these shapes because you can build anything with them and they are easy to rotate in 3D. You can stretch and distort these shapes or combine them to make variations. 2. When I draw characters I always use a line of action. You could also call this the character’s gesture. Here you can also see the benefit of using 3D shapes when you allow them to follow an action line. This is also a great way to practice it. First draw a line shaped like an S and let the shape follow the action line. This way you get a nice sense of flow and depth in your characters. 3. Here you can see how I use spheres, cylinders and cubes to draw a character. Drawing your character like this helps you to understand how it moves the 3D world. When you first draw your character like this you can add its anatomy on top of it. Starting like this is way easier and lets you focus first on getting the basices right, like pose, overlap and depth, before you start adding the details. Here I’m going more in-depth about drawing the basic shapes. Spheres are great to build your character with, but without perspective lines you can’t see the direction. With a cylinder, you can see direction because it has three surfaces. With a cube it’s really clear what the direction is, because it has six surfaces. If the direction and the volume of a shape aren’t clear, you could add perspective guides. construction
  • 7. 13 12 The line of action is a tool to give your character a strong pose. It’s an imaginary line you can draw through your character. Without it, your character looks stiff. So, whenever your character’s pose looks stiff, check the line of action first. A line of action gives your character force, makes it more readable and it will look more dynamic. When I start drawing a character I always start by deciding what I want to draw. The story behind the drawing. For example: a baseball player is going to hit the ball. Based on that one sentence you can make different action lines that depict the desired movement in the most fundamental way. Line of action & gesture study tips Look up some photos of people doing sports or people in other types of motion. Practise to catch their pose by drawing one single line. This is called the action line.
  • 8. 15 14 Here, I’m showing an example of how to practice drawing shapes that follow a line of action. This exercise will help you understand the relationship between lines of action and construction. With this, you give shapes a gesture. When you don’t use a line of action, your characters will look stiff and when you aren’t using construction, your characters won’t look solid. If you want to learn more about this, look for gesture drawing classes or tutorials. Doing gesture drawings is a great warm-up. In short: gesture drawing is making figure drawings by focusing on the gesture of the pose. study tips Draw a swirling line and draw shapes that follow that line. This gives the shapes a flowing direction and interconnects them.
  • 9. 17 16 There are a bunch of rules you could apply to improve your drawings. Of course, these are rules and you can decide for yourself if you want to follow them or not. I do assess my drawings occasionally by these rules to see if I can find something to improve. This book is about anatomy and not so much about drawing principles as such, but they can help you with drawing anatomy. Therefore, I wanted to include them in this book. Drawing fundamentals Avoid parallel lines by mixing straight and curved lines. This will make your drawing look more organic and dynamic. Give your drawings more contrast and guide the eye. The level of detail attracts the eye. If you use a varied combination of S C and I shaped line types, it will make your drawing look more dynamic Use contrast in sizes. Contrast leads the eye and makes your drawing more interesting. Try to see water flowing through your character, or a ball bouncing between the walls. Find the right rythm for a flow. It can be hard to see the direction or angle of an object, using these lines can help make that clearer. An object that is bigger feels closer by than an object that is smaller. By adding a twist to your design, it will look more dynamic and interesting. When your characters look flat they don’t have volume. Volume adds depth to your characters. Tangents don’t often occur in nature and in your drawing, they attract the eye intentionally. Avoid parallel lines to create a rhythm and direction in your drawing. You can combine the main types of shapes (circle, triangle and rectangle) to make anything you want. Creates more depth in your drawing and gives it a more dynamic feeling. An object farther aways lays higher on the surface than an object closer to the viewer. By overlapping different objects you create depth. Symmetry looks man- made and can make your drawings look stiff. Due to perspective you can create the illusion of one end of an object appearing bigger or smaller compared to the other. A strong silhouette, with a nice balance between negative and positive space, makes your character better readable and clear.
  • 11. 21 20 By combining a sphere, cylinder and/ or cube you can create any shape you want. Think of it like clay. You can transform the shapes. Pull, squash and even cut the shapes in any way you like. When drawing the head, I try to keep it really simple. I break it down into three shapes. A sphere for the cranium, a mask for the face/jaw and a cylinder for the neck. So, I start with a sphere for the cranium. I cut off two sides with an imaginary knife (see image). For the face, I make a mask that I put on top of the sphere. And lastly, I use a cylinder for the neck. study tips Try to draw your own shapes from a cube, cylinder and sphere. See what you can come up with and try to combine, morph and slice them up. basic shapes
  • 12. 23 22 This is another example of basic steps to create a base for the head. Try to follow these steps. This is a basic shape. By making individual parts either longer of shorter, you create your own designs . The proportions in the example stays resemble those of a realistic human head, but often I play around with these shapes to make more caricature character types. These are same steps but now from a side profile. See where the neck originates from.
  • 13. 25 24 I really like this approach. You draw a line from the top of the head straight down and after that add lines going from one side of the head to the other. This makes it very fluid and it is very easy to draw. In the last step, you can see I removed a bit at the back of the skull and behind the jaw. This approach also makes it easier to draw the head from different angles, like in these examples. study tips Practice drawing the head from different angles, following these steps. You could also copy the heads from the example, following the same steps I demonstrated. angles
  • 14. 27 26 More examples of drawing the head from different angles. A sphere is easy to draw from a weird angle, so if do that first, you can add shapes afterwards. And that makes it way easier to draw the head from different angles. Earlier, I mentioned the shape of the head. I usually start off with a realistic base and then, I change it to make my character designs more caricature-like. You can squash or stretch the shapes. study tips Try to make your own versions with this basic head construction. Try to see how far you can go by changing these shapes.
  • 15. 29 28 Here, I show how I draw the anatomy for the face. I really try to keep it simple so it’s easy to remember. So, breaking down the face in a couple of shapes like in the image on the left. You can play around with the proportions of these shapes to get variations of the head. I draw these shapes in a very basic way so they are easy to draw from a different angle. This is hard enough so try to keep it as simple as possible for yourself. study tips First learn to draw the regular ¾ view. Once you have nailed that you can start practicing by drawing a head from different angles. simplified anatomy
  • 16. 31 30 Here I show some variations of the heads. If you look closely, you can see I use those basic shapes and change the proportions to make variations. study tips Start creating your own characters with these building blocks. Try using different proportions to make a variation of characters. Don’t be afraid to go too far with this. It’s good to discover how far you can push this to create interesting characters.
  • 17. 33 32 These are the steps I take to draw a head. Using these 1/3 measure steps makes it easy to remember and to draw. Using those flow lines in the second step, when I add the jaw to the circle, helps to get a nice flow in the head shape. I’m using simplified formulas for the head so they are easy to draw and to understand. This is great for when you are just starting or are only drawing stylized characters. If you want to draw more realistic characters you can use this as a foundation to draw on top of. Here, I’m using the same steps as I showed earlier but then more detailed and more realistic. This shows that you can make it as complex as you would like. It also shows the importance of thinking in planes/surfaces on the head. study tips Draw a realistic head and draw a grid on top of it so you can see the planes and surfaces on it. final steps
  • 18. 35 34 Proportions Eight seems to be a magic number. When you divide the head into eight parts, you will find a number of makers of the head. Each head is different, so those markers can be a bit different, too. My drawing style isn’t that realistic, so I always play around with proportions. But still, dividing the head into eight parts can be useful, because it gives you a base to start from. Typically, the female head is round and has soft edges, whereas the male head is more angular and bones and muscles stand out more in a male face. When I draw more cartoony characters, I push this more. This doesn’t mean a woman can’t have an angular face or that a male can’t have a round face. But it’s important to be aware of this, so you know how to use this when designing your characters. Strong characters often have really angular shapes and friendly ones tend to be more rounded. study tips First draw both a round and an angular head. And after that, play around with the space between the lines. Try subtle changes and more extreme ones and see what happens.
  • 20. 39 38 Understanding the skull is very important for a good understanding of how to draw the head. On some parts of our head we can even feel parts of our skull. Like the edge under your eye or around the jaw. It’s also good to know how the jaw opens. When it opens, it moves like an arch, rather than simply dropping down. In cartoon characters, the skull looks different in every character. Some characters have a giant cranium and other characters have an extremely big jaw. study tips study tips Practice drawing the skull from different angles and use the steps I showed on the top of the image. Try to draw the skulls of some of your own characters. Is it different from a realistic skull?
  • 21. 41 40 Here I show different angles of the skull. I’m using basic shapes again to make it easier to rotate. The part of the mouth and teeth isn’t flat. It can help to draw these parts as a ball in the skull. This also makes it easier to draw that part of the skull from different angles. Later, I’ll show how to draw the mouth on top of it. study tips Draw the skull from different angles, using a ball shape where the mouth goes. This will help you later with drawing the mouth from different angles.
  • 22. 43 42 facial details The eyes, the nose, the mouth and the ears
  • 23. 45 44 Cupcakes As for drawing eyes, I like to think of them as cupcakes that I take from the head. Eyes are located in a cavity in the skull called the orbit/eye socket. Eyes are protected by bones around it. You can see this clearly, if you look at an actual skull. The superhero technique Drawing a mask around the eyes helps you determine the right placement for the eyes in the head, when seen in perspective. Look for the lines on top of the mask that give it that 3D shape. Try to understand how everything wraps around it. Now that you have a solid construction for your character, the next step is to add facial details so the character can express himself. On the next pages, I’ll address each element more in-depth. eyes study tips Draw a character with a mask around the eyes. Make sure you use the steps I’m showing here, take two cupcake shapes from the head to place the eyes properly in the head.
  • 24. 47 46 Drawing the eye from the front It’s perfect to learn how to draw the eye using these steps. These are basically the same steps you would take if you would draw it from a different angle. Construction There are different ways to draw the eyes. The simplest way to draw them is to start with a ball and draw the eyelids (the upper and lower one) on top of it. When you draw the eyelids on top, try to think how those eyelids follow the shape of the eyeball. Use your sketchbook and draw a couple of eyes until you can draw it from memory. Once you know how to do that, you could try drawing different types of eyes. study tips
  • 25. 49 48 Eye details If you would dissect the eye, you’ll see it is a complex organ. For drawing, it’s important to understand a bit of the eye’s anatomy. It’s especially important to understand how the light passes the cornea and reflects on the iris. For example: when the light comes from above, the bottom of the iris is lighter. Invisible on the outside, the eyeball has multiple muscles attached to it. They control the movement of the eye and keep the eyeball in place. Around the eye socket, there is a thin layer of muscles, in some places you can’t even feel it. Carefully feel the skin around your eye to see if you can feel the muscles and bone.
  • 26. 51 50 In these three examples I show how you can draw the eye from different perspectives. Notice how little of the actual eyeball you are able to see. The biggest part is inside the head. Also notice how the eyelids wrap around the curvature of the eyeball. study tips Now ty drawing the eye from different angles. Always start with a ball. If you have a hard time with this, you can use a mirror or look up pictures online. You can also ask someone else to model for you and take pictures from that person’s eye from different angles.
  • 27. 53 52 Wrap it! Of course, most of us don’t have just one eye, but two! And they are mirrored. Because they are located inside our skull (think of the cupcake shape I mentioned earlier) they are sometimes covered by our nose. Another thing to consider is that the face isn’t flat, it’s actually wrapped around the skull (refer to image). Around the eye, there are many tiny muscles. I don’t know them all by heart but I do use this breakdown I’m showing hear. It can be useful to look up some anatomy illustrations and try to break down the muscles in more basic shapes. study tips Fill a whole sketchbook page with different pairs of eyes and always start with drawing a ball. Draw a couple of very simple ones, as well as more realistic ones.
  • 28. 55 54 You can draw the nose in many different ways. I try to think of a nose as an object consisiting of three parts, as you can see in the example above. I can play around with green, red and blue shapes to draw a wide variety of noses. On the next page, I will address the diamond or triangle method I use to draw the nose in difficult angles. Here is a collection of noses. You can draw the nose in endless different ways, I would advise to try out different types of construction so you can discover what suits your character best. Simplify it A few different ways of drawing the nose. The advantage of starting with spheres is that it’s easy to rotate around in 3D, so you can easily use these steps if you want to depict a different angle. NOSE
  • 29. 57 56 Prism Here, I use the prism shape to draw the nose in difficult angles. Again, this shows why starting off with using geometric shapes makes drawing characters way easier. Work from big shapes to small details. Triangles The nose consists of a lot of cartilage. That’s soft bone and makes our nose flexible but still quite solid. If you draw a triangle around these nose drawings from different perspectives, you can clearly see there’s a triangle shape hidden in each one of them. study tips Draw the nose from different angles using this prism shape. A great way to do that is to take pictures of your own nose or someone else’s and start drawing those crazy angles.
  • 30. 59 58 As for the placement of the ears: you can align them with the eyes and place them where the jaws start. To draw ears, start with a big diamond-like shape. The next step is to give it rounded edges and after that, you can add the inner shapes of the ear. For drawing the back of the ear, you can start with an S-line and give that volume. If you can draw the ear from a flat perspective in a box, you can draw it from any angle in a box. The only thing you need to know is how to draw a box in perspective and in different angles. In this example, I show a couple of markers to help you remember how to draw the ear. ears
  • 31. 61 60 Look in the mirror, your lips have volume! If you want to draw realistic and voluminous lips, you can break them down into 5 shapes: 3 in the upper lip and 2 in the lower lip. Construction To construct the lips, start with drawing a line that wraps around the head. Then build up the lips on top of that. This will help you to make it easier to draw a mouth with lips. Wrap it! Keep in mind that the mouth is following the shape of the head: it’s wrapped around it. Do you remember the skull drawing in which the mouth follows a ball shape? In this example, I show how to draw the mouth around a ball and what kind of effect this has. the mouth study tips First learn how to draw the mouth from a flat frontal perspective and after that, start drawing it in different angles. Start with simple angles and challenge yourself to go a little bit further each time.
  • 32. 63 62 The jaws Here, I show how the mouth opens and closes. It’s good to realize that the flesh of the mouth is flexible but the teeth are not. Also, consider that the jaw rotates when it opens, it doesn’t simply drop down. Squash and stretch Remember that there is a lot of flesh around the mouth. For example, your cheeks squash and stretch when you yell or laugh. You don’t have to perfectly understand how the muscles work. You don’t have to learn all the muscles by heart either. Having a bit of understanding is enough (at least for me it is). But it’s still good to at least study it roughly, just enough that you have seen it and are able to recognize it. So once you’re stuck with a drawing, you can look up the proper reference and understand how it works. study tips Try drawing different types of mouths. Look up some photos (or even better: use a mirror) for different expressions and see what it does to the mouth and the skin around it.
  • 33. 65 64 Knowing where the hairline is located is important. It can look strange when it’s too low or too high. At the same time, you can play around with this and decide what works and what doesn’t. In this example I’m showing the hairline from different angles. When you draw hair, make sure you draw it on top of the skull. Hair always has some volume. It grows from the skull and gets pulled down by gravity. In these examples you can see that I break the hair down into separate big shapes. So, always start with big shapes and break them down into smaller shapes. Hair is not a static object, it flows. This also means that hair follows the movement of the character when it moves. hair
  • 35. 69 68 Attached to the head, there is – of course – the neck. The neck has a lot of muscles, many more than I show here. However, in the example I’ve grouped the muscles and made them simpler. You can look up a medical image of the neck to see all individual muscles. For these purposes, these images would be way too complex to use when drawing the neck, that’s why I’ve simplified it.
  • 37. 73 72 Inside the box When you know how to draw a skull in a box from a flat side or frontal perspective, you know how to draw it in a different angle. I’m trying to show this with the example image. When you draw the box in perspective, you can add markers to the front and side of the box. Those markers will help you to create the skull in perspective. In this example I show you the head in different angles and how I apply the box method. The first step is drawing the box. In that box I start drawing the basic shapes and from there, I work towards the final sketch. It basically comes doen to combining the techniques that I have already mentioned in in this e-book and the method of drawing a head in a box. study tips study tips First, practice drawing a 2D head from the front and the side. Once you know how to do that, you can try drawing a head in a box like I did in the example. Simply follow the steps. First, try to draw the head in the angle I showed in the example on this page, so looking up. Once you’ve done that, try to apply this method yourself by drawing a head looking down. You could use the drawings from the first pages of this book.
  • 38. 75 74 You can start with a cube like I’ve done. Or you could start with a sphere. How you start doesn’t matter that much, as long as it takes you where you want to go and isn’t too complicated. The advantage of using a cube is that without any perspective guides you can still see where it is headed because it has 6 clear planes. However, with a circle or sphere you already have a solid base to build the skull/head upon. Drawing heads from different angles can be difficult. What helps me, is to draw it from the side first. With a little help from perspective lines, you will learn to understand what it looks like from another angle. study tips Try this method yourself. Maybe with a character you came up with yourself or use one of the heads I drew for this book. Start with a frontal and side view. Then, you could try to draw a ¾ view (in which you see a part of the front and a part of the side of the head).
  • 40. 79 78 Here are some of my head designs. I drew all of these characters with the same techniques I’ve mentioned earlier in this book. It’s not that I draw the skull and all the guides every time, but I do keep them in mind when drawing heads. And that is the goal - I think- you could try to achieve. First, train and learn all those steps with skull, shapes and guides. At one point it will click, don’t stop when you are frustrated by this because that is part of the learning process. You could start by studying all these heads and copy them. Don’t just simply copy them but try to break them down with the steps and guides I’ve shown earlier in this book.
  • 41. 81 80 Here is another example of drawing a head step by step.
  • 43. 85 84 Thanks for reading the book. I hope it helped and you to have a better understanding of how to use and draw anatomy. All of these things definitely helped me and I’m still learning. The thing with drawing is that you are never done learning. Being an artist is a bit like being a gardener. You always have to water your garden or it will become dry and eventually dies. So always keep learning and try to find water for your garden. With this, I mean it’s important to always keep studying and learning. If you have any questions or want to show me some of your studies, drop me a message on my Instagram! Best, Mitch Leeuwe that's it! Contact me Instagram Mitch Leeuwe Patreon patreon.com/mitchleeuwe Gumroad gumroad.com/mitchleeuwe Website mitchleeuwe.nl
  • 44. 86