2012 Toyota Corolla Interior Features Baltimore, Maryland
•
0 likes•752 views

Information on the 2012 Toyota Corolla’s features and benefits. For more information please visit www.jerrystoyota.com.

Recommended
More Related Content
Similar to 2012 Toyota Corolla Interior Features Baltimore, Maryland
Similar to 2012 Toyota Corolla Interior Features Baltimore, Maryland (18)
More from Jerry's Toyota
More from Jerry's Toyota (20)
Recently uploaded
Recently uploaded (20)
2012 Toyota Corolla Interior Features Baltimore, Maryland
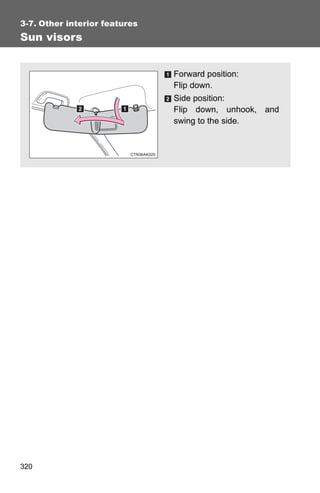
- 1. 3-7. Other interior features Sun visors Forward position: Flip down. Side position: Flip down, unhook, and swing to the side. 320
- 2. 3-7. Other interior features Vanity mirrors Slide the cover. 3 Interior features 321
- 3. 3-7. Other interior features Clock Adjusts the hour Adjusts the minutes ■ The clock is displayed when Vehicles with smart key system The “ENGINE START STOP” switch is in ACCESSORY or IGNITION ON mode. Vehicles without smart key system The engine switch is in the “ACC” or “ON” position. ■ When disconnecting and reconnecting battery terminals The time display will automatically be set to 1:00. 322
- 4. 3-7. Other interior features Ashtray∗ Pull the lid to open. Pull the ashtray to remove. CAUTION 3 ■ When not in use Keep the ashtray closed. Interior features Injuries may result in the event of sudden braking, sudden swerving or an accident. ■ To prevent fire ● Fully extinguish matches and cigarettes before putting them in the ashtray, then make sure the ashtray is fully closed. ● Do not place paper or any other type of flammable object in the ashtray. ∗: If equipped 323
- 5. 3-7. Other interior features Cigarette lighter∗ Pull the lid to open, and push the cigarette lighter down. The cigarette lighter will pop up when it is ready for use. ■ The cigarette lighter can be used when Vehicles with smart key system The “ENGINE START STOP” switch is in ACCESSORY or IGNITION ON mode. Vehicles without smart key system The engine switch is in the “ACC” or “ON” position. CAUTION ■ When not in use Keep the lid closed. Injuries may result in the event of an accident or sudden braking. ■ To avoid burns or fires ● Do not touch the metal parts of the cigarette lighter. ● Do not hold the cigarette lighter down. It could overheat and cause a fire. ● Do not insert anything other than the cigarette lighter into the outlet. ∗: If equipped 324
- 6. 3-7. Other interior features Power outlet∗ The power outlet can be used for 12 V accessories that run on less than 10 A. 3 ■ The power outlet can be used when Interior features Vehicles with smart key system The “ENGINE START STOP” switch is in ACCESSORY or IGNITION ON mode. Vehicles without smart key system The engine switch is in the “ACC” or “ON” position. NOTICE ■ To avoid damaging the power outlet Close the power outlet lid when the power outlet is not in use. Foreign objects or liquids that enter the power outlet may cause a short cir- cuit. ■ To prevent the fuse from being blown Do not use an accessory that uses more than 12 V 10 A. ■ To prevent the battery from being discharged Do not use the power outlet longer than necessary when the engine is not running. ∗: If equipped 325
- 7. 3-7. Other interior features Seat heaters∗ Heats the driver’s seat Heats the front passenger’s seat The indicator light is on while the seat heater is operating. Push the switch once again to turn off the seat heater. ■ The seat heaters can be used when Vehicles with smart key system The “ENGINE START STOP” switch is in IGNITION ON mode. Vehicles without smart key system The engine switch is in the “ON” position. CAUTION ■ Burns ● Use caution when seating the following persons in a seat with the seat heater on to avoid the possibility of burns: • Babies, small children, the elderly, the sick and the disabled • Persons with sensitive skin • Persons who are fatigued • Persons who have taken alcohol or drugs that induce sleep (sleeping drugs, cold remedies, etc.) ● Do not cover the seat with anything when using the seat heater. Using the seat heater with a blanket or cushion increases the temperature of the seat and may lead to overheating. ∗: If equipped 326
- 8. 3-7. Other interior features NOTICE ■ To prevent seat heater damage Do not put unevenly weighted objects on the seat and do not stick sharp objects (needles, nails, etc.) into the seat. ■ To prevent battery discharge Turn the switches off when the engine is not running. 3 Interior features 327
- 9. 3-7. Other interior features Floor mat Use only floor mats designed specifically for vehicles of the same model and model year as your vehicle. Fix them securely in place onto the carpet. Fix the floor mat in place using the retaining hooks (clips) pro- vided. The shape of the retaining hooks (clips) and the fixing procedure of the floor mat for your vehicle may differ from those shown in the illustration. For details, refer to the floor mat retention clip installation instructions supplied with the clips. CAUTION Observe the following precautions. Failure to do so may cause the driver's floor mat to slip, possibly interfering with the pedals while driving. An unexpectedly high speed may result or it may become difficult to stop the vehicle, leading to a serious accident. ■ When installing the driver's floor mat ● Do not use floor mats designed for other models or different model year vehicles, even if they are Toyota Genuine floor mats. ● Only use floor mats designed for the driver's seat. ● Always install the floor mat securely using the retaining hooks (clips) pro- vided. ● Do not use two or more floor mats on top of each other. ● Do not place the floor mat bottom-side up or upside-down. ■ Before driving ● Check that the floor mat is securely fixed in the correct place with all the provided retaining hooks (clips). Be especially careful to perform this check after cleaning the floor. ● With the engine stopped and the shift lever in P (automatic transmission) or N (manual transmission), fully depress each pedal to the floor to make sure it does not interfere with the floor mat. 328
- 10. 3-7. Other interior features Compass∗ The compass on the inside rear view mirror indicates the direction in which the vehicle is heading. ■ Operation To turn the compass on or off, press and hold “AUTO” for 3 seconds. 3 ■ Displays and directions Interior features Display Direction N North NE Northeast E East SE Southeast S South SW Southwest W West NW Northwest ∗: If equipped 329
- 11. 3-7. Other interior features Calibrating the compass The direction display deviates from the true direction determined by the earth’s magnetic field. The amount of deviation varies according to the geographic position of the vehicle. If you cross over a map boundary shown in the illustration, the compass will deviate. To obtain higher precision or perfect calibration, refer to the following. ■ Deviation calibration STEP 1 Stop the vehicle. STEP 2 Press and hold “AUTO” for 6 seconds. A number (1 to 15) appears on the compass display. STEP 3 Press “AUTO” and, referring to the map above, select the number of the zone where you are. If the direction is displayed several seconds after adjustment, the calibration is complete. 330
- 12. 3-7. Other interior features ■ Circling calibration STEP 1 Stop the vehicle in a place where it is safe to drive in a circle. STEP 2 Press and hold “AUTO” for 9 seconds. C appears on the compass dis- play. STEP 3 Drive the vehicle at 5 mph (8 km/h) or less in a circle until a 3 direction is displayed. If there is not enough space to Interior features drive in a circle, drive around the block until the direction is dis- played. ■ Conditions unfavorable for correct operation The compass may not show the correct direction in the following situations: ● The vehicle is stopped immediately after turning. ● The vehicle is on an inclined surface. ● The vehicle is in a place where the earth's magnetic field is subject to interference by artificial magnetic fields (underground car park/parking lot, under a steel tower, between buildings, roof car park/parking lot, near an intersection, near a large vehicle, etc.). ● The vehicle has become magnetized. (There is a magnet or metal object near the anti-glare inside rear view mirror.) ● The battery has been disconnected. ● A door is open. 331
- 13. 3-7. Other interior features CAUTION ■ While driving the vehicle Do not adjust the display. Be sure to adjust the display only when the vehicle is stopped. ■ When doing the circling calibration Be sure to secure a wide space, and watch out for people and vehicles in the neighborhood. Do not violate any local traffic rules while performing circling calibration. NOTICE ■ To avoid compass malfunctions Do not place magnets or any metal objects near the anti-glare inside rear view mirror. Doing this may cause a malfunction of the compass sensor. ■ To ensure normal operation of the compass ● Do not perform circling calibration of the compass in a place where the earth's magnetic field is subject to interference by artificial magnetic fields. ● During calibration, do not operate electric systems (moon roof, power win- dows, etc.) as they may interfere with the calibration. 332