1. TAMIYA’S
NEW
1:24
MERCEDES-BENZ
AMG
GT3
ARRIVES
www.tamiyamodelmagazine.com
Tamiya 1:12 Honda CB750F, Wingnut Wings 1:32 Stahltaube, Revell
1:32 Fw190A-8, plus new kits, books and modelling accessories…
£4.30 December 2017 ISSUE 266
FREE
GIFTS
FOR SUBSCRIBERS!
DETAILS INSIDE...
ALL-OUT
ATTACK!
..LIKE A G-6
TAMIYA’S NEW 1:48
BF109G-6, PREVIEWED
p 01 Cover TMMI 266MN.indd 1 02/11/2017 10:41
2.
3. 4 NEWS DESK
New kit and model product news
8 AIRBORNE HEDGEHOG:
WITH RESIN AND PHOTO-ETCH!
Revell’s 1:32 Fw190A-8/R-11 nightfighter updetailed
with Eduard aftermarket goodies
16 THE STEEL DOVE, FROM UP ABOVE
TMMI is one of the first mags to feature Wingnut
Wings’ stunning new 1:32 Stahltaube
24 BRABHAM BT52 ‘83 MONACO GP
Gordon Murray’s revolutionary arrow-shaped car
arrives in 1:20
26 I AM THE WALRUS!
Airfix’s new Supermarine Walrus Mk.I in 1:48,
previewed
36 SHE MAY NOT LOOK LIKE MUCH,
BUT SHE’S GOT IT WHERE IT
COUNTS, KID
PT.2: PREPARING FOR THE KESSEL RUN
Adding lights and 3D printed extras to DeAgostini’s
1:43 Millennium Falcon
40 REVELL’S STEALTHY MUSTANG
Revell have created an all new P-51D Mustang in 1:32
42 NEW RELEASES ACCESSORIES
New and recently issued modelling accessories
46 NEW RELEASES KITS
New full kits, reviewed
50 TAMIYA’S TIP-TOP TOXOPHILITE
Tamiya’s new 1:35 Archer 17-pdr SPG, previewed
52 ONE CAREFUL RIDER
Giving the classic 1:12 Tamiya Honda CB750F a
lived-in look
56 I COULD DO WITH A ‘D
Brett Green has a new ‘How To Build’ F4U-1D
book on the way!
58 GOSH, YOU’VE... REALLY GOT
SOME NICE TOYS HERE
A new resin kit of the Tyrell building from
‘Blade Runner’
60 BOOK REVIEWS
New and recent books related to scale modelling
64 CONTACTS
Where to buy the products used and reviewed
in TMMI
66 THE EDITOR’S PAGE
A new line of lacquer paints from Tamiya
Contents
TMMI 266 December 2017
Do you live outside the UK and want
Tamiya Model Magazine delivered direct to
your home, anywhere in the world?
Just email us at; enquiries@doolittlemedia.com
Or call +44 (0)1525 222573, fax +44 (0)1525 222574 GMT
Subscription rates for 1 year (12 issues) are:
Within UK: £44, Europe: £56, Worldwide/USA: £69
EDITOR Marcus Nicholls
3
EDITOR Marcus Nicholls
editor@tamiyamodelmagazine.com
HOW TO CONTACT US:
HOW
OW
O TO
TO
T CONTA
TA
T CT
CT
C US:
TELEPHONE:(UK) 01525 222573 FAX: (UK) 01525 222574
EDITORIAL EMAIL: editor@tamiyamodelmagazine.com
ALL OTHER ENQUIRIES: enquiries@doolittlemedia.com
ADDRESS: Tamiya Model Magazine International,
Doolittle Mill, Doolittle Lane, Totternhoe, Bedfordshire, LU6 1QX, UK
Doolittle Mill, Doolittle Lane, Totternhoe, Bedfordshire, LU6 1QX, UK
Tamiya Model Magazine is published monthly by Doolittle Media Ltd.
Reproduction in part or whole of any text, photograph or illustration
without written permission from the publisher is strictly prohibited.
While due care is taken to ensure the contents of Tamiya Model
Magazine is accurate, the publishers and printers cannot accept
liability for errors or omissions.
Join TMMI at facebook.com!
Issue 266 December 2017
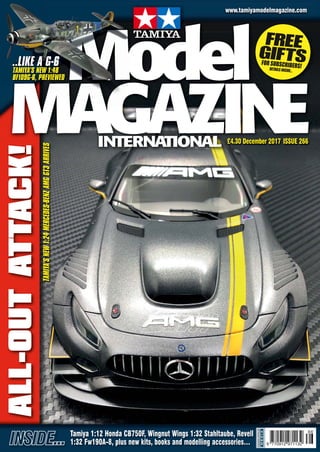
28 ALL-OUT ATTACK!
Tamiya's new 1:24 Mercedes-Benz AMG GT3 arrives
6 ..LIKE A G-6
Tamiya's new 1:48 Messerschmitt Bf109G-6, previewed
p 03 Contents 266MN.indd 3 02/11/2017 11:09
4. Newsdesk
If you have news of forthcoming model, armour, aircraft or car events, changes of address
or just interesting information to share, please write to:
TMMI Newsdesk, Doolittle Mill, Doolittle Lane, Totternhoe, Bedfordshire,
LU6 1QX, UK Tel: +44(0)1525 222573 Email: editor@tamiyamodelmagazine.com
IN BRIEF
...
TAMIYA
- 1:10 RC NSU TT Jagermeister M-05M Chassis
- Night Hunter (FM-A Chassis)
- 1:12 Kawasaki Ninja H2R (Finished Model)
- 1:32 F-35®A Lightning II (w/Japan Air Self
Defence Force Markings)
- 1:10 Scale R/C F12tdf Body Parts Set
- 1:10 RC Nissan Skyline GT-R (R32) (TT-02D)
Drift Spec
- 1:10 RC Lancia 037 Rally
- Tamiya Reel Clip (Black)
- Tamiya Necktie ‘Tomcat’ (Navy Blue)
- Fine Engraving Blade 0.1/0.2/0.3/0.5mm
- Tamiya CA Cement (Easy Sanding)
- Tamiya Multipurpose Cement (Clear)
- Aero Avante Black Special
- Astro-Boomerang Premium Black Special
(Super-II Chassis)
- Mini 4WD Car Catcher (Mini 4WD Station/
Black)
www.hobbyco.net
MR MODELS
- 1:35 stowage boxes and accessories for
Tamiya Brummbär
www.mrmodellbau.com
4 December 2017 TMMI 266
ON THE WAY FROM ZEVZDA
1:35 TIGER WITH KORNET ANTI-TANK MISSILE
This Tiger anti-tank vehicle is based on the GAZ Tiger, but with
different body, interior and armament. Decals are supplied
for Russian Army 'Patriot Park 2017'. The kit consists of 236
parts. Also on way is a newly tooled 1:72 Jagdpanther (Hunting
Panther). The kit consists of ninety-two parts and glueless
assembly. Decals are provided for various German army units
(model shown by Chris Wauchop/Brett Green)
www.hobbyco.net
ON THE WAY FROM TAMIYA
NEW RC VEHICLES
Four new RC cars – or rather, vehicles – are
coming from Tamiya; 1:12 RC Volkswagen
Golf Mk.1 Racing Group 2 (M-05 chassis),
1:10 RC Renault Alpine A110 Monte-Carlo '71
(M-06 chassis), 1:18 RC King Yellow (G6-01
chassis) and the bizarre 1:8 RC 'Dancing
Rider' trike. More news soon!
www.hobbyco.net
ON THE WAY FROM EDUARD
NEW AIRCRAFT KITS
On the way from Eduard are the 1:48 SE.5a Hispano Suiza,
ProfiPACK, 1:48 'Ranger' Hawker Typhoon Limited Edition
and the delicious little 1:72 Fokker Dr.I in ProfiPACK form.
www.eduard.com
ON THE WAY FROM TAMIYA
1:16 PANZERKAMPFWAGEN IV AUSF.J
SD.KFZ.161/2 SINGLE MOTOR
The Pz.IV Ausf.J was originally released by Tamiya as a full-
option radio controlled model, and now the model returns,
but in the form of a static display version, albeit with a
single electric motor to propel it forwards and backwards in
a single direction.
www.hobbyco.net
p 04 News 266MN.indd 4 02/11/2017 11:10
5.
6. KIT PREVIEW
TAMIYA 1:48 MESSERSCHMITT BF109 G-6 ● KIT NO.61117
6 December 2017 TMMI 266
W
ell, it finally
happened. Tamiya
have created their
own kit of the
Messerschmitt Bf109 G-6,
the famous 'Gustav'. The
Bf019 E-3 and E-4/7 'Emils'
have occupied their rightful
place in the catalogue since
the mid-1990s and they are
still superb replicas of these
early variants and now they
are joined by the G-6 which,
from 1943, saw action over
the Soviet Union and Europe
and accounted for well over
half of all Bf109s made.
The kit depicts an early/
mid-production variant,
with the DB605A V12
engine and 20mm MG151
cannon mounted between
its inverted cylinder heads;
later versions would have
the mighty MK108 30mm
cannon fitted here. Three
markings-options will come
with the kit; 'Yellow 1' of
9./JG54, February 1944,
'White 9' of 7./JG27 Maleme,
Crete, December 1943 and
a second 'Yellow 1' of 9./
JG52 Novo-Zaporozhye,
October 1943. All feature
RLM74/75 splinter upper
win camouflage with mottled
fuselage sides and RLM76
undersurfaces.
We recently received a
pre-production kit direct
GROUNDBREAKING GUSTAV
6 December 2017 TMMI 266
266
A test-shot of Tamiya's all-new 1:48 kit of the Bf109G-6 has arrived at TMMI,
but do we really need another kit of this WW2 Luftwaffe fighter?
p 06-07 Gustav Pre 266MN.indd 6 02/11/2017 11:12
7. 7
TMMI 266 December 2017
TMMI 266 7
TMMI 266 December 2017
from Tamiya in Japan, to
allow us to prepare this
preview; the decals weren't
quite ready at this stage
but it's safe to assume they
are of the familiar Tamiya
high quality. Tamiya's
waterslide transfers are
designed to be strong enough
for safe handling during
application but they settle
down perfectly to the model's
surface to look painted-on.
The kit is surprisingly (and
pleasingly) complex with
a higher component-count
than we had anticipated.
This is partly down to
the option of having the
engine on show with open
cowlings, or fully closed up;
both modes are possible
thanks to some extremely
inventive design ideas,
some micro-magnets and,
of course, Tamiya's surgical
engineering precision,
without which this fantastic
option would be far less
practical. The engine itself is
a highly detailed assembly
that builds up from multiple,
highly refined mouldings
and comes with its ancillary
parts ready to be wired up
by the enthusiastic modeller
with the right references.
The prominent engine
radiator flaps at the
wing-roots can be installed
in the open or closed
positions thanks to some
robust and easy to use
snip-off tabs moulded
into the components; this
option will be found on
the main wing flaps and
leading-edge slats too. One
of the keys to a successful
outcome when building a
model of the Bf109 is the
angle at which the main
undercarriage legs are set.
On the real aircraft they
splay awkwardly outwards
and forwards; the exact
angle can be very difficult
to achieve and maintain on
a miniature. In Tamiya's
new kit, each leg comes with
a long, rear-facing bracket
with two, very positive
cementing points that, once
the legs and airframe have
been assembled, are fed
into the UC housings and
fixed firmly in place. This
is a subtle but significant
advance and will give
everyone's model the correct
'sit' when finished. Other
options in the kit box
include 'Umrüst-Bausätze'
(Rüstsätze) items such as
the 300-litre centreline
drop-tank and its ETC rack
plus a pair of underwing
gondolas for the MG151
20mm cannon.
To answer the question
posed in the introduction,
“did we really need another
Bf109G-6?” It's from
Tamiya, so of course we
do! This new kit advances
the production techniques
involved the creation of
this highly significant
fighter in miniature and
makes it possible for the
average modeller to achieve
a realistic, accurate result.
From first inspection, very
highly recommended. We
will be building this kit as
quickly as we can to feature
it in next month's issue of
TMMI, so watch this space
for more on this fabulous
new model! ●
Availability;
Tamiya models and
accessories are widely
available from good model
shops and online. UK import
and distribution by The
Hobby Company Limited;
www.hobbyco.net
splay awkwardly outwards
angle can be very difficult
to achieve and maintain on
a miniature. In Tamiya's
new kit, each leg comes with
a long, rear-facing bracket
cementing points that, once
the legs and airframe have
into the UC housings and
fixed firmly in place. This
is a subtle but significant
everyone's model the correct
'sit' when finished. Other
include 'Umrüst-Bausätze'
(Rüstsätze) items such as
drop-tank and its ETC rack
From first inspection, very
p 06-07 Gustav Pre 266MN.indd 7 02/11/2017 11:12
8. FULL BUILD: WW2 GERMAN AVIATION
REVELL 1:32 FOCKE-WULF FW 190A-8/R-11 NIGHTFIGHTER ● KIT NO.03926
8 December 2017 TMMI 266
FULL BUILD: WW2 GERMAN AVIATION
FULL BUILD: WW2 GERMAN AVIATION
FULL BUILD: WW2 GERMAN AVIATION
FULL BUILD: WW2 GERMAN AVIATION
FULL BUILD: WW2 GERMAN AVIATION
FULL BUILD: WW2 GERMAN AVIATION
FULL BUILD: WW2 GERMAN AVIATION
FULL BUILD: WW2 GERMAN AVIATION
FULL BUILD: WW2 GERMAN AVIATION
FULL BUILD: WW2 GERMAN AVIATION
FULL BUILD: WW2 GERMAN AVIATION
FULL BUILD: WW2 GERMAN AVIATION
FULL BUILD: WW2 GERMAN AVIATION
FULL BUILD: WW2 GERMAN AVIATION
FULL BUILD: WW2 GERMAN AVIATION
FULL BUILD: WW2 GERMAN AVIATION
FULL BUILD: WW2 GERMAN AVIATION
FULL BUILD: WW2 GERMAN AVIATION
FULL BUILD: WW2 GERMAN AVIATION
FULL BUILD: WW2 GERMAN AVIATION
FULL BUILD: WW2 GERMAN AVIATION
FULL BUILD: WW2 GERMAN AVIATION
FULL BUILD: WW2 GERMAN AVIATION
FULL BUILD: WW2 GERMAN AVIATION
FULL BUILD: WW2 GERMAN AVIATION
FULL BUILD: WW2 GERMAN AVIATION
FULL BUILD: WW2 GERMAN AVIATION
FULL BUILD: WW2 GERMAN AVIATION
FULL BUILD: WW2 GERMAN AVIATION
FULL BUILD: WW2 GERMAN AVIATION
FULL BUILD: WW2 GERMAN AVIATION
FULL BUILD: WW2 GERMAN AVIATION
FULL BUILD: WW2 GERMAN AVIATION
FULL BUILD: WW2 GERMAN AVIATION
FULL BUILD: WW2 GERMAN AVIATION
FULL BUILD: WW2 GERMAN AVIATION
FULL BUILD: WW2 GERMAN AVIATION
FULL BUILD: WW2 GERMAN AVIATION
REVELL 1:32 FOCKE-WULF FW 190A-8/R-11 NIGHTFIGHTER
REVELL 1:32 FOCKE-WULF FW 190A-8/R-11 NIGHTFIGHTER
REVELL 1:32 FOCKE-WULF FW 190A-8/R-11 NIGHTFIGHTER
REVELL 1:32 FOCKE-WULF FW 190A-8/R-11 NIGHTFIGHTER
REVELL 1:32 FOCKE-WULF FW 190A-8/R-11 NIGHTFIGHTER
REVELL 1:32 FOCKE-WULF FW 190A-8/R-11 NIGHTFIGHTER
REVELL 1:32 FOCKE-WULF FW 190A-8/R-11 NIGHTFIGHTER
REVELL 1:32 FOCKE-WULF FW 190A-8/R-11 NIGHTFIGHTER
REVELL 1:32 FOCKE-WULF FW 190A-8/R-11 NIGHTFIGHTER
REVELL 1:32 FOCKE-WULF FW 190A-8/R-11 NIGHTFIGHTER
REVELL 1:32 FOCKE-WULF FW 190A-8/R-11 NIGHTFIGHTER
REVELL 1:32 FOCKE-WULF FW 190A-8/R-11 NIGHTFIGHTER
REVELL 1:32 FOCKE-WULF FW 190A-8/R-11 NIGHTFIGHTER
REVELL 1:32 FOCKE-WULF FW 190A-8/R-11 NIGHTFIGHTER ●
● KIT NO.03926
KIT NO.03926
AIRBORNE HEDGEHOG:
WITH RESIN AND PHOTO-ETCH!
James Hatch incorporates a whole suite of Eduard aftermarket
goodies within Revell's 1:32 Fw190A-8/R-11 nightfighter
p 08-14 FW190 266MN.indd 8 02/11/2017 12:14
9. 9
TMMI 266 December 2017
I
encountered the first version of this kit in 2015 when I
built the 'F-8 test shot for this magazine. When Marcus
recently asked me to follow that up with a build of the
nightfighter version, I jumped at the chance to revisit
what is essentially a very nice kit to build up, but this time
as the A-8/R-11. Unlike the previous F-8 though, I would be
free to throw some goodies at it and pimp this ride a little.
Thankfully, Eduard provided me with a large number of
resin and PE parts for this one, and with the exception of
the BMW801 engine that would have added almost another
two to three weeks to this project, I decided to use all the
remaining sets, such as fuselage MG131 mount, cockpit,
landing flaps, propeller, bronze legs and resin wheels etc.
Time to crack on and create a little dust. U
p 08-14 FW190 266MN.indd 9 02/11/2017 12:14
10. FULL BUILD: WW2 GERMAN AVIATION
REVELL 1:32 FOCKE-WULF FW 190A-8/R-11 NIGHTFIGHTER ● KIT NO.03926
10 December 2017 TMMI 266
A WHOLE NEW 'PIT
In preparation, I spent a
good couple of workshop
sessions in removing casting
blocks and cleaning up the
various resin parts, only
leaving the small details on
their blocks until it was time
to use them. Eduard’s resin
really is excellent and I’ve
not encountered any real
issues when grafting it to
the host plastic. As with any
good story, this one begins
in the pilot’s office with a
completely new set of resin
parts to totally replace the
kit parts. Plenty for your
spares box with this build.
Eduard’s cockpit
comprises twenty-eight parts
cast in light and medium
grey resin, although I
wouldn't be using part R11,
which is the bomb/rocket
arming panel, or the shaped
headrest section that is
designed for the blown hood.
After cleaning up, assembly
can take place. This is pretty
easy with nothing at all
complicated, just make sure
that the small parts don’t
flick off into the distance
when handling. I use my
CA of choice for this,
which is MXBON606,
from Fly Models. This
excellent, thin glue is
probably the best CA
I’ve used.
Each instrument was
punched from the sheet
using RP Toolz’ Punch
& Die set. The Eduard/
HGW fabric seatbelts
were then fitted, using
CA. Also applied are
several Airscale placard
decals and Eduard’s warning
placard to the headrest
armour. After being sealed
in, I treated the cockpit to
a dark brown colour-wash
before being flattening with
Mr Hobby H20 Flat Cleat
and a drybrushing of Vallejo
Sky Grey.
Eduard produce an exhaustive
number of resin sets for the
Fw190F-11. As specific sets for this
new kit aren’t yet out, the author
used these as they are still suitable
Top of the range for
this build is a whole new
resin cockpit, from the
Eduard Brassin range
More aftermarket overload
with these photo-etch
sets. The author ended up
abandoning the Master barrels
as they weren’t suitable
sessions in removing casting
leaving the small details on
their blocks until it was time
to use them. Eduard’s resin
the host plastic. As with any
Fw190F-11. As specific sets for this
used these as they are still suitable
resin cockpit, from the
Eduard Brassin range
Whilst Revell’s cockpit can build up
beautifully, the resin details here
certainly eclipse the standard parts
A handy photo-etch jig is included to
ensure the alignment of the resin parts
for the cockpit hood interior
Base colour, followed by highlights and lowlights are what
helps to give this cockpit a little visual interest and stop the
colour looking monotonous
All detail painting is done freehand, with Vallejo’s
acrylic paints. The author ended up changing the
colour of the seat cushions to a canvas colour later in
the project
RP Toolz punch and die set was used
to punch out the individual instrument
decals. Airscale cockpit placards were
also used to enhance the appearance
A silver Prismacolor pencil was used to add paint chip details to key areas
V
U
p 08-14 FW190 266MN.indd 10 02/11/2017 12:14
12. FULL BUILD: WW2 GERMAN AVIATION
REVELL 1:32 FOCKE-WULF FW 190A-8/R-11 NIGHTFIGHTER ● KIT NO.03926
12 December 2017 TMMI 266
WING AND TAILPLANE
At this point I decided to
build the wings because of
the need to do the bulk of
the modification work here.
I started by drilling out the
specific holes that relate to
the nightfighter’s antennae,
plus the leading-edge light.
A support bracket was then
glued into the wing which
not only held the wing
dihedral correctly, but also
provides support for the
large display stand that
wouldn't be used here. Work
started by adding a PE skin
to the firewall, for which a
little of the plastic detail
needed to first be removed.
Other metal structures were
then attached, before finally
fitting the ammo bins with
CA glue. Eduard has aimed
this set at those who also
wish to pose the model with
bins removed, hence the
details on the PE.
One thing this model
really benefits from are
the replacement landing
flaps. Scraping back and
thinning the plastic for the
wing area is a bind, but it’s
pretty easy to do. To help
with getting this thinned
correctly, I decided to build
the inner wing flap areas
first, and dry fit these to the
wing to gauge how much
thinning I still needed to do.
Once complete, the metal
assemblies were set to one
side whilst I concentrated on
the undercarriage bay.
Eduard supply a lot of
metal for this area, including
almost total sheathing for
the spar itself. This area
was quite fiddly to assemble,
with the main liners being
awkward to fit. They also
had to be trapped within the
lower wing and upper panels
to get them to fit. Before this
though, I needed to fit the
newly-constructed landing
flap bays. Numerous other
structures were now added
to the gear bay, enhancing
the detail over the standard
kit parts.
ENGINE
From the outset, I’d decided
not to use the (amazing)
Eduard BMW801 engine,
simply because it would kill
the lines of the aircraft if
I had every panel open. I
did compromise though and
decide to fit the resin and
photo-etch weapons bay, also
from Eduard. Building the
kit engine is very straight-
forward and still affords
a reasonable amount of
detail for the modeller, but
as this would be closed up,
this would be finished in
a simplistic way. You can
barely see this though the
cooling fins behind the prop,
and the most you’ll really
notice is when you look
within the weapons bay and
see the engine’s ancillary
components.
PULLING IT ALL TOGETHER
Assembly from here was
a breeze. I first glued the
fuselage halves together
and removed the seams.
Once complete, the resin
fuselage tub was fitted with
CA and then the rudder
was fitted. It was now
time to fit the fuselage and
wing together and again,
no nasty surprises here,
only a little 'Mr Dissolved
Putty' was needed to fill a
couple of hairline gaps. The
tailplane parts fitted with
a reassuring push and the
basic airframe was then
complete.
Revell supply two styles
of canopy with this model;
one is the standard item and
the other is the blown hood.
I used the standard for this
build. Again, each canopy
style has two options: one
for open and one for closed
(pinched). My canopy
would be posed in the
open position. I fitted the
windscreen to the model and
masked it using Eduard’s
masking set. The same task
was performed with the
hood, although this would be
fitted later. A quick blast of
RLM66 was now airbrushed
over the canopy parts so
that they had the dark grey
internal frame appearance.
Now it was time for primer.
PAINTING
I rarely prime my models,
only if the plastic is an
awkward colour or the paint
is sufficiently fragile enough
to merit it, but as I intend
to use acrylic lacquers, I
undercoated the model with
Tamiya White Fine Surface
Primer, straight from the
aerosol. I then airbrushed
Tamiya Flat Black around
the various panel lines and
ports etc., and followed this
with Mr Paint RLM04 in
the lower cowl area. When
cured, this was masked off
to prevent overspray.
On the undersides and
fuselage sides, I then
airbrushed Mr Paint
Wing
construction
starts by
removing
moulded detail
from the main
spar and fitting
parts from the
undercarriage
and MG131
Eduard sets
More
photo-etch
detail is
destined for
the main wheel
wells. Here
you can see
the basic metal
liners, prior
to the smaller
details being
fitted
Fitting the
numerous metal
detail parts is
time-consuming
and fiddly in
places, but the
result is worth
the effort
Main wing
construction
is complete,
with only
the ailerons
needing fitting.
You can clearly
see the newly
added PE
details
A little more
effort was
needed to
build the
landing flaps
themselves. RP
Toolz rolling set
was invaluable
for this task
V
p 08-14 FW190 266MN.indd 12 02/11/2017 12:15
13. 13
TMMI 266 December 2017
Fitting the wing to the fuselage was very easy. Care
was needed when fitting the engine, so ensure the
alignment didn’t affect the fit of the cowls
The first camouflage colour to be applied was
RLM75, and when cured, tape and Blue-Tack
worms were applied for masking
RLM74 (ignore the bottle!) was now applied to the
model to complete the basic camouflage
It’s easier to airbrush the landing flap and main
gear bays at this stage than it is to paint them
earlier and try to mask them off
Cartograf’s decals perform flawlessly with Mr Mark Setter. Once complete, they were sealed with more Johnson's Klear
RLM76, allowing the
pre-shading to add a little
dimension to things, but not
so much as to look contrived.
With this dry, Blue-Tack
'worms' and tape were used
to mask the wing and tail
edges. My Iwata HP-CH
(www.airbrushes.com) was
now used to airbrush the
lighter RLM75 camouflage
patterns, allowing a small
overlap for the next colour.
More Blue-Tack and tape
was then used to apply the
RLM74 to the designated
areas. With the camouflage
now complete, the model
was airbrushed with a few
thin coats of Johnson's
Klear, to protect it from
washes and decal setting
solutions.
DECALS AND
COLOUR-WASHES
With a smooth and shiny
surface, the decalling process
began. First out of the way
were the fragile markings
such as walkways and the
red flashes, followed by the U
p 08-14 FW190 266MN.indd 13 02/11/2017 12:15
14. FULL BUILD: WW2 GERMAN AVIATION
REVELL 1:32 FOCKE-WULF FW 190A-8/R-11 NIGHTFIGHTER ● KIT NO.03926
14 December 2017 TMMI 266
266
remainder. 'Mr Mark Setter'
was used to apply these,
with all decals bedding
down nicely. Klear was
used to seal them in before
applying washes. For this,
I used Dark Brown from
AK-Interactive. I always
over-apply these to allow me
enough wash left to buff into
the surrounding area using a
cotton bud, creating a sort of
filter effect.
ALL THE SMALL BITS
I opted to use Eduard’s
superb resin propeller and
spinner. First, the blades
and hub were painted and
the resin jig then used to
set the prop pitch evenly.
I painted the spinner flat
black; no spiral on this one!
The landing flaps were
now primed with Mr Metal
Primer and the undersides
painted in RLM76, whilst
the upper sides were
airbrushed in RLM02 to
match the wing flap area.
RLM02 was also used to
paint the gear struts and
the inner gear doors with
RLM76 used on the exterior.
A colour-wash was applied
to these parts, as well as a
small number of decals on
the gear struts, courtesy of
Airscale. The resin wheels
were primed then sprayed
with MRP Rubber Matt,
with the hubs airbrushed
with RLM66. I masked the
wheels with paper, cut using
my DSPIAE circle cutter, a
very precise and useful tool
for masking (more on this
next issue).
Mr Metal Color Dark
Iron was applied to the
wing-root guns and they
were then slipped into
position through the main
gear bays. Finishing touches
were applied to the hood and
the various parts fastened
to the model. For the aerial
wire, I used thin elastic cord.
The wheels were given a
gentle dusting of AMMO by
Mig 'Airfield Dust' pigment.
And the model was complete!
Revell's kit is basically an
excellent production, but
with the addition of Eduard's
extraordinary detail sets, it
can really come to life.
My sincere thanks to
Revell for the kit, Mr Paint
for keeping my Iwata’s
whistle wet, Eduard for the
many detail sets they sent
and to Breveco Modelling
(www.brevecomodelling.
nl) for the DSPIAE Circle
Cutter. ●
T E C H S P E C . . .
Revell 1:32 Fw 190A-8/R11 • Kit No.03926
Additional items;
Eduard Brassin; Fw190F-8 propeller, F-8
cockpit, Fw190 wheels, Fw190 undercarriage
legs, MG131 weapons set, undercarriage set
Airscale; instrument and cockpit placard
decals
Paints and weathering materials;
Vallejo Folkestone Basics paint set
Mr Paint RLM74, RLM75, RLM76, NATO
Black, Rubber Matt, Basic Black
Mr Color RLM66, RLM04
Mr Metal Color Aluminium, Dark Iron
Johnson’s Klear
AK Interactive Dark Brown Wash
Ammo Airfield Dust pigment
Tools and consumables;
Iwata HP-CH airbrush and Smart Jet Pro
compressor, Premi-Air Liquid Reamer, Swann
Morton Scalpels No.15 and No.11, RB
Productions razor saws (fine and medium),
DSPIAE Circle Cutter, Micro drill bits, Albion
Alloys sanding sticks, MDC sanding sponges,
Zoukei Mura fine paintbrushes, Tamiya Extra
Thin Cement (Quick setting), MXBON 606
CA (superglue), Mr Paint scribing tool (fine),
Plastic Dymo tape, Mr Dissolved Putty, Thin
elastic cord, Micro Krystal Klear
Availability;
Revell models are widely available from good
model shops and online. www.revell.de/en
Eduard’s resin and bronze
gear parts were prepared
for construction
The resin parts of
Eduard’s replacement
propeller set are far
nicer than the stock
kit parts. A jig is
included for getting
the pitch set correctly
As the author had lost
his Eduard wheel masks,
he made his own using
the excellent circle
cutter from DSPIAE, an
invaluable tool
“Revell’s kit is basically an excellent
production, but with the addition of
Eduard’s extraordinary detail sets,
it can really come to life...
”
V
Please note, we have omitted
the swastika emblems
on this model to comply
with regulations in certain
countries where Tamiya Model
Magazine is sold
p 08-14 FW190 266MN.indd 14 02/11/2017 12:14
16. FULL BUILD: WW1 GERMAN AVIATION
WINGNUT WINGS 1:32 JEANNIN STAHLTAUBE (1914) ● KIT NO.32058
16 December 2017 TMMI 266
FULL BUILD: WW1 GERMAN AVIATION
FULL BUILD: WW1 GERMAN AVIATION
WINGNUT WINGS 1:32 JEANNIN STAHLTAUBE (1914) ● KIT NO.32058
16 December 2017 TMMI 266
THESTEELDOVE,
FROMUPABOVE
Zdenko Bugáň is one of the first to build Wingnut Wings'
stunning new 1:32 Jeannin Stahltaube, the 'Steel Dove'
p 16-22 Taube 266MN.indd 16 02/11/2017 12:15
17. 17
TMMI 266 December 2017
TMMI 266 December 2017
T
he latest Wingnut
Wings release in
1:32 is the Jeannin
Taube and it can
be really considered a
kit that fans wished
for. Approximately two
years ago, the admins
of a Facebook group
called 'Wingnut Wings
Fans' created a voting
poll where all members
were able to express
which WW1 aeroplane they
would most like to see as
a new company release.
Despite many famous
type names mentioned, to
everyone’s surprise, the
winner was announced; the
elegant Taube. Wingnut
Wings are known to hear
their fans voice and after
two additional years of
waiting, new kit has arrived!
“Such a boring and
insignificant aircraft” you
may say. Well the truth is
that Taube, designed by
Austrian inventor Igo Etrich
was one of the aeroplanes
that initiated a big boost
of German aviation in
its early years. Etrich,
inspired by the shape of the
extraordinary flying seed
of the Zanonia Macrocarpa
plant (above right), created
a truly unique wing-form
that served as a basis for his
successful construction.
The wing shape provided
the airplane with neutral
flying properties, so the
Taube was safe and easy
enough to be flown even by
inexperienced students of
flying schools. In literature
describing this machine,
there are stories of Taubes
with their engines running
but waiting for their
pilots, suddenly taking off
and flying in level flight
until running out of fuel.
Controlling the Taube
was so easy that pilots
that were converting to
more demanding biplanes
needed to take additional
hours on different types to
successfully proceed with
their training.
The wheels without
disc covers were made
from plastic tyres and
photo-etched centre
structures. We don’t
need to worry about their
rigidity, PE parts are quite
strong to hold the weight
of relatively big model
Because of the
photo-etched
middle sections,
it was easier to
paint the tyre
first, then mask it
Then we can paint the
middle structure with
dark green colour
U
p 16-22 Taube 266MN.indd 17 02/11/2017 12:16
18. FULL BUILD: WW1 GERMAN AVIATION
WINGNUT WINGS 1:32 JEANNIN STAHLTAUBE (1914) ● KIT NO.32058
18 December 2017 TMMI 266
A COPIED DESIGN
Ironically, Etrich didn’t make
a fortune from his invention.
When his patents were
cancelled in Germany, many
unhesitating entrepreneurs
started to build their own
versions of original design.
Most active of these were
companies like Rumpler,
Gotha and Kondor. Wingnut
Wings provide us with
the version manufactured
by Alsace businessman
Emil Jeannin, serving in
numerous numbers with the
German air force.
The kit itself was
introduced at Nuremberg
Toy Fair this year and has
only recently been released.
For my presentation model
I built probably the most
beautiful scheme, Taube
A.283/14 in quite interesting
colours. The fuselage of
the aeroplane was painted
with a solid matt colour,
probably field grey, while
wings were left in their
unbleached, clear-doped
linen appearance. Metal
engine covers were left in
natural aluminium, but
creative mechanics applied
decorative 'scaling' with
additional polishing. The
kit itself contains four
additional and interesting
schemes. One of them is for
the only surviving Jeannin
Taube, on show at the
Berlin Technik Museum
with specific orange-yellow
rubberised surface.
Let’s look at the building
process of new Wingnut
Wings Taube itself. It took
approximately one month
to build this new Wingnut
Wings kit. Even if it looks
like small trainer aircraft,
its size is surprising. In
comparison with the classic
Albatros D.V, its wingspan
is almost double. The build
process itself was really
a pleasure, without any
18 December 2017 TMMI 266
problems and many areas
that are usually problematic
on the kits of competing
companies are solved here
in quite clever ways. An
example is the geometry
for self-levelling fuselage/
wing join, that automatically
prevents any drooping
wing-ends.
The painted engine will be attached to
the interior parts before the closing of
the fuselage halves. It will get an extra
load of weathering together with them.
So for now, it was ready and work
started on the cockpit
The linen interior walls were first painted
with base colour, Tamiya XF-57 Buff
To keep them in one plain colour would be a missing an
opportunity, so the author varied their appearance at first
by spraying soft shadows with a highly diluted, darkened
base colour. It was darkened by mix of Tamiya Flat Black
and Red Brown
All metal cowling interior sections were pained with
Alclad 2 Metallic Aluminium
Winsor & Newton Burnt Umber was first
squeezed onto a paper towel and let to
rest for a few minutes. The paper towel will
soak up the unwanted oil and the colour
itself will dry faster to a nice matt look. The
author used a soft sponge for applying
oils to the model parts and then blended
them lightly with a soft brush. A pleasing
wooden texture will start to appear
In a few simple steps we can achieve
quite realistic wooden surface. If there
are only few areas that need to look
as if they are made from 'wood', it
is not necessary to complicate
our work with application
of wood-effect decals
The classic set of weathering
techniques followed. The
first ones were the popular
'filters' (thin colour-washes)
that unify all colours. In
the engine section we on
the other hand use more of
dark-brown filter. The engine
of the Taube spat and sizzled
oil and dirt everywhere
V
U
p 16-22 Taube 266MN.indd 18 02/11/2017 12:16
19. 19
TMMI 266 December 2017
Soft variations of tone can be enhanced in
specific sections by 'oil paint rendering'.
Oil colour is applied in small dots and then
smudged into surroundings by damp brush.
This way we can get more dirt and grime into
corners and more fading effect onto linen
fields for example
The engine section was much more dirty than the
rest of interior and we can simulate this by using
AMMO of Mig Jimenez ‘Engine Grime’ and ‘Fresh
Engine Oil’ products. They are quite thick when
applied directly from the bottle, so we need to thin
them a bit before application, or smudge them by
brush into the surface
Just before the author started to apply final pigments, he
rigged the whole interior with EZ Line thread. Pigments
can be damaged by fingers when trying to do rigging, so
it is better to apply the material afterwards
The pigments were fixed by overspraying with a thin layer of Engine
Grime enamel product. Combination of pigments and enamel dirt
will create nice realistic effect of that 'general grime all around'
Warped sections of Taube wings were much
more translucent than the rest. We can clearly
see their bamboo ribs shining through the linen.
The space between these ribs was first masked
up with Tamiya tape
Believe or not, the Taube was quite a big
aeroplane, and the 1:32 model is also quite big.
It would be unrealistic if the wings were left just
in one solid colour, so we need to do some extra
light variation. As a first step the author sprayed
irregular shadows with darkened base colour
The same way as on the upper section, at first we
have to mask off the space between the bamboo ribs
in the warped wing tips. These will be the lightest
areas of the whole lower section
Then we overspray them with soft shadow of
XF-57 Buff. After unmasking, we can see the
'negative' of the internal structure
The whole fuselage was painted with Tamiya XF-22 RLM
Grey, according to kit instructions
But don’t
celebrate yet,
our masking
fun is not
over, there
still is the tail
The same way
as on wings,
all bamboo
ribs were
masked off
and painted
with the buff
colour
p 16-22 Taube 266MN.indd 19 02/11/2017 12:17
20. FULL BUILD: WW1 GERMAN AVIATION
WINGNUT WINGS 1:32 JEANNIN STAHLTAUBE (1914) ● KIT NO.32058
20 December 2017 TMMI 266
FULL BUILD: WW1 GERMAN AVIATION
FULL BUILD: WW1 GERMAN AVIATION
WINGNUT WINGS 1:32 JEANNIN STAHLTAUBE (1914) ● KIT NO.32058
DEF MODEL 1:35 TYPHOON K
SAGGED WHEEL SET (DW35100)
www.defmodel.com
Last issue we previewed the Kamaz Typhoon K truck from Takom, a fantastic kit with tons of
detail and huge ‘presence’. The only thing it needs is a set of upgraded tyres and now, thanks
to Korean producer DEF Model, we have them. The new wheels/tyres feature better detail all
over, but most importantly they have a subtly weighted bulged that hints at the vast bulk of the
vehicle. The are cast in resin and come with a set of paint masks; well worth the extra investment
Mini Review...
p 16-22 Taube 266MN.indd 20 02/11/2017 12:16
21. 21
TMMI 266 December 2017
Our main colour works are finished, so it’s time
for decals application. There are just few needed
for Taube; insignia crosses and serial numbers
practically cover them all. Don’t forget to apply
decals over gloss varnished surface, to prevent
edge silvering
The first colour applied was Tamiya
Enamel X-11 Chrome Silver, which
will act as reflecting one
When the first colour was dry, the author used a really thin, 00
brush to paint the ‘scales’ by hand using XF-16 Flat Aluminium
enamel. The colour must be properly diluted for this quite
demanding task
p 16-22 Taube 266MN.indd 21 02/11/2017 12:16
22. FULL BUILD: WW1 GERMAN AVIATION
WINGNUT WINGS 1:32 JEANNIN STAHLTAUBE (1914) ● KIT NO.32058
22 December 2017 TMMI 266
FULL BUILD: WW1 GERMAN AVIATION
FULL BUILD: WW1 GERMAN AVIATION
WINGNUT WINGS 1:32 JEANNIN STAHLTAUBE (1914) ● KIT NO.32058
22 December 2017 TMMI 266
TRANSLUCENT LINEN WINGS
The Jeannin Taube I picked
to build was machine
with is probably the most
photographed Taube I know
of. Photos presenting this
machine from below nicely
show how internal structure
of wings shined through
translucent linen. Of course
I wanted to recreate this
effect on my model. This
specific impression is
different if we look at wing
from above or below, both
sides then need a different
approach and I wanted to
represent both of them.
This can be seen in the
accompanying photos.
SO, WHAT'S NEXT?
The cockpit rims are quite
nicely done too. If you look
at the model from above,
the interior side walls look
like they are really thin as
linen. This kit can be truly
recommended – maybe not
for absolute WW1 beginners
because of its advanced
rigging – but if you have at
least some experience with
this kind type of model, you
will be delighted how easily
everything goes together.
Thanks goes of course to
Wingnut Wings for listening
their fans' voices and as I
can see, there is already
second round of 'The most
wanted Wingnut Wings
kit' happening right at this
moment on social media. So
what would we like to see
released in next two years?
What about the Zeppelin
Staaken R.VI..?! ●
www.wingnutwings.com
We can readily appreciate
the size of the Stahltaube
when it is placed next to
a Wingnut Wings’ 1:32
Albatros model
“This kit can be truly
recommended – maybe not for
absolute WW1 beginners...
”
V
p 16-22 Taube 266MN.indd 22 02/11/2017 12:16
24. 24 December 2017 TMMI 266
KIT PREVIEW KIT PREVIEW
BEEMAX 1:20 BRABHAM BT52 ‘83
MONACO GP VERSION ● KIT NO.B20003
BEEMAX 1:20 MCLAREN MP4/2B ‘85
MONACO GP VERSION ● KIT NO.B20002
BRABHAM BT52
'83 MONACO GP
Gordon Murray's revolutionary
arrow-shaped car arrives in 1:20
The Prost/Lauda McLaren gets the
full Beemax treatment
T
he Beemax/Aoshima symbiosis has been coming up
with some marvellous kits lately, catering to car
modellers who want something 'classic' to build,
but of a subject still within living memory. Enter
the Brabham BT52, the 1983 Monaco GP car in its
instantly recognisable blue on white 'Parmalat' livery.
This extraordinary Gordon Murray design had its
side-pods way back on the body, pretty much either side
of the engine, leaving the cockpit clear to the sides and
resulting in a skinny and arrow-like form. It makes a
great subject for a kit and Beemax have done it proud,
not only capturing the radical body shape in miniature
but also including a very nicely detailed replica of the
BMW M12/13 straight-four turbocharged engine which
remains viewable in the finished model thanks to a
lift-off upper cowling.
The cockpit tub is rendered with fantastic detail
and this can be further enhanced with Beemax's
'detail-up' set (available to buy separately) which
provides photo-etched parts (radiator faces, brake
rotors, end-plates and more) plus moulded/plated hose
connectors, seat harnesses and carbon-fibre effect
decals. Well worth the extra expenditure. A fantastic
subject and a thoroughly detailed kit. ●
A
nother excellent and very welcome release in
1:20 is the McLaren MP4/2B of Alain Prost/
Niki Lauda from the 1985 Monaco Grand Prix,
a good-looking machine from one of Formula
1’s golden eras. As with their BT52, Beemax provide
a fully detailed engine, in this case the turbocharged
TAG-Porsche 1.5 litre V6 unit. The monocoque in
this kit is very interesting, coming with a moulded-in
composite texture on its exterior surfaces which might
sound a bit dodgy, but in reality, it looks remarkably
good. If you want to further enhance the appearance
of this area, the manufacturer makes a upgrade set
for this kit too, that includes a full suite of simulated
carbon-fibre decals, photo-etched internal structures,
radiator faces, harness hardware and more besides.
The body is provided with decals for the Rocket Red
areas and if applied with care,
have the potential to look quite
convincing; enthusiasts will want
to paint this area of course.
Another excellent kit from this
new manufacturer; keep reading
TMMI for full-build articles on
both these kits. ●
Availability;
Beemax models and sets are available from Hiroboy;
www.hiroboy.com
BRABHAM BT52
The Prost/Lauda McLaren gets the
MCLAREN MP4/2B
‘85 MONACO GP
p 24 BeemaxCars Pre 266MN.indd 24 02/11/2017 12:18
25. p 25 ADs Collated 266.indd 21 27/10/2017 12:23
26. 26 December 2017 TMMI 266
KIT PREVIEW
AIRFIX 1:48 SUPERMARINE WALRUS MK.I ● KIT NO.A09183
U
s scale modellers are
truly spoiled these
days! There are
so many amazing
new kits being released
on an almost weekly
basis, it has become
hard to keep up. One of
the latest to arrive at
TMMI is Airfix’s new-tool
kit of the wonderfully
charismatic Supermarine
Walrus flying-boat and
it’s in the larger scale
of 1:48. A few years
back, did we ever think
we’d see a mainstream
injection-moulded kit of
this machine? The model
comes in a larger box
containing five sprues of
grey polystyrene plus one
in clear for the canopy and
windows. Markings are
provided to complete one of
three aircraft; a Dark Sea
Grey/Matt Slate Grey/Sky
aircraft of No.276 Royal
Air Force Harrowbeer,
Devon 1944, a Dark Sea
Grey/Dark Green/Sky
Grey machine from No.700
Naval Air Squadron, HMS
Sheffield 1941 and a Royal
Australian Air Force
Walrus of No.5 CF, RAAF,
Australia and New Guinea,
1943 in Grey/Dark Grey/
Sky Blue.
The kit parts carry
some fantastic detail, with
lines of subtle, recessed
riveting apparent over the
whole fuselage that give it
the essential look; on the
underside of the ‘hull’ we
even have raised rivets and
they are some of the most
refined and realistic we’ve
yet seen. On the wings we
can see the simulation of
stretched fabric over wing
ribs and as with the raised
rivets, it is one of the most
convincing attempts at
this effect we have seen
on model kit. The wing
arrangement of the Walrus
is relatively complicated,
with numerous struts
between upper and lower
wings and supporting the
engine pod. To ensure
a strong and positive
assembly, Airfix have
moulded recesses in the
wings where the struts
locate and they should be
more than strong enough
to hold everything in
alignment. The model can
be built with wings folded or
extended, the former taking
up less display cabinet
space but somewhat spoiling
the aircraft’s elegant lines.
This looks like a fabulous
kit and what a wonderful
subject. By buying these
models we are supporting
Airfix and other makers
and enabling them to create
more left-field kit releases
for us. Bring it on! ●
AVAILABILITY;
Airfix models and materials
are widely available from
good model shops and
online. www.airfix.com
U
s scale modellers are Grey/Dark Green/Sky between upper and lower
I AM THE WALRUS!
A Supermarine
Walrus Mk.I in 1:48? You bet!
p 26 Walrus Pre 266MN.indd 26 02/11/2017 12:18
27. Model by Jeremy Moore
Model by Wayne Hui
Get Creative!
HOBBYBOSS, VALLEJO, MODEL MASTER, MINIART, MASTER BOX, AK
INTERACTIVE, MIG PRODUCTIONS, PLUS MODEL AND MANY MORE...
Unit 6-10, Honeysome Ind Est., Honeysome Road, Chatteris, Cambs. PE16 6TG
www.creativemodels.co.uk Tel: +44(0)1354 760022
www.creativemodels.co.uk
p 27 CreativeModels 266.indd 1 27/10/2017 12:10
28. FULL-BUILD: MODEL MOTORSPORT
TAMIYA 1:24 MERCEDES-BENZ AMG GT3 ● KIT NO.24345
28 December 2017 TMMI 266
ALL-OUT ATTA
Lesley Eyckerman is amongst the first to build the
new 1:24 Mercedes-Benz AMG GT3 from Tamiya
ALL-OUT ATTA
ALL-OUT ATTA
Lesley Eyckerman
Lesley Eyckerman is amongst the first to build the
is amongst the first to build the
new 1:24 Mercedes-Benz AMG GT3 from Tamiya
p 28-35 AMG-GT3 266MN.indd 28 02/11/2017 12:20
29. 29
TMMI 266 December 2017
I
recently received the
brand new Tamiya
Mercedes-Benz AMG GT3
from the TMMI office and
the Editor asked me to build
it 'straight out of the box'
for the magazine. I was so
glad to get this opportunity
and I'm honoured to build
this beautiful kit. My first
impression when I opened
the box was WOW. When I
started to look at the sprues
I was really impressed. Such
clean and superbly moulded
parts; the body is a piece of
art in my opinion. I saw this
car at the 24 Hours of Spa in
2016 and 2017 and what a
monster it is in real life. And
that front grille? They really
nailed the kit; it looks way
better than the SLS GT3.
I’ve build this one too from
Fujimi, but the Tamiya kit is
far superior.
BODY
The main body is made
out of ten parts; I did some
test-runs first and noticed
that it was all a perfect fit. I
glued the body parts together
with Tamiya Quick Drying
Liquid Cement and almost
had no seams or flash. Just
a few minor seam-lines to
clean up (with Mr Surfacer
500) on the bonnet and boot
and that was it.
After sanding the
seam-lines I primed the
'shell with Zero Paints Grey
primer, sanded and primed
again, followed by a soapy
bath. I painted the body
with Zero Paints Mercedes
AMG GT3 Metallic Grey,
which looked spot-on to
me. After a day of drying
I sealed the paint with a
fine coat of 2k gloss clear
from Zero Paints. I know
the car has a matt finish,
but I want to make sure I
had no silvering under the
waterslide markings. Before
I could start applying decals,
I had to mask off the front
lip of the nose and paint it
with Motip semi-gloss black.
I removed the masking
tape and cleaned up the
body for the application of
the decals, which were a
dream to apply. They are
very thin and didn’t need a
lot of setting solution or heat
TACK!
Here we see the GT3’s bodyshell undergoing test-fitting, always a
worthwhile procedure, even with the best of kits
Even the massive rear wing was dry-fitted
TACK!
U
p 28-35 AMG-GT3 266MN.indd 29 02/11/2017 12:20
30. U
FULL-BUILD: MODEL MOTORSPORT
TAMIYA 1:24 MERCEDES-BENZ AMG GT3 ● KIT NO.24345
30 December 2017 TMMI 266
Zero Paints’ Grey Filler Primer was used as an overall undercoat, in readiness for the colour coats
Available from; www.hiroboy.com
from a hairdryer. Even the
carbon fibre decals didn’t
need much help. I cleaned
up the body when the decals
had dried, and after a few
days of drying I clear-coated
the body and parts again,
but this time with Zero
Paints 2k matt clear which
creates a nice matt finish,
just like the real car. The
fasteners that are included
in the kit were primed and
painted semi-gloss black,
then fixed to the body with
Tamiya Craft Bond.
In the instructions you
will find a template for the
various grilles. I cut them
out using some aftermarket
mesh from Scale Production,
as the mesh included
in the kit didn't look all
that realistic to me. The
tow-hooks were also replaced
with some 0.5mm red wire
which looks more realistic
that the plastic components.
After those parts had been
installed, I started final
assembly, first with the
headlight lenses and units,
then the front grille and
radiator. This was followed
by the rear light lenses and
their units. Next up were
the windows, but first I
had to paint the window
trim. Tamiya provide some
window templates which
make it a lot easier to
paint them (black). I used
decanted Tamiya TS-14 for
this operation, letting the
paint dry for a few hours
then carefully glueing them
into place.
“Tamiya provide some window templates
which make it a lot easier to paint them...
”
V
The first colour layers are on;
Zero Paints Mercedes AMG
GT3 Metallic Grey
With the decals on, the model
really starts to come to life
p 28-35 AMG-GT3 266MN.indd 30 02/11/2017 12:20
31.
32. The front of the car was masked off in order to paint
the black areas on the nose of the model
The seven grilles were created with the paper
templates provided with the kit
Fitting the grille requires the use of
superglue, plus tweezers
Right; the base silver colour was
masked off and the black areas
painted. Some skilful masking
was required here
The interior tub and rollcage; the
detail here is excellent but the
aftermarket suppliers will no doubt
provide more
The front splitter was covered with
carbon-fibre effect decal
FULL-BUILD: MODEL MOTORSPORT
TAMIYA 1:24 MERCEDES-BENZ AMG GT3 ● KIT NO.24345
32 December 2017 TMMI 266
V INTERIOR AND CHASSIS
One minor point of criticism
is the cabin 'tub' with its
moulded-in telemetry boxes
and driver's counterweight.
They're not a problem to
mask and paint of course, but
there are a few sink-marks
that can’t be filed out without
sanding away the detail, so
care is needed here. This
interior is screaming for
extra detail (it will appear
from the usual aftermarket
manufacturers of course), but
as I mentioned earlier, I was
asked to build it out of the
box for this initial review!
Maybe I will build a second
kit at a later date, with all
the inevitable goodies thrown
at it. The rollcage is made
out of five parts; I performed
some minor clean-up and
glued them together with
Tamiya Quick Setting
Cement. Once the cement
had dried I tidied up the
glued joints with a little filler
and further sanding.
The rollcage and interior
were undercoated with
Tamiya Grey Primer,
followed by semi-gloss black
from Motip, in preparation
for their Alclad Aluminium
colour. I just needed to
mask off the back of the
interior tub and console,
plus the aforementioned
electronics boxes and
counterweight. I masked up
the internal areas with thin
strips of Tamiya tape and
painted them with Alclad
Aluminium, then applied
an acrylic clear coat, also
from Alclad. The seat was
painted semi-gloss black
too, and was then given a
fabric texture treatment
from Tenco. I didn’t want to
use the standard decal seat
belts, so I used aftermarket
items from Scale Production.
The dashboard was also
painted semi-gloss black,
then masked off and finished
with Medium Grey from Zero
Paints. The assembly of the
interior went like a dream,
everything fitting like a
glove. All parts of the chassis
were cemented together
and painted, you guessed
it, semi-gloss black, after a
layer of primer from Alclad.
The brakes were painted
Zero Paints' Chrome and I
hand-painted the rotors and
the callipers using Titanium
Gold from Tamiya. I glued
the chassis and interior
together and applied the
remaining AMG decals to the
seat and callipers.
p 28-35 AMG-GT3 266MN.indd 32 02/11/2017 12:20
33. 33
TMMI 266 December 2017
The simple dashboard is plain grey; note the steering ‘yoke’ The front and rear windscreens have received their inner black borders
FINAL PARTS
The remaining parts were
cleaned up, ejector-pin
marks filled, sanded,
washed and then primed
with Alclad Grey Primer
Filler. The rear wing was
cemented together and
primed with Alclad White
Primer Filler, then the
end-plates were given two
coats of Zero Paints Camel
Yellow, followed by a thin
gloss 2k clear-coat. I masked
off the yellow stripes on
the wing-plates with bare
metal foil and painted it
with more Motip semi-gloss
black. The headlight units
were painted and glued into
their chrome lights. I didn't
strip the chrome off the
parts, because they looked
very realistic to me and it
saved me a lot of time and
work. The rear light units
were painted with Vallejo
transparent red.
Refining
the rollcage
with a piece
of rolled-up
sandpaper,
just to give it
a seamless
appearance
The Mercedes takes shape.. Note the
workable steering and suspension detail
U
p 28-35 AMG-GT3 266MN.indd 33 02/11/2017 12:20
34. FULL-BUILD: MODEL MOTORSPORT
TAMIYA 1:24 MERCEDES-BENZ AMG GT3 ● KIT NO.24345
34 December 2017 TMMI 266
“It went together like a dream,
with no major issues whatsoever...
”
V
The rear light
blocks are
seen here
during paint,
secured to
a bamboo
skewer with
rolled Tamiya
masking tape
The big rear wing looks magnificent
with its decals in place
A small forest of parts, all mounted on cocktail
sticks in readiness for paint application
The GT3’s brake mouldings were left on their sprue
for ease of painting
The radiator was first sprayed silver to simulate aluminium, then masked off for the fan and framework
p 28-35 AMG-GT3 266MN.indd 34 02/11/2017 12:20
35. 35
TMMI 266 December 2017
MARRIAGE OF THE BODY AND CHASSIS
After all parts had been fitted to the
chassis and body, I brought these
two major sub-assemblies together.
The marriage didn’t need glue; two
moulded-in pins locate into holes in the
front, then one hooks the rear into place.
After that I affixed the side mirrors,
antennae and aero flaps to the front end,
and finally, the rear wing. To finish off
the model, I applied some decals for the
fasteners, sunscreen and fog-lights, plus
the metal emblem on the rear of the car.
FINAL THOUGHTS
Tamiya have gone to great efforts with
this kit. It went together like a dream,
with no major issues whatsoever. The
only negative point I can think of is
minor; the mesh for the grilles, but this
can be easily replaced with aftermarket
material. Carbon decals for the rear
diffuser would be a plus too, since Tamiya
include them for the front diffuser and
window trim. Overall, I think this is a
very cool kit and would build it again if
aftermarket decals are released, which I
think will happen for sure. ●
MARRIAGE OF THE BODY AND CHASSIS material. Carbon decals for the rear
T E C H S P E C . . .
TAMIYA 1:24 MERCEDES-BENZ AMG GT3 KIT NO.24345
Paints used:
- Zero Paints grey primer, AMG GT3 Grey, 2k gloss clear, 2k matt
clear, Titanium Gold, Chrome
- Alclad 2 Grey, White primer, Aluminium
- Motip gloss and Semi-gloss Black
- Tamiya Titanium Gold
Availability;
Tamiya models and accessories are widely available from good
model shops and online. UK import and distribution by The Hobby
Company Limited; www.hobbyco.net
V
p 28-35 AMG-GT3 266MN.indd 35 02/11/2017 12:20
36. FULL BUILD: SCIENCE-FICTION FILM MODEL
DEAGOSTINI 1:43 STAR WARS MILLENNIUM FALCON PT.2
36 December 2017 TMMI 266
SHE MAY NOT LOOK LIKE MUCH,
BUT SHE'S GOT IT WHERE IT COUNTS, KID
Jim Hatch continues the construction
of DeAgostini’s 1:43 Millennium Falcon,
adding 3D-printed details and more
Pt.2
PT.2: PREPARING FOR THE KESSEL RUN
Whilst the DeAgostini kit comes with Hyperdrive lights, I wanted something
a little special. These Neopixel lights will fire up in sequence and also pulse
pure power!
Just a fraction of the electronic-related stuff that will be crammed within the
Falcon. Touch-sensitive switches, LEDs, switches, blinkers and a remote
control for the fibre optics
W
hen I started
collecting the
parts for this
project, some two
to three years ago, I had
a game plan. You know
how it goes. The model
would theoretically be built
out-of-box (packet!) as it
was already the ultimate
Millennium Falcon in any
scale. In the last instalment
of this project (TMMI #264),
I had already broken that
idea and decided to adapt
the kit parts to include
fibre-optics for the various
elements within, such as the
cockpit, engineering console
and the famous Dejarikk
gaming table that we saw in
those early films.
There was of course going
to be another deviation
in the way of using some
Paragrafix photo-etch parts
and the odd 3D-printed
part. Well, by now I should
be well into installing these
various parts and trying to
replicate those iconic interior
shots within this model, but
the last 6 weeks has sort of
put me behind schedule, but
for all the right reasons!
With the help of my good
friend and DeAgostini
aficionado, Mark Adams,
we’ve been collating not only
the parts that have been
needed to proceed with the
original idea, but in going
a whole step further and
replacing a good number
of the key internal parts
for items which are more
movie-accurate, and should
result in a more authentic
and pleasing result. Mark
put me in touch with
Antonio Regidor who has
a Shapeways shop under
the name 308Bits, and
Antonio is responsible for
over 100 various 3D items
for improving the Falcon
and adding additional detail
to the interior/exterior.
Antonio had arranged with
Shapeways for me to order
some key parts for the build,
which necessitated the
p 36-38 Falcon Pt2 266MN.indd 36 02/11/2017 12:21
37. 37
TMMI 266 December 2017
SPONSORED BY
delay in starting to build
the interior. The 3D-printed
items that Shapeways kindly
sent me for the purpose
of building the Falcon for
TMMI are:
■ Whole new, accurate
cockpit cone with internal
console details
■ Complete cockpit with
flight consoles and accurate
seating
■ Rear cabin walls with
overhead instruments with
fibre optic locations, plus
cockpit entry door
■ Dejarikk game table with
fibre optic locations
■ Hold chairs and toolsets
■ Hold navigation/
engineering console with
fibre optic locations
■ Engineering/Nav console
seat (Han’s chair!)
■ Replacement Hold couch
■ Hold pillars and pipe/
ducting section
■ Hold items (barrels, crates
etc.)
■ Hyperdrive engine grille
■ Upper turret replacement
interior
■ Hold floor maintenance pit
grille
■ Corridor light sconces
I also added to this
the items which are now
collated for the rest of this
build, courtesy of Mark
Adams. These include
700ft (!) of 0.25mm fibre
optic, multi-colour LED
flashers and blinkers
for the fibre optic looms,
Neopixel power-up
sequencing Hyperdrive
lights, 3D printed hold
These are standard DeAg corridor parts and they fit superbly. These will
also be lit with wall sconces
Shapeways kindly provided me with all of the 3D-printed parts. Here are a
few Hold items, such as the Dejarikk table, couch and Han’s engineering
desk chair
Of course, the cockpit gets a makeover. Here you can see the cockpit back
wall and overheard consoles. It’s difficult to see here, but the detail is
amazing. A coat of primer will make this pop. Holes are included for fibre
optic installation
All of the corridors need the padding cushions that are so familiar from the
films, and these are most of them. A lot of repetition here, so patience and a
high monotony threshold is required
More Hold items here. These are Han’s engineering console, tools and a
wall of pipework with separate stanchions
DeAg provides a very nice cockpit representation, but the 308Bits parts
from Shapeways, take this to a whole new dimension. Printing resolution is
very fine
U
p 36-38 Falcon Pt2 266MN.indd 37 02/11/2017 12:21
38. FULL BUILD: SCIENCE-FICTION FILM MODEL
DEAGOSTINI 1:43 STAR WARS MILLENNIUM FALCON PT.2
38 December 2017 TMMI 266
floor, maintenance pit and
corridor floors with footlights
grilles, remote control unit
for adjusting the fibre optic
brightness and power,
exterior decal sets, and
numerous other things that I
will cram into this project.
Work will begin by
modifying the hold floor.
This consists of cutting a
large section of this away
and creating mounting
points for the new, thinner
and screen-accurate
grille floor. I still need to
fathom how this will work,
especially as the hold
compartment still needs
to locate into the lower
hull. See how I tackle this
in the next instalment of
this article, along with
illuminating the corridors
and recreating the famous
cockpit interior. There are
a few items I still need to
source, such as the LED
strips for the underfloor
lighting in the corridors,
and underneath the hold
floor area. Remember folks,
I usually build 1:32 model
aircraft, so I’m very much
out of my comfort zone
with this project. It might
not look like much now,
but she’ll have it where it
counts, kid! At this point,
I really want to thank
the wonderful Victoria
Martinez from Shapeways
for her amazing generosity,
and Antonio Regidor for
arranging this. I hope I can
do this justice. ●
One disappointing area of the kit is the hold floor. This part replaces it
totally, along with the corridor floors with foot-lighting capability
A whole new nose cone is supplied too, correcting the shape issues with
the kit parts. These also have cockpit consoles printed within
DeAgostini’s 1:43 Millennium Falcon can be purchased monthly, direct from the
website at; www.model-space.com/gb/build-the-millennium-falcon-model.html
SPONSORED BY
V
p 36-38 Falcon Pt2 266MN.indd 38 02/11/2017 12:21
40. 40 December 2017 TMMI 266
KIT PREVIEW
REVELL 1:32 NORTH AMERICAN P-51D
MUSTANG ● KIT NO.03944
T
he P-51 Mustang is
an icon of military
aviation and needs
no introduction here,
other than to say it makes
a wonderful subject for
a model kit and new-tool
releases will always attract
interest from people like
us. Oddly, Revell’s new
releases don’t seem to
get as much fanfare as
Tamiya’s do and this
is a shame because the
company frequently comes
up with some excellent
models, heaped with
detail at prices that are
impossible to beat; it’s
recommended retail price
is around £37 and we have
seen it discounted already.
We have received a
complete, poly-bagged
test-shot of the model’s
sprues from Revell’s UK
division, with instructions
but minus decals, so here
you are seeing kit parts
that are subject to change
before the kit is released.
From our inspection of
the mouldings, it looks
like Revell have gone to
some lengths to create
an accurate and refined
model with this release; the
airframe parts sport very
restrained panel lines and
fasteners (no rivets), a very
well appointed cockpit with
defined detail, individually
moulded cockpit wall
frames and a choice of two
styles of pilot seat.
The kit depicts the early-
production P-51D without
the tail-stiffening filet.
The whole rear fuselage/
tail builds into a separate
sub-assembly, so we can
assume the tail filet version
will be released by Revell
at a later date.
The early tail determines
the markings options of
course, so ‘Desert Rat’ of
Captain Herschel Pascoe
and ‘Athlene/Lou IV’ of
Colonel TJJ Christian are
the two Mustangs that
the modeller can choose
from the box, but of course
there will be other options
available from aftermarket
decal producers.
From our initial rummage
through the sprues, this
looks like an extremely
appealing project, with
enough parts to keep the
builder engaged but with
no engine to slow down the
process. Full build coming
to TMMI soon. ●
AVAILABILITY;
Revell models are widely
available from good model
shops and online.
www.revell.de/en
Revell have created an all new Mustang in
1:32! As is sometimes the case, important
Revell releases can slip under the radar
but we should sit up and take notice
because this an impressive kit
REVELL’S STEALTHY MUSTANG
The early tail determines
p 40 Mustang Pre 266MN.indd 40 02/11/2017 12:22
42. Please turn to page 60 for the
The latest photo-etched sets, resin parts, figures and accessories to enhance your scale models...
Accessories
42 December 2017 TMMI 266
New Releases
What’s in the box?
AD; ACETATE DIALS, CC; CAST CERAMIC (PLASTER), CMA; CAST METAL ALLOY, CP; CHROMED PARTS, CPS; CLEAR PLASTIC SHEET, DT; DRY TRANSFER (DECALS), EM: ELECTRIC MOTOR
EPS; EXTRUDED PLASTIC SECTION, F; FABRIC, IM; INJECTION MOULDED (PLASTIC), ITL; INDIVIDUAL TRACK LINKS, LCC; LASER CUT CARD, LLT; LINK AND LENGTH TRACKS, MC; METAL
CHAIN, MMA; MACHINED METAL ALLOY, MR; METAL ROD, MW; METAL WIRE, MT; METAL TUBING, NM; NYLON MESH, PE; PHOTO ETCH, PEBM; PHOTO-ETCHED BADGES/MIRRORS,
PCM; PRE-CUT MASKS, PMP; PRE-ASSEMBLED METAL PARTS), PS; PAPER STRIP
, R; RESIN, SVT; SOFT VINYL TYRES (OR TUBING), VF; VINYL FIGURES, VFP; VACUUM FORMED (PLASTIC),
WC; WOVEN CORD, WD; WATERSLIDE (DECALS), WS; WOODEN STRIP
EDUARD, CZECH REPUBLIC
www.eduard.com www.creativemodels.co.uk www.hannants.co.uk
This month,Airfix's all new 1:48 P-51D Mustang (New Releases,
page 46/48 this issue) is the recipient of possibly the most
extensive collection of detail upgrades from Eduard yet released.
No less than fifteen separate products have been created for
this kit, from a modest set of resin and photo-etched gunsights
to a full-blown replacement cockpit (right and below right), also
cast in resin with PE brass seat harnesses, instrument panel and
more.Thanks to Eduard's latest releases, you can also replace the
exhausts, propeller and spinner-boss, drop-tanks, main and tail
wheels, rudder and elevators, underwing rocket-launchers, paper
drop-tanks and rear-view mirrors.Additional details are available
in PE, including a pre-coloured set for the cockpit, exterior (bomb
tail-fins, radiator faces and more), plus seatbelts, canopy masks
and a condensed 'Zoom' set for the cockpit. It's a staggering line-
up and if you have the experience and patience, they will help to
boost this excellent kit to even higher standards.
1:48 DETAIL SETS FOR AIRFIX NEW-TOOL P-51D
MUSTANG (AIRFIX KIT NO.A05131)
- P-51D interior PE (49853)
- P-51D exterior PE (48930)
- P-51D Mask (EX560)
- P-51D Zoom details PE (FE853)
- P-51D seatbelts steel PE (FE854)
BRASSIN
- P-51D control surfaces PE/resin (648345)
- P-51D wheels resin (48930)
- P-51D 75gal fuel tanks PE/resin (648349)
- P-51D bazooka rocket launchers PE/resin (648337)
- P-51D Hamilton Standard (cuffed) propeller PE/resin (648347)
- P-51D exhaust stacks (no fairing) resin (648336)
- P-51D exhaust stacks (with fairing) resin (648344)
- P-51D rear-view mirrors resin (648359)
- P-51D gunsights PE/resin (648361)
- P-51D paper 108gal drop tanks PE/resin (648350)
- P-51D cockpit PE/resin (648346)
This month,Airfix's all new 1:48 P-51D Mustang (New Releases,
extensive collection of detail upgrades from Eduard yet released.
this kit, from a modest set of resin and photo-etched gunsights
to a full-blown replacement cockpit (right and below right), also
cast in resin with PE brass seat harnesses, instrument panel and
more.Thanks to Eduard's latest releases, you can also replace the
exhausts, propeller and spinner-boss, drop-tanks, main and tail
wheels, rudder and elevators, underwing rocket-launchers, paper
drop-tanks and rear-view mirrors.Additional details are available
in PE, including a pre-coloured set for the cockpit, exterior (bomb
tail-fins, radiator faces and more), plus seatbelts, canopy masks
and a condensed 'Zoom' set for the cockpit. It's a staggering line-
up and if you have the experience and patience, they will help to
p 42,44 NR Access 266MN.indd 42 02/11/2017 12:23
44. Please turn to page 60 for the
The latest photo-etched sets, resin parts, figures and accessories to enhance your scale models...
Accessories
New Releases
44 December 2017 TMMI 266
What’s in the box?
AD; ACETATE DIALS, CC; CAST CERAMIC (PLASTER), CMA; CAST METAL ALLOY, CP; CHROMED PARTS, CPS; CLEAR PLASTIC SHEET, DT; DRY TRANSFER (DECALS), EM: ELECTRIC MOTOR
EPS; EXTRUDED PLASTIC SECTION, F; FABRIC, IM; INJECTION MOULDED (PLASTIC), ITL; INDIVIDUAL TRACK LINKS, LCC; LASER CUT CARD, LLT; LINK AND LENGTH TRACKS, MC; METAL
CHAIN, MMA; MACHINED METAL ALLOY, MR; METAL ROD, MW; METAL WIRE, MT; METAL TUBING, NM; NYLON MESH, PE; PHOTO ETCH, PEBM; PHOTO-ETCHED BADGES/MIRRORS,
PCM; PRE-CUT MASKS, PMP; PRE-ASSEMBLED METAL PARTS), PS; PAPER STRIP
, R; RESIN, SVT; SOFT VINYL TYRES (OR TUBING), VF; VINYL FIGURES, VFP; VACUUM FORMED (PLASTIC),
WC; WOVEN CORD, WD; WATERSLIDE (DECALS), WS; WOODEN STRIP
FRIULMODEL, HUNGARY
www.friulmodel.com
Two new AFV track sets are on release
from Friulmodel, both for modern-era
subjects.The British FV432 Cold War
armoured personnel carrier, recently
issued as a 1:35 plastic kit by Takom gets
a set of links, replacing the adequate but
imperfect set that comes with the kit.
This is sure to get people building this
otherwise superb replica.
The M270 Multiple Launch Rocket
System (MLRS) was used by other NATO
countries besides the USA and Friulmodel
have created the style of track fitted to
German Bundeswehr M270A1 MARS
vehicles, as kitted by Trumpeter.
As always, the tracks are impeccable cast
in fine metal and after a little clean-up
are assembled by using the roll of wire
(included) to form track pins.A reliable,
robust and realistic solution that will
improve the look of any model AFV to
which they are fitted.
1:35 ATL-114 FV432 FAMILY
1:35 ATL-110 M270 MLRS
MISSION MODELS, USA
www.missionmodelsus.com
Mission Models have release some nifty shades of grey into their
superb acrylic paint range, all tone-matched for US Federal Standard
spec.The colours are useful if you're modelling modern US jets
(F/A-18 etc) and any other subject of course.As we have found with
Mission Models' acrylics, you should use the company's own thinner/
reducer (MMA-003) for the best results.The paints are supremely
refined and airbrush beautifully.
HIGH LOW VIS LIGHT GREY (595) FS363753 (MMP-117)
MEDIUM GREY FS36270 (MMP-118)
LIGHT GREY FS36495 (MMP-116)
US CAMOUFLAGE GREY FS36622 (MMP-095)
HAULER,
CZECH REPUBLIC
www.hauler.cz
Tamiya's recently released 1:48
Elefant tank destroyer is the
recipient of a set of track guards
in photo-etched brass, which will
allow the modeller to add some
of their own 'battle damage' to
this part of the model.The guards
come with non-slip pattern
plus all necessary brackets.Also
for the little Elefant, there's a
'basic' detail set that provides
tool brackets, exhaust grille and
deflector, periscope shrouds and
other useful bits; just enough to
add a sparkle to this kit.
1:48 GERMAN TANK-
DESTROYER ELEFANT
FENDERS (HLX48382)
1:48 GERMAN TANK-
DESTROYER ELEFANT
BASIC (HLX48381)
BRENGUN,
CZECH REPUBLIC
www.brengun.cz
Hasegawa's 2016 release in 1:32
of the Mitsubishi A6M5c Zero
(kit no.08884) receives two
new detail sets from Brengun,
providing a generous crop of
parts to sharpen up the kit
parts. In the exterior set, we
find undercarriage doors, grilles
and other small parts for the
airframe; in the interior set, the
cockpit gets a lot of attention in
the form of a new seat, harness,
throttle parts, instrument panel
and plenty more. Fantastic quality
etchings and well worth having.
1:32 MITSUBISHI A6M5C
EXTERIOR (BRL32025)
1:32 MITSUBISHI A6M5C
INTERIOR (BRL32024)
p 42,44 NR Access 266MN.indd 44 02/11/2017 12:23
45. 1:48
Length 238mm Width 292mm Pieces 157
SUPERMARINE
WALRUS Mk.I
A09183
1:48 – SUPERMARINE
WALRUS MK.I
First developed
to a Royal
Australian Air
Force requirement
for a catapult launched
reconnaissance amphibious
flying boat, the Walrus gained
fame and respect not only for its
usefulness but also its toughness.
SUPERMARINE WALRUS MK.I
No 276 Squadron, Royal Air Force Harrowbeer, Devon,
England, 1944.
SUPERMARINE WALRUS MK.I
No 700 Naval Air Squadron, HMS Sheffield, 1941.
SUPERMARINE WALRUS MK.I
No.5 CF Royal Australian Air Force, Australia and New
Guinea, early 1943.
WALRUS MK.I
First developed
Australian Air
Force requirement
for a catapult launched
reconnaissance amphibious
flying boat, the Walrus gained
fame and respect not only for its
usefulness but also its toughness.
Airfix.com
and all good retail stockists
Official Product
Start as you mean to finish
5356AX_AMW_A09183_ADS__July_2017.indd 1 07/06/2017 14:59
46. A selection of the latest full kits in plastic, resin, metal and more!
New Releases Kit Reviews
46 December 2017 TMMI 266
What’s in the box?
AD; ACETATE DIALS, AP; ACRYLIC PAINT, CC; CAST CERAMIC (PLASTER), CMA; CAST METAL ALLOY, CP; CHROMED PARTS, CPS; CLEAR PLASTIC SHEET, DT; DRY TRANSFER (DECALS),
EM: ELECTRIC MOTOR EPS; EXTRUDED PLASTIC SECTION, F; FABRIC, IM; INJECTION MOULDED (PLASTIC), ITL; INDIVIDUAL TRACK LINKS, LC; LIQUID CEMENT, LCC; LASER CUT CARD,
LLT; LINK AND LENGTH TRACKS, MC; METAL CHAIN, MMA; MACHINED METAL ALLOY, MR; METAL ROD, MT; METAL TUBING, MW; METAL WIRE, NM; NYLON MESH, PB; PAINT BRUSH,
PCM; PRE-CUT MASKS, PE; PHOTO ETCH, PEBM; PHOTO-ETCHED BADGES/MIRRORS, PMP; PRE-ASSEMBLED METAL PARTS), PS; PAPER STRIP
, R; RESIN, SVT; SOFT VINYL TYRES (OR
TUBING), VF; VINYL FIGURES, VFP; VACUUM FORMED (PLASTIC), WC; WOVEN CORD, WD; WATERSLIDE (DECALS), WS; WOODEN STRIP
BRENGUN, CZECH REPUBLIC
A-36 APACHE RAF MARKINGS
www.brengun.cz
SCALE 1:72
MATERIALS; IM, R, PE,WS
ITEM NO.BRP72026
The A-36 Apache is the ground-attack version of the P-51
Mustang, differing from the standard fighter by the addition of
airbrakes mounted in the upper and lower wing surfaces. It
makes a great choice for a model and Brengun have seized the
opportunity and created this 1:72 kit. It comes on three, caramel-
coloured polystyrene sprues with a small bag carrying a resin
belly-scoop, photo-etched brass airbrakes, decals and the clear
canopy sprue.The parts are beautifully executed, carrying finely
recessed panel lines and engine cowling fasteners.The cockpit
is very neat, with individual wall panels and a detailed seat;
harnesses will need adding.Two RAF markings-options finish off
this very appealing little kit.
EDUARD, CZECH REPUBLIC
FW190A-4 PROFIPACK EDITION
www.creativemodels.co.uk www.eduard.com
SCALE 1:48
MATERIALS; IM,WS, PE, PCM
ITEM NO.82142
Eduard have completely re-tooled their 1:48 Focke-Wulf
Fw190A-4 model, making it significantly easier to build than the
arguably over-complex – albeit it beautifully detailed – release
of a few years back. It does away with the engine bay and
accessory access panels and instead has its cowlings moulded
in with the rest of the fuselage.An engine facia moulding is
provided and as the Fw190’s powerplant is tightly cowled and
also has a prominent cooling fan in the aperture, it is more than
adequate for the job.The new model’s parts-breakdown is more
conventional than before and we predict that it will go together
with relative ease. It’s still a very highly detailed kit though, with
a beautifully rendered cockpit and extremely subtle rivet lines
across the airframe exterior. Great news for aircraft modellers
who wish to build their ‘190 in a slightly shorter time-frame.
Well detailed (the main UC bay is delightful) and the PE
dive-brakes are a bonus
Still a brilliant depiction of this famous fighter, but slightly
more buildable now. Fantastic airframe detail
It’s a short-run kit so there are no location pins etc; some
modelling skills will be needed
Nothing noteworthy springs to mind
BRENGUN, CZECH REPUBLIC
p 46,48 NR Kits 266MN.indd 46 02/11/2017 12:25
48. A selection of the latest full kits in plastic, resin, metal and more!
New Releases Kit Reviews
48 December 2017 TMMI 266
What’s in the box?
AD; ACETATE DIALS, AP; ACRYLIC PAINT, CC; CAST CERAMIC (PLASTER), CMA; CAST METAL ALLOY, CP; CHROMED PARTS, CPS; CLEAR PLASTIC SHEET, DT; DRY TRANSFER (DECALS),
EM: ELECTRIC MOTOR EPS; EXTRUDED PLASTIC SECTION, F; FABRIC, IM; INJECTION MOULDED (PLASTIC), ITL; INDIVIDUAL TRACK LINKS, LC; LIQUID CEMENT, LCC; LASER CUT CARD,
LLT; LINK AND LENGTH TRACKS, MC; METAL CHAIN, MMA; MACHINED METAL ALLOY, MR; METAL ROD, MT; METAL TUBING, MW; METAL WIRE, NM; NYLON MESH, PB; PAINT BRUSH,
PCM; PRE-CUT MASKS, PE; PHOTO ETCH, PEBM; PHOTO-ETCHED BADGES/MIRRORS, PMP; PRE-ASSEMBLED METAL PARTS), PS; PAPER STRIP
, R; RESIN, SVT; SOFT VINYL TYRES (OR
TUBING), VF; VINYL FIGURES, VFP; VACUUM FORMED (PLASTIC), WC; WOVEN CORD, WD; WATERSLIDE (DECALS), WS; WOODEN STRIP
NUNU HOBBY MODEL KIT, MACAU/JAPAN
BMW M6 GT3 2016 SPA 24 HOURS WINNER
www.hiroboycom
SCALE 1:24
MATERIALS; IM, SVT, PC,WM, CP,WS
ITEM NO.PN24001
NuNu might have a slightly comical name but their first kit
release is entirely serious. It depicts the mighty BMW M6
GT3 that won at the 2016 24hr race at Spa Francorchamps.
The model is conventionally presented with a very nicely
executed bodyshell in white, injection-moulded polystyrene, an
internal cabin ‘tub’ and a chassis plate to which the suspension
components are fitted. It’s an engineless ‘curbside’ model and
this means there will be no awkward-fitting bonnet to worry
about, just perfect lines.All four of the window glazings fit from
the exterior of the body and so long as the fit is near perfect,
this is generally better than a one-piece glazing that fits from
within. Detail throughout is excellent and livery is colourful and
appealing; more please, NuNu!
AIRFIX, UK
NORTH AMERICAN P-51D MUSTANG
www.airfix.com
SCALE 1:48
MATERIALS; IM,WS
ITEM NO.A05131
Two new Mustangs feature in TMMI this month and both are
noteworthy releases; you can read about Revell’s 1:32 offering on
page 40, and here is Airfix’s 1:48 model. Unlike Revell’s, this one
is the tail-fileted version although the kit’s fuselage is designed
to allow for a filetless version to be issued at a later stage.The
airframe is covered with finely engraved panel lines as we have
come to expect these days; the upper wings exhibit some rivets
that are perhaps a tiny bit too noticeable, but if one chooses
to putty-in the wings as per the original aircraft, this will not be
an issue.The cockpit/internal structure is well executed with
a sensible parts-count.The fuselage innards reach right back
to the tailwheel and include the radiator scoop on the way,
an interesting modular approach.The wings build into a single
unit too, and are fitted with positionable flaps and ailerons, an
attractive feature.
Fantastic subject and from this in-box examination, a well
thought-out production. Full detail set available separately
The P-51D as a model subject will never go out of fashion
and this new kit offers the modeller even more choice.
Great interior detail and some appealing options
Seat harnesses are decals; this is addressed by NuNu’s own
detail set though Marginally over-heavy airframe detailing, but no deal-breaker
AIRFIX, UK
NUNU HOBBY MODEL KIT, MACAU/JAPAN
p 46,48 NR Kits 266MN.indd 48 02/11/2017 12:24
50. 50 December 2017 TMMI 266
KIT PREVIEW
TAMIYA 1:35 BRITISH SELF-PROPELLED ANTI-TANK GUN ARCHER ● KIT NO.35356
T
amiya’s newest 1:35
armour kit takes the
form of the British
WW2 17-Pdr anti-tank
vehicle, later known
as ‘Archer’. This oddity
came about as the need
to bring a panzer-killing
anti-tank gun to the
battlefield became urgent,
and the best the British
had at that time was the
Ordnance Quick-Firing
(QF) 17-Pounder, with its
hard-hitting three-inch
(76.2mm) armour-piercing
round. Perhaps the most
well known use of this gun
is in the Sherman Firefly,
its identity given away by
an almost fourteen foot
barrel, but the weapon
was also mounted on
the smaller (and highly
modified) Valentine tank
hull too, albeit and in an
unusual position; facing
backwards with the big
barrel suspended over the
engine deck. The vehicle
drives with the 17-Pdr
facing rearwards, turning
through 180 degrees
when called to action, the
gun being finally aimed
via limited traverse and
elevation on its mounts.
Tamiya’s new Archer kit
uses some parts from the
recently released Valentine
tank (full-build review in
TMMI Issue 262, August
2017) but there’s also
a large quantity of new
parts, because the vehicle
was heavily modified to
fit the 17-Pdr gun. It’s
Tamiya’s first depiction
of this weapon in 1:35
kit form and it is a little
work of art. The barrel is
a one-piece moulding that
includes one half of the
muzzle brake, the other
half simply cementing in
place. This approach allows
the brake to be moulded
hollow and it’s a perfect
simulation of the real thing.
The breech and mechanical
portions are supremely
well detailed and nothing
has been left off, but in
their familiar, slick style,
Tamiya’s designers haven’t
over-complicated the
sub-assembly with scores
of tiny parts. Because of
the open-topped nature of
the gun installation, we
can see down into the hull,
so a driver’s position with
seat, steering-brake levers
and gear shifter are all
present, a very neat touch.
The fighting compartment
is similarly comprehensive
with ammunition racks and
ready-rounds all provided.
As a finishing touch,
a beautifully sculpted
three-man crew is provided
to serve the gun and they
will bring a sense of scale
to the model.
We will be bringing you a
full-build article on this kit
soon, so keep reading! ●
AVAILABILITY;
Tamiya models and
accessories are widely
available from good model
shops and online. UK
import and distribution
by The Hobby Company
Limited; www.hobbyco.net
TMMI’s Editor is all of a quiver for Tamiya’s new
1:35 Archer 17-Pdr self-propelled anti-tank gun
TAMIYA’S TIP-TOP
TOXOPHILITE
p 50 ArcherSPG Pre 266MN.indd 50 02/11/2017 11:15
51. Order now from a Bachmann stockist www.bachmann.co.uk. For more information on products www.pocketbond.co.uk
Model, Collect & Create
M1117 Guardian Armoured
Security Vehicle PKTM07131
Israeli Main Battle Tank
Merkava 1 PKTAK02078
I:35
Haunebu II Saucer
PKPG9119
Israeli Main Battle Tank
Merkava 1 Hybrid PKTAK02079
Russian Zil-131V towing
PR-11 SA-2 Guideline PKTM01033
Ju 87D-3 Stuka
PKTM02420
SCALE MODEL CONSTRUCTION KITS Exclusive UK Distributors
NEW NEW NEW
NEW NEW
NEW
I:72
A7V “Sturmpanzer” German WWI Tank
PKEM5003
M109A3 Shop Van
PKAF35304
I:35
M113A1 ACAV
PKAF35113
IDF F-CK-1C (Single Seat)
PKAR48108
CMP F15 Ford Water Truck
PKMR35166
CMP F15A Ford Water Truck
PKMR35167
NEW NEW
I:35
NEW NEW
NEW
I:72
German Tiger I “Operation
Citadel” PKAY13509
I:35
B-47 “306th BW(M)”
PKAY12618
ROK Army K-2 Black Panther
PKAY13511
NEW NEW
NEW
I:I44
I:35
I:48
I:35 I:35
I:I44 I:35
I:35 I:24
Tmmi_266.indd 1 16/10/2017 16:37
52. MODEL GALLERY: STREET MOTORCYCLE
TAMIYA 1:12 HONDA CB750F ● KIT NO.14006
52 December 2017 TMMI 266
p 52-55 HondaCB705F 266MN.indd 52 02/11/2017 12:25
53. 53
TMMI 266 December 2017
O
ne day I decided I wanted to set myself
a weathering challenge. I happened to
be browsing a local hobby shop at the
time and a Tamiya 1:12 Honda CB750F
caught my eye. It reminded me of my own
first big bike, a Yamaha XJ750 Seca, so I
thought that replicating that look of a used,
old workhorse would be a fun exercise.
The intention was to replicate the look of
every biker's first 'proper' big bike they could
afford. I was hoping to use this as a practice
kit to try out various weathering techniques,
as well as removing chrome plating with
oven cleaner, something I hadn't tried yet.
There wasn't much call for that on the
usual aircraft and armour kits I was used
to. More or less following the instructions,
construction began with the engine. I wanted
to ultimately replicate the corroded look
that all these big aluminium blocks had,
so after priming with Tamiya grey primer
and then painting with Alclad 2 Semi-Matt
Aluminium, I stippled the engine block with
Vallejo medium grey and white acrylic,
applied via a bit of sponge. All bolt heads
were painted with Tamiya flat brown.
The carburettor bodies were painted
Alclad semi-matte aluminium. The top
covers were painted Alclad Chrome, which
were weathered slightly with Tamiya flat
brown acrylic and a burnt umber wash in
the corners, as chrome plated parts on bikes
tend to rust through the shiny coating. The
bottoms of the carburettors were given a coat
of yellow/brown wash to replicate years of
leaked fuel. The intake hoses were painted
Vallejo grey black and given hose clamps
made from thin strips of aluminium tape.
The airbox was painted black grey followed
by a coat of hairspray, then a light coat of
medium grey. Some of the light grey was
then removed with a damp brush. This was
sealed with a flat clear. This gave a nice sun
damaged black plastic look.
BLOWN SEALS
The front forks had the stanchions painted
Alclad chrome, and the lowers were painted
Alclad 2 Semi-Matt Aluminium, followed
by hairspray and then flat black. The flat
black was then removed around the bottom
of the fork, as well as around the top where
they met the stanchions which gave a nicely
weather worn look to the paint. As standard
on a bike of this vintage, the fork seals would
have had to have blown. I therefore carefully
painted a thin ring around the stanchions
with a black/brown paint. Again, some flat
brown was gently stippled in places and
brown wash applied below the lower yoke.
The switchgear on the left grip and the
throttle cable housing on the right were
painted dark grey, with the grips themselves
black grey. The vibration dampeners were
semi-gloss black. I snipped the end off the
clutch lever, to continue the theme of the
bike having gone down on the left. The brake
fluid reservoir was painted two shades of
dirty white to replicate there being a level of
fluid inside a sun aged plastic housing.
Michael Van Kesteren
takes a classic Tamiya bike kit
and gives it a lived-in look
ONE
CAREFUL
RIDER
U
p 52-55 HondaCB705F 266MN.indd 53 02/11/2017 12:25
54. MODEL GALLERY: STREET MOTORCYCLE
TAMIYA 1:12 HONDA CB750F ● KIT NO.14006
54 December 2017 TMMI 266
Once the engine had been mounted into the frame,
the foot peg mounting plates were painted semi-matte
aluminium, with all bolts again painted flat black.
Some gloss was applied to allow the decals to be
applied, then all sealed with flat and then given dark
brown, black and rust washes, before being mounted
to the frame. The exhaust was assembled and primed,
painted gloss black and then given a coat of Alclad
chrome.
The rear fork was painted like the frame; gloss
black with flat brown in areas. The chain was painted
Alclad steel and then given black and brown washes.
The chain guard was painted semi-gloss black.
ALLOY WHEELS
The Comstar wheels could've been tricky to paint
neatly, so I decided to use hairspray weathering.
The wheels were painted Alclad aluminium followed
by hairspray and flat black. I used the hairspray to
remove the paint in the areas that should be exposed
aluminium, then sealed it all. The rear wheel, besides
the regular washes, was also given heavier washes,
brushed outwards of black and brown, on the chain
side to replicate chain gunk being flung against the
rim. The rubber tyres were given a sand to get rid
of the seam before being installed on the rims. The
saddle was left unpainted, as it already looked just
right. I added strips of aluminium tape painted grey
to look like the saddle was patched with duct tape.
Some Mig industrial city dust pigment was rubbed
into the seams. The same pigment was used inside the
rear mudguard, on the tyres and used to tie the bike
together. Overall I'm very happy how the bike came
out, with the only immediate tell tale signs of the
bike's scale being the tiny Philips screw heads dotted
around the bike. My only regret is never being able to
get around to installing the license plate! ●
MODEL GALLERY: STREET MOTORCYCLE
MODEL GALLERY: STREET MOTORCYCLE
TAMIYA 1:12 HONDA CB750F ● KIT NO.14006
Once the engine had been mounted into the frame,
the foot peg mounting plates were painted semi-matte
aluminium, with all bolts again painted flat black.
Some gloss was applied to allow the decals to be
aluminium, with all bolts again painted flat black.
Some gloss was applied to allow the decals to be
applied, then all sealed with flat and then given dark
brown, black and rust washes, before being mounted
to the frame. The exhaust was assembled and primed,
painted gloss black and then given a coat of Alclad
The rear fork was painted like the frame; gloss
black with flat brown in areas. The chain was painted
Alclad steel and then given black and brown washes.
The chain guard was painted semi-gloss black.
The Comstar wheels could've been tricky to paint
neatly, so I decided to use hairspray weathering.
The wheels were painted Alclad aluminium followed
by hairspray and flat black. I used the hairspray to
remove the paint in the areas that should be exposed
aluminium, then sealed it all. The rear wheel, besides
the regular washes, was also given heavier washes,
brushed outwards of black and brown, on the chain
side to replicate chain gunk being flung against the
rim. The rubber tyres were given a sand to get rid
of the seam before being installed on the rims. The
saddle was left unpainted, as it already looked just
right. I added strips of aluminium tape painted grey
to look like the saddle was patched with duct tape.
Some Mig industrial city dust pigment was rubbed
into the seams. The same pigment was used inside the
rear mudguard, on the tyres and used to tie the bike
together. Overall I'm very happy how the bike came
out, with the only immediate tell tale signs of the
bike's scale being the tiny Philips screw heads dotted
around the bike. My only regret is never being able to
get around to installing the license plate! ●
Once the engine had been mounted into the frame,
the foot peg mounting plates were painted semi-matte
aluminium, with all bolts again painted flat black.
Some gloss was applied to allow the decals to be
Availability;
Tamiya models and accessories are widely available from
good model shops and online. UK import and distribution
by The Hobby Company Limited; www.hobbyco.net
V
p 52-55 HondaCB705F 266MN.indd 54 02/11/2017 12:26
55. 55
TMMI 266 December 2017
TMMI 266
Little touches by the author, such as
the bungees on the seat plus subtle,
well-observed weathering give the model
a highly realistic appearance
modelsforsale.com
Plastic model kits, New, Second-Hand,
and Discontinued. Books and Accessories.
WANTED
Quality collections of second-hand model kits,
military books, decals, photo-etch & detail sets.
Will collect on larger quantities.
Please see our website for more details or please call us.
Tel: 01933 622654
email: sales@modelsforsale.com
Unit 3 Dean Close - Raunds - Northants NN9 6BD
p 52-55 HondaCB705F 266MN.indd 55 02/11/2017 12:26
56. MODEL PREVIEW: MILITARY AVIATION
TAMIYA 1:32 VOUGHT F4U-1D CORSAIR ● KIT NO.60327
56 December 2017 TMMI 266
I
have just finished building Tamiya's new
1:32 F4U-1D Corsair for the forthcoming
book, 'How To Build Tamiya's 1:32
F4U-1A and F4U-1D Corsair'. I
incorporated a number of aftermarket
accessory sets within the model, some of
which were designed for Tamiya's 'Birdcage'
or F4U-1A Corsair and adapted for this
later version. Accessories include Eduard's
'Brassin' cockpit, cowling set and wheels,
fabric harness and Zoom photo-etch for
the instrument panel. I also installed Grey
Matter's open equipment bay. Decals are
one of the standard kit options.
Tamiya's 1:32 scale F4U-1D is a great
kit and was a delight to build, although
you do need to stay focused and follow the
instructions carefully. ●
The book is available to pre-order from
www.adhbooks.com. £14.95 plus shipping
which were designed for Tamiya's 'Birdcage'
ICOULDDOWITHA'D!
Brett Green has a new 'How To Build' book on the way!
The main subject is Tamiya's stunning 1:32 F4U-1D and
here's a sneak peak at his build of the model
Eduard’s impressive
resin 'Brassin' cockpit
Lengths of copper wire were
fitted to the kit’s R-2800 engine
to represent the ignition cabling
p 56 Corsair Pre 266MN.indd 56 02/11/2017 11:18
58. 58 December 2017 TMMI 266
KIT PREVIEW
MINIATURES UNIVERSE BLADE RUNNER 2019/2049 TYRELL CORPORATION PYRAMID
T
he vast, pyramidal
building that was the
Tyrell Corporation’s
headquarters in the
classic science-fiction/
dystopian film ‘Blade
Runner’ has become an icon
of on-screen architecture
since the original’s release
in 1982. The ‘real’ thing
was a vast and exquisitely
detailed model in itself,
created for filming when
digital graphics were in their
infancy.
Blade Runner fans/
obsessives (like myself) are
keen to get our hands on
any models and collectibles
related to the film; almost
no official merchandise
was issued to go with the
original release (a little more
perhaps for Blade Runner
2049) so when something
comes along, we tend to leap
on it, as I did with the kit
reviewed here, a scale model
of Eldon Tyrell’s fortress-like
edifice by French
manufacturer ‘Miniatures
Universe’.
It comes in kit-form as
sixteen unpainted, cast
resin components; four
solid ‘corners’ of the main
structure, four hollow
triangular inserts that sit
between each corner plus
eight flat, outer panels
that lean against the main
building facias. Assembly
is very simple and after
the parts have received the
usual clean-up (just a few
air bubbles and perhaps a
little filling here and there)
the model should go together
in minutes. I would advise
constructing the kit onto a
baseboard so all parts can be
accurately lined up, but it’s
not essential.
The surface detail is
magnificent and captures
the look of the complex
industrial patterns and
textures seen in the films
and one’s painting skills
will be tested in getting it to
look vast and illuminated.
Lighting it from inside is
not a practical option, but
the manufacturer’s painted
model has its ‘windows’
painted light blue which
contrast well against the
warm, brown and rusty
tones of the main walls. It’s
a bold subject to recreate
in miniature and the kit’s
price reflects the hand-made
nature of specialist
productions like this. If
you’re a Blade Runner addict
like me, it’s a must-have
item; I will be building and
paint this kit for a future
issue of TMMI. ●
AVAILABILITY;
Miniatures Universe models
are available from their eBay
store (search in eBay for
‘Pyramid Tyrell Corporation’)
Kit price approximately £99
plus postage from France.
GOSH, YOU’VE... REALLY
GOT SOME NICE TOYS HERE
TMMI’s Editor examines a new resin kit of the imposing Tyrell
Corporation building from the iconic film ‘Blade Runner’
p 58 BladeRunner 266MN.indd 58 02/11/2017 11:19
59. email: sales@umpretail.com
web: www.umpretail.com
Modellers Sanders
Our range of specially produced Ultimate Modellers Sanders provide an excellent abrasive
solution for the discerning modeller. Uniquely shaped they are provided in several grits
(100/180/220/240/400/800/1200) and a buffer (3,000/12,000 grit). They are long lasting and
washable, which will allow them to be used to their maximum potential with the minimum of waste.
Thinny Sticks
Our range of Thinny Stick Sanders have been developed specifically to help modellers get to those
hard to sand areas on all genres of models. They come in six grits (180/240/400/800/1200) and a
buffer (3,000/12,000 grit) and are uniquely shaped to accommodate all your fine sanding scenarios.
They are made from the same high quality materials as our Modellers Sanders and are available in
packs of six.
Thinny Sponges
Our Thinny Sponges are designed to compliment our Thinny Stick range. They come in one grit 220,
but being a softer sponge it’s equivalent to nearly a 300 grit like the full size Ultimate Modellers
Sanders. This will prove to be the go to sander on your bench.
Photo-Etch Placer
Our photo-etch placer is a re-usable wax
based positioning stick that will help you
to hold and place
even the smallest
piece of photo-etch
or styrene. A real
helping hand when
dealing with the
more fiddly side of
modelling.
Airbrush Thinner
Our Ultimate Airbrush
Thinner is specifically
formulated to work with ALL
brands of acrylic modellers
paint. Our blended formula of
six ingredients ensures a fast
drying, smooth finish every
time, no matter what brand
of modelling acrylic paint
you use.
Airbrush Cleaner
Our fast & effective Ultimate
Airbrush Cleaner is specifically
formulated to work with ALL
brands of acrylic modellers
paint and all types of airbrush.
Our cleaner is not overly
aggressive and will not ruin
the seals in your airbrush. We
have also added a blue dye
to the cleaner to be able to
distinguish it from our thinner.
Weathering Wash
Ultimate Weathering Wash has been formulated with several key non-toxic
ingredients to bring you a superior clay based wash to add detail and realism to
your model. The nine vibrant colours in our range cover the most widely used in
modelling. Be aware, the wash will dry slightly lighter than the colour of the bottle
and a good shake and stir is recommended before use.
APEX Airbrush
The Ultimate APEX Airbrush has been designed as a multipurpose airbrush
for all your spraying situations, from tight lines to a wide spray pattern. The
Ultimate APEX Airbrush successfully negates the need for several different
needle and nozzle sizes utilising a progressive needle system, which covers
nearly all spraying patterns and paint consistencies. There is also a reversible
needle guard for even closer detail work. The APEX sits comfortably in the hand
with the aid of an added finger rest for those long spraying sessions. Extremely
easy to use and maintain, this will be your go to airbrush on your work bench....
• Progressive needle for virtually all your spraying needs
• Finger rest for superior handling
• Solvent resistent 'O' rings
• Superb balance
• Easy to clean
• Reversible needle guard for precision work
• Heavy nickel chrome plating
• Plastic colour cup cap for ease of use
• Adjustable trigger tension
• Self centring & sealing fluid tip
• Each unit hand tested
Primer
Our Ultimate Primer is a water based acrylic polyurethane self levelling surface
primer. Offering a simple and easy application with excellent adhesion and durability,
it dries to a hard flat finish and is simple and easy to clean up. It’s also fine to sand.
There are seven colours to choose from: Grey, black, white, gloss black, olive, oxide
and gelb. Ultimate Primer can be applied with a brush, airbrush and sponge for use
on styrene, plastics, resin, metals, woods and various other substrates.
p 59 Ultimate 266.indd 8 27/10/2017 12:13