SlideShare a Scribd company logo
1 of 23
Download to read offline
0-9
CONTENTS
CONTENTS
SECTION 1 GENERAL
SECTION 1 GENERAL
Group 1 Safety Hints -------------------------------------------------------------------------------------------------------- 1-1
Group 2 Specifications ----------------------------------------------------------------------------------------------------- 1-10
Group 3 Operational Checkout Record Sheet --------------------------------------------------------------- 1-17
SECTION 2 ENGINE
SECTION 2 ENGINE
Group 1 Structure and Function -------------------------------------------------------------------------------------- 2-1
Group 3 Engine Speed and Stall rpm ----------------------------------------------------------------------------- 2-8
SECTION 3 POWER TRAIN SYSTEM
Group 1 Structure and Function -------------------------------------------------------------------------------------- 3-1
Group 2 Operational Checks and Troubleshooting ------------------------------------------------------- 3-15
Group 3 Test and Adjustments ---------------------------------------------------------------------------------------- 3-23
Group 4 Disassembly and Assembly ------------------------------------------------------------------------------ 3-25
SECTION 4 BRAKE SYSTEM
Group 1 Structure and Function -------------------------------------------------------------------------------------- 4-1
Group 2 Operational Checks and Troubleshooting ------------------------------------------------------- 4-7
Group 3 Tests and Adjustments -------------------------------------------------------------------------------------- 4-11
SECTION 5 STEERING SYSTEM
Group 1 Structure and Function -------------------------------------------------------------------------------------- 5-1
Group 2 Operational Checks and Troubleshooting ------------------------------------------------------- 5-8
Group 3 Tests and Adjustments -------------------------------------------------------------------------------------- 5-15
Group 4 Disassembly and Assembly ----------------------------------------------------------------------------- 5-22
SECTION 6 WORK EQUIPMENT
Group 1 Structure and Function -------------------------------------------------------------------------------------- 6-1
Group 2 Operational Checks and Troubleshooting ------------------------------------------------------- 6-59
Group 3 Tests and Adjustments -------------------------------------------------------------------------------------- 6-72
Group 4 Disassembly and Assembly ----------------------------------------------------------------------------- 6-86
0-10
SECTION 7 ELECTRICAL SYSTEM
Group 1 Component Location ---------------------------------------------------------------------------------------- 7-1
Group 2 Electrical Circuit ------------------------------------------------------------------------------------------------ 7-3
Group 3 Monitoring System -------------------------------------------------------------------------------------------- 7-22
Group 4 Switches ------------------------------------------------------------------------------------------------------------ 7-27
Group 5 Electrical Component Specification ---------------------------------------------------------------- 7-35
0-1
FOREWORD
FOREWORD
1. STRUCTURE
1. STRUCTURE
This service manual has been prepared as an aid to improve the quality of repairs by giving the
serviceman an accurate understanding of the product and by showing him the correct way to
perform repairs and make judgements. Make sure you understand the contents of this manual and
use it to full effect at every opportunity.
This service manual mainly contains the necessary technical information for operations performed in
a service workshop.
For ease of understanding, the manual is divided into the following sections.
Structure and function
This group explains the structure and function of each component. It serves not only to give an
understanding of the structure, but also serves as reference material for troubleshooting.
Operational checks and troubleshooting
This group explains the system operational checks and troubleshooting charts correlating problem to
remedy.
Tests and adjustments
This group explains checks to be amide before and after performing repairs, as well as adjustments
to be made at completion of the checks and repairs.
Disassembly and assembly
This section explains the order to be followed when removing, installing, disassembling or
assembling each component, as well as precautions to be taken for these operations.
The specifications contained in this shop manual are subject to change at any time and without any
advance notice. Contact your Hyundai distributor for the latest information.
0-2
Revised edition mark
Revised edition mark (ΗΘΙÄ)
When a manual is revised, an edition mark is
recorded on the bottom outside corner of the
pages.
Revisions
Revisions
Revised pages are shown at the list of revised
pages on the between the contents page and
section 1 page.
Symbols
Symbols
So that the shop manual can be of ample
practical use, important places for safety and
quality are marked with the following symbols.
2. HOW TO READ THE SERVICE MANUAL
Distribution and updating
Any additions, amendments or other changes
will be sent to HYUNDAI distributors.
Get the most up-to-date information before you
start any work.
Filing method
Filing method
See the page number on the bottom of the
page.
File the pages in correct order.
Following examples shows how to read the
page number.
Example 1
3 - 3
Section number (3. Power train
system)
Consecutive page number for
each section.
Additional pages : Additional pages are
indicated by a hyphen(-) and number after the
page number. File as in the example.
1.
2.
3.
Symbol Item Remarks
Special safety precautions are
necessary when performing the
work.
Extra special safety precautions
are necessary when performing
the work because it is under
internal pressure.
Special technical precautions or
other precautions for preserving
standards are necessary when
performing the work.
Safety
Caution
ö
10 - 4
10 - 4 - 1
10 - 4 - 2
10 - 5
Added pages
0-3
3. CONVERSION TABLE
3. CONVERSION TABLE
Method of using the Conversion Table
The Conversion Table in this section is provided to enable simple conversion of figures. For details of
the method of using the Conversion Table, see the example given below.
Example
Example
Method of using the Conversion Table to convert from millimeters to inches
Convert 55 mm into inches.
Locate the number 50 in the vertical column at the left side, take this as ͽ, then draw a horizontal
line from ͽ.
Locate the number 5in the row across the top, take this as ;, then draw a perpendicular line
down from ;.
Take the point where the two lines cross as Ϳ. This point Ϳ gives the value when converting
from millimeters to inches. Therefore, 55 mm = 2.165 inches.
Convert 550 mm into inches.
The number 550 does not appear in the table, so divide by 10 (move the decimal point one place
to the left) to convert it to 55 mm.
Carry out the same procedure as above to convert 55 mm to 2.165 inches.
The original value (550 mm) was divided by 10, so multiply 2.165 inches by 10 (move the decimal
point one place to the right) to return to the original value.
This gives 550 mm = 21.65 inches.
1.
2.
(1)
(2)
(3)
(1)
(2)
(3)
Millimeters to inches
1mm = 0.03937 in
;
ͽ
0 1 2 3 4 5 6 7 8 9
0 0.039 0.079 0.118 0.157 0.197 0.236 0.276 0.315 0.354
10 0.394 0.433 0.472 0.512 0.551 0.591 0.630 0.669 0.709 0.748
20 0.787 0.827 0.866 0.906 0.945 0.984 1.024 1.063 1.102 1.142
30 1.181 1.220 1.260 1.299 1.339 1.378 1.417 1.457 1.496 1.536
40 1.575 1.614 1.654 1.693 1.732 1.772 1.811 1.850 1.890 1.929
50 1.969 2.008 2.047 2.087 2.126 2.165 2.205 2.244 2.283 2.323
60 2.362 2.402 2.441 2.480 2.520 2.559 2.598 2.638 2.677 2.717
70 2.756 2.795 2.835 2.874 2.913 2.953 2.992 3.032 3.071 3.110
80 3.150 3.189 3.228 3.268 3.307 3.346 3.386 3.425 3.465 3.504
90 3.543 3.583 3.622 3.661 3.701 3.740 3.780 3.819 3.858 3.898
Ϳ
6-86
1. MAIN PUMP
1. MAIN PUMP
STRUCTURE
STRUCTURE
1)
1)
GROUP 4 DISASSEMBLY AND ASSEMBLY
24
23 4
26
25
22
5
9
26 7
5
22
25
20
33
1
26
21
34
14
28
19
27
13
3
29
30
18
35
15
16
10
16
32
11
25
22
5
5
22
25
20
6
8
2
17
12
31
26
1 Body
2 Body
3 Rear end cover
4 Front cover
5 Thrustplate
6 Driven gear
7 Driven gear
8 Drive shaft
9 Drive shaft
10 Screw
11 Screw
12 Screw
13 Screw
14 Screw
15 Screw
16 Washer
17 Washer
18 O-ring seal
19 O-ring seal
20 Ring
21 O-ring seal
22 Seal
23 Shaft seal
24 Ring
25 Ring
26 Sleeve bearing
27 Spool
28 Filter
29 Spring seat
30 Spring
31 Hub
32 Connection
33 Steel bushing
34 Plug
HB100WE21
6-87
GENERAL INSTRUCTIONS
Check immediately that any spare parts you receive have not been damaged in shipment.
Always work in a clean environment.
Wash all components in solvent and blow dry with compressed air before refitting.
Take care not to damage rubber seals.
Avoid damaging precision machined surfaces.
Components should fit into their housings without excessive force. If force is necessary, this
normally means that the component does not have the correct dimensional tolerances of is
aligned incorrectly.
When hand pressure is insufficient, only use presses or rubber hammer to fit components.
Never strike components with steel hammers.
Steel bushing must be fitted only with a suitable press.
Do not use hammers to fit bearings.
Always respect the direction of rotation when assembling components.
2)
2)
(1)
(2)
(3)
(4)
(5)
(6)
(7)
(8)
(9)
(10)
(11)
6-88
HB100WE51
DISASSEMBLY
DISASSEMBLY
LS priority valve
LS priority valve
Loosen and remove the assembling bolts
and washers from the pump.
3)
3)
(1)
(1)
Loosen and remove plug and take out
spring & spool. (Only when it is needed
to replace components inside).
Pay attention not to give any damage on
the surface of the spool and contamina-
tion to the orifices prearranged at the
spool.
HB100WE52
①
②
※
HB100WE53
Mounting flange
Mounting flange
Loosen and remove the assembling bolts
and washers from the pump.
(2)
(2)
①
6-89
HB100WE54
HB100WE55
HB100WE56
Remove mounting flange taking care to
keep it as straight as possible during
removal.
Tap around the edge with rubber mallet
in order to break away from the body.
Ensure that while removing it, the drive
shaft and other components remain
position.
②
※
Remove shaft seal with (-) screwdriver
and take out snap ring with proper tool
and shaft seal again.
Take out the shaft seals only needed.
Shaft seals disassembled from the
mounting flange is not reusable.
③
※
1st working section
1st working section
Remove the pressure plate with
prearranged parts, O-ring & back up ring
from the working section and examine it
carefully.
(3)
(3)
①
6-90
HB100WE57
HB100WE58
Pull out driving gear & driven gear
keeping gears as straight as possible.
Remove other pressure plate on rear
side with same way for front side.
②
③
Remove square O-ring on the groove of
body.
Remove through shaft and front body.
Tap around marked points with rubber
mallet all around to break away first body
from second.
Do not wedge between the bodies, it
may give serious damage on the surface.
④
⑤
※
HB100WE59
2nd working section
2nd working section
Remove all components inside of second
body with same way for 1st section.
Remove the square O-ring if necessary.
(4)
(4)
①
②
6-91
HB100WE60
ASSEMBLY
ASSEMBLY
Preassemble
Preassemble
Pressure plates
Pressure plates
Locate O-ring into the groove on the
aluminum pressure plate.
Locate back-up ring upon the O-ring.
Smear clean grease on the O-ring &
back-up ring to fix their position while
moving.
4)
4)
(1)
(1)
Working body
Working body
Insert square rings into grooves.
Shape of square ring is different depend
on type of bodies.
HB100WE61
①
②
③
①
HB100WE62
Mounting flange
Mounting flange
Locate shaft seal inside shaft hole to the
end.
Insert snap ring and locate it into the
groove prearranged on the mounting
flange.
Locate shaft seal again but different
direction.
①
②
③
6-92
LS - priority valve
LS - priority valve
Insert the spool prearranged all orifice
first, and spring, plugs.
·Torque value of both sides plugs :
10.2 kgf·m (73.8 lbf·ft)
·Torque value of LS plug :
1.53 kgf·m (11.1 lbf·ft)
HB100WE63
①
HB100WE64
Assembling
Assembling
Prepare cleaned 2nd body prearranged
guard pins and square O-ring.
Insert a pressure plate prearranged
O-ring & back-up ring inside of body.
Opened area of O-ring should face to
suction side. And O-ring side should face
to the body.
(2)
(2)
①
②
※
HB100WE65
LS plug
6-93
HB100WE66
Locate driving gear and driven gear
keeping as straight as possible during
assembling.
Locate one of pressure plates prepared.
③
④
HB100WE67
Locate 1st body on the 2nd body tapping
around the body with rubber mallet to fit it
completely.
Locate through shaft on the driving gear.
Locate pressure plate with same way for
2nd body.
⑤
⑥
⑦
HB100WE68
Locate driving gear and driven gear and
last pressure plate also.
⑧
6-94
HB100WE69
Assemble mounting flange to the body,
taking care not to give any damage on
the shaft seals by sharp edge of shaft.
Smear clean grease on the lips of shaft
seals before assembling.
⑨
※
HB100WE70
Assemble the bolts and tighten the bolts
with in a crisscross pattern to a torque
value of 14.3 kgf·m (103 lbf·ft).
Check that the pump rotates freely when
the drive shaft is turned by hand, if not a
possible, plate seal may be pinched.
⑩
⑪
HB100WE71
Locate an O-ring into the groove on the
body.
Locate preassembled LS - priority valve
on the 1st working section and tighten
the bolts with in a crisscross pattern to a
torque value of 7.14 kgf·m (51.6 lbf·ft).
⑫
⑬
6-95
2. MAIN CONTROL VALVE (
2. MAIN CONTROL VALVE (LOADER
LOADER)
STRUCTURE
STRUCTURE
24 22
22
21
26
16
30
13
32
31
9
3
18
44
46
15
12
42
45
40
19
37
4
23
1
1
2
14
23
2
17
36
24 22
22 24
22
22
24
22
24
22
22
43 33
43
25
11
28
4
23
1
25
11
28
5
23
1
33
33
22
1
23
41
35
29
20
27
21
26
10
20
1
23
34
38
39
7
6
6
8
OPTION
INLET BLOCK
P1 BLOCK
AUX BLOCK
BOOM BLOCK
OUTLET BLOCK
BUCKET BLOCK
1)
1)
HB100WE36
1 Spacer
2 Bushing
3 Spool
4 Spool
5 Spool
6 Element
7 Element
8 Element
9 Inlet cover
10 Outlet cover
11 Flange
12 Spring
13 Spring
14 Spring
15 Poppet
16 Tie rod
17 Screw
18 Dowel
19 Screw
20 Relief valve
21 Nut
22 O-ring
23 O-ring
24 O-ring
25 Seal
26 Spring washer
27 Plug
28 Screw
29 Screw
30 Joint
31 Solenoid valve
32 Body
33 Check valve
34 Valve kit
35 Cap
36 Cap kit
37 Relief valve
38 Relief valve
39 Relief valve
40 Relief valve
41 Spring kit
42 Adapter
43 Plug
44 Plug
45 Plug
46 Plug
6-96
INITIAL SETUP OF THE VALVE ON
ASSEMBLY BENCH
ASSEMBLY BENCH
Clean the table.
Wear safety goggles.
Place the stacked valve with inlet to the
left side as shown in the picture.
Clean the valve using compressed air so
that valve is free from any dust or dirt.
2)
2)
(1)
(2)
(3)
(4)
HB100WE91
HB100WE92
CHECK VALVE ASSEMBLY
Assemble the check valve into the check
valve cavity.
Make sure that O-ring is present in the
check valve.
3)
3)
(1)
(2)
HB100WE93
Tighten in to 4.28 kgf·m (31 lbf·ft) torque
(wrench 08) using pneumatic torque gun.
(3)
HB100WE94
P PORT PLUG ASSEMBLY
Close the top inlet port with SAE 16 plug
and tighten it to 4.28 kgf·m (31 lbf·ft)
torque (wrench 12) using pneumatic
torque gun. (Make sure that O-ring is
present in the plug.)
4)
4)
(1)
6-97
HB100WE95
HB100WE96
MANOMETER PLUG ASSEMBLY
Insert the poppet in the manometer cavity.
Then insert the spring on to the poppet.
5)
5)
(1)
(2)
HB100WE97
Insert the spacer on top of the spring.
(3)
HB100WE98
Assemble the BSP 1/2" plug and tighten it
to 4.28 kgf·m (31 lbf·ft) torque (wrench
27) using pneumatic torque gun. (Make
sure that washer is present in the plug.)
(4)
Plug
6-98
HB100WE99
HB100WE100
PRIORITY INLET SPOOL ASSEMBLY
Insert orifice of (͚0.75 mm) in the spool
as shown in picture.
Lubricate the spool cavity with hyspin
VG46.
6)
6)
(1)
(2)
Insert the spring on to the spool seat.
(4)
HB100WE101
HB100WE102
Assemble the adapter and tighten it to
4.28 kgf·m (31 lbf·ft) torque (wrench 32)
using pneumatic torque gun. (Make sure
that washer & O-rings are present in the
adapter.
(5)
Insert the spool into the spool cavity with
orifice face should go inside.
(3)
6-99
HB100WE103
Plug the other side of the spool cavity with
M22×1.5 mm plug and tighten it to 4.28
kgf·m (31 lbf·ft) torque (wrench 12) using
pneumatic torque gun. (Make sure that
O-ring is present in the adapter.)
(6)
HB100WE104
HB100WE105
UNLOADING SOLENOID VALVE
ASSEMBLY
ASSEMBLY
Assemble the solenoid as shown in the
picture and tighten it to 5.10 kgf·m (36.9
lbf·ft) torque (wrench 24) using pneumatic
torque gun.
7)
7)
(1)
HB100WE106
Insert the coil into the solenoid.
Assemble the insulator.
(2)
(3)
LS VALVE ASSEMBLY
LS VALVE ASSEMBLY
Insert orifice of (͚1.25 mm) in the LS
cavity as shown in picture.
8)
8)
(1)
6-100
HB100WE107
Assemble the LS valve into LS cavity and
tighten it to 2.45 kgf·m (17.7 lbf·ft) torque
(wrench 19) using pneumatic torque gun.
(2)
HB100WE108
MAIN RELIEF VALVE ASSEMBLY
Assemble main relief valve into the main
relief valve cavity as shown in picture and
tighten it to 4.28 kgf·m (31 lbf·ft) torque
(wrench 36) using pneumatic torque gun.
9)
9)
(1)
HB100WE109
PORT RELIEF VALVE ASSEMBLY
Assemble the port relief valve into the port
relief valve cavity as describe below and
tighten it to 2.45 kgf·m (17.7 lbf·ft) torque
(wrench 19) using pneumatic torque gun.
1st section (from inlet) : ZTAL-00206
2nd section (bucket) : ZTAL-00196/00197
3rd section (boom) : ZTAL-00148
10)
10)
(1)
HB100WE110
PORT RELIEF VALVE CAVITY PLUG
ASSEMBLY
ASSEMBLY
Plug remaining port relief cavities with
P3T plugs (i.e. on B1 & B2 port) and
tighten it to 4.28 kgf·m (31 lbf·ft) torque
(wrench 12) using pneumatic torque gun.
11)
11)
(1)
·
·
·
Thank you very much for
your reading. Please Click
Here. Then Get COMPLETE
MANUAL. NO WAITING
NOTE:
If there is no response to
click on the link above,
please download the PDF
document first and then
click on it.
6-101
HB100WE111
SPOOL ASSEMBLY
SPOOL ASSEMBLY
Lubricate all the spool cavities with hyspin
VG46.
Insert spool as describe below with eye
end of the spool is on the lever side.
1st section (Aux) : ZTAL-00167
2nd section (bucket) : ZTAL-00167
3rd section (boom) : ZTAL-00168
Move the spools in and out two to three
times for free movement.
12)
12)
(1)
(2)
(3)
HB100WE112
O-RING AND SPACER ASSEMBLY ON
CONTROL KIT SIDE
CONTROL KIT SIDE
Assemble the O-ring in the O-ring groove
as shown in the picture.
Assemble the spacer into the spacer
groove provided in spool cavity (chamfered
face should go inside the cavity).
13)
13)
(1)
(2)
HB100WE113
CONTROL KIT ASSEMBLY ON BOTH
SIDE OF THE VALVE
SIDE OF THE VALVE
Apply a drop of loctite #270 thread locker
on control kit screw threads.
Place control kit spring in between two
bushes as shown, and then assemble
these into the spool with control kit screw.
(Bucket control kit : ZTAL-00192,
boom control kit : ZTAL-00234)
14)
14)
(1)
(2)
·
·
·
HB100WE114
Tighten the control kit to 0.99 kgf·m (7.16
lbf·ft) torque (wrench 04) using pneumatic
torque gun.
Lubricate the proper quantity of grease to
all control kits.
(3)
(4)
6-102
HB100WE115
Assemble the end cap with M6 screws
and tighten to 0.67 kgf·m (4.85 lbf·ft)
torque using pneumatic torque gun.
(5)
HB100WE116
LEVER KIT ASSEMBLY
LEVER KIT ASSEMBLY
Assemble the O-ring in the O-ring groove
as shown in the picture.
Assemble the spacer into the spacer
groove provided in spool cavity (chamfered
face should go inside the cavity)
15)
15)
(1)
(2)
HB100WE117
Assemble lever cap and tighten it with M6
screws to 0.99 kgf·m (7.16 lbf·ft) torque
using pneumatic torque gun.
(3)
HB100WE118
RE PLUG ASSEMBLY
RE PLUG ASSEMBLY
Assemble the RE plug (M18×1.5 mm)
in tank port as shown in the picture and
tighten it with allen key.
16)
16)
(1)

More Related Content

Similar to Hyundai hb100 backhoe loader service repair manual

Hyundai hb100 backhoe loader service repair manual
Hyundai hb100 backhoe loader service repair manualHyundai hb100 backhoe loader service repair manual
Hyundai hb100 backhoe loader service repair manualudjjfkkskemm
 
Hyundai hb100 backhoe loader service repair manual
Hyundai hb100 backhoe loader service repair manualHyundai hb100 backhoe loader service repair manual
Hyundai hb100 backhoe loader service repair manualeudskkejedmm
 
Hyundai hb90 backhoe loader service repair manual
Hyundai hb90 backhoe loader service repair manualHyundai hb90 backhoe loader service repair manual
Hyundai hb90 backhoe loader service repair manualfjskekfsmem
 
Hyundai hb90 backhoe loader service repair manual
Hyundai hb90 backhoe loader service repair manualHyundai hb90 backhoe loader service repair manual
Hyundai hb90 backhoe loader service repair manualeudskkejedmm
 
Hyundai hb100 backhoe loader service repair manual
Hyundai hb100 backhoe loader service repair manualHyundai hb100 backhoe loader service repair manual
Hyundai hb100 backhoe loader service repair manualfjskekfsmem
 
Hyundai 50 d 7e forklift truck service repair manual
Hyundai 50 d 7e forklift truck service repair manualHyundai 50 d 7e forklift truck service repair manual
Hyundai 50 d 7e forklift truck service repair manualfusjejkdkmse
 
Hyundai 70 d 7e forklift truck service repair manual
Hyundai 70 d 7e forklift truck service repair manualHyundai 70 d 7e forklift truck service repair manual
Hyundai 70 d 7e forklift truck service repair manualfusjejkdkmse
 
Hyundai 60 d 7e forklift truck service repair manual
Hyundai 60 d 7e forklift truck service repair manualHyundai 60 d 7e forklift truck service repair manual
Hyundai 60 d 7e forklift truck service repair manualfusjejkdkmse
 
Hyundai 20253032 bc 7 forklift truck service repair manual
Hyundai 20253032 bc 7 forklift truck service repair manualHyundai 20253032 bc 7 forklift truck service repair manual
Hyundai 20253032 bc 7 forklift truck service repair manualfjjskekmdmme
 
Hyundai 20253032 bc 7 forklift truck service repair manual
Hyundai 20253032 bc 7 forklift truck service repair manualHyundai 20253032 bc 7 forklift truck service repair manual
Hyundai 20253032 bc 7 forklift truck service repair manualidkkddkmd
 

Similar to Hyundai hb100 backhoe loader service repair manual (10)

Hyundai hb100 backhoe loader service repair manual
Hyundai hb100 backhoe loader service repair manualHyundai hb100 backhoe loader service repair manual
Hyundai hb100 backhoe loader service repair manual
 
Hyundai hb100 backhoe loader service repair manual
Hyundai hb100 backhoe loader service repair manualHyundai hb100 backhoe loader service repair manual
Hyundai hb100 backhoe loader service repair manual
 
Hyundai hb90 backhoe loader service repair manual
Hyundai hb90 backhoe loader service repair manualHyundai hb90 backhoe loader service repair manual
Hyundai hb90 backhoe loader service repair manual
 
Hyundai hb90 backhoe loader service repair manual
Hyundai hb90 backhoe loader service repair manualHyundai hb90 backhoe loader service repair manual
Hyundai hb90 backhoe loader service repair manual
 
Hyundai hb100 backhoe loader service repair manual
Hyundai hb100 backhoe loader service repair manualHyundai hb100 backhoe loader service repair manual
Hyundai hb100 backhoe loader service repair manual
 
Hyundai 50 d 7e forklift truck service repair manual
Hyundai 50 d 7e forklift truck service repair manualHyundai 50 d 7e forklift truck service repair manual
Hyundai 50 d 7e forklift truck service repair manual
 
Hyundai 70 d 7e forklift truck service repair manual
Hyundai 70 d 7e forklift truck service repair manualHyundai 70 d 7e forklift truck service repair manual
Hyundai 70 d 7e forklift truck service repair manual
 
Hyundai 60 d 7e forklift truck service repair manual
Hyundai 60 d 7e forklift truck service repair manualHyundai 60 d 7e forklift truck service repair manual
Hyundai 60 d 7e forklift truck service repair manual
 
Hyundai 20253032 bc 7 forklift truck service repair manual
Hyundai 20253032 bc 7 forklift truck service repair manualHyundai 20253032 bc 7 forklift truck service repair manual
Hyundai 20253032 bc 7 forklift truck service repair manual
 
Hyundai 20253032 bc 7 forklift truck service repair manual
Hyundai 20253032 bc 7 forklift truck service repair manualHyundai 20253032 bc 7 forklift truck service repair manual
Hyundai 20253032 bc 7 forklift truck service repair manual
 

More from iekkdmmem

Jcb tm320 tier3 telescopic wheeled loader service repair manual
Jcb tm320 tier3 telescopic wheeled loader service repair manualJcb tm320 tier3 telescopic wheeled loader service repair manual
Jcb tm320 tier3 telescopic wheeled loader service repair manualiekkdmmem
 
Jcb tm310 wm tier3 telescopic wheeled loader service repair manual
Jcb tm310 wm tier3 telescopic wheeled loader service repair manualJcb tm310 wm tier3 telescopic wheeled loader service repair manual
Jcb tm310 wm tier3 telescopic wheeled loader service repair manualiekkdmmem
 
Jcb tm310 s tier3 telescopic wheeled loader service repair manual
Jcb tm310 s tier3 telescopic wheeled loader service repair manualJcb tm310 s tier3 telescopic wheeled loader service repair manual
Jcb tm310 s tier3 telescopic wheeled loader service repair manualiekkdmmem
 
Jcb tm310 tier3 telescopic wheeled loader service repair manual
Jcb tm310 tier3 telescopic wheeled loader service repair manualJcb tm310 tier3 telescopic wheeled loader service repair manual
Jcb tm310 tier3 telescopic wheeled loader service repair manualiekkdmmem
 
Jcb sd70 pt axles service repair manual
Jcb sd70  pt axles service repair manualJcb sd70  pt axles service repair manual
Jcb sd70 pt axles service repair manualiekkdmmem
 
Jcb sd55 3 piece axles service repair manual
Jcb sd55 3 piece axles service repair manualJcb sd55 3 piece axles service repair manual
Jcb sd55 3 piece axles service repair manualiekkdmmem
 
Jcb pd55 axles service repair manual
Jcb pd55 axles service repair manualJcb pd55 axles service repair manual
Jcb pd55 axles service repair manualiekkdmmem
 
Jcb pd40 axles service repair manual
Jcb pd40 axles service repair manualJcb pd40 axles service repair manual
Jcb pd40 axles service repair manualiekkdmmem
 
Jcb jz140 tier 3 isuzu tracked excavator service repair manual from 1789429 t...
Jcb jz140 tier 3 isuzu tracked excavator service repair manual from 1789429 t...Jcb jz140 tier 3 isuzu tracked excavator service repair manual from 1789429 t...
Jcb jz140 tier 3 isuzu tracked excavator service repair manual from 1789429 t...iekkdmmem
 
Jcb jz140 tier 3 isuzu tracked excavator service repair manual from 1390000 t...
Jcb jz140 tier 3 isuzu tracked excavator service repair manual from 1390000 t...Jcb jz140 tier 3 isuzu tracked excavator service repair manual from 1390000 t...
Jcb jz140 tier 3 isuzu tracked excavator service repair manual from 1390000 t...iekkdmmem
 
Jcb js290 tier iii auto tracked excavator service repair manual sn 01421200...
Jcb js290   tier iii auto tracked excavator service repair manual sn 01421200...Jcb js290   tier iii auto tracked excavator service repair manual sn 01421200...
Jcb js290 tier iii auto tracked excavator service repair manual sn 01421200...iekkdmmem
 
Iveco nef45 am1 service repair manual
Iveco nef45 am1 service repair manualIveco nef45 am1 service repair manual
Iveco nef45 am1 service repair manualiekkdmmem
 
Hyundai r170 w 9 wheel excavator service repair manual
Hyundai r170 w 9 wheel excavator service repair manualHyundai r170 w 9 wheel excavator service repair manual
Hyundai r170 w 9 wheel excavator service repair manualiekkdmmem
 
Hyundai r160 lc 7a crawler excavator service repair manual
Hyundai r160 lc 7a crawler excavator service repair manualHyundai r160 lc 7a crawler excavator service repair manual
Hyundai r160 lc 7a crawler excavator service repair manualiekkdmmem
 
Hyundai r140 w 7a wheel excavator service repair manual
Hyundai r140 w 7a wheel excavator service repair manualHyundai r140 w 7a wheel excavator service repair manual
Hyundai r140 w 7a wheel excavator service repair manualiekkdmmem
 
Hyundai r55 w 7 wheel excavator service repair manual
Hyundai r55 w 7 wheel excavator service repair manualHyundai r55 w 7 wheel excavator service repair manual
Hyundai r55 w 7 wheel excavator service repair manualiekkdmmem
 
Hyundai r36 n 7 mini excavator service repair manual
Hyundai r36 n 7 mini excavator service repair manualHyundai r36 n 7 mini excavator service repair manual
Hyundai r36 n 7 mini excavator service repair manualiekkdmmem
 
Fiat kobelco sl55 bh skid steer loader service repair manual
Fiat kobelco sl55 bh skid steer loader service repair manualFiat kobelco sl55 bh skid steer loader service repair manual
Fiat kobelco sl55 bh skid steer loader service repair manualiekkdmmem
 
New holland w130 wheel loader service repair manual
New holland w130 wheel loader service repair manualNew holland w130 wheel loader service repair manual
New holland w130 wheel loader service repair manualiekkdmmem
 
New holland tt75 tier3 engine, 2 wd tractor service repair manual
New holland tt75 tier3 engine, 2 wd tractor service repair manualNew holland tt75 tier3 engine, 2 wd tractor service repair manual
New holland tt75 tier3 engine, 2 wd tractor service repair manualiekkdmmem
 

More from iekkdmmem (20)

Jcb tm320 tier3 telescopic wheeled loader service repair manual
Jcb tm320 tier3 telescopic wheeled loader service repair manualJcb tm320 tier3 telescopic wheeled loader service repair manual
Jcb tm320 tier3 telescopic wheeled loader service repair manual
 
Jcb tm310 wm tier3 telescopic wheeled loader service repair manual
Jcb tm310 wm tier3 telescopic wheeled loader service repair manualJcb tm310 wm tier3 telescopic wheeled loader service repair manual
Jcb tm310 wm tier3 telescopic wheeled loader service repair manual
 
Jcb tm310 s tier3 telescopic wheeled loader service repair manual
Jcb tm310 s tier3 telescopic wheeled loader service repair manualJcb tm310 s tier3 telescopic wheeled loader service repair manual
Jcb tm310 s tier3 telescopic wheeled loader service repair manual
 
Jcb tm310 tier3 telescopic wheeled loader service repair manual
Jcb tm310 tier3 telescopic wheeled loader service repair manualJcb tm310 tier3 telescopic wheeled loader service repair manual
Jcb tm310 tier3 telescopic wheeled loader service repair manual
 
Jcb sd70 pt axles service repair manual
Jcb sd70  pt axles service repair manualJcb sd70  pt axles service repair manual
Jcb sd70 pt axles service repair manual
 
Jcb sd55 3 piece axles service repair manual
Jcb sd55 3 piece axles service repair manualJcb sd55 3 piece axles service repair manual
Jcb sd55 3 piece axles service repair manual
 
Jcb pd55 axles service repair manual
Jcb pd55 axles service repair manualJcb pd55 axles service repair manual
Jcb pd55 axles service repair manual
 
Jcb pd40 axles service repair manual
Jcb pd40 axles service repair manualJcb pd40 axles service repair manual
Jcb pd40 axles service repair manual
 
Jcb jz140 tier 3 isuzu tracked excavator service repair manual from 1789429 t...
Jcb jz140 tier 3 isuzu tracked excavator service repair manual from 1789429 t...Jcb jz140 tier 3 isuzu tracked excavator service repair manual from 1789429 t...
Jcb jz140 tier 3 isuzu tracked excavator service repair manual from 1789429 t...
 
Jcb jz140 tier 3 isuzu tracked excavator service repair manual from 1390000 t...
Jcb jz140 tier 3 isuzu tracked excavator service repair manual from 1390000 t...Jcb jz140 tier 3 isuzu tracked excavator service repair manual from 1390000 t...
Jcb jz140 tier 3 isuzu tracked excavator service repair manual from 1390000 t...
 
Jcb js290 tier iii auto tracked excavator service repair manual sn 01421200...
Jcb js290   tier iii auto tracked excavator service repair manual sn 01421200...Jcb js290   tier iii auto tracked excavator service repair manual sn 01421200...
Jcb js290 tier iii auto tracked excavator service repair manual sn 01421200...
 
Iveco nef45 am1 service repair manual
Iveco nef45 am1 service repair manualIveco nef45 am1 service repair manual
Iveco nef45 am1 service repair manual
 
Hyundai r170 w 9 wheel excavator service repair manual
Hyundai r170 w 9 wheel excavator service repair manualHyundai r170 w 9 wheel excavator service repair manual
Hyundai r170 w 9 wheel excavator service repair manual
 
Hyundai r160 lc 7a crawler excavator service repair manual
Hyundai r160 lc 7a crawler excavator service repair manualHyundai r160 lc 7a crawler excavator service repair manual
Hyundai r160 lc 7a crawler excavator service repair manual
 
Hyundai r140 w 7a wheel excavator service repair manual
Hyundai r140 w 7a wheel excavator service repair manualHyundai r140 w 7a wheel excavator service repair manual
Hyundai r140 w 7a wheel excavator service repair manual
 
Hyundai r55 w 7 wheel excavator service repair manual
Hyundai r55 w 7 wheel excavator service repair manualHyundai r55 w 7 wheel excavator service repair manual
Hyundai r55 w 7 wheel excavator service repair manual
 
Hyundai r36 n 7 mini excavator service repair manual
Hyundai r36 n 7 mini excavator service repair manualHyundai r36 n 7 mini excavator service repair manual
Hyundai r36 n 7 mini excavator service repair manual
 
Fiat kobelco sl55 bh skid steer loader service repair manual
Fiat kobelco sl55 bh skid steer loader service repair manualFiat kobelco sl55 bh skid steer loader service repair manual
Fiat kobelco sl55 bh skid steer loader service repair manual
 
New holland w130 wheel loader service repair manual
New holland w130 wheel loader service repair manualNew holland w130 wheel loader service repair manual
New holland w130 wheel loader service repair manual
 
New holland tt75 tier3 engine, 2 wd tractor service repair manual
New holland tt75 tier3 engine, 2 wd tractor service repair manualNew holland tt75 tier3 engine, 2 wd tractor service repair manual
New holland tt75 tier3 engine, 2 wd tractor service repair manual
 

Recently uploaded

Marathi Call Girls Santacruz WhatsApp +91-9930687706, Best Service
Marathi Call Girls Santacruz WhatsApp +91-9930687706, Best ServiceMarathi Call Girls Santacruz WhatsApp +91-9930687706, Best Service
Marathi Call Girls Santacruz WhatsApp +91-9930687706, Best Servicemeghakumariji156
 
Bhilai Escorts Service Girl ^ 8250092165, WhatsApp Anytime Bhilai
Bhilai Escorts Service Girl ^ 8250092165, WhatsApp Anytime BhilaiBhilai Escorts Service Girl ^ 8250092165, WhatsApp Anytime Bhilai
Bhilai Escorts Service Girl ^ 8250092165, WhatsApp Anytime Bhilaimeghakumariji156
 
❤️Panchkula Enjoy 24/7 Escort Service sdf
❤️Panchkula Enjoy 24/7 Escort Service sdf❤️Panchkula Enjoy 24/7 Escort Service sdf
❤️Panchkula Enjoy 24/7 Escort Service sdfvershagrag
 
一比一原版西安大略大学毕业证(UWO毕业证)成绩单原件一模一样
一比一原版西安大略大学毕业证(UWO毕业证)成绩单原件一模一样一比一原版西安大略大学毕业证(UWO毕业证)成绩单原件一模一样
一比一原版西安大略大学毕业证(UWO毕业证)成绩单原件一模一样wsppdmt
 
一比一原版(PU学位证书)普渡大学毕业证学历认证加急办理
一比一原版(PU学位证书)普渡大学毕业证学历认证加急办理一比一原版(PU学位证书)普渡大学毕业证学历认证加急办理
一比一原版(PU学位证书)普渡大学毕业证学历认证加急办理ezgenuh
 
John Deere Tractors 5415 Diagnostic Repair Service Manual.pdf
John Deere Tractors 5415 Diagnostic Repair Service Manual.pdfJohn Deere Tractors 5415 Diagnostic Repair Service Manual.pdf
John Deere Tractors 5415 Diagnostic Repair Service Manual.pdfExcavator
 
如何办理(Waterloo毕业证书)滑铁卢大学毕业证毕业证成绩单原版一比一
如何办理(Waterloo毕业证书)滑铁卢大学毕业证毕业证成绩单原版一比一如何办理(Waterloo毕业证书)滑铁卢大学毕业证毕业证成绩单原版一比一
如何办理(Waterloo毕业证书)滑铁卢大学毕业证毕业证成绩单原版一比一avy6anjnd
 
Changodar Call Girls Book Now 7737669865 Top Class Escort Service Available
Changodar Call Girls Book Now 7737669865 Top Class Escort Service AvailableChangodar Call Girls Book Now 7737669865 Top Class Escort Service Available
Changodar Call Girls Book Now 7737669865 Top Class Escort Service Availablegargpaaro
 
01552_14_01306_8.0_EPS_CMP_SW_VC2_Notebook.doc
01552_14_01306_8.0_EPS_CMP_SW_VC2_Notebook.doc01552_14_01306_8.0_EPS_CMP_SW_VC2_Notebook.doc
01552_14_01306_8.0_EPS_CMP_SW_VC2_Notebook.docazrfdstgdgdfh
 
如何办理伦敦商学院毕业证(LBS毕业证)毕业证成绩单原版一比一
如何办理伦敦商学院毕业证(LBS毕业证)毕业证成绩单原版一比一如何办理伦敦商学院毕业证(LBS毕业证)毕业证成绩单原版一比一
如何办理伦敦商学院毕业证(LBS毕业证)毕业证成绩单原版一比一avy6anjnd
 
Effortless Driving Experience Premier Mercedes Sprinter Suspension Service
Effortless Driving Experience Premier Mercedes Sprinter Suspension ServiceEffortless Driving Experience Premier Mercedes Sprinter Suspension Service
Effortless Driving Experience Premier Mercedes Sprinter Suspension ServiceSprinter Gurus
 
9352852248 Call Girls Gota Escort Service Available 24×7 In Gota
9352852248 Call Girls  Gota Escort Service Available 24×7 In Gota9352852248 Call Girls  Gota Escort Service Available 24×7 In Gota
9352852248 Call Girls Gota Escort Service Available 24×7 In Gotagargpaaro
 
如何办理多伦多大学毕业证(UofT毕业证书)成绩单原版一比一
如何办理多伦多大学毕业证(UofT毕业证书)成绩单原版一比一如何办理多伦多大学毕业证(UofT毕业证书)成绩单原版一比一
如何办理多伦多大学毕业证(UofT毕业证书)成绩单原版一比一opyff
 
Top profile Call Girls In Ranchi [ 7014168258 ] Call Me For Genuine Models We...
Top profile Call Girls In Ranchi [ 7014168258 ] Call Me For Genuine Models We...Top profile Call Girls In Ranchi [ 7014168258 ] Call Me For Genuine Models We...
Top profile Call Girls In Ranchi [ 7014168258 ] Call Me For Genuine Models We...gajnagarg
 
一比一原版(Greenwich毕业证书)格林威治大学毕业证如何办理
一比一原版(Greenwich毕业证书)格林威治大学毕业证如何办理一比一原版(Greenwich毕业证书)格林威治大学毕业证如何办理
一比一原版(Greenwich毕业证书)格林威治大学毕业证如何办理bd2c5966a56d
 
+97470301568>>buy vape oil,thc oil weed,hash and cannabis oil in qatar doha}}
+97470301568>>buy vape oil,thc oil weed,hash and cannabis oil in qatar doha}}+97470301568>>buy vape oil,thc oil weed,hash and cannabis oil in qatar doha}}
+97470301568>>buy vape oil,thc oil weed,hash and cannabis oil in qatar doha}}Health
 
T.L.E 5S's (Seiri, Seiton, Seiso, Seiketsu, Shitsuke).pptx
T.L.E 5S's (Seiri, Seiton, Seiso, Seiketsu, Shitsuke).pptxT.L.E 5S's (Seiri, Seiton, Seiso, Seiketsu, Shitsuke).pptx
T.L.E 5S's (Seiri, Seiton, Seiso, Seiketsu, Shitsuke).pptxBernardLongboan
 
一比一原版(UdeM学位证书)蒙特利尔大学毕业证学历认证怎样办
一比一原版(UdeM学位证书)蒙特利尔大学毕业证学历认证怎样办一比一原版(UdeM学位证书)蒙特利尔大学毕业证学历认证怎样办
一比一原版(UdeM学位证书)蒙特利尔大学毕业证学历认证怎样办ezgenuh
 
Why Does My Porsche Cayenne's Exhaust Sound So Loud
Why Does My Porsche Cayenne's Exhaust Sound So LoudWhy Does My Porsche Cayenne's Exhaust Sound So Loud
Why Does My Porsche Cayenne's Exhaust Sound So LoudRoyalty Auto Service
 
What Does The Engine Malfunction Reduced Power Message Mean For Your BMW X5
What Does The Engine Malfunction Reduced Power Message Mean For Your BMW X5What Does The Engine Malfunction Reduced Power Message Mean For Your BMW X5
What Does The Engine Malfunction Reduced Power Message Mean For Your BMW X5Bavarian Workshop
 

Recently uploaded (20)

Marathi Call Girls Santacruz WhatsApp +91-9930687706, Best Service
Marathi Call Girls Santacruz WhatsApp +91-9930687706, Best ServiceMarathi Call Girls Santacruz WhatsApp +91-9930687706, Best Service
Marathi Call Girls Santacruz WhatsApp +91-9930687706, Best Service
 
Bhilai Escorts Service Girl ^ 8250092165, WhatsApp Anytime Bhilai
Bhilai Escorts Service Girl ^ 8250092165, WhatsApp Anytime BhilaiBhilai Escorts Service Girl ^ 8250092165, WhatsApp Anytime Bhilai
Bhilai Escorts Service Girl ^ 8250092165, WhatsApp Anytime Bhilai
 
❤️Panchkula Enjoy 24/7 Escort Service sdf
❤️Panchkula Enjoy 24/7 Escort Service sdf❤️Panchkula Enjoy 24/7 Escort Service sdf
❤️Panchkula Enjoy 24/7 Escort Service sdf
 
一比一原版西安大略大学毕业证(UWO毕业证)成绩单原件一模一样
一比一原版西安大略大学毕业证(UWO毕业证)成绩单原件一模一样一比一原版西安大略大学毕业证(UWO毕业证)成绩单原件一模一样
一比一原版西安大略大学毕业证(UWO毕业证)成绩单原件一模一样
 
一比一原版(PU学位证书)普渡大学毕业证学历认证加急办理
一比一原版(PU学位证书)普渡大学毕业证学历认证加急办理一比一原版(PU学位证书)普渡大学毕业证学历认证加急办理
一比一原版(PU学位证书)普渡大学毕业证学历认证加急办理
 
John Deere Tractors 5415 Diagnostic Repair Service Manual.pdf
John Deere Tractors 5415 Diagnostic Repair Service Manual.pdfJohn Deere Tractors 5415 Diagnostic Repair Service Manual.pdf
John Deere Tractors 5415 Diagnostic Repair Service Manual.pdf
 
如何办理(Waterloo毕业证书)滑铁卢大学毕业证毕业证成绩单原版一比一
如何办理(Waterloo毕业证书)滑铁卢大学毕业证毕业证成绩单原版一比一如何办理(Waterloo毕业证书)滑铁卢大学毕业证毕业证成绩单原版一比一
如何办理(Waterloo毕业证书)滑铁卢大学毕业证毕业证成绩单原版一比一
 
Changodar Call Girls Book Now 7737669865 Top Class Escort Service Available
Changodar Call Girls Book Now 7737669865 Top Class Escort Service AvailableChangodar Call Girls Book Now 7737669865 Top Class Escort Service Available
Changodar Call Girls Book Now 7737669865 Top Class Escort Service Available
 
01552_14_01306_8.0_EPS_CMP_SW_VC2_Notebook.doc
01552_14_01306_8.0_EPS_CMP_SW_VC2_Notebook.doc01552_14_01306_8.0_EPS_CMP_SW_VC2_Notebook.doc
01552_14_01306_8.0_EPS_CMP_SW_VC2_Notebook.doc
 
如何办理伦敦商学院毕业证(LBS毕业证)毕业证成绩单原版一比一
如何办理伦敦商学院毕业证(LBS毕业证)毕业证成绩单原版一比一如何办理伦敦商学院毕业证(LBS毕业证)毕业证成绩单原版一比一
如何办理伦敦商学院毕业证(LBS毕业证)毕业证成绩单原版一比一
 
Effortless Driving Experience Premier Mercedes Sprinter Suspension Service
Effortless Driving Experience Premier Mercedes Sprinter Suspension ServiceEffortless Driving Experience Premier Mercedes Sprinter Suspension Service
Effortless Driving Experience Premier Mercedes Sprinter Suspension Service
 
9352852248 Call Girls Gota Escort Service Available 24×7 In Gota
9352852248 Call Girls  Gota Escort Service Available 24×7 In Gota9352852248 Call Girls  Gota Escort Service Available 24×7 In Gota
9352852248 Call Girls Gota Escort Service Available 24×7 In Gota
 
如何办理多伦多大学毕业证(UofT毕业证书)成绩单原版一比一
如何办理多伦多大学毕业证(UofT毕业证书)成绩单原版一比一如何办理多伦多大学毕业证(UofT毕业证书)成绩单原版一比一
如何办理多伦多大学毕业证(UofT毕业证书)成绩单原版一比一
 
Top profile Call Girls In Ranchi [ 7014168258 ] Call Me For Genuine Models We...
Top profile Call Girls In Ranchi [ 7014168258 ] Call Me For Genuine Models We...Top profile Call Girls In Ranchi [ 7014168258 ] Call Me For Genuine Models We...
Top profile Call Girls In Ranchi [ 7014168258 ] Call Me For Genuine Models We...
 
一比一原版(Greenwich毕业证书)格林威治大学毕业证如何办理
一比一原版(Greenwich毕业证书)格林威治大学毕业证如何办理一比一原版(Greenwich毕业证书)格林威治大学毕业证如何办理
一比一原版(Greenwich毕业证书)格林威治大学毕业证如何办理
 
+97470301568>>buy vape oil,thc oil weed,hash and cannabis oil in qatar doha}}
+97470301568>>buy vape oil,thc oil weed,hash and cannabis oil in qatar doha}}+97470301568>>buy vape oil,thc oil weed,hash and cannabis oil in qatar doha}}
+97470301568>>buy vape oil,thc oil weed,hash and cannabis oil in qatar doha}}
 
T.L.E 5S's (Seiri, Seiton, Seiso, Seiketsu, Shitsuke).pptx
T.L.E 5S's (Seiri, Seiton, Seiso, Seiketsu, Shitsuke).pptxT.L.E 5S's (Seiri, Seiton, Seiso, Seiketsu, Shitsuke).pptx
T.L.E 5S's (Seiri, Seiton, Seiso, Seiketsu, Shitsuke).pptx
 
一比一原版(UdeM学位证书)蒙特利尔大学毕业证学历认证怎样办
一比一原版(UdeM学位证书)蒙特利尔大学毕业证学历认证怎样办一比一原版(UdeM学位证书)蒙特利尔大学毕业证学历认证怎样办
一比一原版(UdeM学位证书)蒙特利尔大学毕业证学历认证怎样办
 
Why Does My Porsche Cayenne's Exhaust Sound So Loud
Why Does My Porsche Cayenne's Exhaust Sound So LoudWhy Does My Porsche Cayenne's Exhaust Sound So Loud
Why Does My Porsche Cayenne's Exhaust Sound So Loud
 
What Does The Engine Malfunction Reduced Power Message Mean For Your BMW X5
What Does The Engine Malfunction Reduced Power Message Mean For Your BMW X5What Does The Engine Malfunction Reduced Power Message Mean For Your BMW X5
What Does The Engine Malfunction Reduced Power Message Mean For Your BMW X5
 

Hyundai hb100 backhoe loader service repair manual

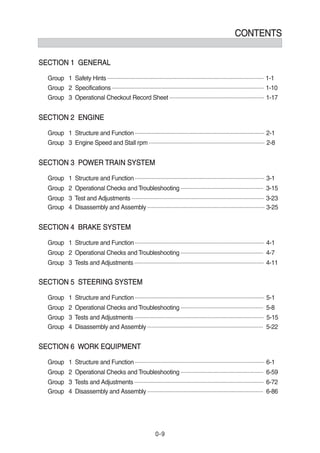
  • 1. 0-9 CONTENTS CONTENTS SECTION 1 GENERAL SECTION 1 GENERAL Group 1 Safety Hints -------------------------------------------------------------------------------------------------------- 1-1 Group 2 Specifications ----------------------------------------------------------------------------------------------------- 1-10 Group 3 Operational Checkout Record Sheet --------------------------------------------------------------- 1-17 SECTION 2 ENGINE SECTION 2 ENGINE Group 1 Structure and Function -------------------------------------------------------------------------------------- 2-1 Group 3 Engine Speed and Stall rpm ----------------------------------------------------------------------------- 2-8 SECTION 3 POWER TRAIN SYSTEM SECTION 3 POWER TRAIN SYSTEM Group 1 Structure and Function -------------------------------------------------------------------------------------- 3-1 Group 2 Operational Checks and Troubleshooting ------------------------------------------------------- 3-15 Group 3 Test and Adjustments ---------------------------------------------------------------------------------------- 3-23 Group 4 Disassembly and Assembly ------------------------------------------------------------------------------ 3-25 SECTION 4 BRAKE SYSTEM SECTION 4 BRAKE SYSTEM Group 1 Structure and Function -------------------------------------------------------------------------------------- 4-1 Group 2 Operational Checks and Troubleshooting ------------------------------------------------------- 4-7 Group 3 Tests and Adjustments -------------------------------------------------------------------------------------- 4-11 SECTION 5 STEERING SYSTEM SECTION 5 STEERING SYSTEM Group 1 Structure and Function -------------------------------------------------------------------------------------- 5-1 Group 2 Operational Checks and Troubleshooting ------------------------------------------------------- 5-8 Group 3 Tests and Adjustments -------------------------------------------------------------------------------------- 5-15 Group 4 Disassembly and Assembly ----------------------------------------------------------------------------- 5-22 SECTION 6 WORK EQUIPMENT SECTION 6 WORK EQUIPMENT Group 1 Structure and Function -------------------------------------------------------------------------------------- 6-1 Group 2 Operational Checks and Troubleshooting ------------------------------------------------------- 6-59 Group 3 Tests and Adjustments -------------------------------------------------------------------------------------- 6-72 Group 4 Disassembly and Assembly ----------------------------------------------------------------------------- 6-86
  • 2. 0-10 SECTION 7 ELECTRICAL SYSTEM SECTION 7 ELECTRICAL SYSTEM Group 1 Component Location ---------------------------------------------------------------------------------------- 7-1 Group 2 Electrical Circuit ------------------------------------------------------------------------------------------------ 7-3 Group 3 Monitoring System -------------------------------------------------------------------------------------------- 7-22 Group 4 Switches ------------------------------------------------------------------------------------------------------------ 7-27 Group 5 Electrical Component Specification ---------------------------------------------------------------- 7-35
  • 3. 0-1 FOREWORD FOREWORD 1. STRUCTURE 1. STRUCTURE This service manual has been prepared as an aid to improve the quality of repairs by giving the serviceman an accurate understanding of the product and by showing him the correct way to perform repairs and make judgements. Make sure you understand the contents of this manual and use it to full effect at every opportunity. This service manual mainly contains the necessary technical information for operations performed in a service workshop. For ease of understanding, the manual is divided into the following sections. Structure and function Structure and function This group explains the structure and function of each component. It serves not only to give an understanding of the structure, but also serves as reference material for troubleshooting. Operational checks and troubleshooting Operational checks and troubleshooting This group explains the system operational checks and troubleshooting charts correlating problem to remedy. Tests and adjustments Tests and adjustments This group explains checks to be amide before and after performing repairs, as well as adjustments to be made at completion of the checks and repairs. Disassembly and assembly Disassembly and assembly This section explains the order to be followed when removing, installing, disassembling or assembling each component, as well as precautions to be taken for these operations. The specifications contained in this shop manual are subject to change at any time and without any advance notice. Contact your Hyundai distributor for the latest information.
  • 4. 0-2 Revised edition mark Revised edition mark (ΗΘΙÄ) When a manual is revised, an edition mark is recorded on the bottom outside corner of the pages. Revisions Revisions Revised pages are shown at the list of revised pages on the between the contents page and section 1 page. Symbols Symbols So that the shop manual can be of ample practical use, important places for safety and quality are marked with the following symbols. 2. HOW TO READ THE SERVICE MANUAL 2. HOW TO READ THE SERVICE MANUAL Distribution and updating Distribution and updating Any additions, amendments or other changes will be sent to HYUNDAI distributors. Get the most up-to-date information before you start any work. Filing method Filing method See the page number on the bottom of the page. File the pages in correct order. Following examples shows how to read the page number. Example 1 3 - 3 Section number (3. Power train system) Consecutive page number for each section. Additional pages : Additional pages are indicated by a hyphen(-) and number after the page number. File as in the example. 1. 2. 3. Symbol Item Remarks Special safety precautions are necessary when performing the work. Extra special safety precautions are necessary when performing the work because it is under internal pressure. Special technical precautions or other precautions for preserving standards are necessary when performing the work. Safety Caution ö 10 - 4 10 - 4 - 1 10 - 4 - 2 10 - 5 Added pages
  • 5. 0-3 3. CONVERSION TABLE 3. CONVERSION TABLE Method of using the Conversion Table The Conversion Table in this section is provided to enable simple conversion of figures. For details of the method of using the Conversion Table, see the example given below. Example Example Method of using the Conversion Table to convert from millimeters to inches Convert 55 mm into inches. Locate the number 50 in the vertical column at the left side, take this as ͽ, then draw a horizontal line from ͽ. Locate the number 5in the row across the top, take this as ;, then draw a perpendicular line down from ;. Take the point where the two lines cross as Ϳ. This point Ϳ gives the value when converting from millimeters to inches. Therefore, 55 mm = 2.165 inches. Convert 550 mm into inches. The number 550 does not appear in the table, so divide by 10 (move the decimal point one place to the left) to convert it to 55 mm. Carry out the same procedure as above to convert 55 mm to 2.165 inches. The original value (550 mm) was divided by 10, so multiply 2.165 inches by 10 (move the decimal point one place to the right) to return to the original value. This gives 550 mm = 21.65 inches. 1. 2. (1) (2) (3) (1) (2) (3) Millimeters to inches Millimeters to inches 1mm = 0.03937 in ; ͽ 0 1 2 3 4 5 6 7 8 9 0 0.039 0.079 0.118 0.157 0.197 0.236 0.276 0.315 0.354 10 0.394 0.433 0.472 0.512 0.551 0.591 0.630 0.669 0.709 0.748 20 0.787 0.827 0.866 0.906 0.945 0.984 1.024 1.063 1.102 1.142 30 1.181 1.220 1.260 1.299 1.339 1.378 1.417 1.457 1.496 1.536 40 1.575 1.614 1.654 1.693 1.732 1.772 1.811 1.850 1.890 1.929 50 1.969 2.008 2.047 2.087 2.126 2.165 2.205 2.244 2.283 2.323 60 2.362 2.402 2.441 2.480 2.520 2.559 2.598 2.638 2.677 2.717 70 2.756 2.795 2.835 2.874 2.913 2.953 2.992 3.032 3.071 3.110 80 3.150 3.189 3.228 3.268 3.307 3.346 3.386 3.425 3.465 3.504 90 3.543 3.583 3.622 3.661 3.701 3.740 3.780 3.819 3.858 3.898 Ϳ
  • 6. 6-86 1. MAIN PUMP 1. MAIN PUMP STRUCTURE STRUCTURE 1) 1) GROUP 4 DISASSEMBLY AND ASSEMBLY GROUP 4 DISASSEMBLY AND ASSEMBLY 24 23 4 26 25 22 5 9 26 7 5 22 25 20 33 1 26 21 34 14 28 19 27 13 3 29 30 18 35 15 16 10 16 32 11 25 22 5 5 22 25 20 6 8 2 17 12 31 26 1 Body 2 Body 3 Rear end cover 4 Front cover 5 Thrustplate 6 Driven gear 7 Driven gear 8 Drive shaft 9 Drive shaft 10 Screw 11 Screw 12 Screw 13 Screw 14 Screw 15 Screw 16 Washer 17 Washer 18 O-ring seal 19 O-ring seal 20 Ring 21 O-ring seal 22 Seal 23 Shaft seal 24 Ring 25 Ring 26 Sleeve bearing 27 Spool 28 Filter 29 Spring seat 30 Spring 31 Hub 32 Connection 33 Steel bushing 34 Plug HB100WE21
  • 7. 6-87 GENERAL INSTRUCTIONS GENERAL INSTRUCTIONS Check immediately that any spare parts you receive have not been damaged in shipment. Always work in a clean environment. Wash all components in solvent and blow dry with compressed air before refitting. Take care not to damage rubber seals. Avoid damaging precision machined surfaces. Components should fit into their housings without excessive force. If force is necessary, this normally means that the component does not have the correct dimensional tolerances of is aligned incorrectly. When hand pressure is insufficient, only use presses or rubber hammer to fit components. Never strike components with steel hammers. Steel bushing must be fitted only with a suitable press. Do not use hammers to fit bearings. Always respect the direction of rotation when assembling components. 2) 2) (1) (2) (3) (4) (5) (6) (7) (8) (9) (10) (11)
  • 8. 6-88 HB100WE51 DISASSEMBLY DISASSEMBLY LS priority valve LS priority valve Loosen and remove the assembling bolts and washers from the pump. 3) 3) (1) (1) Loosen and remove plug and take out spring & spool. (Only when it is needed to replace components inside). Pay attention not to give any damage on the surface of the spool and contamina- tion to the orifices prearranged at the spool. HB100WE52 ① ② ※ HB100WE53 Mounting flange Mounting flange Loosen and remove the assembling bolts and washers from the pump. (2) (2) ①
  • 9. 6-89 HB100WE54 HB100WE55 HB100WE56 Remove mounting flange taking care to keep it as straight as possible during removal. Tap around the edge with rubber mallet in order to break away from the body. Ensure that while removing it, the drive shaft and other components remain position. ② ※ Remove shaft seal with (-) screwdriver and take out snap ring with proper tool and shaft seal again. Take out the shaft seals only needed. Shaft seals disassembled from the mounting flange is not reusable. ③ ※ 1st working section 1st working section Remove the pressure plate with prearranged parts, O-ring & back up ring from the working section and examine it carefully. (3) (3) ①
  • 10. 6-90 HB100WE57 HB100WE58 Pull out driving gear & driven gear keeping gears as straight as possible. Remove other pressure plate on rear side with same way for front side. ② ③ Remove square O-ring on the groove of body. Remove through shaft and front body. Tap around marked points with rubber mallet all around to break away first body from second. Do not wedge between the bodies, it may give serious damage on the surface. ④ ⑤ ※ HB100WE59 2nd working section 2nd working section Remove all components inside of second body with same way for 1st section. Remove the square O-ring if necessary. (4) (4) ① ②
  • 11. 6-91 HB100WE60 ASSEMBLY ASSEMBLY Preassemble Preassemble Pressure plates Pressure plates Locate O-ring into the groove on the aluminum pressure plate. Locate back-up ring upon the O-ring. Smear clean grease on the O-ring & back-up ring to fix their position while moving. 4) 4) (1) (1) Working body Working body Insert square rings into grooves. Shape of square ring is different depend on type of bodies. HB100WE61 ① ② ③ ① HB100WE62 Mounting flange Mounting flange Locate shaft seal inside shaft hole to the end. Insert snap ring and locate it into the groove prearranged on the mounting flange. Locate shaft seal again but different direction. ① ② ③
  • 12. 6-92 LS - priority valve LS - priority valve Insert the spool prearranged all orifice first, and spring, plugs. ·Torque value of both sides plugs : 10.2 kgf·m (73.8 lbf·ft) ·Torque value of LS plug : 1.53 kgf·m (11.1 lbf·ft) HB100WE63 ① HB100WE64 Assembling Assembling Prepare cleaned 2nd body prearranged guard pins and square O-ring. Insert a pressure plate prearranged O-ring & back-up ring inside of body. Opened area of O-ring should face to suction side. And O-ring side should face to the body. (2) (2) ① ② ※ HB100WE65 LS plug
  • 13. 6-93 HB100WE66 Locate driving gear and driven gear keeping as straight as possible during assembling. Locate one of pressure plates prepared. ③ ④ HB100WE67 Locate 1st body on the 2nd body tapping around the body with rubber mallet to fit it completely. Locate through shaft on the driving gear. Locate pressure plate with same way for 2nd body. ⑤ ⑥ ⑦ HB100WE68 Locate driving gear and driven gear and last pressure plate also. ⑧
  • 14. 6-94 HB100WE69 Assemble mounting flange to the body, taking care not to give any damage on the shaft seals by sharp edge of shaft. Smear clean grease on the lips of shaft seals before assembling. ⑨ ※ HB100WE70 Assemble the bolts and tighten the bolts with in a crisscross pattern to a torque value of 14.3 kgf·m (103 lbf·ft). Check that the pump rotates freely when the drive shaft is turned by hand, if not a possible, plate seal may be pinched. ⑩ ⑪ HB100WE71 Locate an O-ring into the groove on the body. Locate preassembled LS - priority valve on the 1st working section and tighten the bolts with in a crisscross pattern to a torque value of 7.14 kgf·m (51.6 lbf·ft). ⑫ ⑬
  • 15. 6-95 2. MAIN CONTROL VALVE ( 2. MAIN CONTROL VALVE (LOADER LOADER) STRUCTURE STRUCTURE 24 22 22 21 26 16 30 13 32 31 9 3 18 44 46 15 12 42 45 40 19 37 4 23 1 1 2 14 23 2 17 36 24 22 22 24 22 22 24 22 24 22 22 43 33 43 25 11 28 4 23 1 25 11 28 5 23 1 33 33 22 1 23 41 35 29 20 27 21 26 10 20 1 23 34 38 39 7 6 6 8 OPTION INLET BLOCK P1 BLOCK AUX BLOCK BOOM BLOCK OUTLET BLOCK BUCKET BLOCK 1) 1) HB100WE36 1 Spacer 2 Bushing 3 Spool 4 Spool 5 Spool 6 Element 7 Element 8 Element 9 Inlet cover 10 Outlet cover 11 Flange 12 Spring 13 Spring 14 Spring 15 Poppet 16 Tie rod 17 Screw 18 Dowel 19 Screw 20 Relief valve 21 Nut 22 O-ring 23 O-ring 24 O-ring 25 Seal 26 Spring washer 27 Plug 28 Screw 29 Screw 30 Joint 31 Solenoid valve 32 Body 33 Check valve 34 Valve kit 35 Cap 36 Cap kit 37 Relief valve 38 Relief valve 39 Relief valve 40 Relief valve 41 Spring kit 42 Adapter 43 Plug 44 Plug 45 Plug 46 Plug
  • 16. 6-96 INITIAL SETUP OF THE VALVE ON INITIAL SETUP OF THE VALVE ON ASSEMBLY BENCH ASSEMBLY BENCH Clean the table. Wear safety goggles. Place the stacked valve with inlet to the left side as shown in the picture. Clean the valve using compressed air so that valve is free from any dust or dirt. 2) 2) (1) (2) (3) (4) HB100WE91 HB100WE92 CHECK VALVE ASSEMBLY CHECK VALVE ASSEMBLY Assemble the check valve into the check valve cavity. Make sure that O-ring is present in the check valve. 3) 3) (1) (2) HB100WE93 Tighten in to 4.28 kgf·m (31 lbf·ft) torque (wrench 08) using pneumatic torque gun. (3) HB100WE94 P PORT PLUG ASSEMBLY P PORT PLUG ASSEMBLY Close the top inlet port with SAE 16 plug and tighten it to 4.28 kgf·m (31 lbf·ft) torque (wrench 12) using pneumatic torque gun. (Make sure that O-ring is present in the plug.) 4) 4) (1)
  • 17. 6-97 HB100WE95 HB100WE96 MANOMETER PLUG ASSEMBLY MANOMETER PLUG ASSEMBLY Insert the poppet in the manometer cavity. Then insert the spring on to the poppet. 5) 5) (1) (2) HB100WE97 Insert the spacer on top of the spring. (3) HB100WE98 Assemble the BSP 1/2" plug and tighten it to 4.28 kgf·m (31 lbf·ft) torque (wrench 27) using pneumatic torque gun. (Make sure that washer is present in the plug.) (4) Plug
  • 18. 6-98 HB100WE99 HB100WE100 PRIORITY INLET SPOOL ASSEMBLY PRIORITY INLET SPOOL ASSEMBLY Insert orifice of (͚0.75 mm) in the spool as shown in picture. Lubricate the spool cavity with hyspin VG46. 6) 6) (1) (2) Insert the spring on to the spool seat. (4) HB100WE101 HB100WE102 Assemble the adapter and tighten it to 4.28 kgf·m (31 lbf·ft) torque (wrench 32) using pneumatic torque gun. (Make sure that washer & O-rings are present in the adapter. (5) Insert the spool into the spool cavity with orifice face should go inside. (3)
  • 19. 6-99 HB100WE103 Plug the other side of the spool cavity with M22×1.5 mm plug and tighten it to 4.28 kgf·m (31 lbf·ft) torque (wrench 12) using pneumatic torque gun. (Make sure that O-ring is present in the adapter.) (6) HB100WE104 HB100WE105 UNLOADING SOLENOID VALVE UNLOADING SOLENOID VALVE ASSEMBLY ASSEMBLY Assemble the solenoid as shown in the picture and tighten it to 5.10 kgf·m (36.9 lbf·ft) torque (wrench 24) using pneumatic torque gun. 7) 7) (1) HB100WE106 Insert the coil into the solenoid. Assemble the insulator. (2) (3) LS VALVE ASSEMBLY LS VALVE ASSEMBLY Insert orifice of (͚1.25 mm) in the LS cavity as shown in picture. 8) 8) (1)
  • 20. 6-100 HB100WE107 Assemble the LS valve into LS cavity and tighten it to 2.45 kgf·m (17.7 lbf·ft) torque (wrench 19) using pneumatic torque gun. (2) HB100WE108 MAIN RELIEF VALVE ASSEMBLY MAIN RELIEF VALVE ASSEMBLY Assemble main relief valve into the main relief valve cavity as shown in picture and tighten it to 4.28 kgf·m (31 lbf·ft) torque (wrench 36) using pneumatic torque gun. 9) 9) (1) HB100WE109 PORT RELIEF VALVE ASSEMBLY PORT RELIEF VALVE ASSEMBLY Assemble the port relief valve into the port relief valve cavity as describe below and tighten it to 2.45 kgf·m (17.7 lbf·ft) torque (wrench 19) using pneumatic torque gun. 1st section (from inlet) : ZTAL-00206 2nd section (bucket) : ZTAL-00196/00197 3rd section (boom) : ZTAL-00148 10) 10) (1) HB100WE110 PORT RELIEF VALVE CAVITY PLUG PORT RELIEF VALVE CAVITY PLUG ASSEMBLY ASSEMBLY Plug remaining port relief cavities with P3T plugs (i.e. on B1 & B2 port) and tighten it to 4.28 kgf·m (31 lbf·ft) torque (wrench 12) using pneumatic torque gun. 11) 11) (1) · · ·
  • 21. Thank you very much for your reading. Please Click Here. Then Get COMPLETE MANUAL. NO WAITING NOTE: If there is no response to click on the link above, please download the PDF document first and then click on it.
  • 22. 6-101 HB100WE111 SPOOL ASSEMBLY SPOOL ASSEMBLY Lubricate all the spool cavities with hyspin VG46. Insert spool as describe below with eye end of the spool is on the lever side. 1st section (Aux) : ZTAL-00167 2nd section (bucket) : ZTAL-00167 3rd section (boom) : ZTAL-00168 Move the spools in and out two to three times for free movement. 12) 12) (1) (2) (3) HB100WE112 O-RING AND SPACER ASSEMBLY ON O-RING AND SPACER ASSEMBLY ON CONTROL KIT SIDE CONTROL KIT SIDE Assemble the O-ring in the O-ring groove as shown in the picture. Assemble the spacer into the spacer groove provided in spool cavity (chamfered face should go inside the cavity). 13) 13) (1) (2) HB100WE113 CONTROL KIT ASSEMBLY ON BOTH CONTROL KIT ASSEMBLY ON BOTH SIDE OF THE VALVE SIDE OF THE VALVE Apply a drop of loctite #270 thread locker on control kit screw threads. Place control kit spring in between two bushes as shown, and then assemble these into the spool with control kit screw. (Bucket control kit : ZTAL-00192, boom control kit : ZTAL-00234) 14) 14) (1) (2) · · · HB100WE114 Tighten the control kit to 0.99 kgf·m (7.16 lbf·ft) torque (wrench 04) using pneumatic torque gun. Lubricate the proper quantity of grease to all control kits. (3) (4)
  • 23. 6-102 HB100WE115 Assemble the end cap with M6 screws and tighten to 0.67 kgf·m (4.85 lbf·ft) torque using pneumatic torque gun. (5) HB100WE116 LEVER KIT ASSEMBLY LEVER KIT ASSEMBLY Assemble the O-ring in the O-ring groove as shown in the picture. Assemble the spacer into the spacer groove provided in spool cavity (chamfered face should go inside the cavity) 15) 15) (1) (2) HB100WE117 Assemble lever cap and tighten it with M6 screws to 0.99 kgf·m (7.16 lbf·ft) torque using pneumatic torque gun. (3) HB100WE118 RE PLUG ASSEMBLY RE PLUG ASSEMBLY Assemble the RE plug (M18×1.5 mm) in tank port as shown in the picture and tighten it with allen key. 16) 16) (1)