1. sapuniversit y.eu http://sapuniversity.eu/usage-and-significance-of-various-layouts-in-webdynpro-abap/
Usage and significance of various layouts in WebDynpro
ABAP
Avinash Palavai
Introduction:
Layouts are used to arrange the UI elements as per our requirement. As we don't have the drag and drop
f acility in WebDynpro, we use layouts.
There are f our types of layouts,
1. Flow Layout :- It is a def ault layout. In this layout, all the UI elements will f low f rom lef t to right
sequentially in a view.
2. Row Layout :- In this layout, we have the options to set the UI element in a same or separate line.
They are,
a. Row Head Data : It places the UI element in separate or f resh line.
b. Row Data : It places in same line.
The disadvantage with row layout is, it doesn't f ollow any vertical f ormat.
3. Matrix Layout :- This layout is also almost same as row layout, which is used to place the UI
element in a separate or same line. The options available are,
a. Matrix Head Data : It places the UI element in separate or f resh line.
b. Matrix Data: It places in same line.
The main advantage is, it f ollows the vertical f ormat.
4. Grid Layout : This layout has user f riendly options to arrange the UI elements like column count,
padding lef t, padding right, padding top, padding bottom, cell spacing etc. This layout also f ollows
the Grid layout.
The below demo explains the usage and signif icance of all these layouts.
Procedure:-
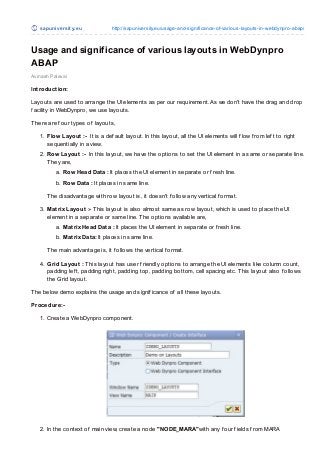
1. Create a WebDynpro component.
2. In the context of main view, create a node "NODE_MARA"with any f our f ields f rom MARA
3. 3. Create f our Group Containers in the Main view with the name Flow
4. Maintain the text property under Caption as Flow Layout.
5. In the same way create another 3 group containers with names Row, Matrix and layout with texts
under caption as Row Layout, Matrix Layout and Grid Layout respectively.
4. 6. Maintain a transparent container between each Group Container and set the height property as
40px, to maintain some space between all the f our Group containers.
7. Create container f orm in all the f our group containers by right clicking on the container name and
bind the f ields.
5. 8. Click on context and select the node NODE_MARAf rom the context.
9. Main view will appear as below af ter creating container f orms and binding the context node in all
the f our containers, as the def ault layout is Flow Layout.
6. 10. Now leave the f irst container (FLOW) as it is and set the layout property of Row, Matrix and Grid
group containers as Row layout, Matrix Layout and Grid Layout respectively and set the colcount
property in Grid group Container as 2.
11. Now in the row group container, set the Layout Data property of all the labels as Row Head Data
and all the input f ields as Row Data.
12. Similarly in matrix group container, set the Layout Data property of all the labels as Matrix Head
Data and all the input f ields as Matrix Data.
7. 13. Now in grid group container set the padding Top property of MTART input f ield as 20px.
14. Create the WebDynpro application and test it.
8. 15. The screen will appear as below according to the layout settings done.
16. The dif f erences in the vertical f ormat between Row and Matrix layouts can be clearly observed and
also the impact of padding Tip property set in Grid group container.