SlideShare a Scribd company logo
1 of 25
Download to read offline
87655301 3/07
1st Printing
© 2007 CNH America LLC
Printed In U.S.A.
TT45A, TT50A
REPAIR MANUAL
COMPLETE CONTENTS
SECTION 00 - GENERAL 2. . . . . . . . . . . . . . . . . . . . . . . . . . . . . . . . . . . . . . . . . . . .
SECTION 10 - ENGINE 3. . . . . . . . . . . . . . . . . . . . . . . . . . . . . . . . . . . . . . . . . . . . . .
SECTION 18 - CLUTCHES 10. . . . . . . . . . . . . . . . . . . . . . . . . . . . . . . . . . . . . . . . . . .
SECTION 21 - TRANSMISSION SYSTEM 11. . . . . . . . . . . . . . . . . . . . . . . . . . . . . .
SECTION 27 - MECHANICAL REAR WHEEL DRIVE 13. . . . . . . . . . . . . . . . . . . .
SECTION 31 - POWER TAKE-OFF 15. . . . . . . . . . . . . . . . . . . . . . . . . . . . . . . . . . . .
SECTION 33 - BRAKING SYSTEM 16. . . . . . . . . . . . . . . . . . . . . . . . . . . . . . . . . . . .
SECTION 35 - HYDRAULIC SYSTEM 16. . . . . . . . . . . . . . . . . . . . . . . . . . . . . . . . . .
SECTION 41 - STEERING SYSTEMS 19. . . . . . . . . . . . . . . . . . . . . . . . . . . . . . . . . .
SECTION 44 - FRONT AXLE 20. . . . . . . . . . . . . . . . . . . . . . . . . . . . . . . . . . . . . . . . .
SECTION 55 - ELECTRICAL SYSTEM 21. . . . . . . . . . . . . . . . . . . . . . . . . . . . . . . . .
SECTION 90 - BODYWORK 27. . . . . . . . . . . . . . . . . . . . . . . . . . . . . . . . . . . . . . . . . .
The following pages are the collation of the contents pages from each section and
chapter of the TT45A, TT50A Repair manual. Complete Repair part # 87655297.
The sections used through out all New Holland product Repair manuals may not be
used for each product. Each Repair manual will be made up of one or several books.
Each book will be labeled as to which sections are in the overall Repair manual and
which sections are in each book.
The sections listed above are the sections utilized for the TT45A, TT50A Tractors.
SECTION 00 -- GENERAL -- CHAPTER 1
00-1
SECTION 00 -- GENERAL
Chapter 1 -- General
CONTENTS
Section Description Page
Federal Emissions Warranty 2. . . . . . . . . . . . . . . . . . . . . . . . . . . . . . . . . . . . . . . . . . . . . . . . . . . . .
California Emission Control Warranty Statement 3. . . . . . . . . . . . . . . . . . . . . . . . . . . . . . . . . . . .
General Instructions 5. . . . . . . . . . . . . . . . . . . . . . . . . . . . . . . . . . . . . . . . . . . . . . . . . . . . . . . . . . . .
Important Notice 5. . . . . . . . . . . . . . . . . . . . . . . . . . . . . . . . . . . . . . . . . . . . . . . . . . . . . . . . . . . .
Shimming 5. . . . . . . . . . . . . . . . . . . . . . . . . . . . . . . . . . . . . . . . . . . . . . . . . . . . . . . . . . . . . . . . . .
Rotating Shaft Seals 5. . . . . . . . . . . . . . . . . . . . . . . . . . . . . . . . . . . . . . . . . . . . . . . . . . . . . . . .
O-Rings 6. . . . . . . . . . . . . . . . . . . . . . . . . . . . . . . . . . . . . . . . . . . . . . . . . . . . . . . . . . . . . . . . . . .
Sealers 6. . . . . . . . . . . . . . . . . . . . . . . . . . . . . . . . . . . . . . . . . . . . . . . . . . . . . . . . . . . . . . . . . . . .
Bearings 6. . . . . . . . . . . . . . . . . . . . . . . . . . . . . . . . . . . . . . . . . . . . . . . . . . . . . . . . . . . . . . . . . . .
Spring Pins 6. . . . . . . . . . . . . . . . . . . . . . . . . . . . . . . . . . . . . . . . . . . . . . . . . . . . . . . . . . . . . . . .
Precautionary Notice 7. . . . . . . . . . . . . . . . . . . . . . . . . . . . . . . . . . . . . . . . . . . . . . . . . . . . . . . .
Equipment Notice 7. . . . . . . . . . . . . . . . . . . . . . . . . . . . . . . . . . . . . . . . . . . . . . . . . . . . . . . . . . .
Spare Parts Notice 7. . . . . . . . . . . . . . . . . . . . . . . . . . . . . . . . . . . . . . . . . . . . . . . . . . . . . . . . . .
General Notices 7. . . . . . . . . . . . . . . . . . . . . . . . . . . . . . . . . . . . . . . . . . . . . . . . . . . . . . . . . . . .
Health and Safety Precautions 8. . . . . . . . . . . . . . . . . . . . . . . . . . . . . . . . . . . . . . . . . . . . . . . . . . .
General Workshop Tools and Equipment 13. . . . . . . . . . . . . . . . . . . . . . . . . . . . . . . . . . . . .
Legal Aspects 13. . . . . . . . . . . . . . . . . . . . . . . . . . . . . . . . . . . . . . . . . . . . . . . . . . . . . . . . . . . .
Lubricants and Greases 13. . . . . . . . . . . . . . . . . . . . . . . . . . . . . . . . . . . . . . . . . . . . . . . . . . .
Precautionary Statements 17. . . . . . . . . . . . . . . . . . . . . . . . . . . . . . . . . . . . . . . . . . . . . . . . . . . . .
Safety 18. . . . . . . . . . . . . . . . . . . . . . . . . . . . . . . . . . . . . . . . . . . . . . . . . . . . . . . . . . . . . . . . . . . . . .
The Tractor 18. . . . . . . . . . . . . . . . . . . . . . . . . . . . . . . . . . . . . . . . . . . . . . . . . . . . . . . . . . . . . .
Driving the Tractor 19. . . . . . . . . . . . . . . . . . . . . . . . . . . . . . . . . . . . . . . . . . . . . . . . . . . . . . . .
Operating the Tractor 20. . . . . . . . . . . . . . . . . . . . . . . . . . . . . . . . . . . . . . . . . . . . . . . . . . . . . .
Operating the PTO 21. . . . . . . . . . . . . . . . . . . . . . . . . . . . . . . . . . . . . . . . . . . . . . . . . . . . . . . .
Servicing the Tractor 21. . . . . . . . . . . . . . . . . . . . . . . . . . . . . . . . . . . . . . . . . . . . . . . . . . . . . .
Diesel Fuel 22. . . . . . . . . . . . . . . . . . . . . . . . . . . . . . . . . . . . . . . . . . . . . . . . . . . . . . . . . . . . . .
Universal Symbols 23. . . . . . . . . . . . . . . . . . . . . . . . . . . . . . . . . . . . . . . . . . . . . . . . . . . . . . . . . . .
Safety Decals 24. . . . . . . . . . . . . . . . . . . . . . . . . . . . . . . . . . . . . . . . . . . . . . . . . . . . . . . . . . . . . . . .
Instructional Decals 28. . . . . . . . . . . . . . . . . . . . . . . . . . . . . . . . . . . . . . . . . . . . . . . . . . . . . . .
Ecology and the Environment 29. . . . . . . . . . . . . . . . . . . . . . . . . . . . . . . . . . . . . . . . . . . . . . . . . .
Minimum Hardware Tightening Torques 30. . . . . . . . . . . . . . . . . . . . . . . . . . . . . . . . . . . . . . . . .
General Specifications 32. . . . . . . . . . . . . . . . . . . . . . . . . . . . . . . . . . . . . . . . . . . . . . . . . . . . . . . .
Lubricants and Coolants 37. . . . . . . . . . . . . . . . . . . . . . . . . . . . . . . . . . . . . . . . . . . . . . . . . . .
SECTION 00 -- GENERAL -- CHAPTER 1
00-5
GENERAL INSTRUCTIONS
WARNING
All maintenance and repair work described in
this manual must be performed exclusively by
NEW HOLLAND service technicians in strict
accordance with the instructions given and
using any specific tools necessary.
WARNING
Anyone who performs the operations described
herein without strictly following the instructions
is personally responsible for resulting injury or
damage to property.
WARNING
The Manufacturer and all organizations belong-
ing to the Manufacturer’s distribution network,
including but not restricted to national, regional
or local distributors, will accept no responsibility
for personal injury or damage to property caused
by abnormal function of parts and/or compo-
nents not approved by the Manufacturer,
including those used for maintenance and/or
repair of the product manufactured or marketed
by the Manufacturer. In any case, the product
manufactured or marketed by the Manufacturer
is covered by no guarantee of any kind against
personal injury or damage to property caused by
abnormal function of parts and/or components
not approved by the Manufacturer.
IMPORTANT NOTICE
All maintenance and repair operations described in
this manual should be carried out exclusively by the
authorized workshops. All instructions detailed
should be carefully observed and special equipment
indicated should be used if necessary.
Everyone who carries out service operations
described without carefully observing these prescrip-
tions will be directly responsible of deriving
damages.
SHIMMING
At each adjustment, select adjusting shims, measure
them individually using a micrometer and then sum
up recorded values. Do not rely on measuring the
whole shimming set, which may be incorrect, or on
the rated value indicated for each shim.
ROTATING SHAFT SEALS
To correctly install rotating shaft seals, observe the
following instructions:
• Let the seal soak into the same oil as it will seal
for at least half an hour before mounting;
• Thoroughly clean the shaft and ensure that the
shaft working surface is not damaged;
• Place the sealing lip towards the fluid. In case of
a hydrodynamic lip, consider the shaft rotation
direction and orient grooves in order that they
deviate the fluid towards the inner side of the
seal;
• Coat the sealing lip with a thin layer of lubricant
(oil rather than grease) and fill the gap between
the sealing lip and the dust lip of double lip seals
with grease;
• Insert the seal into its seat and press it down
using a flat punch. Do not tap the seal with a
hammer or a drift;
• Take care to insert the seal perpendicularly to its
seat while you are pressing it. Once the seal is
settled, ensure that it contacts the thrust element,
if required;
• To prevent damaging the sealing lip against the
shaft, place a suitable protection during
installation.
SECTION 00 -- GENERAL -- CHAPTER 1
00-6
O RINGS
Lubricate the O rings before inserting them into their
seats. This will prevent the O rings from roll over and
twisting during mounting, which will jeopardize
sealing.
SEALERS
Apply silicone/gasket eliminator over the mating
surfaces marked with an X.
Before applying the sealer, prepare the surface as
follows:
• Remove possible scales using a metal brush;
• Thoroughly degrease the surfaces using one of
the following cleaning agents: trichlorethylene,
diesel fuel or a water and soda solution.
BEARINGS
It is advisable to heat the bearings to 80° to 90°C
(176° to 194°F) before mounting them on their shafts
and cool them down before inserting them into their
seats with external tapping.
SPRING PINS
When mounting split socket spring pins, ensure that
the pin notch is oriented in the direction of the effort
to stress the pin.
Spiral spring pins should not be oriented during
installation.
SECTION 00 -- GENERAL -- CHAPTER 1
00-18
SAFETY
PRECAUTIONARY STATEMENTS
A careful operator is the best operator. Most accidents
can be avoided by observing certain precautions. To
help prevent accidents, read and take the following
precautions before driving, operating or servicing the
tractor. Equipment should be operated only by those
who are responsible and instructed to do so.
THE TRACTOR
1. Read this Operator’s Manual carefully before
using the tractor. Lack of operating knowledge
can lead to accidents.
2. Only allow properly trained and qualified persons
to operate the tractor.
3. To prevent falls, use the handrails and step plates
when getting on and off the tractor. Keep steps
and platform clear of mud and debris.
4. Replace all missing, illegible or damaged safety
decals.
5. Keep safety decals free of dirt or grime.
6. Do not permit anyone but the operator to ride on
the tractor. It is unsafe for extra passengers to
travel.
7. Keep children away from the tractor and farm
machinery at all times.
8. Do not modify or alter or permit anyone else to
modify or alter the tractor or any of its
components or any tractor function without first
consulting your dealer.
9. Install all guards before starting the engine or
operating the tractor.
10. Tractor wheels are very heavy. They need to be
handled with care. Ensure that they are stored at
a place where they do not fall down & cause
injury.
SECTION 00 -- GENERAL -- CHAPTER 1
00-19
DRIVING THE TRACTOR
1. Always sit in the driver’s seat while starting or
driving the tractor.
2. When driving on public roads, have
consideration for other road users. Pull in to the
left side of the road occasionally to allow any
following traffic to pass. Do not exceed the legal
speed limit set for agricultural tractors.
3. Dip the tractor lights when meeting a vehicle at
night. Make sure the lights are adjusted to
prevent blinding the driver of an oncoming
vehicle.
4. Reduce speed before turning or applying the
brakes. Brake both wheels simultaneously when
making an emergency stop. Ensure that both
brake pedals are locked together when travelling
at road speeds or when on public roads ensure
correct operation of trailer brakes.
5. Use extreme caution and avoid hard application
of the tractor brakes when towing heavy loads at
road speeds.
6. Keep the tractor in the same gear when going
downhill as would be used when going uphill. Do
not coast or freewheel down hills.
7. Any towed vehicle whose total weight exceeds
that of the towing tractor must be equipped with
brakes for safe operation.
8. Never try to apply the differential lock when
turning. When engaged, the differential lock will
prevent the tractor from turning.
9. Always check overhead clearance, especially
when transporting the tractor. Watch where you
are going, especially at row ends, on roads and
around trees and low overhanging obstacles.
10. To avoid overturns, drive the tractor with care and
at speeds compatible with safety, especially
when operating over rough ground, when
crossing ditches or slopes and when turning
corners.
11. Use extreme caution when operating on steep
slopes.
12. If the tractor becomes stuck or the tires are frozen
to the ground, reverse the tractor out to prevent
overturning.
SECTION 10 -- ENGINE -- CHAPTER 1
10-1
SECTION 10 - ENGINE
Chapter 1 - Engine
CONTENTS
Section Description Page
Specifications 6. . . . . . . . . . . . . . . . . . . . . . . . . . . . . . . . . . . . . . . . . . . . . . . . . . . . . . . . . . . . . . . . . .
Metric Bolt Torque Specifications 15. . . . . . . . . . . . . . . . . . . . . . . . . . . . . . . . . . . . . . . . . . . . . . .
Special Tools 16. . . . . . . . . . . . . . . . . . . . . . . . . . . . . . . . . . . . . . . . . . . . . . . . . . . . . . . . . . . . . . . .
Compression Test and Tools 17. . . . . . . . . . . . . . . . . . . . . . . . . . . . . . . . . . . . . . . . . . . . . . . .
Description of Operation 18. . . . . . . . . . . . . . . . . . . . . . . . . . . . . . . . . . . . . . . . . . . . . . . . . . . . . .
Troubleshooting 19. . . . . . . . . . . . . . . . . . . . . . . . . . . . . . . . . . . . . . . . . . . . . . . . . . . . . . . . . . . . . .
Cylinder Head and Valve Train Components 23. . . . . . . . . . . . . . . . . . . . . . . . . . . . . . . . . .
Cylinder Block Assembly 23. . . . . . . . . . . . . . . . . . . . . . . . . . . . . . . . . . . . . . . . . . . . . . . . . . .
Separating the Tractor at the Clutch Housing/Engine -- 8 x 12 Transmission 25. . . . . . .
Disassembly 25. . . . . . . . . . . . . . . . . . . . . . . . . . . . . . . . . . . . . . . . . . . . . . . . . . . . . . . . . .
Separating the Tractor at the Engine/Frame 28. . . . . . . . . . . . . . . . . . . . . . . . . . . . . . . . . .
Removal 28. . . . . . . . . . . . . . . . . . . . . . . . . . . . . . . . . . . . . . . . . . . . . . . . . . . . . . . . . . . . .
Installation 29. . . . . . . . . . . . . . . . . . . . . . . . . . . . . . . . . . . . . . . . . . . . . . . . . . . . . . . . . . . .
Attaching the Tractor at the Clutch Housing/Engine -- 8 x 12 Transmission 30. . . . . . . .
Assembly 30. . . . . . . . . . . . . . . . . . . . . . . . . . . . . . . . . . . . . . . . . . . . . . . . . . . . . . . . . . . .
Overhaul 34. . . . . . . . . . . . . . . . . . . . . . . . . . . . . . . . . . . . . . . . . . . . . . . . . . . . . . . . . . . . . . . . . . . .
Engine 34. . . . . . . . . . . . . . . . . . . . . . . . . . . . . . . . . . . . . . . . . . . . . . . . . . . . . . . . . . . . . . . . . .
Fuel Injector and Glow Plug 34. . . . . . . . . . . . . . . . . . . . . . . . . . . . . . . . . . . . . . . . . . . . . . . .
Removal 34. . . . . . . . . . . . . . . . . . . . . . . . . . . . . . . . . . . . . . . . . . . . . . . . . . . . . . . . . . . . .
Oil Pressure Switch 34. . . . . . . . . . . . . . . . . . . . . . . . . . . . . . . . . . . . . . . . . . . . . . . . . . . . . . .
Temperature Sending Switch and Alternator 34. . . . . . . . . . . . . . . . . . . . . . . . . . . . . . . . . .
Removal 34. . . . . . . . . . . . . . . . . . . . . . . . . . . . . . . . . . . . . . . . . . . . . . . . . . . . . . . . . . . . .
Fan, Water Pump and External Oil Tube 35. . . . . . . . . . . . . . . . . . . . . . . . . . . . . . . . . . . . .
Removal 35. . . . . . . . . . . . . . . . . . . . . . . . . . . . . . . . . . . . . . . . . . . . . . . . . . . . . . . . . . . . .
Air Inlet Manifold 35. . . . . . . . . . . . . . . . . . . . . . . . . . . . . . . . . . . . . . . . . . . . . . . . . . . . . . . . . .
Removal 35. . . . . . . . . . . . . . . . . . . . . . . . . . . . . . . . . . . . . . . . . . . . . . . . . . . . . . . . . . . . .
Rocker Arm Shaft and Support Bracket 36. . . . . . . . . . . . . . . . . . . . . . . . . . . . . . . . . . . . . .
Removal 36. . . . . . . . . . . . . . . . . . . . . . . . . . . . . . . . . . . . . . . . . . . . . . . . . . . . . . . . . . . . .
10 101 Cylinder Head 36. . . . . . . . . . . . . . . . . . . . . . . . . . . . . . . . . . . . . . . . . . . . . . . . . . . . . . . . . . . .
Removal 36. . . . . . . . . . . . . . . . . . . . . . . . . . . . . . . . . . . . . . . . . . . . . . . . . . . . . . . . . . . . .
Valve Tappet 37. . . . . . . . . . . . . . . . . . . . . . . . . . . . . . . . . . . . . . . . . . . . . . . . . . . . . . . . . . . . .
Removal 37. . . . . . . . . . . . . . . . . . . . . . . . . . . . . . . . . . . . . . . . . . . . . . . . . . . . . . . . . . . . .
Fuel Shutoff Solenoid 37. . . . . . . . . . . . . . . . . . . . . . . . . . . . . . . . . . . . . . . . . . . . . . . . . . . . . .
Removal 37. . . . . . . . . . . . . . . . . . . . . . . . . . . . . . . . . . . . . . . . . . . . . . . . . . . . . . . . . . . . .
SECTION 10 -- ENGINE -- CHAPTER 1
10-2
Section Description Page
10 106 Engine Timing Gear Cover, Timing Gears, and Cam Shaft 37. . . . . . . . . . . . . . . . . . . . . .
Timing Gear Cover Removal 37. . . . . . . . . . . . . . . . . . . . . . . . . . . . . . . . . . . . . . . . . . . .
10 106 Timing Gears and Cam Shaft 40. . . . . . . . . . . . . . . . . . . . . . . . . . . . . . . . . . . . . . . . . . . . . .
Removal 40. . . . . . . . . . . . . . . . . . . . . . . . . . . . . . . . . . . . . . . . . . . . . . . . . . . . . . . . . . . . .
10 102 Oil Sump 41. . . . . . . . . . . . . . . . . . . . . . . . . . . . . . . . . . . . . . . . . . . . . . . . . . . . . . . . . . . . . . . .
Removal 41. . . . . . . . . . . . . . . . . . . . . . . . . . . . . . . . . . . . . . . . . . . . . . . . . . . . . . . . . . . . .
Oil Suction Pipe and Strainer 41. . . . . . . . . . . . . . . . . . . . . . . . . . . . . . . . . . . . . . . . . . . . . . .
Removal 41. . . . . . . . . . . . . . . . . . . . . . . . . . . . . . . . . . . . . . . . . . . . . . . . . . . . . . . . . . . . .
10 110 Balancer Assembly 42. . . . . . . . . . . . . . . . . . . . . . . . . . . . . . . . . . . . . . . . . . . . . . . . . . . . . . .
Removal 42. . . . . . . . . . . . . . . . . . . . . . . . . . . . . . . . . . . . . . . . . . . . . . . . . . . . . . . . . . . . .
10 105 Connecting Rods, Bearings, and Pistons, Rings 42. . . . . . . . . . . . . . . . . . . . . . . . . . . . . . .
Removal 42. . . . . . . . . . . . . . . . . . . . . . . . . . . . . . . . . . . . . . . . . . . . . . . . . . . . . . . . . . . . .
10 103 Flywheel 43. . . . . . . . . . . . . . . . . . . . . . . . . . . . . . . . . . . . . . . . . . . . . . . . . . . . . . . . . . . . . . . . .
Removal 43. . . . . . . . . . . . . . . . . . . . . . . . . . . . . . . . . . . . . . . . . . . . . . . . . . . . . . . . . . . . .
10 103 Backplate and Oil Seal 43. . . . . . . . . . . . . . . . . . . . . . . . . . . . . . . . . . . . . . . . . . . . . . . . . . . .
Removal 43. . . . . . . . . . . . . . . . . . . . . . . . . . . . . . . . . . . . . . . . . . . . . . . . . . . . . . . . . . . . .
Crankshaft -- Main Bearings 43. . . . . . . . . . . . . . . . . . . . . . . . . . . . . . . . . . . . . . . . . . . . . . . .
Removal 43. . . . . . . . . . . . . . . . . . . . . . . . . . . . . . . . . . . . . . . . . . . . . . . . . . . . . . . . . . . . .
10 101 Cylinder Head 44. . . . . . . . . . . . . . . . . . . . . . . . . . . . . . . . . . . . . . . . . . . . . . . . . . . . . . . . . . . .
Disassembly 44. . . . . . . . . . . . . . . . . . . . . . . . . . . . . . . . . . . . . . . . . . . . . . . . . . . . . . . . . .
Inspection and Repair 44. . . . . . . . . . . . . . . . . . . . . . . . . . . . . . . . . . . . . . . . . . . . . . . . . .
Valve Seats 45. . . . . . . . . . . . . . . . . . . . . . . . . . . . . . . . . . . . . . . . . . . . . . . . . . . . . . . . . . . . . .
Valves 46. . . . . . . . . . . . . . . . . . . . . . . . . . . . . . . . . . . . . . . . . . . . . . . . . . . . . . . . . . . . . . . . . . .
Valve Guides 47. . . . . . . . . . . . . . . . . . . . . . . . . . . . . . . . . . . . . . . . . . . . . . . . . . . . . . . . . . . . .
Valve Springs 48. . . . . . . . . . . . . . . . . . . . . . . . . . . . . . . . . . . . . . . . . . . . . . . . . . . . . . . . . . . .
Rocker Arms 48. . . . . . . . . . . . . . . . . . . . . . . . . . . . . . . . . . . . . . . . . . . . . . . . . . . . . . . . . . . . .
Push Rods 49. . . . . . . . . . . . . . . . . . . . . . . . . . . . . . . . . . . . . . . . . . . . . . . . . . . . . . . . . . . . . . .
Cylinder Head 49. . . . . . . . . . . . . . . . . . . . . . . . . . . . . . . . . . . . . . . . . . . . . . . . . . . . . . . . . . . .
Assembly 49. . . . . . . . . . . . . . . . . . . . . . . . . . . . . . . . . . . . . . . . . . . . . . . . . . . . . . . . . . . .
Cylinder Block 50. . . . . . . . . . . . . . . . . . . . . . . . . . . . . . . . . . . . . . . . . . . . . . . . . . . . . . . . . . . .
Pistons 50. . . . . . . . . . . . . . . . . . . . . . . . . . . . . . . . . . . . . . . . . . . . . . . . . . . . . . . . . . . . . . . . . .
Disassembly and Inspection 50. . . . . . . . . . . . . . . . . . . . . . . . . . . . . . . . . . . . . . . . . . . .
Piston Rings 53. . . . . . . . . . . . . . . . . . . . . . . . . . . . . . . . . . . . . . . . . . . . . . . . . . . . . . . . . . . . .
Connecting Rods 53. . . . . . . . . . . . . . . . . . . . . . . . . . . . . . . . . . . . . . . . . . . . . . . . . . . . . . . . .
Connecting Rod Bearing 55. . . . . . . . . . . . . . . . . . . . . . . . . . . . . . . . . . . . . . . . . . . . . . . . . . .
Clearance Check 55. . . . . . . . . . . . . . . . . . . . . . . . . . . . . . . . . . . . . . . . . . . . . . . . . . . . . .
SECTION 10 -- ENGINE -- CHAPTER 1
10-3
Section Description Page
Pistons, Rings, and Connecting Rod 56. . . . . . . . . . . . . . . . . . . . . . . . . . . . . . . . . . . . . . . . .
Assembly 56. . . . . . . . . . . . . . . . . . . . . . . . . . . . . . . . . . . . . . . . . . . . . . . . . . . . . . . . . . . .
10 103 Crankshaft -- Main Bearing and Thrust Washer 57. . . . . . . . . . . . . . . . . . . . . . . . . . . . . . . .
Removal and Inspection 57. . . . . . . . . . . . . . . . . . . . . . . . . . . . . . . . . . . . . . . . . . . . . . . .
Crankshaft 58. . . . . . . . . . . . . . . . . . . . . . . . . . . . . . . . . . . . . . . . . . . . . . . . . . . . . . . . . . . . . .
Bearing (Bushing) 59. . . . . . . . . . . . . . . . . . . . . . . . . . . . . . . . . . . . . . . . . . . . . . . . . . . . . . . . .
Replacement 59. . . . . . . . . . . . . . . . . . . . . . . . . . . . . . . . . . . . . . . . . . . . . . . . . . . . . . . . .
Main Bearing 60. . . . . . . . . . . . . . . . . . . . . . . . . . . . . . . . . . . . . . . . . . . . . . . . . . . . . . . . . . . . .
Assembly 60. . . . . . . . . . . . . . . . . . . . . . . . . . . . . . . . . . . . . . . . . . . . . . . . . . . . . . . . . . . .
Port Block 61. . . . . . . . . . . . . . . . . . . . . . . . . . . . . . . . . . . . . . . . . . . . . . . . . . . . . . . . . . . . . . .
Removal 61. . . . . . . . . . . . . . . . . . . . . . . . . . . . . . . . . . . . . . . . . . . . . . . . . . . . . . . . . . . . .
Installation 61. . . . . . . . . . . . . . . . . . . . . . . . . . . . . . . . . . . . . . . . . . . . . . . . . . . . . . . . . . . .
10 106 Timing Gear 62. . . . . . . . . . . . . . . . . . . . . . . . . . . . . . . . . . . . . . . . . . . . . . . . . . . . . . . . . . . . . .
Camshaft 62. . . . . . . . . . . . . . . . . . . . . . . . . . . . . . . . . . . . . . . . . . . . . . . . . . . . . . . . . . . . . . . .
Disassembly 62. . . . . . . . . . . . . . . . . . . . . . . . . . . . . . . . . . . . . . . . . . . . . . . . . . . . . . . . . .
Inspection 62. . . . . . . . . . . . . . . . . . . . . . . . . . . . . . . . . . . . . . . . . . . . . . . . . . . . . . . . . . . .
Assembly 63. . . . . . . . . . . . . . . . . . . . . . . . . . . . . . . . . . . . . . . . . . . . . . . . . . . . . . . . . . . .
10 103 Flywheel 63. . . . . . . . . . . . . . . . . . . . . . . . . . . . . . . . . . . . . . . . . . . . . . . . . . . . . . . . . . . . . . . . .
10 102 Timing Gear Housing 64. . . . . . . . . . . . . . . . . . . . . . . . . . . . . . . . . . . . . . . . . . . . . . . . . . . . . .
10 102 Front Oil Seal and Steering Pump Seal 64. . . . . . . . . . . . . . . . . . . . . . . . . . . . . . . . . . . . . .
Replacement 64. . . . . . . . . . . . . . . . . . . . . . . . . . . . . . . . . . . . . . . . . . . . . . . . . . . . . . . . .
10 103 Crankshaft and Bearing Holder 65. . . . . . . . . . . . . . . . . . . . . . . . . . . . . . . . . . . . . . . . . . . . .
Installation 65. . . . . . . . . . . . . . . . . . . . . . . . . . . . . . . . . . . . . . . . . . . . . . . . . . . . . . . . . . . .
Rear Oil Seal and Backplate 65. . . . . . . . . . . . . . . . . . . . . . . . . . . . . . . . . . . . . . . . . . . . . . . .
Installation 65. . . . . . . . . . . . . . . . . . . . . . . . . . . . . . . . . . . . . . . . . . . . . . . . . . . . . . . . . . . .
Flywheel 66. . . . . . . . . . . . . . . . . . . . . . . . . . . . . . . . . . . . . . . . . . . . . . . . . . . . . . . . . . . . . . . . .
Installation 66. . . . . . . . . . . . . . . . . . . . . . . . . . . . . . . . . . . . . . . . . . . . . . . . . . . . . . . . . . . .
10 105 Pistons and Connecting Rods 66. . . . . . . . . . . . . . . . . . . . . . . . . . . . . . . . . . . . . . . . . . . . . .
Installation 66. . . . . . . . . . . . . . . . . . . . . . . . . . . . . . . . . . . . . . . . . . . . . . . . . . . . . . . . . . . .
10 110 Balancer Assembly 67. . . . . . . . . . . . . . . . . . . . . . . . . . . . . . . . . . . . . . . . . . . . . . . . . . . . . . .
Installation 67. . . . . . . . . . . . . . . . . . . . . . . . . . . . . . . . . . . . . . . . . . . . . . . . . . . . . . . . . . . .
Balancer Shims 67. . . . . . . . . . . . . . . . . . . . . . . . . . . . . . . . . . . . . . . . . . . . . . . . . . . . . . .
Oil Suction Pipe and Suction Strainer 68. . . . . . . . . . . . . . . . . . . . . . . . . . . . . . . . . . . . . . . .
Installation 68. . . . . . . . . . . . . . . . . . . . . . . . . . . . . . . . . . . . . . . . . . . . . . . . . . . . . . . . . . . .
Oil Sump 68. . . . . . . . . . . . . . . . . . . . . . . . . . . . . . . . . . . . . . . . . . . . . . . . . . . . . . . . . . . . . . . .
Installation 68. . . . . . . . . . . . . . . . . . . . . . . . . . . . . . . . . . . . . . . . . . . . . . . . . . . . . . . . . . . .
10 106 Camshaft and Camshaft Gear 68. . . . . . . . . . . . . . . . . . . . . . . . . . . . . . . . . . . . . . . . . . . . . .
Installation 68. . . . . . . . . . . . . . . . . . . . . . . . . . . . . . . . . . . . . . . . . . . . . . . . . . . . . . . . . . . .
SECTION 10 -- ENGINE -- CHAPTER 1
10-4
Section Description Page
10 106 Idler Gear, Oil Pump, and Injection Timing 69. . . . . . . . . . . . . . . . . . . . . . . . . . . . . . . . . . . .
Installation 69. . . . . . . . . . . . . . . . . . . . . . . . . . . . . . . . . . . . . . . . . . . . . . . . . . . . . . . . . . . .
Timing Gear Cover 69. . . . . . . . . . . . . . . . . . . . . . . . . . . . . . . . . . . . . . . . . . . . . . . . . . . . . . . .
Installation 69. . . . . . . . . . . . . . . . . . . . . . . . . . . . . . . . . . . . . . . . . . . . . . . . . . . . . . . . . . . .
Crankshaft Pulley 70. . . . . . . . . . . . . . . . . . . . . . . . . . . . . . . . . . . . . . . . . . . . . . . . . . . . . . . . .
Installation 70. . . . . . . . . . . . . . . . . . . . . . . . . . . . . . . . . . . . . . . . . . . . . . . . . . . . . . . . . . . .
Fuel Injection Pump 70. . . . . . . . . . . . . . . . . . . . . . . . . . . . . . . . . . . . . . . . . . . . . . . . . . . . . . .
Installation 70. . . . . . . . . . . . . . . . . . . . . . . . . . . . . . . . . . . . . . . . . . . . . . . . . . . . . . . . . . . .
Hydraulic Oil Pump 71. . . . . . . . . . . . . . . . . . . . . . . . . . . . . . . . . . . . . . . . . . . . . . . . . . . . . . .
Installation 71. . . . . . . . . . . . . . . . . . . . . . . . . . . . . . . . . . . . . . . . . . . . . . . . . . . . . . . . . . . .
Power Steering Pump 71. . . . . . . . . . . . . . . . . . . . . . . . . . . . . . . . . . . . . . . . . . . . . . . . . . . . .
Installation 71. . . . . . . . . . . . . . . . . . . . . . . . . . . . . . . . . . . . . . . . . . . . . . . . . . . . . . . . . . . .
10 101 Head Gasket Selection 72. . . . . . . . . . . . . . . . . . . . . . . . . . . . . . . . . . . . . . . . . . . . . . . . . . . .
Selection Chart 72. . . . . . . . . . . . . . . . . . . . . . . . . . . . . . . . . . . . . . . . . . . . . . . . . . . . . . . .
Cylinder Head 72. . . . . . . . . . . . . . . . . . . . . . . . . . . . . . . . . . . . . . . . . . . . . . . . . . . . . . . . . . . .
Installation 72. . . . . . . . . . . . . . . . . . . . . . . . . . . . . . . . . . . . . . . . . . . . . . . . . . . . . . . . . . . .
10 106 Valve Clearance 73. . . . . . . . . . . . . . . . . . . . . . . . . . . . . . . . . . . . . . . . . . . . . . . . . . . . . . . . . .
Adjustment 73. . . . . . . . . . . . . . . . . . . . . . . . . . . . . . . . . . . . . . . . . . . . . . . . . . . . . . . . . . .
Valve Cover 74. . . . . . . . . . . . . . . . . . . . . . . . . . . . . . . . . . . . . . . . . . . . . . . . . . . . . . . . . . . . . .
Installation 74. . . . . . . . . . . . . . . . . . . . . . . . . . . . . . . . . . . . . . . . . . . . . . . . . . . . . . . . . . . .
Water Pump and Cooling Fan 74. . . . . . . . . . . . . . . . . . . . . . . . . . . . . . . . . . . . . . . . . . . . . .
Installation 74. . . . . . . . . . . . . . . . . . . . . . . . . . . . . . . . . . . . . . . . . . . . . . . . . . . . . . . . . . . .
External Oil Tube 74. . . . . . . . . . . . . . . . . . . . . . . . . . . . . . . . . . . . . . . . . . . . . . . . . . . . . . . . .
Assembly 74. . . . . . . . . . . . . . . . . . . . . . . . . . . . . . . . . . . . . . . . . . . . . . . . . . . . . . . . . . . .
Glow Plug and Connector 75. . . . . . . . . . . . . . . . . . . . . . . . . . . . . . . . . . . . . . . . . . . . . . . . . .
Installation 75. . . . . . . . . . . . . . . . . . . . . . . . . . . . . . . . . . . . . . . . . . . . . . . . . . . . . . . . . . . .
Fuel Injector 75. . . . . . . . . . . . . . . . . . . . . . . . . . . . . . . . . . . . . . . . . . . . . . . . . . . . . . . . . . . . .
Installation 75. . . . . . . . . . . . . . . . . . . . . . . . . . . . . . . . . . . . . . . . . . . . . . . . . . . . . . . . . . . .
10 218 Fuel Piping 75. . . . . . . . . . . . . . . . . . . . . . . . . . . . . . . . . . . . . . . . . . . . . . . . . . . . . . . . . . . . . . .
Installation 75. . . . . . . . . . . . . . . . . . . . . . . . . . . . . . . . . . . . . . . . . . . . . . . . . . . . . . . . . . . .
Alternator and Temperature Sender Switch 76. . . . . . . . . . . . . . . . . . . . . . . . . . . . . . . . . . .
Installation 76. . . . . . . . . . . . . . . . . . . . . . . . . . . . . . . . . . . . . . . . . . . . . . . . . . . . . . . . . . . .
Exhaust Manifold 76. . . . . . . . . . . . . . . . . . . . . . . . . . . . . . . . . . . . . . . . . . . . . . . . . . . . . . . . .
Installation 76. . . . . . . . . . . . . . . . . . . . . . . . . . . . . . . . . . . . . . . . . . . . . . . . . . . . . . . . . . . .
10 304 Description of Operation -- Engine Lubrication System 77. . . . . . . . . . . . . . . . . . . . . . . . . . . . .
10 206 Oil Filter 80. . . . . . . . . . . . . . . . . . . . . . . . . . . . . . . . . . . . . . . . . . . . . . . . . . . . . . . . . . . . . . . . .
Construction and Function 80. . . . . . . . . . . . . . . . . . . . . . . . . . . . . . . . . . . . . . . . . . . . . .
Maintenance 80. . . . . . . . . . . . . . . . . . . . . . . . . . . . . . . . . . . . . . . . . . . . . . . . . . . . . . . . . .
SECTION 10 -- ENGINE -- CHAPTER 1
10-5
Section Description Page
10 304 Oil Pump 80. . . . . . . . . . . . . . . . . . . . . . . . . . . . . . . . . . . . . . . . . . . . . . . . . . . . . . . . . . . . . . . .
Removal 80. . . . . . . . . . . . . . . . . . . . . . . . . . . . . . . . . . . . . . . . . . . . . . . . . . . . . . . . . . . . .
Inspection 80. . . . . . . . . . . . . . . . . . . . . . . . . . . . . . . . . . . . . . . . . . . . . . . . . . . . . . . . . . . .
Installation and Adjustment 81. . . . . . . . . . . . . . . . . . . . . . . . . . . . . . . . . . . . . . . . . . . . .
Engine Oil Pressure 82. . . . . . . . . . . . . . . . . . . . . . . . . . . . . . . . . . . . . . . . . . . . . . . . . . . . . . .
Check 82. . . . . . . . . . . . . . . . . . . . . . . . . . . . . . . . . . . . . . . . . . . . . . . . . . . . . . . . . . . . . . .
Oil Pressure Relief Valve 83. . . . . . . . . . . . . . . . . . . . . . . . . . . . . . . . . . . . . . . . . . . . . . . . . . .
Removal 83. . . . . . . . . . . . . . . . . . . . . . . . . . . . . . . . . . . . . . . . . . . . . . . . . . . . . . . . . . . . .
Installation 83. . . . . . . . . . . . . . . . . . . . . . . . . . . . . . . . . . . . . . . . . . . . . . . . . . . . . . . . . . . .
Oil Consumption 83. . . . . . . . . . . . . . . . . . . . . . . . . . . . . . . . . . . . . . . . . . . . . . . . . . . . . . . . . .
10 400 Description of Operation -- Cooling System 84. . . . . . . . . . . . . . . . . . . . . . . . . . . . . . . . . . . . . .
Maintenance 86. . . . . . . . . . . . . . . . . . . . . . . . . . . . . . . . . . . . . . . . . . . . . . . . . . . . . . . . . . . . .
Coolant 86. . . . . . . . . . . . . . . . . . . . . . . . . . . . . . . . . . . . . . . . . . . . . . . . . . . . . . . . . . . . . . . . . .
Radiator Cap 86. . . . . . . . . . . . . . . . . . . . . . . . . . . . . . . . . . . . . . . . . . . . . . . . . . . . . . . . . . . . .
10 402 Thermostat 87. . . . . . . . . . . . . . . . . . . . . . . . . . . . . . . . . . . . . . . . . . . . . . . . . . . . . . . . . . . . . .
10 402 Water Pump 87. . . . . . . . . . . . . . . . . . . . . . . . . . . . . . . . . . . . . . . . . . . . . . . . . . . . . . . . . . . . .
10 414 Cooling Fan 87. . . . . . . . . . . . . . . . . . . . . . . . . . . . . . . . . . . . . . . . . . . . . . . . . . . . . . . . . . . . . .
Overhaul -- Cooling System 88. . . . . . . . . . . . . . . . . . . . . . . . . . . . . . . . . . . . . . . . . . . . . . . . . . .
10 406 Radiator 88. . . . . . . . . . . . . . . . . . . . . . . . . . . . . . . . . . . . . . . . . . . . . . . . . . . . . . . . . . . . . . . . .
Removal 88. . . . . . . . . . . . . . . . . . . . . . . . . . . . . . . . . . . . . . . . . . . . . . . . . . . . . . . . . . . . .
Inspection and Repair 89. . . . . . . . . . . . . . . . . . . . . . . . . . . . . . . . . . . . . . . . . . . . . . . . . .
Installation 89. . . . . . . . . . . . . . . . . . . . . . . . . . . . . . . . . . . . . . . . . . . . . . . . . . . . . . . . . . . .
10 402 Water Pump 90. . . . . . . . . . . . . . . . . . . . . . . . . . . . . . . . . . . . . . . . . . . . . . . . . . . . . . . . . . . . .
Removal 90. . . . . . . . . . . . . . . . . . . . . . . . . . . . . . . . . . . . . . . . . . . . . . . . . . . . . . . . . . . . .
Inspection and Repair 92. . . . . . . . . . . . . . . . . . . . . . . . . . . . . . . . . . . . . . . . . . . . . . . . . .
Installation 92. . . . . . . . . . . . . . . . . . . . . . . . . . . . . . . . . . . . . . . . . . . . . . . . . . . . . . . . . . . .
10 402 Thermostat 93. . . . . . . . . . . . . . . . . . . . . . . . . . . . . . . . . . . . . . . . . . . . . . . . . . . . . . . . . . . . . .
Removal 93. . . . . . . . . . . . . . . . . . . . . . . . . . . . . . . . . . . . . . . . . . . . . . . . . . . . . . . . . . . . .
Inspection and Repair 93. . . . . . . . . . . . . . . . . . . . . . . . . . . . . . . . . . . . . . . . . . . . . . . . . .
Installation 94. . . . . . . . . . . . . . . . . . . . . . . . . . . . . . . . . . . . . . . . . . . . . . . . . . . . . . . . . . . .
SECTION 10 -- ENGINE -- CHAPTER 1
10-6
SPECIFICATIONS
GENERAL TT45A TT50A
Engine Model N844 N844L
Number of Cylinders 4 4
Bore x Stroke
84 x 90 mm
(3.31 x 3.54 in)
84 x 100 mm
(3.31 x 3.94 in)
Displacement
1995 cc
(121.7 cu. in.)
2216 cc
(135.2 cu. in.)
Compression Ratio 22.5:1 22.4:1
Rated Speed (rpm) 2600 2800
Gross Engine Horsepower 29.8 kw (40 Hp) 33.5 kw (45 Hp)
PTO Horsepower at 2250 Engine and 766 PTO rpm 26.1 kw (35.0 Hp) 31.3 kw (42.2 Hp)
Firing Order 1-3-4-2 1-3-4-2
Low Idle Speed 1050 rpm 1050 rpm
Maximum No-Load Speed 2855 rpm 3000 rpm
Cylinder Arrangement In-Line Vertical In-Line Vertical
Valve Arrangement Overhead Overhead
Compression Pressure at 200 rpm (cylinder speed)
29.4 ± 1.8 bar
(427 ± 50 psi)
29.4 ± 1.8 bar
(427 ± 50 psi)
Variation between cylinders 1.8 bar (50 psi) 1.8 bar (50 psi)
CYLINDER BLOCK N844 N844L
Bore
Standard
84.0 mm
(3.3071 -- 3.3078 in)
84.0 mm
(3.3071 -- 3.3078 in)
Maximum
85.2 mm
(3.3543 in)
85.2 mm
(3.3543 in)
Head Surface Warp
Standard
0.002 in.
(0.05 mm)
0.05 mm
(0.002 in)
Maximum
0.12 mm
(0.005 in)
0.12 mm
(0.005 in)
* If bore size exceeds 85.2 mm (3.3543 in) replace with long block.
SECTION 10 -- ENGINE -- CHAPTER 1
10-24
MODEL N844 and N844L - TT45A and TT50A
10044351
10044352
4
SECTION 10 -- ENGINE -- CHAPTER 1
10-25
86071893
6
1
73
4
9
8
5
2
5
SEPARATING THE TRACTOR AT THE
CLUTCH HOUSING/ENGINE –
8 x 2 TRANSMISSION
Disassembly
1. Disconnect the negative (--) battery cable, and
the positive (+) battery cable from the battery, 1.
2. Disconnect the headlight wiring harness, 2, and
remove the hood, 3.
3. If equipped, remove the remote loader control
valve, and all the connecting hydraulic tubes
from the right side loader tower.
4. Remove the LH and RH engine side covers, 4.
5. Remove the LH, RH and center rear hood
panels, 5.
6. Remove the steering wheel, 6.
7. Remove the instrument panel, 7, from the dash
housing. Disconnect all electrical connectors
from the instrument panel.
8. Remove the dash housing, 8, from the firewall.
Disconnect all electrical connectors from the
dash housing.
9. Disconnect electrical harness to the starter, 9.
SECTION 10 -- ENGINE -- CHAPTER 1
10-26
86071894
10 13
15
1412
11
6
10. Disconnect and remove the throttle cable from
the dash mounted throttle control lever, 10.
11. Disconnect and remove the throttle cable from
the foot control pedal, 11.
12. Drain fuel from fuel tank, 12, into a suitable
container. Remove fuel tank from firewall.
13. Remove the firewall, 13, from the tractor.
14. Disconnect all hydraulic tubes 14, to the
hydraulic pump, 15.
SECTION 10 -- ENGINE -- CHAPTER 1
10-27
15. Attach a chain sling to the two hoist eyes, 1.
16. Attach a suitable hoist to the chain sling.
NOTE: The hoist is used for supporting the engine
and axle assembly, not necessarily for lifting.
17. Roll a floor jack under the rear of the tractor, and
place under the clutch housing. Raise the jack
enough to support the drive train.
86071896
1
7
18. Remove the buckle-up bolts, 1, and starter, 2,
that secure the engine, 3, to the clutch housing,
4.
NOTE: The hoist and/or floor jack may need to be
raised or lowered to allow for separation of the
engine and clutch housing.
19. Carefully roll the drive train away from the
engine, using the floor jack for support.
86071895
2
1
3
4
8
SECTION 10 -- ENGINE -- CHAPTER 1
10-28
SEPARATING THE TRACTOR AT THE
ENGINE/FRAME
Removal
1. Use jack stands under the frame rails to support
the front frame/engine assembly.
WARNING
Make sure the front frame/engine assembly is
securely supported before removing the engine.
2. Remove the chain sling from the two hoist eyes
on the engine.
3. Drain the hydraulic fluid from the power steering
reservoir, 1, into a suitable container. Remove
the reservoir, 1, and mounting bracket from the
engine.
1
86061281
9
4. Remove the air cleaner assembly, 1, from the
tractor.
5. Remove the muffler and tailpipe assembly, 2,
from engine.
6. Loosen the lower radiator hose, 3, and drain the
coolant into a suitable container.
7. Remove the lower, 3, and upper, 4, radiator
hoses.
8. Remove the radiator, 5, from the tractor.
86071897
5
1
3
2
4
10
SECTION 10 -- ENGINE -- CHAPTER 1
10-29
9. Attach a chain sling to the two hoist eyes, 1.
10. Attach a suitable hoist to the chain sling, and
raise the engine enough to support the engine.
86071896
1
11
11. Loosen and remove the engine mounting bolts,
1, on both sides of the frame.
12. Carefully lift the engine from the frame.
13. Attach the engine to a suitable engine stand.
14. With the engine securely attached to the engine
stand, remove the chain sling from the two
engine hoist eyes.
86071898
1
12
Installation
1. Attach a chain sling to the two hoist eyes.
2. Attach a suitable hoist to the chain sling, and
raise the engine enough to support the engine.
3. Remove the engine from the engine stand.
4. Using a hoist, position the engine in the frame,
aligning the mounting holes in the frame with the
mounting holes in the engine.
5. Install the engine mounting bolts, 1, on both sides
of the frame. Tighten the mounting bolts to 139 –
175 N⋅m (102 – 129 ft-lb).
6. With the engine securely installed into the frame,
remove the chain sling from the two engine hoist
eyes.
86071898
1
13
SECTION 10 -- ENGINE -- CHAPTER 1
10-30
7. Reinstall the radiator, 1, into the tractor.
8. Reinstall the lower, 2, and upper, 3, radiator
hoses.
9. 9. Fill the radiator, 1, with new coolant to the
proper level.
10. Reinstall the muffler and exhaust pipe, 4, onto
the exhaust manifold.
11. Reinstall the air cleaner assembly, 5, onto the
engine.
86071897
1
2
4
5
3
14
12. Reinstall the power steering reservoir and
mounting bracket, 1, onto the engine. Reconnect
the hydraulic lines to the reservoir.
13. Refill the reservoir to the proper level with Ambra
Multi G 134.
1
86061281
15
ATTACHING THE TRACTOR AT THE
CLUTCH HOUSING/ENGINE --
8 x 2 TRANSMISSION
Assembly
WARNING
Do not use the buckle-up bolts to draw the drive
train together with the engine. Severe damage to
the drive train may result.
1. Attach a chain sling to the two hoist eyes, 1.
2. Attach a suitable hoist to the chain sling.
3. Carefully roll the drive train into alignment with
the engine. Align the splines on the 8 x 2 input
shaft with the clutch and the engine flywheel.
Rotate the engine fan to align the input shaft and
the clutch/flywheel. The floor jack or hoist may be
needed to raise or lower the engine to make
alignment possible.
86071896
1
16
SECTION 10 -- ENGINE -- CHAPTER 1
10-31
4. Connect the clutch housing, 1, to the engine, 2,
and install the bucket-up bolts, 3.
5. Reinstall the starter, 4, and secure with the
retaining nuts. Connect the wiring harness, 5, to
the starter.
6. Tighten the buckle-up bolts, 3, in a criss--cross
pattern. Torque the M10 bolts and nuts to 68 N⋅m
(50 ft-lb) Torque the two M12 bolts to 81 N⋅m (60
ft-lb).
7. Remove the chain hoist and sling from the engine
hoist eyes. Remove the floor jack from under the
tractor. 86071895
5
4
3
1
2
17
SECTION 10 -- ENGINE -- CHAPTER 1
10-32
86071894
1
6 3
2
4
5
18
8. Reconnect all hydraulic tubes, 1, to the hydraulic
pump, 2.
9. Reattach the firewall, 3, to the tractor.
10. Reattach the fuel tank, 4, to the firewall.
Reconnect fuel lines to the fuel shut--off valve
and tank vent.
11. Reattach the throttle cable to the foot control
pedal, 5.
12. Reattach the throttle cable to the dash mounted
throttle control lever, 6.
Thank you very much for
your reading. Please Click
Here. Then Get COMPLETE
MANUAL. NO WAITING
NOTE:
If there is no response to
click on the link above,
please download the PDF
document first and then
click on it.
SECTION 10 -- ENGINE -- CHAPTER 1
10-33
86071893
3
26
5
4
7
8
1
19
13. Reconnect all electrical connectors to the dash
housing, 1.
14. Reattach the dash housing, 1, to the firewall.
15. Reconnect all electrical connectors to the
instrument panel, 2, and insert the instrument
panel into the dash housing, 1.
16. Reinstall the steering wheel, 3.
17. Reinstall the LH, RH and center rear hood
panels, 4.
18. Reinstall the LH and RH engine side covers, 5.
19. Reinstall the hood, 6, and reconnect headlight
wiring harness, 7.
20. Install the remote loader control valve, and all
connecting hydraulic tubes to the right side
loader tower.
21. Reconnect the positive (+) battery cable and
negative (--) battery cable to the battery.
WARNING
Escaping hydraulic/diesel fluid pressures can
penetrate the skin causing serious injury. Never
use your hands to check for hydraulic leaks, use
a piece of paper or cardboard to search for leaks.
22. Start the tractor and check for leaks.
23. Make any necessary adjustments needed for
proper operation of the tractor.
SECTION 10 -- ENGINE -- CHAPTER 1
10-34
OVERHAUL
ENGINE
NOTE: Some procedures discussed in this chapter
are shown with the engine in the tractor. Many of the
procedures can be done with the engine in or out of
the tractor.
FUEL INJECTOR AND GLOW PLUG
Removal
1. Clean all dirt and oil from the injectors and sur-
rounding areas.
2. Disconnect the fuel lines, 1, from the injectors
and cap all openings.
3. Remove the injector fuel leak-off line, 2.
4. Remove the injector assemblies, 3.
5. Remove the glow plug bus connector, 4, and re-
move the glow plugs, 5.
1
2
54
3
5
20
OIL PRESSURE SWITCH
Remove the oil pressure switch, 1. 1
21
TEMPERATURE SENDING SWITCH AND
ALTERNATOR
Removal
1. Remove the temperature sending switch, 1, from
the front of the cylinder head.
2. Loosen the alternator mounting bolts, 2, and re-
move the V-belt, 3, from the drive pulley.
3. Disconnect the alternator wires from the back of
alternator, 4.
4. Remove the alternator mounting bolts, 2, and re-
move the alternator.
1
3
2
4
2
22
SECTION 10 -- ENGINE -- CHAPTER 1
10-35
FAN, WATER PUMP, AND EXTERNAL OIL
TUBE
Removal
1. Remove the fan and water pump assembly. See
“Fan Removal” and “Water Pump Removal” dis-
cussed later in this section.
2. Remove the external oil transfer tube banjo bolt,
1, from the front of the cylinder head.
1
19988040
23
AIR INLET MANIFOLD
Removal
1. Remove the retaining bolts, 1, cap nuts, 2, and
seal washers, 3.
2. Remove the air inlet manifold, 4, and gasket, 5.
10044353
2
4
5
3
1
24

More Related Content

What's hot

PERKINS 1106C-E70TA AND 1106D-E70TA INDUSTRIAL ENGINE (Model PV)Service Repai...
PERKINS 1106C-E70TA AND 1106D-E70TA INDUSTRIAL ENGINE (Model PV)Service Repai...PERKINS 1106C-E70TA AND 1106D-E70TA INDUSTRIAL ENGINE (Model PV)Service Repai...
PERKINS 1106C-E70TA AND 1106D-E70TA INDUSTRIAL ENGINE (Model PV)Service Repai...fhsekfmmse
 
99239843 esprit-get-started
99239843 esprit-get-started99239843 esprit-get-started
99239843 esprit-get-startedTrung Quoc Le
 
Cummins mercruiser qsd 2.0 l diesel engine service repair manual sn:88200000 ...
Cummins mercruiser qsd 2.0 l diesel engine service repair manual sn:88200000 ...Cummins mercruiser qsd 2.0 l diesel engine service repair manual sn:88200000 ...
Cummins mercruiser qsd 2.0 l diesel engine service repair manual sn:88200000 ...jhnem kjmemm
 
PERKINS 2800 SERIES 2806C-E18 TAG2 DIESEL ENGINE Service Repair Manual
PERKINS 2800 SERIES 2806C-E18 TAG2 DIESEL ENGINE Service Repair ManualPERKINS 2800 SERIES 2806C-E18 TAG2 DIESEL ENGINE Service Repair Manual
PERKINS 2800 SERIES 2806C-E18 TAG2 DIESEL ENGINE Service Repair Manualhjskemd seudkjmd
 
Jcb isuzu 4 hk1 engine service repair manual
Jcb isuzu 4 hk1 engine service repair manualJcb isuzu 4 hk1 engine service repair manual
Jcb isuzu 4 hk1 engine service repair manualdujjsjekkekmme
 
New holland td90 d tractor service repair manual
New holland td90 d tractor service repair manualNew holland td90 d tractor service repair manual
New holland td90 d tractor service repair manualfujsejfksekkme
 
New holland ts110 a tractor service repair manual
New holland ts110 a tractor service repair manualNew holland ts110 a tractor service repair manual
New holland ts110 a tractor service repair manualfujsejfksekkme
 
Manual Operação e Manutenção AP300
Manual Operação e Manutenção AP300Manual Operação e Manutenção AP300
Manual Operação e Manutenção AP300Marcelo Cardozo
 
PERKINS 3000 SERIES 3012 CV12 12 CYLINDER DIESEL ENGINE Service Repair Manual
PERKINS 3000 SERIES 3012 CV12 12 CYLINDER DIESEL ENGINE Service Repair ManualPERKINS 3000 SERIES 3012 CV12 12 CYLINDER DIESEL ENGINE Service Repair Manual
PERKINS 3000 SERIES 3012 CV12 12 CYLINDER DIESEL ENGINE Service Repair Manualjnekmsmme
 
Caterpillar cat 3406 c marine engine parts catalogue manual
Caterpillar cat 3406 c marine engine parts catalogue manualCaterpillar cat 3406 c marine engine parts catalogue manual
Caterpillar cat 3406 c marine engine parts catalogue manualfujskekfmsme
 
CASE IH JX90 TRACTOR Service Repair Manual
CASE IH JX90 TRACTOR Service Repair ManualCASE IH JX90 TRACTOR Service Repair Manual
CASE IH JX90 TRACTOR Service Repair Manualjksemmmd
 
Caterpillar Diesel Engine Control Systems [PDF, ENG, 588 KB].pdf
Caterpillar Diesel Engine Control Systems [PDF, ENG, 588 KB].pdfCaterpillar Diesel Engine Control Systems [PDF, ENG, 588 KB].pdf
Caterpillar Diesel Engine Control Systems [PDF, ENG, 588 KB].pdfEguima Guima
 
Perkins 2500 series 2506 15 industrial engine (mga ) service repair manual
Perkins 2500 series 2506 15 industrial engine (mga ) service repair manualPerkins 2500 series 2506 15 industrial engine (mga ) service repair manual
Perkins 2500 series 2506 15 industrial engine (mga ) service repair manualjkmsedopl
 
Perkins 2500 series 2506 15 industrial engine (mga ) service repair manual
Perkins 2500 series 2506 15 industrial engine (mga ) service repair manualPerkins 2500 series 2506 15 industrial engine (mga ) service repair manual
Perkins 2500 series 2506 15 industrial engine (mga ) service repair manualfjjsieskekfmmse
 
Bt 50 en repair manual
Bt 50 en repair manualBt 50 en repair manual
Bt 50 en repair manualpacho916
 
1990 ARCTIC CAT SNOWMOBILE Service Repair Manual
1990 ARCTIC CAT SNOWMOBILE Service Repair Manual1990 ARCTIC CAT SNOWMOBILE Service Repair Manual
1990 ARCTIC CAT SNOWMOBILE Service Repair Manualhjmkmd jskemmd
 
PERKINS 3000 SERIES 3008 CV8 8 CYLINDER DIESEL ENGINE Service Repair Manual
PERKINS 3000 SERIES 3008 CV8 8 CYLINDER DIESEL ENGINE Service Repair ManualPERKINS 3000 SERIES 3008 CV8 8 CYLINDER DIESEL ENGINE Service Repair Manual
PERKINS 3000 SERIES 3008 CV8 8 CYLINDER DIESEL ENGINE Service Repair Manualjnekmsmme
 
At Manual de taller de Nissan almera modelo m16 caja de cambios automática
At Manual de taller de Nissan almera modelo m16 caja de cambios automática At Manual de taller de Nissan almera modelo m16 caja de cambios automática
At Manual de taller de Nissan almera modelo m16 caja de cambios automática Jordan Felipe Cabrera Nuñez
 
PERKINS 100 SERIES 104-22 DIESEL ENGINE Service Repair Manual
PERKINS 100 SERIES 104-22 DIESEL ENGINE Service Repair ManualPERKINS 100 SERIES 104-22 DIESEL ENGINE Service Repair Manual
PERKINS 100 SERIES 104-22 DIESEL ENGINE Service Repair Manualjskemmdn eukdms
 
Caterpillar cat 3406 c marine engine parts catalogue manual
Caterpillar cat 3406 c marine engine parts catalogue manualCaterpillar cat 3406 c marine engine parts catalogue manual
Caterpillar cat 3406 c marine engine parts catalogue manualfhsjekdmme
 

What's hot (20)

PERKINS 1106C-E70TA AND 1106D-E70TA INDUSTRIAL ENGINE (Model PV)Service Repai...
PERKINS 1106C-E70TA AND 1106D-E70TA INDUSTRIAL ENGINE (Model PV)Service Repai...PERKINS 1106C-E70TA AND 1106D-E70TA INDUSTRIAL ENGINE (Model PV)Service Repai...
PERKINS 1106C-E70TA AND 1106D-E70TA INDUSTRIAL ENGINE (Model PV)Service Repai...
 
99239843 esprit-get-started
99239843 esprit-get-started99239843 esprit-get-started
99239843 esprit-get-started
 
Cummins mercruiser qsd 2.0 l diesel engine service repair manual sn:88200000 ...
Cummins mercruiser qsd 2.0 l diesel engine service repair manual sn:88200000 ...Cummins mercruiser qsd 2.0 l diesel engine service repair manual sn:88200000 ...
Cummins mercruiser qsd 2.0 l diesel engine service repair manual sn:88200000 ...
 
PERKINS 2800 SERIES 2806C-E18 TAG2 DIESEL ENGINE Service Repair Manual
PERKINS 2800 SERIES 2806C-E18 TAG2 DIESEL ENGINE Service Repair ManualPERKINS 2800 SERIES 2806C-E18 TAG2 DIESEL ENGINE Service Repair Manual
PERKINS 2800 SERIES 2806C-E18 TAG2 DIESEL ENGINE Service Repair Manual
 
Jcb isuzu 4 hk1 engine service repair manual
Jcb isuzu 4 hk1 engine service repair manualJcb isuzu 4 hk1 engine service repair manual
Jcb isuzu 4 hk1 engine service repair manual
 
New holland td90 d tractor service repair manual
New holland td90 d tractor service repair manualNew holland td90 d tractor service repair manual
New holland td90 d tractor service repair manual
 
New holland ts110 a tractor service repair manual
New holland ts110 a tractor service repair manualNew holland ts110 a tractor service repair manual
New holland ts110 a tractor service repair manual
 
Manual Operação e Manutenção AP300
Manual Operação e Manutenção AP300Manual Operação e Manutenção AP300
Manual Operação e Manutenção AP300
 
PERKINS 3000 SERIES 3012 CV12 12 CYLINDER DIESEL ENGINE Service Repair Manual
PERKINS 3000 SERIES 3012 CV12 12 CYLINDER DIESEL ENGINE Service Repair ManualPERKINS 3000 SERIES 3012 CV12 12 CYLINDER DIESEL ENGINE Service Repair Manual
PERKINS 3000 SERIES 3012 CV12 12 CYLINDER DIESEL ENGINE Service Repair Manual
 
Caterpillar cat 3406 c marine engine parts catalogue manual
Caterpillar cat 3406 c marine engine parts catalogue manualCaterpillar cat 3406 c marine engine parts catalogue manual
Caterpillar cat 3406 c marine engine parts catalogue manual
 
CASE IH JX90 TRACTOR Service Repair Manual
CASE IH JX90 TRACTOR Service Repair ManualCASE IH JX90 TRACTOR Service Repair Manual
CASE IH JX90 TRACTOR Service Repair Manual
 
Caterpillar Diesel Engine Control Systems [PDF, ENG, 588 KB].pdf
Caterpillar Diesel Engine Control Systems [PDF, ENG, 588 KB].pdfCaterpillar Diesel Engine Control Systems [PDF, ENG, 588 KB].pdf
Caterpillar Diesel Engine Control Systems [PDF, ENG, 588 KB].pdf
 
Perkins 2500 series 2506 15 industrial engine (mga ) service repair manual
Perkins 2500 series 2506 15 industrial engine (mga ) service repair manualPerkins 2500 series 2506 15 industrial engine (mga ) service repair manual
Perkins 2500 series 2506 15 industrial engine (mga ) service repair manual
 
Perkins 2500 series 2506 15 industrial engine (mga ) service repair manual
Perkins 2500 series 2506 15 industrial engine (mga ) service repair manualPerkins 2500 series 2506 15 industrial engine (mga ) service repair manual
Perkins 2500 series 2506 15 industrial engine (mga ) service repair manual
 
Bt 50 en repair manual
Bt 50 en repair manualBt 50 en repair manual
Bt 50 en repair manual
 
1990 ARCTIC CAT SNOWMOBILE Service Repair Manual
1990 ARCTIC CAT SNOWMOBILE Service Repair Manual1990 ARCTIC CAT SNOWMOBILE Service Repair Manual
1990 ARCTIC CAT SNOWMOBILE Service Repair Manual
 
PERKINS 3000 SERIES 3008 CV8 8 CYLINDER DIESEL ENGINE Service Repair Manual
PERKINS 3000 SERIES 3008 CV8 8 CYLINDER DIESEL ENGINE Service Repair ManualPERKINS 3000 SERIES 3008 CV8 8 CYLINDER DIESEL ENGINE Service Repair Manual
PERKINS 3000 SERIES 3008 CV8 8 CYLINDER DIESEL ENGINE Service Repair Manual
 
At Manual de taller de Nissan almera modelo m16 caja de cambios automática
At Manual de taller de Nissan almera modelo m16 caja de cambios automática At Manual de taller de Nissan almera modelo m16 caja de cambios automática
At Manual de taller de Nissan almera modelo m16 caja de cambios automática
 
PERKINS 100 SERIES 104-22 DIESEL ENGINE Service Repair Manual
PERKINS 100 SERIES 104-22 DIESEL ENGINE Service Repair ManualPERKINS 100 SERIES 104-22 DIESEL ENGINE Service Repair Manual
PERKINS 100 SERIES 104-22 DIESEL ENGINE Service Repair Manual
 
Caterpillar cat 3406 c marine engine parts catalogue manual
Caterpillar cat 3406 c marine engine parts catalogue manualCaterpillar cat 3406 c marine engine parts catalogue manual
Caterpillar cat 3406 c marine engine parts catalogue manual
 

Similar to New holland tt45 a tractor service repair manual

New holland tm175 tractor service repair manual
New holland tm175 tractor service repair manualNew holland tm175 tractor service repair manual
New holland tm175 tractor service repair manualfujjsefkskemm
 
New holland tm190 tractor service repair manual
New holland tm190 tractor service repair manualNew holland tm190 tractor service repair manual
New holland tm190 tractor service repair manualfusjfjskekmsme
 
New holland tm120 tractor service repair manual
New holland tm120 tractor service repair manualNew holland tm120 tractor service repair manual
New holland tm120 tractor service repair manualufjjsjkfkmsem
 
New holland tm140 tractor service repair manual
New holland tm140 tractor service repair manualNew holland tm140 tractor service repair manual
New holland tm140 tractor service repair manualfusjfjskekmem
 
New holland tm175 tractor service repair manual
New holland tm175 tractor service repair manualNew holland tm175 tractor service repair manual
New holland tm175 tractor service repair manualujjsfjkkekmem
 
New holland tm175 tractor service repair manual
New holland tm175 tractor service repair manualNew holland tm175 tractor service repair manual
New holland tm175 tractor service repair manualufjjsjfkememe
 
New holland tm155 tractor service repair manual
New holland tm155 tractor service repair manualNew holland tm155 tractor service repair manual
New holland tm155 tractor service repair manualusuejjskkemme
 
New holland tm120 tractor service repair manual
New holland tm120 tractor service repair manualNew holland tm120 tractor service repair manual
New holland tm120 tractor service repair manualufjjsjefkskekmme
 
New holland tm190 tractor service repair manual
New holland tm190 tractor service repair manualNew holland tm190 tractor service repair manual
New holland tm190 tractor service repair manualfujsjefkksekmm
 
New holland tm130 tractor service repair manual
New holland tm130 tractor service repair manualNew holland tm130 tractor service repair manual
New holland tm130 tractor service repair manualoekdmjkemme
 
New holland tm155 tractor service repair manual
New holland tm155 tractor service repair manualNew holland tm155 tractor service repair manual
New holland tm155 tractor service repair manualfujsjefjskekemm
 
New holland tm175 tractor service repair manual
New holland tm175 tractor service repair manualNew holland tm175 tractor service repair manual
New holland tm175 tractor service repair manualfujsejfksekkme
 
New Holland TM155 Tractor Service Repair Manual.pdf
New Holland TM155 Tractor Service Repair Manual.pdfNew Holland TM155 Tractor Service Repair Manual.pdf
New Holland TM155 Tractor Service Repair Manual.pdffusedkdm9id
 
New Holland TM120 Tractor Service Repair Manual.pdf
New Holland TM120 Tractor Service Repair Manual.pdfNew Holland TM120 Tractor Service Repair Manual.pdf
New Holland TM120 Tractor Service Repair Manual.pdffusedkdm9id
 
New Holland TM175 Tractor Service Repair Manual.pdf
New Holland TM175 Tractor Service Repair Manual.pdfNew Holland TM175 Tractor Service Repair Manual.pdf
New Holland TM175 Tractor Service Repair Manual.pdffusedkdm9id
 
New Holland TM190 Tractor Service Repair Manual.pdf
New Holland TM190 Tractor Service Repair Manual.pdfNew Holland TM190 Tractor Service Repair Manual.pdf
New Holland TM190 Tractor Service Repair Manual.pdffusedkdm9id
 
New Holland TM130 Tractor Service Repair Manual.pdf
New Holland TM130 Tractor Service Repair Manual.pdfNew Holland TM130 Tractor Service Repair Manual.pdf
New Holland TM130 Tractor Service Repair Manual.pdffusedkdm9id
 
New Holland TM140 Tractor Service Repair Manual.pdf
New Holland TM140 Tractor Service Repair Manual.pdfNew Holland TM140 Tractor Service Repair Manual.pdf
New Holland TM140 Tractor Service Repair Manual.pdffusedkdm9id
 
New holland tm130 tractor service repair manual
New holland tm130 tractor service repair manualNew holland tm130 tractor service repair manual
New holland tm130 tractor service repair manualfjjskekdmmem
 
New holland tm140 tractor service repair manual
New holland tm140 tractor service repair manualNew holland tm140 tractor service repair manual
New holland tm140 tractor service repair manualfjsekkdmme
 

Similar to New holland tt45 a tractor service repair manual (20)

New holland tm175 tractor service repair manual
New holland tm175 tractor service repair manualNew holland tm175 tractor service repair manual
New holland tm175 tractor service repair manual
 
New holland tm190 tractor service repair manual
New holland tm190 tractor service repair manualNew holland tm190 tractor service repair manual
New holland tm190 tractor service repair manual
 
New holland tm120 tractor service repair manual
New holland tm120 tractor service repair manualNew holland tm120 tractor service repair manual
New holland tm120 tractor service repair manual
 
New holland tm140 tractor service repair manual
New holland tm140 tractor service repair manualNew holland tm140 tractor service repair manual
New holland tm140 tractor service repair manual
 
New holland tm175 tractor service repair manual
New holland tm175 tractor service repair manualNew holland tm175 tractor service repair manual
New holland tm175 tractor service repair manual
 
New holland tm175 tractor service repair manual
New holland tm175 tractor service repair manualNew holland tm175 tractor service repair manual
New holland tm175 tractor service repair manual
 
New holland tm155 tractor service repair manual
New holland tm155 tractor service repair manualNew holland tm155 tractor service repair manual
New holland tm155 tractor service repair manual
 
New holland tm120 tractor service repair manual
New holland tm120 tractor service repair manualNew holland tm120 tractor service repair manual
New holland tm120 tractor service repair manual
 
New holland tm190 tractor service repair manual
New holland tm190 tractor service repair manualNew holland tm190 tractor service repair manual
New holland tm190 tractor service repair manual
 
New holland tm130 tractor service repair manual
New holland tm130 tractor service repair manualNew holland tm130 tractor service repair manual
New holland tm130 tractor service repair manual
 
New holland tm155 tractor service repair manual
New holland tm155 tractor service repair manualNew holland tm155 tractor service repair manual
New holland tm155 tractor service repair manual
 
New holland tm175 tractor service repair manual
New holland tm175 tractor service repair manualNew holland tm175 tractor service repair manual
New holland tm175 tractor service repair manual
 
New Holland TM155 Tractor Service Repair Manual.pdf
New Holland TM155 Tractor Service Repair Manual.pdfNew Holland TM155 Tractor Service Repair Manual.pdf
New Holland TM155 Tractor Service Repair Manual.pdf
 
New Holland TM120 Tractor Service Repair Manual.pdf
New Holland TM120 Tractor Service Repair Manual.pdfNew Holland TM120 Tractor Service Repair Manual.pdf
New Holland TM120 Tractor Service Repair Manual.pdf
 
New Holland TM175 Tractor Service Repair Manual.pdf
New Holland TM175 Tractor Service Repair Manual.pdfNew Holland TM175 Tractor Service Repair Manual.pdf
New Holland TM175 Tractor Service Repair Manual.pdf
 
New Holland TM190 Tractor Service Repair Manual.pdf
New Holland TM190 Tractor Service Repair Manual.pdfNew Holland TM190 Tractor Service Repair Manual.pdf
New Holland TM190 Tractor Service Repair Manual.pdf
 
New Holland TM130 Tractor Service Repair Manual.pdf
New Holland TM130 Tractor Service Repair Manual.pdfNew Holland TM130 Tractor Service Repair Manual.pdf
New Holland TM130 Tractor Service Repair Manual.pdf
 
New Holland TM140 Tractor Service Repair Manual.pdf
New Holland TM140 Tractor Service Repair Manual.pdfNew Holland TM140 Tractor Service Repair Manual.pdf
New Holland TM140 Tractor Service Repair Manual.pdf
 
New holland tm130 tractor service repair manual
New holland tm130 tractor service repair manualNew holland tm130 tractor service repair manual
New holland tm130 tractor service repair manual
 
New holland tm140 tractor service repair manual
New holland tm140 tractor service repair manualNew holland tm140 tractor service repair manual
New holland tm140 tractor service repair manual
 

More from fdjsuekskefmm

New holland tt50 a tractor service repair manual
New holland tt50 a tractor service repair manualNew holland tt50 a tractor service repair manual
New holland tt50 a tractor service repair manualfdjsuekskefmm
 
New holland tn70 da tractor service repair manual
New holland tn70 da tractor service repair manualNew holland tn70 da tractor service repair manual
New holland tn70 da tractor service repair manualfdjsuekskefmm
 
New holland tn70 a tractor service repair manual
New holland tn70 a tractor service repair manualNew holland tn70 a tractor service repair manual
New holland tn70 a tractor service repair manualfdjsuekskefmm
 
New holland tn60 sa tractor service repair manual
New holland tn60 sa tractor service repair manualNew holland tn60 sa tractor service repair manual
New holland tn60 sa tractor service repair manualfdjsuekskefmm
 
New holland tc40 d tractor service repair manual
New holland tc40 d tractor service repair manualNew holland tc40 d tractor service repair manual
New holland tc40 d tractor service repair manualfdjsuekskefmm
 
New holland tc33 da tractor service repair manual
New holland tc33 da tractor service repair manualNew holland tc33 da tractor service repair manual
New holland tc33 da tractor service repair manualfdjsuekskefmm
 
New holland tc29 da tractor service repair manual
New holland tc29 da tractor service repair manualNew holland tc29 da tractor service repair manual
New holland tc29 da tractor service repair manualfdjsuekskefmm
 
New holland tc21 d tractor service repair manual
New holland tc21 d tractor service repair manualNew holland tc21 d tractor service repair manual
New holland tc21 d tractor service repair manualfdjsuekskefmm
 
New holland tc21 tractor service repair manual
New holland tc21 tractor service repair manualNew holland tc21 tractor service repair manual
New holland tc21 tractor service repair manualfdjsuekskefmm
 
New holland 1630 tractor service repair manual
New holland 1630 tractor service repair manualNew holland 1630 tractor service repair manual
New holland 1630 tractor service repair manualfdjsuekskefmm
 
Kubota z485 e4 b diesel engine service repair manual
Kubota z485 e4 b diesel engine service repair manualKubota z485 e4 b diesel engine service repair manual
Kubota z485 e4 b diesel engine service repair manualfdjsuekskefmm
 
Kubota d722 e4 b diesel engine service repair manual
Kubota d722 e4 b diesel engine service repair manualKubota d722 e4 b diesel engine service repair manual
Kubota d722 e4 b diesel engine service repair manualfdjsuekskefmm
 
Doosan da40 5 articulated dump truck service repair manual
Doosan da40 5 articulated dump truck service repair manualDoosan da40 5 articulated dump truck service repair manual
Doosan da40 5 articulated dump truck service repair manualfdjsuekskefmm
 
Caterpillar cat m318 d mh wheeled excavator (prefix w8r) service repair manua...
Caterpillar cat m318 d mh wheeled excavator (prefix w8r) service repair manua...Caterpillar cat m318 d mh wheeled excavator (prefix w8r) service repair manua...
Caterpillar cat m318 d mh wheeled excavator (prefix w8r) service repair manua...fdjsuekskefmm
 
Caterpillar cat m318 d mh wheeled excavator (prefix d9x) service repair manua...
Caterpillar cat m318 d mh wheeled excavator (prefix d9x) service repair manua...Caterpillar cat m318 d mh wheeled excavator (prefix d9x) service repair manua...
Caterpillar cat m318 d mh wheeled excavator (prefix d9x) service repair manua...fdjsuekskefmm
 
Caterpillar cat d350 c articulated dump truck (prefix 8xc) service repair man...
Caterpillar cat d350 c articulated dump truck (prefix 8xc) service repair man...Caterpillar cat d350 c articulated dump truck (prefix 8xc) service repair man...
Caterpillar cat d350 c articulated dump truck (prefix 8xc) service repair man...fdjsuekskefmm
 
Caterpillar cat 320 e lrr excavator (prefix tfx) service repair manual (tfx00...
Caterpillar cat 320 e lrr excavator (prefix tfx) service repair manual (tfx00...Caterpillar cat 320 e lrr excavator (prefix tfx) service repair manual (tfx00...
Caterpillar cat 320 e lrr excavator (prefix tfx) service repair manual (tfx00...fdjsuekskefmm
 
Caterpillar cat 320 e lrr excavator (prefix pnl) service repair manual (pnl00...
Caterpillar cat 320 e lrr excavator (prefix pnl) service repair manual (pnl00...Caterpillar cat 320 e lrr excavator (prefix pnl) service repair manual (pnl00...
Caterpillar cat 320 e lrr excavator (prefix pnl) service repair manual (pnl00...fdjsuekskefmm
 
Caterpillar cat 320 e excavator (prefix lak) service repair manual (lak00001 ...
Caterpillar cat 320 e excavator (prefix lak) service repair manual (lak00001 ...Caterpillar cat 320 e excavator (prefix lak) service repair manual (lak00001 ...
Caterpillar cat 320 e excavator (prefix lak) service repair manual (lak00001 ...fdjsuekskefmm
 
Caterpillar cat 320 d3 excavator (prefix esx) service repair manual (esx00001...
Caterpillar cat 320 d3 excavator (prefix esx) service repair manual (esx00001...Caterpillar cat 320 d3 excavator (prefix esx) service repair manual (esx00001...
Caterpillar cat 320 d3 excavator (prefix esx) service repair manual (esx00001...fdjsuekskefmm
 

More from fdjsuekskefmm (20)

New holland tt50 a tractor service repair manual
New holland tt50 a tractor service repair manualNew holland tt50 a tractor service repair manual
New holland tt50 a tractor service repair manual
 
New holland tn70 da tractor service repair manual
New holland tn70 da tractor service repair manualNew holland tn70 da tractor service repair manual
New holland tn70 da tractor service repair manual
 
New holland tn70 a tractor service repair manual
New holland tn70 a tractor service repair manualNew holland tn70 a tractor service repair manual
New holland tn70 a tractor service repair manual
 
New holland tn60 sa tractor service repair manual
New holland tn60 sa tractor service repair manualNew holland tn60 sa tractor service repair manual
New holland tn60 sa tractor service repair manual
 
New holland tc40 d tractor service repair manual
New holland tc40 d tractor service repair manualNew holland tc40 d tractor service repair manual
New holland tc40 d tractor service repair manual
 
New holland tc33 da tractor service repair manual
New holland tc33 da tractor service repair manualNew holland tc33 da tractor service repair manual
New holland tc33 da tractor service repair manual
 
New holland tc29 da tractor service repair manual
New holland tc29 da tractor service repair manualNew holland tc29 da tractor service repair manual
New holland tc29 da tractor service repair manual
 
New holland tc21 d tractor service repair manual
New holland tc21 d tractor service repair manualNew holland tc21 d tractor service repair manual
New holland tc21 d tractor service repair manual
 
New holland tc21 tractor service repair manual
New holland tc21 tractor service repair manualNew holland tc21 tractor service repair manual
New holland tc21 tractor service repair manual
 
New holland 1630 tractor service repair manual
New holland 1630 tractor service repair manualNew holland 1630 tractor service repair manual
New holland 1630 tractor service repair manual
 
Kubota z485 e4 b diesel engine service repair manual
Kubota z485 e4 b diesel engine service repair manualKubota z485 e4 b diesel engine service repair manual
Kubota z485 e4 b diesel engine service repair manual
 
Kubota d722 e4 b diesel engine service repair manual
Kubota d722 e4 b diesel engine service repair manualKubota d722 e4 b diesel engine service repair manual
Kubota d722 e4 b diesel engine service repair manual
 
Doosan da40 5 articulated dump truck service repair manual
Doosan da40 5 articulated dump truck service repair manualDoosan da40 5 articulated dump truck service repair manual
Doosan da40 5 articulated dump truck service repair manual
 
Caterpillar cat m318 d mh wheeled excavator (prefix w8r) service repair manua...
Caterpillar cat m318 d mh wheeled excavator (prefix w8r) service repair manua...Caterpillar cat m318 d mh wheeled excavator (prefix w8r) service repair manua...
Caterpillar cat m318 d mh wheeled excavator (prefix w8r) service repair manua...
 
Caterpillar cat m318 d mh wheeled excavator (prefix d9x) service repair manua...
Caterpillar cat m318 d mh wheeled excavator (prefix d9x) service repair manua...Caterpillar cat m318 d mh wheeled excavator (prefix d9x) service repair manua...
Caterpillar cat m318 d mh wheeled excavator (prefix d9x) service repair manua...
 
Caterpillar cat d350 c articulated dump truck (prefix 8xc) service repair man...
Caterpillar cat d350 c articulated dump truck (prefix 8xc) service repair man...Caterpillar cat d350 c articulated dump truck (prefix 8xc) service repair man...
Caterpillar cat d350 c articulated dump truck (prefix 8xc) service repair man...
 
Caterpillar cat 320 e lrr excavator (prefix tfx) service repair manual (tfx00...
Caterpillar cat 320 e lrr excavator (prefix tfx) service repair manual (tfx00...Caterpillar cat 320 e lrr excavator (prefix tfx) service repair manual (tfx00...
Caterpillar cat 320 e lrr excavator (prefix tfx) service repair manual (tfx00...
 
Caterpillar cat 320 e lrr excavator (prefix pnl) service repair manual (pnl00...
Caterpillar cat 320 e lrr excavator (prefix pnl) service repair manual (pnl00...Caterpillar cat 320 e lrr excavator (prefix pnl) service repair manual (pnl00...
Caterpillar cat 320 e lrr excavator (prefix pnl) service repair manual (pnl00...
 
Caterpillar cat 320 e excavator (prefix lak) service repair manual (lak00001 ...
Caterpillar cat 320 e excavator (prefix lak) service repair manual (lak00001 ...Caterpillar cat 320 e excavator (prefix lak) service repair manual (lak00001 ...
Caterpillar cat 320 e excavator (prefix lak) service repair manual (lak00001 ...
 
Caterpillar cat 320 d3 excavator (prefix esx) service repair manual (esx00001...
Caterpillar cat 320 d3 excavator (prefix esx) service repair manual (esx00001...Caterpillar cat 320 d3 excavator (prefix esx) service repair manual (esx00001...
Caterpillar cat 320 d3 excavator (prefix esx) service repair manual (esx00001...
 

Recently uploaded

T.L.E 5S's (Seiri, Seiton, Seiso, Seiketsu, Shitsuke).pptx
T.L.E 5S's (Seiri, Seiton, Seiso, Seiketsu, Shitsuke).pptxT.L.E 5S's (Seiri, Seiton, Seiso, Seiketsu, Shitsuke).pptx
T.L.E 5S's (Seiri, Seiton, Seiso, Seiketsu, Shitsuke).pptxBernardLongboan
 
❤️Panchkula Enjoy 24/7 Escort Service sdf
❤️Panchkula Enjoy 24/7 Escort Service sdf❤️Panchkula Enjoy 24/7 Escort Service sdf
❤️Panchkula Enjoy 24/7 Escort Service sdfvershagrag
 
Is Your Volvo XC90 Displaying Anti-Skid Service Required Alert Here's Why
Is Your Volvo XC90 Displaying Anti-Skid Service Required Alert Here's WhyIs Your Volvo XC90 Displaying Anti-Skid Service Required Alert Here's Why
Is Your Volvo XC90 Displaying Anti-Skid Service Required Alert Here's WhyBavarium Autoworks
 
Changodar Call Girls Book Now 7737669865 Top Class Escort Service Available
Changodar Call Girls Book Now 7737669865 Top Class Escort Service AvailableChangodar Call Girls Book Now 7737669865 Top Class Escort Service Available
Changodar Call Girls Book Now 7737669865 Top Class Escort Service Availablegargpaaro
 
Vip Begusarai Escorts Service Girl ^ 9332606886, WhatsApp Anytime Begusarai
Vip Begusarai Escorts Service Girl ^ 9332606886, WhatsApp Anytime BegusaraiVip Begusarai Escorts Service Girl ^ 9332606886, WhatsApp Anytime Begusarai
Vip Begusarai Escorts Service Girl ^ 9332606886, WhatsApp Anytime Begusaraimeghakumariji156
 
Top profile Call Girls In Anand [ 7014168258 ] Call Me For Genuine Models We ...
Top profile Call Girls In Anand [ 7014168258 ] Call Me For Genuine Models We ...Top profile Call Girls In Anand [ 7014168258 ] Call Me For Genuine Models We ...
Top profile Call Girls In Anand [ 7014168258 ] Call Me For Genuine Models We ...gajnagarg
 
What Does It Mean When Mercedes Says 'ESP Inoperative See Owner's Manual'
What Does It Mean When Mercedes Says 'ESP Inoperative See Owner's Manual'What Does It Mean When Mercedes Says 'ESP Inoperative See Owner's Manual'
What Does It Mean When Mercedes Says 'ESP Inoperative See Owner's Manual'Euromotive Performance
 
Stacey+= Dubai Calls Girls O525547819 Call Girls In Dubai
Stacey+= Dubai Calls Girls O525547819 Call Girls In DubaiStacey+= Dubai Calls Girls O525547819 Call Girls In Dubai
Stacey+= Dubai Calls Girls O525547819 Call Girls In Dubaikojalkojal131
 
如何办理加拿大麦克马斯特大学毕业证(McMaste 毕业证书)毕业证成绩单原版一比一
如何办理加拿大麦克马斯特大学毕业证(McMaste 毕业证书)毕业证成绩单原版一比一如何办理加拿大麦克马斯特大学毕业证(McMaste 毕业证书)毕业证成绩单原版一比一
如何办理加拿大麦克马斯特大学毕业证(McMaste 毕业证书)毕业证成绩单原版一比一8jg9cqy
 
Bhubaneswar🌹Vip Call Girls Odisha❤Heer 9777949614 💟 Full Trusted CALL GIRLS I...
Bhubaneswar🌹Vip Call Girls Odisha❤Heer 9777949614 💟 Full Trusted CALL GIRLS I...Bhubaneswar🌹Vip Call Girls Odisha❤Heer 9777949614 💟 Full Trusted CALL GIRLS I...
Bhubaneswar🌹Vip Call Girls Odisha❤Heer 9777949614 💟 Full Trusted CALL GIRLS I...jabtakhaidam7
 
Amreli } Russian Call Girls Ahmedabad - Phone 8005736733 Escorts Service at 6...
Amreli } Russian Call Girls Ahmedabad - Phone 8005736733 Escorts Service at 6...Amreli } Russian Call Girls Ahmedabad - Phone 8005736733 Escorts Service at 6...
Amreli } Russian Call Girls Ahmedabad - Phone 8005736733 Escorts Service at 6...gragchanchal546
 
Top profile Call Girls In Ranchi [ 7014168258 ] Call Me For Genuine Models We...
Top profile Call Girls In Ranchi [ 7014168258 ] Call Me For Genuine Models We...Top profile Call Girls In Ranchi [ 7014168258 ] Call Me For Genuine Models We...
Top profile Call Girls In Ranchi [ 7014168258 ] Call Me For Genuine Models We...gajnagarg
 
Premium Call Girls Nagpur Call Girls (Adult Only) 💯Call Us 🔝 6378878445 🔝 💃 E...
Premium Call Girls Nagpur Call Girls (Adult Only) 💯Call Us 🔝 6378878445 🔝 💃 E...Premium Call Girls Nagpur Call Girls (Adult Only) 💯Call Us 🔝 6378878445 🔝 💃 E...
Premium Call Girls Nagpur Call Girls (Adult Only) 💯Call Us 🔝 6378878445 🔝 💃 E...vershagrag
 
Top profile Call Girls In Darbhanga [ 7014168258 ] Call Me For Genuine Models...
Top profile Call Girls In Darbhanga [ 7014168258 ] Call Me For Genuine Models...Top profile Call Girls In Darbhanga [ 7014168258 ] Call Me For Genuine Models...
Top profile Call Girls In Darbhanga [ 7014168258 ] Call Me For Genuine Models...nirzagarg
 
John deere 7200r 7230R 7260R Problems Repair Manual
John deere 7200r 7230R 7260R Problems Repair ManualJohn deere 7200r 7230R 7260R Problems Repair Manual
John deere 7200r 7230R 7260R Problems Repair ManualExcavator
 
Premium Call Girls Aurangabad Call Girls 💯Call Us 🔝 6378878445 🔝 💃 Top Class ...
Premium Call Girls Aurangabad Call Girls 💯Call Us 🔝 6378878445 🔝 💃 Top Class ...Premium Call Girls Aurangabad Call Girls 💯Call Us 🔝 6378878445 🔝 💃 Top Class ...
Premium Call Girls Aurangabad Call Girls 💯Call Us 🔝 6378878445 🔝 💃 Top Class ...vershagrag
 
如何办理伦敦商学院毕业证(LBS毕业证)毕业证成绩单原版一比一
如何办理伦敦商学院毕业证(LBS毕业证)毕业证成绩单原版一比一如何办理伦敦商学院毕业证(LBS毕业证)毕业证成绩单原版一比一
如何办理伦敦商学院毕业证(LBS毕业证)毕业证成绩单原版一比一avy6anjnd
 
Electronic Stability Program. (ESP).pptx
Electronic Stability Program. (ESP).pptxElectronic Stability Program. (ESP).pptx
Electronic Stability Program. (ESP).pptxmohamedAabdeltwab
 
Marathi Call Girls Santacruz WhatsApp +91-9930687706, Best Service
Marathi Call Girls Santacruz WhatsApp +91-9930687706, Best ServiceMarathi Call Girls Santacruz WhatsApp +91-9930687706, Best Service
Marathi Call Girls Santacruz WhatsApp +91-9930687706, Best Servicemeghakumariji156
 
Illustrative History and Influence of Board Games - Thesis.pptx
Illustrative History and Influence of Board Games - Thesis.pptxIllustrative History and Influence of Board Games - Thesis.pptx
Illustrative History and Influence of Board Games - Thesis.pptxHenriSandoval
 

Recently uploaded (20)

T.L.E 5S's (Seiri, Seiton, Seiso, Seiketsu, Shitsuke).pptx
T.L.E 5S's (Seiri, Seiton, Seiso, Seiketsu, Shitsuke).pptxT.L.E 5S's (Seiri, Seiton, Seiso, Seiketsu, Shitsuke).pptx
T.L.E 5S's (Seiri, Seiton, Seiso, Seiketsu, Shitsuke).pptx
 
❤️Panchkula Enjoy 24/7 Escort Service sdf
❤️Panchkula Enjoy 24/7 Escort Service sdf❤️Panchkula Enjoy 24/7 Escort Service sdf
❤️Panchkula Enjoy 24/7 Escort Service sdf
 
Is Your Volvo XC90 Displaying Anti-Skid Service Required Alert Here's Why
Is Your Volvo XC90 Displaying Anti-Skid Service Required Alert Here's WhyIs Your Volvo XC90 Displaying Anti-Skid Service Required Alert Here's Why
Is Your Volvo XC90 Displaying Anti-Skid Service Required Alert Here's Why
 
Changodar Call Girls Book Now 7737669865 Top Class Escort Service Available
Changodar Call Girls Book Now 7737669865 Top Class Escort Service AvailableChangodar Call Girls Book Now 7737669865 Top Class Escort Service Available
Changodar Call Girls Book Now 7737669865 Top Class Escort Service Available
 
Vip Begusarai Escorts Service Girl ^ 9332606886, WhatsApp Anytime Begusarai
Vip Begusarai Escorts Service Girl ^ 9332606886, WhatsApp Anytime BegusaraiVip Begusarai Escorts Service Girl ^ 9332606886, WhatsApp Anytime Begusarai
Vip Begusarai Escorts Service Girl ^ 9332606886, WhatsApp Anytime Begusarai
 
Top profile Call Girls In Anand [ 7014168258 ] Call Me For Genuine Models We ...
Top profile Call Girls In Anand [ 7014168258 ] Call Me For Genuine Models We ...Top profile Call Girls In Anand [ 7014168258 ] Call Me For Genuine Models We ...
Top profile Call Girls In Anand [ 7014168258 ] Call Me For Genuine Models We ...
 
What Does It Mean When Mercedes Says 'ESP Inoperative See Owner's Manual'
What Does It Mean When Mercedes Says 'ESP Inoperative See Owner's Manual'What Does It Mean When Mercedes Says 'ESP Inoperative See Owner's Manual'
What Does It Mean When Mercedes Says 'ESP Inoperative See Owner's Manual'
 
Stacey+= Dubai Calls Girls O525547819 Call Girls In Dubai
Stacey+= Dubai Calls Girls O525547819 Call Girls In DubaiStacey+= Dubai Calls Girls O525547819 Call Girls In Dubai
Stacey+= Dubai Calls Girls O525547819 Call Girls In Dubai
 
如何办理加拿大麦克马斯特大学毕业证(McMaste 毕业证书)毕业证成绩单原版一比一
如何办理加拿大麦克马斯特大学毕业证(McMaste 毕业证书)毕业证成绩单原版一比一如何办理加拿大麦克马斯特大学毕业证(McMaste 毕业证书)毕业证成绩单原版一比一
如何办理加拿大麦克马斯特大学毕业证(McMaste 毕业证书)毕业证成绩单原版一比一
 
Bhubaneswar🌹Vip Call Girls Odisha❤Heer 9777949614 💟 Full Trusted CALL GIRLS I...
Bhubaneswar🌹Vip Call Girls Odisha❤Heer 9777949614 💟 Full Trusted CALL GIRLS I...Bhubaneswar🌹Vip Call Girls Odisha❤Heer 9777949614 💟 Full Trusted CALL GIRLS I...
Bhubaneswar🌹Vip Call Girls Odisha❤Heer 9777949614 💟 Full Trusted CALL GIRLS I...
 
Amreli } Russian Call Girls Ahmedabad - Phone 8005736733 Escorts Service at 6...
Amreli } Russian Call Girls Ahmedabad - Phone 8005736733 Escorts Service at 6...Amreli } Russian Call Girls Ahmedabad - Phone 8005736733 Escorts Service at 6...
Amreli } Russian Call Girls Ahmedabad - Phone 8005736733 Escorts Service at 6...
 
Top profile Call Girls In Ranchi [ 7014168258 ] Call Me For Genuine Models We...
Top profile Call Girls In Ranchi [ 7014168258 ] Call Me For Genuine Models We...Top profile Call Girls In Ranchi [ 7014168258 ] Call Me For Genuine Models We...
Top profile Call Girls In Ranchi [ 7014168258 ] Call Me For Genuine Models We...
 
Premium Call Girls Nagpur Call Girls (Adult Only) 💯Call Us 🔝 6378878445 🔝 💃 E...
Premium Call Girls Nagpur Call Girls (Adult Only) 💯Call Us 🔝 6378878445 🔝 💃 E...Premium Call Girls Nagpur Call Girls (Adult Only) 💯Call Us 🔝 6378878445 🔝 💃 E...
Premium Call Girls Nagpur Call Girls (Adult Only) 💯Call Us 🔝 6378878445 🔝 💃 E...
 
Top profile Call Girls In Darbhanga [ 7014168258 ] Call Me For Genuine Models...
Top profile Call Girls In Darbhanga [ 7014168258 ] Call Me For Genuine Models...Top profile Call Girls In Darbhanga [ 7014168258 ] Call Me For Genuine Models...
Top profile Call Girls In Darbhanga [ 7014168258 ] Call Me For Genuine Models...
 
John deere 7200r 7230R 7260R Problems Repair Manual
John deere 7200r 7230R 7260R Problems Repair ManualJohn deere 7200r 7230R 7260R Problems Repair Manual
John deere 7200r 7230R 7260R Problems Repair Manual
 
Premium Call Girls Aurangabad Call Girls 💯Call Us 🔝 6378878445 🔝 💃 Top Class ...
Premium Call Girls Aurangabad Call Girls 💯Call Us 🔝 6378878445 🔝 💃 Top Class ...Premium Call Girls Aurangabad Call Girls 💯Call Us 🔝 6378878445 🔝 💃 Top Class ...
Premium Call Girls Aurangabad Call Girls 💯Call Us 🔝 6378878445 🔝 💃 Top Class ...
 
如何办理伦敦商学院毕业证(LBS毕业证)毕业证成绩单原版一比一
如何办理伦敦商学院毕业证(LBS毕业证)毕业证成绩单原版一比一如何办理伦敦商学院毕业证(LBS毕业证)毕业证成绩单原版一比一
如何办理伦敦商学院毕业证(LBS毕业证)毕业证成绩单原版一比一
 
Electronic Stability Program. (ESP).pptx
Electronic Stability Program. (ESP).pptxElectronic Stability Program. (ESP).pptx
Electronic Stability Program. (ESP).pptx
 
Marathi Call Girls Santacruz WhatsApp +91-9930687706, Best Service
Marathi Call Girls Santacruz WhatsApp +91-9930687706, Best ServiceMarathi Call Girls Santacruz WhatsApp +91-9930687706, Best Service
Marathi Call Girls Santacruz WhatsApp +91-9930687706, Best Service
 
Illustrative History and Influence of Board Games - Thesis.pptx
Illustrative History and Influence of Board Games - Thesis.pptxIllustrative History and Influence of Board Games - Thesis.pptx
Illustrative History and Influence of Board Games - Thesis.pptx
 

New holland tt45 a tractor service repair manual

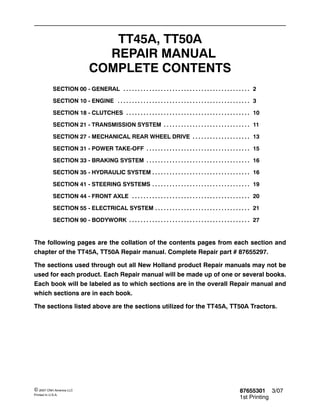
  • 1. 87655301 3/07 1st Printing © 2007 CNH America LLC Printed In U.S.A. TT45A, TT50A REPAIR MANUAL COMPLETE CONTENTS SECTION 00 - GENERAL 2. . . . . . . . . . . . . . . . . . . . . . . . . . . . . . . . . . . . . . . . . . . . SECTION 10 - ENGINE 3. . . . . . . . . . . . . . . . . . . . . . . . . . . . . . . . . . . . . . . . . . . . . . SECTION 18 - CLUTCHES 10. . . . . . . . . . . . . . . . . . . . . . . . . . . . . . . . . . . . . . . . . . . SECTION 21 - TRANSMISSION SYSTEM 11. . . . . . . . . . . . . . . . . . . . . . . . . . . . . . SECTION 27 - MECHANICAL REAR WHEEL DRIVE 13. . . . . . . . . . . . . . . . . . . . SECTION 31 - POWER TAKE-OFF 15. . . . . . . . . . . . . . . . . . . . . . . . . . . . . . . . . . . . SECTION 33 - BRAKING SYSTEM 16. . . . . . . . . . . . . . . . . . . . . . . . . . . . . . . . . . . . SECTION 35 - HYDRAULIC SYSTEM 16. . . . . . . . . . . . . . . . . . . . . . . . . . . . . . . . . . SECTION 41 - STEERING SYSTEMS 19. . . . . . . . . . . . . . . . . . . . . . . . . . . . . . . . . . SECTION 44 - FRONT AXLE 20. . . . . . . . . . . . . . . . . . . . . . . . . . . . . . . . . . . . . . . . . SECTION 55 - ELECTRICAL SYSTEM 21. . . . . . . . . . . . . . . . . . . . . . . . . . . . . . . . . SECTION 90 - BODYWORK 27. . . . . . . . . . . . . . . . . . . . . . . . . . . . . . . . . . . . . . . . . . The following pages are the collation of the contents pages from each section and chapter of the TT45A, TT50A Repair manual. Complete Repair part # 87655297. The sections used through out all New Holland product Repair manuals may not be used for each product. Each Repair manual will be made up of one or several books. Each book will be labeled as to which sections are in the overall Repair manual and which sections are in each book. The sections listed above are the sections utilized for the TT45A, TT50A Tractors.
  • 2. SECTION 00 -- GENERAL -- CHAPTER 1 00-1 SECTION 00 -- GENERAL Chapter 1 -- General CONTENTS Section Description Page Federal Emissions Warranty 2. . . . . . . . . . . . . . . . . . . . . . . . . . . . . . . . . . . . . . . . . . . . . . . . . . . . . California Emission Control Warranty Statement 3. . . . . . . . . . . . . . . . . . . . . . . . . . . . . . . . . . . . General Instructions 5. . . . . . . . . . . . . . . . . . . . . . . . . . . . . . . . . . . . . . . . . . . . . . . . . . . . . . . . . . . . Important Notice 5. . . . . . . . . . . . . . . . . . . . . . . . . . . . . . . . . . . . . . . . . . . . . . . . . . . . . . . . . . . . Shimming 5. . . . . . . . . . . . . . . . . . . . . . . . . . . . . . . . . . . . . . . . . . . . . . . . . . . . . . . . . . . . . . . . . . Rotating Shaft Seals 5. . . . . . . . . . . . . . . . . . . . . . . . . . . . . . . . . . . . . . . . . . . . . . . . . . . . . . . . O-Rings 6. . . . . . . . . . . . . . . . . . . . . . . . . . . . . . . . . . . . . . . . . . . . . . . . . . . . . . . . . . . . . . . . . . . Sealers 6. . . . . . . . . . . . . . . . . . . . . . . . . . . . . . . . . . . . . . . . . . . . . . . . . . . . . . . . . . . . . . . . . . . . Bearings 6. . . . . . . . . . . . . . . . . . . . . . . . . . . . . . . . . . . . . . . . . . . . . . . . . . . . . . . . . . . . . . . . . . . Spring Pins 6. . . . . . . . . . . . . . . . . . . . . . . . . . . . . . . . . . . . . . . . . . . . . . . . . . . . . . . . . . . . . . . . Precautionary Notice 7. . . . . . . . . . . . . . . . . . . . . . . . . . . . . . . . . . . . . . . . . . . . . . . . . . . . . . . . Equipment Notice 7. . . . . . . . . . . . . . . . . . . . . . . . . . . . . . . . . . . . . . . . . . . . . . . . . . . . . . . . . . . Spare Parts Notice 7. . . . . . . . . . . . . . . . . . . . . . . . . . . . . . . . . . . . . . . . . . . . . . . . . . . . . . . . . . General Notices 7. . . . . . . . . . . . . . . . . . . . . . . . . . . . . . . . . . . . . . . . . . . . . . . . . . . . . . . . . . . . Health and Safety Precautions 8. . . . . . . . . . . . . . . . . . . . . . . . . . . . . . . . . . . . . . . . . . . . . . . . . . . General Workshop Tools and Equipment 13. . . . . . . . . . . . . . . . . . . . . . . . . . . . . . . . . . . . . Legal Aspects 13. . . . . . . . . . . . . . . . . . . . . . . . . . . . . . . . . . . . . . . . . . . . . . . . . . . . . . . . . . . . Lubricants and Greases 13. . . . . . . . . . . . . . . . . . . . . . . . . . . . . . . . . . . . . . . . . . . . . . . . . . . Precautionary Statements 17. . . . . . . . . . . . . . . . . . . . . . . . . . . . . . . . . . . . . . . . . . . . . . . . . . . . . Safety 18. . . . . . . . . . . . . . . . . . . . . . . . . . . . . . . . . . . . . . . . . . . . . . . . . . . . . . . . . . . . . . . . . . . . . . The Tractor 18. . . . . . . . . . . . . . . . . . . . . . . . . . . . . . . . . . . . . . . . . . . . . . . . . . . . . . . . . . . . . . Driving the Tractor 19. . . . . . . . . . . . . . . . . . . . . . . . . . . . . . . . . . . . . . . . . . . . . . . . . . . . . . . . Operating the Tractor 20. . . . . . . . . . . . . . . . . . . . . . . . . . . . . . . . . . . . . . . . . . . . . . . . . . . . . . Operating the PTO 21. . . . . . . . . . . . . . . . . . . . . . . . . . . . . . . . . . . . . . . . . . . . . . . . . . . . . . . . Servicing the Tractor 21. . . . . . . . . . . . . . . . . . . . . . . . . . . . . . . . . . . . . . . . . . . . . . . . . . . . . . Diesel Fuel 22. . . . . . . . . . . . . . . . . . . . . . . . . . . . . . . . . . . . . . . . . . . . . . . . . . . . . . . . . . . . . . Universal Symbols 23. . . . . . . . . . . . . . . . . . . . . . . . . . . . . . . . . . . . . . . . . . . . . . . . . . . . . . . . . . . Safety Decals 24. . . . . . . . . . . . . . . . . . . . . . . . . . . . . . . . . . . . . . . . . . . . . . . . . . . . . . . . . . . . . . . . Instructional Decals 28. . . . . . . . . . . . . . . . . . . . . . . . . . . . . . . . . . . . . . . . . . . . . . . . . . . . . . . Ecology and the Environment 29. . . . . . . . . . . . . . . . . . . . . . . . . . . . . . . . . . . . . . . . . . . . . . . . . . Minimum Hardware Tightening Torques 30. . . . . . . . . . . . . . . . . . . . . . . . . . . . . . . . . . . . . . . . . General Specifications 32. . . . . . . . . . . . . . . . . . . . . . . . . . . . . . . . . . . . . . . . . . . . . . . . . . . . . . . . Lubricants and Coolants 37. . . . . . . . . . . . . . . . . . . . . . . . . . . . . . . . . . . . . . . . . . . . . . . . . . .
  • 3. SECTION 00 -- GENERAL -- CHAPTER 1 00-5 GENERAL INSTRUCTIONS WARNING All maintenance and repair work described in this manual must be performed exclusively by NEW HOLLAND service technicians in strict accordance with the instructions given and using any specific tools necessary. WARNING Anyone who performs the operations described herein without strictly following the instructions is personally responsible for resulting injury or damage to property. WARNING The Manufacturer and all organizations belong- ing to the Manufacturer’s distribution network, including but not restricted to national, regional or local distributors, will accept no responsibility for personal injury or damage to property caused by abnormal function of parts and/or compo- nents not approved by the Manufacturer, including those used for maintenance and/or repair of the product manufactured or marketed by the Manufacturer. In any case, the product manufactured or marketed by the Manufacturer is covered by no guarantee of any kind against personal injury or damage to property caused by abnormal function of parts and/or components not approved by the Manufacturer. IMPORTANT NOTICE All maintenance and repair operations described in this manual should be carried out exclusively by the authorized workshops. All instructions detailed should be carefully observed and special equipment indicated should be used if necessary. Everyone who carries out service operations described without carefully observing these prescrip- tions will be directly responsible of deriving damages. SHIMMING At each adjustment, select adjusting shims, measure them individually using a micrometer and then sum up recorded values. Do not rely on measuring the whole shimming set, which may be incorrect, or on the rated value indicated for each shim. ROTATING SHAFT SEALS To correctly install rotating shaft seals, observe the following instructions: • Let the seal soak into the same oil as it will seal for at least half an hour before mounting; • Thoroughly clean the shaft and ensure that the shaft working surface is not damaged; • Place the sealing lip towards the fluid. In case of a hydrodynamic lip, consider the shaft rotation direction and orient grooves in order that they deviate the fluid towards the inner side of the seal; • Coat the sealing lip with a thin layer of lubricant (oil rather than grease) and fill the gap between the sealing lip and the dust lip of double lip seals with grease; • Insert the seal into its seat and press it down using a flat punch. Do not tap the seal with a hammer or a drift; • Take care to insert the seal perpendicularly to its seat while you are pressing it. Once the seal is settled, ensure that it contacts the thrust element, if required; • To prevent damaging the sealing lip against the shaft, place a suitable protection during installation.
  • 4. SECTION 00 -- GENERAL -- CHAPTER 1 00-6 O RINGS Lubricate the O rings before inserting them into their seats. This will prevent the O rings from roll over and twisting during mounting, which will jeopardize sealing. SEALERS Apply silicone/gasket eliminator over the mating surfaces marked with an X. Before applying the sealer, prepare the surface as follows: • Remove possible scales using a metal brush; • Thoroughly degrease the surfaces using one of the following cleaning agents: trichlorethylene, diesel fuel or a water and soda solution. BEARINGS It is advisable to heat the bearings to 80° to 90°C (176° to 194°F) before mounting them on their shafts and cool them down before inserting them into their seats with external tapping. SPRING PINS When mounting split socket spring pins, ensure that the pin notch is oriented in the direction of the effort to stress the pin. Spiral spring pins should not be oriented during installation.
  • 5. SECTION 00 -- GENERAL -- CHAPTER 1 00-18 SAFETY PRECAUTIONARY STATEMENTS A careful operator is the best operator. Most accidents can be avoided by observing certain precautions. To help prevent accidents, read and take the following precautions before driving, operating or servicing the tractor. Equipment should be operated only by those who are responsible and instructed to do so. THE TRACTOR 1. Read this Operator’s Manual carefully before using the tractor. Lack of operating knowledge can lead to accidents. 2. Only allow properly trained and qualified persons to operate the tractor. 3. To prevent falls, use the handrails and step plates when getting on and off the tractor. Keep steps and platform clear of mud and debris. 4. Replace all missing, illegible or damaged safety decals. 5. Keep safety decals free of dirt or grime. 6. Do not permit anyone but the operator to ride on the tractor. It is unsafe for extra passengers to travel. 7. Keep children away from the tractor and farm machinery at all times. 8. Do not modify or alter or permit anyone else to modify or alter the tractor or any of its components or any tractor function without first consulting your dealer. 9. Install all guards before starting the engine or operating the tractor. 10. Tractor wheels are very heavy. They need to be handled with care. Ensure that they are stored at a place where they do not fall down & cause injury.
  • 6. SECTION 00 -- GENERAL -- CHAPTER 1 00-19 DRIVING THE TRACTOR 1. Always sit in the driver’s seat while starting or driving the tractor. 2. When driving on public roads, have consideration for other road users. Pull in to the left side of the road occasionally to allow any following traffic to pass. Do not exceed the legal speed limit set for agricultural tractors. 3. Dip the tractor lights when meeting a vehicle at night. Make sure the lights are adjusted to prevent blinding the driver of an oncoming vehicle. 4. Reduce speed before turning or applying the brakes. Brake both wheels simultaneously when making an emergency stop. Ensure that both brake pedals are locked together when travelling at road speeds or when on public roads ensure correct operation of trailer brakes. 5. Use extreme caution and avoid hard application of the tractor brakes when towing heavy loads at road speeds. 6. Keep the tractor in the same gear when going downhill as would be used when going uphill. Do not coast or freewheel down hills. 7. Any towed vehicle whose total weight exceeds that of the towing tractor must be equipped with brakes for safe operation. 8. Never try to apply the differential lock when turning. When engaged, the differential lock will prevent the tractor from turning. 9. Always check overhead clearance, especially when transporting the tractor. Watch where you are going, especially at row ends, on roads and around trees and low overhanging obstacles. 10. To avoid overturns, drive the tractor with care and at speeds compatible with safety, especially when operating over rough ground, when crossing ditches or slopes and when turning corners. 11. Use extreme caution when operating on steep slopes. 12. If the tractor becomes stuck or the tires are frozen to the ground, reverse the tractor out to prevent overturning.
  • 7. SECTION 10 -- ENGINE -- CHAPTER 1 10-1 SECTION 10 - ENGINE Chapter 1 - Engine CONTENTS Section Description Page Specifications 6. . . . . . . . . . . . . . . . . . . . . . . . . . . . . . . . . . . . . . . . . . . . . . . . . . . . . . . . . . . . . . . . . . Metric Bolt Torque Specifications 15. . . . . . . . . . . . . . . . . . . . . . . . . . . . . . . . . . . . . . . . . . . . . . . Special Tools 16. . . . . . . . . . . . . . . . . . . . . . . . . . . . . . . . . . . . . . . . . . . . . . . . . . . . . . . . . . . . . . . . Compression Test and Tools 17. . . . . . . . . . . . . . . . . . . . . . . . . . . . . . . . . . . . . . . . . . . . . . . . Description of Operation 18. . . . . . . . . . . . . . . . . . . . . . . . . . . . . . . . . . . . . . . . . . . . . . . . . . . . . . Troubleshooting 19. . . . . . . . . . . . . . . . . . . . . . . . . . . . . . . . . . . . . . . . . . . . . . . . . . . . . . . . . . . . . . Cylinder Head and Valve Train Components 23. . . . . . . . . . . . . . . . . . . . . . . . . . . . . . . . . . Cylinder Block Assembly 23. . . . . . . . . . . . . . . . . . . . . . . . . . . . . . . . . . . . . . . . . . . . . . . . . . . Separating the Tractor at the Clutch Housing/Engine -- 8 x 12 Transmission 25. . . . . . . Disassembly 25. . . . . . . . . . . . . . . . . . . . . . . . . . . . . . . . . . . . . . . . . . . . . . . . . . . . . . . . . . Separating the Tractor at the Engine/Frame 28. . . . . . . . . . . . . . . . . . . . . . . . . . . . . . . . . . Removal 28. . . . . . . . . . . . . . . . . . . . . . . . . . . . . . . . . . . . . . . . . . . . . . . . . . . . . . . . . . . . . Installation 29. . . . . . . . . . . . . . . . . . . . . . . . . . . . . . . . . . . . . . . . . . . . . . . . . . . . . . . . . . . . Attaching the Tractor at the Clutch Housing/Engine -- 8 x 12 Transmission 30. . . . . . . . Assembly 30. . . . . . . . . . . . . . . . . . . . . . . . . . . . . . . . . . . . . . . . . . . . . . . . . . . . . . . . . . . . Overhaul 34. . . . . . . . . . . . . . . . . . . . . . . . . . . . . . . . . . . . . . . . . . . . . . . . . . . . . . . . . . . . . . . . . . . . Engine 34. . . . . . . . . . . . . . . . . . . . . . . . . . . . . . . . . . . . . . . . . . . . . . . . . . . . . . . . . . . . . . . . . . Fuel Injector and Glow Plug 34. . . . . . . . . . . . . . . . . . . . . . . . . . . . . . . . . . . . . . . . . . . . . . . . Removal 34. . . . . . . . . . . . . . . . . . . . . . . . . . . . . . . . . . . . . . . . . . . . . . . . . . . . . . . . . . . . . Oil Pressure Switch 34. . . . . . . . . . . . . . . . . . . . . . . . . . . . . . . . . . . . . . . . . . . . . . . . . . . . . . . Temperature Sending Switch and Alternator 34. . . . . . . . . . . . . . . . . . . . . . . . . . . . . . . . . . Removal 34. . . . . . . . . . . . . . . . . . . . . . . . . . . . . . . . . . . . . . . . . . . . . . . . . . . . . . . . . . . . . Fan, Water Pump and External Oil Tube 35. . . . . . . . . . . . . . . . . . . . . . . . . . . . . . . . . . . . . Removal 35. . . . . . . . . . . . . . . . . . . . . . . . . . . . . . . . . . . . . . . . . . . . . . . . . . . . . . . . . . . . . Air Inlet Manifold 35. . . . . . . . . . . . . . . . . . . . . . . . . . . . . . . . . . . . . . . . . . . . . . . . . . . . . . . . . . Removal 35. . . . . . . . . . . . . . . . . . . . . . . . . . . . . . . . . . . . . . . . . . . . . . . . . . . . . . . . . . . . . Rocker Arm Shaft and Support Bracket 36. . . . . . . . . . . . . . . . . . . . . . . . . . . . . . . . . . . . . . Removal 36. . . . . . . . . . . . . . . . . . . . . . . . . . . . . . . . . . . . . . . . . . . . . . . . . . . . . . . . . . . . . 10 101 Cylinder Head 36. . . . . . . . . . . . . . . . . . . . . . . . . . . . . . . . . . . . . . . . . . . . . . . . . . . . . . . . . . . . Removal 36. . . . . . . . . . . . . . . . . . . . . . . . . . . . . . . . . . . . . . . . . . . . . . . . . . . . . . . . . . . . . Valve Tappet 37. . . . . . . . . . . . . . . . . . . . . . . . . . . . . . . . . . . . . . . . . . . . . . . . . . . . . . . . . . . . . Removal 37. . . . . . . . . . . . . . . . . . . . . . . . . . . . . . . . . . . . . . . . . . . . . . . . . . . . . . . . . . . . . Fuel Shutoff Solenoid 37. . . . . . . . . . . . . . . . . . . . . . . . . . . . . . . . . . . . . . . . . . . . . . . . . . . . . . Removal 37. . . . . . . . . . . . . . . . . . . . . . . . . . . . . . . . . . . . . . . . . . . . . . . . . . . . . . . . . . . . .
  • 8. SECTION 10 -- ENGINE -- CHAPTER 1 10-2 Section Description Page 10 106 Engine Timing Gear Cover, Timing Gears, and Cam Shaft 37. . . . . . . . . . . . . . . . . . . . . . Timing Gear Cover Removal 37. . . . . . . . . . . . . . . . . . . . . . . . . . . . . . . . . . . . . . . . . . . . 10 106 Timing Gears and Cam Shaft 40. . . . . . . . . . . . . . . . . . . . . . . . . . . . . . . . . . . . . . . . . . . . . . Removal 40. . . . . . . . . . . . . . . . . . . . . . . . . . . . . . . . . . . . . . . . . . . . . . . . . . . . . . . . . . . . . 10 102 Oil Sump 41. . . . . . . . . . . . . . . . . . . . . . . . . . . . . . . . . . . . . . . . . . . . . . . . . . . . . . . . . . . . . . . . Removal 41. . . . . . . . . . . . . . . . . . . . . . . . . . . . . . . . . . . . . . . . . . . . . . . . . . . . . . . . . . . . . Oil Suction Pipe and Strainer 41. . . . . . . . . . . . . . . . . . . . . . . . . . . . . . . . . . . . . . . . . . . . . . . Removal 41. . . . . . . . . . . . . . . . . . . . . . . . . . . . . . . . . . . . . . . . . . . . . . . . . . . . . . . . . . . . . 10 110 Balancer Assembly 42. . . . . . . . . . . . . . . . . . . . . . . . . . . . . . . . . . . . . . . . . . . . . . . . . . . . . . . Removal 42. . . . . . . . . . . . . . . . . . . . . . . . . . . . . . . . . . . . . . . . . . . . . . . . . . . . . . . . . . . . . 10 105 Connecting Rods, Bearings, and Pistons, Rings 42. . . . . . . . . . . . . . . . . . . . . . . . . . . . . . . Removal 42. . . . . . . . . . . . . . . . . . . . . . . . . . . . . . . . . . . . . . . . . . . . . . . . . . . . . . . . . . . . . 10 103 Flywheel 43. . . . . . . . . . . . . . . . . . . . . . . . . . . . . . . . . . . . . . . . . . . . . . . . . . . . . . . . . . . . . . . . . Removal 43. . . . . . . . . . . . . . . . . . . . . . . . . . . . . . . . . . . . . . . . . . . . . . . . . . . . . . . . . . . . . 10 103 Backplate and Oil Seal 43. . . . . . . . . . . . . . . . . . . . . . . . . . . . . . . . . . . . . . . . . . . . . . . . . . . . Removal 43. . . . . . . . . . . . . . . . . . . . . . . . . . . . . . . . . . . . . . . . . . . . . . . . . . . . . . . . . . . . . Crankshaft -- Main Bearings 43. . . . . . . . . . . . . . . . . . . . . . . . . . . . . . . . . . . . . . . . . . . . . . . . Removal 43. . . . . . . . . . . . . . . . . . . . . . . . . . . . . . . . . . . . . . . . . . . . . . . . . . . . . . . . . . . . . 10 101 Cylinder Head 44. . . . . . . . . . . . . . . . . . . . . . . . . . . . . . . . . . . . . . . . . . . . . . . . . . . . . . . . . . . . Disassembly 44. . . . . . . . . . . . . . . . . . . . . . . . . . . . . . . . . . . . . . . . . . . . . . . . . . . . . . . . . . Inspection and Repair 44. . . . . . . . . . . . . . . . . . . . . . . . . . . . . . . . . . . . . . . . . . . . . . . . . . Valve Seats 45. . . . . . . . . . . . . . . . . . . . . . . . . . . . . . . . . . . . . . . . . . . . . . . . . . . . . . . . . . . . . . Valves 46. . . . . . . . . . . . . . . . . . . . . . . . . . . . . . . . . . . . . . . . . . . . . . . . . . . . . . . . . . . . . . . . . . . Valve Guides 47. . . . . . . . . . . . . . . . . . . . . . . . . . . . . . . . . . . . . . . . . . . . . . . . . . . . . . . . . . . . . Valve Springs 48. . . . . . . . . . . . . . . . . . . . . . . . . . . . . . . . . . . . . . . . . . . . . . . . . . . . . . . . . . . . Rocker Arms 48. . . . . . . . . . . . . . . . . . . . . . . . . . . . . . . . . . . . . . . . . . . . . . . . . . . . . . . . . . . . . Push Rods 49. . . . . . . . . . . . . . . . . . . . . . . . . . . . . . . . . . . . . . . . . . . . . . . . . . . . . . . . . . . . . . . Cylinder Head 49. . . . . . . . . . . . . . . . . . . . . . . . . . . . . . . . . . . . . . . . . . . . . . . . . . . . . . . . . . . . Assembly 49. . . . . . . . . . . . . . . . . . . . . . . . . . . . . . . . . . . . . . . . . . . . . . . . . . . . . . . . . . . . Cylinder Block 50. . . . . . . . . . . . . . . . . . . . . . . . . . . . . . . . . . . . . . . . . . . . . . . . . . . . . . . . . . . . Pistons 50. . . . . . . . . . . . . . . . . . . . . . . . . . . . . . . . . . . . . . . . . . . . . . . . . . . . . . . . . . . . . . . . . . Disassembly and Inspection 50. . . . . . . . . . . . . . . . . . . . . . . . . . . . . . . . . . . . . . . . . . . . Piston Rings 53. . . . . . . . . . . . . . . . . . . . . . . . . . . . . . . . . . . . . . . . . . . . . . . . . . . . . . . . . . . . . Connecting Rods 53. . . . . . . . . . . . . . . . . . . . . . . . . . . . . . . . . . . . . . . . . . . . . . . . . . . . . . . . . Connecting Rod Bearing 55. . . . . . . . . . . . . . . . . . . . . . . . . . . . . . . . . . . . . . . . . . . . . . . . . . . Clearance Check 55. . . . . . . . . . . . . . . . . . . . . . . . . . . . . . . . . . . . . . . . . . . . . . . . . . . . . .
  • 9. SECTION 10 -- ENGINE -- CHAPTER 1 10-3 Section Description Page Pistons, Rings, and Connecting Rod 56. . . . . . . . . . . . . . . . . . . . . . . . . . . . . . . . . . . . . . . . . Assembly 56. . . . . . . . . . . . . . . . . . . . . . . . . . . . . . . . . . . . . . . . . . . . . . . . . . . . . . . . . . . . 10 103 Crankshaft -- Main Bearing and Thrust Washer 57. . . . . . . . . . . . . . . . . . . . . . . . . . . . . . . . Removal and Inspection 57. . . . . . . . . . . . . . . . . . . . . . . . . . . . . . . . . . . . . . . . . . . . . . . . Crankshaft 58. . . . . . . . . . . . . . . . . . . . . . . . . . . . . . . . . . . . . . . . . . . . . . . . . . . . . . . . . . . . . . Bearing (Bushing) 59. . . . . . . . . . . . . . . . . . . . . . . . . . . . . . . . . . . . . . . . . . . . . . . . . . . . . . . . . Replacement 59. . . . . . . . . . . . . . . . . . . . . . . . . . . . . . . . . . . . . . . . . . . . . . . . . . . . . . . . . Main Bearing 60. . . . . . . . . . . . . . . . . . . . . . . . . . . . . . . . . . . . . . . . . . . . . . . . . . . . . . . . . . . . . Assembly 60. . . . . . . . . . . . . . . . . . . . . . . . . . . . . . . . . . . . . . . . . . . . . . . . . . . . . . . . . . . . Port Block 61. . . . . . . . . . . . . . . . . . . . . . . . . . . . . . . . . . . . . . . . . . . . . . . . . . . . . . . . . . . . . . . Removal 61. . . . . . . . . . . . . . . . . . . . . . . . . . . . . . . . . . . . . . . . . . . . . . . . . . . . . . . . . . . . . Installation 61. . . . . . . . . . . . . . . . . . . . . . . . . . . . . . . . . . . . . . . . . . . . . . . . . . . . . . . . . . . . 10 106 Timing Gear 62. . . . . . . . . . . . . . . . . . . . . . . . . . . . . . . . . . . . . . . . . . . . . . . . . . . . . . . . . . . . . . Camshaft 62. . . . . . . . . . . . . . . . . . . . . . . . . . . . . . . . . . . . . . . . . . . . . . . . . . . . . . . . . . . . . . . . Disassembly 62. . . . . . . . . . . . . . . . . . . . . . . . . . . . . . . . . . . . . . . . . . . . . . . . . . . . . . . . . . Inspection 62. . . . . . . . . . . . . . . . . . . . . . . . . . . . . . . . . . . . . . . . . . . . . . . . . . . . . . . . . . . . Assembly 63. . . . . . . . . . . . . . . . . . . . . . . . . . . . . . . . . . . . . . . . . . . . . . . . . . . . . . . . . . . . 10 103 Flywheel 63. . . . . . . . . . . . . . . . . . . . . . . . . . . . . . . . . . . . . . . . . . . . . . . . . . . . . . . . . . . . . . . . . 10 102 Timing Gear Housing 64. . . . . . . . . . . . . . . . . . . . . . . . . . . . . . . . . . . . . . . . . . . . . . . . . . . . . . 10 102 Front Oil Seal and Steering Pump Seal 64. . . . . . . . . . . . . . . . . . . . . . . . . . . . . . . . . . . . . . Replacement 64. . . . . . . . . . . . . . . . . . . . . . . . . . . . . . . . . . . . . . . . . . . . . . . . . . . . . . . . . 10 103 Crankshaft and Bearing Holder 65. . . . . . . . . . . . . . . . . . . . . . . . . . . . . . . . . . . . . . . . . . . . . Installation 65. . . . . . . . . . . . . . . . . . . . . . . . . . . . . . . . . . . . . . . . . . . . . . . . . . . . . . . . . . . . Rear Oil Seal and Backplate 65. . . . . . . . . . . . . . . . . . . . . . . . . . . . . . . . . . . . . . . . . . . . . . . . Installation 65. . . . . . . . . . . . . . . . . . . . . . . . . . . . . . . . . . . . . . . . . . . . . . . . . . . . . . . . . . . . Flywheel 66. . . . . . . . . . . . . . . . . . . . . . . . . . . . . . . . . . . . . . . . . . . . . . . . . . . . . . . . . . . . . . . . . Installation 66. . . . . . . . . . . . . . . . . . . . . . . . . . . . . . . . . . . . . . . . . . . . . . . . . . . . . . . . . . . . 10 105 Pistons and Connecting Rods 66. . . . . . . . . . . . . . . . . . . . . . . . . . . . . . . . . . . . . . . . . . . . . . Installation 66. . . . . . . . . . . . . . . . . . . . . . . . . . . . . . . . . . . . . . . . . . . . . . . . . . . . . . . . . . . . 10 110 Balancer Assembly 67. . . . . . . . . . . . . . . . . . . . . . . . . . . . . . . . . . . . . . . . . . . . . . . . . . . . . . . Installation 67. . . . . . . . . . . . . . . . . . . . . . . . . . . . . . . . . . . . . . . . . . . . . . . . . . . . . . . . . . . . Balancer Shims 67. . . . . . . . . . . . . . . . . . . . . . . . . . . . . . . . . . . . . . . . . . . . . . . . . . . . . . . Oil Suction Pipe and Suction Strainer 68. . . . . . . . . . . . . . . . . . . . . . . . . . . . . . . . . . . . . . . . Installation 68. . . . . . . . . . . . . . . . . . . . . . . . . . . . . . . . . . . . . . . . . . . . . . . . . . . . . . . . . . . . Oil Sump 68. . . . . . . . . . . . . . . . . . . . . . . . . . . . . . . . . . . . . . . . . . . . . . . . . . . . . . . . . . . . . . . . Installation 68. . . . . . . . . . . . . . . . . . . . . . . . . . . . . . . . . . . . . . . . . . . . . . . . . . . . . . . . . . . . 10 106 Camshaft and Camshaft Gear 68. . . . . . . . . . . . . . . . . . . . . . . . . . . . . . . . . . . . . . . . . . . . . . Installation 68. . . . . . . . . . . . . . . . . . . . . . . . . . . . . . . . . . . . . . . . . . . . . . . . . . . . . . . . . . . .
  • 10. SECTION 10 -- ENGINE -- CHAPTER 1 10-4 Section Description Page 10 106 Idler Gear, Oil Pump, and Injection Timing 69. . . . . . . . . . . . . . . . . . . . . . . . . . . . . . . . . . . . Installation 69. . . . . . . . . . . . . . . . . . . . . . . . . . . . . . . . . . . . . . . . . . . . . . . . . . . . . . . . . . . . Timing Gear Cover 69. . . . . . . . . . . . . . . . . . . . . . . . . . . . . . . . . . . . . . . . . . . . . . . . . . . . . . . . Installation 69. . . . . . . . . . . . . . . . . . . . . . . . . . . . . . . . . . . . . . . . . . . . . . . . . . . . . . . . . . . . Crankshaft Pulley 70. . . . . . . . . . . . . . . . . . . . . . . . . . . . . . . . . . . . . . . . . . . . . . . . . . . . . . . . . Installation 70. . . . . . . . . . . . . . . . . . . . . . . . . . . . . . . . . . . . . . . . . . . . . . . . . . . . . . . . . . . . Fuel Injection Pump 70. . . . . . . . . . . . . . . . . . . . . . . . . . . . . . . . . . . . . . . . . . . . . . . . . . . . . . . Installation 70. . . . . . . . . . . . . . . . . . . . . . . . . . . . . . . . . . . . . . . . . . . . . . . . . . . . . . . . . . . . Hydraulic Oil Pump 71. . . . . . . . . . . . . . . . . . . . . . . . . . . . . . . . . . . . . . . . . . . . . . . . . . . . . . . Installation 71. . . . . . . . . . . . . . . . . . . . . . . . . . . . . . . . . . . . . . . . . . . . . . . . . . . . . . . . . . . . Power Steering Pump 71. . . . . . . . . . . . . . . . . . . . . . . . . . . . . . . . . . . . . . . . . . . . . . . . . . . . . Installation 71. . . . . . . . . . . . . . . . . . . . . . . . . . . . . . . . . . . . . . . . . . . . . . . . . . . . . . . . . . . . 10 101 Head Gasket Selection 72. . . . . . . . . . . . . . . . . . . . . . . . . . . . . . . . . . . . . . . . . . . . . . . . . . . . Selection Chart 72. . . . . . . . . . . . . . . . . . . . . . . . . . . . . . . . . . . . . . . . . . . . . . . . . . . . . . . . Cylinder Head 72. . . . . . . . . . . . . . . . . . . . . . . . . . . . . . . . . . . . . . . . . . . . . . . . . . . . . . . . . . . . Installation 72. . . . . . . . . . . . . . . . . . . . . . . . . . . . . . . . . . . . . . . . . . . . . . . . . . . . . . . . . . . . 10 106 Valve Clearance 73. . . . . . . . . . . . . . . . . . . . . . . . . . . . . . . . . . . . . . . . . . . . . . . . . . . . . . . . . . Adjustment 73. . . . . . . . . . . . . . . . . . . . . . . . . . . . . . . . . . . . . . . . . . . . . . . . . . . . . . . . . . . Valve Cover 74. . . . . . . . . . . . . . . . . . . . . . . . . . . . . . . . . . . . . . . . . . . . . . . . . . . . . . . . . . . . . . Installation 74. . . . . . . . . . . . . . . . . . . . . . . . . . . . . . . . . . . . . . . . . . . . . . . . . . . . . . . . . . . . Water Pump and Cooling Fan 74. . . . . . . . . . . . . . . . . . . . . . . . . . . . . . . . . . . . . . . . . . . . . . Installation 74. . . . . . . . . . . . . . . . . . . . . . . . . . . . . . . . . . . . . . . . . . . . . . . . . . . . . . . . . . . . External Oil Tube 74. . . . . . . . . . . . . . . . . . . . . . . . . . . . . . . . . . . . . . . . . . . . . . . . . . . . . . . . . Assembly 74. . . . . . . . . . . . . . . . . . . . . . . . . . . . . . . . . . . . . . . . . . . . . . . . . . . . . . . . . . . . Glow Plug and Connector 75. . . . . . . . . . . . . . . . . . . . . . . . . . . . . . . . . . . . . . . . . . . . . . . . . . Installation 75. . . . . . . . . . . . . . . . . . . . . . . . . . . . . . . . . . . . . . . . . . . . . . . . . . . . . . . . . . . . Fuel Injector 75. . . . . . . . . . . . . . . . . . . . . . . . . . . . . . . . . . . . . . . . . . . . . . . . . . . . . . . . . . . . . Installation 75. . . . . . . . . . . . . . . . . . . . . . . . . . . . . . . . . . . . . . . . . . . . . . . . . . . . . . . . . . . . 10 218 Fuel Piping 75. . . . . . . . . . . . . . . . . . . . . . . . . . . . . . . . . . . . . . . . . . . . . . . . . . . . . . . . . . . . . . . Installation 75. . . . . . . . . . . . . . . . . . . . . . . . . . . . . . . . . . . . . . . . . . . . . . . . . . . . . . . . . . . . Alternator and Temperature Sender Switch 76. . . . . . . . . . . . . . . . . . . . . . . . . . . . . . . . . . . Installation 76. . . . . . . . . . . . . . . . . . . . . . . . . . . . . . . . . . . . . . . . . . . . . . . . . . . . . . . . . . . . Exhaust Manifold 76. . . . . . . . . . . . . . . . . . . . . . . . . . . . . . . . . . . . . . . . . . . . . . . . . . . . . . . . . Installation 76. . . . . . . . . . . . . . . . . . . . . . . . . . . . . . . . . . . . . . . . . . . . . . . . . . . . . . . . . . . . 10 304 Description of Operation -- Engine Lubrication System 77. . . . . . . . . . . . . . . . . . . . . . . . . . . . . 10 206 Oil Filter 80. . . . . . . . . . . . . . . . . . . . . . . . . . . . . . . . . . . . . . . . . . . . . . . . . . . . . . . . . . . . . . . . . Construction and Function 80. . . . . . . . . . . . . . . . . . . . . . . . . . . . . . . . . . . . . . . . . . . . . . Maintenance 80. . . . . . . . . . . . . . . . . . . . . . . . . . . . . . . . . . . . . . . . . . . . . . . . . . . . . . . . . .
  • 11. SECTION 10 -- ENGINE -- CHAPTER 1 10-5 Section Description Page 10 304 Oil Pump 80. . . . . . . . . . . . . . . . . . . . . . . . . . . . . . . . . . . . . . . . . . . . . . . . . . . . . . . . . . . . . . . . Removal 80. . . . . . . . . . . . . . . . . . . . . . . . . . . . . . . . . . . . . . . . . . . . . . . . . . . . . . . . . . . . . Inspection 80. . . . . . . . . . . . . . . . . . . . . . . . . . . . . . . . . . . . . . . . . . . . . . . . . . . . . . . . . . . . Installation and Adjustment 81. . . . . . . . . . . . . . . . . . . . . . . . . . . . . . . . . . . . . . . . . . . . . Engine Oil Pressure 82. . . . . . . . . . . . . . . . . . . . . . . . . . . . . . . . . . . . . . . . . . . . . . . . . . . . . . . Check 82. . . . . . . . . . . . . . . . . . . . . . . . . . . . . . . . . . . . . . . . . . . . . . . . . . . . . . . . . . . . . . . Oil Pressure Relief Valve 83. . . . . . . . . . . . . . . . . . . . . . . . . . . . . . . . . . . . . . . . . . . . . . . . . . . Removal 83. . . . . . . . . . . . . . . . . . . . . . . . . . . . . . . . . . . . . . . . . . . . . . . . . . . . . . . . . . . . . Installation 83. . . . . . . . . . . . . . . . . . . . . . . . . . . . . . . . . . . . . . . . . . . . . . . . . . . . . . . . . . . . Oil Consumption 83. . . . . . . . . . . . . . . . . . . . . . . . . . . . . . . . . . . . . . . . . . . . . . . . . . . . . . . . . . 10 400 Description of Operation -- Cooling System 84. . . . . . . . . . . . . . . . . . . . . . . . . . . . . . . . . . . . . . Maintenance 86. . . . . . . . . . . . . . . . . . . . . . . . . . . . . . . . . . . . . . . . . . . . . . . . . . . . . . . . . . . . . Coolant 86. . . . . . . . . . . . . . . . . . . . . . . . . . . . . . . . . . . . . . . . . . . . . . . . . . . . . . . . . . . . . . . . . . Radiator Cap 86. . . . . . . . . . . . . . . . . . . . . . . . . . . . . . . . . . . . . . . . . . . . . . . . . . . . . . . . . . . . . 10 402 Thermostat 87. . . . . . . . . . . . . . . . . . . . . . . . . . . . . . . . . . . . . . . . . . . . . . . . . . . . . . . . . . . . . . 10 402 Water Pump 87. . . . . . . . . . . . . . . . . . . . . . . . . . . . . . . . . . . . . . . . . . . . . . . . . . . . . . . . . . . . . 10 414 Cooling Fan 87. . . . . . . . . . . . . . . . . . . . . . . . . . . . . . . . . . . . . . . . . . . . . . . . . . . . . . . . . . . . . . Overhaul -- Cooling System 88. . . . . . . . . . . . . . . . . . . . . . . . . . . . . . . . . . . . . . . . . . . . . . . . . . . 10 406 Radiator 88. . . . . . . . . . . . . . . . . . . . . . . . . . . . . . . . . . . . . . . . . . . . . . . . . . . . . . . . . . . . . . . . . Removal 88. . . . . . . . . . . . . . . . . . . . . . . . . . . . . . . . . . . . . . . . . . . . . . . . . . . . . . . . . . . . . Inspection and Repair 89. . . . . . . . . . . . . . . . . . . . . . . . . . . . . . . . . . . . . . . . . . . . . . . . . . Installation 89. . . . . . . . . . . . . . . . . . . . . . . . . . . . . . . . . . . . . . . . . . . . . . . . . . . . . . . . . . . . 10 402 Water Pump 90. . . . . . . . . . . . . . . . . . . . . . . . . . . . . . . . . . . . . . . . . . . . . . . . . . . . . . . . . . . . . Removal 90. . . . . . . . . . . . . . . . . . . . . . . . . . . . . . . . . . . . . . . . . . . . . . . . . . . . . . . . . . . . . Inspection and Repair 92. . . . . . . . . . . . . . . . . . . . . . . . . . . . . . . . . . . . . . . . . . . . . . . . . . Installation 92. . . . . . . . . . . . . . . . . . . . . . . . . . . . . . . . . . . . . . . . . . . . . . . . . . . . . . . . . . . . 10 402 Thermostat 93. . . . . . . . . . . . . . . . . . . . . . . . . . . . . . . . . . . . . . . . . . . . . . . . . . . . . . . . . . . . . . Removal 93. . . . . . . . . . . . . . . . . . . . . . . . . . . . . . . . . . . . . . . . . . . . . . . . . . . . . . . . . . . . . Inspection and Repair 93. . . . . . . . . . . . . . . . . . . . . . . . . . . . . . . . . . . . . . . . . . . . . . . . . . Installation 94. . . . . . . . . . . . . . . . . . . . . . . . . . . . . . . . . . . . . . . . . . . . . . . . . . . . . . . . . . . .
  • 12. SECTION 10 -- ENGINE -- CHAPTER 1 10-6 SPECIFICATIONS GENERAL TT45A TT50A Engine Model N844 N844L Number of Cylinders 4 4 Bore x Stroke 84 x 90 mm (3.31 x 3.54 in) 84 x 100 mm (3.31 x 3.94 in) Displacement 1995 cc (121.7 cu. in.) 2216 cc (135.2 cu. in.) Compression Ratio 22.5:1 22.4:1 Rated Speed (rpm) 2600 2800 Gross Engine Horsepower 29.8 kw (40 Hp) 33.5 kw (45 Hp) PTO Horsepower at 2250 Engine and 766 PTO rpm 26.1 kw (35.0 Hp) 31.3 kw (42.2 Hp) Firing Order 1-3-4-2 1-3-4-2 Low Idle Speed 1050 rpm 1050 rpm Maximum No-Load Speed 2855 rpm 3000 rpm Cylinder Arrangement In-Line Vertical In-Line Vertical Valve Arrangement Overhead Overhead Compression Pressure at 200 rpm (cylinder speed) 29.4 ± 1.8 bar (427 ± 50 psi) 29.4 ± 1.8 bar (427 ± 50 psi) Variation between cylinders 1.8 bar (50 psi) 1.8 bar (50 psi) CYLINDER BLOCK N844 N844L Bore Standard 84.0 mm (3.3071 -- 3.3078 in) 84.0 mm (3.3071 -- 3.3078 in) Maximum 85.2 mm (3.3543 in) 85.2 mm (3.3543 in) Head Surface Warp Standard 0.002 in. (0.05 mm) 0.05 mm (0.002 in) Maximum 0.12 mm (0.005 in) 0.12 mm (0.005 in) * If bore size exceeds 85.2 mm (3.3543 in) replace with long block.
  • 13. SECTION 10 -- ENGINE -- CHAPTER 1 10-24 MODEL N844 and N844L - TT45A and TT50A 10044351 10044352 4
  • 14. SECTION 10 -- ENGINE -- CHAPTER 1 10-25 86071893 6 1 73 4 9 8 5 2 5 SEPARATING THE TRACTOR AT THE CLUTCH HOUSING/ENGINE – 8 x 2 TRANSMISSION Disassembly 1. Disconnect the negative (--) battery cable, and the positive (+) battery cable from the battery, 1. 2. Disconnect the headlight wiring harness, 2, and remove the hood, 3. 3. If equipped, remove the remote loader control valve, and all the connecting hydraulic tubes from the right side loader tower. 4. Remove the LH and RH engine side covers, 4. 5. Remove the LH, RH and center rear hood panels, 5. 6. Remove the steering wheel, 6. 7. Remove the instrument panel, 7, from the dash housing. Disconnect all electrical connectors from the instrument panel. 8. Remove the dash housing, 8, from the firewall. Disconnect all electrical connectors from the dash housing. 9. Disconnect electrical harness to the starter, 9.
  • 15. SECTION 10 -- ENGINE -- CHAPTER 1 10-26 86071894 10 13 15 1412 11 6 10. Disconnect and remove the throttle cable from the dash mounted throttle control lever, 10. 11. Disconnect and remove the throttle cable from the foot control pedal, 11. 12. Drain fuel from fuel tank, 12, into a suitable container. Remove fuel tank from firewall. 13. Remove the firewall, 13, from the tractor. 14. Disconnect all hydraulic tubes 14, to the hydraulic pump, 15.
  • 16. SECTION 10 -- ENGINE -- CHAPTER 1 10-27 15. Attach a chain sling to the two hoist eyes, 1. 16. Attach a suitable hoist to the chain sling. NOTE: The hoist is used for supporting the engine and axle assembly, not necessarily for lifting. 17. Roll a floor jack under the rear of the tractor, and place under the clutch housing. Raise the jack enough to support the drive train. 86071896 1 7 18. Remove the buckle-up bolts, 1, and starter, 2, that secure the engine, 3, to the clutch housing, 4. NOTE: The hoist and/or floor jack may need to be raised or lowered to allow for separation of the engine and clutch housing. 19. Carefully roll the drive train away from the engine, using the floor jack for support. 86071895 2 1 3 4 8
  • 17. SECTION 10 -- ENGINE -- CHAPTER 1 10-28 SEPARATING THE TRACTOR AT THE ENGINE/FRAME Removal 1. Use jack stands under the frame rails to support the front frame/engine assembly. WARNING Make sure the front frame/engine assembly is securely supported before removing the engine. 2. Remove the chain sling from the two hoist eyes on the engine. 3. Drain the hydraulic fluid from the power steering reservoir, 1, into a suitable container. Remove the reservoir, 1, and mounting bracket from the engine. 1 86061281 9 4. Remove the air cleaner assembly, 1, from the tractor. 5. Remove the muffler and tailpipe assembly, 2, from engine. 6. Loosen the lower radiator hose, 3, and drain the coolant into a suitable container. 7. Remove the lower, 3, and upper, 4, radiator hoses. 8. Remove the radiator, 5, from the tractor. 86071897 5 1 3 2 4 10
  • 18. SECTION 10 -- ENGINE -- CHAPTER 1 10-29 9. Attach a chain sling to the two hoist eyes, 1. 10. Attach a suitable hoist to the chain sling, and raise the engine enough to support the engine. 86071896 1 11 11. Loosen and remove the engine mounting bolts, 1, on both sides of the frame. 12. Carefully lift the engine from the frame. 13. Attach the engine to a suitable engine stand. 14. With the engine securely attached to the engine stand, remove the chain sling from the two engine hoist eyes. 86071898 1 12 Installation 1. Attach a chain sling to the two hoist eyes. 2. Attach a suitable hoist to the chain sling, and raise the engine enough to support the engine. 3. Remove the engine from the engine stand. 4. Using a hoist, position the engine in the frame, aligning the mounting holes in the frame with the mounting holes in the engine. 5. Install the engine mounting bolts, 1, on both sides of the frame. Tighten the mounting bolts to 139 – 175 N⋅m (102 – 129 ft-lb). 6. With the engine securely installed into the frame, remove the chain sling from the two engine hoist eyes. 86071898 1 13
  • 19. SECTION 10 -- ENGINE -- CHAPTER 1 10-30 7. Reinstall the radiator, 1, into the tractor. 8. Reinstall the lower, 2, and upper, 3, radiator hoses. 9. 9. Fill the radiator, 1, with new coolant to the proper level. 10. Reinstall the muffler and exhaust pipe, 4, onto the exhaust manifold. 11. Reinstall the air cleaner assembly, 5, onto the engine. 86071897 1 2 4 5 3 14 12. Reinstall the power steering reservoir and mounting bracket, 1, onto the engine. Reconnect the hydraulic lines to the reservoir. 13. Refill the reservoir to the proper level with Ambra Multi G 134. 1 86061281 15 ATTACHING THE TRACTOR AT THE CLUTCH HOUSING/ENGINE -- 8 x 2 TRANSMISSION Assembly WARNING Do not use the buckle-up bolts to draw the drive train together with the engine. Severe damage to the drive train may result. 1. Attach a chain sling to the two hoist eyes, 1. 2. Attach a suitable hoist to the chain sling. 3. Carefully roll the drive train into alignment with the engine. Align the splines on the 8 x 2 input shaft with the clutch and the engine flywheel. Rotate the engine fan to align the input shaft and the clutch/flywheel. The floor jack or hoist may be needed to raise or lower the engine to make alignment possible. 86071896 1 16
  • 20. SECTION 10 -- ENGINE -- CHAPTER 1 10-31 4. Connect the clutch housing, 1, to the engine, 2, and install the bucket-up bolts, 3. 5. Reinstall the starter, 4, and secure with the retaining nuts. Connect the wiring harness, 5, to the starter. 6. Tighten the buckle-up bolts, 3, in a criss--cross pattern. Torque the M10 bolts and nuts to 68 N⋅m (50 ft-lb) Torque the two M12 bolts to 81 N⋅m (60 ft-lb). 7. Remove the chain hoist and sling from the engine hoist eyes. Remove the floor jack from under the tractor. 86071895 5 4 3 1 2 17
  • 21. SECTION 10 -- ENGINE -- CHAPTER 1 10-32 86071894 1 6 3 2 4 5 18 8. Reconnect all hydraulic tubes, 1, to the hydraulic pump, 2. 9. Reattach the firewall, 3, to the tractor. 10. Reattach the fuel tank, 4, to the firewall. Reconnect fuel lines to the fuel shut--off valve and tank vent. 11. Reattach the throttle cable to the foot control pedal, 5. 12. Reattach the throttle cable to the dash mounted throttle control lever, 6.
  • 22. Thank you very much for your reading. Please Click Here. Then Get COMPLETE MANUAL. NO WAITING NOTE: If there is no response to click on the link above, please download the PDF document first and then click on it.
  • 23. SECTION 10 -- ENGINE -- CHAPTER 1 10-33 86071893 3 26 5 4 7 8 1 19 13. Reconnect all electrical connectors to the dash housing, 1. 14. Reattach the dash housing, 1, to the firewall. 15. Reconnect all electrical connectors to the instrument panel, 2, and insert the instrument panel into the dash housing, 1. 16. Reinstall the steering wheel, 3. 17. Reinstall the LH, RH and center rear hood panels, 4. 18. Reinstall the LH and RH engine side covers, 5. 19. Reinstall the hood, 6, and reconnect headlight wiring harness, 7. 20. Install the remote loader control valve, and all connecting hydraulic tubes to the right side loader tower. 21. Reconnect the positive (+) battery cable and negative (--) battery cable to the battery. WARNING Escaping hydraulic/diesel fluid pressures can penetrate the skin causing serious injury. Never use your hands to check for hydraulic leaks, use a piece of paper or cardboard to search for leaks. 22. Start the tractor and check for leaks. 23. Make any necessary adjustments needed for proper operation of the tractor.
  • 24. SECTION 10 -- ENGINE -- CHAPTER 1 10-34 OVERHAUL ENGINE NOTE: Some procedures discussed in this chapter are shown with the engine in the tractor. Many of the procedures can be done with the engine in or out of the tractor. FUEL INJECTOR AND GLOW PLUG Removal 1. Clean all dirt and oil from the injectors and sur- rounding areas. 2. Disconnect the fuel lines, 1, from the injectors and cap all openings. 3. Remove the injector fuel leak-off line, 2. 4. Remove the injector assemblies, 3. 5. Remove the glow plug bus connector, 4, and re- move the glow plugs, 5. 1 2 54 3 5 20 OIL PRESSURE SWITCH Remove the oil pressure switch, 1. 1 21 TEMPERATURE SENDING SWITCH AND ALTERNATOR Removal 1. Remove the temperature sending switch, 1, from the front of the cylinder head. 2. Loosen the alternator mounting bolts, 2, and re- move the V-belt, 3, from the drive pulley. 3. Disconnect the alternator wires from the back of alternator, 4. 4. Remove the alternator mounting bolts, 2, and re- move the alternator. 1 3 2 4 2 22
  • 25. SECTION 10 -- ENGINE -- CHAPTER 1 10-35 FAN, WATER PUMP, AND EXTERNAL OIL TUBE Removal 1. Remove the fan and water pump assembly. See “Fan Removal” and “Water Pump Removal” dis- cussed later in this section. 2. Remove the external oil transfer tube banjo bolt, 1, from the front of the cylinder head. 1 19988040 23 AIR INLET MANIFOLD Removal 1. Remove the retaining bolts, 1, cap nuts, 2, and seal washers, 3. 2. Remove the air inlet manifold, 4, and gasket, 5. 10044353 2 4 5 3 1 24