
Recommended
Recommended
More Related Content
Similar to 48-inch pool ladder owner's manual
Similar to 48-inch pool ladder owner's manual (20)
More from Shane
More from Shane (12)
Recently uploaded
Recently uploaded (11)
48-inch pool ladder owner's manual
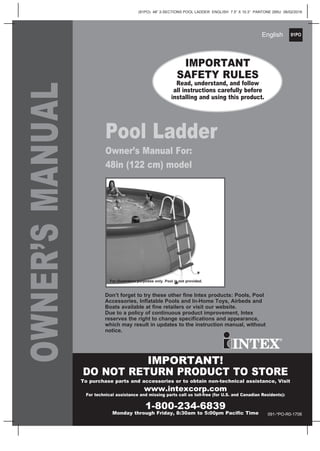
- 1. 91PO (91PO) 48” 2-SECTIONS POOL LADDER ENGLISH 7.5” X 10.3” PANTONE 295U 06/02/2016 English OWNER’SMANUAL Pool Ladder Owner’s Manual For: 48in (122 cm) model IMPORTANT SAFETY RULES Read, understand, and follow all instructions carefully before installing and using this product. Don’t forget to try these other fine Intex products: Pools, Pool Accessories, Inflatable Pools and In-Home Toys, Airbeds and Boats available at fine retailers or visit our website. Due to a policy of continuous product improvement, Intex reserves the right to change specifications and appearance, which may result in updates to the instruction manual, without notice. For illustrative purposes only. Pool is not provided. IMPORTANT! DO NOT RETURN PRODUCT TO STORE To purchase parts and accessories or to obtain non-technical assistance, Visit www.intexcorp.com For technical assistance and missing parts call us toll-free (for U.S. and Canadian Residents): 1-800-234-6839 Monday through Friday, 8:30am to 5:00pm Pacific Time 091-*PO-R0-1706
- 2. 91PO SAVE THESE INSTRUCTIONS (91PO) 48” 2-SECTIONS POOL LADDER ENGLISH 7.5” X 10.3” PANTONE 295U 06/02/2016 English Page 2 Warnings.......................................................................................... 3 Parts References............................................................................. 4 Setup Instructions........................................................................... 5-7 General Aquatic Safety................................................................... 8 Limited Warranty............................................................................ 9 TABLE OF CONTENTS
- 3. 91PO SAVE THESE INSTRUCTIONS (91PO) 48” 2-SECTIONS POOL LADDER ENGLISH 7.5” X 10.3” PANTONE 295U 06/02/2016 English Page 3 IMPORTANT SAFETY RULESRead, Understand and Follow All Instructions Carefully Before Installing and Using this Product. • Supervise children and those with disabilities at all times. • Always assist children when they use the ladder to avoid falls and/or serious injury. • Never dive or jump from this ladder. • Locate the ladder on a level, solid base. • One person on this ladder at a time. • Maximum load: 300 lbs (136 kg). Complies with EN16582 strength requirements. • Face the ladder at all times for entry/exit of pool. • Remove and secure ladder when pool is not occupied. • Do not swim under, through or behind ladder. • Check all nuts and bolts regularly to ensure ladder stays sturdy. • If swimming at night use artificial lighting to illuminate all safety signs, ladders, pool floor and walkways. • Assembly and disassembly by adults only. • This ladder is designed and manufactured for a specific pool wall height and/or deck of the pool. • The non-respect of the maintenance instruction may result in huge risk for health, particularly for children. • Only use this ladder for the purposes described in this manual. FAILURE TO FOLLOW THESE WARNINGS MAY RESULT IN BROKEN BONES, ENTRAPMENT, PARALYSIS, DROWNING OR OTHER SERIOUS INJURY. These product warnings, instructions and safety rules provided with the product represent some common risks of water recreation devices and do not cover all instances of risk and danger. Please use common sense and good judgment when enjoying any water activity. WARNING
- 4. 91PO SAVE THESE INSTRUCTIONS (91PO) 48” 2-SECTIONS POOL LADDER ENGLISH 7.5” X 10.3” PANTONE 295U 06/02/2016 English Page 4 PARTS REFERENCE Before assembling your product, please take a few minutes to check the contents and become familiar with all the parts. NOTE: Drawings for illustration purpose only. Actual product may vary. Not to scale. REF. NO. DESCRIPTION QUANTITY SPARE PART NO. #28062 #10903/28058 1 U-SHAPED TOP RAIL 2 11167 12499 2 TOP BRACE 2 11168 11172 3 SHORT FASTENER FOR U-SHAPED TOP RAIL (WITH 1 EXTRA) 5 10810 10810 4 LONG FASTENER FOR TOP BRACE (WITH 1 EXTRA) 5 10227 10227 5 STEP MOUNTING PIN (WITH 2 EXTRA) 34 10349 10913 6 STEP 8 10348 10914 7 UPPER SIDE LEG (MARKED “A”) 2 11553A 12500A 8 UPPER SIDE LEG (MARKED “B”) 2 11553B 12500B 9 LOWER J-SHAPED SIDE LEG (MARKED “A”) 2 12266A 12501A 10 LOWER J-SHAPED SIDE LEG (MARKED “B”) 2 12266B 12501B 1 3 4 7 9 106 8 2 5 48” (122 cm) model This ladder is designed and manufactured for Intex pool wall height: Item # Pool Wall Height 28062 (white & blue) 48in (122 cm) 10903/28058 (grey & white) 48in (122 cm)
- 5. 91PO SAVE THESE INSTRUCTIONS (91PO) 48” 2-SECTIONS POOL LADDER ENGLISH 7.5” X 10.3” PANTONE 295U 06/02/2016 English Page 5 LADDER SETUP TOOLS REQUIRED: One (1) Phillips screwdriver One (1) pair of pliers or a small adjustable wrench IMPORTANT: Do not fully tighten fasterners until last assembly operation. WARNING ASSEMBLE THE LEGS BEFORE INSTALLING THE LADDER STEPS. FAILURE TO ASSEMBLE THE LEGS BEFORE INSTALLING THE STEPS MAY ALLOW THE LEGS TO SEPARATE FROM THE LADDER DURING USE, POSSIBLY RESULTING IN SERIOUS INJURY OR DEATH. WARNING INCORRECTLY CONNECTED PARTS MAY RESULT IN AN UNSTABLE LADDER OR LADDER FAILURE WHICH CAN CAUSE FALLING AND PERSONAL INJURY OR DEATH. 1. IDENTIFY PARTS: It is very important to lay out the parts correctly and identify which parts connect together before starting the assembly. Although some parts look alike, they are not always interchangeable. Refer to the parts list. 2. LEG ASSEMBLY (refer to figures 1.1 through 1.2): IMPORTANT: Make sure the legs are securely connected and locked. Check the spring pins have snapped out before proceeding to the next step. Ensure the J-shaped legs are pointing outwards before installing the steps. 1.2 A B Spring pin 6 A B 1.1 9 10 8 7 Press, hold and insert
- 6. 91PO SAVE THESE INSTRUCTIONS (91PO) 48” 2-SECTIONS POOL LADDER ENGLISH 7.5” X 10.3” PANTONE 295U 06/02/2016 English Page 6 LADDER SETUP (continued) 3. STEP INSTALLATION (refer to figures 2.1 through 2.2): IMPORTANT: Make sure all pins are securely locked. 4. TOP BRACE INSTALLATION – ONE SIDE AT A TIME (refer to figure 3): Identify hole “A” and hole “B” on the top braces (2), marked accordingly at each end. Slide the top braces over the legs, making sure hole “A” of one brace slides over leg “A” and hole “B” of the other brace over leg “B”. The small holes on the side of braces should align with the lower holes on the legs. Fasten each brace to the legs using the longer fasteners/screws (4). Do not yet attach the other side of the ladder to the top braces – this assembly step will follow later. 2.1 A B 6 2.2 A B 5 6 A B 3 2 4
- 7. 91PO SAVE THESE INSTRUCTIONS (91PO) 48” 2-SECTIONS POOL LADDER ENGLISH 7.5” X 10.3” PANTONE 295U 06/02/2016 English Page 7 LADDER SETUP (continued) 5. U-SHAPED TOP RAIL INSTALLATION (refer to figure 4): Install the U-shaped top rails (1) onto the legs above the top brace (2) and fasten them with the shorter fasteners/screws (3) – see figure 4. 6. INSTALLATON OF THE REMAINING LADDER SIDE (refer to figure 5): With all the top rail and top brace holes in alignment, slide the remaining ladder side from the underside into its proper position. Make sure the “A” leg slides into hole “A” of the top brace and the “B” leg slides into hole “B” of the corresponding top brace. Fasten all parts using the appropriate fasteners/screws (4) and (3), as described earlier. 7. BEFORE USE OF LADDER: With all parts now in place, verify that all fasteners/screws are fully tightened and apply downward pressure to each step to be sure they are fully anchored in place. If your ladder came with a ladder barrier, proceed to instructions for ladder barrier installation, otherwise proceed to placing the ladder over the side wall of your pool, with one side of the ladder located inside the pool and the other side outside of the pool - see figure 6. Estimated assembly time 20~45 minutes. (Note the assembly time is only approximate and individual assembly experience may vary.) WARNING • Locate ladder on a level, solid base and make sure the ladder is stable and safe to climb. • Remove and secure ladder away from the pool when the pool is not in use to prevent unauthorized, unintentional or unsupervised pool entry. • Check all nuts and bolts regularly and before each use to ensure the ladder is sturdy. See maintenance instructions. 8. MAINTENANCE: Regularly check all nuts, bolts, step mounting fixtures and step mounting pins to ensure all parts are secured properly and the ladder is sturdy. Bring the ladder indoors and store in a safe and dry area, preferably between 32 degrees Fahrenheit (0 degrees Celsius) and 104 degrees Fahrenheit (40 degrees Celsius). 4 5 6 1 3
- 8. 91PO SAVE THESE INSTRUCTIONS (91PO) 48” 2-SECTIONS POOL LADDER ENGLISH 7.5” X 10.3” PANTONE 295U 06/02/2016 English Page 8 GENERAL AQUATIC SAFETY Water recreation is both fun and therapeutic. However, it involves inherent risks of injury and death. To reduce your risk of injury, read and follow all product, package and package insert warnings and instructions. Remember, however, that product warnings, instructions and safety guidelines cover some common risks of water recreation, but do not cover all risks and dangers. For additional safeguards, also familiarize yourself with the following general guidelines as well as guidelines provided by nationally recognized Safety Organizations: • Demand constant supervision. A competent adult should be appointed as a “lifeguard” or water watcher, especially when children are in and around the pool. • Learn to swim. • Take the time to learn CPR and first aid. • Instruct anyone who is supervising pool users about potential pool hazards and about the use of protective devices such as locked doors, barriers, etc. • Instruct all pool users, including children what to do in case of an emergency. • Always use common sense and good judgement when enjoying any water activity. • Supervise, supervise, supervise. For additional information on safety, please visit • The Association of Pool and Spa Professionals: The Sensible Way to Enjoy Your Aboveground/Onground Swimming Pool www.nspi.org • American Academy of Pediatrics: Pool Safety for Children www.aap.org • Red Cross www.redcross.org • Safe Kids www.safekids.org • Home Safety Council: Safety Guide www.homesafetycouncil.org • Toy Industry Association: Toy Safety www.toy-tia.org SAVE THE CARTON FOR STORAGE AND THE INSTRUCTIONS FOR RE-ASSEMBLY
- 9. 91PO SAVE THESE INSTRUCTIONS (91PO) 48” 2-SECTIONS POOL LADDER ENGLISH 7.5” X 10.3” PANTONE 295U 06/02/2016 English Page 9 Your Intex Pool Ladder has been manufactured using the highest quality materials and workmanship. All Intex products have been inspected and found free of defects prior to leaving the factory. This Limited Warranty applies to the Intex Pool Ladder only. The provisions of this Limited Warranty apply only to the original purchaser and is not transferable. This Limited Warranty is valid for a period of 90 days from the date of the initial retail purchase. Keep your original sales receipt with this manual, as proof of purchase will be required and must accompany warranty claims or the Limited Warranty is invalid. If a manufacturing defect is found within this 90-day period, please contact the appropriate Intex Service Center listed in the separate “Authorized Service Centers” sheet. The Service Center will determine the validity of the claim. If the Service Center directs you to return the product, please carefully package the product and send with shipping and insurance prepaid to the Service Center. Upon receipt of the returned product, the Intex Service Center will inspect the item and determine the validity of the claim. If the provisions of this warranty cover the item, the item will be repaired or replaced at no charge. Any and all disputes regarding the provisions of this Limited Warranty shall be brought before an informal dispute settlement board and unless and until the provisions of these paragraphs are carried forth, no civil action may be instituted. The methods and procedures of this settlement board shall be subject to the rules and regulations set forth by the Federal Trade Commission (F.T.C.). IMPLIED WARRANTIES ARE LIMITED TO THE TERMS OF THIS WARRANTY AND IN NO EVENT SHALL INTEX, THEIR AUTHORIZED AGENTS OR EMPLOYEES BE LIABLE TO THE BUYER OR ANY OTHER PARTY FOR DIRECT OR CONSEQUENTIAL DAMAGES OR LIABILITIES. Some states, or jurisdictions do not allow the exclusion or limitation of incidental or consequential damages, so the above limitation or exclusion may not apply to you. This Limited Warranty does not apply if the Intex product is subject to negligence, abnormal use or operation, accident, improper operation, improper maintenance or storage, or to damage by circumstances beyond Intex’s control, including but not limited to, ordinary wear and tear and damage caused by exposure to fire, flood, freezing, rain, or other external environmental forces. This Limited Warranty applies only to those parts and components sold by Intex. The Limited Warranty does not cover unauthorized alterations, repairs or disassembly by anyone other than Intex Service Center personnel. DO NOT GO BACK TO THE PLACE OF PURCHASE FOR RETURN OR REPLACEMENT. IF YOU ARE MISSING PARTS OR NEED ASSISTANCE, PLEASE CALL US TOLL-FREE (FOR U.S. AND CANADIAN RESIDENTS): 1-800-234-6839 OR VISIT OUR WEBSITE: WWW.INTEXSTORE.COM. Proof of Purchase must accompany all returns or the warranty claim will be invalid. LIMITED WARRANTY