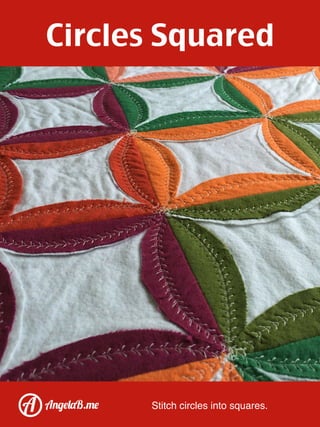
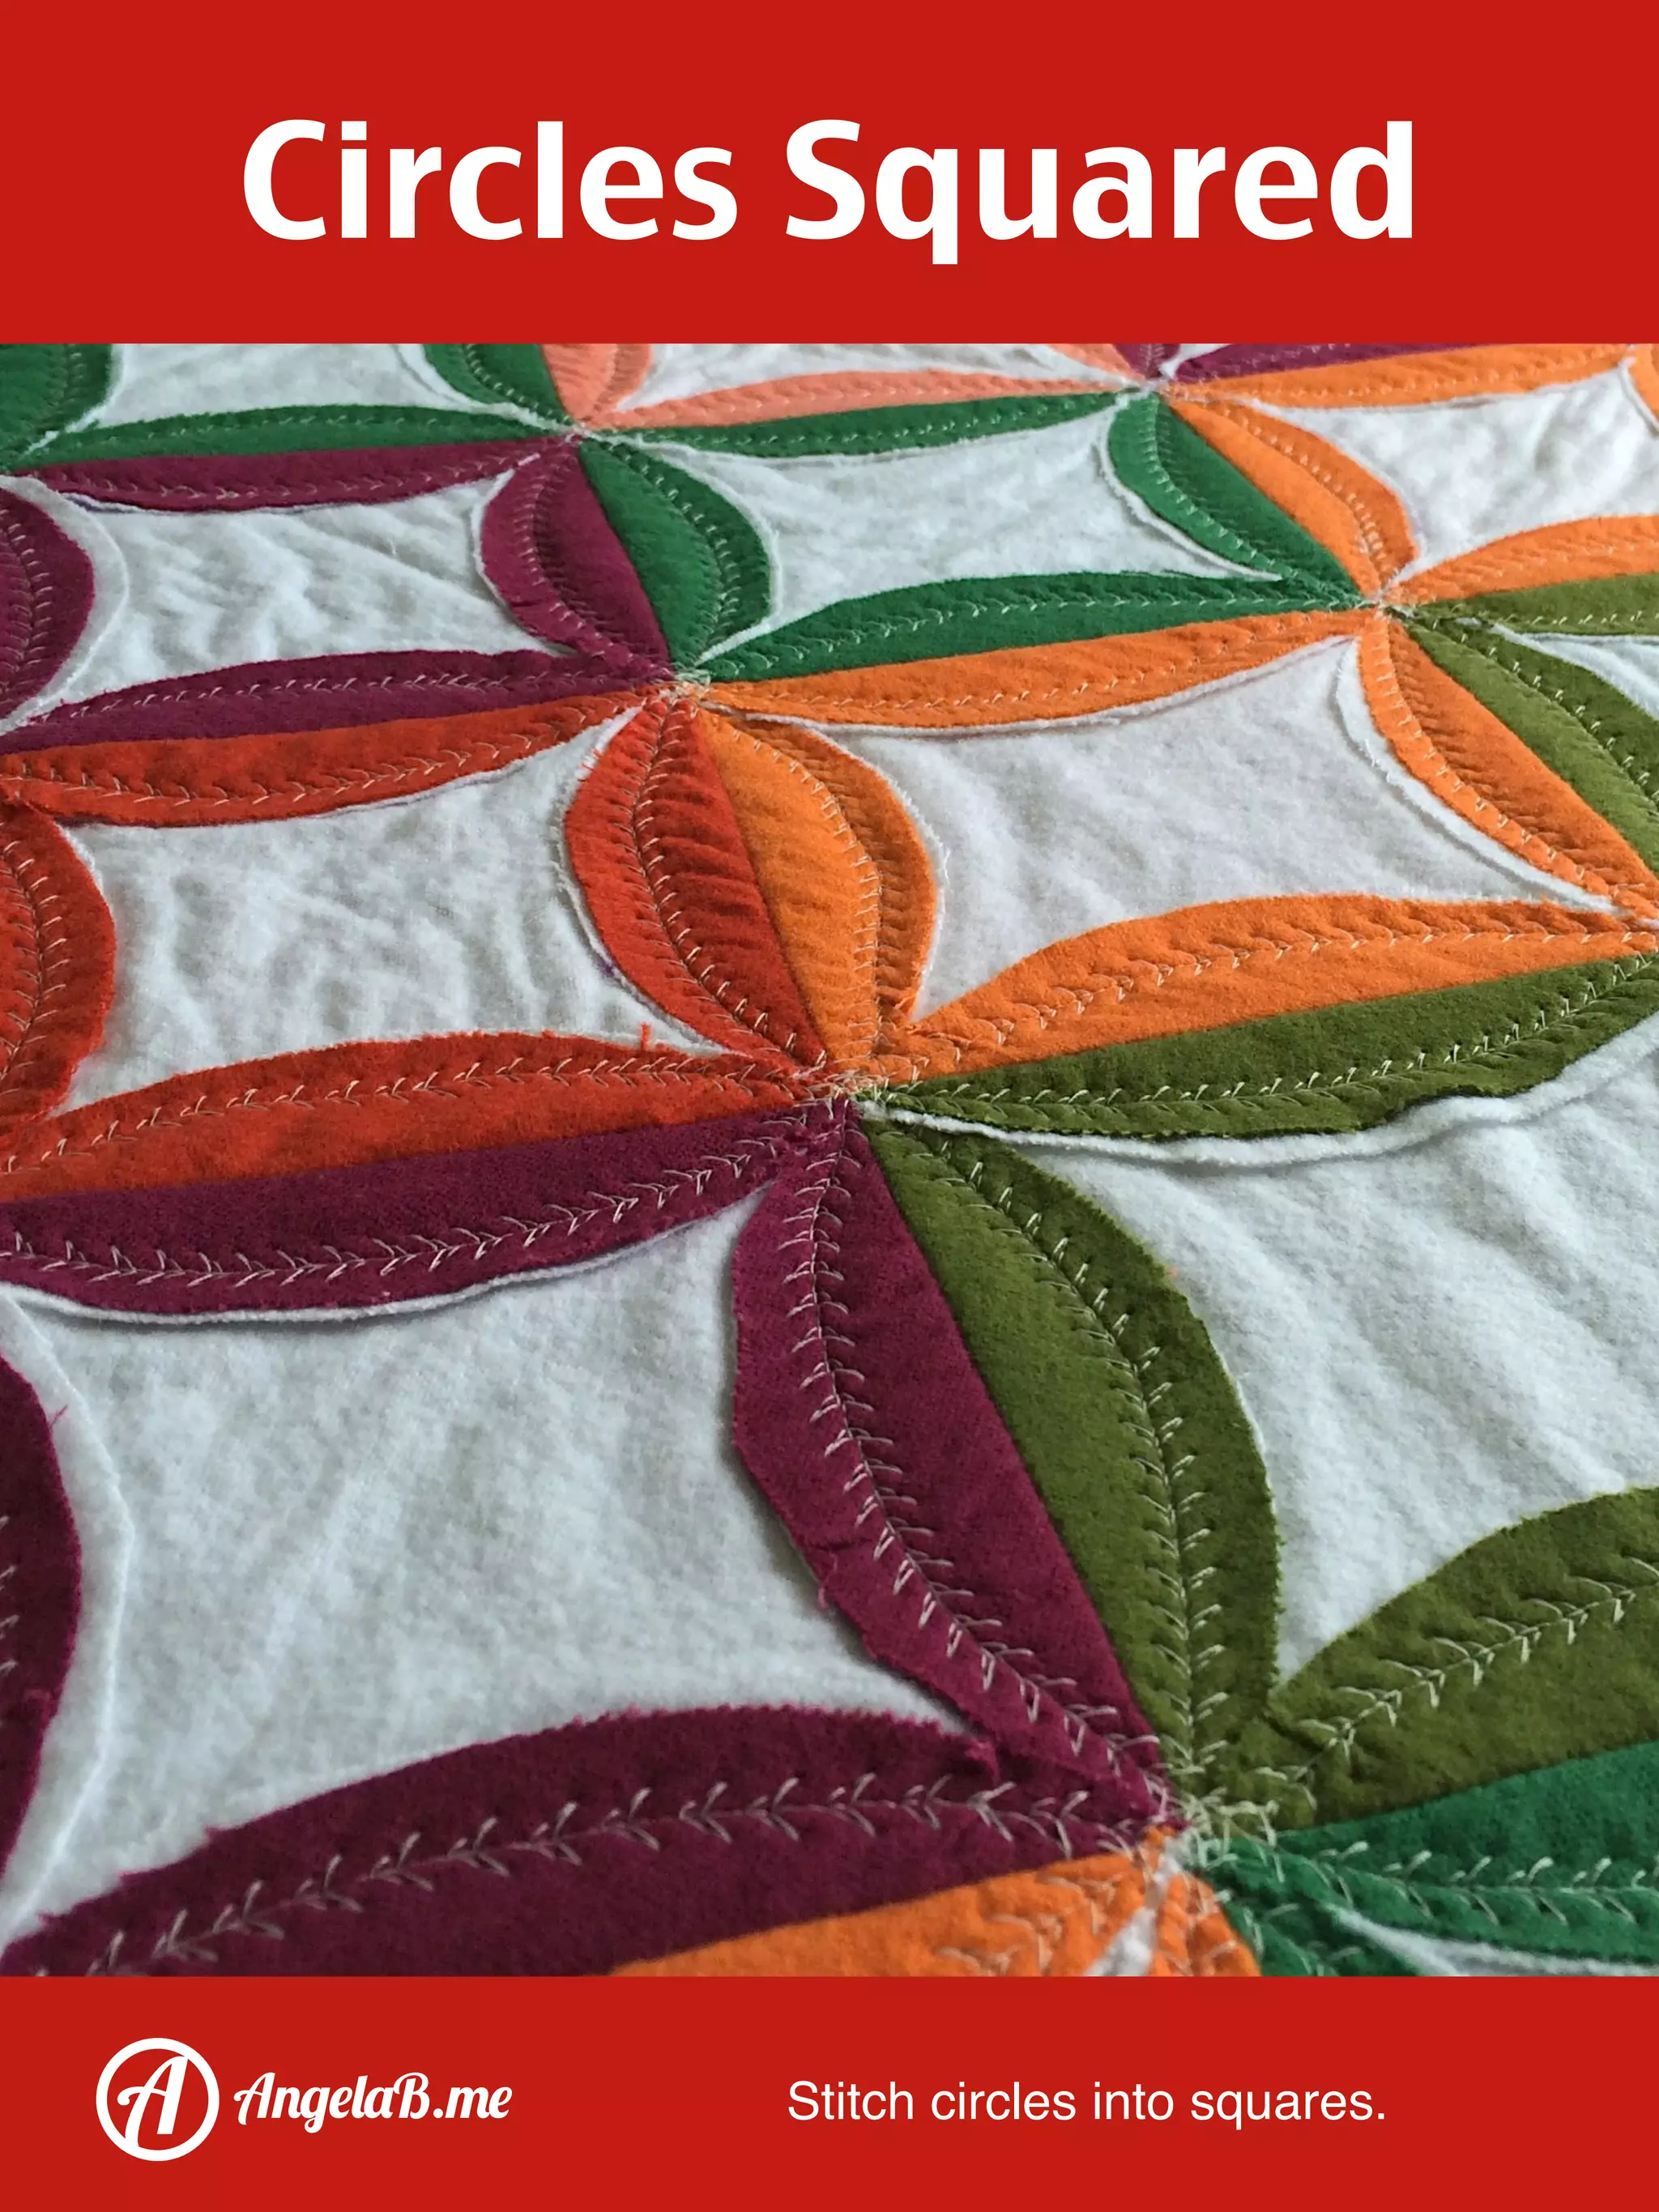
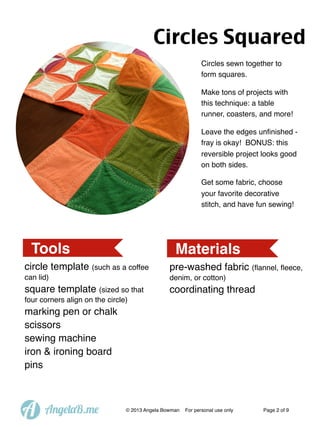
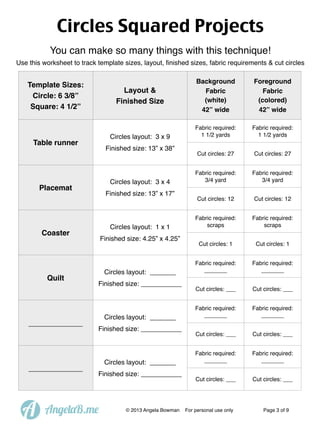
Circles Squared

A

AngelaB.me

Stitch circles into squares.
Circles Squared
Circles sewn together to
form squares.
Make tons of projects with
this technique: a table
runner, coasters, and more!
Leave the edges unfinished fray is okay! BONUS: this
reversible project looks good
on both sides.
Get some fabric, choose
your favorite decorative
stitch, and have fun sewing!

Tools

Materials

circle template (such as a coffee

pre-washed fabric (flannel, fleece,

can lid)

denim, or cotton)

square template (sized so that

coordinating thread

four corners align on the circle)

marking pen or chalk
scissors
sewing machine
iron & ironing board
pins

A

AngelaB.me

© 2013 Angela Bowman

For personal use only

Page 2 of 9
Circles Squared Projects
You can make so many things with this technique!
Use this worksheet to track template sizes, layout, finished sizes, fabric requirements & cut circles

Template Sizes:
Circle: 6 3/8”
Square: 4 1/2”

Layout &
Finished Size

Circles layout: 3 x 9

Table runner

Finished size: 13” x 38”

Circles layout: 3 x 4

Placemat

Finished size: 13” x 17”

Circles layout: 1 x 1

Coaster

Quilt

_____________

_____________

A

Finished size: 4.25” x 4.25”

Circles layout: _______
Finished size: ___________

Circles layout: _______
Finished size: ___________

Circles layout: _______
Finished size: ___________

AngelaB.me

© 2013 Angela Bowman

Background
Fabric
(white)
42” wide

Foreground
Fabric
(colored)
42” wide

Fabric required:
1 1/2 yards

Fabric required:
1 1/2 yards

Cut circles: 27

Cut circles: 27

Fabric required:
3/4 yard

Fabric required:
3/4 yard

Cut circles: 12

Cut circles: 12

Fabric required:
scraps

Fabric required:
scraps

Cut circles: 1

Cut circles: 1

Fabric required:
_______

Fabric required:
_______

Cut circles: ___

Cut circles: ___

Fabric required:
_______

Fabric required:
_______

Cut circles: ___

Cut circles: ___

Fabric required:
_______

Fabric required:
_______

Cut circles: ___

Cut circles: ___

For personal use only

Page 3 of 9
1. Determine how many
background (white) circles and
foreground (colored) circles
are needed for the project,
using the worksheet on the
previous page.

2. Trace circles onto fabric, using
the circle template. I like using
a coffee can lid (6 3/8”
diameter).

3. Place a couple pins inside
each circle, to prevent the
fabric from shifting.

4. Cut out the circles. Remove
pins.

A

AngelaB.me

© 2013 Angela Bowman

For personal use only

Page 4 of 9
5. Trace a square onto the right
side of the white circles, using
the square template. I like
using a 4 1/2” square quilting
ruler and a disappearing
marker.

6. Place a white and a colored
circle wrong sides together.
Repeat for another set of two
circles.

7. Layer these two sets so that
the colored circles’ right sides
are together, aligning the
drawn lines. Pin in place
above one of the lines.

8. Stitch along one drawn line,
backstitching at each end.

A

AngelaB.me

© 2013 Angela Bowman

For personal use only

Page 5 of 9
9. Place another white and
colored circle wrong sides
together. Layer and stitch this
third circle set to the set you
just made in the same manner,
forming a row of three circles.

10. Finger-press the seams open.

11. Repeat steps 6 - 10 to make
another row.

12. Layer the two rows so that the
colored circles’ right sides are
together, aligning the seams
and the outside edges. Pin the
top edge in place.

A

AngelaB.me

© 2013 Angela Bowman

For personal use only

Page 6 of 9
13. Stitch slightly inside the top
drawn lines, backstitching at
each end. This will ensure crisp
intersections with less fraying
where the seams meet.

14. Finger-press the seams open.
Looks good, huh?!

15. Continue making and adding
rows until you have the desired
size. Have fun randomly
arranging color placement!

16. Fold in the outside edges a
little deeper than the drawn
lines. This will ensure crisp
intersections with less fraying
where the seams meet.
Press well.

A

AngelaB.me

© 2013 Angela Bowman

For personal use only

Page 7 of 9
17. Pin the outside edges in place.

18. Stitch the outside pinned edges
with a decorative stitch, close
to the raw edges. Begin at one
corner and continue in a
scalloping fashion all the way
around the piece.

19. Stitch the interior edges down
with a decorative stitch in the
same manner. Press well.
You’re done!

20. Take a look at the underside.
Looks good! It’s reversible!

A

AngelaB.me

© 2013 Angela Bowman

For personal use only

Page 8 of 9
21. To make coasters, cut a white
and a colored circle, draw a
square on the white circle,
layer squares wrong sides
together, fold in the sides along
the drawn lines, and pin in
place.
22. Stitch the edges with a
decorative stitch, close to the
raw edges all the way around
the piece.
Link up your project online!
Visit www.angelab.me/projects

The Possibilities!
Try different layouts to
assemble a table runner,
coasters, placemats,
quilts, and more. Use
flannel prints instead of
solids for a different look.
This would be a great
project for upcycling
flannel shirts!

A

AngelaB.me

© 2013 Angela Bowman

For personal use only

Page 9 of 9

Circles Squared

  • 1.
  • 2.
    Circles Squared Circles sewntogether to form squares. Make tons of projects with this technique: a table runner, coasters, and more! Leave the edges unfinished fray is okay! BONUS: this reversible project looks good on both sides. Get some fabric, choose your favorite decorative stitch, and have fun sewing! Tools Materials circle template (such as a coffee pre-washed fabric (flannel, fleece, can lid) denim, or cotton) square template (sized so that coordinating thread four corners align on the circle) marking pen or chalk scissors sewing machine iron & ironing board pins A AngelaB.me © 2013 Angela Bowman For personal use only Page 2 of 9
  • 3.
    Circles Squared Projects Youcan make so many things with this technique! Use this worksheet to track template sizes, layout, finished sizes, fabric requirements & cut circles Template Sizes: Circle: 6 3/8” Square: 4 1/2” Layout & Finished Size Circles layout: 3 x 9 Table runner Finished size: 13” x 38” Circles layout: 3 x 4 Placemat Finished size: 13” x 17” Circles layout: 1 x 1 Coaster Quilt _____________ _____________ A Finished size: 4.25” x 4.25” Circles layout: _______ Finished size: ___________ Circles layout: _______ Finished size: ___________ Circles layout: _______ Finished size: ___________ AngelaB.me © 2013 Angela Bowman Background Fabric (white) 42” wide Foreground Fabric (colored) 42” wide Fabric required: 1 1/2 yards Fabric required: 1 1/2 yards Cut circles: 27 Cut circles: 27 Fabric required: 3/4 yard Fabric required: 3/4 yard Cut circles: 12 Cut circles: 12 Fabric required: scraps Fabric required: scraps Cut circles: 1 Cut circles: 1 Fabric required: _______ Fabric required: _______ Cut circles: ___ Cut circles: ___ Fabric required: _______ Fabric required: _______ Cut circles: ___ Cut circles: ___ Fabric required: _______ Fabric required: _______ Cut circles: ___ Cut circles: ___ For personal use only Page 3 of 9
  • 4.
    1. Determine howmany background (white) circles and foreground (colored) circles are needed for the project, using the worksheet on the previous page. 2. Trace circles onto fabric, using the circle template. I like using a coffee can lid (6 3/8” diameter). 3. Place a couple pins inside each circle, to prevent the fabric from shifting. 4. Cut out the circles. Remove pins. A AngelaB.me © 2013 Angela Bowman For personal use only Page 4 of 9
  • 5.
    5. Trace asquare onto the right side of the white circles, using the square template. I like using a 4 1/2” square quilting ruler and a disappearing marker. 6. Place a white and a colored circle wrong sides together. Repeat for another set of two circles. 7. Layer these two sets so that the colored circles’ right sides are together, aligning the drawn lines. Pin in place above one of the lines. 8. Stitch along one drawn line, backstitching at each end. A AngelaB.me © 2013 Angela Bowman For personal use only Page 5 of 9
  • 6.
    9. Place anotherwhite and colored circle wrong sides together. Layer and stitch this third circle set to the set you just made in the same manner, forming a row of three circles. 10. Finger-press the seams open. 11. Repeat steps 6 - 10 to make another row. 12. Layer the two rows so that the colored circles’ right sides are together, aligning the seams and the outside edges. Pin the top edge in place. A AngelaB.me © 2013 Angela Bowman For personal use only Page 6 of 9
  • 7.
    13. Stitch slightlyinside the top drawn lines, backstitching at each end. This will ensure crisp intersections with less fraying where the seams meet. 14. Finger-press the seams open. Looks good, huh?! 15. Continue making and adding rows until you have the desired size. Have fun randomly arranging color placement! 16. Fold in the outside edges a little deeper than the drawn lines. This will ensure crisp intersections with less fraying where the seams meet. Press well. A AngelaB.me © 2013 Angela Bowman For personal use only Page 7 of 9
  • 8.
    17. Pin theoutside edges in place. 18. Stitch the outside pinned edges with a decorative stitch, close to the raw edges. Begin at one corner and continue in a scalloping fashion all the way around the piece. 19. Stitch the interior edges down with a decorative stitch in the same manner. Press well. You’re done! 20. Take a look at the underside. Looks good! It’s reversible! A AngelaB.me © 2013 Angela Bowman For personal use only Page 8 of 9
  • 9.
    21. To makecoasters, cut a white and a colored circle, draw a square on the white circle, layer squares wrong sides together, fold in the sides along the drawn lines, and pin in place. 22. Stitch the edges with a decorative stitch, close to the raw edges all the way around the piece. Link up your project online! Visit www.angelab.me/projects The Possibilities! Try different layouts to assemble a table runner, coasters, placemats, quilts, and more. Use flannel prints instead of solids for a different look. This would be a great project for upcycling flannel shirts! A AngelaB.me © 2013 Angela Bowman For personal use only Page 9 of 9