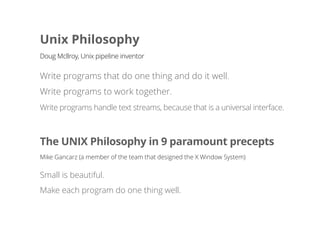
Unix Philosophy
Write programsthat do one thing and do it well.
Write programs to work together.
Doug Mcllroy, Unix pipeline inventor
The UNIX Philosophy in 9 paramount precepts
Mike Gancarz (a member of the team that designed the X Window System)
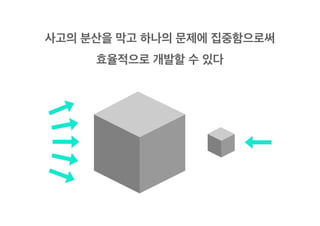
Small is beautiful.
Make each program do one thing well.
Write programs handle text streams, because that is a universal interface.
14.
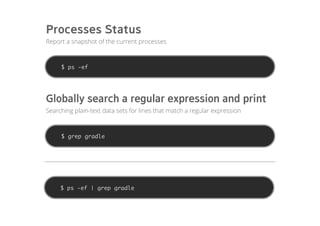
$ ps -ef
ProcessesStatus
Report a snapshot of the current processes
$ grep gradle
Globally search a regular expression and print
Searching plain-text data sets for lines that match a regular expression
$ ps -ef | grep gradle
_changeTabs() {
const fragment= this._parseFragment();
if (fragment === null) {
return;
}
_.each(fragment, (value, key) => {
const target = $(_.find(this.$sections, i => {
return $(i).dataset('type') === key);
});
// 선택한 탭으로 변경한다.
target.find('.cs-tab li').removeClass('is-on');
target.find('.cs-tab li')
.has(`a[href='#${value}']`).addClass('is-on');
// 탭에 해당하는 목록으로 변경한다.
target.find('.cs-body').removeClass('is-on');
target.find(`.cs-body#cs-${key}-${value}`)
.addClass('is-on');
});
}
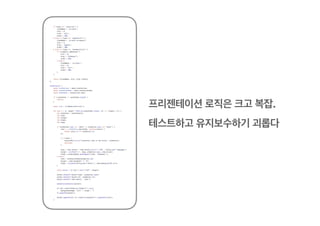
DOM을 직접 핸들링, 장황하고 UI의 형태를 한눈에
파악하기 힘듦
21.
_changeTabs() {
const fragment= this._parseFragment();
if (fragment === null) {
return;
}
_.each(fragment, (value, key) => {
const target = $(_.find(this.$sections, i => {
return $(i).dataset('type') === key);
});
// 선택한 탭으로 변경한다.
target.find('.cs-tab li').removeClass('is-on');
target.find('.cs-tab li')
.has(`a[href='#${value}']`).addClass('is-on');
// 탭에 해당하는 목록으로 변경한다.
target.find('.cs-body').removeClass('is-on');
target.find(`.cs-body#cs-${key}-${value}`)
.addClass('is-on');
});
}
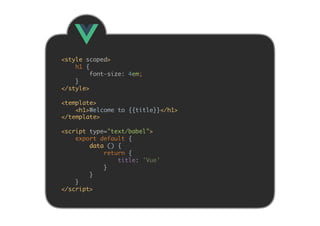
상태를 class나 data attr에 설정 및 사용하여
전체적인 상태 흐름을 알기 힘듦
22.
_changeTabs() {
const fragment= this._parseFragment();
if (fragment === null) {
return;
}
_.each(fragment, (value, key) => {
const target = $(_.find(this.$sections, i => {
return $(i).dataset('type') === key);
});
// 선택한 탭으로 변경한다.
target.find('.cs-tab li').removeClass('is-on');
target.find('.cs-tab li')
.has(`a[href='#${value}']`).addClass('is-on');
// 탭에 해당하는 목록으로 변경한다.
target.find('.cs-body').removeClass('is-on');
target.find(`.cs-body#cs-${key}-${value}`)
.addClass('is-on');
});
}
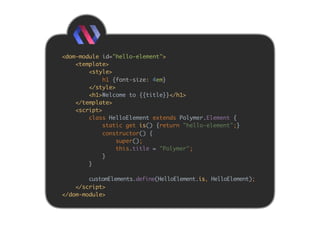
DOM API의 비용은 비쌈. 상태 변화를 위해
DOM API 호출이 남용됨
23.
_changeTabs() {
const fragment= this._parseFragment();
if (fragment === null) {
return;
}
_.each(fragment, (value, key) => {
const target = $(_.find(this.$sections, i => {
return $(i).dataset('type') === key);
});
// 선택한 탭으로 변경한다.
target.find('.cs-tab li').removeClass('is-on');
target.find('.cs-tab li')
.has(`a[href='#${value}']`).addClass('is-on');
// 탭에 해당하는 목록으로 변경한다.
target.find('.cs-body').removeClass('is-on');
target.find(`.cs-body#cs-${key}-${value}`)
.addClass('is-on');
});
}
UI 상태 변화를 위한 render 외의 부가적 메서드
다량 정의


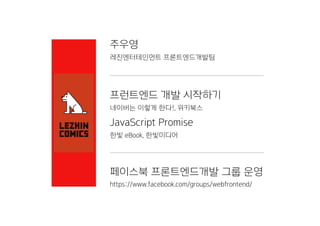


![import {Component} from '@angular/core';
@Component({
selector: 'my-app',
template: `
<h1>Welcome to {{title}}</h1>
`,
styles: [`
h1 {
font-size: 4em;
}
`]
})
export class AppComponent {
title = 'app';
}](https://image.slidesharecdn.com/random-170714024723/85/slide-6-320.jpg)
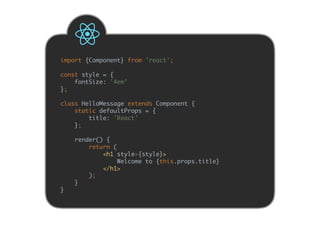

![_changeTabs() {
const fragment = this._parseFragment();
if (fragment === null) {
return;
}
_.each(fragment, (value, key) => {
const target = $(_.find(this.$sections, i => {
return $(i).dataset('type') === key);
});
// 선택한 탭으로 변경한다.
target.find('.cs-tab li').removeClass('is-on');
target.find('.cs-tab li')
.has(`a[href='#${value}']`).addClass('is-on');
// 탭에 해당하는 목록으로 변경한다.
target.find('.cs-body').removeClass('is-on');
target.find(`.cs-body#cs-${key}-${value}`)
.addClass('is-on');
});
}](https://image.slidesharecdn.com/random-170714024723/85/slide-19-320.jpg)
![_changeTabs() {
const fragment = this._parseFragment();
if (fragment === null) {
return;
}
_.each(fragment, (value, key) => {
const target = $(_.find(this.$sections, i => {
return $(i).dataset('type') === key);
});
// 선택한 탭으로 변경한다.
target.find('.cs-tab li').removeClass('is-on');
target.find('.cs-tab li')
.has(`a[href='#${value}']`).addClass('is-on');
// 탭에 해당하는 목록으로 변경한다.
target.find('.cs-body').removeClass('is-on');
target.find(`.cs-body#cs-${key}-${value}`)
.addClass('is-on');
});
}
DOM을 직접 핸들링, 장황하고 UI의 형태를 한눈에
파악하기 힘듦](https://image.slidesharecdn.com/random-170714024723/85/slide-20-320.jpg)
![_changeTabs() {
const fragment = this._parseFragment();
if (fragment === null) {
return;
}
_.each(fragment, (value, key) => {
const target = $(_.find(this.$sections, i => {
return $(i).dataset('type') === key);
});
// 선택한 탭으로 변경한다.
target.find('.cs-tab li').removeClass('is-on');
target.find('.cs-tab li')
.has(`a[href='#${value}']`).addClass('is-on');
// 탭에 해당하는 목록으로 변경한다.
target.find('.cs-body').removeClass('is-on');
target.find(`.cs-body#cs-${key}-${value}`)
.addClass('is-on');
});
}
상태를 class나 data attr에 설정 및 사용하여
전체적인 상태 흐름을 알기 힘듦](https://image.slidesharecdn.com/random-170714024723/85/slide-21-320.jpg)
![_changeTabs() {
const fragment = this._parseFragment();
if (fragment === null) {
return;
}
_.each(fragment, (value, key) => {
const target = $(_.find(this.$sections, i => {
return $(i).dataset('type') === key);
});
// 선택한 탭으로 변경한다.
target.find('.cs-tab li').removeClass('is-on');
target.find('.cs-tab li')
.has(`a[href='#${value}']`).addClass('is-on');
// 탭에 해당하는 목록으로 변경한다.
target.find('.cs-body').removeClass('is-on');
target.find(`.cs-body#cs-${key}-${value}`)
.addClass('is-on');
});
}
DOM API의 비용은 비쌈. 상태 변화를 위해
DOM API 호출이 남용됨](https://image.slidesharecdn.com/random-170714024723/85/slide-22-320.jpg)
![_changeTabs() {
const fragment = this._parseFragment();
if (fragment === null) {
return;
}
_.each(fragment, (value, key) => {
const target = $(_.find(this.$sections, i => {
return $(i).dataset('type') === key);
});
// 선택한 탭으로 변경한다.
target.find('.cs-tab li').removeClass('is-on');
target.find('.cs-tab li')
.has(`a[href='#${value}']`).addClass('is-on');
// 탭에 해당하는 목록으로 변경한다.
target.find('.cs-body').removeClass('is-on');
target.find(`.cs-body#cs-${key}-${value}`)
.addClass('is-on');
});
}
UI 상태 변화를 위한 render 외의 부가적 메서드
다량 정의](https://image.slidesharecdn.com/random-170714024723/85/slide-23-320.jpg)


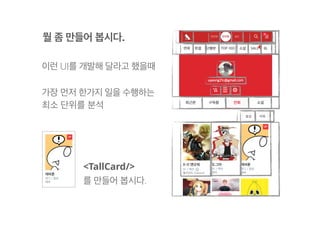

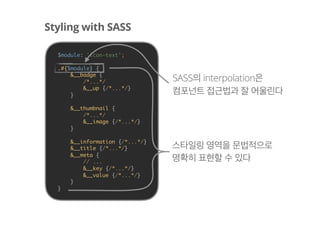
![const TallCard = ({title, image, badge, metadata = []}) => (
<div className={`tall-card ${badge === 'up' ? ‘tall-card_badge_up' … `}>
<div className="tall-card__badge">
<i className=“tall-card__badge-up”/>
</div>
<div className="tall-card__thumbnail">
<img className="…" src={image} alt={`${title}의 썸네일`}/>
</div>
<div className="tall-card__information">
<h5 className="tall-card__title">{title}</h5>
{metadata.length > 0 ? (
<dl className=“tall-card__meta">
${metadata.map(({key, value}) => ([
<dt className=“tall-card__meta-key">{key}</dt>,
<dt className=“tall-card__meta-key">{value}</dt>
]))}
</dl>
) : null}
</div>
</div>
);
Create React Component](https://image.slidesharecdn.com/random-170714024723/85/slide-50-320.jpg)


![[토크아이티] 프런트엔드 개발 시작하기 저자 특강](https://cdn.slidesharecdn.com/ss_thumbnails/random-141024103422-conversion-gate01-thumbnail.jpg?width=640&height=640&fit=bounds)


![[리뷰] 풀스택 개발자를 위한 MEAM 스택 입문](https://cdn.slidesharecdn.com/ss_thumbnails/mean-re-151003142901-lva1-app6892-thumbnail.jpg?width=640&height=640&fit=bounds)


![[Korea Linux Forum] Implementing web based online multiplayer tetris with Ope...](https://cdn.slidesharecdn.com/ss_thumbnails/implementingwebbasedonlinemultiplayertetris-141111200036-conversion-gate02-thumbnail.jpg?width=640&height=640&fit=bounds)


![[D2 CAMPUS] 안드로이드 오픈소스 스터디자료 - HTML, Android Animation](https://cdn.slidesharecdn.com/ss_thumbnails/nexters4-htmlandroidanimation-160927091904-thumbnail.jpg?width=640&height=640&fit=bounds)


![[아꿈사/110903] 도메인주도설계 4장](https://cdn.slidesharecdn.com/ss_thumbnails/110903-110903003107-phpapp02-thumbnail.jpg?width=640&height=640&fit=bounds)


![[152] 웹브라우저 감옥에서 살아남기](https://cdn.slidesharecdn.com/ss_thumbnails/152-150914023446-lva1-app6892-thumbnail.jpg?width=640&height=640&fit=bounds)


![[Toolcon2014] WebStorm에서 자바스크립트 리팩토링하기](https://cdn.slidesharecdn.com/ss_thumbnails/toolcon2014-140602234750-phpapp02-thumbnail.jpg?width=640&height=640&fit=bounds)


