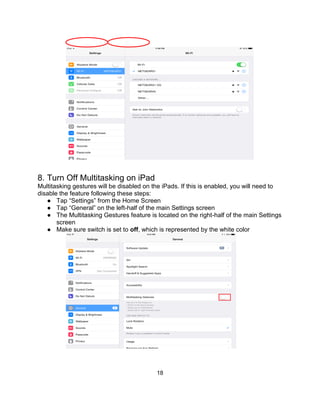
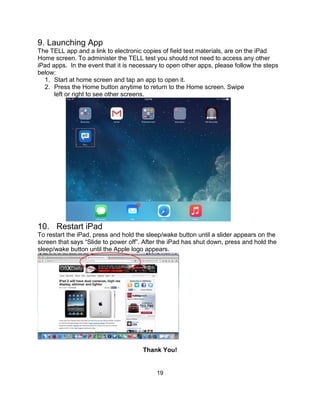
SlideShare a Scribd company logo
1 of 20
Download to read offline
TELL User Guide
Grades K through 12
Revision Who Date Revision Comments
1.0 Christina 4/15/15 New baseline document
1
Table of Contents
TELL Test Administration Guide
1. Introduction to TELL
2. What you need for testing
3. General Considerations for TELL Test Sessions
4. Accessing electronic copies of TELL User Guide
5. Pearson/TELL Contact Information
Navigating the TELL App
1. Accessing TELL App
2. Test Login
a. TELL ID and Test Code
b. Adjusting the Volume
c. Adjusting the Microphone
3. Taking practice items
4. Checking Test Progress and Upload Status
5. Admin Screens
iPad Basics
1. Turn iPad On/Off
2. Using the iPad’s Home button
3. Adjust Volume Levels and Turn Side Switch On/Off
4. Connecting to Wi-Fi
5. Turn Microphone On
6. Charge and Monitor the Battery
7. Status Icons
8. Turn Off Multitasking on iPad
9. Launching App
10. Restart iPad
2
TELL Test Administration Guide
1. Introduction to TELL
Thank you for choosing the Test of English Language Learning (TELL). You are
amongst the first to experience this new, touch-screen delivered assessment solution!
TELL is a battery of formative assessments designed for K-12 ELLs and is delivered on
a touch-screen device (e.g., iPad). TELL will consist of a screener, a diagnostic, and
eight progress monitoring assessments, providing schools and districts a flexible and
consistent performance assessment solution. TELL will feature engaging and interactive
tasks with integrated-skill items that meet state standards. Once published, TELL will
offer automated scoring for objective and swift feedback without the need for on-site
scorers. Scores will be provided for the four foundational skills (listening, reading,
writing and speaking), as well as for 6 sub-skills (pronunciation, fluency, grammar,
vocabulary, spelling and pre-literacy), enabling schools, teachers, and students to
effectively monitor progress on the development of core language skills necessary for
learning academic content.
Materials are still being developed. What you are seeing is not necessarily the final
product. At this time, you will not have access to the scores and reports.
2. What you need for testing
1. Login Codes
● Read-Only Login Codes that can be taken multiple times
Test Code Grade Band Pin
835547007 Grade K 19394063
835547007 Grade K 22087305
835547007 Grade 1-2 56225307
835547007 Grade 1-2 78634166
835547007 Grade 3-5 21726642
835547007 Grade 3-5 21919016
835547007 Grade 6-8 27642416
835547007 Grade 6-8 94235786
835547007 Grade 9-12 65533847
835547007 Grade 9-12 64764350
● Administrator Passcode (200314)
2. iPad/charger
3. Headset
4. TELL user guide
3
3. General Considerations for TELL Test Sessions
a. Testing & Proctor Considerations
Prior taking the TELL test, it is recommended to have a brief orientation about the test
and what you should expect to see on the test. In addition:
● It is strongly encouraged to familiarize themselves with the different TELL
question types via the practice section (see Navigating the TELL App: section 3)
prior to starting the test.
● Encourage the students to answer the test items based on what they think each
item is asking to the best of their ability.
● Younger students may require some additional help during their first testing
experience if they are unsure how to interact with an item type.
o Test administrators can and should spend extra time with younger students
demonstrating the microphone and a proper speaking level (see Navigating
the TELL App- section 2.c)
o If students are unfamiliar with a keyboard, test administrators can show
younger students how to manipulate the keyboard via the practice section
(see Navigating the TELL App- section 3)
o Let students know that tests may include some questions too difficult for
them. If they cannot answer the questions fully, partial responses are still
preferable. If they do not know the answer at all, they can skip an item via
the “Next” button.
● Again, please encourage the students to answer questions to the best of their
ability.
If a student reports a problem with a specific item (e.g., something missing on the
screen, unable to advance to the next item), please pause the test application via the
iPad’s home button and restart the application.
We recommend not allowing students to stop in the middle of an assessment. Doing so
will cause the assessment to time out and will require the test administrator to unlock
the test.
● If a test is stopped before finishing, the test can only be resumed using the same
iPad where the test was initially launched.
● To start a different test on the same device and save test progress on the current,
unfinished test, pause the application via the iPad’s home button. Wait 30
seconds, or until Admin Screen is displayed. Enter in the Administration Passcode
of 200314 (can also be found on the administrative roster) and then on next
screen select “Start New Test.”
b. Recommended Testing Group Size and Schedule
Tests should be administered in a room with only one student or in small groups of no
more than five students, due to test questions requiring spoken responses. The
students should be spaced as far apart from each other as the test location allows, to
prevent other students’ voices from interfering with another’s test. The approximate
testing time will be 25-30 minutes for grade K tests, 35-40 min for grades 1-2 tests, 45-
50 minutes for grades 3-5 tests, and 65-70 minutes for grades 6-12 tests.
4
c. Keep the iPad Fully Charged
Prior to beginning a test, check that the iPad’s battery is at least 20% charged to ensure
that the iPad has enough power for the entire testing session (for information on how to
do this see iPad Basics- section 5). If the battery level is below 20%, the iPad must be
charged; either while the student is testing or prior to starting the test. See approximate
test times per grade band in section c above.
4. Accessing electronic copies of TELL User Guide
Visit https://pearson.app.box.com/TELLFT for an online version of this document.
5. Pearson/TELL Contact Information
Contact us at fieldresearchtesting@pearson.com (please include TELL in subject line)
or by calling 1-800-233-5686 between the hours of 8am-5pm CT.
We sincerely appreciate your interest in TELL. Our goal, to make quality assessments
to improve learning, is not possible without your help.
Thank You!
5
Navigating the TELL App
1. Accessing TELL App
a. To access the TELL app, tap the TELL icon located on the “Dock bar” at the bottom
of the iPad’s home screen.
b. Once the TELL app is selected, the TELL home screen will display.
1) To practice different types of items in different grade bands, tap the “Practice”
button located on the bottom left of the screen.
2) To start the test, tap the “Start” button located on the bottom right of the screen.
3) To see testing and/or upload status, tap on the “Upload Status” link the center
bottom of the screen.
6
c. Select the “Home” button, located on the bottom left of the screen, to return to the
TELL home screen from any of these three options.
2. Test Login
a. TELL ID and Test Code
1) To access a test, enter in the Test Code by tapping in the first textbox. See TELL
Test Administration Guide- section 2.1 for specific Test Codes.
2) Enter in the TELL ID by tapping in the second textbox. See TELL Test
Administration Guide- section 2.1 for specific TELL IDs.
3) Finally, tap the “Sign In” button to begin the test.
7
b. Adjusting the Volume
1) To adjust the application’s volume, slide the volume controller right to raise the
volume level, or left to decrease it. The slider must be adjusted to advance
beyond this screen. Ensure the volume is loud enough so as to clearly hear the
instructions given throughout the test.
2) Once the volume level has been adjusted, tap the “Next” button to proceed. The
“Next” button will enable once the volume slider has been touched.
3) If the volume slider is not touched or the volume is set to 0, the admin screen will
display, and the student will need help to return to the test. The test administrator
must enter in a passcode in order to proceed by tapping in the textbox. The
Administration Passcode is 200314 and can also be found on the administrative
roster.
4) Once the passcode has been entered, tap “Submit” to continue.
5) Tap the “Try Again” button, and then adjust the volume level until the music
playing is at a comfortable level.
8
c. Adjusting the Microphone
1) To ensure the microphone is working, after the instructions specify, count aloud
from 1 to 5. Green lights indicate speaking at an appropriate level, while yellow or
red mean you are speaking too loudly. If there are no lights next to the
microphone, the microphone may be disabled. Please refer to iPad Basics-
section 4 in this user guide to enable the microphone.
2) Once the microphone detects your voice, the “Next” button will be enabled. Tap
the “Next” button to proceed.
3) If you do not speak loud enough or your microphone is not working, the admin
screen will display along with a message asking if TELL can access your
microphone. You need to ask for help.
4) The teacher or administrator must select OK, allowing TELL to access your
microphone.
5) Next the teacher or administrator must enter in a passcode in order to proceed
by tapping in the textbox. The Administration Passcode is 200314 and can also
be found on the administrative roster.
6) Tap the “Submit” button to continue.
9
7) Tap the “Try Again” button to exit the admin screen; then make sure to count
aloud from 1-5 at an appropriate level, so the microphone detects your voice and
microphone indicator shows green lights.
3. Taking practice items
a. It is recommended, prior to starting the TELL test with students, that both
administrator and students familiarize themselves with TELL test item types via the
practice section from the home page.
b. To practice taking TELL items, tap the “Practice” button located on the bottom left of
the screen.
10
c. Select the preferred grade-band to begin the practice test.
d. Once in the selected grade-band, choose the question type to practice.
e. Tap the “Back” button to return to the previous page and select another grade’s
practice items.
f. Tap the “Home” button to return to the TELL home screen.
11
4. Checking Test Progress and Upload Status
Check the completion status of tests taken on a particular iPad, and confirm test data
has been sent back to Pearson, via the “Upload Status” button located at the bottom of
the home screen. Once each student completes the TELL test, the test data will
automatically be uploaded back to Pearson as long as a wireless connection is
maintained.
After tapping “Upload Status”, administrators are brought to a screen where they can
view different status information for TELL tests taken on the iPad. A “Completed” status
indicates that the test data upload to Pearson was successful. Completed tests will be
removed from the list after 7 days.
If you noticed that the test status does not change to “Completed” after a few hours,
please confirm the iPad has a wireless connection and leave the application running
from the home screen to resume upload progress. Please note Read-Only login codes
will not register on this screen.
5. Admin Screens
During test administration, the admin screen will display if the application is paused for
more than 30 seconds or paused more than 4 times.
12
1) The teacher or administrator must enter in a passcode in order to proceed by
tapping in the textbox. The Administration Passcode is 200314 and can also be
found on the administrative roster.
2) Tap the “Submit” button to continue.
13
3) Tap the “Resume” button if you would like to start the test exactly where it was
paused.
4) Tap the “Start New” button if you would like to start a new test. Selecting this
button will bring you back to the test Log In screen. The test progress will be
saved and the user can resume the previous test only on the same iPad using
original login credentials.
5) Select a reason that the test was paused. The reason selected here will not be
reported with test scores, this data will be used to improve general test
functionality.
14
iPad Basics
1. Turn iPad On/Off
Turn iPad on. Hold down the Sleep/Wake button until the Apple logo appears.
Turn iPad off. Hold down the Sleep/Wake button for a few seconds until the ‘Slide to
power off’ slider appears onscreen, and then drag the slider to the right.
Click the link to watch a video on how to turn an iPad on/off or type the following link
into an internet browser: http://youtu.be/WWGdFVVLUEY
2. Using the iPad’s Home button
Within this User Guide, we often refer to the iPad’s “home button” (see above picture).
The “home button” can be used for pausing the TELL application and returning to the
iPad’s home screen. You can also double click the “home button” to display recently
used apps. Swipe left or right to find the TELL application and quickly return to the
same spot you left off. See Navigating the TELL App- Section 5 if the Administrative
Screen is displaying on the application and you are unsure how to proceed.
3. Adjust Volume Levels and Turn Side Switch On/Off
During test administration, the volume should be adjusted via the slider bar within the
application (see Navigating the TELL App- Section 2a). If you are still experiencing
difficulties hearing sound during the test administration, you may need to check the side
switch and/or headset volume control are in the proper place.
● The side switch is used to silence audio alerts and notifications. Make sure the
Side Switch does not display a red dot (indicating it is not silenced).
● The headset’s volume control has been covered to prevent tampering. Please
remove the tape on the volume control and make sure the volume knob has been
15
turned up to maximum level, then adjust for loudness via the volume slider in the
app. Please reseal the volume control to prevent future tampering.
● The volume buttons on the side of the iPad can be used to adjust the volume of
the application, songs, other media, alerts and sound effects.
● If you are using headsets and there is still no sound, make sure the headsets are
plugged in all the way.
4. Connecting to Wi-Fi
If the wireless symbol appears at the top of the screen, you’re connected to a Wi-Fi
network. The iPad will reconnect anytime you return to the same location.
Click the link to watch a video on how to connect your iPad to the Wi-Fi network or type
the following link into an internet browser: http://youtu.be/pxyvca7dGp4
Join a Wi-Fi network or adjust Wi-Fi settings. Go to Settings>Wi-Fi.
1. Choose a network: Tap one of the listed networks, then enter the password,
if asked.
2. Ask to join networks: Turn on “Ask to Join Networks” to be prompted when a
Wi-Fi network is available. Otherwise, you must manually join a network when
a previously used network isn’t available.
3. Forget a network: Tap next to a network you’ve joined before, then
tap “Forget this Network”.
4. Join other network: Tap “Other”, then enter the name of the network. You
need to know the network name, security type, and password.
16
5. Turn Microphone On
The microphone on the iPads should already be turned on when they arrive. If the
microphone is turned off, you will need to enable by following these steps:
● Tap “Settings” from the Home Screen.
● Tap “Privacy” on the left-half of the main Settings screen.
● Then select “Microphone”
● Make sure switch is set to “On”, which is represented by the color green
6. Charge and Monitor the Battery
Charge the battery: The best way to charge the iPad
battery is to connect iPad to a power outlet using the
included cable and USB power adapter.
An iPad may also charge slowly when you connect it to
a USB 2.0 port on your computer. If your Mac or PC
doesn’t provide enough power to charge iPad, a “Not
Charging” message will appear in the menu status bar.
17
Important: The iPad battery will not charge if the iPad is connected to a computer that
is in sleep/standby mode or turned off. The iPad will not charge if connected to a USB
port on a keyboard. It is strongly recommended to charge iPads via a power outlet.
The battery icon in the upper-right corner of the status bar shows the battery level or
charging status.
To display the percentage of battery charge: Go to Settings > General > Usage, then
turn on “Battery Percentage”.
7. Status Icons
The icons in the status bar at the top of the screen give information about iPad:
Status Icons What it means
Wi-Fi
iPad has a Wi-Fi Internet Connection. The more bars, the
stronger the connection
Cell signal
iPad (Wi-Fi + Cellular models) is in range of the cellular network.
If there’s no signal, “No service” appears.
Airplane Mode
Airplane mode is on—you can’t access the internet, or use
Bluetooth devices. Non-wireless features are available.
LTE
iPad (Wi-Fi + Cellular models) is connected to the Internet over a
4G LTE network.
4G
iPad (Wi-Fi + Cellular models) is connected to the Internet over a
4G LTE network.
3G
iPad (Wi-Fi + Cellular models) is connected to the Internet over a
3G LTE network.
Do Not Disturb Do Not Disturb is turned on.
Alarm An alarm is set.
Lock iPad is locked.
Battery Battery level or charging status.
To ensure successful testing: Please make sure your iPad does not have “Airplane
Mode” or “Do Not Disturb” mode turned on. Go to “Settings” to make sure each of these
features are turned off.
18
8. Turn Off Multitasking on iPad
Multitasking gestures will be disabled on the iPads. If this is enabled, you will need to
disable the feature following these steps:
● Tap “Settings” from the Home Screen
● Tap “General” on the left-half of the main Settings screen
● The Multitasking Gestures feature is located on the right-half of the main Settings
screen
● Make sure switch is set to off, which is represented by the white color
19
9. Launching App
The TELL app and a link to electronic copies of field test materials, are on the iPad
Home screen. To administer the TELL test you should not need to access any other
iPad apps. In the event that it is necessary to open other apps, please follow the steps
below:
1. Start at home screen and tap an app to open it.
2. Press the Home button anytime to return to the Home screen. Swipe
left or right to see other screens.
10. Restart iPad
To restart the iPad, press and hold the sleep/wake button until a slider appears on the
screen that says “Slide to power off”. After the iPad has shut down, press and hold the
sleep/wake button until the Apple logo appears.
Thank You!

More Related Content

Similar to TELL User Guide

Step-By-Step Guide to Creating Assessments
  Step-By-Step Guide to Creating Assessments  Step-By-Step Guide to Creating Assessments
Step-By-Step Guide to Creating AssessmentsJeffrey Fuller
 
Cs02 2014
Cs02 2014Cs02 2014
Cs02 2014madhesi
 
Cs02 2014
Cs02 2014Cs02 2014
Cs02 2014madhesi
 
Insight360 student App for android
Insight360 student App for androidInsight360 student App for android
Insight360 student App for androidWilliam McIntosh
 
How to use the lg p500 smart phone
How to use the lg p500 smart phoneHow to use the lg p500 smart phone
How to use the lg p500 smart phonetaklej
 
Cs01 2014
Cs01 2014Cs01 2014
Cs01 2014madhesi
 
Example Instructions for an Online Exam
Example Instructions for an Online ExamExample Instructions for an Online Exam
Example Instructions for an Online ExamJLewisGeology
 
01042023_HKYw5UBJV JKJBJJBJBGIUJNLNJNJNN JJJ
01042023_HKYw5UBJV JKJBJJBJBGIUJNLNJNJNN  JJJ01042023_HKYw5UBJV JKJBJJBJBGIUJNLNJNJNN  JJJ
01042023_HKYw5UBJV JKJBJJBJBGIUJNLNJNJNN JJJVinaySharma894248
 
Integrating study island with smart response
Integrating study island with smart responseIntegrating study island with smart response
Integrating study island with smart responseJoanne Riddles
 
K to 12_pc_hardware_servicing_learning_module
K to 12_pc_hardware_servicing_learning_moduleK to 12_pc_hardware_servicing_learning_module
K to 12_pc_hardware_servicing_learning_moduleA J
 
K to 12 - Hardware Servicing Learning Module
K to 12 - Hardware Servicing Learning ModuleK to 12 - Hardware Servicing Learning Module
K to 12 - Hardware Servicing Learning ModuleEdmund Blanco
 
K to 12_pc_hardware_servicing_learning_module
K to 12_pc_hardware_servicing_learning_moduleK to 12_pc_hardware_servicing_learning_module
K to 12_pc_hardware_servicing_learning_moduleMaeveAnnieRoseEllore
 
K TO 12 PC HARDWARE SERVICING LEARNING MODULE.pdf
K TO 12 PC HARDWARE SERVICING LEARNING MODULE.pdfK TO 12 PC HARDWARE SERVICING LEARNING MODULE.pdf
K TO 12 PC HARDWARE SERVICING LEARNING MODULE.pdfNoliEdubalad4
 
K to 12_PC LEARNING MODULE
K to 12_PC LEARNING MODULEK to 12_PC LEARNING MODULE
K to 12_PC LEARNING MODULEJohndion Ruloma
 
K TO 12 PC HARDWARE SERVICING LEARNING MODULE.pdf
K TO 12 PC HARDWARE SERVICING LEARNING MODULE.pdfK TO 12 PC HARDWARE SERVICING LEARNING MODULE.pdf
K TO 12 PC HARDWARE SERVICING LEARNING MODULE.pdfNoliEdubalad4
 
K to 12_pc_hardware_servicing_learning_module
K to 12_pc_hardware_servicing_learning_moduleK to 12_pc_hardware_servicing_learning_module
K to 12_pc_hardware_servicing_learning_modulewiewei
 
K 20to-2012-20pc-20hardware-20servicing-20learning-20module-131227142941-phpa...
K 20to-2012-20pc-20hardware-20servicing-20learning-20module-131227142941-phpa...K 20to-2012-20pc-20hardware-20servicing-20learning-20module-131227142941-phpa...
K 20to-2012-20pc-20hardware-20servicing-20learning-20module-131227142941-phpa...Alvin Francisco
 

Similar to TELL User Guide (20)

Step-By-Step Guide to Creating Assessments
  Step-By-Step Guide to Creating Assessments  Step-By-Step Guide to Creating Assessments
Step-By-Step Guide to Creating Assessments
 
Cs02 2014
Cs02 2014Cs02 2014
Cs02 2014
 
Cs02 2014
Cs02 2014Cs02 2014
Cs02 2014
 
Insight360 student App for android
Insight360 student App for androidInsight360 student App for android
Insight360 student App for android
 
How to use the lg p500 smart phone
How to use the lg p500 smart phoneHow to use the lg p500 smart phone
How to use the lg p500 smart phone
 
GATE CS paper 2014
GATE CS paper 2014GATE CS paper 2014
GATE CS paper 2014
 
Cs01 2014
Cs01 2014Cs01 2014
Cs01 2014
 
Example Instructions for an Online Exam
Example Instructions for an Online ExamExample Instructions for an Online Exam
Example Instructions for an Online Exam
 
01042023_HKYw5UBJV JKJBJJBJBGIUJNLNJNJNN JJJ
01042023_HKYw5UBJV JKJBJJBJBGIUJNLNJNJNN  JJJ01042023_HKYw5UBJV JKJBJJBJBGIUJNLNJNJNN  JJJ
01042023_HKYw5UBJV JKJBJJBJBGIUJNLNJNJNN JJJ
 
Integrating study island with smart response
Integrating study island with smart responseIntegrating study island with smart response
Integrating study island with smart response
 
chs 7 and 8.pdf
chs 7 and 8.pdfchs 7 and 8.pdf
chs 7 and 8.pdf
 
K to 12_pc_hardware_servicing_learning_module
K to 12_pc_hardware_servicing_learning_moduleK to 12_pc_hardware_servicing_learning_module
K to 12_pc_hardware_servicing_learning_module
 
K to 12 - Hardware Servicing Learning Module
K to 12 - Hardware Servicing Learning ModuleK to 12 - Hardware Servicing Learning Module
K to 12 - Hardware Servicing Learning Module
 
K to 12_pc_hardware_servicing_learning_module
K to 12_pc_hardware_servicing_learning_moduleK to 12_pc_hardware_servicing_learning_module
K to 12_pc_hardware_servicing_learning_module
 
Computer
Computer Computer
Computer
 
K TO 12 PC HARDWARE SERVICING LEARNING MODULE.pdf
K TO 12 PC HARDWARE SERVICING LEARNING MODULE.pdfK TO 12 PC HARDWARE SERVICING LEARNING MODULE.pdf
K TO 12 PC HARDWARE SERVICING LEARNING MODULE.pdf
 
K to 12_PC LEARNING MODULE
K to 12_PC LEARNING MODULEK to 12_PC LEARNING MODULE
K to 12_PC LEARNING MODULE
 
K TO 12 PC HARDWARE SERVICING LEARNING MODULE.pdf
K TO 12 PC HARDWARE SERVICING LEARNING MODULE.pdfK TO 12 PC HARDWARE SERVICING LEARNING MODULE.pdf
K TO 12 PC HARDWARE SERVICING LEARNING MODULE.pdf
 
K to 12_pc_hardware_servicing_learning_module
K to 12_pc_hardware_servicing_learning_moduleK to 12_pc_hardware_servicing_learning_module
K to 12_pc_hardware_servicing_learning_module
 
K 20to-2012-20pc-20hardware-20servicing-20learning-20module-131227142941-phpa...
K 20to-2012-20pc-20hardware-20servicing-20learning-20module-131227142941-phpa...K 20to-2012-20pc-20hardware-20servicing-20learning-20module-131227142941-phpa...
K 20to-2012-20pc-20hardware-20servicing-20learning-20module-131227142941-phpa...
 

TELL User Guide

  • 1. TELL User Guide Grades K through 12 Revision Who Date Revision Comments 1.0 Christina 4/15/15 New baseline document
  • 2. 1 Table of Contents TELL Test Administration Guide 1. Introduction to TELL 2. What you need for testing 3. General Considerations for TELL Test Sessions 4. Accessing electronic copies of TELL User Guide 5. Pearson/TELL Contact Information Navigating the TELL App 1. Accessing TELL App 2. Test Login a. TELL ID and Test Code b. Adjusting the Volume c. Adjusting the Microphone 3. Taking practice items 4. Checking Test Progress and Upload Status 5. Admin Screens iPad Basics 1. Turn iPad On/Off 2. Using the iPad’s Home button 3. Adjust Volume Levels and Turn Side Switch On/Off 4. Connecting to Wi-Fi 5. Turn Microphone On 6. Charge and Monitor the Battery 7. Status Icons 8. Turn Off Multitasking on iPad 9. Launching App 10. Restart iPad
  • 3. 2 TELL Test Administration Guide 1. Introduction to TELL Thank you for choosing the Test of English Language Learning (TELL). You are amongst the first to experience this new, touch-screen delivered assessment solution! TELL is a battery of formative assessments designed for K-12 ELLs and is delivered on a touch-screen device (e.g., iPad). TELL will consist of a screener, a diagnostic, and eight progress monitoring assessments, providing schools and districts a flexible and consistent performance assessment solution. TELL will feature engaging and interactive tasks with integrated-skill items that meet state standards. Once published, TELL will offer automated scoring for objective and swift feedback without the need for on-site scorers. Scores will be provided for the four foundational skills (listening, reading, writing and speaking), as well as for 6 sub-skills (pronunciation, fluency, grammar, vocabulary, spelling and pre-literacy), enabling schools, teachers, and students to effectively monitor progress on the development of core language skills necessary for learning academic content. Materials are still being developed. What you are seeing is not necessarily the final product. At this time, you will not have access to the scores and reports. 2. What you need for testing 1. Login Codes ● Read-Only Login Codes that can be taken multiple times Test Code Grade Band Pin 835547007 Grade K 19394063 835547007 Grade K 22087305 835547007 Grade 1-2 56225307 835547007 Grade 1-2 78634166 835547007 Grade 3-5 21726642 835547007 Grade 3-5 21919016 835547007 Grade 6-8 27642416 835547007 Grade 6-8 94235786 835547007 Grade 9-12 65533847 835547007 Grade 9-12 64764350 ● Administrator Passcode (200314) 2. iPad/charger 3. Headset 4. TELL user guide
  • 4. 3 3. General Considerations for TELL Test Sessions a. Testing & Proctor Considerations Prior taking the TELL test, it is recommended to have a brief orientation about the test and what you should expect to see on the test. In addition: ● It is strongly encouraged to familiarize themselves with the different TELL question types via the practice section (see Navigating the TELL App: section 3) prior to starting the test. ● Encourage the students to answer the test items based on what they think each item is asking to the best of their ability. ● Younger students may require some additional help during their first testing experience if they are unsure how to interact with an item type. o Test administrators can and should spend extra time with younger students demonstrating the microphone and a proper speaking level (see Navigating the TELL App- section 2.c) o If students are unfamiliar with a keyboard, test administrators can show younger students how to manipulate the keyboard via the practice section (see Navigating the TELL App- section 3) o Let students know that tests may include some questions too difficult for them. If they cannot answer the questions fully, partial responses are still preferable. If they do not know the answer at all, they can skip an item via the “Next” button. ● Again, please encourage the students to answer questions to the best of their ability. If a student reports a problem with a specific item (e.g., something missing on the screen, unable to advance to the next item), please pause the test application via the iPad’s home button and restart the application. We recommend not allowing students to stop in the middle of an assessment. Doing so will cause the assessment to time out and will require the test administrator to unlock the test. ● If a test is stopped before finishing, the test can only be resumed using the same iPad where the test was initially launched. ● To start a different test on the same device and save test progress on the current, unfinished test, pause the application via the iPad’s home button. Wait 30 seconds, or until Admin Screen is displayed. Enter in the Administration Passcode of 200314 (can also be found on the administrative roster) and then on next screen select “Start New Test.” b. Recommended Testing Group Size and Schedule Tests should be administered in a room with only one student or in small groups of no more than five students, due to test questions requiring spoken responses. The students should be spaced as far apart from each other as the test location allows, to prevent other students’ voices from interfering with another’s test. The approximate testing time will be 25-30 minutes for grade K tests, 35-40 min for grades 1-2 tests, 45- 50 minutes for grades 3-5 tests, and 65-70 minutes for grades 6-12 tests.
  • 5. 4 c. Keep the iPad Fully Charged Prior to beginning a test, check that the iPad’s battery is at least 20% charged to ensure that the iPad has enough power for the entire testing session (for information on how to do this see iPad Basics- section 5). If the battery level is below 20%, the iPad must be charged; either while the student is testing or prior to starting the test. See approximate test times per grade band in section c above. 4. Accessing electronic copies of TELL User Guide Visit https://pearson.app.box.com/TELLFT for an online version of this document. 5. Pearson/TELL Contact Information Contact us at fieldresearchtesting@pearson.com (please include TELL in subject line) or by calling 1-800-233-5686 between the hours of 8am-5pm CT. We sincerely appreciate your interest in TELL. Our goal, to make quality assessments to improve learning, is not possible without your help. Thank You!
  • 6. 5 Navigating the TELL App 1. Accessing TELL App a. To access the TELL app, tap the TELL icon located on the “Dock bar” at the bottom of the iPad’s home screen. b. Once the TELL app is selected, the TELL home screen will display. 1) To practice different types of items in different grade bands, tap the “Practice” button located on the bottom left of the screen. 2) To start the test, tap the “Start” button located on the bottom right of the screen. 3) To see testing and/or upload status, tap on the “Upload Status” link the center bottom of the screen.
  • 7. 6 c. Select the “Home” button, located on the bottom left of the screen, to return to the TELL home screen from any of these three options. 2. Test Login a. TELL ID and Test Code 1) To access a test, enter in the Test Code by tapping in the first textbox. See TELL Test Administration Guide- section 2.1 for specific Test Codes. 2) Enter in the TELL ID by tapping in the second textbox. See TELL Test Administration Guide- section 2.1 for specific TELL IDs. 3) Finally, tap the “Sign In” button to begin the test.
  • 8. 7 b. Adjusting the Volume 1) To adjust the application’s volume, slide the volume controller right to raise the volume level, or left to decrease it. The slider must be adjusted to advance beyond this screen. Ensure the volume is loud enough so as to clearly hear the instructions given throughout the test. 2) Once the volume level has been adjusted, tap the “Next” button to proceed. The “Next” button will enable once the volume slider has been touched. 3) If the volume slider is not touched or the volume is set to 0, the admin screen will display, and the student will need help to return to the test. The test administrator must enter in a passcode in order to proceed by tapping in the textbox. The Administration Passcode is 200314 and can also be found on the administrative roster. 4) Once the passcode has been entered, tap “Submit” to continue. 5) Tap the “Try Again” button, and then adjust the volume level until the music playing is at a comfortable level.
  • 9. 8 c. Adjusting the Microphone 1) To ensure the microphone is working, after the instructions specify, count aloud from 1 to 5. Green lights indicate speaking at an appropriate level, while yellow or red mean you are speaking too loudly. If there are no lights next to the microphone, the microphone may be disabled. Please refer to iPad Basics- section 4 in this user guide to enable the microphone. 2) Once the microphone detects your voice, the “Next” button will be enabled. Tap the “Next” button to proceed. 3) If you do not speak loud enough or your microphone is not working, the admin screen will display along with a message asking if TELL can access your microphone. You need to ask for help. 4) The teacher or administrator must select OK, allowing TELL to access your microphone. 5) Next the teacher or administrator must enter in a passcode in order to proceed by tapping in the textbox. The Administration Passcode is 200314 and can also be found on the administrative roster. 6) Tap the “Submit” button to continue.
  • 10. 9 7) Tap the “Try Again” button to exit the admin screen; then make sure to count aloud from 1-5 at an appropriate level, so the microphone detects your voice and microphone indicator shows green lights. 3. Taking practice items a. It is recommended, prior to starting the TELL test with students, that both administrator and students familiarize themselves with TELL test item types via the practice section from the home page. b. To practice taking TELL items, tap the “Practice” button located on the bottom left of the screen.
  • 11. 10 c. Select the preferred grade-band to begin the practice test. d. Once in the selected grade-band, choose the question type to practice. e. Tap the “Back” button to return to the previous page and select another grade’s practice items. f. Tap the “Home” button to return to the TELL home screen.
  • 12. 11 4. Checking Test Progress and Upload Status Check the completion status of tests taken on a particular iPad, and confirm test data has been sent back to Pearson, via the “Upload Status” button located at the bottom of the home screen. Once each student completes the TELL test, the test data will automatically be uploaded back to Pearson as long as a wireless connection is maintained. After tapping “Upload Status”, administrators are brought to a screen where they can view different status information for TELL tests taken on the iPad. A “Completed” status indicates that the test data upload to Pearson was successful. Completed tests will be removed from the list after 7 days. If you noticed that the test status does not change to “Completed” after a few hours, please confirm the iPad has a wireless connection and leave the application running from the home screen to resume upload progress. Please note Read-Only login codes will not register on this screen. 5. Admin Screens During test administration, the admin screen will display if the application is paused for more than 30 seconds or paused more than 4 times.
  • 13. 12 1) The teacher or administrator must enter in a passcode in order to proceed by tapping in the textbox. The Administration Passcode is 200314 and can also be found on the administrative roster. 2) Tap the “Submit” button to continue.
  • 14. 13 3) Tap the “Resume” button if you would like to start the test exactly where it was paused. 4) Tap the “Start New” button if you would like to start a new test. Selecting this button will bring you back to the test Log In screen. The test progress will be saved and the user can resume the previous test only on the same iPad using original login credentials. 5) Select a reason that the test was paused. The reason selected here will not be reported with test scores, this data will be used to improve general test functionality.
  • 15. 14 iPad Basics 1. Turn iPad On/Off Turn iPad on. Hold down the Sleep/Wake button until the Apple logo appears. Turn iPad off. Hold down the Sleep/Wake button for a few seconds until the ‘Slide to power off’ slider appears onscreen, and then drag the slider to the right. Click the link to watch a video on how to turn an iPad on/off or type the following link into an internet browser: http://youtu.be/WWGdFVVLUEY 2. Using the iPad’s Home button Within this User Guide, we often refer to the iPad’s “home button” (see above picture). The “home button” can be used for pausing the TELL application and returning to the iPad’s home screen. You can also double click the “home button” to display recently used apps. Swipe left or right to find the TELL application and quickly return to the same spot you left off. See Navigating the TELL App- Section 5 if the Administrative Screen is displaying on the application and you are unsure how to proceed. 3. Adjust Volume Levels and Turn Side Switch On/Off During test administration, the volume should be adjusted via the slider bar within the application (see Navigating the TELL App- Section 2a). If you are still experiencing difficulties hearing sound during the test administration, you may need to check the side switch and/or headset volume control are in the proper place. ● The side switch is used to silence audio alerts and notifications. Make sure the Side Switch does not display a red dot (indicating it is not silenced). ● The headset’s volume control has been covered to prevent tampering. Please remove the tape on the volume control and make sure the volume knob has been
  • 16. 15 turned up to maximum level, then adjust for loudness via the volume slider in the app. Please reseal the volume control to prevent future tampering. ● The volume buttons on the side of the iPad can be used to adjust the volume of the application, songs, other media, alerts and sound effects. ● If you are using headsets and there is still no sound, make sure the headsets are plugged in all the way. 4. Connecting to Wi-Fi If the wireless symbol appears at the top of the screen, you’re connected to a Wi-Fi network. The iPad will reconnect anytime you return to the same location. Click the link to watch a video on how to connect your iPad to the Wi-Fi network or type the following link into an internet browser: http://youtu.be/pxyvca7dGp4 Join a Wi-Fi network or adjust Wi-Fi settings. Go to Settings>Wi-Fi. 1. Choose a network: Tap one of the listed networks, then enter the password, if asked. 2. Ask to join networks: Turn on “Ask to Join Networks” to be prompted when a Wi-Fi network is available. Otherwise, you must manually join a network when a previously used network isn’t available. 3. Forget a network: Tap next to a network you’ve joined before, then tap “Forget this Network”. 4. Join other network: Tap “Other”, then enter the name of the network. You need to know the network name, security type, and password.
  • 17. 16 5. Turn Microphone On The microphone on the iPads should already be turned on when they arrive. If the microphone is turned off, you will need to enable by following these steps: ● Tap “Settings” from the Home Screen. ● Tap “Privacy” on the left-half of the main Settings screen. ● Then select “Microphone” ● Make sure switch is set to “On”, which is represented by the color green 6. Charge and Monitor the Battery Charge the battery: The best way to charge the iPad battery is to connect iPad to a power outlet using the included cable and USB power adapter. An iPad may also charge slowly when you connect it to a USB 2.0 port on your computer. If your Mac or PC doesn’t provide enough power to charge iPad, a “Not Charging” message will appear in the menu status bar.
  • 18. 17 Important: The iPad battery will not charge if the iPad is connected to a computer that is in sleep/standby mode or turned off. The iPad will not charge if connected to a USB port on a keyboard. It is strongly recommended to charge iPads via a power outlet. The battery icon in the upper-right corner of the status bar shows the battery level or charging status. To display the percentage of battery charge: Go to Settings > General > Usage, then turn on “Battery Percentage”. 7. Status Icons The icons in the status bar at the top of the screen give information about iPad: Status Icons What it means Wi-Fi iPad has a Wi-Fi Internet Connection. The more bars, the stronger the connection Cell signal iPad (Wi-Fi + Cellular models) is in range of the cellular network. If there’s no signal, “No service” appears. Airplane Mode Airplane mode is on—you can’t access the internet, or use Bluetooth devices. Non-wireless features are available. LTE iPad (Wi-Fi + Cellular models) is connected to the Internet over a 4G LTE network. 4G iPad (Wi-Fi + Cellular models) is connected to the Internet over a 4G LTE network. 3G iPad (Wi-Fi + Cellular models) is connected to the Internet over a 3G LTE network. Do Not Disturb Do Not Disturb is turned on. Alarm An alarm is set. Lock iPad is locked. Battery Battery level or charging status. To ensure successful testing: Please make sure your iPad does not have “Airplane Mode” or “Do Not Disturb” mode turned on. Go to “Settings” to make sure each of these features are turned off.
  • 19. 18 8. Turn Off Multitasking on iPad Multitasking gestures will be disabled on the iPads. If this is enabled, you will need to disable the feature following these steps: ● Tap “Settings” from the Home Screen ● Tap “General” on the left-half of the main Settings screen ● The Multitasking Gestures feature is located on the right-half of the main Settings screen ● Make sure switch is set to off, which is represented by the white color
  • 20. 19 9. Launching App The TELL app and a link to electronic copies of field test materials, are on the iPad Home screen. To administer the TELL test you should not need to access any other iPad apps. In the event that it is necessary to open other apps, please follow the steps below: 1. Start at home screen and tap an app to open it. 2. Press the Home button anytime to return to the Home screen. Swipe left or right to see other screens. 10. Restart iPad To restart the iPad, press and hold the sleep/wake button until a slider appears on the screen that says “Slide to power off”. After the iPad has shut down, press and hold the sleep/wake button until the Apple logo appears. Thank You!