More Related Content
Similar to feedable pet workshop 1 _ Evernote Web
Similar to feedable pet workshop 1 _ Evernote Web (9)
feedable pet workshop 1 _ Evernote Web
- 3. 10/5/2016 feedable pet workshop 1 | Evernote Web
https://www.evernote.com/Home.action#n=de619b3f3d694a958dc65a885a4d31ba&t=345ec54562534dfda983209117cb2355&ses=4&sh=3&sds=5& 3/3
Distance sensor
Beam (made out of cardboard, doublelayered)
Makedo's
Hot Glue Gun
Xacto Knife w/ cutting mat
Ruler
Bracket to connect with Motor
Dowel
Small platform to support the dowel
(2x) Black Circular Discs that connect to the motor and beam
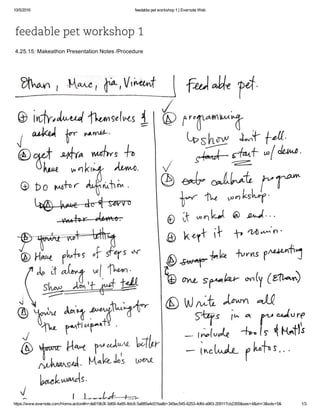
Procedure:
1. Glue the "cross" shaped cardboard together to form the box shape for the Pig's head; there should be one side
that is open, while the others have walls.
2. Glue the rectangular cardboard piece together; this becomes the nose.
3. Piece these two parts together to form the basic outline of the Pig's head and nose.
4. Cut a slit below the nose; this is where the user/interactors will insert the food to make the pet "feed." (dimensions:
1 1/2''x 1/8'')
5. Now, tape the distance sensor underneath and against the wall of where the food will enter via the slit.
6. To form the interaction, the ears will be moving when the distance sensor is triggered.
7. Using the bracket, tape it around the DC Motor. Then glue it on the upper left/right hand side of the Pig's head.
8. Create the doweldisc system by hot gluing the pieces together, then support it by gluing the platform on the
"ceiling" of the Pig's head. Then glue part of the dowel to the platform.
9. Add the other disc to the DC motor if it isn't already attached.
10. Now, use makedo's to connect the beam, ears, and disc together; when the motor rotates, it will move the entire
system.