SlideShare a Scribd company logo
1 of 2
Download to read offline
MADE IN SPAIN
FABRICADO POR:
Arttros 2040 S.L.
Pol. Ind. La Granja · C/ Naval, parcela 8
31230 Viana (Navarra)
Tel. 0034/ 948 446 941
Fax 0034/ 948 446 943
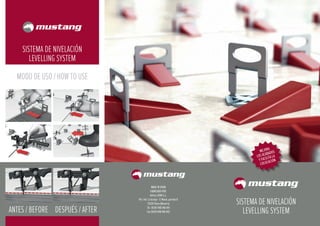
SISTEMA DE NIVELACIÓN
LEVELLING SYSTEM
MODO DE USO / HOW TO USE
MEJORA
LOS ACABADOS
Y FACILITA LA
COLOCACIÓN
ANTES / BEFORE DESPUÉS / AFTER
SISTEMA DE NIVELACIÓN
LEVELLING SYSTEM
MODO DE USO
Colocación de la base:
1. Después de extender el cemento cola, colocar las bases debajo de las piezas en
los 4 lados.
2. Para piezas de gran tamaño usar uno o más bases por lado.
3. Colocar la baldosa y golpear con el mazo de goma.
Inserción de las cuñas:
1. Insertar las cuñas en el alojamiento apretando sin superar el punto de rotura.
2. Para facilitar esta tarea se aconseja el uso del Mustang tool.
Eliminación del soporte:
Una vez ha fraguado el cemento cola, para arrancar la base basta con golpear con el
mazo de goma o con la punta del pie en la dirección de la junta.
Ancho mínimo de la junta: 0.9 mm.
ESPESOR DE LAS PIEZAS CERÁMICAS: MÍNIMO 3 MM. / MÁX 20 MM.
ES
HOW TO USE
How to set the base:
1. After having spread the adhesive, insert the base underneath the tiles and along
the 4 sides.
2. According wiyh tile size, set one or more base on every side of the tile.
3. Set the tile and beat it with a rubber mallet.
How to insert the wedge:
1. Insert de wedge in the base slot paying attention not to pass the breakpoint.
2. To facilitate this operation, the use of the Mustang tool is recommendet.
How to remove the base:
Once the adhesive is set, the protruding part, has to be removed. This can be done
with a rubber mallet or even with feet. Beat parallel to the joint.
Minimun requiered joint: 0.9 mm (1/32”).
TILE THICKNESS: MIN. 3 MM (1/8”) / MAX. 20 MM (3/4”).
MODE D´EMPLOI
Comment positionner la base:
1. Après avoir étendu la colle, insére la base au dessous des carreuax (un par côté).
2. En fonction du format du carreau, positionner un ou pluisieurs supports pour
chaque côté du carreau.
3. Positionner le carreau et le taper avec un maillet.
Comment insére le coin:
1. Insére le coin dans la fente de la base en veillant à ne pas dèpasser le poin de
rupture.
2. Pour faciliter l’insertion du coin, nous vous conseillons l’usage du Mustang tool.
Comment enlever la base:
Lorsque la colle est séche, la partie haute de la base se sépare dans la direction de la
ligne du joint, avec un maillet ou avec le pie.
Largeur minimale du joint: 0,9 mm.
ÉPAISSEUR CARREAUX: 3 MM MIN. / 20 MM MAX.
FR
ANWENDUNG
So funktioniert’s:
1. Nachdem Sie den Kleber augetragen haben, legen Sie die Basis/Clips unter alle 4
Seiten der Fliesen.
2. Verwenden si je nach Plattenformat eine oder mehrere Basis pro Seite.
So setzten Sie den Keil ein:
1. Setzen Sie den Keil in die Basis. Beachten Sie, dass der Bruchpunkt nicht
überschritten wird.
2. Um diesen Vorgang zu erleichtern empfehlen wir die Verwendung des Mustang tool.
So entfernen Sie die Verlegehilfe:
Sobald der Klebstoff abgebunden hat, können Sie den Vorstehenden Teil der Basis
mit einem Schlag mit dem Schuh oder dem Gummihammer entfernen. Zu beachten
ist, dass Sie parallel zu Fuge schlagen.
Die Fugen müssen mindestens: 0.9 mm dick sein.
DIE PLATTENSTÄRKE MUSS ZWISCHEN: 3 UND / 20 MM LIEGEN.
DE
ИНСТРУКЦИЯ ПО ПРИМЕНЕНИЮ
Как надеть скрепитель:
1. После нанесения клея необходимо вставить скрепители по всем сторонам
плитки.
2. В зависимости от величины плитки наденьте один или более скрепители на
каждую сторону.
3. Положите плитку и выровняйте ее резиновым молотком.
Как надеть клин:
1. Осторожно вложите клин в отверстие скрепителя таким образом, чтобы не
сломать его.
2. Для упрощения этого действия желательно использовать специальный зажим.
Как удалить скрепитель:
1. После приклеивания плитки выступающую часть скрепителя необходимо
удалить. Для этого следует наносить удары параллельно шву.
доска: 0,9 мм.
ТОЛЩИНА ПЛИТКИ: ОТ 3 ММ ДО 20 ММ
RU
COME SI USA
Posizionamento della base:
1. Dopo avere steso l’adesivo inserire la base al di sotto della piastrelle in
corrispondenza dei 4 lati.
2. In Funzione del formato della piastrella posizionare uno più base per ogni lato
della piastrella.
3. Posizionare la piastrella e batterla con martello in gomma.
Inserimiento del cuneo:
1. Inserire il cuneo nella feritoia de la base facendo attenzione a non superare il
punto di rottura.
2. Per agevolare l’inserimento del cuneo si consiglia l’uso di Mustang tool.
Eliminazione della base:
A maturazione dell’adesivo avvenuta, la parte sporgente del supporto si separa dalla
base battendo, nella direzione della linea di fuga, con un martello in gomma o col piede.
Larghezza minima giunto/fuga: 0.9 mm.
SPESSORE PIASTRELLA: MIN. 3 MM / MAX 20 MM.
IT
42 28 21 17 17 15 13 11 10 8 7 6 7 6
10 15 20 25 30 33 40 45 50 60 80 90 100 120 Y cm
50 33 25 20 20 18 15 13 12 10 9 8 8
44 30 22 18 19 17 14 12 11 9 8 7
50 33 25 20 21 19 16 14 12 10 9
50 33 25 20 22 20 17 15 13 11
60 40 30 24 27 24 20 18 16
67 44 33 27 30 27 22 20
75 50 37 30 33 30 25
91 61 45 36 40 37
100 67 50 40 44
80 53 40 32
100 67 50
133 89
200
120
100
90
80
60
50
45
40
33
30
25
20
15
10
X cm
Piezas m²
X (60 cm) Y (80 cm) = 10 Piezas m²
X Y
Tabla para el cálculo de piezas necesarias
GB
BASE CUÑA / WEDGE
MUSTANG TOOL
MIN.
3 MM (1/8”)
MAX.
20 MM (3/4”)

More Related Content

Viewers also liked

Cómo funciona e a e
Cómo funciona e a eCómo funciona e a e
Cómo funciona e a emeuamigo
 
Le Conseil d'Etat rejette les recours contre la réforme des collèges
Le Conseil d'Etat rejette les recours contre la réforme des collèges Le Conseil d'Etat rejette les recours contre la réforme des collèges
Le Conseil d'Etat rejette les recours contre la réforme des collèges blogVAP
 
Presentación stand sutega
Presentación stand sutegaPresentación stand sutega
Presentación stand sutegameuamigo
 
Meuble davos porte panneaux / Metal displays for sample boards
Meuble davos porte panneaux / Metal displays for sample boardsMeuble davos porte panneaux / Metal displays for sample boards
Meuble davos porte panneaux / Metal displays for sample boardsDavid Martinez Da Mart Export
 
Stand para Sutega
Stand para SutegaStand para Sutega
Stand para Sutegameuamigo
 
Metodología de la antropología
Metodología de la antropologíaMetodología de la antropología
Metodología de la antropologíarafayeomans
 
La lettre des associations bretonnes
La lettre des associations bretonnesLa lettre des associations bretonnes
La lettre des associations bretonnesblogVAP
 
Plataforma A cidade dos barrios
Plataforma A cidade dos barrios Plataforma A cidade dos barrios
Plataforma A cidade dos barrios meuamigo
 
Bruno Leone, presidente de la Cámara Nacional de Pesquería
Bruno Leone, presidente de la Cámara Nacional de PesqueríaBruno Leone, presidente de la Cámara Nacional de Pesquería
Bruno Leone, presidente de la Cámara Nacional de PesqueríaESPAE
 
Communiqué CREO Lengadòc
Communiqué CREO LengadòcCommuniqué CREO Lengadòc
Communiqué CREO LengadòcBenaset Roux
 
Biometric Fingerprint Recognintion based on Minutiae Matching
Biometric Fingerprint Recognintion based on Minutiae MatchingBiometric Fingerprint Recognintion based on Minutiae Matching
Biometric Fingerprint Recognintion based on Minutiae MatchingNabila mahjabin
 
Presentación eae
Presentación eaePresentación eae
Presentación eaemeuamigo
 
İdrar Retansiyonu Sunum
İdrar Retansiyonu Sunumİdrar Retansiyonu Sunum
İdrar Retansiyonu Sunumnandacepte.org
 

Viewers also liked (15)

Cómo funciona e a e
Cómo funciona e a eCómo funciona e a e
Cómo funciona e a e
 
Le Conseil d'Etat rejette les recours contre la réforme des collèges
Le Conseil d'Etat rejette les recours contre la réforme des collèges Le Conseil d'Etat rejette les recours contre la réforme des collèges
Le Conseil d'Etat rejette les recours contre la réforme des collèges
 
Presentación stand sutega
Presentación stand sutegaPresentación stand sutega
Presentación stand sutega
 
Présentation adwizmi commerce_associe
Présentation adwizmi commerce_associePrésentation adwizmi commerce_associe
Présentation adwizmi commerce_associe
 
Meuble davos porte panneaux / Metal displays for sample boards
Meuble davos porte panneaux / Metal displays for sample boardsMeuble davos porte panneaux / Metal displays for sample boards
Meuble davos porte panneaux / Metal displays for sample boards
 
Stand para Sutega
Stand para SutegaStand para Sutega
Stand para Sutega
 
Metodología de la antropología
Metodología de la antropologíaMetodología de la antropología
Metodología de la antropología
 
La lettre des associations bretonnes
La lettre des associations bretonnesLa lettre des associations bretonnes
La lettre des associations bretonnes
 
Plataforma A cidade dos barrios
Plataforma A cidade dos barrios Plataforma A cidade dos barrios
Plataforma A cidade dos barrios
 
Bruno Leone, presidente de la Cámara Nacional de Pesquería
Bruno Leone, presidente de la Cámara Nacional de PesqueríaBruno Leone, presidente de la Cámara Nacional de Pesquería
Bruno Leone, presidente de la Cámara Nacional de Pesquería
 
Communiqué CREO Lengadòc
Communiqué CREO LengadòcCommuniqué CREO Lengadòc
Communiqué CREO Lengadòc
 
Biometric Fingerprint Recognintion based on Minutiae Matching
Biometric Fingerprint Recognintion based on Minutiae MatchingBiometric Fingerprint Recognintion based on Minutiae Matching
Biometric Fingerprint Recognintion based on Minutiae Matching
 
Presentación eae
Presentación eaePresentación eae
Presentación eae
 
İdrar Retansiyonu Sunum
İdrar Retansiyonu Sunumİdrar Retansiyonu Sunum
İdrar Retansiyonu Sunum
 
Hipotermi
HipotermiHipotermi
Hipotermi
 

Mustang

  • 1. MADE IN SPAIN FABRICADO POR: Arttros 2040 S.L. Pol. Ind. La Granja · C/ Naval, parcela 8 31230 Viana (Navarra) Tel. 0034/ 948 446 941 Fax 0034/ 948 446 943 SISTEMA DE NIVELACIÓN LEVELLING SYSTEM MODO DE USO / HOW TO USE MEJORA LOS ACABADOS Y FACILITA LA COLOCACIÓN ANTES / BEFORE DESPUÉS / AFTER SISTEMA DE NIVELACIÓN LEVELLING SYSTEM
  • 2. MODO DE USO Colocación de la base: 1. Después de extender el cemento cola, colocar las bases debajo de las piezas en los 4 lados. 2. Para piezas de gran tamaño usar uno o más bases por lado. 3. Colocar la baldosa y golpear con el mazo de goma. Inserción de las cuñas: 1. Insertar las cuñas en el alojamiento apretando sin superar el punto de rotura. 2. Para facilitar esta tarea se aconseja el uso del Mustang tool. Eliminación del soporte: Una vez ha fraguado el cemento cola, para arrancar la base basta con golpear con el mazo de goma o con la punta del pie en la dirección de la junta. Ancho mínimo de la junta: 0.9 mm. ESPESOR DE LAS PIEZAS CERÁMICAS: MÍNIMO 3 MM. / MÁX 20 MM. ES HOW TO USE How to set the base: 1. After having spread the adhesive, insert the base underneath the tiles and along the 4 sides. 2. According wiyh tile size, set one or more base on every side of the tile. 3. Set the tile and beat it with a rubber mallet. How to insert the wedge: 1. Insert de wedge in the base slot paying attention not to pass the breakpoint. 2. To facilitate this operation, the use of the Mustang tool is recommendet. How to remove the base: Once the adhesive is set, the protruding part, has to be removed. This can be done with a rubber mallet or even with feet. Beat parallel to the joint. Minimun requiered joint: 0.9 mm (1/32”). TILE THICKNESS: MIN. 3 MM (1/8”) / MAX. 20 MM (3/4”). MODE D´EMPLOI Comment positionner la base: 1. Après avoir étendu la colle, insére la base au dessous des carreuax (un par côté). 2. En fonction du format du carreau, positionner un ou pluisieurs supports pour chaque côté du carreau. 3. Positionner le carreau et le taper avec un maillet. Comment insére le coin: 1. Insére le coin dans la fente de la base en veillant à ne pas dèpasser le poin de rupture. 2. Pour faciliter l’insertion du coin, nous vous conseillons l’usage du Mustang tool. Comment enlever la base: Lorsque la colle est séche, la partie haute de la base se sépare dans la direction de la ligne du joint, avec un maillet ou avec le pie. Largeur minimale du joint: 0,9 mm. ÉPAISSEUR CARREAUX: 3 MM MIN. / 20 MM MAX. FR ANWENDUNG So funktioniert’s: 1. Nachdem Sie den Kleber augetragen haben, legen Sie die Basis/Clips unter alle 4 Seiten der Fliesen. 2. Verwenden si je nach Plattenformat eine oder mehrere Basis pro Seite. So setzten Sie den Keil ein: 1. Setzen Sie den Keil in die Basis. Beachten Sie, dass der Bruchpunkt nicht überschritten wird. 2. Um diesen Vorgang zu erleichtern empfehlen wir die Verwendung des Mustang tool. So entfernen Sie die Verlegehilfe: Sobald der Klebstoff abgebunden hat, können Sie den Vorstehenden Teil der Basis mit einem Schlag mit dem Schuh oder dem Gummihammer entfernen. Zu beachten ist, dass Sie parallel zu Fuge schlagen. Die Fugen müssen mindestens: 0.9 mm dick sein. DIE PLATTENSTÄRKE MUSS ZWISCHEN: 3 UND / 20 MM LIEGEN. DE ИНСТРУКЦИЯ ПО ПРИМЕНЕНИЮ Как надеть скрепитель: 1. После нанесения клея необходимо вставить скрепители по всем сторонам плитки. 2. В зависимости от величины плитки наденьте один или более скрепители на каждую сторону. 3. Положите плитку и выровняйте ее резиновым молотком. Как надеть клин: 1. Осторожно вложите клин в отверстие скрепителя таким образом, чтобы не сломать его. 2. Для упрощения этого действия желательно использовать специальный зажим. Как удалить скрепитель: 1. После приклеивания плитки выступающую часть скрепителя необходимо удалить. Для этого следует наносить удары параллельно шву. доска: 0,9 мм. ТОЛЩИНА ПЛИТКИ: ОТ 3 ММ ДО 20 ММ RU COME SI USA Posizionamento della base: 1. Dopo avere steso l’adesivo inserire la base al di sotto della piastrelle in corrispondenza dei 4 lati. 2. In Funzione del formato della piastrella posizionare uno più base per ogni lato della piastrella. 3. Posizionare la piastrella e batterla con martello in gomma. Inserimiento del cuneo: 1. Inserire il cuneo nella feritoia de la base facendo attenzione a non superare il punto di rottura. 2. Per agevolare l’inserimento del cuneo si consiglia l’uso di Mustang tool. Eliminazione della base: A maturazione dell’adesivo avvenuta, la parte sporgente del supporto si separa dalla base battendo, nella direzione della linea di fuga, con un martello in gomma o col piede. Larghezza minima giunto/fuga: 0.9 mm. SPESSORE PIASTRELLA: MIN. 3 MM / MAX 20 MM. IT 42 28 21 17 17 15 13 11 10 8 7 6 7 6 10 15 20 25 30 33 40 45 50 60 80 90 100 120 Y cm 50 33 25 20 20 18 15 13 12 10 9 8 8 44 30 22 18 19 17 14 12 11 9 8 7 50 33 25 20 21 19 16 14 12 10 9 50 33 25 20 22 20 17 15 13 11 60 40 30 24 27 24 20 18 16 67 44 33 27 30 27 22 20 75 50 37 30 33 30 25 91 61 45 36 40 37 100 67 50 40 44 80 53 40 32 100 67 50 133 89 200 120 100 90 80 60 50 45 40 33 30 25 20 15 10 X cm Piezas m² X (60 cm) Y (80 cm) = 10 Piezas m² X Y Tabla para el cálculo de piezas necesarias GB BASE CUÑA / WEDGE MUSTANG TOOL MIN. 3 MM (1/8”) MAX. 20 MM (3/4”)