2. Contents
Intensity Operation Manual
08 How to Install 47 Helpful Information
How to Install on a Windows PC 9 Support 48
Installation Requirements for Windows 9 Which connections should I use for best quality video? 48
Installing Intensity Pro in your PCIe computer 9 USB 3.0 Frequently Asked Questions 50
Installing the Intensity Pro software for Windows 10 Uncompressed data rates for capture and playback 52
Before Connecting Intensity Shuttle via USB 3.0 11 Compressed data rates for capture and playback 53
Connecting Intensity Shuttle to your USB 3.0 computer 13 Troubleshooting 54
Installing the Intensity Shuttle software for Windows 14
How to Install on a Mac Pro 16 55 Connection Diagrams
Installation Requirements for Mac OS X 16
Intensity Shuttle: Component Analog Video Connections 56
Installing Intensity Pro in your Mac Pro 16
Intensity Shuttle: S-Video Analog Connections 57
Installing the Intensity software for Mac OS X 17
Intensity Shuttle: Composite Analog Video Connections 58
18 Software
Intensity Shuttle: Connecting to an HDMI HDTV
Intensity Shuttle: Video Workflow
59
60
Blackmagic Software 19 Intensity Pro: Component Analog Video Connections 61
Intensity Settings 19 Intensity Pro: S-Video Analog Connections 62
Blackmagic Media Express 22 Intensity Pro: Composite Analog Video Connections 63
Blackmagic Speed Disk (PC) 30 Intensity Pro: Connecting to an HDMI HDTV 64
Uncompressed Disk Arrays (PC) 30 Intensity Pro: Video Workflow 65
66
Blackmagic Speed Disk (Mac) 31
Disk Arrays (Mac) 31 Warranty
Third Party Applications / Windows 32 Warranty Terms and Conditions 67
Adobe Premiere Pro 32
Adobe After Effects 35
Adobe Photoshop 36
Sony Vegas Pro 9 37
Third Party Applications / Mac 38
Adobe Premiere Pro 38
Adobe After Effects 41
Adobe Photoshop 42
Adobe Final Cut Pro 43
3. 3 Welcome
Welcome to Intensity!
We hope you share our dream of making the video industry truly creative by allowing everyone access to
the highest quality video and sound. Intensity includes the same high quality video technology used in all
Blackmagic Design video products, so you won’t be limited creatively.
I have always felt that everyone should have the possibility of self-actualization through creative expression.
When you think about it, creativity, design and the arts are the true essence of humanity and is what makes
us unique as a species. Television is a wonderful creative medium because it overloads the senses with
exciting vision and sound, while being easy for viewers to experience.
Until now, the high quality video required for feature films, music videos, television commercials and
episodic television production required massive equipment costs. Unfortunately this turned the television
industry into an exclusive club. I think one of the most exciting things we have done at Blackmagic Design
is make the highest quality video available to all of us - so now your creative abilities can make you the
world’s best.
We are really excited about what you’ll do with your new Intensity!
The instruction manual you’re reading now contains all the information you’ll need for installing your
Intensity, plus extra instructions on using it as a powerful HDMI based editing, design and effects solution.
Please take the time to check it out as there are lots of tips and tricks to help you.
Before you install Intensity, please visit our support page at www.blackmagic-design.com to download the
latest updates to this instruction manual and Intensity driver software. We have more helpful tech notes on
our support page, and you might find a newer version of the software and manual than was included on
the CD with your Intensity package.
Lastly, please register your Intensity serial number with us, when you download the latest Intensity driver
software, so we can keep you updated when new software is released.
Perhaps you can even send us your latest “show reel” of work completed on your Intensity and any ideas
for changes to the Intensity software. We are constantly working on new features and improvements, so we
would really love to hear from you!
Grant Petty
CEO Blackmagic Design
4. 4 Welcome
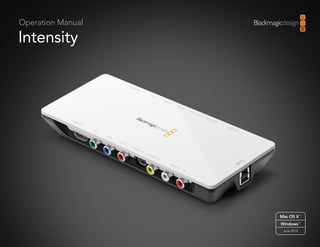
Intensity Shuttle
HDMI
Component analog video
S-Video
Composite analog video
Left & Right
analog audio USB 3.0
5. 5 Welcome
Intensity Pro
3. R-Y Out 3
Analog video output 4. Y Out 4
5. B-Y Out 5
7. R-Y In 7
Analog video input 8. Y In 8 Intensity Pro
Breakout Cable
9. B-Y In 9
Digital audio output 10. AES/SPDIF Out 10
HDMI 4:2:2 Output
12. Audio Out Left 12
HDMI 4:2:2 Input
Analog audio output
13. Audio Out Right 13
14. Audio In Left 14
Analog audio input
15. Audio In Right 15
6. 6 Welcome
Introducing Intensity
Intensity features the latest HDMI and analog technology for the highest quality capture and playback
on Mac OS X or Windows computers. Now you can edit using big-screen HDMI televisions and video
projectors, or capture uncompressed quality directly from AVCHD and HDV cameras.
True HDMI digital connections
Intensity features HDMI input for connecting cameras and digital set-top boxes for the highest quality
uncompressed capture. Get the highest quality capture possible from AVCHD and HDV cameras
by capturing from the camera’s image sensor and bypassing the compression chip. Because edit
Intensity Shuttle
software cannot play back to AVCHD and HDV cameras for monitoring, Intensity is ideal for monitoring
uncompressed HD, or AVCHD, HDV and even DV edits on big screen televisions and video projectors.
Analog connections
Intensity includes analog video and audio connections for capture and playback from analog equipment.
Capture from VHS or DVD players via the composite input, or use analog Y,Cr,Cb for capture in high
quality component video in SD or HD. Featuring analog audio, Intensity can connect to VHS and
S-Video decks, DVD players, set top boxes, AVCHD cameras and many more. Now you can play back
to televisions and monitors in composite, S-Video, component analog or HDMI.
Go beyond HDV video quality
HDV video compression suffers from not being full 1920 HD resolution, with the extra processing required
Intensity Pro PCI Express card making editing difficult. Now you can capture and play back full resolution HDTV uncompressed video for
true broadcast and feature film quality editing, totally eliminating HDV & DV compression quality problems.
Professional video standards
Intensity Pro will instantly switch between HD and SD video standards including HDTV 1080i/50,
1080i/59.94, 1080p/23.98, 1080p/24, 720p/50, 720p/59.94, NTSC and PAL. Intensity Shuttle also
instantly switches between HD and SD video standards and has extra formats including HDTV 1080i/50,
1080i/59.94, 1080i/60, 1080p/23.98, 1080p/24, 1080p/25, 1080p/29.97, 1080p/30, 720p/50, 720p/59.94,
720p/60, NTSC and PAL. Intensity allows capture in professional file formats which are fully compatible
with Blackmagic Design’s DeckLink, Multibridge and UltraStudio capture products.
Intensity Pro breakout cable
7. 7 Welcome
Compatible with all video software
Compatible with QuickTime™ and DirectShow™, Intensity can use a wide range of video software for
video capture and playback in either standard definition or high definition 4:2:2. Use Blackmagic Media
Express to capture and play back your clips without having to buy anything more. Use Final Cut Studio™
or Adobe Premiere Pro® on Mac OS X™, or Premiere Pro® and Sony Vegas Pro 9 on Windows™ for
editing and then combine Adobe After Effects® and Photoshop® for broadcast design and paint. Then
finish your job by using DVD authoring software to give your clients a DVD.
Copy protected video
HDMI video sources may output copy protected video. By law Intensity is not allowed to capture from
copy protected HDMI sources, such as HDCP encrypted video and DVD players.
9. 9 How to install Intensity Pro on a Windows PC
Installation Requirements for Windows
Your new Intensity includes video capture hardware and a software package containing the Blackmagic
driver, Blackmagic codecs, Blackmagic Media Express application and presets and plug-ins for popular
video applications. It does not matter in which order the hardware and software are installed.
Intensity Pro hardware is a x1 lane PCI Express card and should work in any x1, x4, x8 or x16 lane PCI
Express slot, whereas Intensity Shuttle hardware connects via USB 3.0. Older computers only have USB
2.0 ports and it is essential that Intensity Shuttle directly connects to a dedicated USB 3.0 port.
Please see the support pages at www.blackmagic-design.com/support for a comprehensive list of the
latest, minimum system requirements for Windows.
Installing Intensity Pro in your PCIe computer
1. Shut down and remove the power plug from the back of your computer. This is a safety precaution
before opening your computer. Ensure that you are statically discharged by using a static strap.
2. Remove the side cover of your computer to gain access to the PCI Express slots.
3. Remove your Intensity Pro card from the protective static bag making sure you don’t touch the
gold connectors on the base of the card.
4. Find a spare PCI Express slot within the computer, any slot will do. Intensity Pro is a PCI Express
1 lane card and is compatible with 1, 4, 8 and 16 lane PCIe slots. Remove the metal port access
cover and it’s screw from the back of your computer.
5. Insert your Intensity Pro PCI Express card and ensure it clicks firmly into place.
6. Secure the card with a screw and replace the side cover of your computer.
7. Connect the breakout cable to Intensity Pro.
Intensity Pro PCI Express card
8. Connect HDMI devices, such as an AVCHD camera to Intensity Pro’s HDMI input.
9. Connect HDMI compatible large screen televisions or projectors to the HDMI output.
Note: This is also a great time to install disk arrays and extra memory into your computer.
10. 10 How to install Intensity Pro on a Windows PC
Installing the Intensity Pro software for Windows
Contents
The Intensity software installer will install the following components for your Intensity Pro:
‚ Blackmagic Intensity drivers
‚ Blackmagic Control Panel
‚ Blackmagic Media Express application for capture and playback
‚ Blackmagic AVI and QuickTime™ codecs
‚ Blackmagic Disk Speed Test
‚ Adobe® presets and plug-ins
Note: Before installing any software or hardware you will need administrator privileges. Make sure that
your applications such as Adobe Premiere Pro™ and Apple QuickTime™ are installed before running the
Intensity installer.
Intensity Setup Wizard
Intensity software
1. The CD supplied with Intensity contains the Intensity software. Before you install, ensure you have
the very latest driver. Visit www.blackmagic-design.com/support
2. Open the “Intensity Installer” folder and launch the “Intensity Installer” application.
3. The drivers will now be installed on your system. A warning will appear that “Windows
can’t verify the publisher of this driver software” or about “logo certification” .
Click Continue Anyway to ignore this warning.
4. On Windows XP (only) you will see a dialog bubble saying “found new hardware” and the hardware
Restart your PC! wizard will appear. Select “install automatically” and the system will find the required Intensity
drivers. You will then receive another dialog bubble saying “your new hardware is ready for use.”
5. Now restart your machine to enable the new software drivers.
Automatic firmware updating
After your computer has restarted, the software will check the Intensity hardware to see what firmware
the hardware contains. If the firmware version does not match the software version, Intensity will offer
to update the firmware. This is automatic and all you need to do is click OK to start the update. After the
firmware has updated, restart your computer to complete the process.
Programmable firmware can provide new features, compatibility with new hardware and support for
new formats.
11. 11 How to install Intensity Shuttle on a Windows PC
Before Connecting Intensity Shuttle to your USB 3.0 computer
IMPORTANT INFORMATION
If your computer uses the NEC chip for its USB 3.0 connection, then you might need to update its
software driver before you install your Blackmagic Design USB 3.0 product.
USB 3.0 is a new technology, so it requires the latest version of the NEC software drivers to enable the
high speed performance required for high definition video capture and playback.
Please follow the instructions to check if your computer has the NEC USB 3.0 chip, and if its software
driver needs updating.
Check your Computer
The first step is to check your computer to see if it uses the NEC chip and if the software needs
updating. This can also apply to plug in USB 3.0 cards that use the NEC USB 3.0 chip as well.
To check the firmware and driver versions installed on your computer, you will need to run the
Renesas Electronics USB 3.0 Host Controller Utility.
If your computer has the NEC chip, then this utility will already be installed on your computer.
Checking the NEC driver and firmware on your computer. Go to the Start/Programs menu on your desktop, then click All Programs/Renesas
Electronics and then USB 3.0 Host Controller Utility.
Once you run this, it will indicate your current driver and firmware version. You will need to have
firmware version 3.0.2.5, and driver version 2.0.4.0, or higher. If not, you will need to download and
update both the firmware and the driver, as described in Step 2.
2 Download the Updates
If you need to update your NEC driver and firmware, then the next step is to download the
software and install it on your computer. The NEC USB 3.0 driver and firmware packages can be
downloaded from the following website www.station-drivers.com/page/nec.htm. Double-click
the downloaded files to extract the installers to your preferred directory.
12. 12 How to install Intensity Shuttle on a Windows PC
3 Install the Updates
Now you have downloaded the correct updates for your computer’s NEC USB 3.0 chip, the next
step is to install them onto your computer.
• Before you install the software driver, disconnect all USB 3.0 devices from your computer
• Run the 32 or 64 bit software driver installer as appropriate for your version of Windows.
The installer is named RENESAS-USB3-Host-Driver-2040-setup.
• After installing the drivers, navigate to the Firmware folder, which was previously
extracted, and run the firmware update utility named F302508FWUP1. Your machine will
require a reboot after the update.
• Verify that the driver and firmware updates have been successful by running the USB 3.0
Host Controller Utility again as in Step 1.
Update your USB 3.0 Firmware
13. 13 How to install Intensity Shuttle on a Windows PC
Connecting Intensity Shuttle to your USB 3.0 computer
Use the SuperSpeed USB 3.0 cable to connect Intensity Shuttle directly to a dedicated USB 3.0 port on your
compatible computer.
If Intensity Shuttle software has previously been installed and offers to update the firmware,
click Update to run the update. When the firmware update is finished, follow the onscreen prompt to
restart the computer.
Intensity Shuttle is now ready for use. The connection diagrams toward the end of this manual show how to
connect Intensity Shuttle to video equipment.
Connect the SuperSpeed USB 3.0 cable to Intensity Shuttle and to your computer.
14. 14 How to install Intensity Shuttle on a Windows PC
Installing the Intensity Shuttle software for Windows
Contents
The Blackmagic USB 3.0 Desktop Video Installer will install the following components for your Intensity
Shuttle:
‚ Blackmagic Intensity drivers
‚ Blackmagic Control Panel
‚ Blackmagic Media Express application for capture and playback
‚ Blackmagic AVI and QuickTime™ codecs
‚ Blackmagic Disk Speed Test
‚ Adobe® presets and plug-ins
Note: Before installing any software or hardware you will need administrator privileges. Make sure that
your applications such as Adobe Premiere Pro™ and Apple QuickTime™ are installed before running the
Blackmagic USB 3.0 Desktop Video Setup Wizard Intensity installer.
Intensity software
1. The CD supplied with Intensity Shuttle contains the Blackmagic USB 3.0 Desktop Video Installer.
Before you install, ensure you have the very latest driver. Visit www.blackmagic-design.com/support
2. Open the “USB 3.0 Desktop Video Installer” folder and launch the “USB 3.0 Desktop Video
Installer” application.
3. The drivers will now be installed on your system. A warning will appear that “Windows
can’t verify the publisher of this driver software” or about “logo certification” .
Click Continue Anyway to ignore this warning.
4. On Windows XP (only) you will see a dialog bubble saying “found new hardware” and the hardware
Restart your PC! wizard will appear. Select “install automatically” and the system will find the required Intensity
drivers. You will then receive another dialog bubble saying “your new hardware is ready for use.”
5. Now restart your machine to enable the new software drivers.
15. 15 How to install Intensity Shuttle on a Windows PC
Installing the Intensity Shuttle software for Windows
Automatic firmware updating
After your computer has restarted, the software will check the Intensity hardware to see what firmware
the hardware contains. If the firmware version does not match the software version, Intensity will offer
to update the firmware. This is automatic and all you need to do is click OK to start the update. After the
firmware has updated, restart your computer to complete the process.
Programmable firmware can provide new features, compatibility with new hardware and support for
new formats.
16. 16 How to install Intensity Pro on a Mac Pro
Installation Requirements for Mac OS X
Your new Intensity Pro includes video capture hardware and a software package containing the
Blackmagic driver, Blackmagic codecs, Blackmagic Media Express application and presets and plug-
ins for popular video applications. It does not matter in which order the hardware and software are
installed.
Intensity Pro hardware is a x1 lane PCI Express card and should work in any PCI Express slot in a Mac Pro.
Please see the support pages at www.blackmagic-design.com for a comprehensive list of the latest,
minimum system requirements for Mac OS X.
Installing Intensity Pro in your Mac Pro
1. Shut down and remove the power plug from the back of your Mac Pro. This is a safety precaution
before opening your computer. Ensure that you are statically discharged by using a static strap.
2. Remove the side cover of your Mac Pro to gain access to the PCI Express slots.
3. Unscrew the captive screws in the PCI bracket and remove the bracket.
4. Remove your Intensity Pro card from the protective static bag making sure you don’t touch the
gold connectors on the base of the card.
5. Find a spare PCI Express slot within the Mac Pro, any slot will do. Intensity Pro is a PCI Express
1 lane card and is compatible with 1, 4, 8 and 16 lane PCIe slots. Remove the port access cover
from the slot in which you plan to install the card.
6. Insert your Intensity Pro PCI Express card and ensure it clicks firmly into place.
Intensity Pro PCI Express card
7. Replace the PCI bracket and tighten the captive screws to secure the card.
8. Replace the side cover of your Mac Pro.
9. Connect the breakout cable to Intensity Pro.
10. Connect HDMI devices, such as AVCHD cameras to Intensity Pro’s HDMI input.
11. Connect HDMI compatible large screen televisions or projectors to the HDMI output.
Note: This is also a great time to install disk arrays and extra memory into your computer.
17. 17 How to install Intensity Pro on a Mac Pro
Installing the Intensity Pro software for Mac OS X
Contents
The Intensity software installer will install the following components for your Intensity Pro:
‚ Blackmagic Intensity drivers
‚ Blackmagic System Preference
‚ Blackmagic Media Express application
‚ Blackmagic QuickTime™ codecs
‚ Blackmagic Disk Speed Test
‚ Adobe® presets and plug-ins
Intensity Installer components ‚ Apple Final Cut Pro™ Easy Setups, presets and enablers
Note: Before installing any software or hardware you will need administrator privileges. Make sure that
your applications such as Apple Final Cut Pro™ and Adobe Photoshop® are installed before running the
Intensity installer.
Intensity software
1. The CD supplied with Intensity contains the Intensity software. Before you install, ensure you have
the very latest driver. Visit www.blackmagic-design.com/support
2. Open the “Intensity Installer” folder and launch the “Intensity Installer” application.
3. Click Continue, Agree and Install buttons and the drivers will be installed on your system.
Follow install prompts
4. Now restart your machine to enable the new software drivers.
Automatic firmware updating
After your Mac has restarted, the software will check the Intensity hardware to see what firmware the
hardware contains. If the firmware version does not match the software version, Intensity will offer to update
the firmware. This is automatic and all you need to do is click OK to start the update. After the firmware has
updated, restart your Mac to complete the process.
Programmable firmware can provide new features, compatibility with new hardware and support for
new formats.
Restart your Mac!
19. 19 Blackmagic Software
Intensity Settings
Intensity settings control how video and audio is managed on the inputs and outputs of your Intensity.
Intensity settings are almost identical on Windows and Mac OS X.
On Windows XP, open the Control Panel and click “Switch to “Classic View” to reveal the Blackmagic
Control Panel. Open the Blackmagic Control Panel to gain access to the Intensity settings.
On Windows Vista and Windows 7, open the Control Panel and click on “Hardware and Sound” to reveal
the Blackmagic Control Panel. Open the Blackmagic Control Panel to gain access to the Intensity settings.
On Mac OS X, open the System Preferences and look in the “Other” category to locate the Blackmagic
system preferences. Click the Blackmagic icon to gain access to the Intensity settings.
Blackmagic Control Panel on Windows 7
Blackmagic System Preferences on Mac OS X 10.6
20. 20 Blackmagic Software
Intensity Settings
Intensity video and audio output connections
All of the video and audio outputs of Intensity are active all of the time. This means that when you play
video through Intensity, it will be play out through all video and audio outputs simultaneously.
Intensity Pro uses shared connectors for analog video output and so one must choose between component
analog video, S-Video or composite NTSC/PAL analog video output. Intensity Pro also includes an AES/
SPDIF connector, which outputs 2 channel digital audio at 48 kHz, in addition to the analog audio output
connectors.
The HDMI and component analog video outputs support HD and SD video. S-Video and composite
analog video do not support high definition video and so you will not see video on these outputs when
working with HD video unless you switch on down conversion.
S-video is supported on both Intensity Shuttle and Intensity Pro but Intensity Pro requires the use of
an inexpensive S-video adapter cable. See the connection diagrams for S-video towards the end of
Intensity settings in Windows this manual.
Intensity video and audio input connections
Intensity supports the following combinations of video and audio on its inputs:
‚ HDMI Video & HDMI Audio
‚ HDMI Video & Analog RCA Audio
‚ Component Video & Analog RCA Audio.
‚ Composite (Y In) & Analog RCA Audio.
‚ S-Video & Analog RCA Audio
It is essential to select the correct inputs for your video and audio, otherwise you may see a blank screen
and hear no audio.
NTSC setup
The NTSC composite video used in the USA, and some other countries uses 7.5% setup. Setup is only
used in composite video and never in HDMI, component or S-Video. Your Intensity will handle adding and
removing setup from NTSC video automatically for you. The USA and countries that use 7.5% setup should
enable this setting; if you’re working in Japan and countries that don’t use this setup, leave this set to 0 IRE
Intensity settings in Mac OS X setup. The PAL and high definition standards do not use this setup.
21. 21 Blackmagic Software
Intensity Settings
Remove Filter Jitter
“Remove field jitter when video is paused” allows Intensity to display only a single field when paused, while
turning this mode off will display a complete frame in pause. Single field eliminates field flicker from paused
images and most people would choose to enable this setting.
If you’re doing work without interlaced video, such as animation, then you can turn this mode off
so you can see both fields in full resolution for best quality. Regardless of this setting, you always get the
correct full frame dual field output when in playback mode, as this setting only effects paused video.
HDTV Up/Down/Cross Conversion
The software drivers included with Intensity can be used to downconvert high definition video to NTSC or
PAL video in real time during capture or playback.
Cross conversion from HD 720p to HD 1080i can be enabled during playback.
Select Output Processing Up conversion from SD to HD can be performed during capture. If your project is in the HD 1080i format,
your SD video will upconvert to HD 1080i. If your project is in the HD 720p format, your SD video will
upconvert to HD 720p when an upconversion option is chosen.
Output Processing during playback
‚ HD to SD Letterbox
‚ HD to SD Anamorphic
‚ HD 720p to HD 1080i
Input Processing during capture
‚ 1080i HD to SD Letterbox 16:9
‚ 1080i HD to SD Anamorphic 16:9
‚ 720p HD to SD Letterbox 16:9
‚ 720p HD to SD Anamorphic 16:9
‚ SD Letterbox 16:9 to HD
‚ SD Anamorphic 16:9 to HD
Select Input Processing
22. 22 Welcome Media Express
Blackmagic
Welcome to Media Express 2.0
Blackmagic Media Express 2.0 is a sophisticated software application which enables UltraStudio, DeckLink,
Multibridge and Intensity users to capture, play back and preview video and audio via Blackmagic capture hardware.
Media Express 2.0 replaces all previous versions of Blackmagic Deck Control and Blackmagic Media Express.
We hope you love the new interface and features.
Media Express has an intuitive interface and requires a 1920 x 1200, or 1280 x 800, pixel computer display to
compliment its uncluttered appearance. The capture, playback and master views are color-coded so you will
know at a glance which mode is being used.
Media Express uses many of the same keyboard shortcuts which are standard in the video industry so there is
little to learn. Use j, k, l to shuttle backwards, pause and shuttle forwards.
Media Express can directly capture to, and play back from, DPX files or movie files.
Use the Grab Frame feature to capture still images during capture or playback. Frame grabs are saved in the
targa (.tga) graphic file format.
Blackmagic Media Express 2.0 is not NLE software and does not have a timeline. It is a great tool when you don’t
need the complexity of NLE software but simply want to capture and play back, especially when working with
video compositing software.
23. 23 Welcome Media Express
Blackmagic
Blackmagic Media Express 2.0 Interface
Media List
Search field
Remote indicator
VTR / deck timecode
Video Preview
Transport Control
Mark In / Mark Out
Track enable/disable
Project name, video format
and frame rate
24. 24 Welcome Media Express – Preferences
Blackmagic
Media Express preferences are accessed from Media Express>Preferences on Mac OS X or
Edit>Preferences on Windows.
Project Video Format
Project Video Format defines the frame rate and frame size of the current project.
Capture File Format
Capture File Format sets the video codec and file format when capturing in the current project.
On Mac OS X, the capture file format options are either QuickTime movies or DPX files. If Apple Final Cut Pro is
installed, Media Express can capture QuickTime movies with DVCPRO/DVCPRO HD and ProRes codecs as well
as Apple Uncompressed codecs.
On Windows, the capture file format options are either AVI movies or DPX files. A choice of Blackmagic
Uncompressed or Motion JPEG codecs can be made when capturing to AVI movies.
Preferences in Windows
Video formats in Windows
Video formats in Mac OS X
Capture file formats in Windows
Preferences in Mac OS X
Capture file formats in Mac OS X
25. 25 Welcome Media Express – Media List
Blackmagic
The Media List holds a list of clips used in a project. When in Capture view, the Media List can be a list of clips to
be batch-captured. Media List becomes a playlist when used in Playback view. These views are explained later
in the manual.
The Media List can contain clips that are of different codecs as long as they are of the same frame rate and size.
The Media List is a project which can contain clips of the same frame size and frame rate.
The list can be sorted by each column heading. Columns can be rearranged and widened if desired.
The order of the clips in the list can be sorted manually by dragging and dropping within the list. Single or
multiple clips can be dragged and dropped together.
The film strip icon on the left of the list shows whether a clip has linked media. If a clip has no linked media,
the film strip icon displays a red “X” and selecting the clip will show a “Media Offline” message in the Video
Preview Window.
Clips can be added to the list by:
‚ double-clicking on an empty area in the list
‚ selecting File > Import > Media Files
‚ right-clicking on the list and selecting ‘Import Media Files’
‚ capturing a clip from tape.
Right-clicking in the Media List will open a contextual menu. Depending upon the menu item chosen, Media
Express will switch to the appropriate Capture or Playback view that fits the operation.
Media Express can play back files of different codecs, in the same playlist, as long as they are of the same frame
rate and size. For example, you may have a mix of 1080p23.98 MJPEG and 1080p23.98 Uncompressed video
clips in the same playlist and Media Express will play them out seamlessly.
Media List showing an untitled clip which is not linked to any media.
26. 26 Welcome Media Express – Capture
Blackmagic
Capture View showing the contextual menu in the Media List.
27. 27 Welcome Media Express – Capture
Blackmagic
Capture operations are performed in the Capture view (ctrl-1, cmd-1)
Capturing on the fly.
Ensure the Project Video Format is set to the format of video you wish to capture.
Ensure the Capture File Format is set to the format you wish to capture.
Connect a video source to an input of your Intensity. Ensure the desired input has been selected in the Blackmagic
control panel (Windows) or Blackmagic system preferences (Mac OS X).
Enter Reel and Name information into the information area. The Name will be applied to the clip(s) which are
about to be captured.
Before capturing, the audio channels to be captured can be switched on or off via the track enable/disable
buttons. The video track cannot be turned off.
Click on the “Capture” button to commence capturing.
To end capture, click on the “Capture” button again or press the “Esc” key.
29. 29 Welcome Media Express – Playback
Blackmagic
Capture
Playback operations are performed in the Playback tab (ctrl-2, cmd-2)
Importing clips into the Media List
Import media into the Media List using one of the following methods:
‚ Double-click on an empty area of the list.
‚ Select File > Import > Media Files.
‚ Right-click on the list and select ‘Import Media Files’.
‚ Capture a clip from tape.
Any of these actions will reveal an Open Video Clip window where more where one or more files can be selected.
If the files being imported match the frame rate and size of those in the Media List, the import will be successful.
If the files being imported do not match the frame rate and size of existing clips in the Media List, the user will be
prompted to create a new project and to save the current project.
If the current project has had no changes, and has already been saved, the user will only be prompted to start a
new project as there is no need to save the existing project.
Playing back a single clip
Selecting a clip (single click) on the list will load it into the Video Preview Window.
To play back a single clip in the Media List, double click the clip and it will start playing in the Video Preview Window.
To loop the playback of the clip, click on the loop button in the transport control. The selected clip will now play
back and loop until the user clicks on the pause button or presses the spacebar.
Playing back multiple clips
To play back multiple clips, select the clips in the Media Library and click the Play button or press the spacebar.
Selected clips in the playlist will be played back in sequence. Unselected clips will not be played.
If no clips are selected, the whole playlist is played back, starting from the last-played clip.
Clicking on the loop button will cause the playback to loop.
During playback, the audio channels being monitored can be switched on or off via the track enable/disable
buttons. The video track cannot be turned off.
30. 30 Blackmagic Design Applications
Using Blackmagic Disk Speed Test to check your disk (PC)
If you want to check your disk array speed for uncompressed video, Blackmagic Disk Speed Test can be
run to check the array speed and provide the results in video frame rates. This makes it much easier to
understand how various disk arrays will handle video capture and playback at various video resolutions
and frame rates.
Disk Speed Test provides more accurate results for large disk arrays, as often the manufacturer provided
speed results only check small data blocks; so you only get an indication of the cache speed of the disk
and not the sustained data rate of the disk. Video uses sustained data rates and only Disk Speed Test
provides a long burst of data for more accurate results.
When using Disk Speed Test, you need to account for disk seeking, so it’s best to add a healthy margin
to the results. If a disk array tests at 32 frames per second HD 1080, it doesn’t mean you can do 29.97
HD capture and playback, as the margin is too tight.
Disk Speed RAID results after testing a disk array
Building uncompressed disk arrays (PC)
When you’re working with uncompressed HD video, the internal hard disk will not be fast enough. You
need a high speed disk array. These can be purchased pre-built, or you can build your own using two hard
disks for SD or at least eight hard disks for HD. The first step is to install and connect the hard disks.
If you intend to run your disk array as a software stripe, you will need to make sure that “host RAID” is
disabled. Use the “Disk Management” tool in “Computer Management” within Windows XP™ to set up
your software RAID, or refer to third party instructions when using pre-configured hardware RAIDs.
Further information can be obtained via the Windows™ Help and Support. Search and review the section
on “Dynamic Disks”. This section will provide you with information on configuration steps on striping
your disk array. Due to disk seeks, when calculating the data rates required for your disk system, it is a
good idea to add a safety margin due to fluctuations in disk speed. Disk speeds can be increased by
adding more disks. Serial ATA (SATA) disks can reduce to half their speed as they become full, so in a
2-disk SATA array you should aim for a 100% safety margin. In an 8-disk SATA array, a 30% safety margin
should be adequate. Generally the more disks in the array, the better.
Disk Management
Note: Other vendors and third parties may provide different data rates for uncompressed video, the
above recommendations are tested for use with Intensity.
31. 31 Blackmagic Design Applications
Using Blackmagic Disk Speed Test to check your disk (Mac)
If you want to check your disk array speed, Blackmagic Disk Speed Test can be run to check the array
speed, and to provide the results in video frame rates. This makes it much easier to understand how
various disk arrays will handle video capture and playback at various video resolutions and frame rates.
Disk Speed Test provides more accurate results for large disk arrays, as often the manufacturer provided
speed results only check small data blocks, so you only get an indication of the cache speed of the disk
and not the sustained data rate of the disk. Video uses sustained data rates and only Disk Speed Test
provides a long burst of data for more accurate results.
When using Disk Speed Test, you need to account for disk seeking, so it’s best to add a healthy margin
to the results. If a disk array tests at 32 frames per second HD 1080, it doesn’t mean you can do 29.97
HD capture and playback, as the margin is too tight.
Disk Speed RAID results after testing a disk array
Using the Apple Xserve RAID Disk Array (Mac)
When you’re working with uncompressed HD video, your internal hard disk will not be fast enough. In
this case you need a high speed disk array, such as the Apple Xserve RAID. The Apple Xserve RAID works
great for both SD and HD when fully populated with 14 disks and at least 512 MB of RAM for each RAID
controller. For maximum performance and stable capture and playback with uncompressed video we
recommend the following settings:
Check Use Controller Write Cache
Uncheck Allow Host Cache Flushing
Check Use Drive Write Cache
Uncheck Use Steady Streaming Mode
Set “Read Prefetch” to 128 Stripes (8 MB/disk) — If you observe dropped frames or jerky
video, try 8 Stripes (512 KB/disk) as recommended by Apple.
Note: No single setting will work for all sizes and brands of disks.
Apple Xserve RAID preferences. These are the settings we have found delivers stable capture and playback with uncompressed video.
Other settings might also provide optimal performance and we recommend you check with your local
reseller before changing settings if you’re unsure of what these controls do.
32. 32 Third Party Applications / Windows
Adobe Premiere Pro CS5
Adobe Premiere Pro® is a powerful real-time video and audio non-linear editing application. Full presets for
Premiere Pro are included with the Blackmagic driver software and will be automatically loaded into your
system during the installation process. Premiere Pro must be installed on your system before running the
Blackmagic driver installer.
Premiere Pro can capture and playback with sequences of different formats within the one project. For
Adobe Premiere Pro example, Intensity can capture 1080i59.94, 1080i50 and NTSC video to corresponding sequences within
the one Premiere Pro project.
Setting Up
1. Launch Premiere Pro CS5.
2. Create a New Project and set the Capture Format to Blackmagic Capture.
3. Click on the Properties button and then choose from the desired properties for your project.
The Video Standard can be set to NTSC, PAL, HD720, HD1080 or 2K. The Video Format can be
uncompressed or compressed and you should also specify the number of audio channels to be
captured. Now click OK.
4. Select your disk array as the Location for your media.
5. Set the location and type the name of your project. Click OK.
6. The New Sequence window will appear. Select the desired Blackmagic preset, give the sequence
New Sequence
a name and then click OK.
Audio
Blackmagic software features support for multiple channels of audio in Premiere Pro CS5 using the
Blackmagic audio plugin. Blackmagic audio hardware is automatically chosen when a new project is created
and the capture format is set to Blackmagic Capture. The choice of audio hardware can also be configured
through Edit > Preferences > Audio Hardware. The ASIO Settings button serves no function as
ASIO audio is not used for capture or playback.
You may also wish to visit Edit > Preferences > Audio Output Mapping to select the mix of the
multi-channel audio. Set Map Output for to either Blackmagic Audio or Blackmagic Audio (CS5)
as both are the same as each other.
Audio Output Mapping
33. 33 Third Party Applications / Windows
Device Control
Device control is provided by Premiere Pro and is independent of Intensity. No support is provided
by Blackmagic Design for device control problems in conjunction with Intensity. Questions relating to
device control should be referred to Premiere Pro support and the relevant camera and deck vendors.
Premiere Pro includes DV/HDV Device Control which may be used to control some cameras and decks
with a FireWire connection. FireWire is also known as IEEE 1394 and i.LINK. Logging clips, batch capture
and export to tape are only possible if some form of device control is available, e.g. FireWire or third party
serial device control. Device control is only useful with video tape devices such as HDV cameras or decks.
Player Settings
The default player should be switched from Adobe Player to Blackmagic Design Playback. The choice of
player settings can be configured through Edit > Preferences > Player Settings.
Playback
As a quick test to make sure everything is connected correctly, use the Premiere Pro test media (Bars and
Tone or Universal Counter Leader). Drag your test media from within the Premiere Pro project and drop it
on to the timeline. You should now see the image on both your computer desktop and the output of your
Intensity. If you can’t see any video on your Blackmagic output, check the connections again and ensure
Player Settings you have the correct output settings configured in the Blackmagic Control Panel. SDI, HDMI and analog
outputs are always active.
Capture
To capture choose: File > Capture [F5]
To immediately capture, click the red record button [G]. If you wish to log the clip, enter the desired In and
Out points using either the Set In and Set Out buttons, or manually by typing the timecode and clicking
Log Clip. The empty clip will now appear in the Project window. Repeat this until you have logged all of
the clips you wish to batch capture.
To change the capture format, click on the Settings tab and then the Edit button. Ensure the Capture
Format is set to Blackmagic Capture, click on the Properties button and then change the Blackmagic
Capture Settings as desired.
Capture
34. 34 Third Party Applications / Windows
Batch Capture
Select the clips you wish to capture by drag selecting or shift-clicking each clip. Then choose:
File > Batch Capture [F6]. To set handles on the clips, enable the option to Capture with handles
and type the number of additional frames you require at the start and end of each clip.
Export to Tape
To export to tape, select the sequence you require and then choose File > Export > Tape
Insert editing requires unbroken timecode over the full length of the project which is to be laid to tape. The
process of creating unbroken timecode is referred to as “blacking the tape”.
In assemble mode the tape needs only to be “blacked” until a point just beyond the start time of the
project. As assemble editing erases the tape ahead of the record heads, it should not be used where other
projects already exist on the tape after the out point of your edit.
When editing to tape, the software waits at the first frame of your project for the deck to drop into record
at the predetermined timecode. At that exact moment, the software begins to play until the edit is
completed. Should you find that either the first frame of your program is repeated or lost, during the edit
to tape procedure, you will need to adjust the playback offset to bring the deck and computer in sync.
You should only need to do this once with any combination of deck and computer and the correct setting
will be retained.
Now, simply enter the desired in point and offsets if required, and click OK.
Export to Tape
35. 35 Third Party Applications / Windows
Adobe After Effects CS5
It’s very easy to setup playback and rendering in Adobe After Effects® for a complete broadcast and design
workstation that connects direct to decks for capture and playback of clips. Intensity also supports real time
preview while working on your compositions.
Create a New Composition
Go to the “Composition” menu and select Composition > New Composition (Control + n) In the
Launching Adobe After Effects dialogue box, select the desired television standard from the pulldown menu. Click OK
How to use Intensity as a Preview Output Frame Buffer
To allow your Adobe After Effects composition to be displayed in real-time through your Intensity, go to
Edit > Preferences > Video Preview. Select Blackmagic Video Output and the appropriate
Output Mode. This lets you view your Adobe After Effects compositions in the correct video colorspace on
your broadcast monitor as you work. You will always see the correct color and interlace when working, and
you don’t have to wait until your composition is rendered to see what it looks like when output as video.
Rendering
When you have completed your composition, you will need to render to a pixel format supported by
Intensity. Following is a list of some supported codecs:
AVI codecs QuickTime codecs
“Composition Settings” options
‚ Blackmagic 10 bit 4:4:4 (RGB) ‚ Blackmagic RGB 10 bit (4:4:4)
‚ Blackmagic 10 bit 4:2:2 ‚ Blackmagic 10 bit
‚ Blackmagic HD 8 bit 4:2:2 ‚ Blackmagic 8 bit
‚ Blackmagic SD 8 bit 4:2:2 ‚ Blackmagic 8 bit (2Vuy)
‚ Blackmagic 8 bit MJPEG ‚ Apple Photo-JPEG
‚ Adobe DVCPRO HD ‚ Apple DV - NTSC
‚ Adobe DVCPRO50 ‚ Apple DV - PAL
“Video Preview” preferences
36. 36 Third Party Applications / Windows
Adobe Photoshop CS5
Intensity includes Adobe Photoshop® plug-ins, so you can directly capture and output still frames from
within the Photoshop application itself.
If you’re working with HD/SD, you can even import and export 16 bit Photoshop images for full quality.
Import an image into Photoshop
1. From Photoshop select File > Import > Blackmagic Image Capture
Launching Adobe Photoshop 2. Select the “Video Input Format” and the “Image Bit Depth” and then click Capture Image.
Export an image from Photoshop
1. Select File > Export > Blackmagic Image Export
2. Select Video Output Format and then Output Image.
Note: Once you have set the options in the “Export” window, each subsequent Export will not display
the window so you can output frames much faster. However, if you would like to change your export
Image Capture formats, hold the Ctrl key when selecting export.
Image Export
37. 37 Third Party Applications / Windows
Sony Vegas Pro 9
Sony Vegas Pro 9 is a popular real-time video and audio non-linear editing application that includes
uncompressed SD and HD support with Intensity Pro and Intensity Shuttle. Sony’s included support for
Blackmagic Design means that when the Blackmagic Design driver is installed, Vegas Pro 9 will capture and
play back video with Intensity. Vegas Pro 9 must be installed on your system before running the Blackmagic
driver installer.
Sony Vegas Pro 9 can capture and playback with sequences of different formats within the one project.
Launching Sony Vegas Pro 9
For example, Intensity can capture 1080i59.94, 1080i50 and NTSC video to corresponding sequences
within the one Vegas Pro 9 project.
Setting Up
1. Launch Vegas Pro 9
2. Create a New Project.
3. In the New Project or the Project Properties windows, choose the desired video and audio
properties for your project.
4. The Template can be set to NTSC, PAL, HD720 or HD1080.
Capture Video options
5. Select your disk array as the location for your media under Prerendered Files Folder in the
New Project or Project Properties windows.
6. To select video capture quality and format, go to Capture Video and select DV, or for broadcast
quality uncompressed video, select HDV or SDI.
Important Note: Sony Vegas uses the HDV or SDI option for capturing uncompressed video
from both HDMI and analog video connections on Intensity Pro and Intensity Shuttle.
7. For video capture, go to the Prefs tab, select Capture Prefs and device Blackmagic Design
DeckLink and then chose the desired video format and frame rate.
Audio Settings
Under the Audio tab found in the New Project or the Project Properties windows, you can select
your desired audio options and settings.
New Project window
38. 38 Third Party Applications / Mac
Adobe Premiere Pro CS5
Adobe Premiere Pro™ is a powerful real-time video and audio non-linear editing application. Full presets for
Premiere Pro are included with the Blackmagic driver software and will be automatically loaded into your
system during the installation process. Premiere Pro must be installed on your system before running the
Blackmagic driver installer.
Premiere Pro can capture and playback with sequences of different formats within the one project. For
Adobe Premiere Pro example, Intensity can capture 1080i59.94, 1080i50 and NTSC video to corresponding sequences within
the one Premiere Pro project.
Setting Up
1. Launch Premiere Pro CS5.
2. Create a New Project and click on the Scratch Disks tab.
3. Set the desired Location and Name for your project at the bottom of this window.
4. Set the locations for your captured video, captured audio, video previews and audio previews.
5. Click on the General tab and set the Capture Format to Blackmagic Capture.
6. Click on the Settings button to reveal the Blackmagic Capture Settings for your project. The Video
Standard can be set to NTSC, PAL, HD720, HD1080 or 2K. The Video Format can be uncompressed
or compressed. Now click OK.
7. The New Sequence window will appear and you will usually want to select a Blackmagic sequence
New Sequence
preset which matches the Blackmagic capture settings you chose for the project. Select the desired
Blackmagic preset, give the sequence a name and then click OK.
Audio
Blackmagic software features support for multiple channels of audio in Premiere Pro CS5 using the
Blackmagic audio plugin. Blackmagic audio hardware is automatically chosen when a new project is created
and the capture format is set to Blackmagic Capture. The choice of audio hardware can also be configured
through Premiere Pro > Preferences > Audio Hardware. Verify that the Default Device is set to
Blackmagic Audio.
You may also wish to visit Premiere Pro > Preferences > Audio Output Mapping to select the mix
of the multi-channel audio. Set Map Output for to Blackmagic Audio.
Audio Output Mapping
39. 39 Third Party Applications / Mac
Device Control
Device control is provided by Premiere Pro and is independent of Intensity. No support is provided
by Blackmagic Design for device control problems in conjunction with Intensity. Questions relating to
device control should be referred to Premiere Pro support and the relevant camera and deck vendors.
Premiere Pro includes DV/HDV Device Control which may be used to control some cameras and decks with
a Firewire connection. FireWire is also known as IEEE 1394 and i.LINK. Logging clips, batch capture and
export to tape are only possible if some form of device control is available, e.g. FireWire or third party serial
device control. Device control is only useful with video tape devices such as HDV cameras or decks.
Player Settings
The default player should be switched from Adobe Player to Blackmagic Playback. The choice of player
settings can be configured through Premiere Pro > Preferences > Player Settings.
Playback
As a quick test to make sure everything is connected correctly, use the Premiere Pro test media (bars and
tone). Copy to your disk array, a test clip which matches the format of your project e.g. Bars HDTV 1080 10
bit.mov. Take your media from within the Premiere Pro project and drop it on to the timeline. You should now
see the image on both your computer desktop and the output of your Blackmagic hardware. If you can’t see
Player Settings any video on your Blackmagic output, check the connections again and ensure you have the correct output
settings configured in the Blackmagic Control Panel. SDI, HDMI and analog outputs are always active.
Capture
To capture choose: File > Capture [F5]
To immediately capture, click the red record button [G]. If you wish to log the clip, enter the desired In and
Out points using either the Set In and Set Out buttons, or manually by typing the timecode and clicking
Log Clip. The empty clip will now appear in the Project window. Repeat this until you have logged all of
the clips you wish to batch capture.
To change the capture format, click on the Settings tab and then the Edit button. Ensure the Capture
Format is set to Blackmagic Capture, click on the Settings button and then change the Blackmagic
Capture Settings as desired.
Capture
40. 40 Third Party Applications / Mac
Batch Capture
Select the clips you wish to capture by drag-selecting or shift-clicking each clip. Then choose:
File > Batch Capture [F6]. To set handles on the clips, enable the option to Capture with handles
and type the number of additional frames you require at the start and end of each clip.
Export to Tape
To export to tape, select the sequence you require and then choose File > Export > Tape
Insert editing requires unbroken timecode over the full length of the project which is to be laid to tape. The
process of creating unbroken timecode is referred to as “blacking the tape”.
In assemble mode the tape needs only to be “blacked” until a point just beyond the start time of the
project. As assemble editing erases the tape ahead of the record heads, it should not be used where other
projects already exist on the tape after the out point of your edit.
When editing to tape, the software waits at the first frame of your project for the deck to drop into
record at the predetermined timecode. At that exact moment, the software begins to play and the edit is
completed. Should you find that either the first frame of your program is repeated or lost, during the edit
to tape procedure, you will need to adjust the playback offset to bring the deck and computer in sync.
You should only need to do this once with any combination of deck and computer and the correct setting
will be retained.
Now, simply enter the desired in point and offsets if required, and click OK.
Export to Tape
41. 41 Third Party Applications / Mac
Adobe After Effects CS5
It’s very easy to set up playback and rendering in Adobe After Effects™ for a complete broadcast and
design workstation that connects direct to decks for capture and playback of clips. Intensity also supports
real time preview while working on your compositions.
Create a New Composition
Go to the “Composition” menu and select Composition > New Composition. (Command + n)
Launching After Effects In the dialogue box, select the desired television standard from the Preset pulldown menu. Click OK
How to use Intensity as a preview output frame buffer
To allow your Adobe After Effects composition to be displayed in real-time through your Intensity, go to
After Effects > Preferences > Video Preview. Select Blackmagic Video Output and the appropriate
Output Mode. This lets you view your Adobe After Effects compositions in the correct video colorspace on
your broadcast monitor as you work. You will always see the correct color and interlace when working, and
you don’t have to wait until your composition is rendered to see what it looks like when output as video.
Rendering
When you have completed your composition, you will need to render to a pixel format supported by
Intensity . Following is a list of some supported QuickTime™ codecs:
‚ Blackmagic RGB 10 bit (uncompressed)
“Composition Settings” options ‚ Apple Uncompressed YUV 10 bit 4:2:2
‚ Apple Uncompressed YUV 8 bit 4:2:2
‚ Apple Photo - JPEG (compressed)
‚ Apple DV - NTSC (compressed)
‚ Apple DV - PAL (compressed)
“Video Preview” preferences
42. 42 Third Party Applications / Mac
Adobe Photoshop CS5
Intensity includes Adobe Photoshop™ plug-ins, so you can directly capture and output still frames from
within the Photoshop application itself.
If you’re working with HD/SD, you can even import and export 16 bit Photoshop images for full quality.
Import an image into Photoshop
1. From Photoshop select File > Import > Blackmagic Image Capture
Launching Adobe Photoshop 2. Select the “Video Input Format” and the “Image Bit Depth” and then click Capture Image
Export an image from Photoshop
1. Select File > Export > Blackmagic Image Export
2. Select “Video Output Format” and then click Output Image
Note: Once you have set the options in the “Import” or “Export” windows, each Import and Export after
will not display the window, so you can grab and output frames much faster. However if you would like to
Image Capture
change your import or export formats, hold the Option key, when selecting import or export.
Image Export
43. 43 Third Party Applications / Mac
Apple Final Cut Pro
Apple Final Cut Pro™ is a powerful real-time video and audio non-linear editing application. In
conjunction with your new Intensity, Final Cut Pro will allow you to work in every video standard from DV
up to uncompressed 4:2:2 high definition video.
“Easy Setups” for Final Cut Pro will have been added automatically during the Intensity installation
process if Final Cut Pro is previously installed. It’s important to install Final Cut Pro before installing the
Intensity software.
Note: If necessary, reinstall the Intensity software after installing Final Cut Pro.
Final Cut Pro
Setting Up
1. Launch Final Cut Pro.
2. The Easy Setup window will appear.
3. Click on the popup menu named Setup for and select a relevant Intensity Easy Setup.
For each TV format (NTSC, PAL and HDTV) you will find a range of compressed and uncompressed
file formats you can choose. For example, if you are working in NTSC format, you could choose one
of the following “Easy Setups”:
‚ Blackmagic NTSC Uncompressed
‚ Blackmagic NTSC - DV
The “Easy Setup” you choose will be dictated partly by the speed of your disk array and partly by
whether you already have movie clips in a particular format. If you have a fast disk array, you can
“Easy Setup” options choose uncompressed video for the highest quality video. If you only have a single disk for storage,
you could choose either DV, DV50, DVCPRO HD or JPEG for professional quality compression.
JPEG often looks better but unfortunately Apple have not yet implemented RT Effects with JPEG.
If you need to add RT Effects, then DV, DV50 or DVCPRO HD would be a better choice.
4. Click on the popup menu named Primary Scratch Disk and select your disk array from the
popup menu. Then click OK.
5. Final Cut Pro will finish launching.
44. 44 Third Party Applications / Mac
Capture from non-controllable devices
Video sources including AVCHD cameras, VHS tape players and security cameras do not provide
any method of device control and are classified as non-controllable devices. For this reason,
after selecting an Intensity Easy Setup, Final Cut Pro will sometimes warn that device control
is set to “non-controllable device”. This is as expected. Click OK and then create a project with these
settings.
To capture video from a non-controllable device, choose File > Log & Capture. (Command + 8).
Press play on your video source and then press the Now button in the Log and Capture window. Final
Cut Pro will show you a preview of the video you are capturing. Press the ‘esc’ key at the top left of your
keyboard when you wish to stop capturing.
Configuring controllable devices
The following information provides methods for using Intensity in conjunction with controllable devices.
Log and Capture Device control is provided by Final Cut Pro and is independent of Intensity. No support is provided
by Blackmagic Design for device control problems in conjunction with Intensity. Questions relating to
device control should be referred to Final Cut Pro support and the relevant camera and deck vendors.
DV cameras include FireWire device control which can be enabled in the Audio/Video Settings >
Device Control Presets of Final Cut Pro 6.0. Select a preset by clicking in the far left column so
that a check mark appears next to FireWire NTSC or FireWire PAL. Click OK. Open the “Log and
Capture” window and you should now be able to control the tape in the DV camera via FireWire and
capture video and audio via your Intensity.
HDV cameras include FireWire device control. However Final Cut Pro only enables the use of HDV
FireWire device control when HDV video is being captured via FireWire. Fortunately the following
method can be used to control most HDV cameras which support HDV>DV down conversion on their
FireWire output. Set the HDV camera to output standard definition DV on its FireWire output. This can
be achieved using the “i.LINK CONV” setting on Sony cameras and the “DV LOCKED” setting on the
Logging a clip
Canon HV20. In Final Cut Pro, go to Audio/Video Settings > Device Control Presets. Select a
preset by clicking in the far left column so that a checkmark appears next to the desired preset. Choose
the FireWire NTSC preset if you are working in HD720p59.94 or HD1080i59.94 video. Choose the
FireWire PAL preset if you are working in HD720p50 or HD1080i50 video. Click OK. Open the Log and
Capture window and you should now be able to control the tape in the HDV camera via FireWire and
capture video and audio via your Intensity.
The Sony HVR-M25U deck can be controlled and used with Intensity using the same instructions
detailed above for HDV cameras.
45. 45 Third Party Applications / Mac
The JVC BR-HD50 deck features RS-422 device control which can be used to control the deck
while capturing HDMI video and audio with Intensity. Final Cut Pro can control the deck via RS-422
using a Keyspan USB Twin Serial Adapter (USB to MiniDin8 serial ports) partnered with an Addenda
SC-M/9M Mac-to-RS-422 cable. The total cost for these two serial items is under US$100.
On the deck, go to the REMOTE [2/2] Menu screen and set CONTROLLER SEL (0209) to TYPE 7 for use
with NLE systems. In Final Cut Pro, go to Audio/Video Settings > Device Control Presets and
create a new preset by duplicating an existing preset and then changing the settings as follows.
Name: JVC HDTV 720p 59.94 (NTSC), or JVC HDTV 720p 50 (PAL)
Protocol: Sony RS-422
Audio Mapping: 2 Channels
Time Source: LTC + VITC
Port: Select the Keyspan port which is connected to the deck.
Frame rate: 29.97 (NTSC) or 50 (PAL)
Default Timecode: Non-Drop Frame
Click OK to complete the creation of the preset. Click in the far left column so that a check
mark appears next to the new JVC preset. Click OK. Open the “Log and Capture” window and
you should now be able to control the JVC BR-HD50 deck via RS-422 and capture video and
audio via your Intensity. While this deck also features FireWire, it does not support HDV>DV
down conversion on its FireWire output and so RS-422 is the only option for device control with Final
Cut Pro 6.0 when capturing via Intensity.
Capture from controllable devices
To capture, choose File > Log & Capture. (Command + 8) Your video deck or camera will respond in
the same way as a clip in the timeline, via the “<spacebar>”, “j”, “k” and “l” keys. It is important to set
the correct tape number for your clip. To immediately capture, click the Capture Now button.
If you wish to log the clip, enter the desired “in” and “out” points using either the “i” and “o”
keys on your keyboard, or manually by typing in the timecode and clicking Log Clip. If you have
the “Prompt” checkbox selected, Final Cut Pro will now ask you to name the clip. Name it and
click OK; the clip will appear in your browser with a diagonal red line indicating that it’s “offline”.
Repeat this until you have logged all of the clips you wish to capture in a batch.
Note: When capturing sequential clips from tape, Final Cut Pro will automatically suggest a name
for each clip based on the previous clip. So, if your first clip is called “Mary, MCU”, Final Cut Pro
will suggest the next clip be called “Mary, MCU 01” etc. This can make logging large numbers
of clips much faster.
46. 46 Third Party Applications / Mac
Batch Capture
Select the clips you wish to capture by drag selecting or shift-click. Choose File > Batch Capture
or click on the Batch button in the “Logging” tab of the “Log & Capture“ window. (Control + C)
To set handles on the clips, go to and choose File > Batch Capture (Control + C). Enable the
“Add Handles” box to capture additional frames (“handles”) before and after the “In” and “Out”
points of a clip.
RT Extreme Real Time Effects
Real Time Effects are one of the great features of Final Cut Pro, and with your Intensity you are fully
compatible with Apple’s RT Extreme™.
Batch Capture