Cisco 5508 wlc setup and initial configuration
•Download as DOCX, PDF•
3 likes•1,205 views

Cisco 5508 wlc setup and initial configuration. More...

Recommended
Recommended
More Related Content
More from IT Tech
More from IT Tech (20)
Recently uploaded
Recently uploaded (20)
Cisco 5508 wlc setup and initial configuration
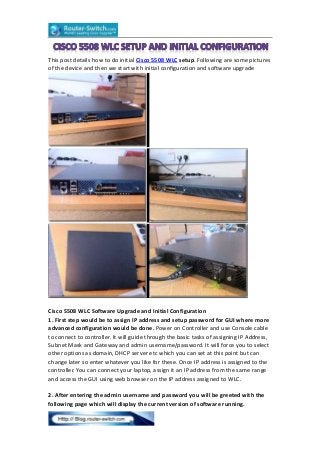
- 1. This post details how to do initial Cisco 5508 WLC setup. Following are some pictures of the device and then we start with initial configuration and software upgrade Cisco 5508 WLC Software Upgrade and Initial Configuration 1. First step would be to assign IP address and setup password for GUI where more advanced configuration would be done. Power on Controller and use Console cable to connect to controller. It will guide through the basic tasks of assigning IP Address, Subnet Mask and Gateway and admin username/password. It will force you to select other options as domain, DHCP server etc which you can set at this point but can change later so enter whatever you like for these. Once IP address is assigned to the controller. You can connect your laptop, assign it an IP address from the same range and access the GUI using web browser on the IP address assigned to WLC. 2. After entering the admin username and password you will be greeted with the following page which will display the current version of software running.
- 2. 3. Now, the first thing we will do is to upgrade the running software on the controller from 6.0 to 7.2. The upgrade involves upgrading the software and also Field Recovery Image which is used when you want to use the boot menu such as restoring to backup version or other boot options. Download the latest controller software from Cisco website, setup a TFTP server on your machine and set the home directory to where you have downloaded the files. We will use the controller GUI to download the latest software on controller. Select Command>Download File option as shown in the screenshot below
- 3. Restart the WLC and then upgrade the Field Recovery Image
- 4. Restart again and on startup you will be asked to input your answer, you need to be very careful here, as if you lose power to device, it will be unrecoverable. These warning messages are displayed during the process. Also, there is timeout set and if you don't answer a question within certain time, it will abort the upgrade process.
- 5. 4. Once the upgrade process is complete, you can see the latest software version displayed on the monitor page. Let’s move to the next part of initial configuration. 5. If you haven't already set you will set the name, RF Group Name, Default Mobility Domain Name.
- 6. 6. Enable Network Support by using menu Wireless>802.11b/g/n>Network. It must be enabled otherwise radios on APs attached to controller will stay down. The next post details setting up SSIDs, Configuring Interfaces, Configuring AP Groups and use FlexConnect for APs on remote sites. More Cisco Products Tips you can visit: http://blog.router-switch.com/