DVD artwork guide
•
1 like•434 views

The document provides guidelines for designing still screens for DVDs at Zuma. It discusses naming conventions, file formats, and technical specifications. Designers should create layered Photoshop files at 720x540 pixels and scale elements down to 720x480 for the final artwork. Text and graphics must stay within the title safe area. Overlays must use a limited palette and be non-anti-aliased. Motion menus should be designed at D1 resolution of 720x540 and scaled to 720x486 for output. Final artwork is delivered as flattened TIFF or PSD files within the specified dimensions and color values.

Recommended
More Related Content
Recently uploaded
Recently uploaded (20)
Featured
Featured (20)
DVD artwork guide
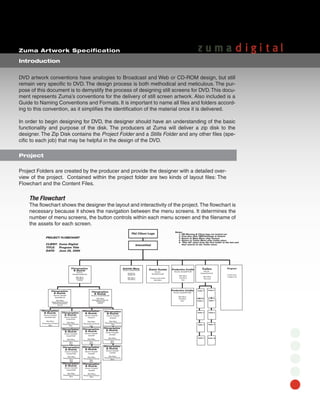
- 1. Zuma Artwork Specification Introduction DVD artwork conventions have analogies to Broadcast and Web or CD-ROM design, but still remain very specific to DVD. The design process is both methodical and meticulous. The pur- pose of this document is to demystify the process of designing still screens for DVD. This docu- ment represents Zuma’s conventions for the delivery of still screen artwork. Also included is a Guide to Naming Conventions and Formats. It is important to name all files and folders accord- ing to this convention, as it simplifies the identification of the material once it is delivered. In order to begin designing for DVD, the designer should have an understanding of the basic functionality and purpose of the disk. The producers at Zuma will deliver a zip disk to the designer. The Zip Disk contains the Project Folder and a Stills Folder and any other files (spe- cific to each job) that may be helpful in the design of the DVD. Project Project Folders are created by the producer and provide the designer with a detailed over- view of the project. Contained within the project folder are two kinds of layout files: The Flowchart and the Content Files. The Flowchart The flowchart shows the designer the layout and interactivity of the project. The flowchart is necessary because it shows the navigation between the menu screens. It determines the number of menu screens, the button controls within each menu screen and the filename of the assets for each screen. Notes: Fbi/ Client Logo 1. FBI Warning & Client logo are locked out 2. First play after FBI/Clientlogo is feature PROJECT FLOWCHART 3. Return to Main Menu after feature 4. Return to Trailer Menu after trailer plays 5. "Play All" plays from the first trailer to the last and CLIENT: Zuma Digital Interstitial then returns to the Trailer menu TITLE: Program Title DATE: June 26, 2000 Filmographies Subtitle Menu Scene Access Production Credits Trailers Program & Awards filename: Sample01Sub01 filename: Sample01Prod01 filename: filename: filename: Subtitle On Sample01Scene01 Sample01Trailer01 Sample01FilmMenu01 Subtitle Off 2 audio tracks Main Menu Main Menu Main Menu 1 subtitle track Main Menu 6 scene access points Play Movie Play Movie Play Movie Play movie 2 names Main Menu Next Filmographies Production Credits Trailer 1 Trailer 6 Filmographies filename: Sample01Prod02 & Awards & Awards filename: Sample01 filename: Sample01Menu01 SampleMenu01 Main Menu Main Menu Play Movie Main Menu Filmographies & Awards Back Trailer 2 Trailer 7 Filmographies & Awards Filmography Selected Filmography Awards Awards Filmographies Filmographies Filmographies & Awards Filmographies & Awards & Awards Trailer 3 Trailer 8 filename: Sample01 & Awards filename: Sample01 filename: Sample01 SampleAward01 filename: Sample01 Sample 01 Sample01 SampleFilm01 Main Menu Main Menu Main Menu Filmographies & Awards Main Menu Filmographies & Awards Filmographies & Awards Filmographies & Awards Next Trailer 9 Back Trailer 4 Next Next Filmographies Filmographies Filmographies & Awards & Awards & Awards filename: Sample01 filename: Sample01 filename: Sample01 Sample02 SampleFilm02 Sample02 Main Menu Trailer 5 Trailer 10 Main Menu Main Menu Filmographies & Awards Filmographies & Awards Filmographies & Awards Next Next Next Back Back Back Filmographies Filmographies Filmographies & Awards & Awards & Awards filename: Sample01 filename: Sample01 filename: Sample01 Sample03 TruFilm03 SampleFilm03 Main Menu Main Menu Main Menu Filmographies & Awards Filmographies & Awards Filmographies & Awards Back Next Back Next Back Filmographies Filmographies & Awards & Awards filename: Sample01 filename: Sample01 SampleFilm04 Sample04 Main Menu Main Menu Filmographies & Awards Filmographies & Awards Back Back
- 2. Content A content file is delivered to the designer for each menu screen of the project. Each content file specifies the filename, major controls, minor controls and the content that will appear on each screen. The Filename The filename is the filename used in the assets file. Major Controls and Minor Controls The major and minor controls are the button controls for that screen; major button controls should be more visually prominent on a screen than the minor controls. Content Content of the screen refers to all the text that will appear on that screen. The designer should not make any changes to the punctuation, grammar or spelling of the text. Text can appear on a screen as a “heading”, a “subheading”, a “footer”, or in the main “body” of the screen. Generally these terms are useful because they provide the designer with an idea of how the text should look on the screen (e.g. a “heading” is usually at the top of the page and more prominent than the “subheading”). HEADING Heading Sub Note: Graphic Major control elements that reside out of Text Body Major control action safe are not guaranteed to be visible on Note: All text and con- every television. trols reside within title safe. Minor Control Minor Control Stills The Stills folder contains stills taken from video elements that exist on the DVD. These stills can be an integral part of a motion or still menu design.
- 3. Designing for DVD Layered Files Designing is usually done in Photoshop. Scaled type; interface elements are combined with stills and other graphics to create the screens. Since menu screens often have similar button controls, it is a good idea to have each button control on a separate layer and then duplicate that layer for use on other similar screens within a project. It is essential to keep all original layers, so that you can make any last minute changes easily. Designing for NTSC TV Display Certain colors do not reproduce well on DVD. In general it is best to avoid over-saturated colors because TV color displays make colors look even brighter than on a computer moni- tor. Over – saturated colors will bleed and the image will lose sharpness and definition. Photoshop has an NTSC color filter that will pull colors into acceptable color range. Many designers use maximum RGB values of 234 or less. For example, the RGB value 234,0,0 would be pure red on a TV color display. Another useful tip is to adjust the brightness and contrast. High contrast images may cause jittering around edges, thin lines and text. Working with Text All the text that appears on each screen should first be created in Illustrator as a vector Note: The later ver- file. Text should be created on a canvas size of 720 x 540 pixels then scaled down to 720 sions of Photoshop, x 480 using vectors. It is essential that all type elements be scaled as vector objects so Adobe Photoshop 5.0 as to ensure clean type on interlaced monitors. The scaling is to compensate for the dif- and onwards, uses vec- ference between square pixels of the computer monitor and the rectangular pixels of an tors for transforming NTSC monitor. If the text is not scaled down, it will appear out of proportion on an NTSC images and text. If you monitor. are using this version, you do not need to create vector files in It is important that all text remains within the inner NTSC title safe boundary. Text should Illustrator. You can not be any smaller than 18 point for Sans Serif fonts and 24 point for Serif fonts. The larger create all artwork and the type, the more readable it will be on an NTSC monitor. Thin lines that are close together text in Photoshop on a flicker when displayed on NTSC monitors, so it is recommended to leave a little space canvas size of 720 x 540 between the letters. Accounting for common interface elements, a typical screen should and then scale all ele- not contain more than 80 words. ments down to 720 x 480 as the last step of All fonts used for design should be included in the final delivery of the artwork, in its own the design process. separate folder. Click below to open a Title Safe Template. Title Safe Template in Photoshop Title Safe Template in Illustrator
- 4. Motion Menus Motion menus should be designed at D1 resolution for output to tape. All compositions should be set to 29.97 fps and all video footage should be conformed to 29.97 fps. Ele- ments should be assembled as a 720 x 540 composition. In the final render, this composi- tion should be imported and scaled down to fit into a new 720 x 486 composition. Motion menus may be delivered on Digibeta or Beta SP. If the motion menu loops, it is required to loop at least once in the final delivery. This will ensure that the loop is seam- less. If the motion menu ends on a still frame, it should freeze on the last frame for at least two seconds. Zuma can also accept uncompressed Quicktime files for output to Digibeta. If Zuma is responsible for mastering to tape, we recommend that you interpret the video footage as lower field first and render out the final movie as lower field first. Quicktime files must be delivered on CD-R, a jaz, zip disk or mac-formatted hard drive. Overlays Overlays are necessary for the interactivity of a DVD. The basic purpose of an overlay is to define the selection and activation states of all the buttons on each screen. It is the duty of the designer to define the area that will change color, as well as the RGB value and opacity of the color, which will be used in both the selection and activation state. The selection and activation states A button is selected on a DVD by using the remote control. When a button is selected, it turns a different color. This is to inform the viewer which button has been selected. The viewer can then press enter on their remote control to activate the button. The button will quickly flash another color indicating that its function has been activated. Overlays have to be 2 bit, 4 color, and NON-ANTI-ALIASED files. The only colors that can be used in an overlay are pure White (R=255, G=255, B=255), Black (R=0, G=0, B=0), Blue (R=0, G=0, B=255), and Red(R=255, G=0, B=0). This means that the overlay files are heavily aliased, and any small curves will appear pixilated. The DVD Overlay Palette Creating a Custom Palette
- 5. Aliasing Curves created in Photoshop are anti - aliased by default. The anti – aliasing creates a subtle blur around a shape to make it appear smooth rather than pixilated. Blurs are not acceptable in overlays because they introduce a lot more color values than the four accepted RGB values. It is very important to convert the overlays in Photoshop to non – anti – aliased files. The best method to make sure a file is aliased is to create a custom palette for the overlay files. This palette should contain only the four acceptable RGB values. Note: An easy way to make an overlay is to Aliased Anti-aliased work on it as a separate layer in the layered Photoshop file for that screen. This ensures that the overlay correctly lines up with all the button controls on that screen. Large blocky shapes make the best overlays. Small curves look very pixilated. CORRECT INCORRECT The four acceptable RGB values in the overlay are for use ONLY in the premastering process of the DVD. Each of the four RGB values can then be mapped to a different color as specified by the designer. It is the designer’s responsibility to choose the selection and activation colors for the button controls. Select and Activation colors, as well as opacity levels must be specified on the Zuma Color Specifier Form. Delivery of Art Files Delivery of final art is dependent on the nature of the project. Delivery of final still art should be as flattened Photoshop Tiff or Pict files. Files should be 720 x 480 pixels at 72 dpi and be within NTSC safe color limits. Remove all alpha channels and paths from the final art, as they will not import into an authoring script. It is important to check that each screen meets the specifications of its corresponding content file. Zuma uses different authoring platforms depending on the nature of the project. In some cases, the producer will ask for a layered psd file in which case the background is the menu screen and layer 1 is the overlay.
- 6. Guide to File Delivery Creating Artwork Document/Comp Size Render/Export Filename Artwork Delivery Photoshop 720x540 Sample01Scene01 720x480 PSD to TIFF Illustrator 720x540 NA PDF, eps to PSD Indesign 720x540 PDF, eps to PSD NA After Effects Comp size: 720x540 For Output to dBeta: 720x486 square pixels Drop Square Pixel comp into 720x486 D1 comp “fit to comp” Quark Express Comp size: 720x540 eps to PSD NA