SlideShare a Scribd company logo
1 of 38
Download to read offline
Unity Multiplayer Tutorial
For using Networking in Unity.
Author: Andrius Kuznecovas
Last Revision: 24-MAR-2010
Contents
1. Multiplayer Tutorial
1. Introduction
 3
2. Getting Started
 3
3. Creating Your First Client / Server Application
 4
3.1 Preparing Scene
 4
3.2 Creating Scripts & Adding Components
 5
3.2.1 Server & Client
 5
3.2.2 Scene & Objects Instantiation On The Network
 8
3.3 Quick Overview
 10
4. Implementing Multiplayer in Startrooper
 11
4.1 Changing Scene
 11
4.2 Integration
 11
4.2.1 Integrating Objects & Scene
 11
4.2.2 Server & Client
 21
4.3.3 Final Polishing
 37
4.3 Quick Overview
 38
Multiplayer Tutorial
1. Introduction
The aim of this tutorial is to show the essence of Unity Networking. We will show
how to create basic and advanced network applications using Master Server/Client,
UDP Server/Client and Direct Connect. In this tutorial we will use Unity iPhone 1.6,
iPhone 3GS and the StarTrooper demo from the Unity web site.
2. Getting Started
There are a few things that you should know before you start.
• You will learn how to:
Use basic and advanced components of networking.
Create a server and client.
Use the Master Server.
Use Direct Connect.
Use UDP Broadcast Server.
Create a simple scene on the network.
Convert the StarTrooper game to multiplayer.
Welcome, Unity User.
Here you will learn
advanced usage of Unity
Networking.
Have a great time and we
hope that this tutorial will
be helpful.
Use other Unity components and more.
• You should have:
Unity iPhone 1.6.
iPhone or iPod.
Knowledge about networks and how they work.
Advanced C# and JavaScript skills.
Basic Unity skills. You can find more information here.
• Important notes:
Unity supports .NET 1.1 and 2.1.
You can disable or enable Networking in: Edit -> Project Settings -> Player
-> Enable Unity Networking.
Unity Networking supports wifi, 3G and GSM connections.
You can connect between different types of Unity targets. For example you
can connect from Unity on the desktop to Unity iPhone, from Unity Web
Player to Unity iPhone, etc.
3. Creating Your First Client / Server Application
In this chapter, we will cover the basics needed to create a simple multiplayer ap-
plication. We will create our first example featuring moving objects on the network
and basic handshaking between the client and server. The example uses all basic
multiplayer components such as: Network and NetworkView. We will use Direct
Connect for connection between client and server.
3.1 Preparing Scene
• Now let’s start with a simple scene. Your first steps:
Create a new Project.
Create a new Prefab and name it Player: Assets -> Create -> Prefab.
Create a new Cube GameObject: GameObject -> Create other -> Cube.
Drag your Cube from the Hierarchy to your Player Prefab in the Project and
then delete your Cube from the scene.
4
Create a new Plane and name it Ground: GameObject -> Create other ->
Plane. Your Plane parameters should be: Position (0,0,0), Rotation (0,0,0),
Scale (5,5,5).
Create a Directional Light: GameObject -> Create other -> Directional Light.
Light parameters: Position (0,15,0), Rotation (25,0,0), Scale (1,1,1) Shadows
-> Type -> Soft Shadows.
Finally, save your scene and name it MainGame: File -> Save Scene.
Everything should look like this image:
3.2 Creating Scripts & Adding Components
• Next you will learn how to create the server and client, instantiate the scene and
objects on the network, move objects, and connect everything together.
3.2.1 Server & Client
• We will start with the most important — the creation of Server and Client:
Create a new JavaScript file and name it ConnectionGUI: Assets -> Create ->
JavaScript.
Add this file (by dragging) to the Main Camera object in the Hierarchy, then
open the file and create some variables:
var remoteIP = "127.0.0.1";
var remotePort = 25000;
var listenPort = 25000;
var useNAT = false;
var yourIP = "";
var yourPort = "";
5
Now we will create an interface using Unity GUI for creating the server and
connecting to it:
function OnGUI () {
// Checking if you are connected to the server or not
if (Network.peerType == NetworkPeerType.Disconnected)
{
// If not connected
if (GUI.Button (new Rect(10,10,100,30),"Connect"))
{
Network.useNat = useNAT;
// Connecting to the server
Network.Connect(remoteIP, remotePort);
}
if (GUI.Button (new Rect(10,50,100,30),"Start Server"))
{
Network.useNat = useNAT;
// Creating server
Network.InitializeServer(32, listenPort);
// Notify our objects that the level and the network is ready
for (var go : GameObject in FindObjectsOfType(GameObject))
{
go.SendMessage("OnNetworkLoadedLevel",
SendMessageOptions.DontRequireReceiver);
}
}
// Fields to insert ip address and port
remoteIP = GUI.TextField(new Rect(120,10,100,20),remoteIP);
remotePort = parseInt(GUI.TextField(new
Rect(230,10,40,20),remotePort.ToString()));
}
else
{
// Getting your ip address and port
ipaddress = Network.player.ipAddress;
port = Network.player.port.ToString();
GUI.Label(new Rect(140,20,250,40),"IP Adress: "+ipaddress+":"+port);
if (GUI.Button (new Rect(10,10,100,50),"Disconnect"))
{
// Disconnect from the server
Network.Disconnect(200);
}
}
}
6
• Pay attention to the function below. This function is called every time someone
successfully connects. When this happens, we notify all objects that the scene and
the network are ready.
function OnConnectedToServer () {
// Notify our objects that the level and the network are ready
for (var go : GameObject in FindObjectsOfType(GameObject))
go.SendMessage("OnNetworkLoadedLevel",
SendMessageOptions.DontRequireReceiver);
}
• In Play mode your screen should look like these images:
• Now you can test your server and client. Edit your Player Settings (Edit -> Project
Settings -> Player) to set up your iPhone Bundle Identifier and switch the Default
Screen Orientation to Landscape Right. Build your project to the iPhone and create
a server in the Editor. Try to connect to the server using the IP address you can
find on the server screen — if everything goes OK you will see “Disconnect” button
and your IP address on both screens. Note that both applications must be on the
same network for everything to work.
7
3.2.2 Scene & Objects Instantiation On The Network
• Now we need to add the network components to your Player (Cube) and write code
to instantiate it:
Select Player Prefab and add a NetworkView: Components -> Miscellaneous
-> NetworkView.
When the component appears on your object change the State Synchroniza-
tion parameter to Reliable Delta Compressed. This is needed to show your
synchronized transformation to all users.
Add a Rigidbody to your Player Prefab: Select Prefab -> Component -> Phys-
ics -> Rigidbody.
Your new components should look like this image:
• Now we will instantiate your Player and objects on the network:
Create a new empty GameObject and name it Spawn. Object parameters: Po-
sition (0,5,0), Rotation (0,0,0), Scale (1,1,1).
Create a new JavaScript file and name it Instantiate.
Open the file and write following code:
var SpaceCraft : Transform;
function OnNetworkLoadedLevel () {
// Instantiating SpaceCraft when Network is loaded
Network.Instantiate(SpaceCraft, transform.position, transform.rotation, 0);
}
function OnPlayerDisconnected (player : NetworkPlayer) {
Network.RemoveRPCs(player, 0);
Network.DestroyPlayerObjects(player);
}
8
Add this file to your Spawn object: Select Spawn Object -> Component ->
Scripts -> Instantiate.
Select your Spawn object and change the Player parameter to “Player (Trans-
form)” by selecting your prefab from the list.
• If you test your example you will see that the server and each connected user will
have their own Player (Cube). To be sure, we will create a simple test:
Create a new JavaScript file and name it Control.js.
Add this code to the file:
function OnGUI() {
if(GUI.Button(new Rect(20,100,50,50),"up"))
{
GameObject.Find("Player(Clone)").transform.position = new Vector3(0,5,0);
}
}
Add this file to the Spawn object in the Hierarchy.
Build your project, create a server and connect to it. Now you can see that
everyone can move their own Player (Cube).
Your editor screen should look like this image:
9
3.3 Quick Overview
Congratulations! You have covered all of the basics
needed to create a multiplayer application.
• You have learned how to:
Prepare a basic scene for a multiplayer game.
Create a server.
Create a client.
Use Direct Connect.
Use the basic network components.
Instantiate a scene and objects on the network.
Connect everything together.
Download the whole NetworkExample project.
In the next chapter, we will expand on the ideas that we have
already covered and create an advanced networking setup.
10
4. Implementing Multiplayer in Startrooper
In this chapter you will learn how to convert the StarTrooper game from single
player to multiplayer. We will use complex components and three different con-
nection types: Direct Connect (that you have seen in chapter 4), MasterServer Con-
nection and UDP Broadcast connection. At the end of this chapter you will be able
to fly around and kill other users in multiplayer mode.
• Download StarTrooper from the Unity Web Site and make yourself familiar with it.
4.1 Changing Scene
• As the scene we're going to modify was designed for single player game, we need
to change it a little bit. We will make more changes here later, but we'll start with
some basics:
Open the downloaded StarTrooper project.
Select the StarTrooper scene.
Select SpaceCraftFBX in Hierarchy.
Add a NetworkView Component: Component -> Miscellaneous -> Net-
workView.
Remove the Player Controls script from the object.
Remove the Missile Launcher script from the object.
Add a Trail Render: Component -> Particles -> Trail Render.
In the Trail Render set Materials -> Element 0 -> missleTracer.
Create a new GameObject and name it Spawn: GameObject -> Create Empty.
Set Transform parameters: Position (0,30,11), Rotation (0,0,0), Scale (1,1,1).
4.2 Integration
Now we will make our main changes and integrate networking into the project.
Let's begin by preparing the scene and SpaceCraft for the network. When we are
done, we will create a server and client.
4.2.1 Integrating Objects & Scene
• Now we need to create a script that will translate our Rigidbody on the Network:
First, create two folders: "NetworkFIles" for new scripts and "Plugins"for C#
files that should be pre-compiled.
Create a C# file and name it NetworkRigidbody.
Move the NetworkRigidbody.cs file to the Plugins folder.
11
Do not worry much about this file, just use it where it is required.
You can use this script on any project you want, because it's suitable for all
Rigidbody objects.
Open your NetworkRigidbody.cs file and use this code:
using UnityEngine;
using System.Collections;
public class NetworkRigidbody : MonoBehaviour {
public double m_InterpolationBackTime = 0.1;
public double m_ExtrapolationLimit = 0.5;
internal struct State
{
internal double timestamp;
internal Vector3 pos;
internal Vector3 velocity;
internal Quaternion rot;
internal Vector3 angularVelocity;
}
// We store twenty states with "playback" information
State[] m_BufferedState = new State[20];
// Keep track of what slots are used
int m_TimestampCount;
void OnSerializeNetworkView(BitStream stream, NetworkMessageInfo info) {
// Send data to server
if (stream.isWriting)
{
Vector3 pos = rigidbody.position;
Quaternion rot = rigidbody.rotation;
Vector3 velocity = rigidbody.velocity;
Vector3 angularVelocity = rigidbody.angularVelocity;
stream.Serialize(ref pos);
stream.Serialize(ref velocity);
stream.Serialize(ref rot);
stream.Serialize(ref angularVelocity);
}
// Read data from remote client
else
{
Vector3 pos = Vector3.zero;
Vector3 velocity = Vector3.zero;
Quaternion rot = Quaternion.identity;
12
Vector3 angularVelocity = Vector3.zero;
stream.Serialize(ref pos);
stream.Serialize(ref velocity);
stream.Serialize(ref rot);
stream.Serialize(ref angularVelocity);
// Shift the buffer sideways, deleting state 20
for (int i=m_BufferedState.Length-1;i>=1;i--)
{
m_BufferedState[i] = m_BufferedState[i-1];
}
// Record current state in slot 0
State state;
state.timestamp = info.timestamp;
state.pos = pos;
state.velocity = velocity;
state.rot = rot;
state.angularVelocity = angularVelocity;
m_BufferedState[0] = state;
// Update used slot count, however never exceed the buffer size
// Slots aren't actually freed so this just makes sure the buffer is
// filled up and that uninitalized slots aren't used.
m_TimestampCount = Mathf.Min(m_TimestampCount + 1,
m_BufferedState.Length);
// Check if states are in order, if it is inconsistent you could reshuffel or
// drop the out-of-order state. Nothing is done here
for (int i=0;i<m_TimestampCount-1;i++)
{
if (m_BufferedState[i].timestamp < m_BufferedState[i+1].timestamp)
Debug.Log("State inconsistent");
}
}
}
// We have a window of interpolationBackTime where we basically play
// By having interpolationBackTime the average ping, you will usually use
interpolation.
// And only if no more data arrives we will use extra polation
void Update () {
// This is the target playback time of the rigid body
double interpolationTime = Network.time - m_InterpolationBackTime;
// Use interpolation if the target playback time is present in the buffer
if (m_BufferedState[0].timestamp > interpolationTime)
{
13
// Go through buffer and find correct state to play back
for (int i=0;i<m_TimestampCount;i++)
{
if (m_BufferedState[i].timestamp <= interpolationTime || i ==
m_TimestampCount-1)
{
// The state one slot newer (<100ms) than the best playback state
State rhs = m_BufferedState[Mathf.Max(i-1, 0)];
// The best playback state (closest to 100 ms old (default time))
State lhs = m_BufferedState[i];
// Use the time between the two slots to determine if interpolation is
necessary
double length = rhs.timestamp - lhs.timestamp;
float t = 0.0F;
// As the time difference gets closer to 100 ms t gets closer to 1 in
// which case rhs is only used
// Example:
// Time is 10.000, so sampleTime is 9.900
// lhs.time is 9.910 rhs.time is 9.980 length is 0.070
// t is 9.900 - 9.910 / 0.070 = 0.14. So it uses 14% of rhs, 86% of
lhs
if (length > 0.0001)
t = (float)((interpolationTime - lhs.timestamp) / length);
// if t=0 => lhs is used directly
transform.localPosition = Vector3.Lerp(lhs.pos, rhs.pos, t);
transform.localRotation = Quaternion.Slerp(lhs.rot, rhs.rot, t);
return;
}
}
}
// Use extrapolation
else
{
State latest = m_BufferedState[0];
float extrapolationLength = (float)(interpolationTime - latest.timestamp);
// Don't extrapolation for more than 500 ms, you would need to do that
carefully
if (extrapolationLength < m_ExtrapolationLimit)
{
float axisLength = extrapolationLength * latest.angularVelocity.magnitude
* Mathf.Rad2Deg;
Quaternion angularRotation = Quaternion.AngleAxis(axisLength,
latest.angularVelocity);
rigidbody.position = latest.pos + latest.velocity * extrapolationLength;
14
rigidbody.rotation = angularRotation * latest.rot;
rigidbody.velocity = latest.velocity;
rigidbody.angularVelocity = latest.angularVelocity;
}
}
}
}
Select your SpaceCraftFBX object in the Hierarchy (not in the Project files).
Add NetworkRigidbody.cs to your selected object: Component -> Scripts ->
Network Rigidbody.
Disable the NetworkRigidbody component (just remove a tick from compo-
nent). We will enable it later with some conditions.
In the Network View component: change the Observed parameter from
SpaceCraftFBX (Transform) to SpaceCraftFBX (NetworkRigidbody).
Create a new JavaScript file and name it RigidAssign.
Add RigidAssign.js to your object and edit the file:
function OnNetworkInstantiate (msg : NetworkMessageInfo) {
if (networkView.isMine)
{
var _NetworkRigidbody : NetworkRigidbody =
GetComponent("NetworkRigidbody");
_NetworkRigidbody.enabled = false;
}
else
{
name += "Remote";
var _NetworkRigidbody2 : NetworkRigidbody =
GetComponent("NetworkRigidbody");
_NetworkRigidbody2.enabled = true;
}
}
Create a new Prefab, name it SpaceCraft and move it to your Prefabs folder.
Drag your SpaceCraftFBX from the Hierarchy to your new Prefab (SpaceCraft)
in Project window.
Delete SpaceCraftFBX from the scene.
Create the Tag "SpaceCraft" for your SpaceCraft Prefab: Edit -> Project Set-
tings -> Tags.
15
Select your SpaceCraft Prefab again and assign the Tag to it: click on "Un-
tagged" and select "SpaceCraft".
• Your SpaceCraft Prefab should look like this image:
The SpaceCraft is now prepared for the Network!
Create a new JavaScript file and name it Instantiate.js
Add the file to the Spawn object in the Hierarchy and write this code to it:
var SpaceCraft : Transform;
function OnNetworkLoadedLevel () {
// Instantiating SpaceCraft when Network is loaded
Network.Instantiate(SpaceCraft, transform.position, transform.rotation, 0);
}
function OnPlayerDisconnected (player : NetworkPlayer) {
// Removing player if Network is disconnected
16
Debug.Log("Server destroying player");
Network.RemoveRPCs(player, 0);
Network.DestroyPlayerObjects(player);
}
Select the Spawn object in the Hierarchy and set the Space Craft parameter to
SpaceCraft (Transform) (select your SpaceCraft Prefab from list).
Select the Main Camera object in the Hierarchy.
Open the Smooth Follow script and change everything to:
var target : Transform;
var distance : float = 10.0;
var height : float = 5.0;
var heightDamping : float = 2.0;
var rotationDamping : float = 3.0;
function LateUpdate () {
if(GameObject.FindWithTag("SpaceCraft"))
{
if (!target)
target = GameObject.FindWithTag("SpaceCraft").transform;
// Calculate the current rotation angles
var wantedRotationAngle : float = target.eulerAngles.y;
var wantedHeight : float = target.position.y + height;
var currentRotationAngle : float = transform.eulerAngles.y;
var currentHeight : float = transform.position.y;
// Damp the rotation around the y-axis
var dt : float = Time.deltaTime;
currentRotationAngle = Mathf.LerpAngle (currentRotationAngle,
wantedRotationAngle, rotationDamping * dt);
// Damp the height
currentHeight = Mathf.Lerp (currentHeight, wantedHeight, heightDamping * dt);
// Convert the angle into a rotation
var currentRotation : Quaternion = Quaternion.Euler (0, currentRotationAngle,
0);
// Set the position of the camera on the x-z plane to:
// distance meters behind the target
//transform.position = target.position;
var pos : Vector3 = target.position - currentRotation * Vector3.forward *
distance;
pos.y = currentHeight;
// Set the height of the camera
17
transform.position = pos;
// Always look at the target
transform.LookAt (target);
}
}
Add the Player Controls script to the Main Camera and open it to edit.
Change everything to this code:
var turnSpeed : float = 3.0;
var maxTurnLean : float = 70.0;
var maxTilt : float = 50.0;
var sensitivity : float = 0.5;
var forwardForce : float = 5.0;
var guiSpeedElement : Transform;
var craft : GameObject;
private var normalizedSpeed : float = 0.2;
private var euler : Vector3 = Vector3.zero;
var horizontalOrientation : boolean = true;
function Awake () {
if (horizontalOrientation)
{
iPhoneSettings.screenOrientation =
iPhoneScreenOrientation.LandscapeLeft;
}
else
{
iPhoneSettings.screenOrientation =
iPhoneScreenOrientation.Portrait;
}
guiSpeedElement = GameObject.Find("speed").transform;
guiSpeedElement.position = new Vector3 (0, normalizedSpeed, 0);
}
function FixedUpdate () {
if(GameObject.FindWithTag("SpaceCraft"))
{
GameObject.FindWithTag("SpaceCraft").rigidbody.AddRelativeForce(0, 0,
normalizedSpeed * (forwardForce*3));
var accelerator : Vector3 = iPhoneInput.acceleration;
18
if (horizontalOrientation)
{
var t : float = accelerator.x;
accelerator.x = -accelerator.y;
accelerator.y = t;
}
// Rotate turn based on acceleration
euler.y += accelerator.x * turnSpeed;
// Since we set absolute lean position, do some extra smoothing on it
euler.z = Mathf.Lerp(euler.z, -accelerator.x * maxTurnLean, 0.2);
// Since we set absolute lean position, do some extra smoothing on it
euler.x = Mathf.Lerp(euler.x, accelerator.y * maxTilt, 0.2);
// Apply rotation and apply some smoothing
var rot : Quaternion = Quaternion.Euler(euler);
GameObject.FindWithTag("SpaceCraft").transform.rotation = Quaternion.Lerp
(transform.rotation, rot, sensitivity);
}
}
function Update () {
for (var evt : iPhoneTouch in iPhoneInput.touches)
{
if (evt.phase == iPhoneTouchPhase.Moved)
{
normalizedSpeed = evt.position.y / Screen.height;
guiSpeedElement.position = new Vector3 (0, normalizedSpeed, 0);
}
}
}
Add a Missile Launcher script to the Main Camera. Set the Missile parameter
to missilePrefab.
Open the Missile Launcher script to edit.
We will add a timer for shooting and some small changes as well.
var missile : GameObject;
var timer : int = 0;
function FixedUpdate() {
timer++;
}
19
function Update () {
if ((Input.GetMouseButtonDown (0))&&(timer>10))
{
// if SpaceCraft exists
if(GameObject.FindWithTag("SpaceCraft"))
{
var position : Vector3 = new Vector3(0, -0.2, 1) * 10.0;
position = GameObject.FindWithTag("SpaceCraft").transform.TransformPoint
(position);
// instantiating missile
var thisMissile : GameObject = Network.Instantiate (missile, position,
GameObject.FindWithTag("SpaceCraft").transform.rotation,0) as GameObject;
Physics.IgnoreCollision(thisMissile.collider,
GameObject.FindWithTag("SpaceCraft").collider);;
timer = 0;
}
}
}
Create the new tag "Missile" and assign it to missilePrefab.
Select the missilePrefab and open the MissileTrajectory script to edit.
We will make the ability to kill other SpaceCraft:
var explosion : GameObject;
function OnCollisionEnter(collision : Collision) {
if(GameObject.FindWithTag("SpaceCraft"))
{
if(((collision.gameObject.tag == "Untagged")||(collision.gameObject.tag ==
"SpaceCraft"))&&(collision.gameObject.tag != "Missile"))
{
var contact : ContactPoint = collision.contacts[0];
Instantiate (explosion, contact.point + (contact.normal * 5.0) ,
Quaternion.identity);
if (collision.gameObject.tag == "SpaceCraft")
{
Instantiate (explosion, contact.point + (contact.normal * 5.0) ,
camera.main.transform.rotation);
collision.gameObject.transform.position =
GameObject.Find("Spawn").transform.position;
}
Destroy (gameObject);
}
20
}
}
function FixedUpdate () {
if(GameObject.FindWithTag("Missile"))
{
rigidbody.AddForce (transform.TransformDirection (Vector3.forward +
Vector3(0,0.1,0)) * 720.0);
}
}
You have prepared the Scene and Objects for the
Network.
4.2.2 Server & Client
Now it's time to create the server for this game. We will be creating three different
types of servers.
Create a new scene and save it as ServerChoose: File -> New Scene, File ->
Save Scene. The scene will be used for choosing server type.
Create a new scene and save it as UDPServer. This scene will be used for UDP
Broadcast connection.
Create a new scene and save it as MasterServer. This scene will be used for
Master Server.
Create a new scene again, save as EmptyScene. We will use this scene when
player has disconnected to clear up leftovers before new connection.
Add all your scenes to the build settings: File -> Build Settings -> Add Open
Scene. Your scene "ServerChoose" should be first in the list, for example:
• PS: you can create a folder and put all scenes together in one place.
21
Open the ServerChoose scene.
Create a new JavaScript file and name it Menu. We will use this scene and this
script for choosing a type of server and connection.
Add this script to the Main Camera and add the following code:
function OnGUI() {
GUI.Label(new Rect((Screen.width/2)-80,(Screen.height/2)-130,200,50),"SELECT
CONNECTION TYPE");
GUI.Label(new Rect((Screen.width-220),(Screen.height-30),220,30),"STAR-TROOPER
MULTIPLAYER DEMO");
if(GUI.Button(new Rect((Screen.width/2)-100,(Screen.height/
2)-100,200,50),"Master Server Connection"))
{
Application.LoadLevel("MasterServer");
}
if(GUI.Button(new Rect((Screen.width/2)-100,(Screen.height/2)-40,200,50),"Direct
Connection"))
{
Application.LoadLevel("StarTrooper");
}
if(GUI.Button(new Rect((Screen.width/2)-100,(Screen.height/2)+20,200,50),"UDP
Connection"))
{
Application.LoadLevel("UDPServer");
}
}
Open the MasterServer scene.
Create a new JavaScript file and name it NetworkLevelLoad. We will use this
script for loading the StarTrooper scene and objects to the network.
Create a new Empty GameObject and name it ConnectionGUI.
Add the NetworkLevelLoad script to the ConnectionGUI object and open to
edit:
// Keep track of the last level prefix (increment each time a new level loads)
private var lastLevelPrefix = 0;
function Awake () {
// Network level loading is done in a seperate channel.
DontDestroyOnLoad(this);
networkView.group = 1;
22
Application.LoadLevel("EmptyScene");
}
function OnGUI () {
// When network is running (server or client) then display the level "StarTrooper"
if (Network.peerType != NetworkPeerType.Disconnected)
{
if (GUI.Button(new Rect(350,10,100,30),"StarTrooper"))
{
// Make sure no old RPC calls are buffered and then send load level command
Network.RemoveRPCsInGroup(0);
Network.RemoveRPCsInGroup(1);
// Load level with incremented level prefix (for view IDs)
networkView.RPC( "LoadLevel", RPCMode.AllBuffered, "StarTrooper",
lastLevelPrefix + 1);
}
}
}
@RPC
function LoadLevel (level : String, levelPrefix : int) {
Debug.Log("Loading level " + level + " with prefix " + levelPrefix);
lastLevelPrefix = levelPrefix;
// There is no reason to send any more data over the network on the default
channel,
// because we are about to load the level, because all those objects will get deleted
anyway
Network.SetSendingEnabled(0, false);
// We need to stop receiving because first the level must be loaded.
// Once the level is loaded, RPC's and other state update attached to objects in the
level are allowed to fire
Network.isMessageQueueRunning = false;
// All network views loaded from a level will get a prefix into their NetworkViewID.
// This will prevent old updates from clients leaking into a newly created scene.
Network.SetLevelPrefix(levelPrefix);
Application.LoadLevel(level);
yield;
yield;
// Allow receiving data again
Network.isMessageQueueRunning = true;
// Now the level has been loaded and we can start sending out data
Network.SetSendingEnabled(0, true);
// Notify our objects that the level and the network is ready
23
var go : Transform[] = FindObjectsOfType(Transform);
var go_len = go.length;
for (var i=0;i<go_len;i++)
{
go[i].SendMessage("OnNetworkLoadedLevel",
SendMessageOptions.DontRequireReceiver);
}
}
function OnDisconnectedFromServer () {
Application.LoadLevel("EmptyScene");
}
@script RequireComponent(NetworkView)
• Ensure that this script has added a NetworkView automatically, otherwise add Net-
workLevelLoad from the menu (Component->Scripts->NetworkLevelLoad).
Create a new JavaScript file and name it MasterServerGUI. With this script we
will create a Master Server/Client and some GUI to use it.
Add this file to the ConnectionGUI object and open the script to edit:
DontDestroyOnLoad(this);
var gameName = "YourGameName";
var serverPort = 25002;
private var timeoutHostList = 0.0;
private var lastHostListRequest = -1000.0;
private var hostListRefreshTimeout = 10.0;
private var natCapable : ConnectionTesterStatus =
ConnectionTesterStatus.Undetermined;
private var filterNATHosts = false;
private var probingPublicIP = false;
private var doneTesting = false;
private var timer : float = 0.0;
private var windowRect = Rect (Screen.width-300,0,300,100);
private var hideTest = false;
private var testMessage = "Undetermined NAT capabilities";
// Enable this if not running a client on the server machine
// MasterServer.dedicatedServer = true;
function OnFailedToConnectToMasterServer(info: NetworkConnectionError) {
Debug.Log(info);
}
24
function OnFailedToConnect(info: NetworkConnectionError) {
Debug.Log(info);
}
function OnGUI () {
ShowGUI();
}
function Awake () {
// Start connection test
natCapable = Network.TestConnection();
// What kind of IP does this machine have? TestConnection also indicates this in the
// test results
if (Network.HavePublicAddress())
Debug.Log("This machine has a public IP address");
else
Debug.Log("This machine has a private IP address");
}
function Update() {
// If test is undetermined, keep running
if (!doneTesting) {
TestConnection();
}
}
function TestConnection() {
// Start/Poll the connection test, report the results in a label and react to the results
accordingly
natCapable = Network.TestConnection();
switch (natCapable) {
case ConnectionTesterStatus.Error:
testMessage = "Problem determining NAT capabilities";
doneTesting = true;
break;
case ConnectionTesterStatus.Undetermined:
testMessage = "Undetermined NAT capabilities";
doneTesting = false;
break;
case ConnectionTesterStatus.PrivateIPNoNATPunchthrough:
testMessage = "Cannot do NAT punchthrough, filtering NAT enabled hosts for
client connections,"
+" local LAN games only.";
filterNATHosts = true;
25
Network.useNat = true;
doneTesting = true;
break;
case ConnectionTesterStatus.PrivateIPHasNATPunchThrough:
if (probingPublicIP)
testMessage = "Non-connectable public IP address (port "+ serverPort +"
blocked),"
+" NAT punchthrough can circumvent the firewall.";
else
testMessage = "NAT punchthrough capable. Enabling NAT punchthrough
functionality.";
// NAT functionality is enabled in case a server is started,
// clients should enable this based on if the host requires it
Network.useNat = true;
doneTesting = true;
break;
case ConnectionTesterStatus.PublicIPIsConnectable:
testMessage = "Directly connectable public IP address.";
Network.useNat = false;
doneTesting = true;
break;
// This case is a bit special as we now need to check if we can
// use the blocking by using NAT punchthrough
case ConnectionTesterStatus.PublicIPPortBlocked:
testMessage = "Non-connectble public IP address (port " + serverPort +"
blocked),"
+" running a server is impossible.";
Network.useNat = false;
// If no NAT punchthrough test has been performed on this public IP, force a
test
if (!probingPublicIP)
{
Debug.Log("Testing if firewall can be circumnvented");
natCapable = Network.TestConnectionNAT();
probingPublicIP = true;
timer = Time.time + 10;
}
// NAT punchthrough test was performed but we still get blocked
else if (Time.time > timer)
{
probingPublicIP = false; // reset
Network.useNat = true;
doneTesting = true;
}
break;
26
case ConnectionTesterStatus.PublicIPNoServerStarted:
testMessage = "Public IP address but server not initialized,"
+"it must be started to check server accessibility. Restart connection test
when ready.";
break;
default:
testMessage = "Error in test routine, got " + natCapable;
}
}
function ShowGUI() {
if (GUI.Button (new Rect(100,10,120,30),"Retest connection"))
{
Debug.Log("Redoing connection test");
probingPublicIP = false;
doneTesting = false;
natCapable = Network.TestConnection(true);
}
if (Network.peerType == NetworkPeerType.Disconnected)
{
// Start a new server
if (GUI.Button(new Rect(10,10,90,30),"Start Server"))
{
Network.InitializeServer(32, serverPort);
MasterServer.updateRate = 3;
MasterServer.RegisterHost(gameName, "stuff", "profas chat test");
}
// Refresh hosts
if (GUI.Button(new Rect(10,40,210,30),"Refresh available Servers")
|| Time.realtimeSinceStartup > lastHostListRequest + hostListRefreshTimeout)
{
MasterServer.ClearHostList();
MasterServer.RequestHostList (gameName);
lastHostListRequest = Time.realtimeSinceStartup;
Debug.Log("Refresh Click");
}
var data : HostData[] = MasterServer.PollHostList();
var _cnt : int = 0;
for (var element in data)
{
// Do not display NAT enabled games if we cannot do NAT punchthrough
if ( !(filterNATHosts && element.useNat) )
{
27
var name = element.gameName + " " + element.connectedPlayers + " / "
+ element.playerLimit;
var hostInfo;
hostInfo = "[";
// Here we display all IP addresses, there can be multiple in cases where
// internal LAN connections are being attempted. In the GUI we could just
display
// the first one in order not confuse the end user, but internally Unity will
// do a connection check on all IP addresses in the element.ip list, and
connect to the
// first valid one.
for (var host in element.ip)
{
hostInfo = hostInfo + host + ":" + element.port + " ";
}
hostInfo = hostInfo + "]";
if (GUI.Button(new Rect(20,(_cnt*50)+90,400,40),hostInfo.ToString()))
{
// Enable NAT functionality based on what the hosts if configured to
do
Network.useNat = element.useNat;
if (Network.useNat)
print("Using Nat punchthrough to connect");
else
print("Connecting directly to host");
Network.Connect(element.ip, element.port);
}
}
}
}
else
{
if (GUI.Button (new Rect(10,10,90,30),"Disconnect"))
{
Network.Disconnect();
MasterServer.UnregisterHost();
}
}
}
• Now you can test your project using the Master Server:
Go to Edit -> Project Settings -> Player and set up your iPhone Bundle Iden-
tifier and change the Default Screen Orientation to Landscape Left.
28
Build your project to the iPhone.
Run the Server scene in the Editor.
Click on Master Server Connection in the Editor and on the iPhone.
Click on Start Server on Editor.
The server should appear on iPhone (if not, click Refresh available Servers).
Connect to the server from the iPhone.
Click on the StarTrooper button in the Editor or on the iPhone.
Your screens should look like these images:
We have finished our Master Server!
29
• Now we need to create a second connection type - UDP Broadcast connection:
Open the UDPServer scene.
Create a new C# file and name it UDPConnectionGUI.
Move the UDPConnection file to the Plugins folder.
Create a new empty GameObject and name it UDPServer.
Assign the UDPConnectionGUI file to the UDPServer object. (Or assign it after
you write the following code).
Assign a NetworkView Component to the UDPServer object and change the
Observed parameter to UDPServer (Transform).
Assign the NetworkLevelLoad Script file to the UDPServer object.
Open UDPConnectionGUI and write the following:
using UnityEngine;
using System.Collections;
using System.Net;
using System.Net.Sockets;
using System.Threading;
public class UDPConnectionGUI : MonoBehaviour {
private UdpClient server;
private UdpClient client;
private IPEndPoint receivePoint;
private string port = "6767";
private int listenPort = 25001;
private string ip = "0.0.0.0";
private string ip_broadcast = "255.255.255.255";
private bool youServer = false;
private bool connected = false;
private string server_name = "";
private int clear_list = 0;
public void Update() {
if(clear_list++>200)
{
server_name = "";
clear_list = 0;
}
30
}
public void Start() {
Debug.Log("Start");
LoadClient();
}
public void LoadClient() {
client = new UdpClient(System.Convert.ToInt32(port));
receivePoint = new
IPEndPoint(IPAddress.Parse(ip),System.Convert.ToInt32(port));
Thread startClient = new Thread(new ThreadStart(start_client));
startClient.Start();
}
public void start_client() {
bool continueLoop =true;
try
{
while(continueLoop)
{
byte[] recData = client.Receive(ref receivePoint);
System.Text.ASCIIEncoding encode = new System.Text.ASCIIEncoding();
server_name = encode.GetString(recData);
if(connected)
{
server_name = "";
client.Close();
break;
}
}
} catch {}
}
public void start_server() {
try
{
while(true)
{
System.Text.ASCIIEncoding encode = new System.Text.ASCIIEncoding();
byte[] sendData = encode.GetBytes(Network.player.ipAddress.ToString());
31
server.Send(sendData,sendData.Length,ip_broadcast,System.Convert.ToInt32(port));
Thread.Sleep(100);
}
} catch {}
}
void OnGUI() {
if(!youServer)
{
if(GUI.Button(new Rect(10,10,100,30),"Start Server"))
{
youServer = true;
Network.InitializeServer(32, listenPort);
string ipaddress = Network.player.ipAddress.ToString();
ip = ipaddress;
client.Close();
server = new UdpClient(System.Convert.ToInt32(port));
receivePoint = new
IPEndPoint(IPAddress.Parse(ipaddress),System.Convert.ToInt32(port));
Thread startServer = new Thread(new ThreadStart(start_server));
startServer.Start();
}
if(server_name!="")
{
if(GUI.Button(new Rect(20,100,200,50),server_name))
{
connected = true;
Network.Connect(server_name, listenPort);
}
}
}
else
{
if(GUI.Button(new Rect(10,10,100,30),"Disconnect"))
{
Network.Disconnect();
youServer = false;
server.Close();
LoadClient();
}
}
}
}
32
• Now you can test this connection type:
Set your Player Settings (if you haven't changed them yet) as instructed
above.
Build the project to the iPhone.
Play the UDPServer scene in the Editor.
Start the server from the Editor by clicking Start Server.
Connect to the server from the iPhone when the IP address button appears.
Your screens should look like these images:
We have finished our UDP Broadcast server!
• Now we need to create a third connection type - Direct Connect:
Open the StarTrooper scene.
Create a new JavaScript file and name it ConnectionGUI.
Assign the ConnectionGUI.js file to the Main Camera and write the following:
var remoteIP = "127.0.0.1";
var remotePort = 25000;
var listenPort = 25000;
var useNAT = false;
var yourIP = "";
var yourPort = "";
function Awake() {
if (FindObjectOfType(MasterServerGUI))
this.enabled = false;
33
if(FindObjectOfType(UDPConnectionGUI))
this.enabled = false;
}
function OnGUI () {
if (Network.peerType == NetworkPeerType.Disconnected)
{
// If not connected
if (GUI.Button (new Rect(10,10,100,30),"Connect"))
{
Network.useNat = useNAT;
// Connecting to the server
Network.Connect(remoteIP, remotePort);
}
if (GUI.Button (new Rect(10,50,100,30),"Start Server"))
{
Network.useNat = useNAT;
// Creating server
Network.InitializeServer(32, listenPort);
// Notify our objects that the level and the network is ready
for (var go : GameObject in FindObjectsOfType(GameObject))
{
go.SendMessage("OnNetworkLoadedLevel",
SendMessageOptions.DontRequireReceiver);
}
}
remoteIP = GUI.TextField(new Rect(120,10,100,20),remoteIP);
remotePort = parseInt(GUI.TextField(new
Rect(230,10,40,20),remotePort.ToString()));
}
else
{
// If connected
// Getting your ip address and port
ipaddress = Network.player.ipAddress;
port = Network.player.port.ToString();
GUI.Label(new Rect(140,20,250,40),"IP Adress: "+ipaddress+":"+port);
if (GUI.Button (new Rect(10,10,100,50),"Disconnect"))
{
// Disconnect from the server
Network.Disconnect(200);
}
34
}
}
function OnConnectedToServer() {
// Notify our objects that the level and the network is ready
for (var go : GameObject in FindObjectsOfType(GameObject))
go.SendMessage("OnNetworkLoadedLevel",
SendMessageOptions.DontRequireReceiver);
}
function OnDisconnectedFromServer () {
if (this.enabled != false)
Application.LoadLevel(Application.loadedLevel);
else
{
var _NetworkLevelLoad : NetworkLevelLoad =
FindObjectOfType(NetworkLevelLoad);
_NetworkLevelLoad.OnDisconnectedFromServer();
}
}
• Now you can test this connection type:
Set your Player Settings (if you haven't changed them yet) as instructed
above.
Build the project to the iPhone.
Play the StarTrooper scene in the Editor.
Click Direct Connection in the Editor and on the iPhone.
Start the server from the Editor by clicking Start Server.
Enter the IP address on the iPhone in the IP field. You can get the IP address
from the Editor Player screen. Click Connect.
Your screens should look like these images:
35
We have finished our Client and Server with three
connection types.
36
4.3.3 Final Polishing
• Our project is almost finished now. To make our game more playable we need to
add some final polish:
Open the StarTrooper scene.
Select the SpaceCraft Prefab and set the Transform Scale parameters to:
1.8,1.8,1.8.
Select the Main Camera in the Hierarchy and change the public parameters in
the Player Controls script: Turn Speed: 3, Max Turn Lean: 70, Max Tilt: 50,
Sensitivity: 0.5, Forward Force: 20.
In the Main Camera open MissileLauncher.js script. At line 16, change the
vector from Vector3(0,-0.2,1) to Vector3(0,-0.3,0.5).
Select the missilePrefab Prefab and set the Transform Scale parameters to:
8,8,8.
Your last screen should look something like this image:
• PS: These last modifications are based only on my taste, so feel free to make your
own modifications or new features.
37
4.3 Quick Overview
Congratulations! You have finished your MultiPlayer
StarTrooper project.
• You have learned how to:
Prepare a scene and object for the network.
Translate a scene and objects on the network.
Convert a single player game into multiplayer.
Create a Master Server/Client.
Create a Server/Client using Direct Connection.
Create a Server/Client using UDP Broadcast connection.
Use the main Network Components.
Use advanced Unity Components.
Download the whole MultiPlayer StarTrooper Project
38

More Related Content

Similar to 38199728 multi-player-tutorial

Unity Class 13 Presentation - .
Unity Class 13 Presentation -           .Unity Class 13 Presentation -           .
Unity Class 13 Presentation - .TaydeMCruz
 
Getting started with Verold and Three.js
Getting started with Verold and Three.jsGetting started with Verold and Three.js
Getting started with Verold and Three.jsVerold
 
HoloLens Unity Build Pipelines on Azure DevOps
HoloLens Unity Build Pipelines on Azure DevOpsHoloLens Unity Build Pipelines on Azure DevOps
HoloLens Unity Build Pipelines on Azure DevOpsSarah Sexton
 
Cross platform game development
Cross platform game developmentCross platform game development
Cross platform game developmentJerel Hass
 
Uccn1003 -may10_-_lab_01_-_network_services_and_commands
Uccn1003  -may10_-_lab_01_-_network_services_and_commandsUccn1003  -may10_-_lab_01_-_network_services_and_commands
Uccn1003 -may10_-_lab_01_-_network_services_and_commandsShu Shin
 
Uccn1003 -may10_-_lab_01_-_network_services_and_commands
Uccn1003  -may10_-_lab_01_-_network_services_and_commandsUccn1003  -may10_-_lab_01_-_network_services_and_commands
Uccn1003 -may10_-_lab_01_-_network_services_and_commandsShu Shin
 
How to implement camera recording for USB webcam or IP camera in C#.NET
How to implement camera recording for USB webcam or IP camera in C#.NETHow to implement camera recording for USB webcam or IP camera in C#.NET
How to implement camera recording for USB webcam or IP camera in C#.NETOzeki Informatics Ltd.
 
Reactive & Realtime Web Applications with TurboGears2
Reactive & Realtime Web Applications with TurboGears2Reactive & Realtime Web Applications with TurboGears2
Reactive & Realtime Web Applications with TurboGears2Alessandro Molina
 
Handson1 6 federp
Handson1 6 federpHandson1 6 federp
Handson1 6 federpfederpmatc
 
Mikrotik Network Simulator (MUM Presentation Material 2013)
Mikrotik Network Simulator (MUM Presentation Material 2013)Mikrotik Network Simulator (MUM Presentation Material 2013)
Mikrotik Network Simulator (MUM Presentation Material 2013)Rofiq Fauzi
 
Reactotron - A Debugging Agent
Reactotron -  A Debugging AgentReactotron -  A Debugging Agent
Reactotron - A Debugging AgentMatthieu Vachon
 
A complete guide to Node.js
A complete guide to Node.jsA complete guide to Node.js
A complete guide to Node.jsPrabin Silwal
 
Mikrotik Network Simulator (MUM Presentation Material 2013) [COPY]
Mikrotik Network Simulator (MUM Presentation Material 2013) [COPY]Mikrotik Network Simulator (MUM Presentation Material 2013) [COPY]
Mikrotik Network Simulator (MUM Presentation Material 2013) [COPY]Mahadiputra S
 
Developing VR Experiences with Unity
Developing VR Experiences with UnityDeveloping VR Experiences with Unity
Developing VR Experiences with UnityMark Billinghurst
 
20180518 QNAP Seminar - Introduction to React Native
20180518 QNAP Seminar - Introduction to React Native20180518 QNAP Seminar - Introduction to React Native
20180518 QNAP Seminar - Introduction to React NativeEric Deng
 
Augmented reality in web rtc browser
Augmented reality in web rtc browserAugmented reality in web rtc browser
Augmented reality in web rtc browserALTANAI BISHT
 
How to build a chat application with react js, nodejs, and socket.io
How to build a chat application with react js, nodejs, and socket.ioHow to build a chat application with react js, nodejs, and socket.io
How to build a chat application with react js, nodejs, and socket.ioKaty Slemon
 

Similar to 38199728 multi-player-tutorial (20)

Unity Class 13 Presentation - .
Unity Class 13 Presentation -           .Unity Class 13 Presentation -           .
Unity Class 13 Presentation - .
 
Getting started with Verold and Three.js
Getting started with Verold and Three.jsGetting started with Verold and Three.js
Getting started with Verold and Three.js
 
HoloLens Unity Build Pipelines on Azure DevOps
HoloLens Unity Build Pipelines on Azure DevOpsHoloLens Unity Build Pipelines on Azure DevOps
HoloLens Unity Build Pipelines on Azure DevOps
 
Unity3 d devfest-2014
Unity3 d devfest-2014Unity3 d devfest-2014
Unity3 d devfest-2014
 
Cross platform game development
Cross platform game developmentCross platform game development
Cross platform game development
 
Uccn1003 -may10_-_lab_01_-_network_services_and_commands
Uccn1003  -may10_-_lab_01_-_network_services_and_commandsUccn1003  -may10_-_lab_01_-_network_services_and_commands
Uccn1003 -may10_-_lab_01_-_network_services_and_commands
 
Uccn1003 -may10_-_lab_01_-_network_services_and_commands
Uccn1003  -may10_-_lab_01_-_network_services_and_commandsUccn1003  -may10_-_lab_01_-_network_services_and_commands
Uccn1003 -may10_-_lab_01_-_network_services_and_commands
 
How to implement camera recording for USB webcam or IP camera in C#.NET
How to implement camera recording for USB webcam or IP camera in C#.NETHow to implement camera recording for USB webcam or IP camera in C#.NET
How to implement camera recording for USB webcam or IP camera in C#.NET
 
IoT-javascript-2019-fosdem
IoT-javascript-2019-fosdemIoT-javascript-2019-fosdem
IoT-javascript-2019-fosdem
 
Reactive & Realtime Web Applications with TurboGears2
Reactive & Realtime Web Applications with TurboGears2Reactive & Realtime Web Applications with TurboGears2
Reactive & Realtime Web Applications with TurboGears2
 
Handson1 6 federp
Handson1 6 federpHandson1 6 federp
Handson1 6 federp
 
Mikrotik Network Simulator (MUM Presentation Material 2013)
Mikrotik Network Simulator (MUM Presentation Material 2013)Mikrotik Network Simulator (MUM Presentation Material 2013)
Mikrotik Network Simulator (MUM Presentation Material 2013)
 
Reactotron - A Debugging Agent
Reactotron -  A Debugging AgentReactotron -  A Debugging Agent
Reactotron - A Debugging Agent
 
A complete guide to Node.js
A complete guide to Node.jsA complete guide to Node.js
A complete guide to Node.js
 
DotNetNuke
DotNetNukeDotNetNuke
DotNetNuke
 
Mikrotik Network Simulator (MUM Presentation Material 2013) [COPY]
Mikrotik Network Simulator (MUM Presentation Material 2013) [COPY]Mikrotik Network Simulator (MUM Presentation Material 2013) [COPY]
Mikrotik Network Simulator (MUM Presentation Material 2013) [COPY]
 
Developing VR Experiences with Unity
Developing VR Experiences with UnityDeveloping VR Experiences with Unity
Developing VR Experiences with Unity
 
20180518 QNAP Seminar - Introduction to React Native
20180518 QNAP Seminar - Introduction to React Native20180518 QNAP Seminar - Introduction to React Native
20180518 QNAP Seminar - Introduction to React Native
 
Augmented reality in web rtc browser
Augmented reality in web rtc browserAugmented reality in web rtc browser
Augmented reality in web rtc browser
 
How to build a chat application with react js, nodejs, and socket.io
How to build a chat application with react js, nodejs, and socket.ioHow to build a chat application with react js, nodejs, and socket.io
How to build a chat application with react js, nodejs, and socket.io
 

Recently uploaded

Crypto Cloud Review - How To Earn Up To $500 Per DAY Of Bitcoin 100% On AutoP...
Crypto Cloud Review - How To Earn Up To $500 Per DAY Of Bitcoin 100% On AutoP...Crypto Cloud Review - How To Earn Up To $500 Per DAY Of Bitcoin 100% On AutoP...
Crypto Cloud Review - How To Earn Up To $500 Per DAY Of Bitcoin 100% On AutoP...SelfMade bd
 
Payment Gateway Testing Simplified_ A Step-by-Step Guide for Beginners.pdf
Payment Gateway Testing Simplified_ A Step-by-Step Guide for Beginners.pdfPayment Gateway Testing Simplified_ A Step-by-Step Guide for Beginners.pdf
Payment Gateway Testing Simplified_ A Step-by-Step Guide for Beginners.pdfkalichargn70th171
 
The Guide to Integrating Generative AI into Unified Continuous Testing Platfo...
The Guide to Integrating Generative AI into Unified Continuous Testing Platfo...The Guide to Integrating Generative AI into Unified Continuous Testing Platfo...
The Guide to Integrating Generative AI into Unified Continuous Testing Platfo...kalichargn70th171
 
OpenChain - The Ramifications of ISO/IEC 5230 and ISO/IEC 18974 for Legal Pro...
OpenChain - The Ramifications of ISO/IEC 5230 and ISO/IEC 18974 for Legal Pro...OpenChain - The Ramifications of ISO/IEC 5230 and ISO/IEC 18974 for Legal Pro...
OpenChain - The Ramifications of ISO/IEC 5230 and ISO/IEC 18974 for Legal Pro...Shane Coughlan
 
Optimizing AI for immediate response in Smart CCTV
Optimizing AI for immediate response in Smart CCTVOptimizing AI for immediate response in Smart CCTV
Optimizing AI for immediate response in Smart CCTVshikhaohhpro
 
The Ultimate Test Automation Guide_ Best Practices and Tips.pdf
The Ultimate Test Automation Guide_ Best Practices and Tips.pdfThe Ultimate Test Automation Guide_ Best Practices and Tips.pdf
The Ultimate Test Automation Guide_ Best Practices and Tips.pdfkalichargn70th171
 
How To Troubleshoot Collaboration Apps for the Modern Connected Worker
How To Troubleshoot Collaboration Apps for the Modern Connected WorkerHow To Troubleshoot Collaboration Apps for the Modern Connected Worker
How To Troubleshoot Collaboration Apps for the Modern Connected WorkerThousandEyes
 
A Secure and Reliable Document Management System is Essential.docx
A Secure and Reliable Document Management System is Essential.docxA Secure and Reliable Document Management System is Essential.docx
A Secure and Reliable Document Management System is Essential.docxComplianceQuest1
 
MarTech Trend 2024 Book : Marketing Technology Trends (2024 Edition) How Data...
MarTech Trend 2024 Book : Marketing Technology Trends (2024 Edition) How Data...MarTech Trend 2024 Book : Marketing Technology Trends (2024 Edition) How Data...
MarTech Trend 2024 Book : Marketing Technology Trends (2024 Edition) How Data...Jittipong Loespradit
 
The Real-World Challenges of Medical Device Cybersecurity- Mitigating Vulnera...
The Real-World Challenges of Medical Device Cybersecurity- Mitigating Vulnera...The Real-World Challenges of Medical Device Cybersecurity- Mitigating Vulnera...
The Real-World Challenges of Medical Device Cybersecurity- Mitigating Vulnera...ICS
 
Exploring the Best Video Editing App.pdf
Exploring the Best Video Editing App.pdfExploring the Best Video Editing App.pdf
Exploring the Best Video Editing App.pdfproinshot.com
 
AI Mastery 201: Elevating Your Workflow with Advanced LLM Techniques
AI Mastery 201: Elevating Your Workflow with Advanced LLM TechniquesAI Mastery 201: Elevating Your Workflow with Advanced LLM Techniques
AI Mastery 201: Elevating Your Workflow with Advanced LLM TechniquesVictorSzoltysek
 
The title is not connected to what is inside
The title is not connected to what is insideThe title is not connected to what is inside
The title is not connected to what is insideshinachiaurasa2
 
Right Money Management App For Your Financial Goals
Right Money Management App For Your Financial GoalsRight Money Management App For Your Financial Goals
Right Money Management App For Your Financial GoalsJhone kinadey
 
Learn the Fundamentals of XCUITest Framework_ A Beginner's Guide.pdf
Learn the Fundamentals of XCUITest Framework_ A Beginner's Guide.pdfLearn the Fundamentals of XCUITest Framework_ A Beginner's Guide.pdf
Learn the Fundamentals of XCUITest Framework_ A Beginner's Guide.pdfkalichargn70th171
 
introduction-to-automotive Andoid os-csimmonds-ndctechtown-2021.pdf
introduction-to-automotive Andoid os-csimmonds-ndctechtown-2021.pdfintroduction-to-automotive Andoid os-csimmonds-ndctechtown-2021.pdf
introduction-to-automotive Andoid os-csimmonds-ndctechtown-2021.pdfVishalKumarJha10
 
%in kempton park+277-882-255-28 abortion pills for sale in kempton park
%in kempton park+277-882-255-28 abortion pills for sale in kempton park %in kempton park+277-882-255-28 abortion pills for sale in kempton park
%in kempton park+277-882-255-28 abortion pills for sale in kempton park masabamasaba
 
Define the academic and professional writing..pdf
Define the academic and professional writing..pdfDefine the academic and professional writing..pdf
Define the academic and professional writing..pdfPearlKirahMaeRagusta1
 
VTU technical seminar 8Th Sem on Scikit-learn
VTU technical seminar 8Th Sem on Scikit-learnVTU technical seminar 8Th Sem on Scikit-learn
VTU technical seminar 8Th Sem on Scikit-learnAmarnathKambale
 
%in ivory park+277-882-255-28 abortion pills for sale in ivory park
%in ivory park+277-882-255-28 abortion pills for sale in ivory park %in ivory park+277-882-255-28 abortion pills for sale in ivory park
%in ivory park+277-882-255-28 abortion pills for sale in ivory park masabamasaba
 

Recently uploaded (20)

Crypto Cloud Review - How To Earn Up To $500 Per DAY Of Bitcoin 100% On AutoP...
Crypto Cloud Review - How To Earn Up To $500 Per DAY Of Bitcoin 100% On AutoP...Crypto Cloud Review - How To Earn Up To $500 Per DAY Of Bitcoin 100% On AutoP...
Crypto Cloud Review - How To Earn Up To $500 Per DAY Of Bitcoin 100% On AutoP...
 
Payment Gateway Testing Simplified_ A Step-by-Step Guide for Beginners.pdf
Payment Gateway Testing Simplified_ A Step-by-Step Guide for Beginners.pdfPayment Gateway Testing Simplified_ A Step-by-Step Guide for Beginners.pdf
Payment Gateway Testing Simplified_ A Step-by-Step Guide for Beginners.pdf
 
The Guide to Integrating Generative AI into Unified Continuous Testing Platfo...
The Guide to Integrating Generative AI into Unified Continuous Testing Platfo...The Guide to Integrating Generative AI into Unified Continuous Testing Platfo...
The Guide to Integrating Generative AI into Unified Continuous Testing Platfo...
 
OpenChain - The Ramifications of ISO/IEC 5230 and ISO/IEC 18974 for Legal Pro...
OpenChain - The Ramifications of ISO/IEC 5230 and ISO/IEC 18974 for Legal Pro...OpenChain - The Ramifications of ISO/IEC 5230 and ISO/IEC 18974 for Legal Pro...
OpenChain - The Ramifications of ISO/IEC 5230 and ISO/IEC 18974 for Legal Pro...
 
Optimizing AI for immediate response in Smart CCTV
Optimizing AI for immediate response in Smart CCTVOptimizing AI for immediate response in Smart CCTV
Optimizing AI for immediate response in Smart CCTV
 
The Ultimate Test Automation Guide_ Best Practices and Tips.pdf
The Ultimate Test Automation Guide_ Best Practices and Tips.pdfThe Ultimate Test Automation Guide_ Best Practices and Tips.pdf
The Ultimate Test Automation Guide_ Best Practices and Tips.pdf
 
How To Troubleshoot Collaboration Apps for the Modern Connected Worker
How To Troubleshoot Collaboration Apps for the Modern Connected WorkerHow To Troubleshoot Collaboration Apps for the Modern Connected Worker
How To Troubleshoot Collaboration Apps for the Modern Connected Worker
 
A Secure and Reliable Document Management System is Essential.docx
A Secure and Reliable Document Management System is Essential.docxA Secure and Reliable Document Management System is Essential.docx
A Secure and Reliable Document Management System is Essential.docx
 
MarTech Trend 2024 Book : Marketing Technology Trends (2024 Edition) How Data...
MarTech Trend 2024 Book : Marketing Technology Trends (2024 Edition) How Data...MarTech Trend 2024 Book : Marketing Technology Trends (2024 Edition) How Data...
MarTech Trend 2024 Book : Marketing Technology Trends (2024 Edition) How Data...
 
The Real-World Challenges of Medical Device Cybersecurity- Mitigating Vulnera...
The Real-World Challenges of Medical Device Cybersecurity- Mitigating Vulnera...The Real-World Challenges of Medical Device Cybersecurity- Mitigating Vulnera...
The Real-World Challenges of Medical Device Cybersecurity- Mitigating Vulnera...
 
Exploring the Best Video Editing App.pdf
Exploring the Best Video Editing App.pdfExploring the Best Video Editing App.pdf
Exploring the Best Video Editing App.pdf
 
AI Mastery 201: Elevating Your Workflow with Advanced LLM Techniques
AI Mastery 201: Elevating Your Workflow with Advanced LLM TechniquesAI Mastery 201: Elevating Your Workflow with Advanced LLM Techniques
AI Mastery 201: Elevating Your Workflow with Advanced LLM Techniques
 
The title is not connected to what is inside
The title is not connected to what is insideThe title is not connected to what is inside
The title is not connected to what is inside
 
Right Money Management App For Your Financial Goals
Right Money Management App For Your Financial GoalsRight Money Management App For Your Financial Goals
Right Money Management App For Your Financial Goals
 
Learn the Fundamentals of XCUITest Framework_ A Beginner's Guide.pdf
Learn the Fundamentals of XCUITest Framework_ A Beginner's Guide.pdfLearn the Fundamentals of XCUITest Framework_ A Beginner's Guide.pdf
Learn the Fundamentals of XCUITest Framework_ A Beginner's Guide.pdf
 
introduction-to-automotive Andoid os-csimmonds-ndctechtown-2021.pdf
introduction-to-automotive Andoid os-csimmonds-ndctechtown-2021.pdfintroduction-to-automotive Andoid os-csimmonds-ndctechtown-2021.pdf
introduction-to-automotive Andoid os-csimmonds-ndctechtown-2021.pdf
 
%in kempton park+277-882-255-28 abortion pills for sale in kempton park
%in kempton park+277-882-255-28 abortion pills for sale in kempton park %in kempton park+277-882-255-28 abortion pills for sale in kempton park
%in kempton park+277-882-255-28 abortion pills for sale in kempton park
 
Define the academic and professional writing..pdf
Define the academic and professional writing..pdfDefine the academic and professional writing..pdf
Define the academic and professional writing..pdf
 
VTU technical seminar 8Th Sem on Scikit-learn
VTU technical seminar 8Th Sem on Scikit-learnVTU technical seminar 8Th Sem on Scikit-learn
VTU technical seminar 8Th Sem on Scikit-learn
 
%in ivory park+277-882-255-28 abortion pills for sale in ivory park
%in ivory park+277-882-255-28 abortion pills for sale in ivory park %in ivory park+277-882-255-28 abortion pills for sale in ivory park
%in ivory park+277-882-255-28 abortion pills for sale in ivory park
 

38199728 multi-player-tutorial

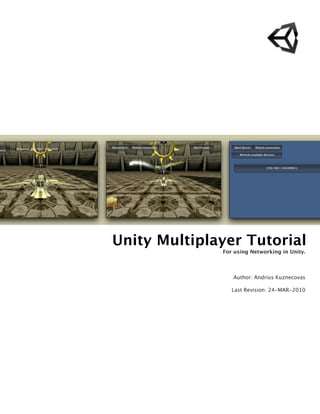
  • 1. Unity Multiplayer Tutorial For using Networking in Unity. Author: Andrius Kuznecovas Last Revision: 24-MAR-2010
  • 2. Contents 1. Multiplayer Tutorial 1. Introduction 3 2. Getting Started 3 3. Creating Your First Client / Server Application 4 3.1 Preparing Scene 4 3.2 Creating Scripts & Adding Components 5 3.2.1 Server & Client 5 3.2.2 Scene & Objects Instantiation On The Network 8 3.3 Quick Overview 10 4. Implementing Multiplayer in Startrooper 11 4.1 Changing Scene 11 4.2 Integration 11 4.2.1 Integrating Objects & Scene 11 4.2.2 Server & Client 21 4.3.3 Final Polishing 37 4.3 Quick Overview 38
  • 3. Multiplayer Tutorial 1. Introduction The aim of this tutorial is to show the essence of Unity Networking. We will show how to create basic and advanced network applications using Master Server/Client, UDP Server/Client and Direct Connect. In this tutorial we will use Unity iPhone 1.6, iPhone 3GS and the StarTrooper demo from the Unity web site. 2. Getting Started There are a few things that you should know before you start. • You will learn how to: Use basic and advanced components of networking. Create a server and client. Use the Master Server. Use Direct Connect. Use UDP Broadcast Server. Create a simple scene on the network. Convert the StarTrooper game to multiplayer. Welcome, Unity User. Here you will learn advanced usage of Unity Networking. Have a great time and we hope that this tutorial will be helpful.
  • 4. Use other Unity components and more. • You should have: Unity iPhone 1.6. iPhone or iPod. Knowledge about networks and how they work. Advanced C# and JavaScript skills. Basic Unity skills. You can find more information here. • Important notes: Unity supports .NET 1.1 and 2.1. You can disable or enable Networking in: Edit -> Project Settings -> Player -> Enable Unity Networking. Unity Networking supports wifi, 3G and GSM connections. You can connect between different types of Unity targets. For example you can connect from Unity on the desktop to Unity iPhone, from Unity Web Player to Unity iPhone, etc. 3. Creating Your First Client / Server Application In this chapter, we will cover the basics needed to create a simple multiplayer ap- plication. We will create our first example featuring moving objects on the network and basic handshaking between the client and server. The example uses all basic multiplayer components such as: Network and NetworkView. We will use Direct Connect for connection between client and server. 3.1 Preparing Scene • Now let’s start with a simple scene. Your first steps: Create a new Project. Create a new Prefab and name it Player: Assets -> Create -> Prefab. Create a new Cube GameObject: GameObject -> Create other -> Cube. Drag your Cube from the Hierarchy to your Player Prefab in the Project and then delete your Cube from the scene. 4
  • 5. Create a new Plane and name it Ground: GameObject -> Create other -> Plane. Your Plane parameters should be: Position (0,0,0), Rotation (0,0,0), Scale (5,5,5). Create a Directional Light: GameObject -> Create other -> Directional Light. Light parameters: Position (0,15,0), Rotation (25,0,0), Scale (1,1,1) Shadows -> Type -> Soft Shadows. Finally, save your scene and name it MainGame: File -> Save Scene. Everything should look like this image: 3.2 Creating Scripts & Adding Components • Next you will learn how to create the server and client, instantiate the scene and objects on the network, move objects, and connect everything together. 3.2.1 Server & Client • We will start with the most important — the creation of Server and Client: Create a new JavaScript file and name it ConnectionGUI: Assets -> Create -> JavaScript. Add this file (by dragging) to the Main Camera object in the Hierarchy, then open the file and create some variables: var remoteIP = "127.0.0.1"; var remotePort = 25000; var listenPort = 25000; var useNAT = false; var yourIP = ""; var yourPort = ""; 5
  • 6. Now we will create an interface using Unity GUI for creating the server and connecting to it: function OnGUI () { // Checking if you are connected to the server or not if (Network.peerType == NetworkPeerType.Disconnected) { // If not connected if (GUI.Button (new Rect(10,10,100,30),"Connect")) { Network.useNat = useNAT; // Connecting to the server Network.Connect(remoteIP, remotePort); } if (GUI.Button (new Rect(10,50,100,30),"Start Server")) { Network.useNat = useNAT; // Creating server Network.InitializeServer(32, listenPort); // Notify our objects that the level and the network is ready for (var go : GameObject in FindObjectsOfType(GameObject)) { go.SendMessage("OnNetworkLoadedLevel", SendMessageOptions.DontRequireReceiver); } } // Fields to insert ip address and port remoteIP = GUI.TextField(new Rect(120,10,100,20),remoteIP); remotePort = parseInt(GUI.TextField(new Rect(230,10,40,20),remotePort.ToString())); } else { // Getting your ip address and port ipaddress = Network.player.ipAddress; port = Network.player.port.ToString(); GUI.Label(new Rect(140,20,250,40),"IP Adress: "+ipaddress+":"+port); if (GUI.Button (new Rect(10,10,100,50),"Disconnect")) { // Disconnect from the server Network.Disconnect(200); } } } 6
  • 7. • Pay attention to the function below. This function is called every time someone successfully connects. When this happens, we notify all objects that the scene and the network are ready. function OnConnectedToServer () { // Notify our objects that the level and the network are ready for (var go : GameObject in FindObjectsOfType(GameObject)) go.SendMessage("OnNetworkLoadedLevel", SendMessageOptions.DontRequireReceiver); } • In Play mode your screen should look like these images: • Now you can test your server and client. Edit your Player Settings (Edit -> Project Settings -> Player) to set up your iPhone Bundle Identifier and switch the Default Screen Orientation to Landscape Right. Build your project to the iPhone and create a server in the Editor. Try to connect to the server using the IP address you can find on the server screen — if everything goes OK you will see “Disconnect” button and your IP address on both screens. Note that both applications must be on the same network for everything to work. 7
  • 8. 3.2.2 Scene & Objects Instantiation On The Network • Now we need to add the network components to your Player (Cube) and write code to instantiate it: Select Player Prefab and add a NetworkView: Components -> Miscellaneous -> NetworkView. When the component appears on your object change the State Synchroniza- tion parameter to Reliable Delta Compressed. This is needed to show your synchronized transformation to all users. Add a Rigidbody to your Player Prefab: Select Prefab -> Component -> Phys- ics -> Rigidbody. Your new components should look like this image: • Now we will instantiate your Player and objects on the network: Create a new empty GameObject and name it Spawn. Object parameters: Po- sition (0,5,0), Rotation (0,0,0), Scale (1,1,1). Create a new JavaScript file and name it Instantiate. Open the file and write following code: var SpaceCraft : Transform; function OnNetworkLoadedLevel () { // Instantiating SpaceCraft when Network is loaded Network.Instantiate(SpaceCraft, transform.position, transform.rotation, 0); } function OnPlayerDisconnected (player : NetworkPlayer) { Network.RemoveRPCs(player, 0); Network.DestroyPlayerObjects(player); } 8
  • 9. Add this file to your Spawn object: Select Spawn Object -> Component -> Scripts -> Instantiate. Select your Spawn object and change the Player parameter to “Player (Trans- form)” by selecting your prefab from the list. • If you test your example you will see that the server and each connected user will have their own Player (Cube). To be sure, we will create a simple test: Create a new JavaScript file and name it Control.js. Add this code to the file: function OnGUI() { if(GUI.Button(new Rect(20,100,50,50),"up")) { GameObject.Find("Player(Clone)").transform.position = new Vector3(0,5,0); } } Add this file to the Spawn object in the Hierarchy. Build your project, create a server and connect to it. Now you can see that everyone can move their own Player (Cube). Your editor screen should look like this image: 9
  • 10. 3.3 Quick Overview Congratulations! You have covered all of the basics needed to create a multiplayer application. • You have learned how to: Prepare a basic scene for a multiplayer game. Create a server. Create a client. Use Direct Connect. Use the basic network components. Instantiate a scene and objects on the network. Connect everything together. Download the whole NetworkExample project. In the next chapter, we will expand on the ideas that we have already covered and create an advanced networking setup. 10
  • 11. 4. Implementing Multiplayer in Startrooper In this chapter you will learn how to convert the StarTrooper game from single player to multiplayer. We will use complex components and three different con- nection types: Direct Connect (that you have seen in chapter 4), MasterServer Con- nection and UDP Broadcast connection. At the end of this chapter you will be able to fly around and kill other users in multiplayer mode. • Download StarTrooper from the Unity Web Site and make yourself familiar with it. 4.1 Changing Scene • As the scene we're going to modify was designed for single player game, we need to change it a little bit. We will make more changes here later, but we'll start with some basics: Open the downloaded StarTrooper project. Select the StarTrooper scene. Select SpaceCraftFBX in Hierarchy. Add a NetworkView Component: Component -> Miscellaneous -> Net- workView. Remove the Player Controls script from the object. Remove the Missile Launcher script from the object. Add a Trail Render: Component -> Particles -> Trail Render. In the Trail Render set Materials -> Element 0 -> missleTracer. Create a new GameObject and name it Spawn: GameObject -> Create Empty. Set Transform parameters: Position (0,30,11), Rotation (0,0,0), Scale (1,1,1). 4.2 Integration Now we will make our main changes and integrate networking into the project. Let's begin by preparing the scene and SpaceCraft for the network. When we are done, we will create a server and client. 4.2.1 Integrating Objects & Scene • Now we need to create a script that will translate our Rigidbody on the Network: First, create two folders: "NetworkFIles" for new scripts and "Plugins"for C# files that should be pre-compiled. Create a C# file and name it NetworkRigidbody. Move the NetworkRigidbody.cs file to the Plugins folder. 11
  • 12. Do not worry much about this file, just use it where it is required. You can use this script on any project you want, because it's suitable for all Rigidbody objects. Open your NetworkRigidbody.cs file and use this code: using UnityEngine; using System.Collections; public class NetworkRigidbody : MonoBehaviour { public double m_InterpolationBackTime = 0.1; public double m_ExtrapolationLimit = 0.5; internal struct State { internal double timestamp; internal Vector3 pos; internal Vector3 velocity; internal Quaternion rot; internal Vector3 angularVelocity; } // We store twenty states with "playback" information State[] m_BufferedState = new State[20]; // Keep track of what slots are used int m_TimestampCount; void OnSerializeNetworkView(BitStream stream, NetworkMessageInfo info) { // Send data to server if (stream.isWriting) { Vector3 pos = rigidbody.position; Quaternion rot = rigidbody.rotation; Vector3 velocity = rigidbody.velocity; Vector3 angularVelocity = rigidbody.angularVelocity; stream.Serialize(ref pos); stream.Serialize(ref velocity); stream.Serialize(ref rot); stream.Serialize(ref angularVelocity); } // Read data from remote client else { Vector3 pos = Vector3.zero; Vector3 velocity = Vector3.zero; Quaternion rot = Quaternion.identity; 12
  • 13. Vector3 angularVelocity = Vector3.zero; stream.Serialize(ref pos); stream.Serialize(ref velocity); stream.Serialize(ref rot); stream.Serialize(ref angularVelocity); // Shift the buffer sideways, deleting state 20 for (int i=m_BufferedState.Length-1;i>=1;i--) { m_BufferedState[i] = m_BufferedState[i-1]; } // Record current state in slot 0 State state; state.timestamp = info.timestamp; state.pos = pos; state.velocity = velocity; state.rot = rot; state.angularVelocity = angularVelocity; m_BufferedState[0] = state; // Update used slot count, however never exceed the buffer size // Slots aren't actually freed so this just makes sure the buffer is // filled up and that uninitalized slots aren't used. m_TimestampCount = Mathf.Min(m_TimestampCount + 1, m_BufferedState.Length); // Check if states are in order, if it is inconsistent you could reshuffel or // drop the out-of-order state. Nothing is done here for (int i=0;i<m_TimestampCount-1;i++) { if (m_BufferedState[i].timestamp < m_BufferedState[i+1].timestamp) Debug.Log("State inconsistent"); } } } // We have a window of interpolationBackTime where we basically play // By having interpolationBackTime the average ping, you will usually use interpolation. // And only if no more data arrives we will use extra polation void Update () { // This is the target playback time of the rigid body double interpolationTime = Network.time - m_InterpolationBackTime; // Use interpolation if the target playback time is present in the buffer if (m_BufferedState[0].timestamp > interpolationTime) { 13
  • 14. // Go through buffer and find correct state to play back for (int i=0;i<m_TimestampCount;i++) { if (m_BufferedState[i].timestamp <= interpolationTime || i == m_TimestampCount-1) { // The state one slot newer (<100ms) than the best playback state State rhs = m_BufferedState[Mathf.Max(i-1, 0)]; // The best playback state (closest to 100 ms old (default time)) State lhs = m_BufferedState[i]; // Use the time between the two slots to determine if interpolation is necessary double length = rhs.timestamp - lhs.timestamp; float t = 0.0F; // As the time difference gets closer to 100 ms t gets closer to 1 in // which case rhs is only used // Example: // Time is 10.000, so sampleTime is 9.900 // lhs.time is 9.910 rhs.time is 9.980 length is 0.070 // t is 9.900 - 9.910 / 0.070 = 0.14. So it uses 14% of rhs, 86% of lhs if (length > 0.0001) t = (float)((interpolationTime - lhs.timestamp) / length); // if t=0 => lhs is used directly transform.localPosition = Vector3.Lerp(lhs.pos, rhs.pos, t); transform.localRotation = Quaternion.Slerp(lhs.rot, rhs.rot, t); return; } } } // Use extrapolation else { State latest = m_BufferedState[0]; float extrapolationLength = (float)(interpolationTime - latest.timestamp); // Don't extrapolation for more than 500 ms, you would need to do that carefully if (extrapolationLength < m_ExtrapolationLimit) { float axisLength = extrapolationLength * latest.angularVelocity.magnitude * Mathf.Rad2Deg; Quaternion angularRotation = Quaternion.AngleAxis(axisLength, latest.angularVelocity); rigidbody.position = latest.pos + latest.velocity * extrapolationLength; 14
  • 15. rigidbody.rotation = angularRotation * latest.rot; rigidbody.velocity = latest.velocity; rigidbody.angularVelocity = latest.angularVelocity; } } } } Select your SpaceCraftFBX object in the Hierarchy (not in the Project files). Add NetworkRigidbody.cs to your selected object: Component -> Scripts -> Network Rigidbody. Disable the NetworkRigidbody component (just remove a tick from compo- nent). We will enable it later with some conditions. In the Network View component: change the Observed parameter from SpaceCraftFBX (Transform) to SpaceCraftFBX (NetworkRigidbody). Create a new JavaScript file and name it RigidAssign. Add RigidAssign.js to your object and edit the file: function OnNetworkInstantiate (msg : NetworkMessageInfo) { if (networkView.isMine) { var _NetworkRigidbody : NetworkRigidbody = GetComponent("NetworkRigidbody"); _NetworkRigidbody.enabled = false; } else { name += "Remote"; var _NetworkRigidbody2 : NetworkRigidbody = GetComponent("NetworkRigidbody"); _NetworkRigidbody2.enabled = true; } } Create a new Prefab, name it SpaceCraft and move it to your Prefabs folder. Drag your SpaceCraftFBX from the Hierarchy to your new Prefab (SpaceCraft) in Project window. Delete SpaceCraftFBX from the scene. Create the Tag "SpaceCraft" for your SpaceCraft Prefab: Edit -> Project Set- tings -> Tags. 15
  • 16. Select your SpaceCraft Prefab again and assign the Tag to it: click on "Un- tagged" and select "SpaceCraft". • Your SpaceCraft Prefab should look like this image: The SpaceCraft is now prepared for the Network! Create a new JavaScript file and name it Instantiate.js Add the file to the Spawn object in the Hierarchy and write this code to it: var SpaceCraft : Transform; function OnNetworkLoadedLevel () { // Instantiating SpaceCraft when Network is loaded Network.Instantiate(SpaceCraft, transform.position, transform.rotation, 0); } function OnPlayerDisconnected (player : NetworkPlayer) { // Removing player if Network is disconnected 16
  • 17. Debug.Log("Server destroying player"); Network.RemoveRPCs(player, 0); Network.DestroyPlayerObjects(player); } Select the Spawn object in the Hierarchy and set the Space Craft parameter to SpaceCraft (Transform) (select your SpaceCraft Prefab from list). Select the Main Camera object in the Hierarchy. Open the Smooth Follow script and change everything to: var target : Transform; var distance : float = 10.0; var height : float = 5.0; var heightDamping : float = 2.0; var rotationDamping : float = 3.0; function LateUpdate () { if(GameObject.FindWithTag("SpaceCraft")) { if (!target) target = GameObject.FindWithTag("SpaceCraft").transform; // Calculate the current rotation angles var wantedRotationAngle : float = target.eulerAngles.y; var wantedHeight : float = target.position.y + height; var currentRotationAngle : float = transform.eulerAngles.y; var currentHeight : float = transform.position.y; // Damp the rotation around the y-axis var dt : float = Time.deltaTime; currentRotationAngle = Mathf.LerpAngle (currentRotationAngle, wantedRotationAngle, rotationDamping * dt); // Damp the height currentHeight = Mathf.Lerp (currentHeight, wantedHeight, heightDamping * dt); // Convert the angle into a rotation var currentRotation : Quaternion = Quaternion.Euler (0, currentRotationAngle, 0); // Set the position of the camera on the x-z plane to: // distance meters behind the target //transform.position = target.position; var pos : Vector3 = target.position - currentRotation * Vector3.forward * distance; pos.y = currentHeight; // Set the height of the camera 17
  • 18. transform.position = pos; // Always look at the target transform.LookAt (target); } } Add the Player Controls script to the Main Camera and open it to edit. Change everything to this code: var turnSpeed : float = 3.0; var maxTurnLean : float = 70.0; var maxTilt : float = 50.0; var sensitivity : float = 0.5; var forwardForce : float = 5.0; var guiSpeedElement : Transform; var craft : GameObject; private var normalizedSpeed : float = 0.2; private var euler : Vector3 = Vector3.zero; var horizontalOrientation : boolean = true; function Awake () { if (horizontalOrientation) { iPhoneSettings.screenOrientation = iPhoneScreenOrientation.LandscapeLeft; } else { iPhoneSettings.screenOrientation = iPhoneScreenOrientation.Portrait; } guiSpeedElement = GameObject.Find("speed").transform; guiSpeedElement.position = new Vector3 (0, normalizedSpeed, 0); } function FixedUpdate () { if(GameObject.FindWithTag("SpaceCraft")) { GameObject.FindWithTag("SpaceCraft").rigidbody.AddRelativeForce(0, 0, normalizedSpeed * (forwardForce*3)); var accelerator : Vector3 = iPhoneInput.acceleration; 18
  • 19. if (horizontalOrientation) { var t : float = accelerator.x; accelerator.x = -accelerator.y; accelerator.y = t; } // Rotate turn based on acceleration euler.y += accelerator.x * turnSpeed; // Since we set absolute lean position, do some extra smoothing on it euler.z = Mathf.Lerp(euler.z, -accelerator.x * maxTurnLean, 0.2); // Since we set absolute lean position, do some extra smoothing on it euler.x = Mathf.Lerp(euler.x, accelerator.y * maxTilt, 0.2); // Apply rotation and apply some smoothing var rot : Quaternion = Quaternion.Euler(euler); GameObject.FindWithTag("SpaceCraft").transform.rotation = Quaternion.Lerp (transform.rotation, rot, sensitivity); } } function Update () { for (var evt : iPhoneTouch in iPhoneInput.touches) { if (evt.phase == iPhoneTouchPhase.Moved) { normalizedSpeed = evt.position.y / Screen.height; guiSpeedElement.position = new Vector3 (0, normalizedSpeed, 0); } } } Add a Missile Launcher script to the Main Camera. Set the Missile parameter to missilePrefab. Open the Missile Launcher script to edit. We will add a timer for shooting and some small changes as well. var missile : GameObject; var timer : int = 0; function FixedUpdate() { timer++; } 19
  • 20. function Update () { if ((Input.GetMouseButtonDown (0))&&(timer>10)) { // if SpaceCraft exists if(GameObject.FindWithTag("SpaceCraft")) { var position : Vector3 = new Vector3(0, -0.2, 1) * 10.0; position = GameObject.FindWithTag("SpaceCraft").transform.TransformPoint (position); // instantiating missile var thisMissile : GameObject = Network.Instantiate (missile, position, GameObject.FindWithTag("SpaceCraft").transform.rotation,0) as GameObject; Physics.IgnoreCollision(thisMissile.collider, GameObject.FindWithTag("SpaceCraft").collider);; timer = 0; } } } Create the new tag "Missile" and assign it to missilePrefab. Select the missilePrefab and open the MissileTrajectory script to edit. We will make the ability to kill other SpaceCraft: var explosion : GameObject; function OnCollisionEnter(collision : Collision) { if(GameObject.FindWithTag("SpaceCraft")) { if(((collision.gameObject.tag == "Untagged")||(collision.gameObject.tag == "SpaceCraft"))&&(collision.gameObject.tag != "Missile")) { var contact : ContactPoint = collision.contacts[0]; Instantiate (explosion, contact.point + (contact.normal * 5.0) , Quaternion.identity); if (collision.gameObject.tag == "SpaceCraft") { Instantiate (explosion, contact.point + (contact.normal * 5.0) , camera.main.transform.rotation); collision.gameObject.transform.position = GameObject.Find("Spawn").transform.position; } Destroy (gameObject); } 20
  • 21. } } function FixedUpdate () { if(GameObject.FindWithTag("Missile")) { rigidbody.AddForce (transform.TransformDirection (Vector3.forward + Vector3(0,0.1,0)) * 720.0); } } You have prepared the Scene and Objects for the Network. 4.2.2 Server & Client Now it's time to create the server for this game. We will be creating three different types of servers. Create a new scene and save it as ServerChoose: File -> New Scene, File -> Save Scene. The scene will be used for choosing server type. Create a new scene and save it as UDPServer. This scene will be used for UDP Broadcast connection. Create a new scene and save it as MasterServer. This scene will be used for Master Server. Create a new scene again, save as EmptyScene. We will use this scene when player has disconnected to clear up leftovers before new connection. Add all your scenes to the build settings: File -> Build Settings -> Add Open Scene. Your scene "ServerChoose" should be first in the list, for example: • PS: you can create a folder and put all scenes together in one place. 21
  • 22. Open the ServerChoose scene. Create a new JavaScript file and name it Menu. We will use this scene and this script for choosing a type of server and connection. Add this script to the Main Camera and add the following code: function OnGUI() { GUI.Label(new Rect((Screen.width/2)-80,(Screen.height/2)-130,200,50),"SELECT CONNECTION TYPE"); GUI.Label(new Rect((Screen.width-220),(Screen.height-30),220,30),"STAR-TROOPER MULTIPLAYER DEMO"); if(GUI.Button(new Rect((Screen.width/2)-100,(Screen.height/ 2)-100,200,50),"Master Server Connection")) { Application.LoadLevel("MasterServer"); } if(GUI.Button(new Rect((Screen.width/2)-100,(Screen.height/2)-40,200,50),"Direct Connection")) { Application.LoadLevel("StarTrooper"); } if(GUI.Button(new Rect((Screen.width/2)-100,(Screen.height/2)+20,200,50),"UDP Connection")) { Application.LoadLevel("UDPServer"); } } Open the MasterServer scene. Create a new JavaScript file and name it NetworkLevelLoad. We will use this script for loading the StarTrooper scene and objects to the network. Create a new Empty GameObject and name it ConnectionGUI. Add the NetworkLevelLoad script to the ConnectionGUI object and open to edit: // Keep track of the last level prefix (increment each time a new level loads) private var lastLevelPrefix = 0; function Awake () { // Network level loading is done in a seperate channel. DontDestroyOnLoad(this); networkView.group = 1; 22
  • 23. Application.LoadLevel("EmptyScene"); } function OnGUI () { // When network is running (server or client) then display the level "StarTrooper" if (Network.peerType != NetworkPeerType.Disconnected) { if (GUI.Button(new Rect(350,10,100,30),"StarTrooper")) { // Make sure no old RPC calls are buffered and then send load level command Network.RemoveRPCsInGroup(0); Network.RemoveRPCsInGroup(1); // Load level with incremented level prefix (for view IDs) networkView.RPC( "LoadLevel", RPCMode.AllBuffered, "StarTrooper", lastLevelPrefix + 1); } } } @RPC function LoadLevel (level : String, levelPrefix : int) { Debug.Log("Loading level " + level + " with prefix " + levelPrefix); lastLevelPrefix = levelPrefix; // There is no reason to send any more data over the network on the default channel, // because we are about to load the level, because all those objects will get deleted anyway Network.SetSendingEnabled(0, false); // We need to stop receiving because first the level must be loaded. // Once the level is loaded, RPC's and other state update attached to objects in the level are allowed to fire Network.isMessageQueueRunning = false; // All network views loaded from a level will get a prefix into their NetworkViewID. // This will prevent old updates from clients leaking into a newly created scene. Network.SetLevelPrefix(levelPrefix); Application.LoadLevel(level); yield; yield; // Allow receiving data again Network.isMessageQueueRunning = true; // Now the level has been loaded and we can start sending out data Network.SetSendingEnabled(0, true); // Notify our objects that the level and the network is ready 23
  • 24. var go : Transform[] = FindObjectsOfType(Transform); var go_len = go.length; for (var i=0;i<go_len;i++) { go[i].SendMessage("OnNetworkLoadedLevel", SendMessageOptions.DontRequireReceiver); } } function OnDisconnectedFromServer () { Application.LoadLevel("EmptyScene"); } @script RequireComponent(NetworkView) • Ensure that this script has added a NetworkView automatically, otherwise add Net- workLevelLoad from the menu (Component->Scripts->NetworkLevelLoad). Create a new JavaScript file and name it MasterServerGUI. With this script we will create a Master Server/Client and some GUI to use it. Add this file to the ConnectionGUI object and open the script to edit: DontDestroyOnLoad(this); var gameName = "YourGameName"; var serverPort = 25002; private var timeoutHostList = 0.0; private var lastHostListRequest = -1000.0; private var hostListRefreshTimeout = 10.0; private var natCapable : ConnectionTesterStatus = ConnectionTesterStatus.Undetermined; private var filterNATHosts = false; private var probingPublicIP = false; private var doneTesting = false; private var timer : float = 0.0; private var windowRect = Rect (Screen.width-300,0,300,100); private var hideTest = false; private var testMessage = "Undetermined NAT capabilities"; // Enable this if not running a client on the server machine // MasterServer.dedicatedServer = true; function OnFailedToConnectToMasterServer(info: NetworkConnectionError) { Debug.Log(info); } 24
  • 25. function OnFailedToConnect(info: NetworkConnectionError) { Debug.Log(info); } function OnGUI () { ShowGUI(); } function Awake () { // Start connection test natCapable = Network.TestConnection(); // What kind of IP does this machine have? TestConnection also indicates this in the // test results if (Network.HavePublicAddress()) Debug.Log("This machine has a public IP address"); else Debug.Log("This machine has a private IP address"); } function Update() { // If test is undetermined, keep running if (!doneTesting) { TestConnection(); } } function TestConnection() { // Start/Poll the connection test, report the results in a label and react to the results accordingly natCapable = Network.TestConnection(); switch (natCapable) { case ConnectionTesterStatus.Error: testMessage = "Problem determining NAT capabilities"; doneTesting = true; break; case ConnectionTesterStatus.Undetermined: testMessage = "Undetermined NAT capabilities"; doneTesting = false; break; case ConnectionTesterStatus.PrivateIPNoNATPunchthrough: testMessage = "Cannot do NAT punchthrough, filtering NAT enabled hosts for client connections," +" local LAN games only."; filterNATHosts = true; 25
  • 26. Network.useNat = true; doneTesting = true; break; case ConnectionTesterStatus.PrivateIPHasNATPunchThrough: if (probingPublicIP) testMessage = "Non-connectable public IP address (port "+ serverPort +" blocked)," +" NAT punchthrough can circumvent the firewall."; else testMessage = "NAT punchthrough capable. Enabling NAT punchthrough functionality."; // NAT functionality is enabled in case a server is started, // clients should enable this based on if the host requires it Network.useNat = true; doneTesting = true; break; case ConnectionTesterStatus.PublicIPIsConnectable: testMessage = "Directly connectable public IP address."; Network.useNat = false; doneTesting = true; break; // This case is a bit special as we now need to check if we can // use the blocking by using NAT punchthrough case ConnectionTesterStatus.PublicIPPortBlocked: testMessage = "Non-connectble public IP address (port " + serverPort +" blocked)," +" running a server is impossible."; Network.useNat = false; // If no NAT punchthrough test has been performed on this public IP, force a test if (!probingPublicIP) { Debug.Log("Testing if firewall can be circumnvented"); natCapable = Network.TestConnectionNAT(); probingPublicIP = true; timer = Time.time + 10; } // NAT punchthrough test was performed but we still get blocked else if (Time.time > timer) { probingPublicIP = false; // reset Network.useNat = true; doneTesting = true; } break; 26
  • 27. case ConnectionTesterStatus.PublicIPNoServerStarted: testMessage = "Public IP address but server not initialized," +"it must be started to check server accessibility. Restart connection test when ready."; break; default: testMessage = "Error in test routine, got " + natCapable; } } function ShowGUI() { if (GUI.Button (new Rect(100,10,120,30),"Retest connection")) { Debug.Log("Redoing connection test"); probingPublicIP = false; doneTesting = false; natCapable = Network.TestConnection(true); } if (Network.peerType == NetworkPeerType.Disconnected) { // Start a new server if (GUI.Button(new Rect(10,10,90,30),"Start Server")) { Network.InitializeServer(32, serverPort); MasterServer.updateRate = 3; MasterServer.RegisterHost(gameName, "stuff", "profas chat test"); } // Refresh hosts if (GUI.Button(new Rect(10,40,210,30),"Refresh available Servers") || Time.realtimeSinceStartup > lastHostListRequest + hostListRefreshTimeout) { MasterServer.ClearHostList(); MasterServer.RequestHostList (gameName); lastHostListRequest = Time.realtimeSinceStartup; Debug.Log("Refresh Click"); } var data : HostData[] = MasterServer.PollHostList(); var _cnt : int = 0; for (var element in data) { // Do not display NAT enabled games if we cannot do NAT punchthrough if ( !(filterNATHosts && element.useNat) ) { 27
  • 28. var name = element.gameName + " " + element.connectedPlayers + " / " + element.playerLimit; var hostInfo; hostInfo = "["; // Here we display all IP addresses, there can be multiple in cases where // internal LAN connections are being attempted. In the GUI we could just display // the first one in order not confuse the end user, but internally Unity will // do a connection check on all IP addresses in the element.ip list, and connect to the // first valid one. for (var host in element.ip) { hostInfo = hostInfo + host + ":" + element.port + " "; } hostInfo = hostInfo + "]"; if (GUI.Button(new Rect(20,(_cnt*50)+90,400,40),hostInfo.ToString())) { // Enable NAT functionality based on what the hosts if configured to do Network.useNat = element.useNat; if (Network.useNat) print("Using Nat punchthrough to connect"); else print("Connecting directly to host"); Network.Connect(element.ip, element.port); } } } } else { if (GUI.Button (new Rect(10,10,90,30),"Disconnect")) { Network.Disconnect(); MasterServer.UnregisterHost(); } } } • Now you can test your project using the Master Server: Go to Edit -> Project Settings -> Player and set up your iPhone Bundle Iden- tifier and change the Default Screen Orientation to Landscape Left. 28
  • 29. Build your project to the iPhone. Run the Server scene in the Editor. Click on Master Server Connection in the Editor and on the iPhone. Click on Start Server on Editor. The server should appear on iPhone (if not, click Refresh available Servers). Connect to the server from the iPhone. Click on the StarTrooper button in the Editor or on the iPhone. Your screens should look like these images: We have finished our Master Server! 29
  • 30. • Now we need to create a second connection type - UDP Broadcast connection: Open the UDPServer scene. Create a new C# file and name it UDPConnectionGUI. Move the UDPConnection file to the Plugins folder. Create a new empty GameObject and name it UDPServer. Assign the UDPConnectionGUI file to the UDPServer object. (Or assign it after you write the following code). Assign a NetworkView Component to the UDPServer object and change the Observed parameter to UDPServer (Transform). Assign the NetworkLevelLoad Script file to the UDPServer object. Open UDPConnectionGUI and write the following: using UnityEngine; using System.Collections; using System.Net; using System.Net.Sockets; using System.Threading; public class UDPConnectionGUI : MonoBehaviour { private UdpClient server; private UdpClient client; private IPEndPoint receivePoint; private string port = "6767"; private int listenPort = 25001; private string ip = "0.0.0.0"; private string ip_broadcast = "255.255.255.255"; private bool youServer = false; private bool connected = false; private string server_name = ""; private int clear_list = 0; public void Update() { if(clear_list++>200) { server_name = ""; clear_list = 0; } 30
  • 31. } public void Start() { Debug.Log("Start"); LoadClient(); } public void LoadClient() { client = new UdpClient(System.Convert.ToInt32(port)); receivePoint = new IPEndPoint(IPAddress.Parse(ip),System.Convert.ToInt32(port)); Thread startClient = new Thread(new ThreadStart(start_client)); startClient.Start(); } public void start_client() { bool continueLoop =true; try { while(continueLoop) { byte[] recData = client.Receive(ref receivePoint); System.Text.ASCIIEncoding encode = new System.Text.ASCIIEncoding(); server_name = encode.GetString(recData); if(connected) { server_name = ""; client.Close(); break; } } } catch {} } public void start_server() { try { while(true) { System.Text.ASCIIEncoding encode = new System.Text.ASCIIEncoding(); byte[] sendData = encode.GetBytes(Network.player.ipAddress.ToString()); 31
  • 32. server.Send(sendData,sendData.Length,ip_broadcast,System.Convert.ToInt32(port)); Thread.Sleep(100); } } catch {} } void OnGUI() { if(!youServer) { if(GUI.Button(new Rect(10,10,100,30),"Start Server")) { youServer = true; Network.InitializeServer(32, listenPort); string ipaddress = Network.player.ipAddress.ToString(); ip = ipaddress; client.Close(); server = new UdpClient(System.Convert.ToInt32(port)); receivePoint = new IPEndPoint(IPAddress.Parse(ipaddress),System.Convert.ToInt32(port)); Thread startServer = new Thread(new ThreadStart(start_server)); startServer.Start(); } if(server_name!="") { if(GUI.Button(new Rect(20,100,200,50),server_name)) { connected = true; Network.Connect(server_name, listenPort); } } } else { if(GUI.Button(new Rect(10,10,100,30),"Disconnect")) { Network.Disconnect(); youServer = false; server.Close(); LoadClient(); } } } } 32
  • 33. • Now you can test this connection type: Set your Player Settings (if you haven't changed them yet) as instructed above. Build the project to the iPhone. Play the UDPServer scene in the Editor. Start the server from the Editor by clicking Start Server. Connect to the server from the iPhone when the IP address button appears. Your screens should look like these images: We have finished our UDP Broadcast server! • Now we need to create a third connection type - Direct Connect: Open the StarTrooper scene. Create a new JavaScript file and name it ConnectionGUI. Assign the ConnectionGUI.js file to the Main Camera and write the following: var remoteIP = "127.0.0.1"; var remotePort = 25000; var listenPort = 25000; var useNAT = false; var yourIP = ""; var yourPort = ""; function Awake() { if (FindObjectOfType(MasterServerGUI)) this.enabled = false; 33
  • 34. if(FindObjectOfType(UDPConnectionGUI)) this.enabled = false; } function OnGUI () { if (Network.peerType == NetworkPeerType.Disconnected) { // If not connected if (GUI.Button (new Rect(10,10,100,30),"Connect")) { Network.useNat = useNAT; // Connecting to the server Network.Connect(remoteIP, remotePort); } if (GUI.Button (new Rect(10,50,100,30),"Start Server")) { Network.useNat = useNAT; // Creating server Network.InitializeServer(32, listenPort); // Notify our objects that the level and the network is ready for (var go : GameObject in FindObjectsOfType(GameObject)) { go.SendMessage("OnNetworkLoadedLevel", SendMessageOptions.DontRequireReceiver); } } remoteIP = GUI.TextField(new Rect(120,10,100,20),remoteIP); remotePort = parseInt(GUI.TextField(new Rect(230,10,40,20),remotePort.ToString())); } else { // If connected // Getting your ip address and port ipaddress = Network.player.ipAddress; port = Network.player.port.ToString(); GUI.Label(new Rect(140,20,250,40),"IP Adress: "+ipaddress+":"+port); if (GUI.Button (new Rect(10,10,100,50),"Disconnect")) { // Disconnect from the server Network.Disconnect(200); } 34
  • 35. } } function OnConnectedToServer() { // Notify our objects that the level and the network is ready for (var go : GameObject in FindObjectsOfType(GameObject)) go.SendMessage("OnNetworkLoadedLevel", SendMessageOptions.DontRequireReceiver); } function OnDisconnectedFromServer () { if (this.enabled != false) Application.LoadLevel(Application.loadedLevel); else { var _NetworkLevelLoad : NetworkLevelLoad = FindObjectOfType(NetworkLevelLoad); _NetworkLevelLoad.OnDisconnectedFromServer(); } } • Now you can test this connection type: Set your Player Settings (if you haven't changed them yet) as instructed above. Build the project to the iPhone. Play the StarTrooper scene in the Editor. Click Direct Connection in the Editor and on the iPhone. Start the server from the Editor by clicking Start Server. Enter the IP address on the iPhone in the IP field. You can get the IP address from the Editor Player screen. Click Connect. Your screens should look like these images: 35
  • 36. We have finished our Client and Server with three connection types. 36
  • 37. 4.3.3 Final Polishing • Our project is almost finished now. To make our game more playable we need to add some final polish: Open the StarTrooper scene. Select the SpaceCraft Prefab and set the Transform Scale parameters to: 1.8,1.8,1.8. Select the Main Camera in the Hierarchy and change the public parameters in the Player Controls script: Turn Speed: 3, Max Turn Lean: 70, Max Tilt: 50, Sensitivity: 0.5, Forward Force: 20. In the Main Camera open MissileLauncher.js script. At line 16, change the vector from Vector3(0,-0.2,1) to Vector3(0,-0.3,0.5). Select the missilePrefab Prefab and set the Transform Scale parameters to: 8,8,8. Your last screen should look something like this image: • PS: These last modifications are based only on my taste, so feel free to make your own modifications or new features. 37
  • 38. 4.3 Quick Overview Congratulations! You have finished your MultiPlayer StarTrooper project. • You have learned how to: Prepare a scene and object for the network. Translate a scene and objects on the network. Convert a single player game into multiplayer. Create a Master Server/Client. Create a Server/Client using Direct Connection. Create a Server/Client using UDP Broadcast connection. Use the main Network Components. Use advanced Unity Components. Download the whole MultiPlayer StarTrooper Project 38