1. HP2400TECH
Technical Instructions Supplies Tools 1
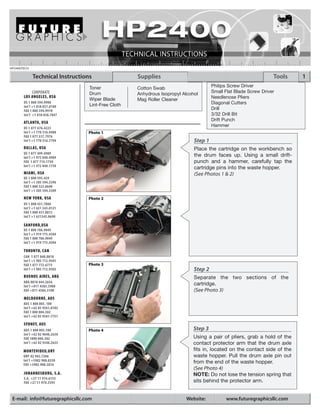
Toner Cotton Swab Philips Screw Driver
CORPORATE Drum Anhydrous Isopropyl Alcohol Small Flat Blade Screw Driver
LOS ANGELES, USA Needlenose Pliers
Wiper Blade Mag Roller Cleaner
US 1 800 394.9900 Diagonal Cutters
Int’l +1 818 837.8100 Lint-Free Cloth
FAX 1 800 394.9910
Drill
Int’l +1 818 838.7047 3/32 Drill Bit
Drift Punch
ATLANTA, USA
Hammer
US 1 877 676.4223
Int’l +1 770 516.9488 Photo 1
FAX 1 877 337.7976
Int’l +1 770 516.7794 Step 1
DALLAS, USA Place the cartridge on the workbench so
US 1 877 499.4989
Int’l +1 972 840.4989
the drum faces up. Using a small drift-
FAX 1 877 774.1750 punch and a hammer, carefully tap the
Int’l +1 972 840.1750
cartridge pins into the waste hopper.
MIAMI, USA (See Photos 1 & 2)
US 1 800 595.429
Int’l +1 305 594.3396
FAX 1 800 522.8640
Int’l +1 305 594.3309
NEW YORK, USA Photo 2
US 1 800 431.7884
Int’l +1 631 345.0121
FAX 1 800 431.8812
Int’l +1 631345.0690
SANFORD,USA
US 1 800 786.9049
Int’l +1 919 775.4584
FAX 1 800 786.9049
Int’l +1 919 775.4584
TORONTO, CAN
CAN 1 877 848.0818
Int’l +1 905 712.9501
FAX 1 877 772.6773 Photo 3
Int’l +1 905 712.9502 Step 2
BUENOS AIRES, ARG Separate the two sections of the
ARG 0810 444.2656
Int’l +011 4583.5900
cartridge.
FAX +011 4584.3100 (See Photo 3)
MELBOURNE, AUS
AUS 1 800 003. 100
Int’l +62 03 9561.8102
FAX 1 800 004.302
Int’l +62 03 9561-7751
SYDNEY, AUS
AUS 1 800 003.100 Photo 4 Step 3
Int’l +62 02 9648.2630
FAX 1800 004.302 Using a pair of pliers, grab a hold of the
Int’l +62 02 9548.2635 contact protector arm that the drum axle
MONTEVIDEO,URY fits in, located on the contact side of the
URY 02 902.7206 waste hopper. Pull the drum axle pin out
Int’l +5982 900.8358 from the end of the waste hopper.
FAX +5982 908.3816
(See Photo 4)
JOHANNESBURG, S.A. NOTE: Do not lose the tension spring that
S.A. +27 11 974.6155
FAX +27 11 974.3593 sits behind the protector arm.
E-mail: info@futuregraphicsllc.com Website: www.futuregraphicsllc.com
2. 2 HP 2400 Technical Instructions
Photo 5
Step 4
Remove the drum axle pin from the con-
tact protector arm. Reattach the tension
Notes spring to the contact protector arm.
(See Photos 5)
Photo 6
Step 5
Lift up on the non gear side of the drum,
removing the drum from the bearing hub.
(See Photos 6)
Photo 7
Step 6
Lift out the PCR. (See Photos 7) Clean the
PCR using a mild soap and water.
Photo 8
Step 7
Remove the two screws holding the wiper
blade and remove the blade. (See Photo 8)
Dump out the waste toner and clean
the hopper using dry compressed air or a
vacuum.
Photo 9
Step 8
Apply padding powder to the wiper blade.
Place the blade into the hopper and install
the two screws that hold the blade in
place. (See Photo 9)
Need trust-worthy, detailed Technical
Instructions for another engine?
Visit: www.futuregraphicsllc.com
3. HP 2400 Technical Instructions 3
Photo 10
Step 9
Clean the PCR saddles using a cotton
swab and alcohol. Apply new conduc-
tive grease to the black conductive Step 13
saddle. (See Photo 10) Release the locking tab that
holds the drum shutter arm to
the toner hopper.
(See Photo 15)
Photo 11
Step 10
Photo 15
Place the PCR into the waste hopper.
(See Photo 11)
Photo 12
Step 11
Apply padding powder to the drum. Step 14
Carefully slide the drum onto the contact Remove the shutter arm from
axle while rotating the drum counter- the alignment post. Do not lose
clockwise. the tension spring that sits
(See Photo 12) behind the arm. Place the ten-
sion spring back into the drum
shutter arm. (See Photo 16)
Photo 13
Step 12
Photo 16
Place the drum axle pin into the contact
protector arm. Slide the drum axle into the
end of the waste hopper.
(See Photo 13)
NOTE: The tension spring for the protector
arm fits into a notch in the waste hopper
located at about 11 o’clock (when looking
at the end of the drum axle).
Photo 14 (See Photo 14)
Open the protector arm to engage the
tension spring.
Need trust-worthy, detailed Technical
Instructions for another engine?
Visit: www.futuregraphicsllc.com
4. 4 HP 2400 Technical Instructions
Photo 19
Step 17
Remove the two screws holding the toner
hopper gear housing end cap.
Step 15 (See Photo 19) Slide the gear housing end
Remove the drum shutter bar cap away from the toner hopper.
from the contact side of the
toner hopper. (See Photo 17)
Step 18
Photo 17 Photo 20 Remove the two screws holding the con-
tact end cap to the toner hopper.
(See Photo 20) Remove the end cap.
Step 19
Lift the mag roller away from the toner
hopper. (See Photo 21)
Photo 21 Step 20
Step 16 Remove the mag roller stabilizer bar and
Remove the drum shutter bar the mag roller bushings from the ends of
from the gear housing end cap. the mag roller. Clean the mag roller fist
(See Photo 18) using dry compressed air or a vacuum,
and then by using a mag roller cleaner.
Step 21
Photo 18
Remove the two screws holding the
doctor blade. (See Photo 22)
Photo 22
Step 22
Remove the plastic scrapers from the end
of the doctor blade. Lift out the doctor
blade. (See Photo 23) Clean the doctor
blade using a lint-free cloth and alcohol.
Photo 23
Step 23
Dump the unused toner from the toner
hopper. Clean the toner hopper using dry
compressed air or a vacuum.
Step 24
Need trust-worthy, detailed Technical Fill the toner hopper through the mag
Instructions for another engine? roller opening.
Visit: www.futuregraphicsllc.com
E-mail: info@futuregraphicsllc.com Website: www.futuregraphicsllc.com
5. HP 2400 Technical Instructions 5
Photo 24
Step 25
Place the cleaned doctor blade onto the
toner hopper. Install the two plastic scrap-
ers on each side of the blade and install Step 30
the two screws that hold the doctor blade Insert the non-keyed end of the
in place. (See Photo 24) drum shutter bar into the posi-
tioning hole on the contact side
of the toner hopper.
(See Photo 29) Press the keyed
end of the drum shutter bar into
Step 26 the gear housing end cap.
Photo 25 (See Photo 30)
Slide the black mag roller bushing onto
the contact side of the mag roller, and the
green bushing onto the drive gear side of
the roller. Install the stabilizing bar onto Photo 29
the mag roller with the C-bearing facing
towards the mag roller bushing. Slide the
mag roller drive gear onto the roller so the
injection molding points face outward.
(See Photo 25)
Photo 26
Step 27
Place the mag roller into the toner hopper.
(See Photo 26) Photo 30
Photo 27
Step 28
Place the contact end cap onto the end of
the toner hopper. Install the two screws Step 31
that hold the end cap in place. Slide the drum shutter arm onto
(See Photo 27) the positioning post. Install the
drum shutter arm into the drum
NOTE: Make sure the white bearing is shutter. Slide the drum shutter
present in the contact end cap before it is open to engage the tension
installed. spring. (See Photo 30)
Photo 28
Step 29 Photo 31
Place the gear housing end cap onto the
end of the cartridge. Install the two screws
that hold the end cap in place.
(See Photo 28)
6. 6 HP 2400 Technical Instructions
Photo 32 Photo 31
Step 32
Holding the drum shutter open, join the
toner hopper and waste hopper. Install the
cartridge pins in each end of the cartridge.
(See Photos 31 & 32)
First Look into the New HP LaserJet 2400
The new HP LaserJet 2400 series of printers consists of three
models, the LaserJet 2410, the LaserJet 2420 and the LaserJet
2430. The LaserJet 2410 prints at 25ppm and will only be sold
into Europe and Latin America. The LaserJet 2420 printer series
is made up of four models capable of printing 30 pages per
minute at up to 1200 x 1200 dpi with HP ProRes 1200,
Resolution Enhancement technology (REt). The base model
2420 will sell for $549. The LaserJet 2420d comes with duplex
capabilities, 48MB of RAM standard and sells for $649; the net-
work version the LaserJet 2420n lists at $799 and the LaserJet
2420dn sells for $899 it has duplex capabilities and is network
ready.
The HP LaserJet 2430 series of printers is available in three
models. Each printer ships with an additional 500 sheet paper
tray and all three models are network ready. The printers print
up to 35ppm at up to 1200 x 1200 dpi with HP ProRes 1200
and Resolution Enhancement technology (Ret). The HP The toner cartridges for the HP2400 series are available in a
LaserJet 2430t will not be available in the U.S. do to the fact 6,000 page standard yield (Q6511A) and a 12,000 page high
that HP feels that at 35ppm the LaserJet 2430 will be used in a yield (Q6511X) cartridge. The high yield cartridge sells for
networking environment. The LaserJet 2430tn is network ready $205.99 which at 5% coverage would give you a cost of 2
and sells for $999, while the HP2430dtn lists at $1099, is net- cents per page, while at $123.99, the low yield cartridge would
work ready, and is able to duplex. cost you 1.7 cents per page.
Machines: OEM Information:
HP LaserJet 2410 HP LaserJet 2430t Q6511A – 6,000 pages at 5% coverage
HP LaserJet 2420 HP LaserJet 2430tn Q6511X – 12,000 pages at 5% coverage
HP LaserJet 2420d HP LaserJet 2430dtn
HP LaserJet 2420n
HP LaserJet 2420dn
Future Graphics (FG) is a distributor of compatible replacement parts and products for imagining equipment.
None of FG's products are genuine OEM replacement parts and no affiliation or sponsorship is to be implied between FG and any OEM.