UNIVERSITA’ DEGLI STUDI ISTITUTO NAZIONALE 
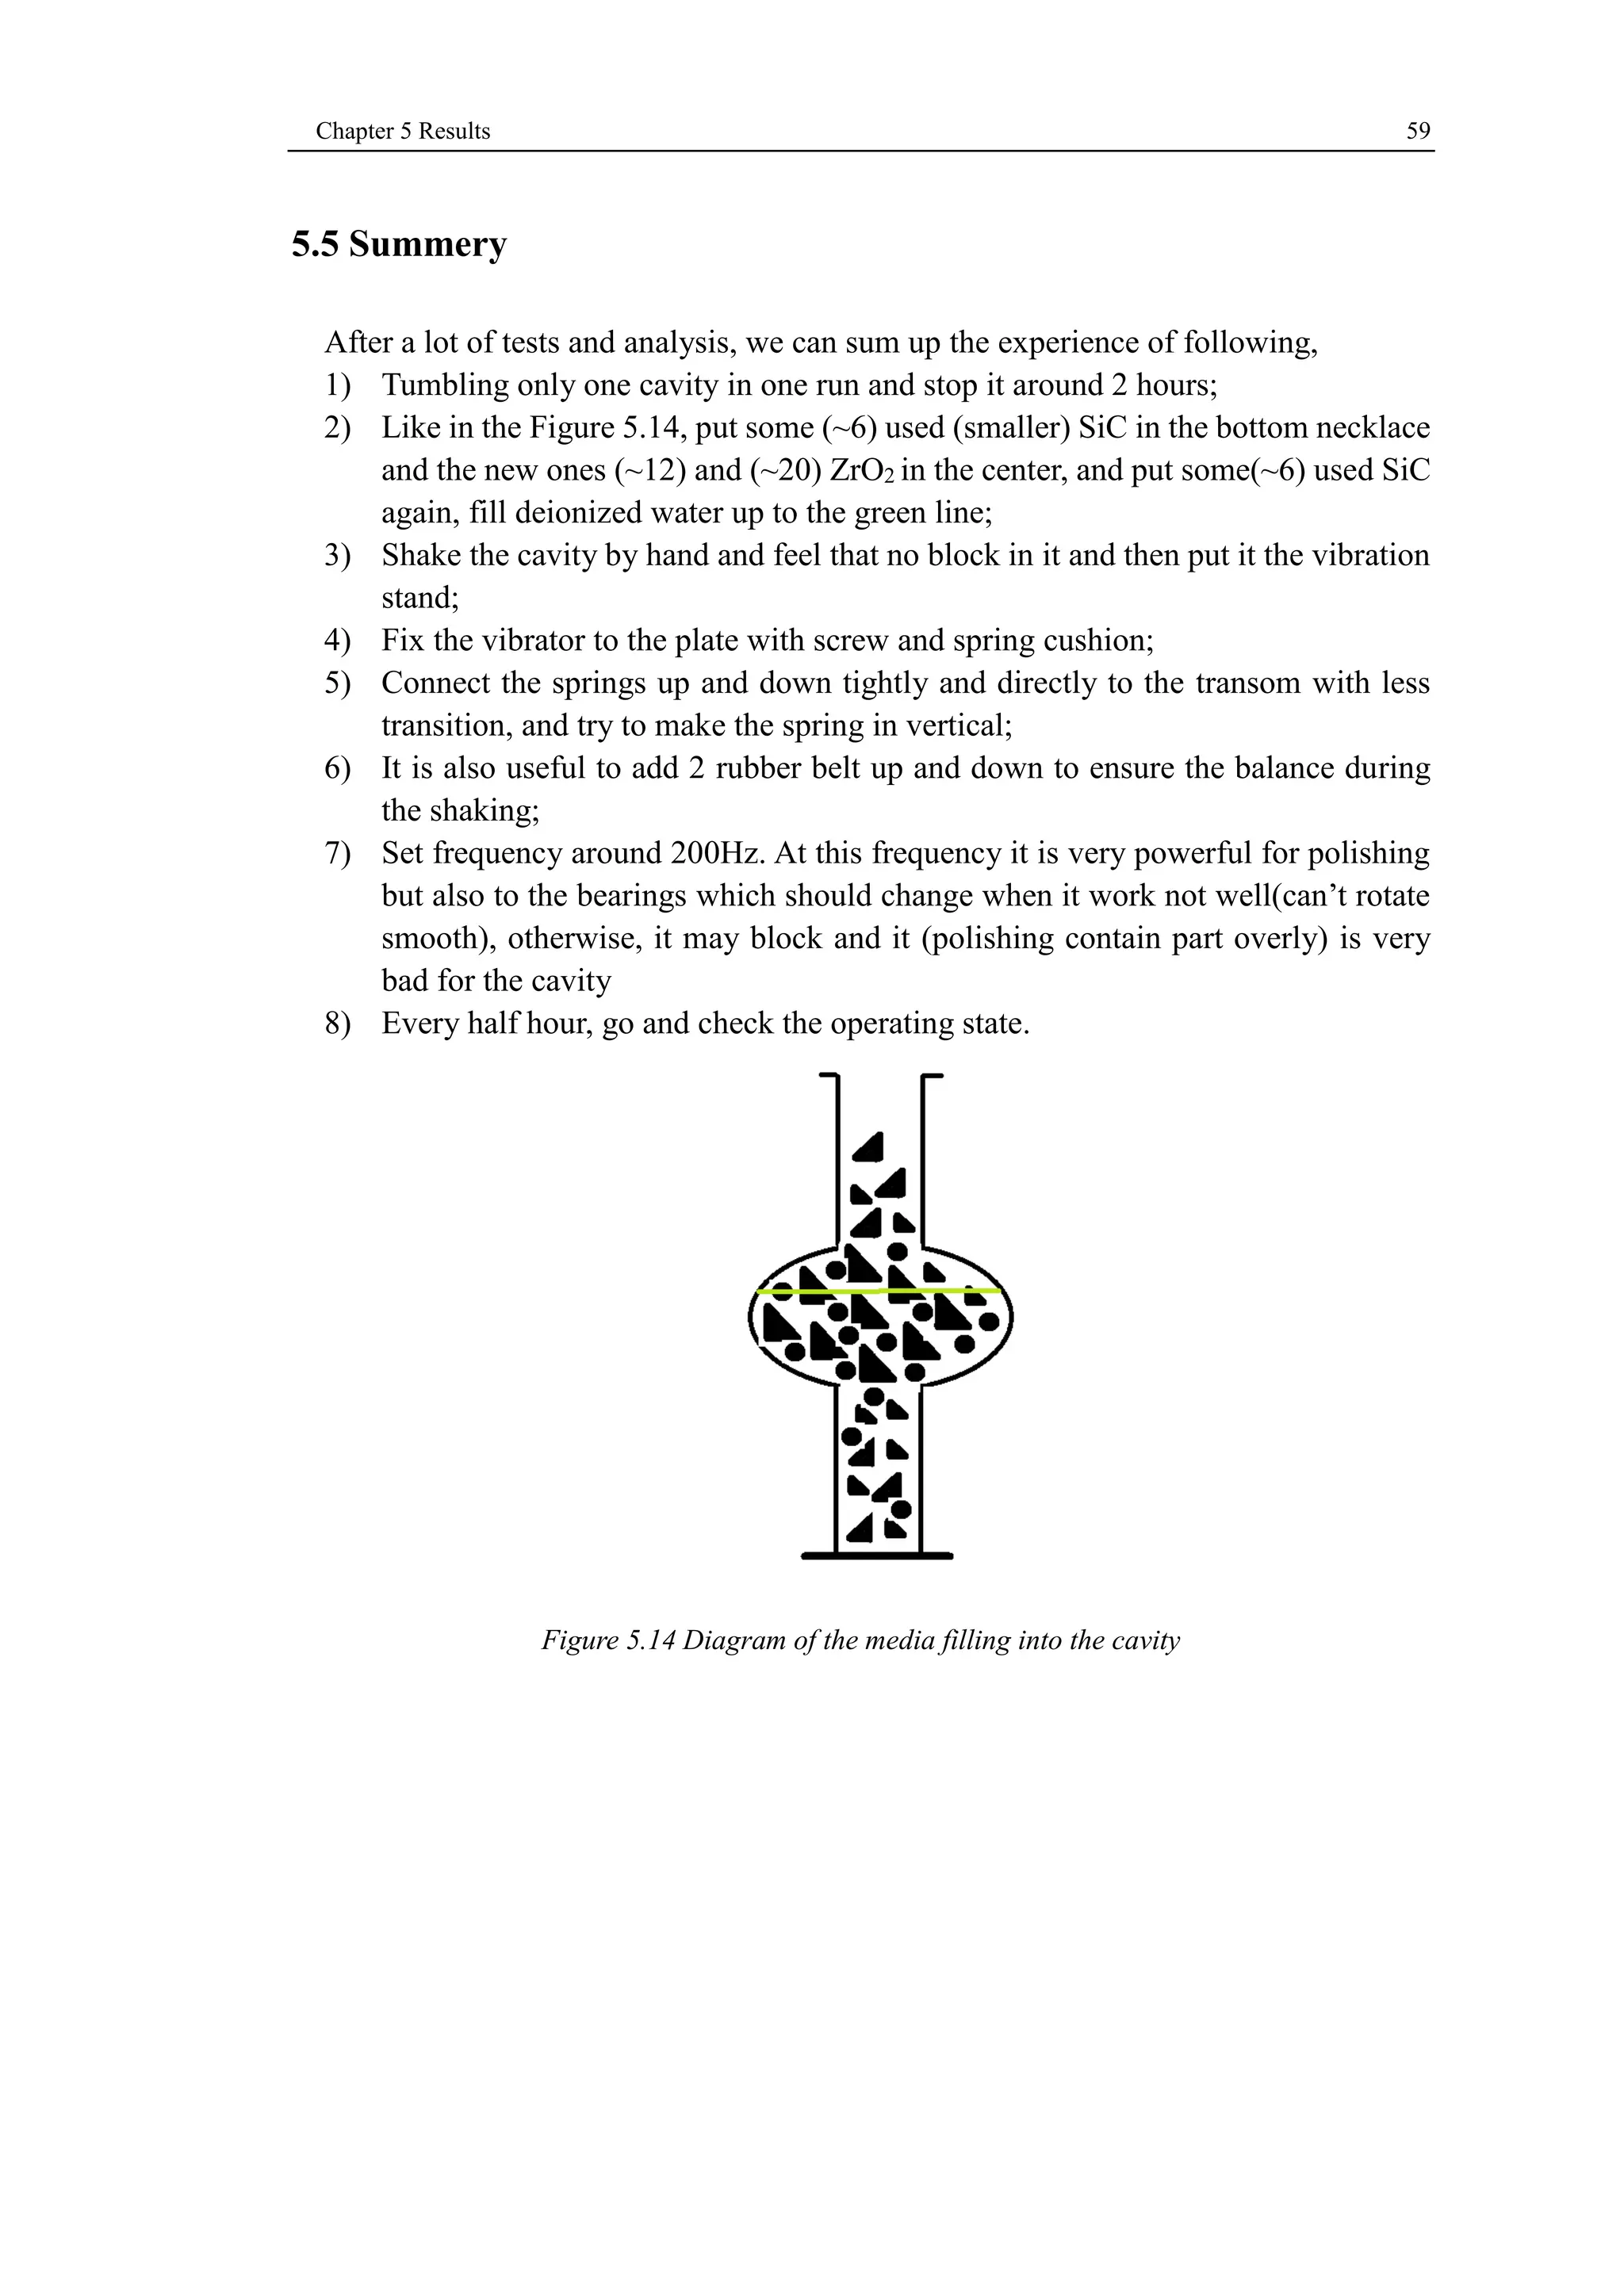
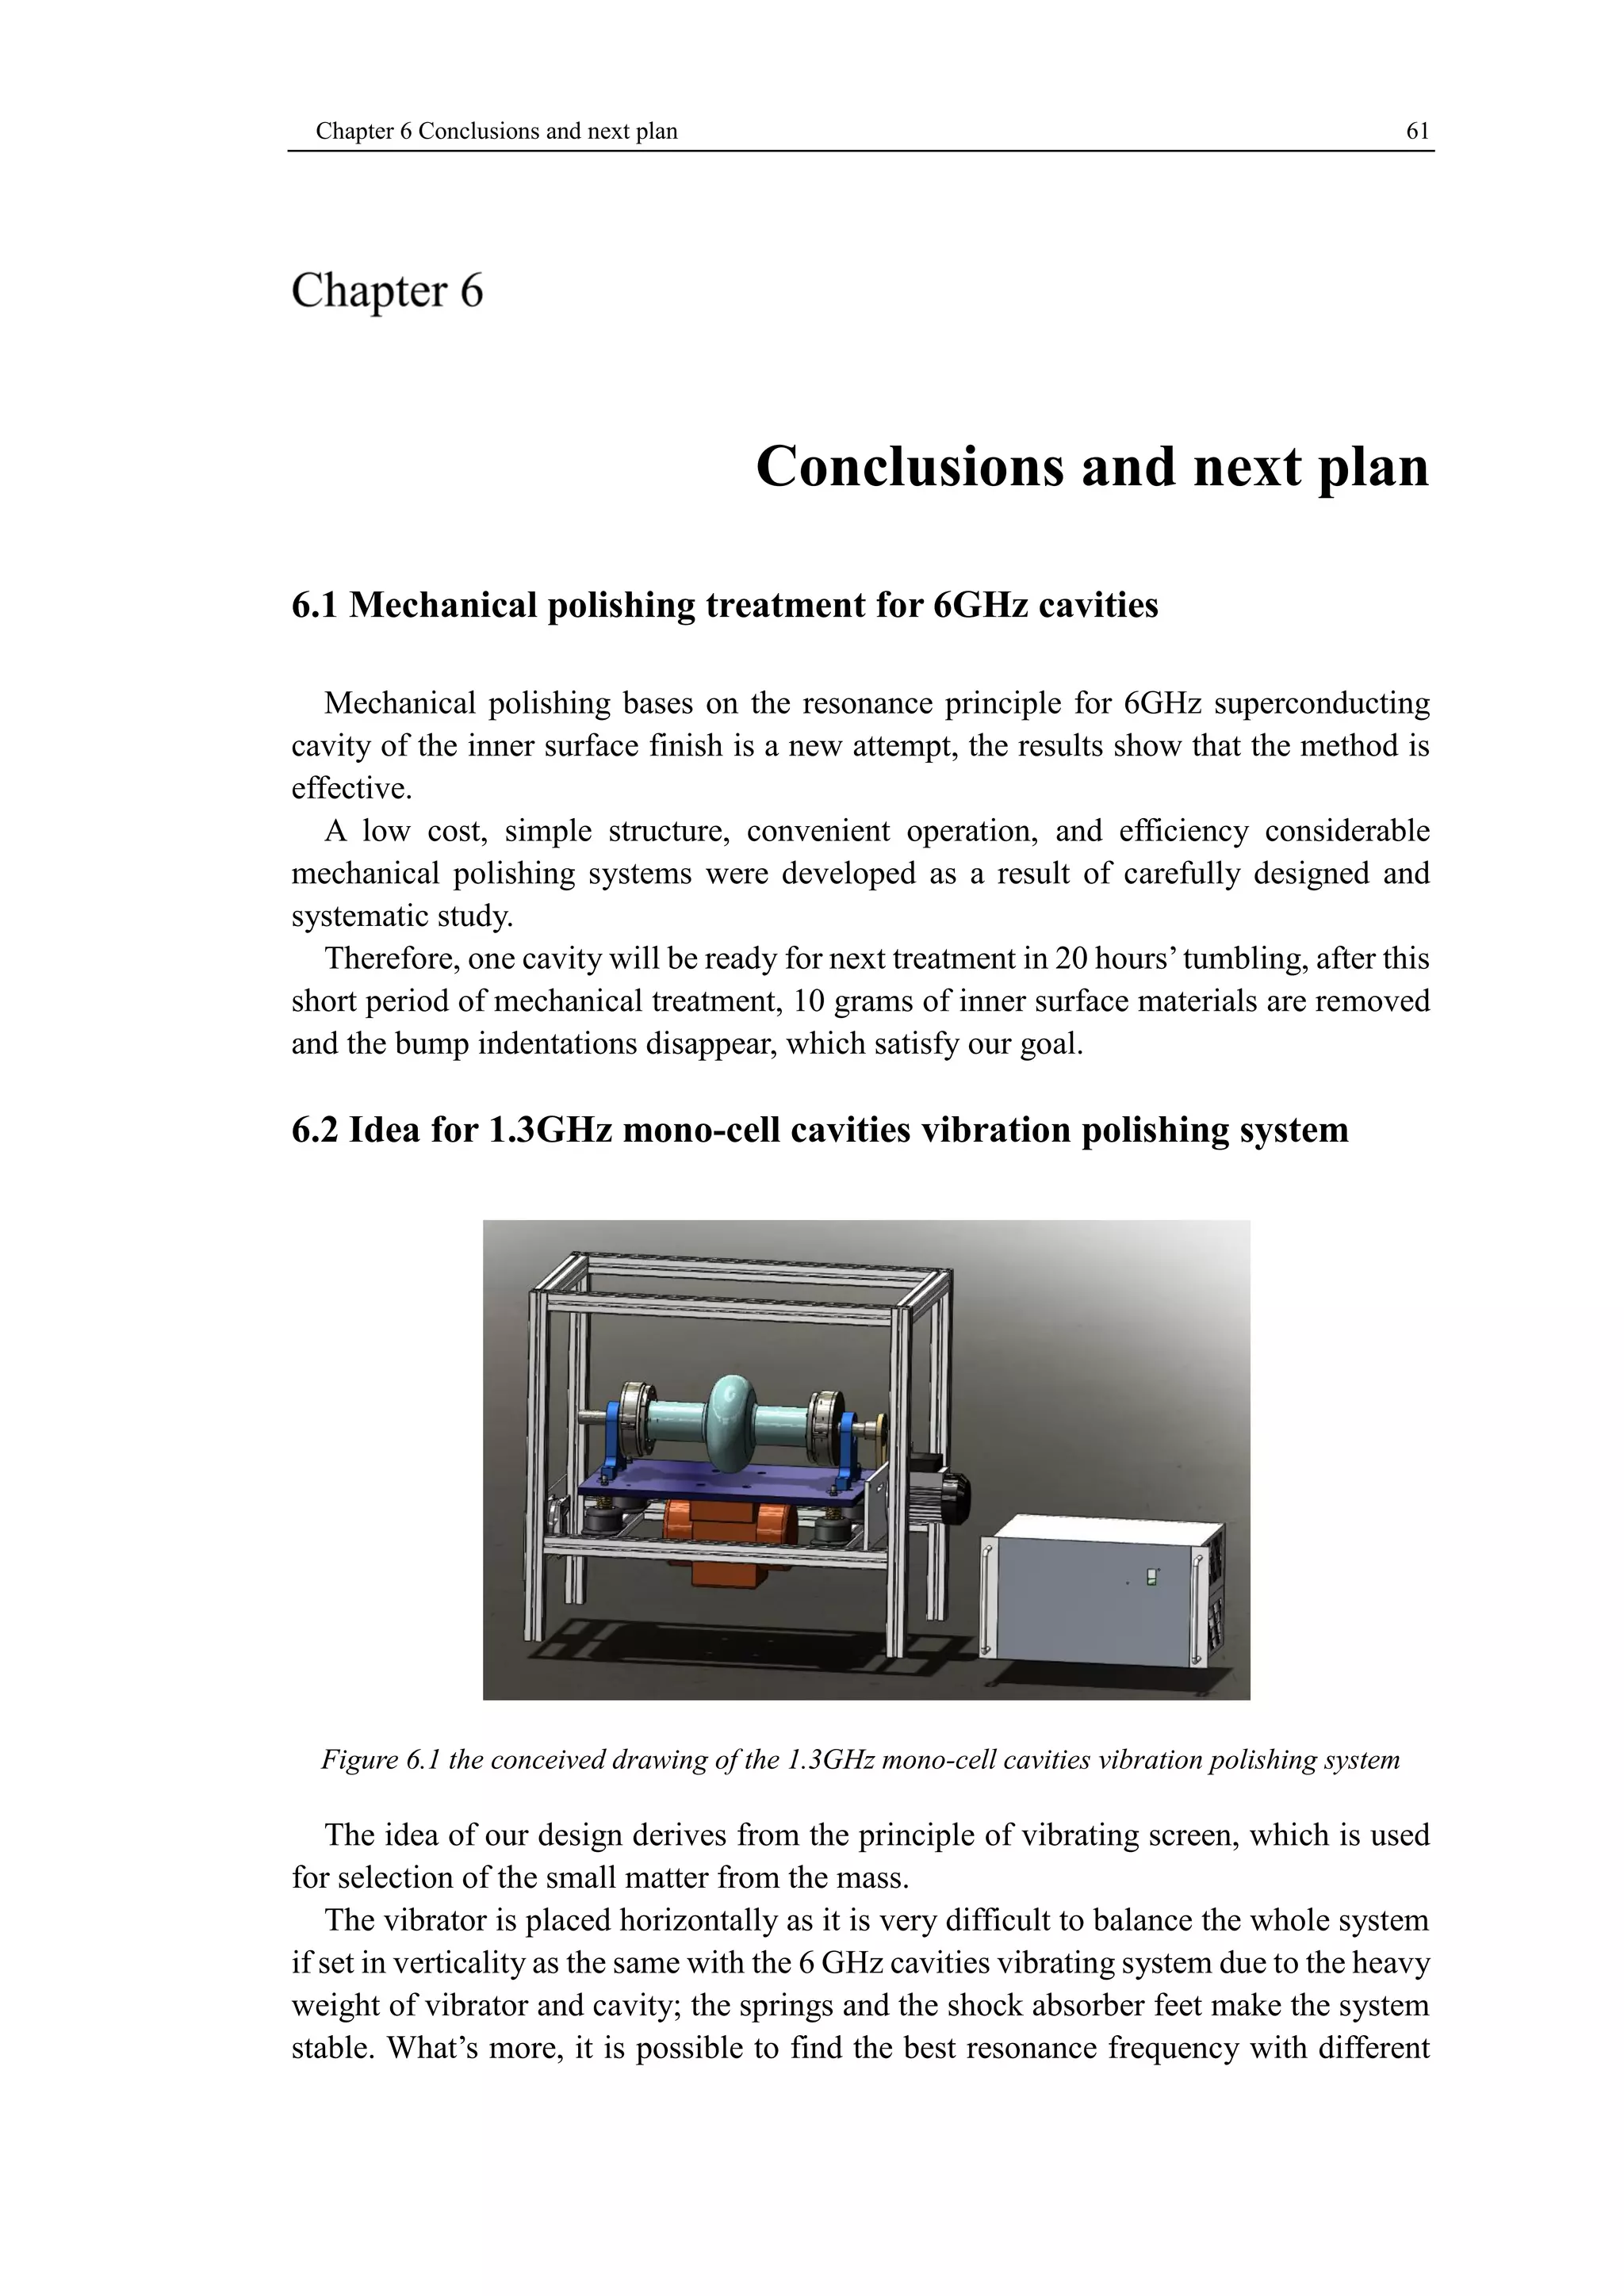
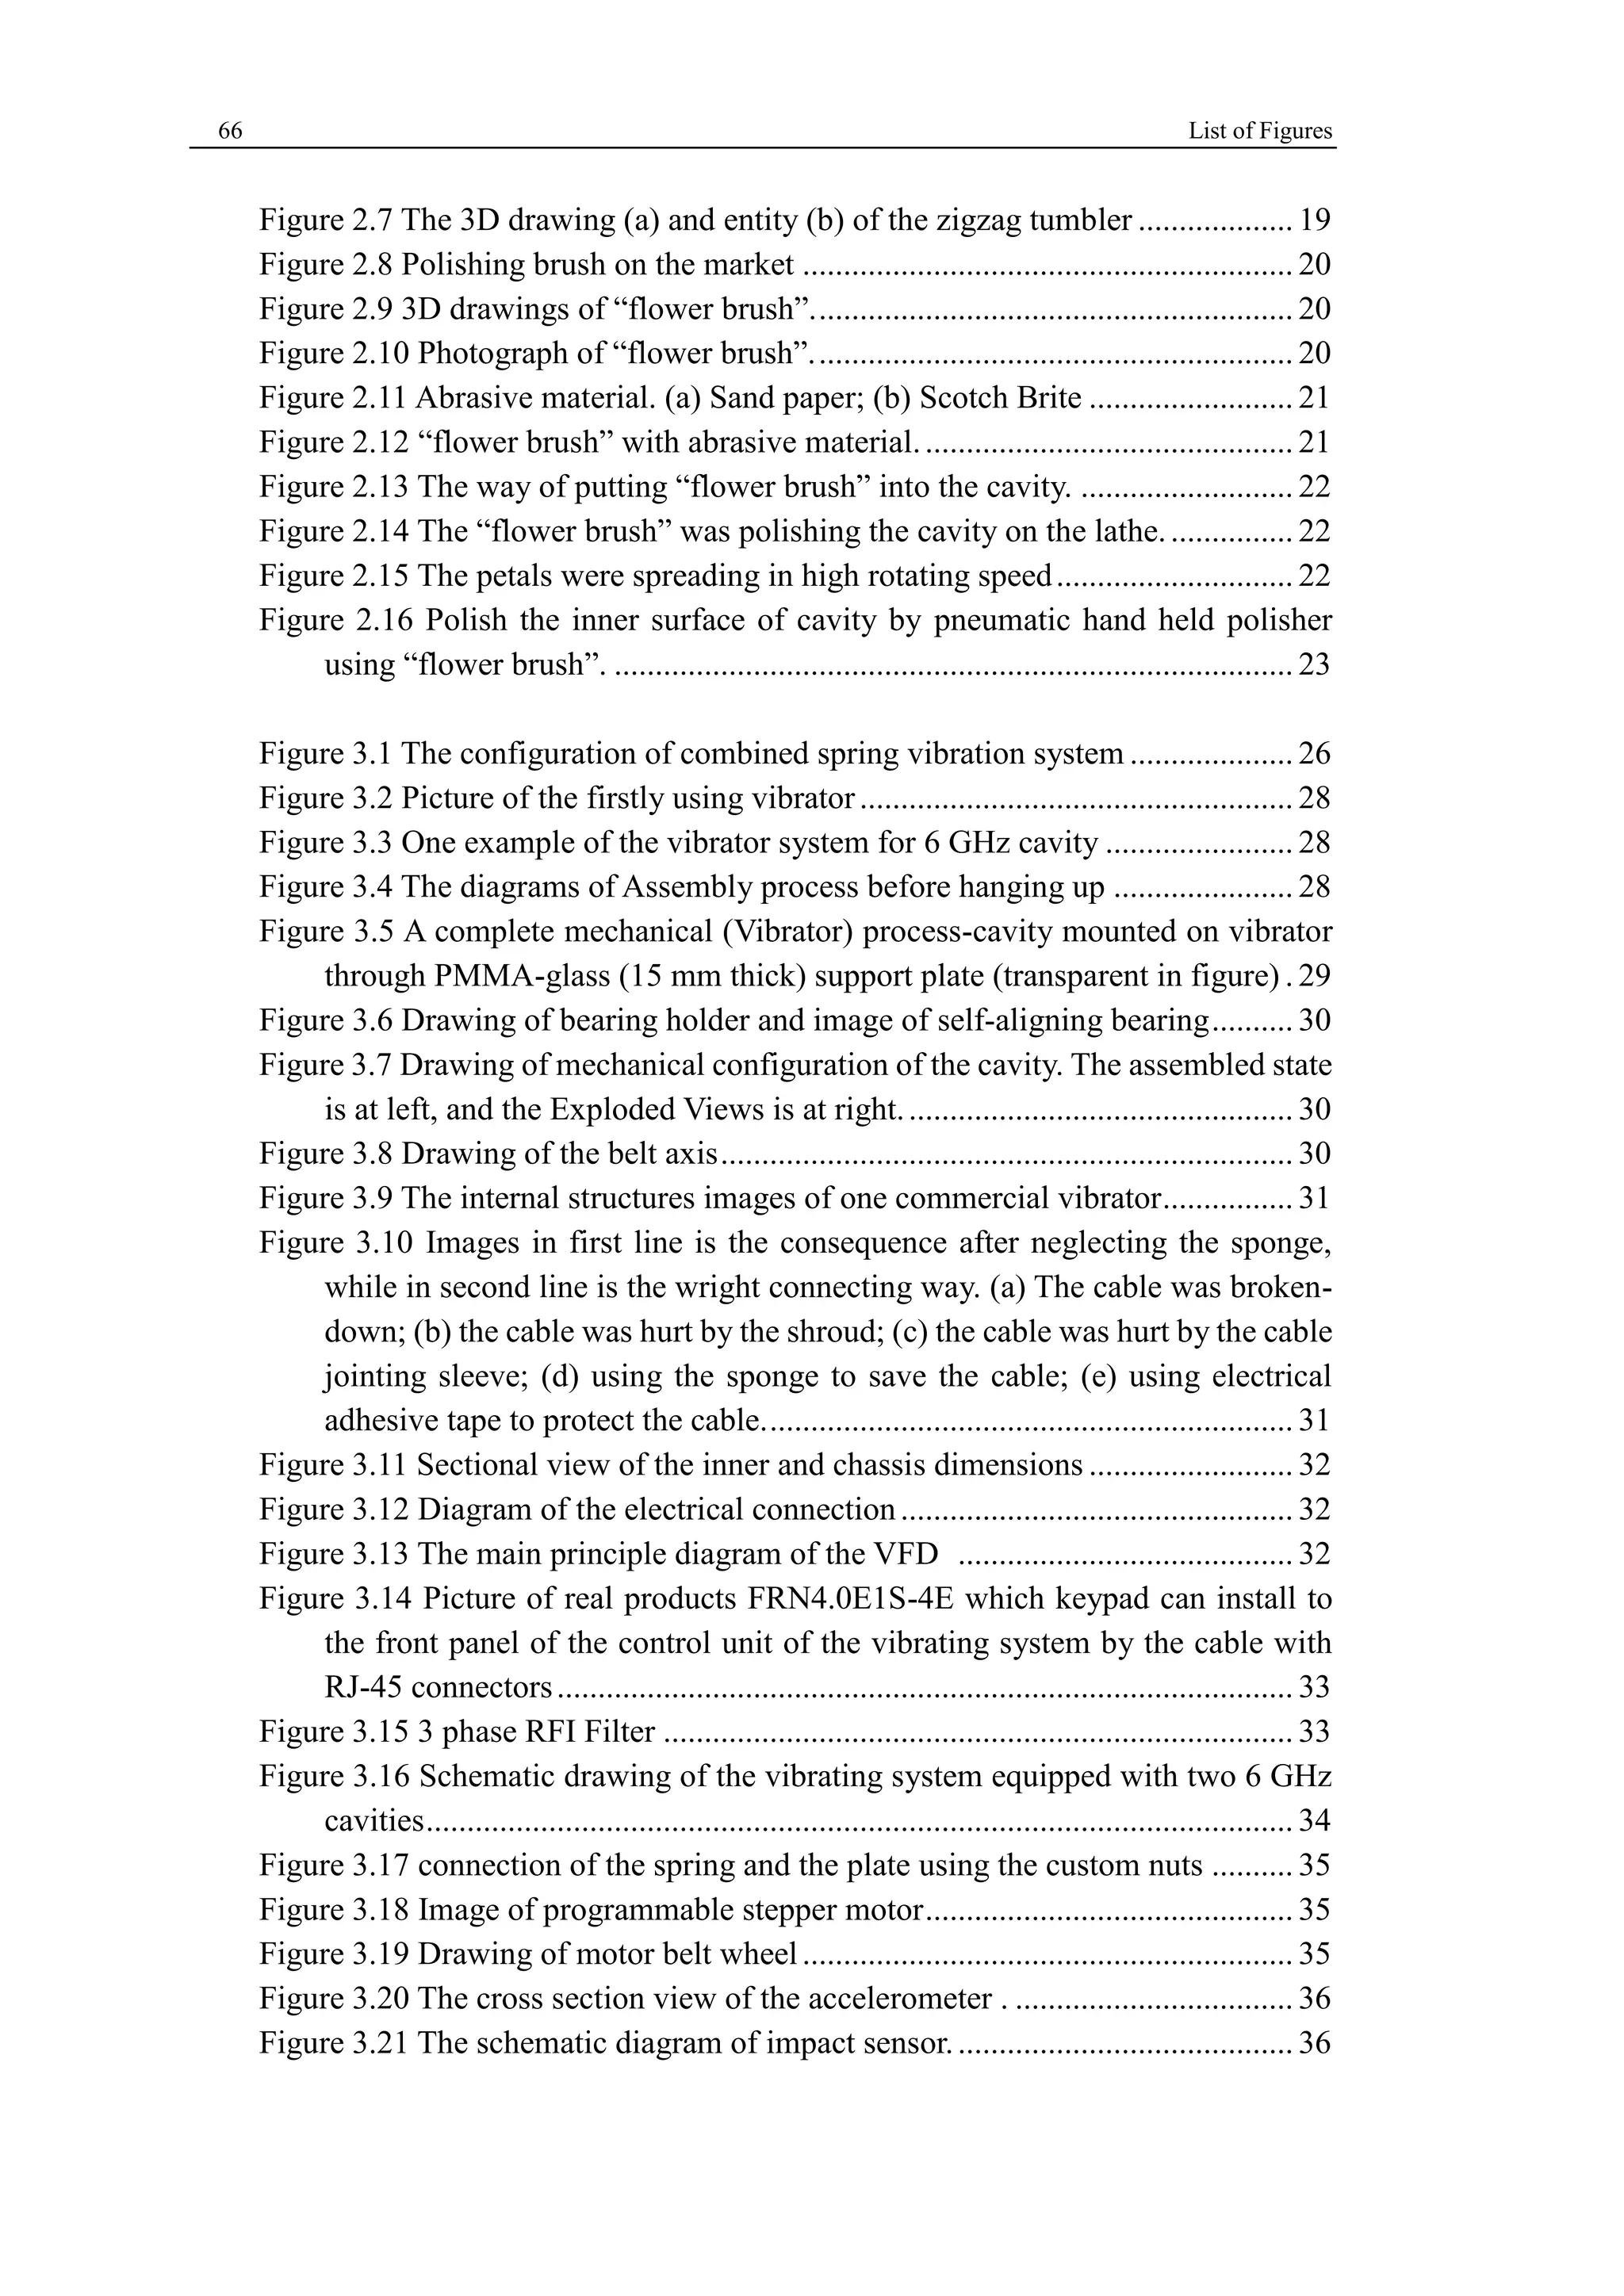
DI PADOVA DI FISICA NUCLEARE Dipartimento di Fisica e Astronomia 
Dipartimento di Ingegneria Industriale Laboratori Nazionali di Legnaro 
Under the Auspice of the TESLA TECHNOLOGY COLLABORATION 
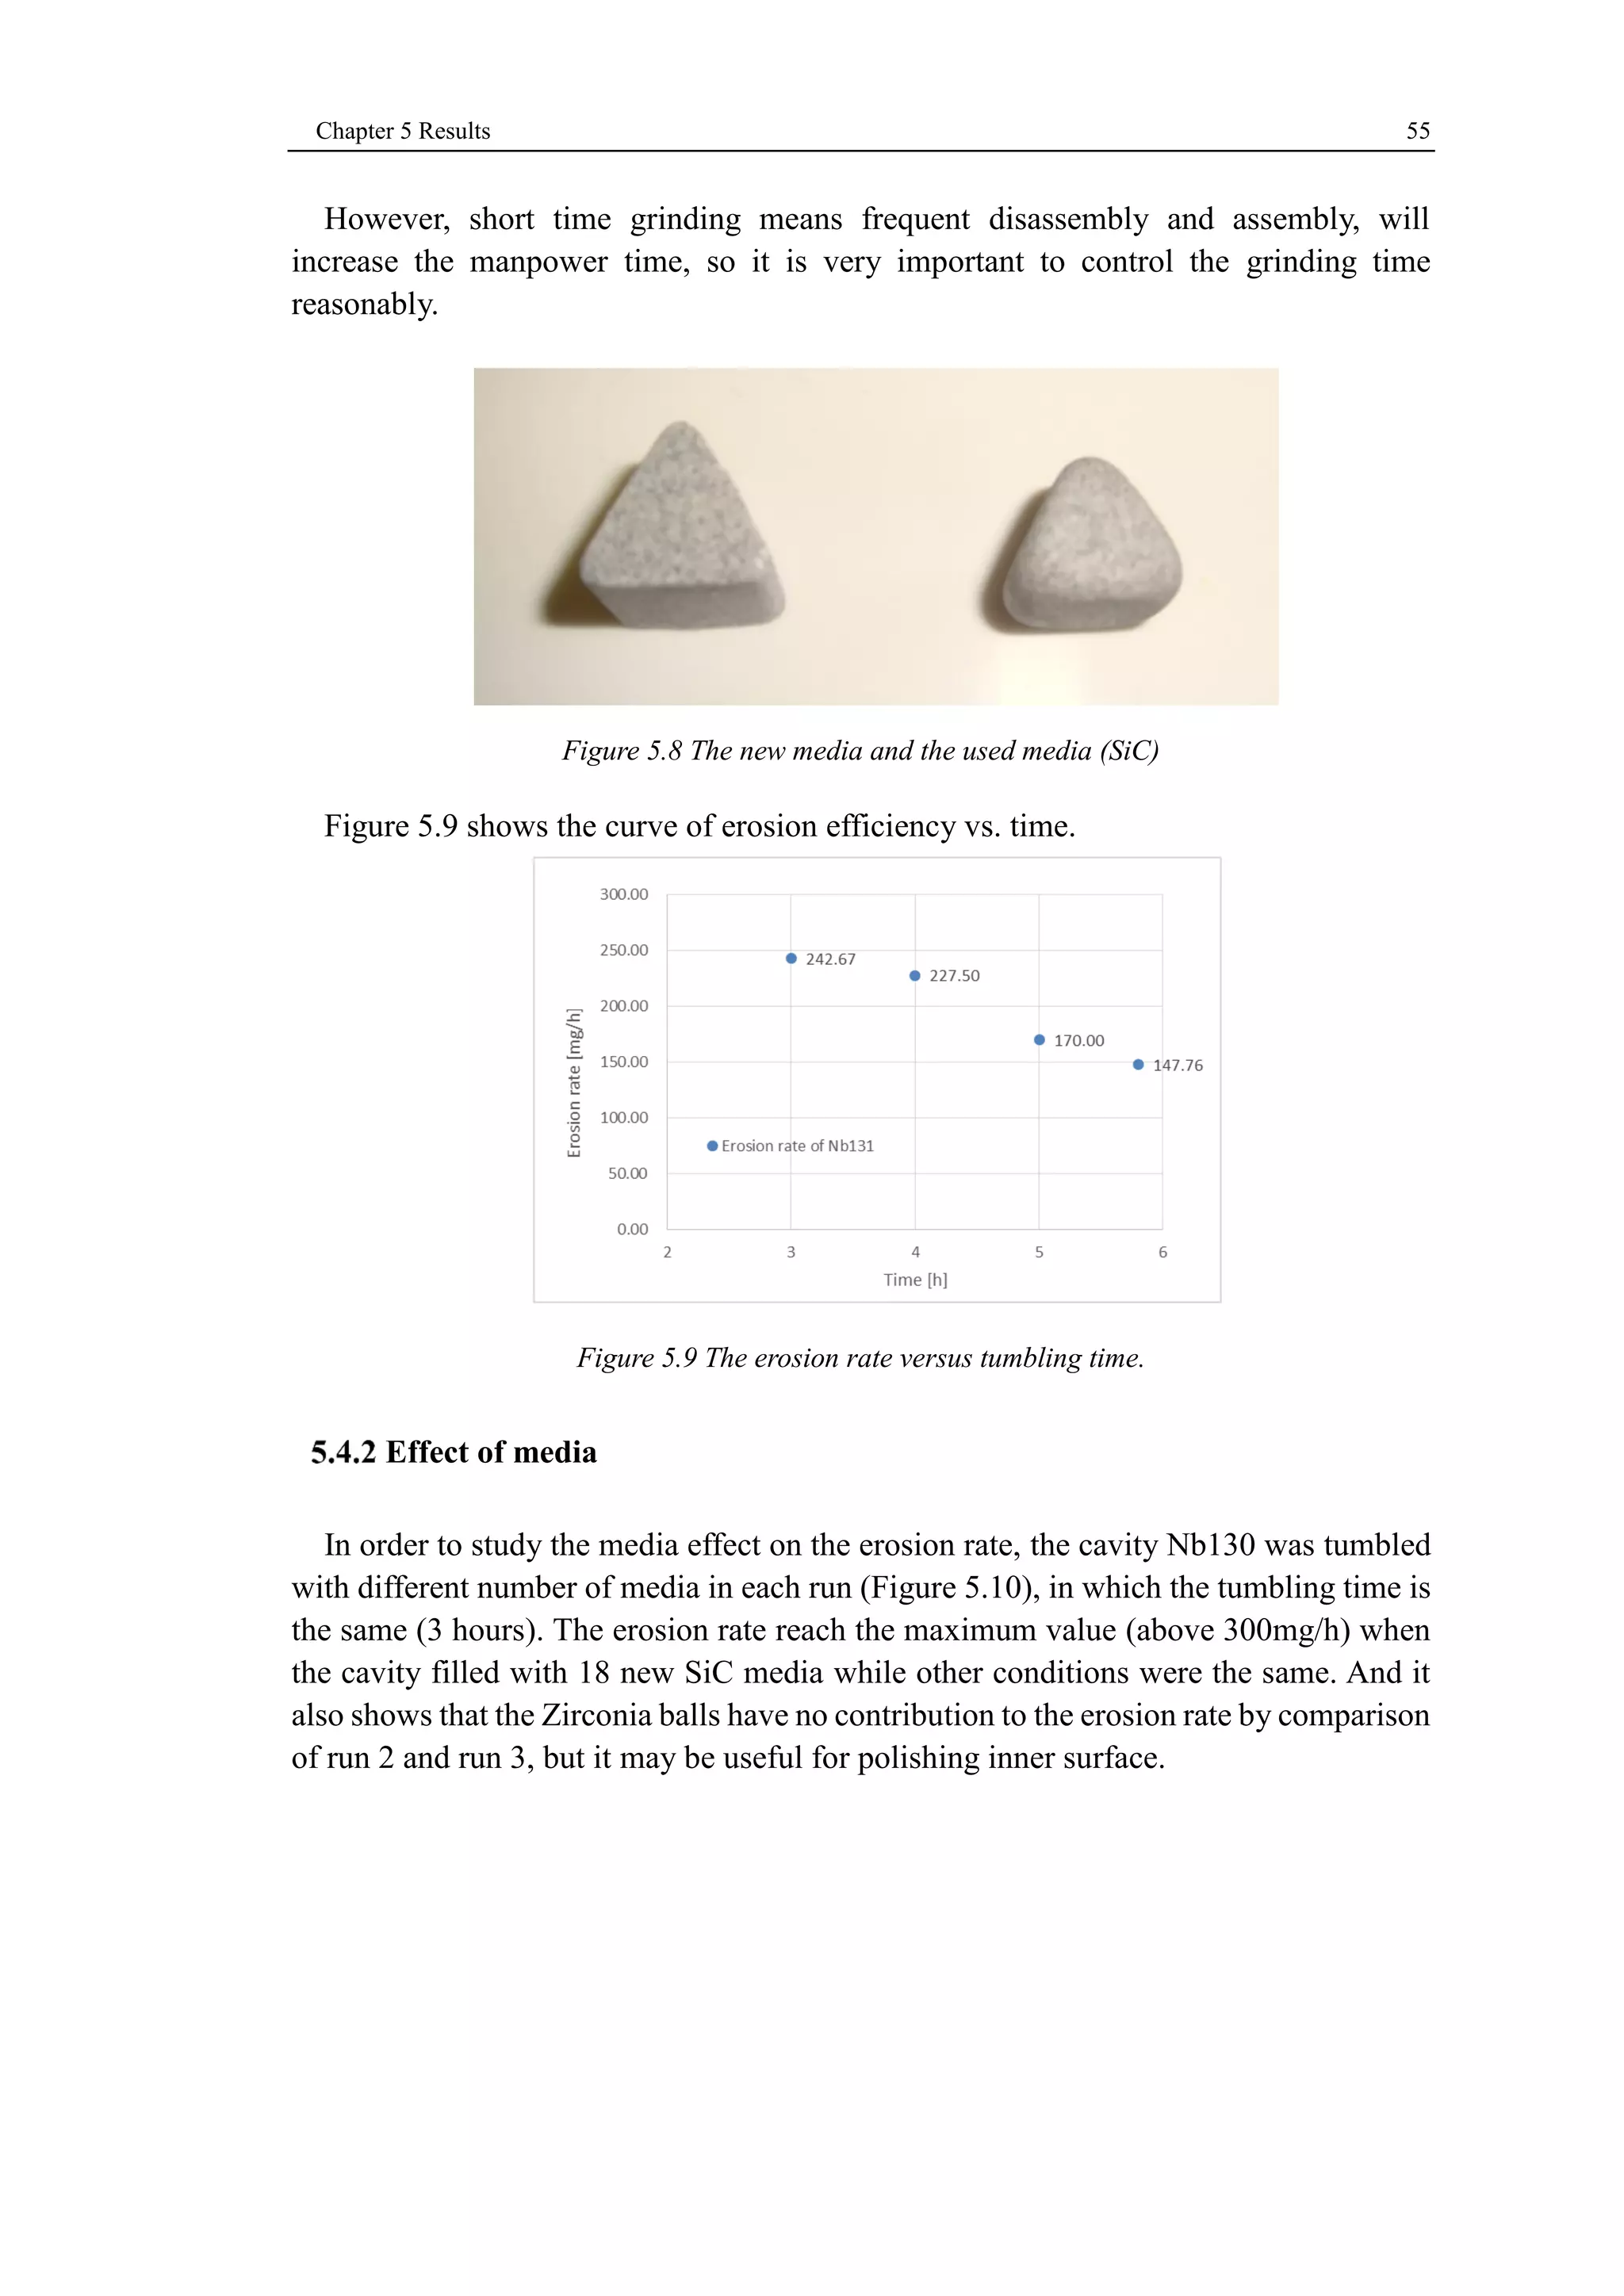
MASTER THESIS 
in 
“Surface Treatments for Industrial Applications” 
Development of a new mechanical 
surface treatment for the internal finishing of 
6 GHz superconducting cavities 
Supervisor: Prof. V. Palmieri 
Co-Supervisor: Dott. A.A.Rossi 
Student: Yu Guolong 
N. Matr.: 1064843 
Academic Year 2012-2013
有志者,事竟成。 Where there is a will, there is a way. 谨以此文献给我的妻子和儿子 二零一二年九月~二零一三年九月于意大利
Contents I 
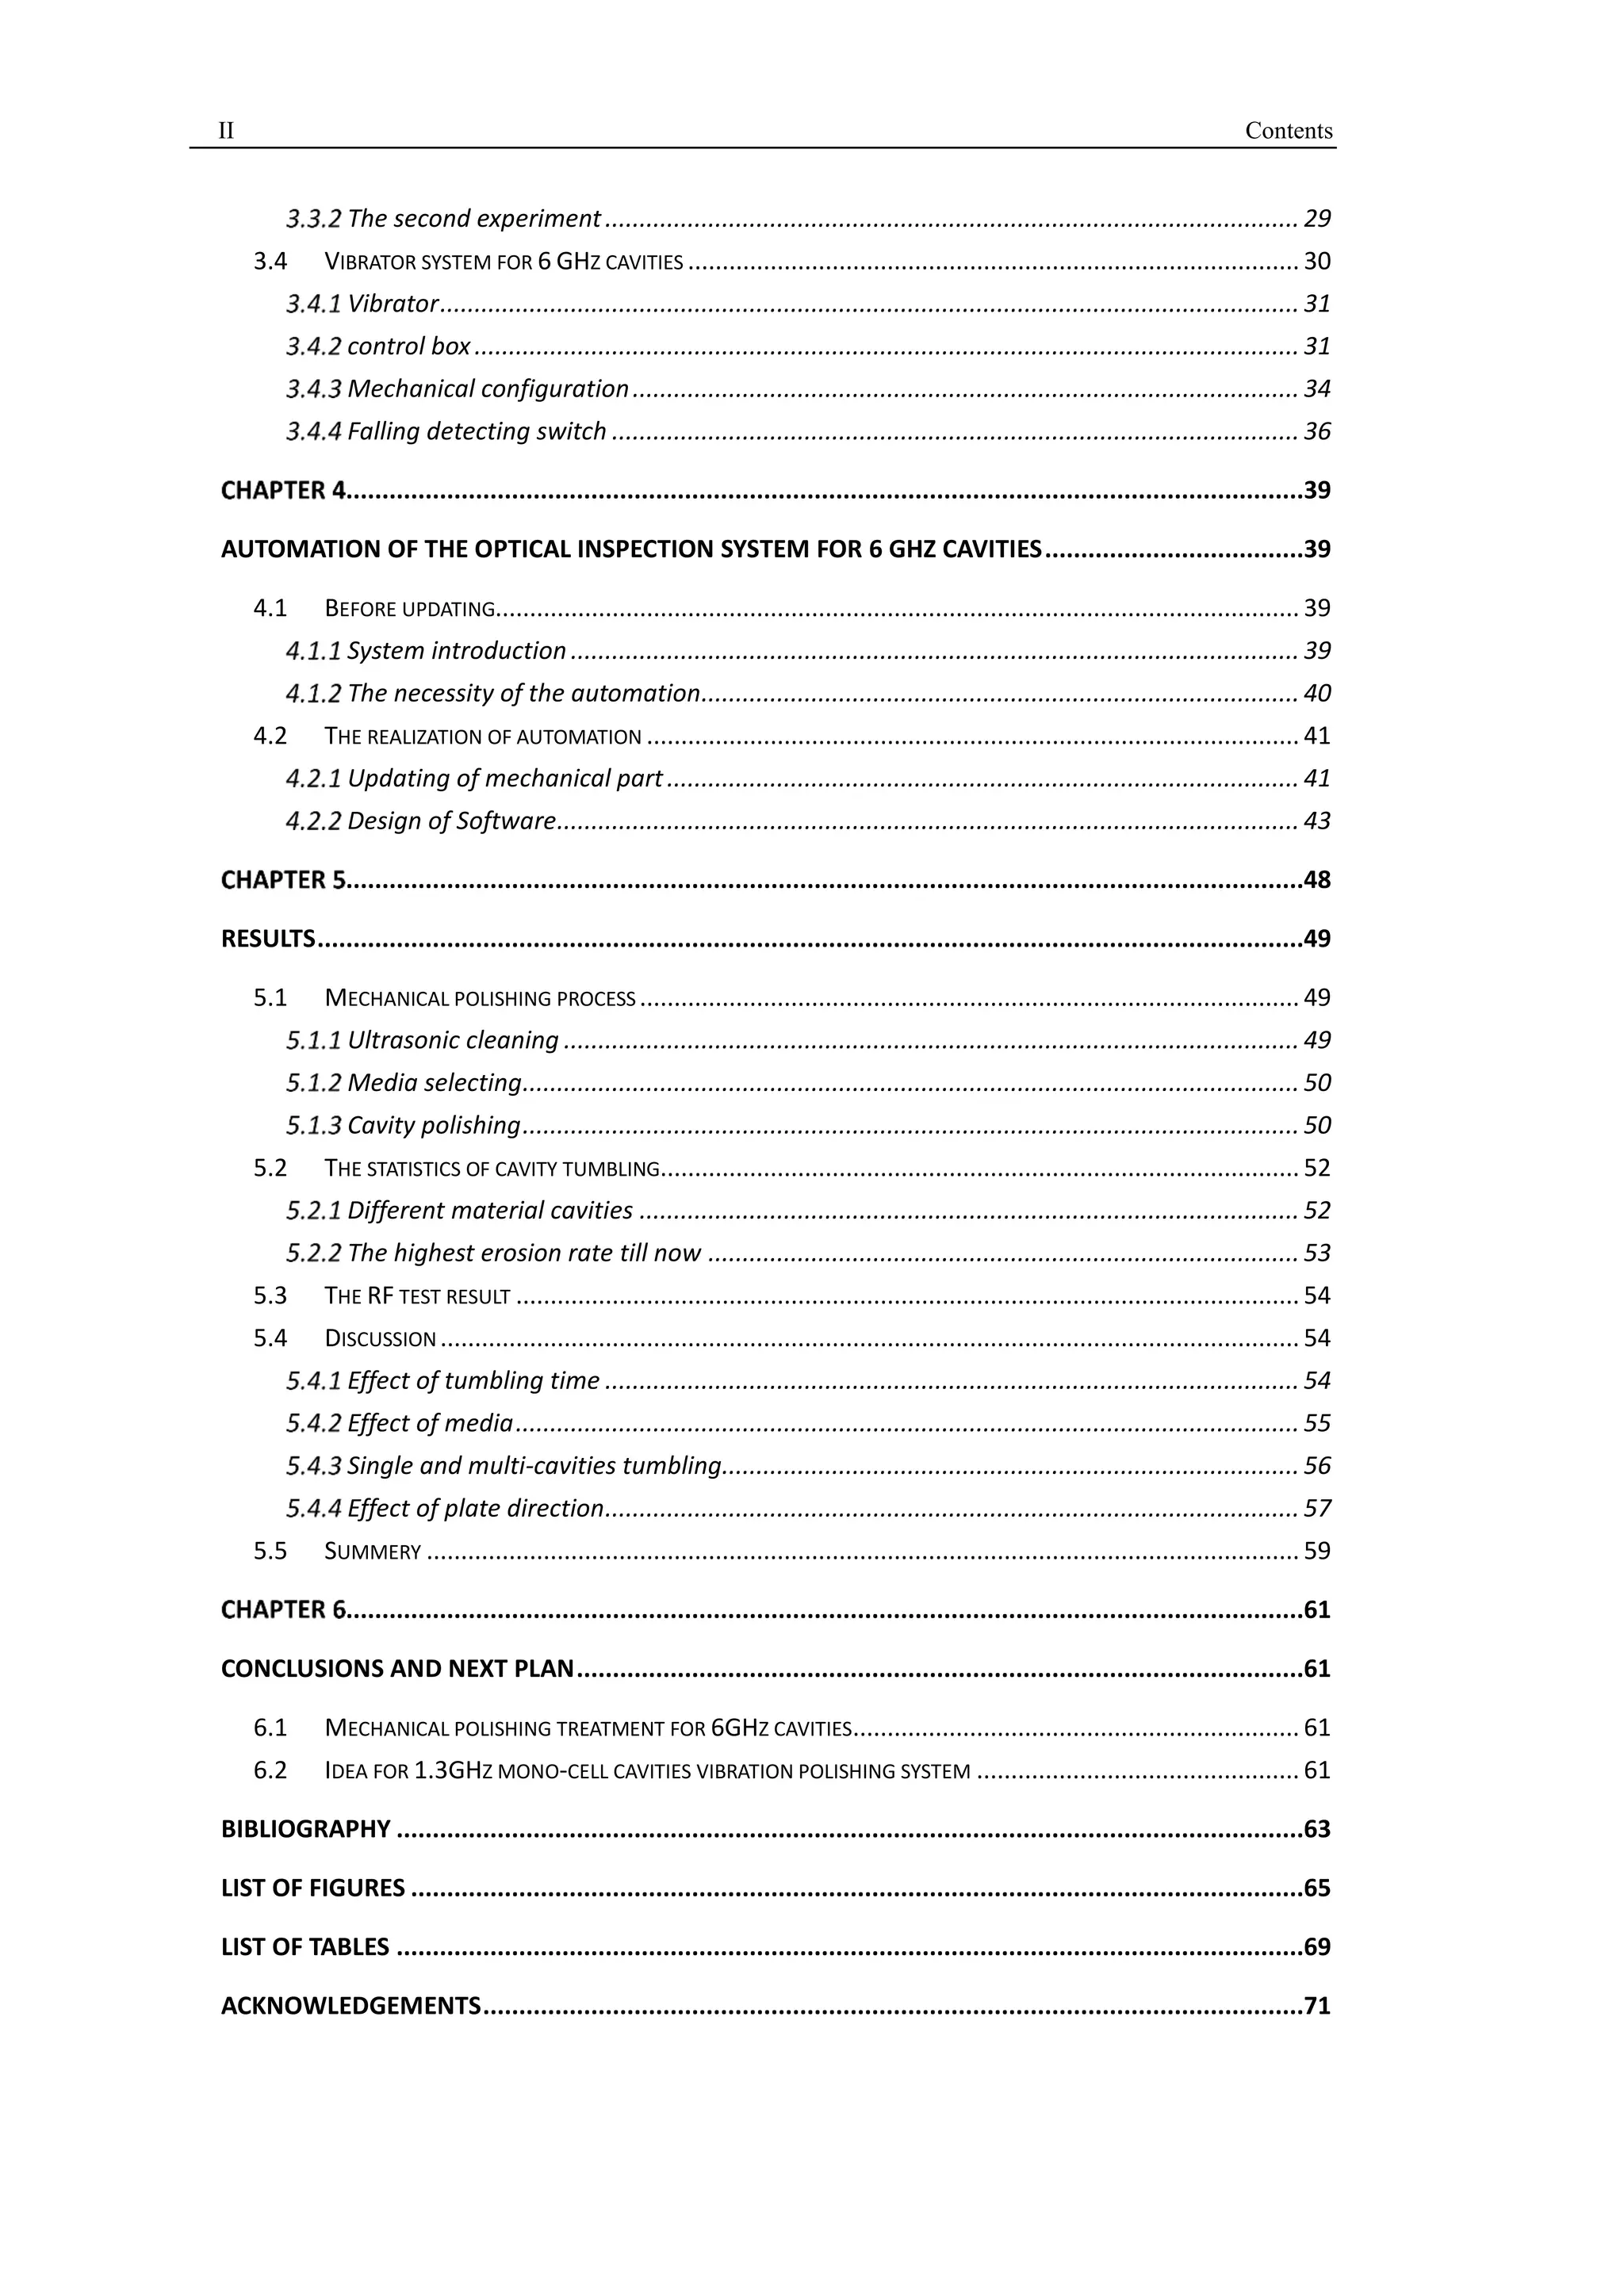
Contents 
CONTENTS ....................................................................................................................................... I 
ABSTRACT ....................................................................................................................................... V 
ACRONYM ..................................................................................................................................... VII 
...................................................................................................................................... 1 
INTRODUCTION .............................................................................................................................. 1 
0.1 BACKGROUND AND PURPOSE ......................................................................................................... 1 
0.2 ORGANIZATION OF THE THESIS ....................................................................................................... 1 
...................................................................................................................................... 3 
6 GHZ SPUN SEAMLESS CAVITIES .................................................................................................... 3 
1.1 TEV ENERGY SUPERCONDUCTING LINEAR ACCELERATOR (TESLA) CAVITIES ............................................ 3 
Key parameters and limitations .......................................................................................... 3 
Standard fabrication techniques [1] ................................................................................... 5 
Disadvantages and limitation ............................................................................................. 7 
1.2 SEAMLESS CAVITIES ..................................................................................................................... 7 
Description of Spinning technique ...................................................................................... 8 
RF measurements and results of seamless cavities ............................................................ 9 
1.3 6 GHZ CAVITIES .......................................................................................................................... 9 
Advantages of 6 GHz cavities ........................................................................................... 10 
Drawback.......................................................................................................................... 11 
Standard surface polishing techniques ............................................................................. 12 
.................................................................................................................................... 15 
MECHANICAL POLISHING APPROACHES ........................................................................................ 15 
2.1 TURBULA® SHAKER-MIXER ...................................................................................................... 15 
2.2 CENTRIFUGAL BARREL POLISHING (CBP) ........................................................................................ 16 
2.3 ZIGZAG TUMBLER ...................................................................................................................... 18 
2.4 “FLOWER BRUSH” ..................................................................................................................... 19 
“Flower brush” design for polishing 6 GHz cavities .......................................................... 19 
Polishing test .................................................................................................................... 21 
.................................................................................................................................... 25 
VIBRATING SYSTEM - A NEW MECHANICAL POLISHING APPROACH .............................................. 25 
3.1 INDUSTRIAL APPLICATION OF VIBRATOR .......................................................................................... 25 
3.2 RESONANCE-THE ORIGINAL IDEA .................................................................................................. 25 
3.3 EXPERIMENT WITH SMALL VIBRATOR ............................................................................................. 27 
The first experiment .......................................................................................................... 27
II Contents 
The second experiment ..................................................................................................... 29 
3.4 VIBRATOR SYSTEM FOR 6 GHZ CAVITIES ......................................................................................... 30 
Vibrator ............................................................................................................................. 31 
control box ........................................................................................................................ 31 
Mechanical configuration ................................................................................................. 34 
Falling detecting switch .................................................................................................... 36 
.....................................................................................................................................39 
AUTOMATION OF THE OPTICAL INSPECTION SYSTEM FOR 6 GHZ CAVITIES ....................................39 
4.1 BEFORE UPDATING..................................................................................................................... 39 
System introduction .......................................................................................................... 39 
The necessity of the automation ....................................................................................... 40 
4.2 THE REALIZATION OF AUTOMATION ............................................................................................... 41 
Updating of mechanical part ............................................................................................ 41 
Design of Software ............................................................................................................ 43 
.....................................................................................................................................48 
RESULTS .........................................................................................................................................49 
5.1 MECHANICAL POLISHING PROCESS ................................................................................................ 49 
Ultrasonic cleaning ........................................................................................................... 49 
Media selecting ................................................................................................................. 50 
Cavity polishing ................................................................................................................. 50 
5.2 THE STATISTICS OF CAVITY TUMBLING............................................................................................. 52 
Different material cavities ................................................................................................ 52 
The highest erosion rate till now ...................................................................................... 53 
5.3 THE RF TEST RESULT .................................................................................................................. 54 
5.4 DISCUSSION ............................................................................................................................. 54 
Effect of tumbling time ..................................................................................................... 54 
Effect of media .................................................................................................................. 55 
Single and multi-cavities tumbling .................................................................................... 56 
Effect of plate direction ..................................................................................................... 57 
5.5 SUMMERY ............................................................................................................................... 59 
.....................................................................................................................................61 
CONCLUSIONS AND NEXT PLAN .....................................................................................................61 
6.1 MECHANICAL POLISHING TREATMENT FOR 6GHZ CAVITIES ................................................................. 61 
6.2 IDEA FOR 1.3GHZ MONO-CELL CAVITIES VIBRATION POLISHING SYSTEM ............................................... 61 
BIBLIOGRAPHY ..............................................................................................................................63 
LIST OF FIGURES ............................................................................................................................65 
LIST OF TABLES ..............................................................................................................................69 
ACKNOWLEDGEMENTS ..................................................................................................................71
Contents III
IV Contents
Abstract V 
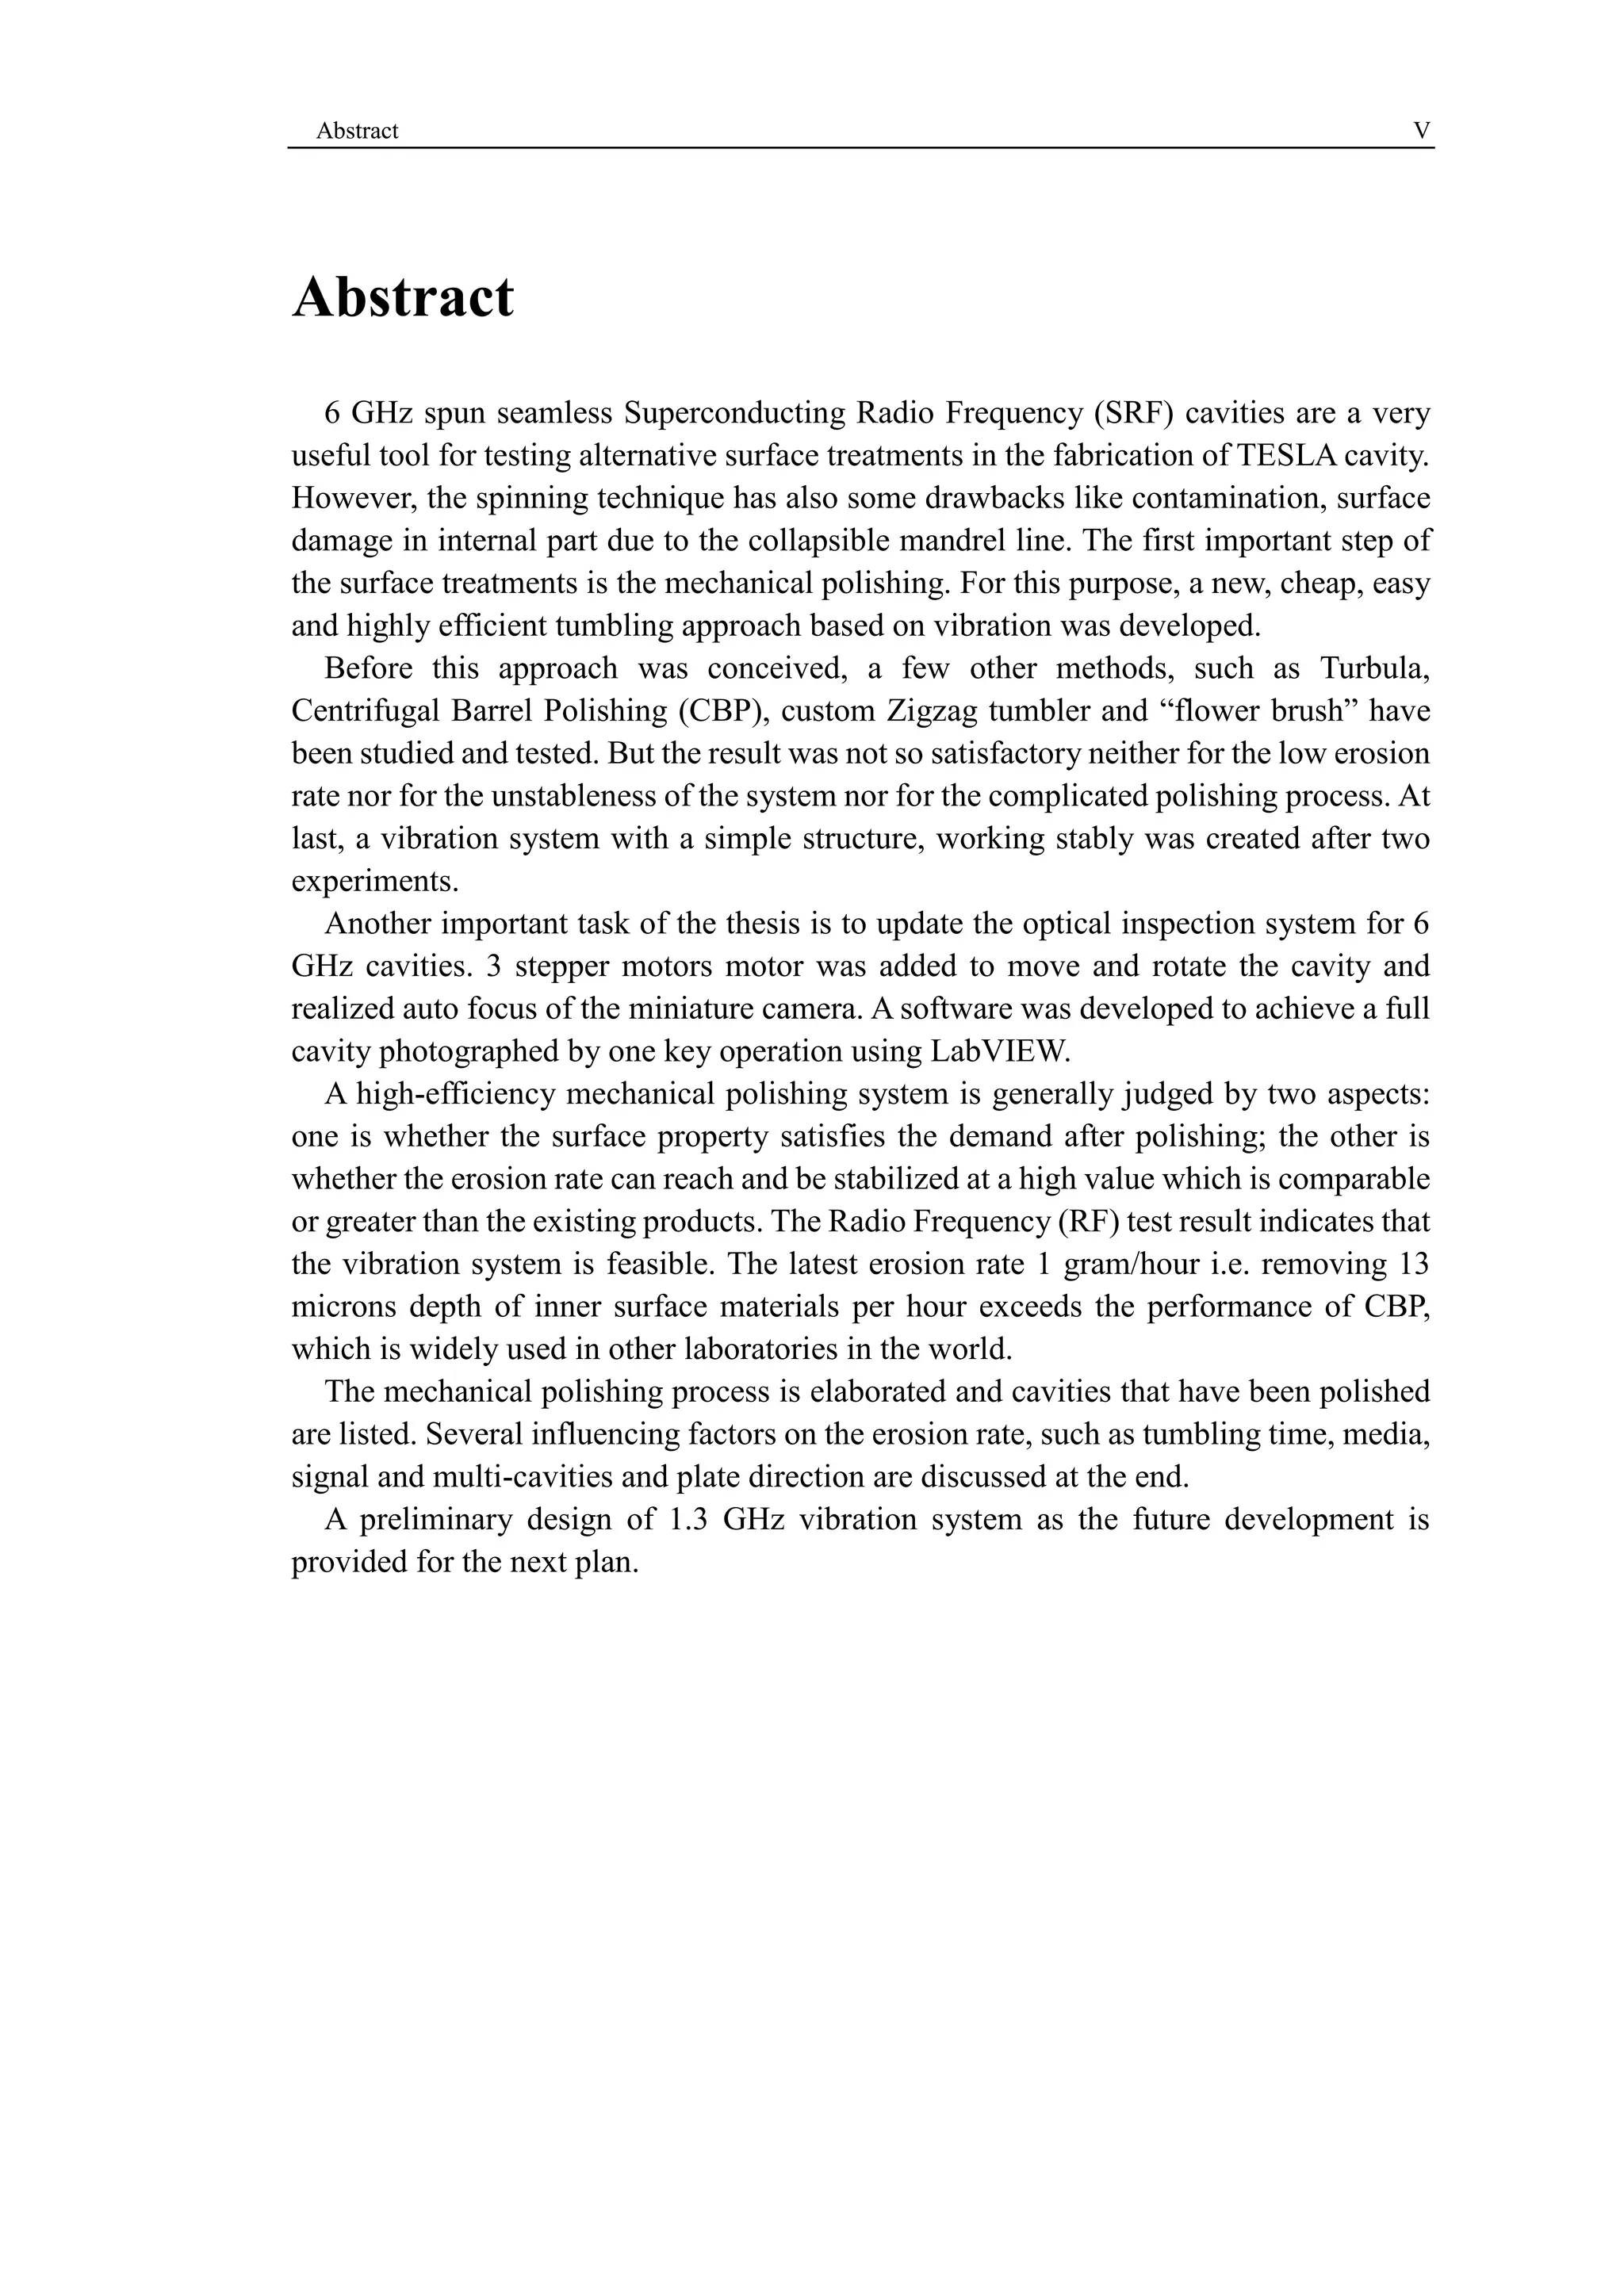
Abstract 
6 GHz spun seamless Superconducting Radio Frequency (SRF) cavities are a very 
useful tool for testing alternative surface treatments in the fabrication of TESLA cavity. 
However, the spinning technique has also some drawbacks like contamination, surface 
damage in internal part due to the collapsible mandrel line. The first important step of 
the surface treatments is the mechanical polishing. For this purpose, a new, cheap, easy 
and highly efficient tumbling approach based on vibration was developed. 
Before this approach was conceived, a few other methods, such as Turbula, 
Centrifugal Barrel Polishing (CBP), custom Zigzag tumbler and “flower brush” have 
been studied and tested. But the result was not so satisfactory neither for the low erosion 
rate nor for the unstableness of the system nor for the complicated polishing process. At 
last, a vibration system with a simple structure, working stably was created after two 
experiments. 
Another important task of the thesis is to update the optical inspection system for 6 
GHz cavities. 3 stepper motors motor was added to move and rotate the cavity and 
realized auto focus of the miniature camera. A software was developed to achieve a full 
cavity photographed by one key operation using LabVIEW. 
A high-efficiency mechanical polishing system is generally judged by two aspects: 
one is whether the surface property satisfies the demand after polishing; the other is 
whether the erosion rate can reach and be stabilized at a high value which is comparable 
or greater than the existing products. The Radio Frequency (RF) test result indicates that 
the vibration system is feasible. The latest erosion rate 1 gram/hour i.e. removing 13 
microns depth of inner surface materials per hour exceeds the performance of CBP, 
which is widely used in other laboratories in the world. 
The mechanical polishing process is elaborated and cavities that have been polished 
are listed. Several influencing factors on the erosion rate, such as tumbling time, media, 
signal and multi-cavities and plate direction are discussed at the end. 
A preliminary design of 1.3 GHz vibration system as the future development is 
provided for the next plan.
VI Contents
Acronym VII 
Acronym 
The acronyms used in this thesis are listed in the following, 
ILC = International Linear Collider 
INFN-LNL = Istituto Nazionale di Fisica Nucleare - Laboratori Nazionali di Legnaro 
(Padova) 
TESLA = TeV Energy Superconducting Linear Accelerator 
SRF = Superconducting Radio Frequency 
RF = Radio Frequency 
BCP = Buffered Chemical Polishing 
CBP = Centrifugal Barrel Polishing 
PCB = Printed Circuit Board 
rpm = revolutions per minute 
EB = Electron Beam 
EP = Electro Polishing 
HPR = High Pressure Water Rinsing 
VFD = Variable-Frequency Drive 
UHV = Ultra-High Vacuum
VIII Acronym
Chapter 0 Introduction 1 
Introduction 
0.1 Background and purpose 
Advantages of SRF cavities for accelerators are well known and a large number of 9- 
cells TESLA cavities is needed for the International Linear Collider (ILC). The 
fabrication of these cavities using the traditional way will cost much time and expensive. 
The spinning technology for seamless cavities invented in INFN-LNL is an answer for 
this challenge. Using this technology not only multi-cell 1.3 GHz resonators but also 
the 6 GHz cavity can be produced. 
The mechanical polish for 6 GHz cavity is the first and important step, it will remove 
the defects and scratches of the inner surface due to using collapsible mandrel. 
A high efficient mechanical treatment for the micro-cavities is a key to accelerate the 
process of studying the thin film deposition techniques and new superconducting 
materials for RF applications. The purpose of this thesis is to develop a new, cheap, easy 
and highly efficient tumbling approach. 
0.2 Organization of the thesis 
The first chapter introduces the origin of research. It gives a briefly introduction of 
TESLA cavities and the standard fabrication techniques, then expounds the seamless 
cavities technique, 6 GHz cavities and standard surface polishing techniques. 
The second chapter describes the learning and trying of some mechanical polishing 
means for 6GHz resonator, including Turbula, Zigzag tumbler, CBP and polishing brush. 
In chapter 3, the development of a new mechanical polishing approach and treatment 
is described in detail. It encompasses everything from birth of the ideas to the 
preliminary tests, from the working principle to the system structure. 
Chapter 4 is an overview of the upgrading of cavity inner surface optical inspection 
system, involving both hardware and software, which is also an important part of this 
thesis. 
The chapter 5 gives the results. It summarizes the mechanical polishing process, 
presents the statistics for the different materials cavity polished results, shows the 
highest polishing efficiency so far, states the RF test data, and finally discusses the 
impacts of abrasive materials type, quantity and mixing ratio, tumbling time, spatial 
arrangement of the vibrator on the polishing efficiency. It also compared the polishing 
efficiency of single cavity and multi-cavities in the same system.
2 0.2 Organization of the thesis 
The last part of the thesis is the conclusions and one idea for 1.3GHz mono-cell 
cavities vibration polishing system is proposed.
Chapter 1 6 GHz spun seamless cavities 3 
6 GHz spun seamless cavities 
1.1 TeV Energy Superconducting Linear Accelerator (TESLA) cavities 
In the past 40 years, electron-positron collisions have played a central role in the 
discovery and detailed investigation of new elementary particles and their interactions. 
But some important fundamental questions still remain to be answered, which force the 
High Energy Physics community to build the next generation facility- the International 
Linear Collider (ILC) [1]. 
Superconducting radio-frequency (SRF) resonating cavity can operate in continuous-wave 
mode or long macro pulse mode, providing high acceleration gradients [2], 
therefore, it was chosen by the ILC. 
The international TESLA project [3] uses nine-cell 1.3 GHz niobium cavities (shown 
in Figure 1.1), which reduce the cost per MeV by a factor of 20 over the then (year 1992) 
state-of-the-art SRF installation (CEBAF) by increasing the operating accelerating 
gradient by a factor of five from 5 MV/m to 25 MV/m, and reducing the cost per meter 
of the complete accelerating module by a factor of four for large-scale production [4]. 
Figure 1.1 A TESLA nine-cell 1.3 GHz superconducting niobium cavity [4]. 
The TESLA 9-cell cavity is a standing wave structure of about 1 m length whose 
fundamental π -mode has a frequency of 1.3 GHz. It is made from 2.8mm thick high 
quality niobium sheets by deep drawing of half-cells, followed by trimming and electron 
beam welding. 
Key parameters and limitations 
 Surface resistance
4 1.1.1 Key parameters and limitations 
There is an energy dissipation in superconductors in microware fields who penetrates 
a thin surface layer and induces oscillations of the electrons which are not bound in 
Cooper pairs. In the two-fluid model of superconductors one can derive an expression 
for the surface resistance 
푅퐵퐶푆 = 퐴푒− 
푠 
2 
푇푐 
푇 (1.1) 
Here 퐴 is constant, s is strong coupling factor, approximate 3.8 for Niobium, is critical 
temperature, 푇 is the bath temperature. In addition to the BCS term there is a residual 
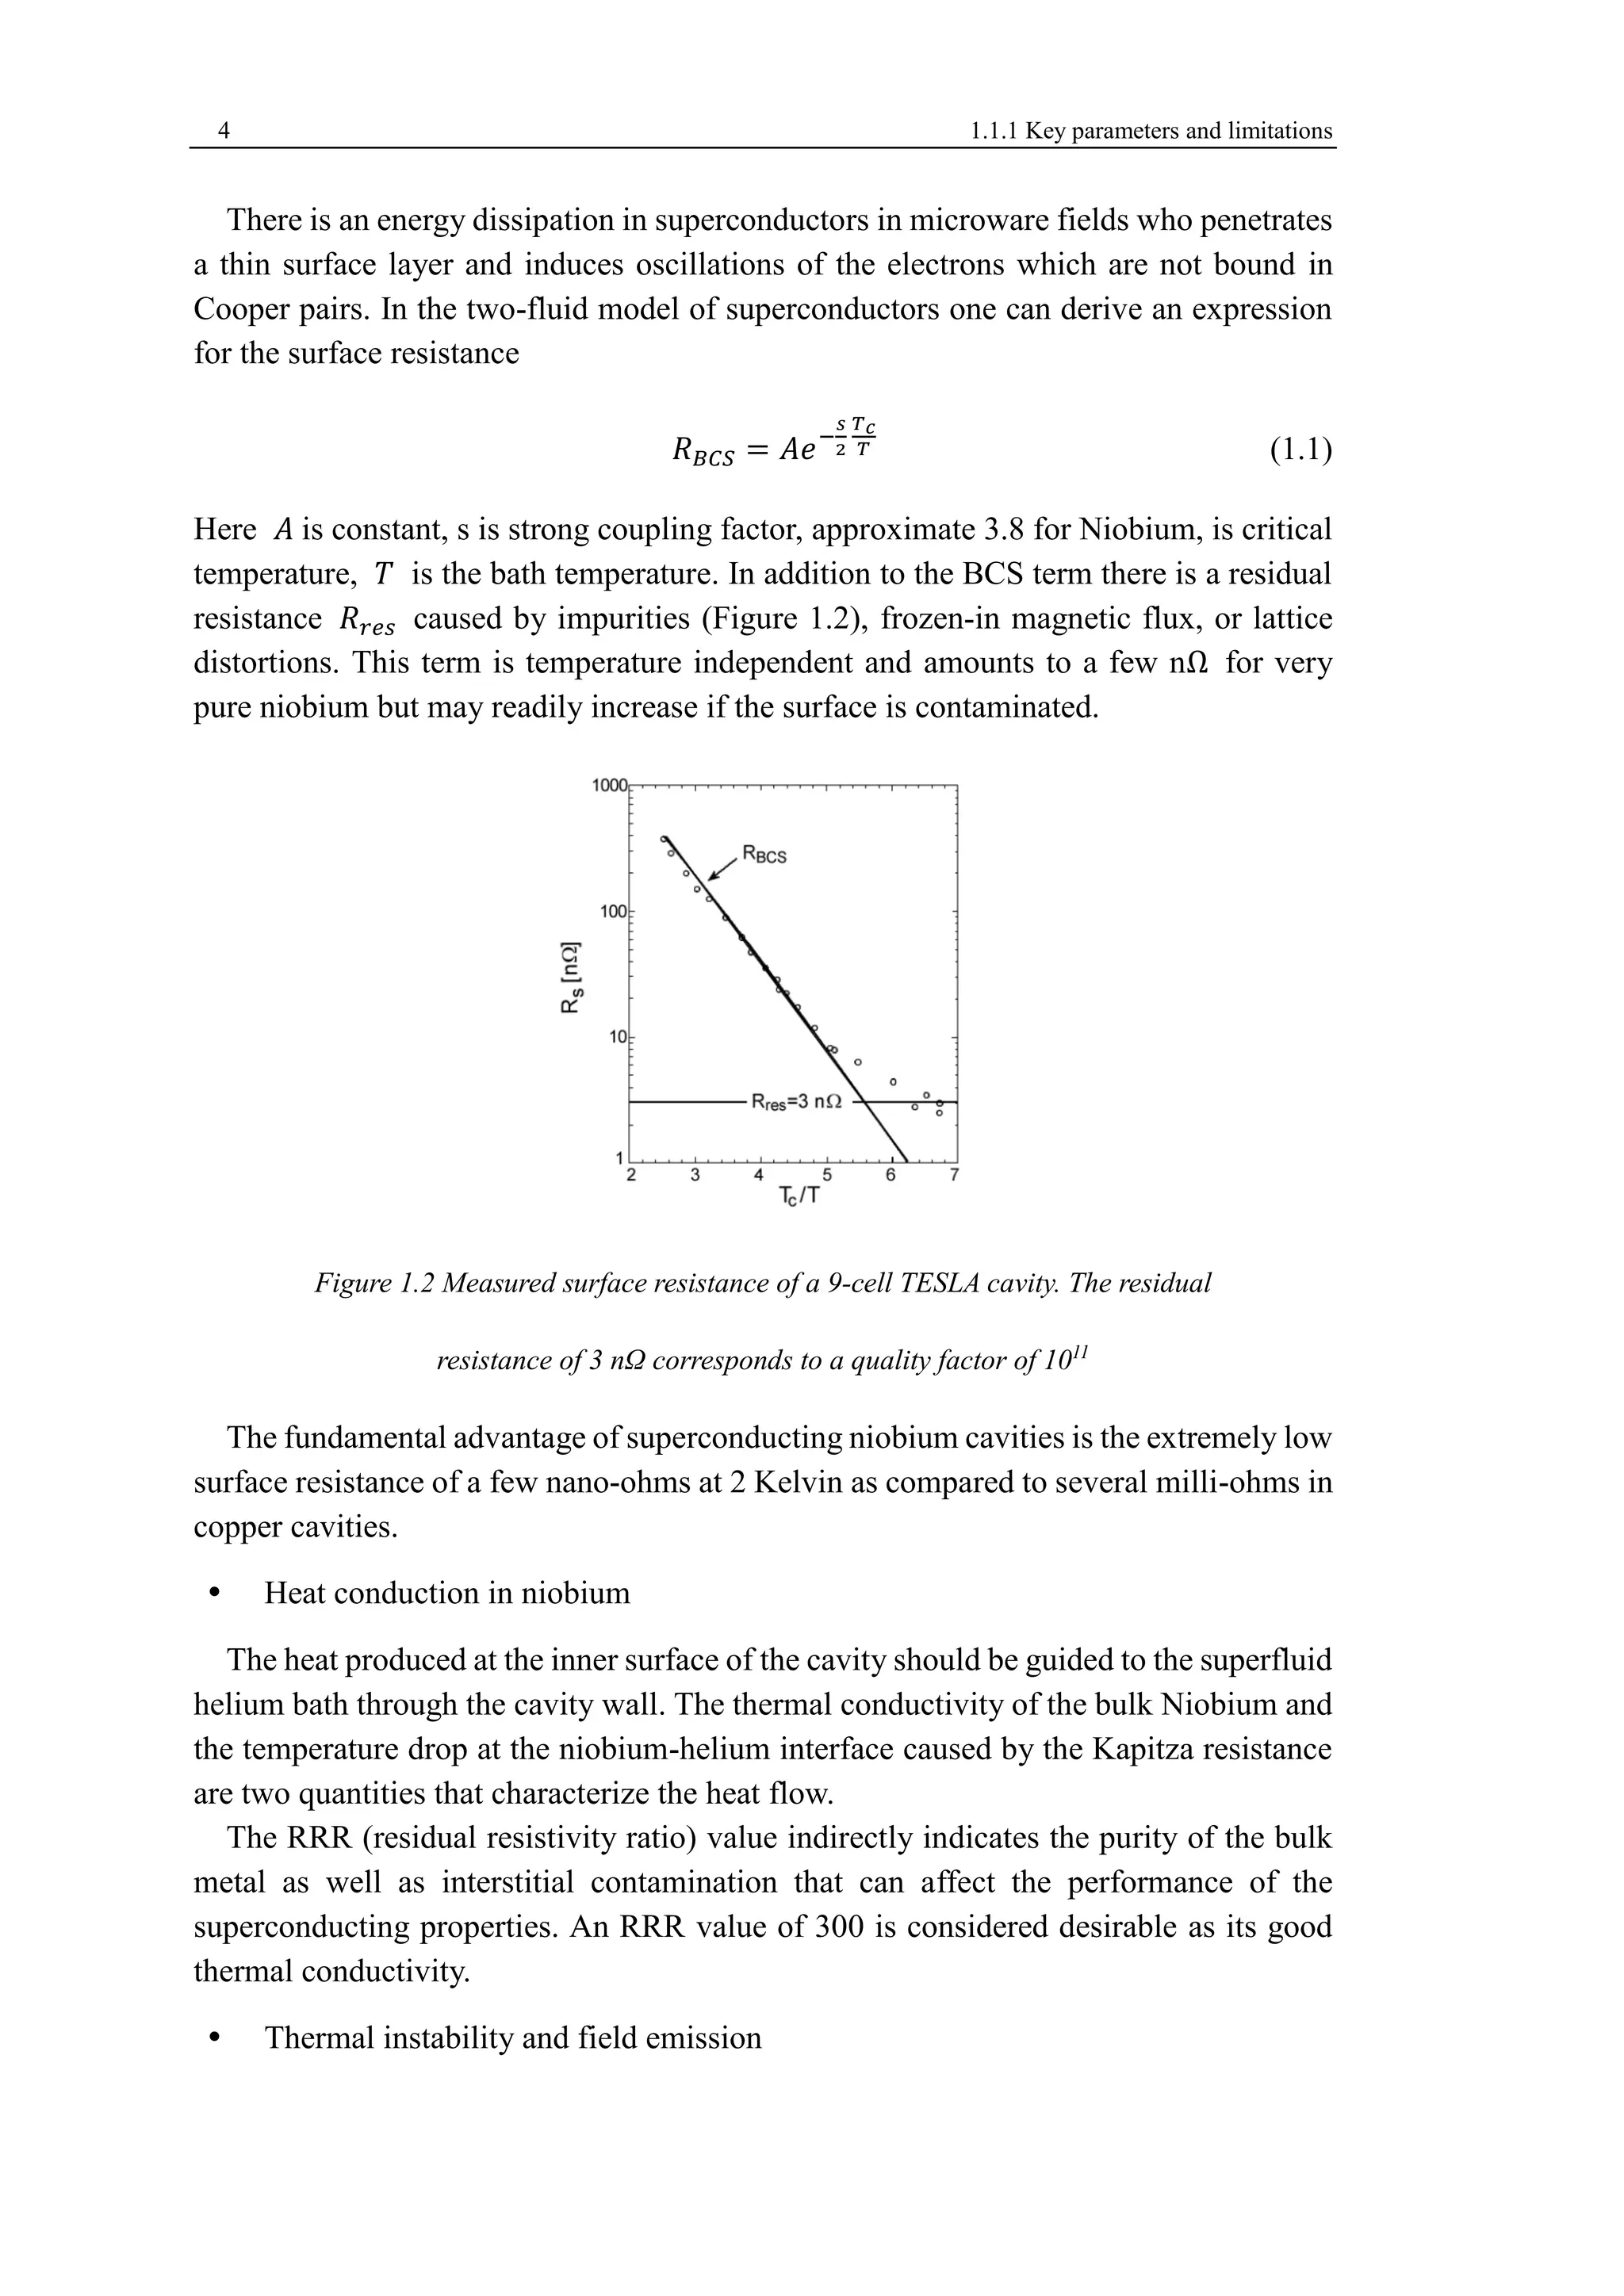
resistance 푅푟푒푠 caused by impurities (Figure 1.2), frozen-in magnetic flux, or lattice 
distortions. This term is temperature independent and amounts to a few nΩ for very 
pure niobium but may readily increase if the surface is contaminated. 
Figure 1.2 Measured surface resistance of a 9-cell TESLA cavity. The residual 
resistance of 3 nΩ corresponds to a quality factor of 1011 
The fundamental advantage of superconducting niobium cavities is the extremely low 
surface resistance of a few nano-ohms at 2 Kelvin as compared to several milli-ohms in 
copper cavities. 
 Heat conduction in niobium 
The heat produced at the inner surface of the cavity should be guided to the superfluid 
helium bath through the cavity wall. The thermal conductivity of the bulk Niobium and 
the temperature drop at the niobium-helium interface caused by the Kapitza resistance 
are two quantities that characterize the heat flow. 
The RRR (residual resistivity ratio) value indirectly indicates the purity of the bulk 
metal as well as interstitial contamination that can affect the performance of the 
superconducting properties. An RRR value of 300 is considered desirable as its good 
thermal conductivity. 
 Thermal instability and field emission
Chapter 1 6 GHz spun seamless cavities 5 
One basic limitation of the maximum field in a superconducting cavity is thermal 
instability. The heating by RF losses is not uniform over the whole surface but that 
certain spots where the defects locate exhibit larger temperature rises, often beyond the 
critical temperature of the superconductor. Hence the cavity becomes partially normal 
conducting, associated with strongly enhanced power dissipation. Because of the 
exponential increase of surface resistance with temperature, this may result in a runaway 
effect and eventually a quench of the entire cavity. 
The tolerable defect size depends on the RRR of the material and the desired field 
level. As a typical number, the diameter of a normal-conducting spot must exceed 50 μm 
to be able to initiate a thermal instability at 25 MV/m for RRR>200 [5]. 
There have been many attempts to identify defects which were localized by 
temperature mapping. Examples of defects are drying spots, fibers from tissues, foreign 
material inclusions, weld splatter, and cracks in the welds. There are two obvious and 
successful methods for reducing the danger of thermal instability: 
(i) avoid defects by preparing and cleaning the cavity surface with extreme care 
(ii) increase the thermal conductivity of the superconductor. 
Field emission of electrons from sharp tips is the most severe limitation in high-gradient 
superconducting cavities. In field-emission loaded cavities, the quality factor 
drops exponentially above a certain threshold and x rays are observed. 
Small particles on the cavity surface (e.g., dust) is confirmed by the experimental that 
they act as field emitters [6]. Therefore, perfect cleaning, such as High-Pressure water 
Rinsing (HPR), is the most effective remedy against field emission. By applying this 
technique it has been possible to raise the threshold for field emission in multi-cell 
cavities from about 10 MV/m to more than 20 MV /m in the past few years. 
Standard fabrication techniques [1] 
The classic fabrication of a superconducting resonator consist of three major activities 
(see Figure 1.3[7]) 
Figure 1.3 General fabrication steps of standard fabrication technique for s.c. Cavities 
Niobium 
•Electron Beam Melting of Ingot in UHV oven 
•Rolling of sheets from Ingot 
•Cutting of circular or rectangular plates 
Cavity parts 
•Forming by deep drawing 
•Facing on turning machine 
•Preparation by chemical etching 
Welding 
•Electron beam welding machine/set up and vacuum 
•Electron beam welding parameter set 
•Preparation and sequence of welding
6 1.1.2 Standard fabrication techniques [1] 
 Fabrication of Niobium 
The 9-cell resonators are made from 2.8 mm thick sheet niobium by deep drawing of 
half-cells, followed by trimming and electron beam welding. Niobium of high purity is 
needed. Tantalum with a typical concentration of 500 ppm is the most important metallic 
impurity. Among the interstitially dissolved impurities, oxygen is dominant due to the 
high affinity of Nb for O2 above 200℃. Interstitial atoms act as scattering centers for 
the unpaired electrons and reduce the RRR and the thermal conductivity. The niobium 
ingot is highly purified by several remelting steps in a high vacuum electron beam 
furnace. This procedure reduces the interstitial oxygen, nitrogen, and carbon 
contamination to a few ppm. 
After forging and sheet rolling, the 2.8 mm thick Nb sheets are degreased, a 5 mm 
surface layer is removed by etching, and then the sheets are annealed for 1-2h at 700℃ 
-800℃ in a vacuum oven at a pressure of 10-5-10-6 mbar to achieve full recrystallization 
and a uniform grain size of about 50 μm. 
 Fabrication of Cavity parts and welding 
Cups are produced by deep drawing. The dies are usually made from a high yield 
strength aluminum alloy. To achieve the small curvature required at the iris, an 
additional step of forming, e.g., coining, may be needed. 
The half-cells are machined at the iris and the equator. At the iris the cup is cut to the 
specified length (allowing for weld shrinkage) while at the equator an extra length of 1 
mm is left to retain the possibility of a precise length trimming of the dumbbell after 
frequency measurement. The accuracy of the shape is controlled by sandwiching the 
cups between two metal plates and measuring the resonance frequency. The cups are 
thoroughly cleaned by ultrasonic degreasing, 20mm chemical etching, and ultrapure 
water rinsing. 
Two cups are then joined at the iris with an EB weld to form a “dumbbell.” The EB 
welding is usually done from the inside to ensure a smooth weld seam at the location of 
the highest electric field in the resonator. Since niobium is a strong getter material for 
oxygen, it is important to carry out the EB welds in a sufficiently good vacuum. Tests 
have shown that RRR=300 niobium is not degraded by welding at a pressure of less 
than 5×10⁻⁵ mbar. 
The next step is the welding of the stiffening ring. Here the weld shrinkage may lead 
to a slight distortion of the cell shape which needs to be corrected. Afterwards, 
frequency measurements are made on the dumbbells to determine the correct amount of 
trimming at the equators. After proper cleaning by a 30mm etching, the dumbbells are 
visually inspected. Defects and foreign material imprints from previous fabrication steps 
are removed by grinding. After the inspection and proper cleaning (a few mm etching 
followed by ultraclean water rinsing and clean room drying), eight dumbbells and two 
beam-pipe sections with attached end cups are stacked in a precise fixture to carry out 
the equator welds which are done from the outside.
Chapter 1 6 GHz spun seamless cavities 7 
 Cavity treatment 
The completed cavity has both internal and external chemistry to further remove the 
damage layer from the fabrication steps of both welding and handling. A smooth outer 
surface is necessary to provide good thermal contact with the cryogenic bath. 
In total about 150-250 m of niobium material is removed from the interior RF surface 
of the cavity through several cleaning steps. After each of these acid etchings the cavity 
has a new superconducting RF surface and can have different RF performance and a 
different gradient limitation. 
Disadvantages and limitation 
The two primary issues with cavity fabrication are quality assurance on the niobium 
materials and on the electron beam welds. Niobium materials must be scanned to detect 
and eliminate surface defects, and then protected with care throughout the 
manufacturing process. Contaminated or defected material will ultimately limit the 
gradient performance of a completed cavity. As with the surface defects, impurities in 
the welds and heat a defected zones next to welds will also limit the gradient 
performance. Welds must have a smooth under bead and form no surface irregularities, 
in particular, sharp edges where the weld puddle meets the bulk material. Defects in the 
equator welds will limit the gradient by thermal quenches due to the high magnetic fields 
there. Thermal mapping of quench locations suggests that they are typically located at 
or near the equator region. 
Cavity fabrication by electron-beam welding of deep-drawn half-cells is a delicate 
procedure [5], requiring intermediate cleaning steps and a careful choice of the weld 
parameters to achieve full penetration of the joints. First, two half cells are connected at 
the iris; the stiffening rings are welded in next. At this point weld shrinkage may lead to 
a slight distortion of the cell shape which needs to be corrected. Particularly critical are 
the equator welds, which are made from the outside, and a reliable method for obtaining 
a smooth weld seam at the inner cavity surface was required. 
1.2 Seamless cavities 
20,000 nine-cell resonators would be required for the ILC [4]. A great many 
physicists believe that a so huge amount of resonators could be manufacturable using 
the standard fabrication technique [8], and the bare bulk Niobium cavity costs roughly 
include material costs and fabrication costs. 500 tons of high purity Niobium will be 
need; the procedure of EB welding is very complicated as described in the previous 
section and longtime costs. For this reason there is a trend to research on alternative 
fabrication technology [9] 
At the National Institute of Nuclear Physics in Legnaro (INFN-LNL) the well-known 
spinning technique has been adapted to form a fully seamless resonator without electron
8 1.2.1 Description of Spinning technique 
beam welding [13]. In this way, starting from a disk or a seamless tube, it is possible to 
build seamless cavities with no intermediate annealing, more rapidly, simply, and with 
a uniform thickness. Both 1.3 GHz niobium and copper cavities can be easily 
manufactured with high reproducibility and significant savings in manufacture costs. 
Description of Spinning technique 
Spinning of a seamless mono-cell resonator from a circular blank is depicted on 
Figure 1.4. The process is mainly divided in four steps [10]. A circular disk of 400 mm 
diameter and 3 mm thickness is first preformed onto a frustum shaped mandrel, then the 
first half-cell is formed and a cylindrical shape is given to the remaining part of the 
piece, by means of a second pre-mandrel. The third step consists in spinning the 
obtained manufacture onto a collapsible mandrel that has exactly the same shape of the 
cavity interior, up to when the roller overcomes the equator and fixes the piece to spin 
onto the mandrel. Then the fourth and last step consists in inserting a further frustum-shaped 
collapsible mandrel in order to guide the material when spinning the second half-cell. 
Both collapsible mandrels are then removed. 
Figure 1.4 Spinning of a seamless mono-cell resonator from a circular blank. No intermediate 
annealing is required during forming. 
Figure 1.5 shows schematically the various manufacturing steps needed for 
conventional cavity fabrication and the reduced number of manufacturing steps for 
fabrication of seamless cavities.
Chapter 1 6 GHz spun seamless cavities 9 
Inspect 
Material 
Deep Draw 
Half Cell 
Assemble For 
Trimming 
Trimming For 
EBW 
Degreasing 
Buffered 
Chemical 
Polishing 
EWB Of 
Dumbbells 
Leak 
Checking 
Inspection Of 
Weld + 
Surface 
Mech. 
Grinding Of 
Dumbbell 
Degreasing 
Buffered 
Chemical 
Polishing 
N × EBW Of 
Dumbbells 
EBW Of 
Beampipes / 
Fianges 
Weld Inspection 
Leak Checking 
Conventional cavity fabrication 
Inspect 
Material 
Deep Draw 
Tube 
Grinding Of 
Tube 
Degreasing 
Spin Cavity 
On Mandrel 
Remove 
Mandrel 
Inspect Cavity 
( Grind ) 
EBW 
Beampipe / 
Flanges 
Leak Check 
Cavity 
Seamless cavity fabrication 
Figure 1.5 Process comparison of conventional and seamless cavity Fabrication [11] 
RF measurements and results of seamless cavities 
Cavities after spinning must be internally tumbled or mechanically grinded, then 
simply chemical polished. Low temperature radiofrequency tests have proofed that the 
seamless approach and in particular spinning is a solution worthwhile to pursue. 
Spun cavities was sent to CERN, DESY, TJNAF and to KEK for characterization. 
CERN proved that spun copper mono-cells are superior to hydro-formed ones, because 
of lower losses and lower Q-slope. Accelerating fields up to 25 MV/m was measured at 
DESY on 1.3 GHz Niobium mono-cell cavity; At KEK and CERNM, the accelerating 
fields achieved 40MV/m on mono-cell and 25MV/m on 3-cell cavity, a 9-cell has not 
been tested yet. 
1.3 6 GHz cavities 
The R.F. characterization of samples is a useful diagnostic tool to accurately 
investigate local properties of superconducting materials. However the most common 
limitation of such a system, consists often in the difficulty of scaling the measured 
results to the real resonator [12]. 
Using 1.3/1.5 GHz resonant structures cavities is obviously the most direct way, but
10 1.3.1 Advantages of 6 GHz cavities 
would be too onerous both for the material cost and the cryogenic expense. Instead, the 
micro-cavities that completely equal in shape to the real scale model would be the best 
and most direct way for measuring material R.F. properties. 
Using the spinning technique, it becomes feasible to produce small scale resonators 
in little time, negligible cost and in large quantity. 
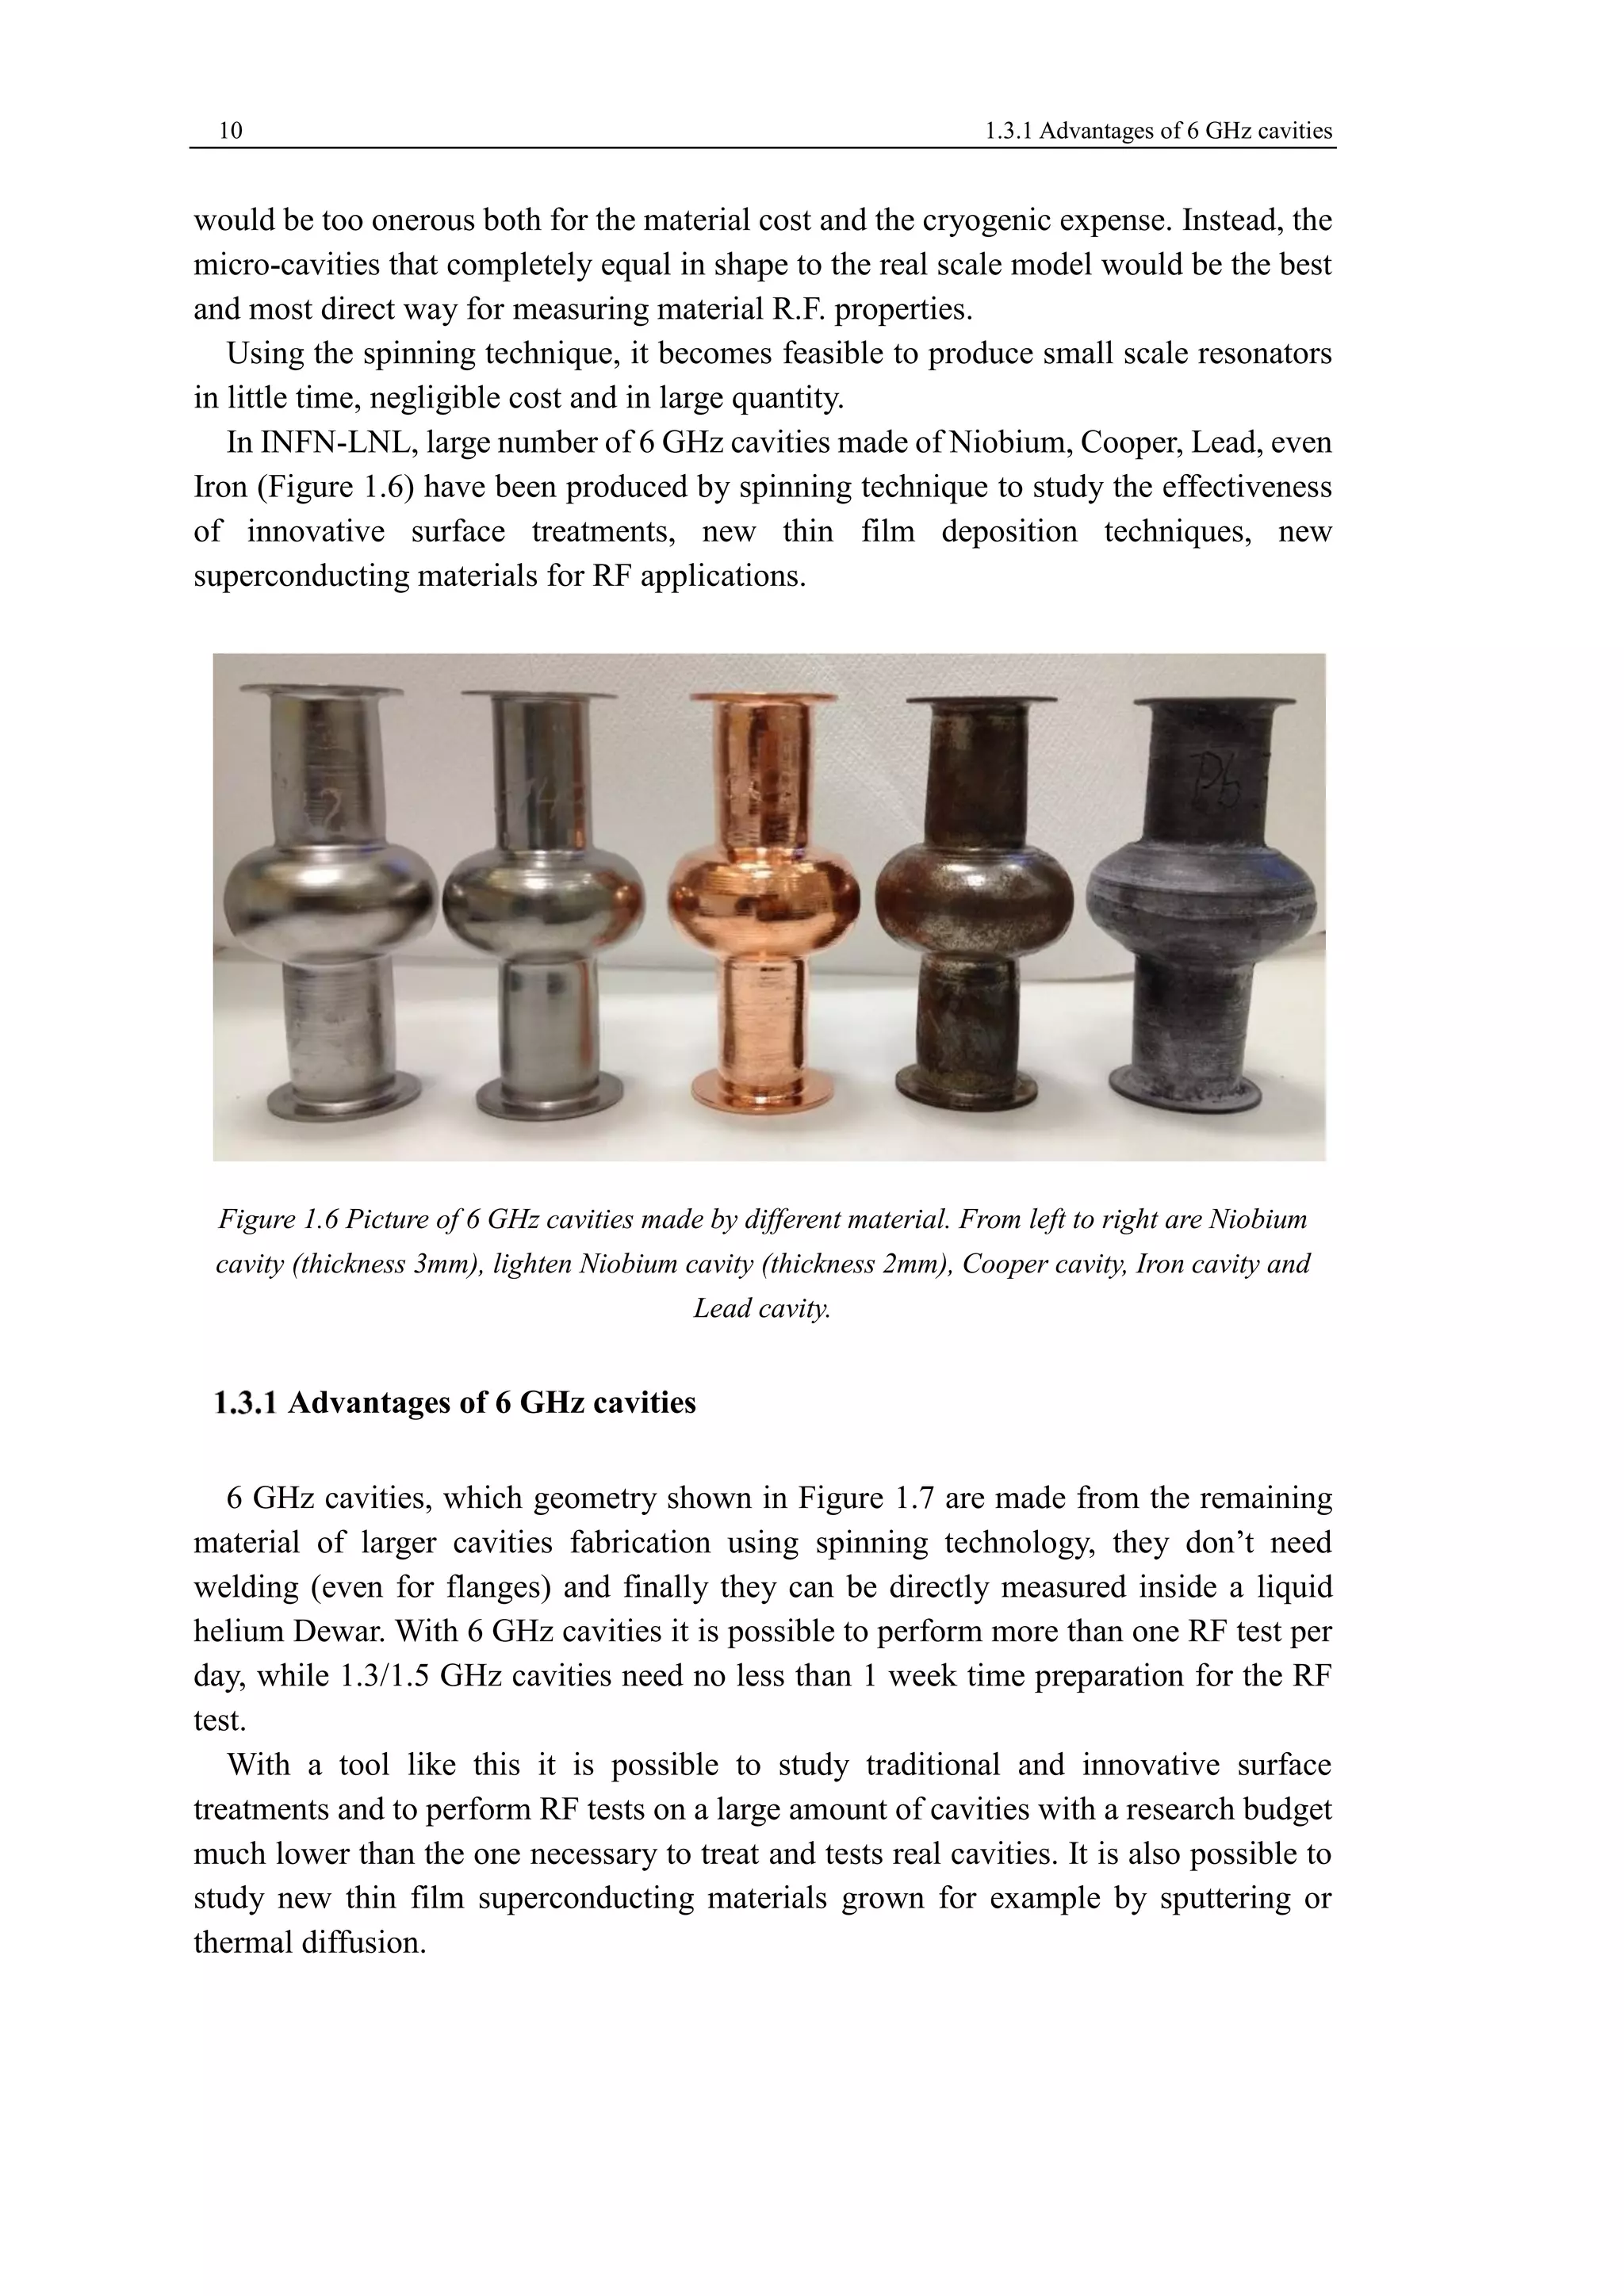
In INFN-LNL, large number of 6 GHz cavities made of Niobium, Cooper, Lead, even 
Iron (Figure 1.6) have been produced by spinning technique to study the effectiveness 
of innovative surface treatments, new thin film deposition techniques, new 
superconducting materials for RF applications. 
Figure 1.6 Picture of 6 GHz cavities made by different material. From left to right are Niobium 
cavity (thickness 3mm), lighten Niobium cavity (thickness 2mm), Cooper cavity, Iron cavity and 
Lead cavity. 
Advantages of 6 GHz cavities 
6 GHz cavities, which geometry shown in Figure 1.7 are made from the remaining 
material of larger cavities fabrication using spinning technology, they don’t need 
welding (even for flanges) and finally they can be directly measured inside a liquid 
helium Dewar. With 6 GHz cavities it is possible to perform more than one RF test per 
day, while 1.3/1.5 GHz cavities need no less than 1 week time preparation for the RF 
test. 
With a tool like this it is possible to study traditional and innovative surface 
treatments and to perform RF tests on a large amount of cavities with a research budget 
much lower than the one necessary to treat and tests real cavities. It is also possible to 
study new thin film superconducting materials grown for example by sputtering or 
thermal diffusion.
Chapter 1 6 GHz spun seamless cavities 11 
Figure 1.7 The 6 GHz cavity geometry 
Summarily, the spinning seamless technology has several advantages in comparison 
with welding one [13]: 
 no welding; 
 short fabrication time; 
 equipment could be adapted for any size of the cavity, and any quantity of cells; 
 comparably low fabrication costs; 
 no intermediate annealing; 
 almost no scraps; 
Drawback 
A die (see Figure 1.8(a)) has exactly the same shape of the cavity interior, composed 
of three collapsible mandrels is used to guide the material when spinning. 
(a) (b) (c) 
Figure 1.8 (a)Drawings of the die, which is composed of two cylinders and a shell, assembled and 
ready for the spinning operation; (b)Disassembled when partially extracted after spinning; 
(c)Exploded view of the nylon shell of the die with all its ten sectors.[14] 
In order to extract the die from the final resonator, two things are taken into account: 
1) The central mandrel is Nylon shell, which composed of eight sectors (Figure 
1.8(c)), locked together by the two steel cylinders. It is cut symmetrically along 
a longitudinal plane two four pairs of identical and opposite sectors. 
2) Pure motor oil is used as the lubricant between the die and resonator.
12 1.3.3 Standard surface polishing techniques 
Evident vertical scratches (see Figure 1.9) were extruded in the inner surface of the 
cavity due to the using central mandrel; cavity must be electropolished or chemical 
polished of the internal surface immediately after spinning, and then immersed in an 
ultrasonic bath to remove oil contamination. 
Figure 1.9 Image of inner surface at the center of the cavity, two evident vertical scratches shown 
in the red rectangles. 
Standard surface polishing techniques 
The spinning process implies material surface defects, stress and dislocations. The 
cavity cell is characterized by the presence of evident vertical scratches due to the used 
mandrel. Obviously the internal surface finishing of a resonant structure is directly 
correlated to its performance, especially at high fields. Moreover, the lubricant, 
necessary for the metal mechanical processing can contaminate the used material. The 
idea is to make the surface smooth and free from contaminants. 
There are four techniques used for material removal in 6 GHz cavities: Tumbling, 
Lapping, Buffered Chemical Polishing (BCP) [15] and Electro-Polishing (EP) [16]. 
 Tumbling 
Tumbling is one of the mechanical polishing treatment, using the abrasive media to 
remove the defects. Usually it is done by Centrifugal barrel polishing (CBP) machine. 
During mechanical treatment, it is necessary to monitor the weight and the 
morphology of inner surface changing after each tumbling for each cavity. 
Mechanical polishing treatment of 6 GHz cavities is the core content of this thesis 
that will be discussed in detail in later chapters. 
 Lapping 
After finishing the mechanical polishing of internal surface of cavity, the flanges 
needs to be lapped flatly using the metallographic polishing machine (Figure 1.10). The
Chapter 1 6 GHz spun seamless cavities 13 
aim of this step is to avoid the vacuum leaking during the cryogenic RF test. 
At the beginning of lapping, the big roughness abrasive paper would be better for the 
burrs. Then change to low roughness one, which will increasing the smoothness of the 
flanges. Finally, using the alcohol as the polishing liquid instead of water. After lapping, 
it is necessary to make precise washing of cavity in ultrasound bath with soap in few 
steps and rinsing with acetone and ethanol. 
Figure 1.10 Metallographic polishing machine with sandpaper 
 BCP 
Buffered Chemical Polishing (BCP), in use for over 20 years, is recognized to be the 
most reliable and stable process. The composition of the mixture is 1:1:2 in volume of 
hydrofluoric (HF 49%wt), nitric (HNO3 69.5%wt) and ortho-phosphoric (H3PO4 85%wt) 
acids, with a viscosity, at room temperature, of 0.022 Pa-s and a density of 1545 kg/m3 
[17]. 
Figure 1.11 The stand for BCP and EP 
As one of chemical treatments, BCP, performed using the standard mixture of acids, 
removes the possible niobium sub-oxide and contaminants, resulting in a smoother inner 
surface of the cavity. 
In our case, 6 GHz cavity is treated by a small system as the one present in Figure
14 1.3.3 Standard surface polishing techniques 
1.11, which designed for both traditional surface chemical treatments: BCP(does not 
require cathode) and EP (require cathode) in INFN-LNL. 
After the BCP, 300μm thickness corresponding to around 30 grams damage layer is 
removed. 
 EP 
Electro-Polishing is believed to be the most desirable treatment for SRF cavities [18], 
the principle of which is presented in Figure 1.12. EP is an anodic electrochemical 
treatment carried out in concentrated hydrofluoric-sulfuric (HF-H2SO4) acids 
electrolytes in proportions 1-9. 
Figure 1.12 The schematic diagram of EP 
 HPR 
High pressure rinsing (HPR) is nowadays routinely used in the process of 
superconducting RF cavities assembly to remove residuals from the resonator wall. The 
pressure of high pure water is about 100 MPa. It is successful in improving cavity 
performances, mainly reducing field emission. It is usually done before the RF test. 
Figure 1.13 HPR for 6 GHz cavities in LNL-INF
Chapter 2 Mechanical polishing approaches 15 
Mechanical polishing approaches 
Cavity defects compromise the achievable values of Q-factor and accelerating fields. 
Mechanical polishing is the first and impartment step to eliminate defects in the cavity 
interior. 
In order to develop a high erosion rate, stable, cheap and safe apparatus, many 
commercial product like Turbula and some custom designed devices like Zigzag 
tumbler, CBP and polishing brush have been applied and studied to polish the 6 GHz 
spun seamless cavities. Some of them run with unsatisfying erosion rate, while other 
works unstable for long time and it will cost more time and money to repair them when 
problem happens. But finally, a new mechanical polishing system based on vibrator, 
with good performance was invented. It will be detailed introduction in the next chapter. 
2.1 TURBULA® Shaker-Mixer 
Figure 2.1 TURBULA® Shaker-Mixer (model T2F) and 6 GHz cavity 
TURBULA® Shaker-Mixer presented in Figure 2.1 is one product from Glen Mills 
Inc., it is used in many exacting powder blending and mixing applications [19], such as 
used for homogeneous mixing of powders or different wet components with differing 
specific weights and particle sizes. But it also includes the application for metal 
finishing, intricate precision parts can be deburred and polished without damage. 
It is composed of plastic container, elastic bands, crowns, and tensioning tool. The 
mixing container is set into three-dimensional movement that exposes the product to
16 2.2 Centrifugal barrel polishing (CBP) 
always changing, rhythmically pulsing motion; the exceptional efficiency comes from 
use of rotation, translation and inversion according to the Schatz geometric theory; the 
speed change is by the step pulley. 
The cavity was filled with the abrasive media and assembled to the plastic cylinder 
shell with the configuration shown in Figure 2.2. Then the cylinder was mounted to the 
tumbling container utilizing its unique clamping system. It is available to modify the 
frequency of tumbling and set the run time. 
The characteristics of this tumbler are safe, quiet, but low erosion efficient, 15mg/h 
is of the maximum value up to now. It could be ascribed to the frequency of the 
movement, which could not be set at very high, otherwise the system would be very 
unstable and easily broken. 
Figure 2.2 The section of the configuration of cavity before mounting to the TURBULA® Shaker- 
Mixer 
2.2 Centrifugal barrel polishing (CBP) 
CBP is considered a valuable method that limits the use of harsh chemicals, which 
would decrease the environmental impact of the surface treatment process while 
increasing the smoothness of the surface. 
The studying of the centrifugal barrel polishing began in the mid to late 1990s. As 
one of the mechanical polishing equipment, the first CBP system was first build at KEK, 
High Energy Accelerator Research Organization (KEK) by Kenji Saito & Tamawo 
Higuchi, and adopted by many other laboratories around the world, the Thomas 
Jefferson National Accelerator Facility (JLab), the Raja Ramanna Centre for Advanced 
Technology (RRCAT), Fermi National Accelerator Lab (Fermilab) and so on. A mirror 
like finishes on the 1.3GHz Tesla-type cavity SRF surface has been produced in 
Fermilab. All these labs designed their own system or bought industrial machines based 
on the same principle: mechanically polished the inner surface of the SRF cavities by 
rotating them at high speeds while filled with abrasive media, which is shown in the 
Figure 2.3.
Chapter 2 Mechanical polishing approaches 17 
R 
Turntable 
Equation of cavity 
Media 
R 
Fmedia 
Vmedia 
r 
Figure 2.3 Schematic diagram of the Centrifugal barrel polishing (CBP). The red point is the 
reference point when the angular velocity of the barrel related to the turntable 휔2 equals to zero. 
The tangential speed of the media sliding on cavity wall was calculated with the 
formula 
푉푚푒푑푖푎 = (휔1 + 휔2) × 푟 (2.1) 
Where, 
 휔1 - Angular velocity of turntable; 
 휔2 - Angular velocity of cavity related to the turntable; 
 r - Radius of the cavity. 
The centrifugal force of the media is 
퐹푚푒푑푖푎 = 
푚푉푚푒푑푖푎 
2 
푅+푟 
(2.2) 
Where, 
 푚 - Mass of the media; 
 푅 - Radius of the trajectory of cavity. 
In INFN-LNL, one CBP system presented in Figure 2.4(a) was developed several 
years ago, in which the 휔2 = 0, worked properly and with high erosion rate. The 
dimension was not so big that it save much lab space. In this system, six 6 GHz cavities 
were tumbled together by fixing them in two groups like the way shown in Figure 2.4(b). 
But in the CBP process the whole system was shaken due to only one barrel spin 
around a central shaft. In this situation, the central shaft endured a big tensile force when 
work at high revolving speed and would be broken after a long time working. 
At present, the CBP machine has been industrialized (Figure 2.5), which used for 9 
cells TESLA-type cavities tumbling. There are two or four barrels at axial symmetry 
position. Each barrel spins around its own axis at the same speed and in the opposite 
direction as the main shaft. This secondary rotation of the barrel around its own axis 
greatly reduces processing time (Figure 2.6). 
ω1 
ω2
18 2.3 Zigzag tumbler 
(a) (b) 
Figure 2.4 (a) Photograph of the CBP system in INFN-LNL. (b) The configuration of the cavities. 
Figure 2.5 Industrial centrifugal barrel polishing machine 
Figure 2.6: Schematic of main shaft and 2 barrels of a centrifugal barrel polishing machine 
denoting the directions of rotation. This is a model of the Fermilab machine with a 9-cell Tesla – 
type cavity and counterweight shown in the barrels [20]. 
2.3 Zigzag tumbler 
The tumbler presented in Figure 2.7, which named zigzag tumbler, was another
Chapter 2 Mechanical polishing approaches 19 
attempting to polish the cavity in an easy, cheap way. The cavity was filled with abrasive 
media and blocked off by two plastic plugs in both terminals, then put into the tumbler 
and sealed by the cap (Figure 2.7 (c)). When the tumbler turned by pivoting its center 
shaft with a high speed, the cavity was rotated by the zigzag style. The media in the 
cavity was not rotated so fast as the cavity due to the force of gravity itself, therefore a 
relative movement is exit between the cavity and the media. 
(a) (b) (c) 
Figure 2.7 The 3D drawing (a) and entity (b) of the zigzag tumbler 
Two different way which called dry polishing without water and wet polishing with 
water were tested, but there is no essential difference between the two results. In both 
situation, the erosion rate of zigzag tumbler was not as high as expected due to the small 
force inflicting to the inner surface of the cavity, although with a very high turning speed. 
2.4 “Flower brush” 
“Flower brush” design for polishing 6 GHz cavities 
Polishing brush is one product that mainly used for deburring, fine grinding and other 
processing for the parabolic surface. It is mainly composed of the iron wire as a skeleton, 
with lots of neat rows of fine brush filaments stretching outwards (Figure 2.8). The 
material of brush wire is nylon yarn, fiber hair, bristle, steel wire, copper wire, abrasive 
wire and so on, have different scope respectively. 
The polishing brush on the market was usually used to polish the inner surface of 
tube, whose diameter equal everywhere. For 6 GHz cavities, the dimension of two 
terminals are small and the center is bigger, while the center is the aim region should be 
mainly polished, therefore, the brush mentioned above is not suitable obviously. 
So it needs to design a customized brush that can go to the center of the cavity and 
can change the angle in order to polish the whole area inside. Base on this idea, a brush 
was machined and assembled, whose 3D drawings was shown in Figure 2.9. As its 
special shape of the head and angle changeable leafs look like one flower, we call it 
“flower brush”. The whole “flower” is made in stainless steel (Figure 2.10), and the 
holes in the “leaves” was used to fix the abrasive material (shown in Figure 2.11), which 
is suggested to be wear-resistant material.
20 2.4.1 “Flower brush” design for polishing 6 GHz cavities 
Figure 2.8 Polishing brush on the market 
Figure 2.9 3D drawings of “flower brush”. 
Figure 2.10 Photograph of “flower brush”.
Chapter 2 Mechanical polishing approaches 21 
(a) (b) 
Figure 2.11 Abrasive material. (a) Sand paper; (b) Scotch Brite 
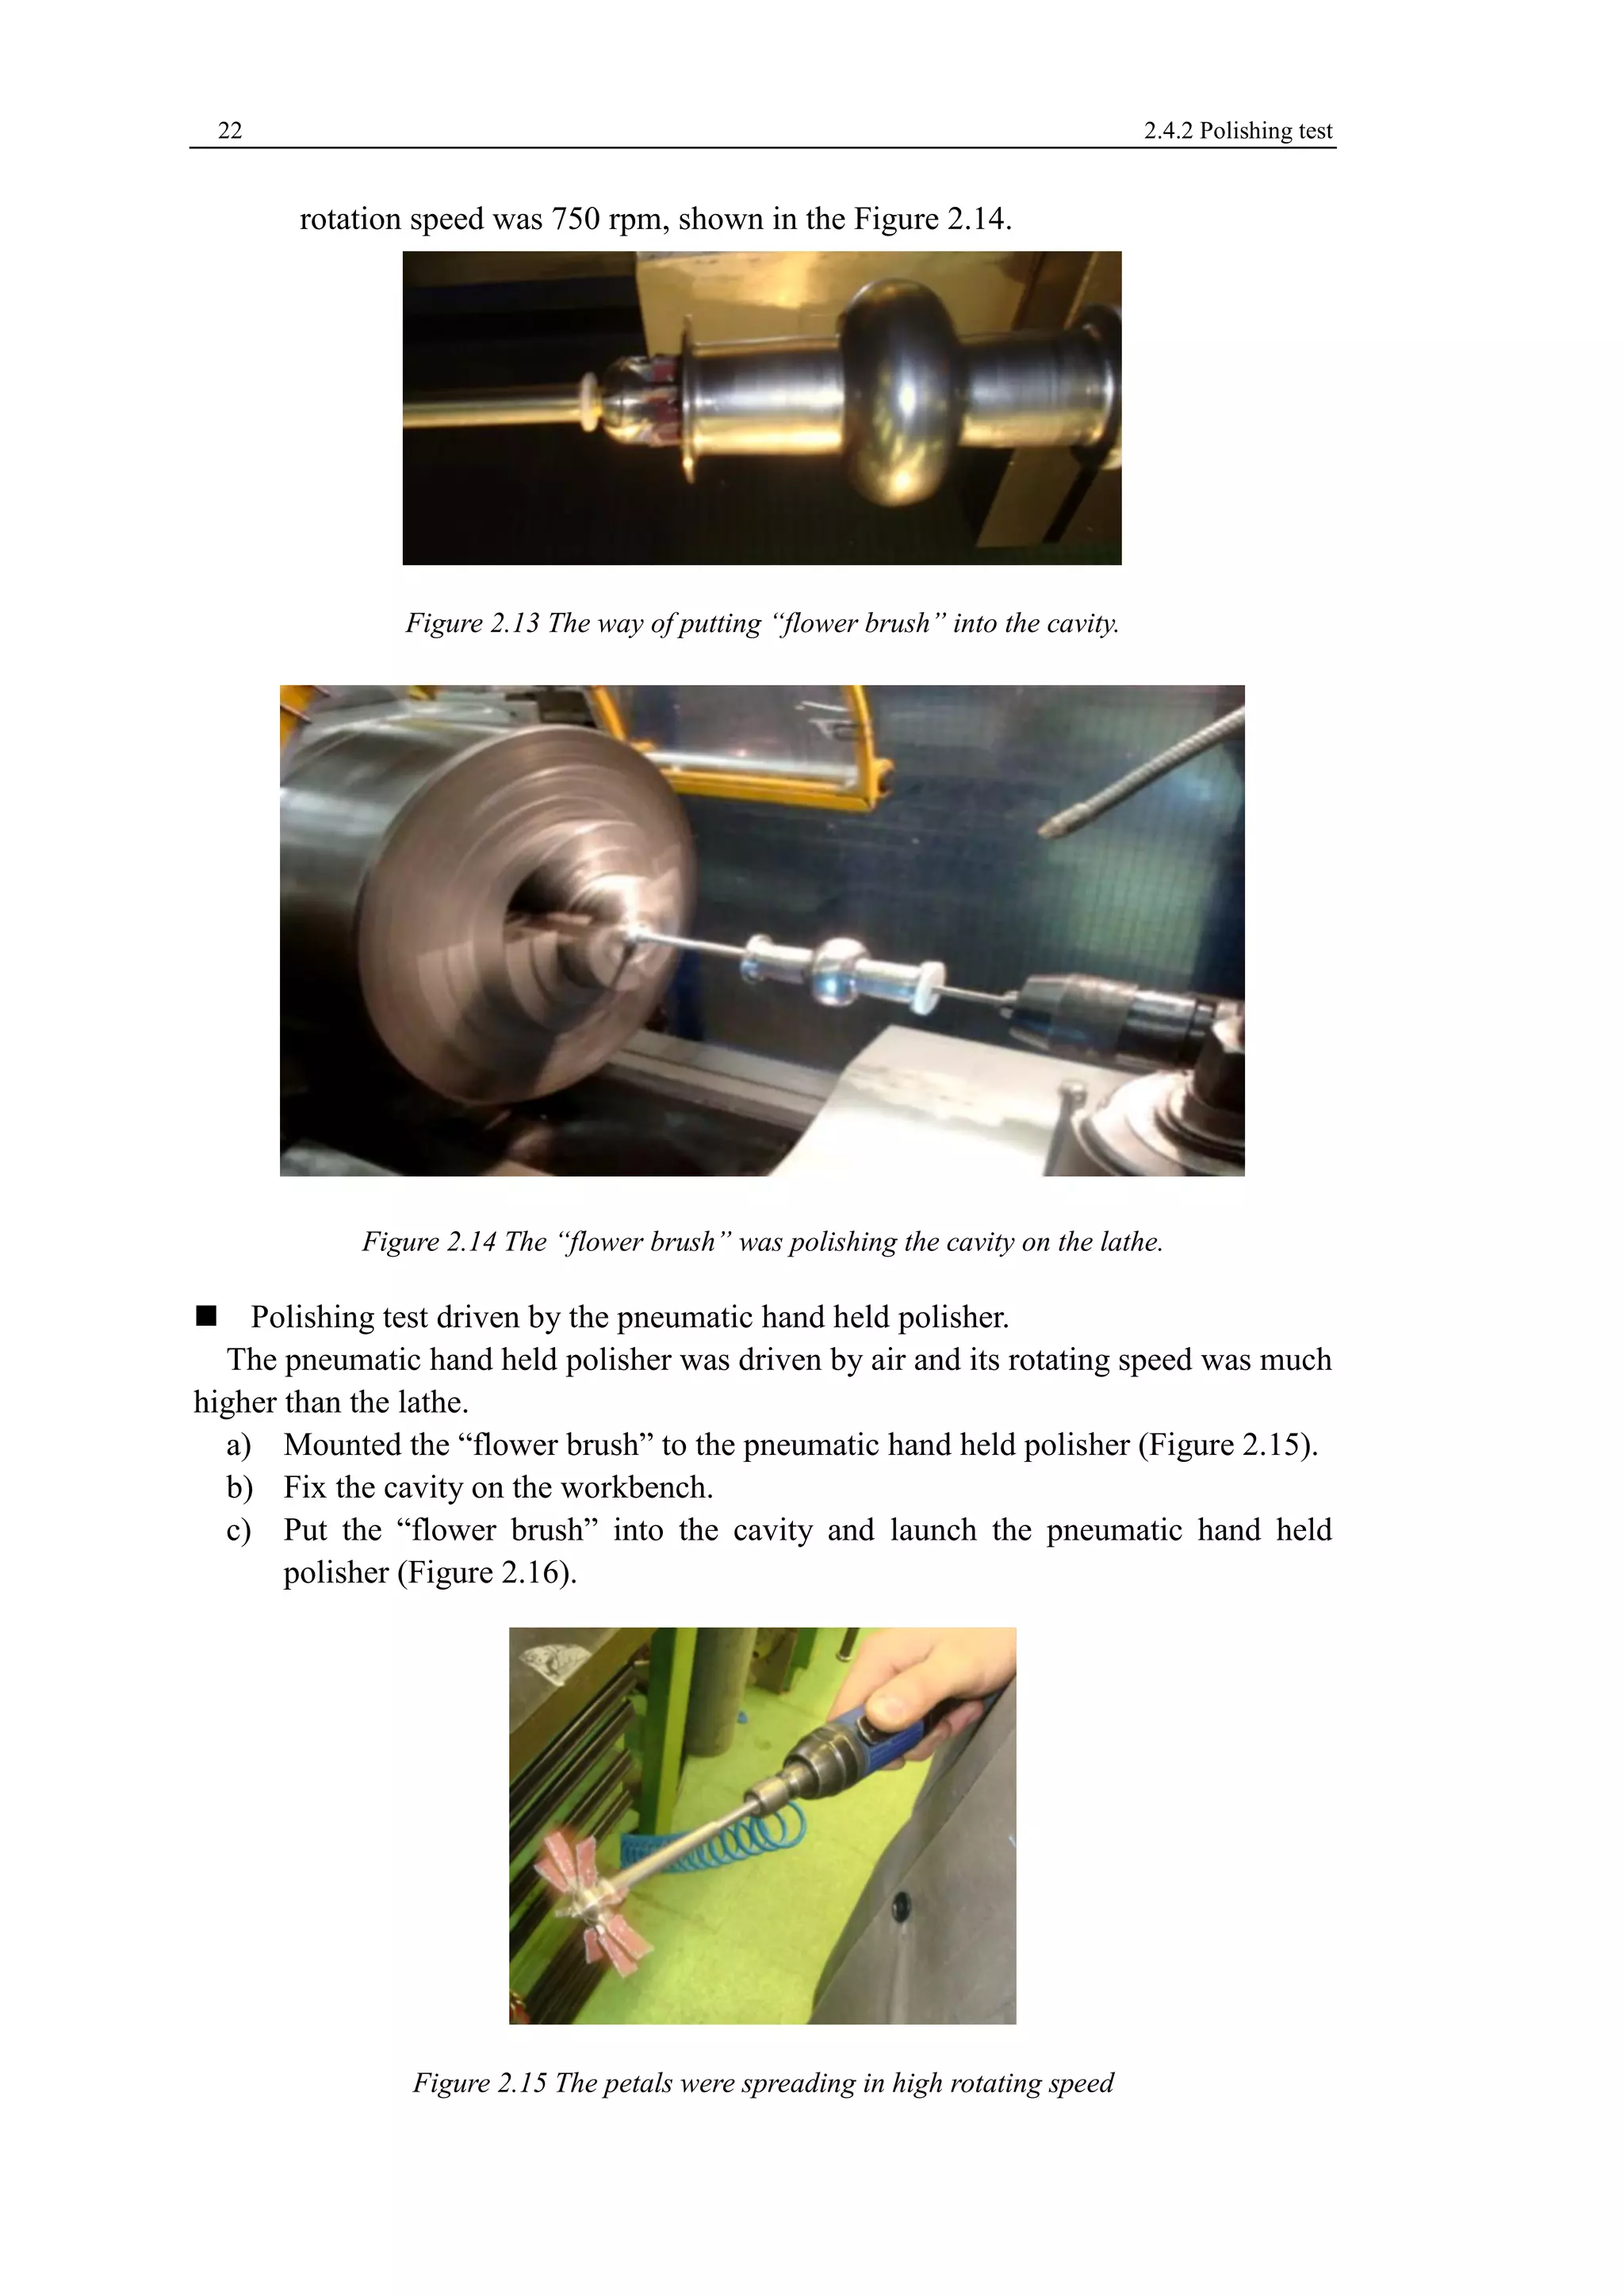
Before putting the “flower brush” into the cavity, the abrasive material were fixed to 
the leaves of the “flower”, which presented in the Figure 2.12. We can test different 
abrasive material just by changing the “leaves” conveniently. 
(a) (b) (c) 
Figure 2.12 “flower brush” with abrasive material. 
When the leaves are ready, the petals are drawn in together as shown in the Figure 
2.9(a) and pushed into the cavity, which is fixed on workbench well, then the brush is 
rotated by the driving of a handing , due to the centrifugal effect, the blades open 
automatically Figure 2.9 (b, c). Its angle can be changed by a thin line pulling wire by 
adjusting the position of the nut (Figure 2.9(d), the line is not shown). Thus it ensures 
each place of the interior surface of the cavity can be brushed, i.e., the inner surface of 
the center part of the cavity can be polished back and forth. 
Polishing test 
Test on lathe with abrasive paper 
a) The cavity was clean in the ultrasonic bath, flushed with the ethanol and dried 
with nitrogen before polishing; 
b) Fixed the cavity on one terminal of the lathe, which can move back and forth; 
c) Fixed the “flower brush” on the other terminal of the lathe, which can rotate; 
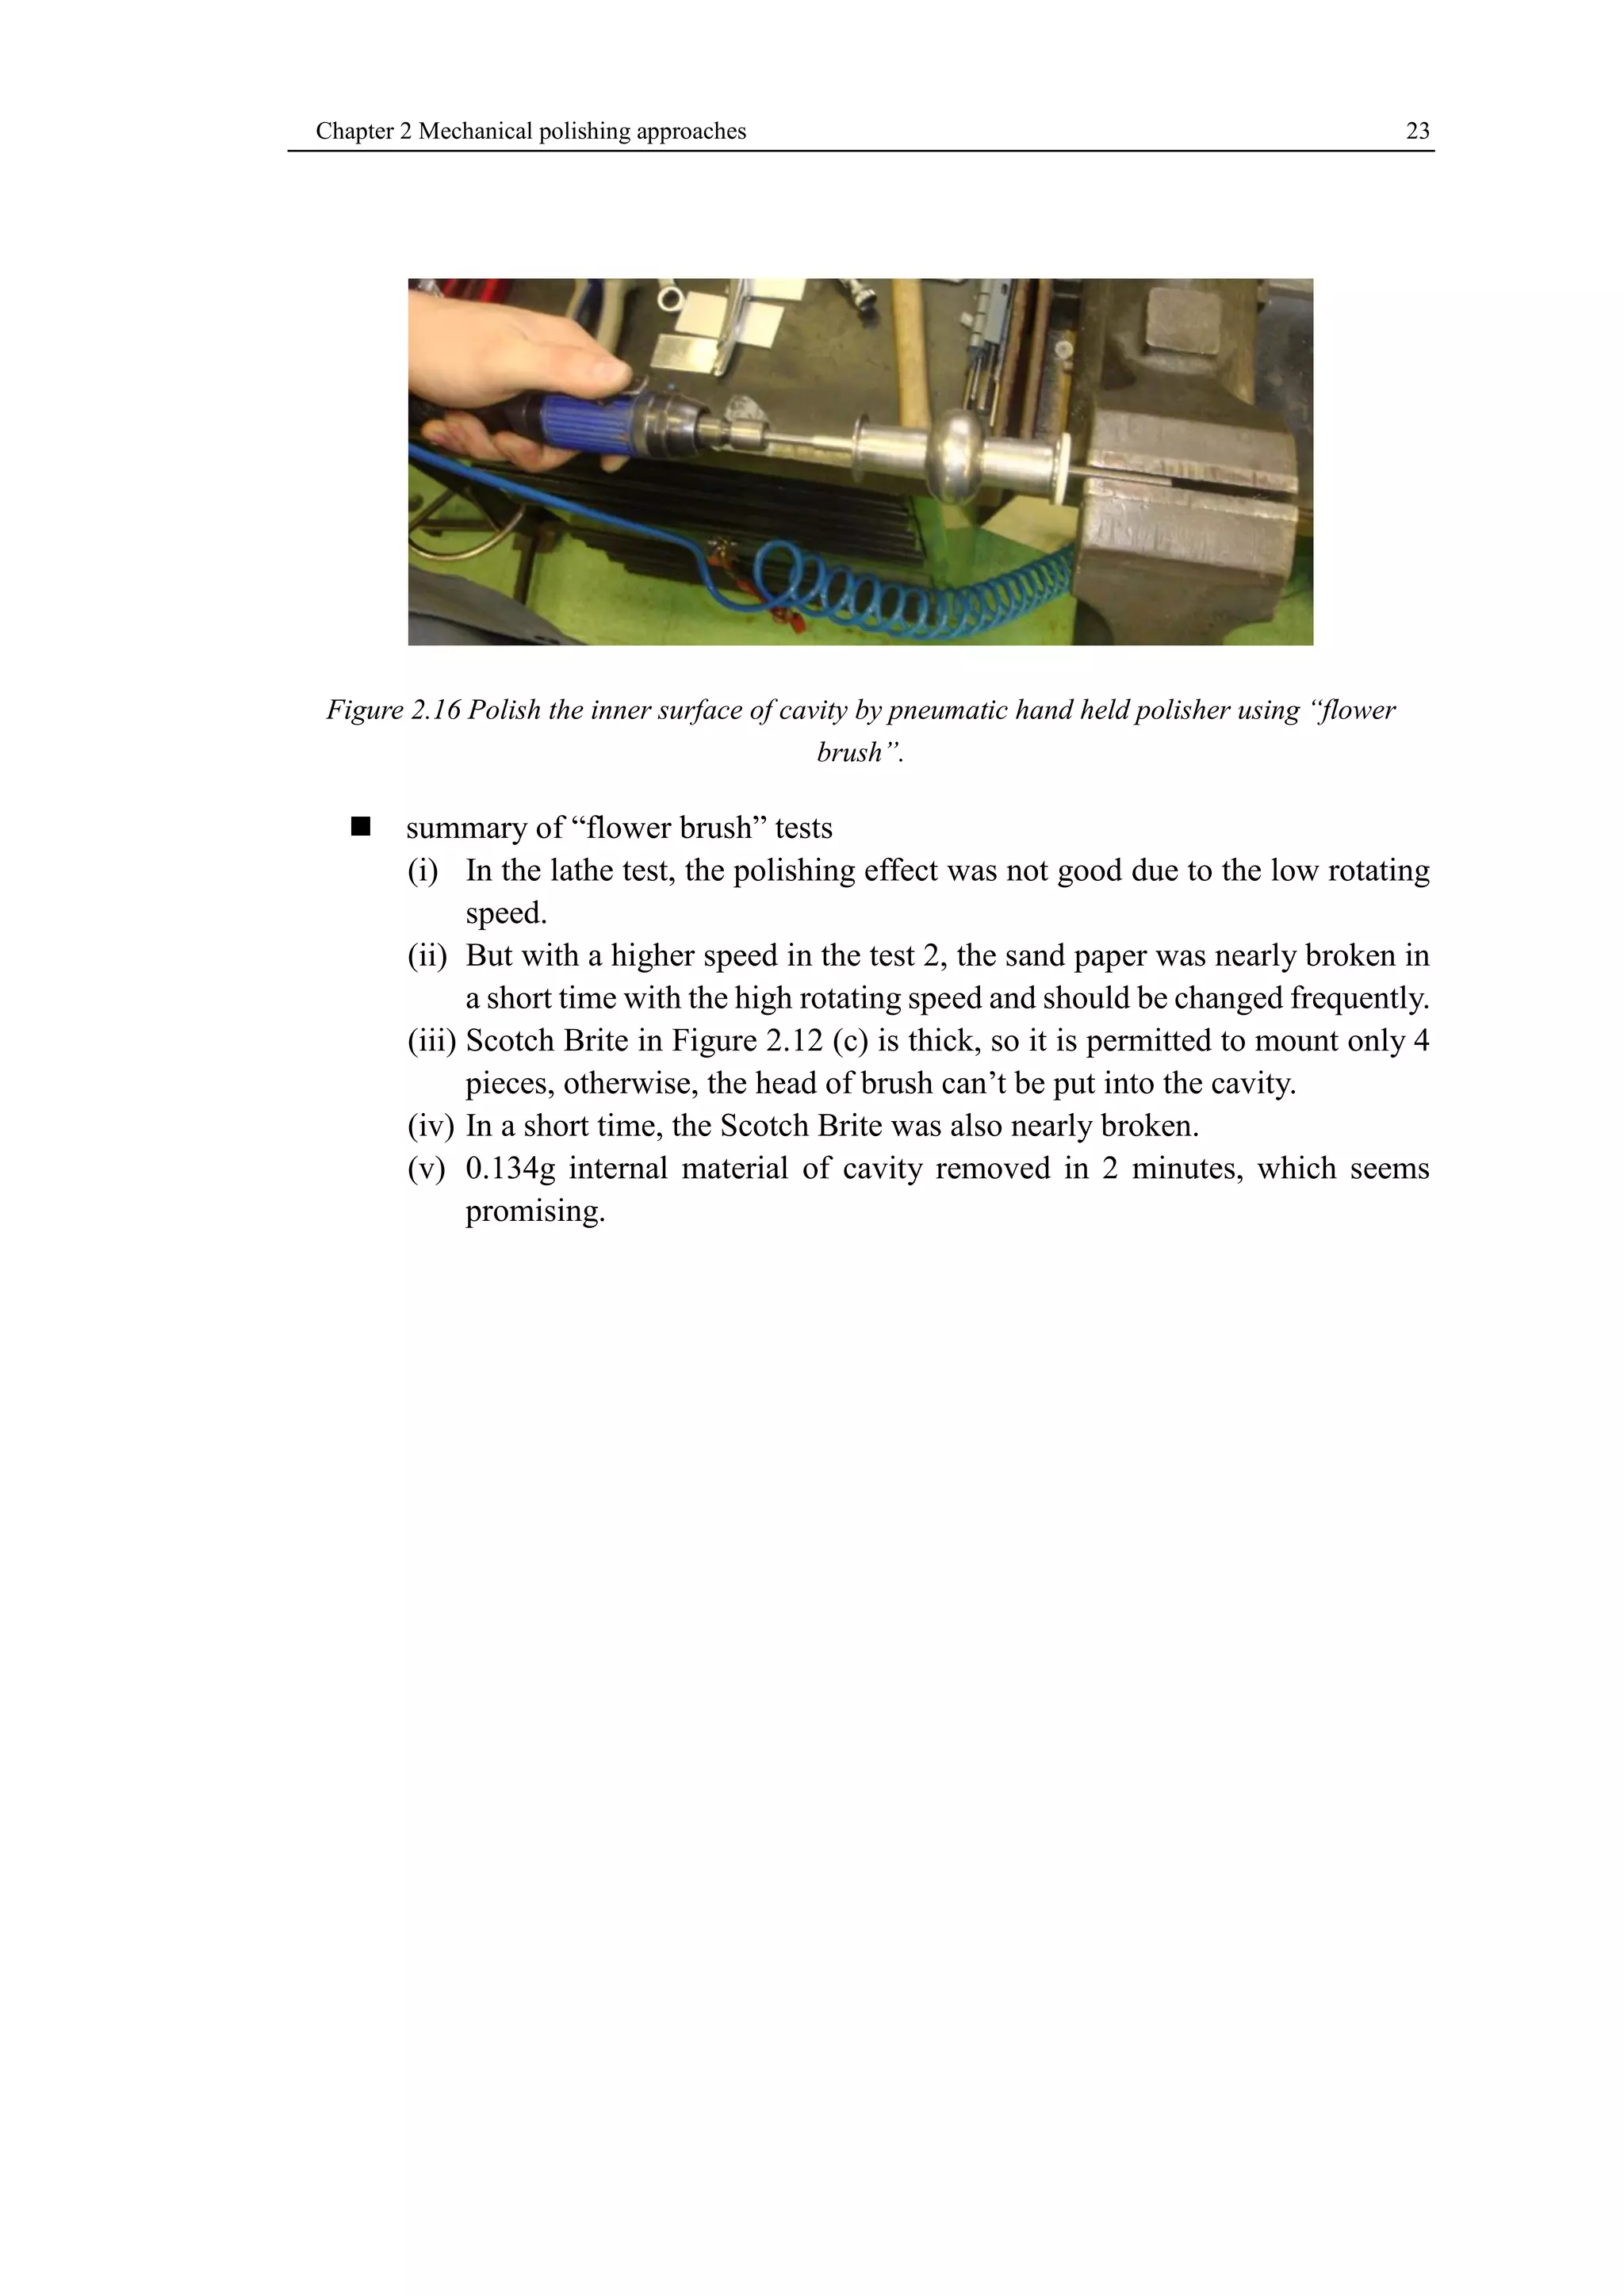
d) Put the “flower brush” into the cavity like Figure 2.13, then run the lathe, which
22 2.4.2 Polishing test 
rotation speed was 750 rpm, shown in the Figure 2.14. 
Figure 2.13 The way of putting “flower brush” into the cavity. 
Figure 2.14 The “flower brush” was polishing the cavity on the lathe. 
Polishing test driven by the pneumatic hand held polisher. 
The pneumatic hand held polisher was driven by air and its rotating speed was much 
higher than the lathe. 
a) Mounted the “flower brush” to the pneumatic hand held polisher (Figure 2.15). 
b) Fix the cavity on the workbench. 
c) Put the “flower brush” into the cavity and launch the pneumatic hand held 
polisher (Figure 2.16). 
Figure 2.15 The petals were spreading in high rotating speed
Chapter 2 Mechanical polishing approaches 23 
Figure 2.16 Polish the inner surface of cavity by pneumatic hand held polisher using “flower 
brush”. 
 summary of “flower brush” tests 
(i) In the lathe test, the polishing effect was not good due to the low rotating 
speed. 
(ii) But with a higher speed in the test 2, the sand paper was nearly broken in 
a short time with the high rotating speed and should be changed frequently. 
(iii) Scotch Brite in Figure 2.12 (c) is thick, so it is permitted to mount only 4 
pieces, otherwise, the head of brush can’t be put into the cavity. 
(iv) In a short time, the Scotch Brite was also nearly broken. 
(v) 0.134g internal material of cavity removed in 2 minutes, which seems 
promising.
24 2.4.2 Polishing test
Chapter 3 Vibrating system - a new mechanical polishing approach 25 
Vibrating system - a new mechanical 
polishing approach 
After a long time exploration, a vibrating system was realized and studied to improve 
the erosion rate for different material cavities. This chapter will focus on how this 
system was developed step by step. 
3.1 Industrial application of vibrator 
A vibrator is a mechanical device to generate vibrations by an electric motor with an 
unbalanced mass on its driveshaft. 
Vibrators are used in many different industrial applications both as components and 
as individual pieces of equipment [21]. 
Vibratory feeders and vibrating hoppers are used widely in the pharmaceutical, food, 
and chemical industries to move and position bulk material or small component parts. 
The application of vibration working with the force of gravity can often move materials 
through a process more effectively than other methods. Vibrating screens are used to 
separate bulk materials in a mixture of different sized particles. Vibrating compactors 
are used for soil compaction especially in foundations for roads, railways, and buildings. 
Concrete vibrators consolidate freshly poured concrete so that trapped air and excess 
water are released and the concrete settles firmly in place in the formwork. 
3.2 Resonance-the original idea 
Resonance phenomenon is refers to the mechanical system by excitation frequency 
and the system of a certain natural frequency were close, system amplitude increase 
significantly. And this excitation frequency is called resonance frequency. The input 
energy of motivate to the mechanical system is the largest when resonance. A system of 
many objects can have more than one resonance frequency. 
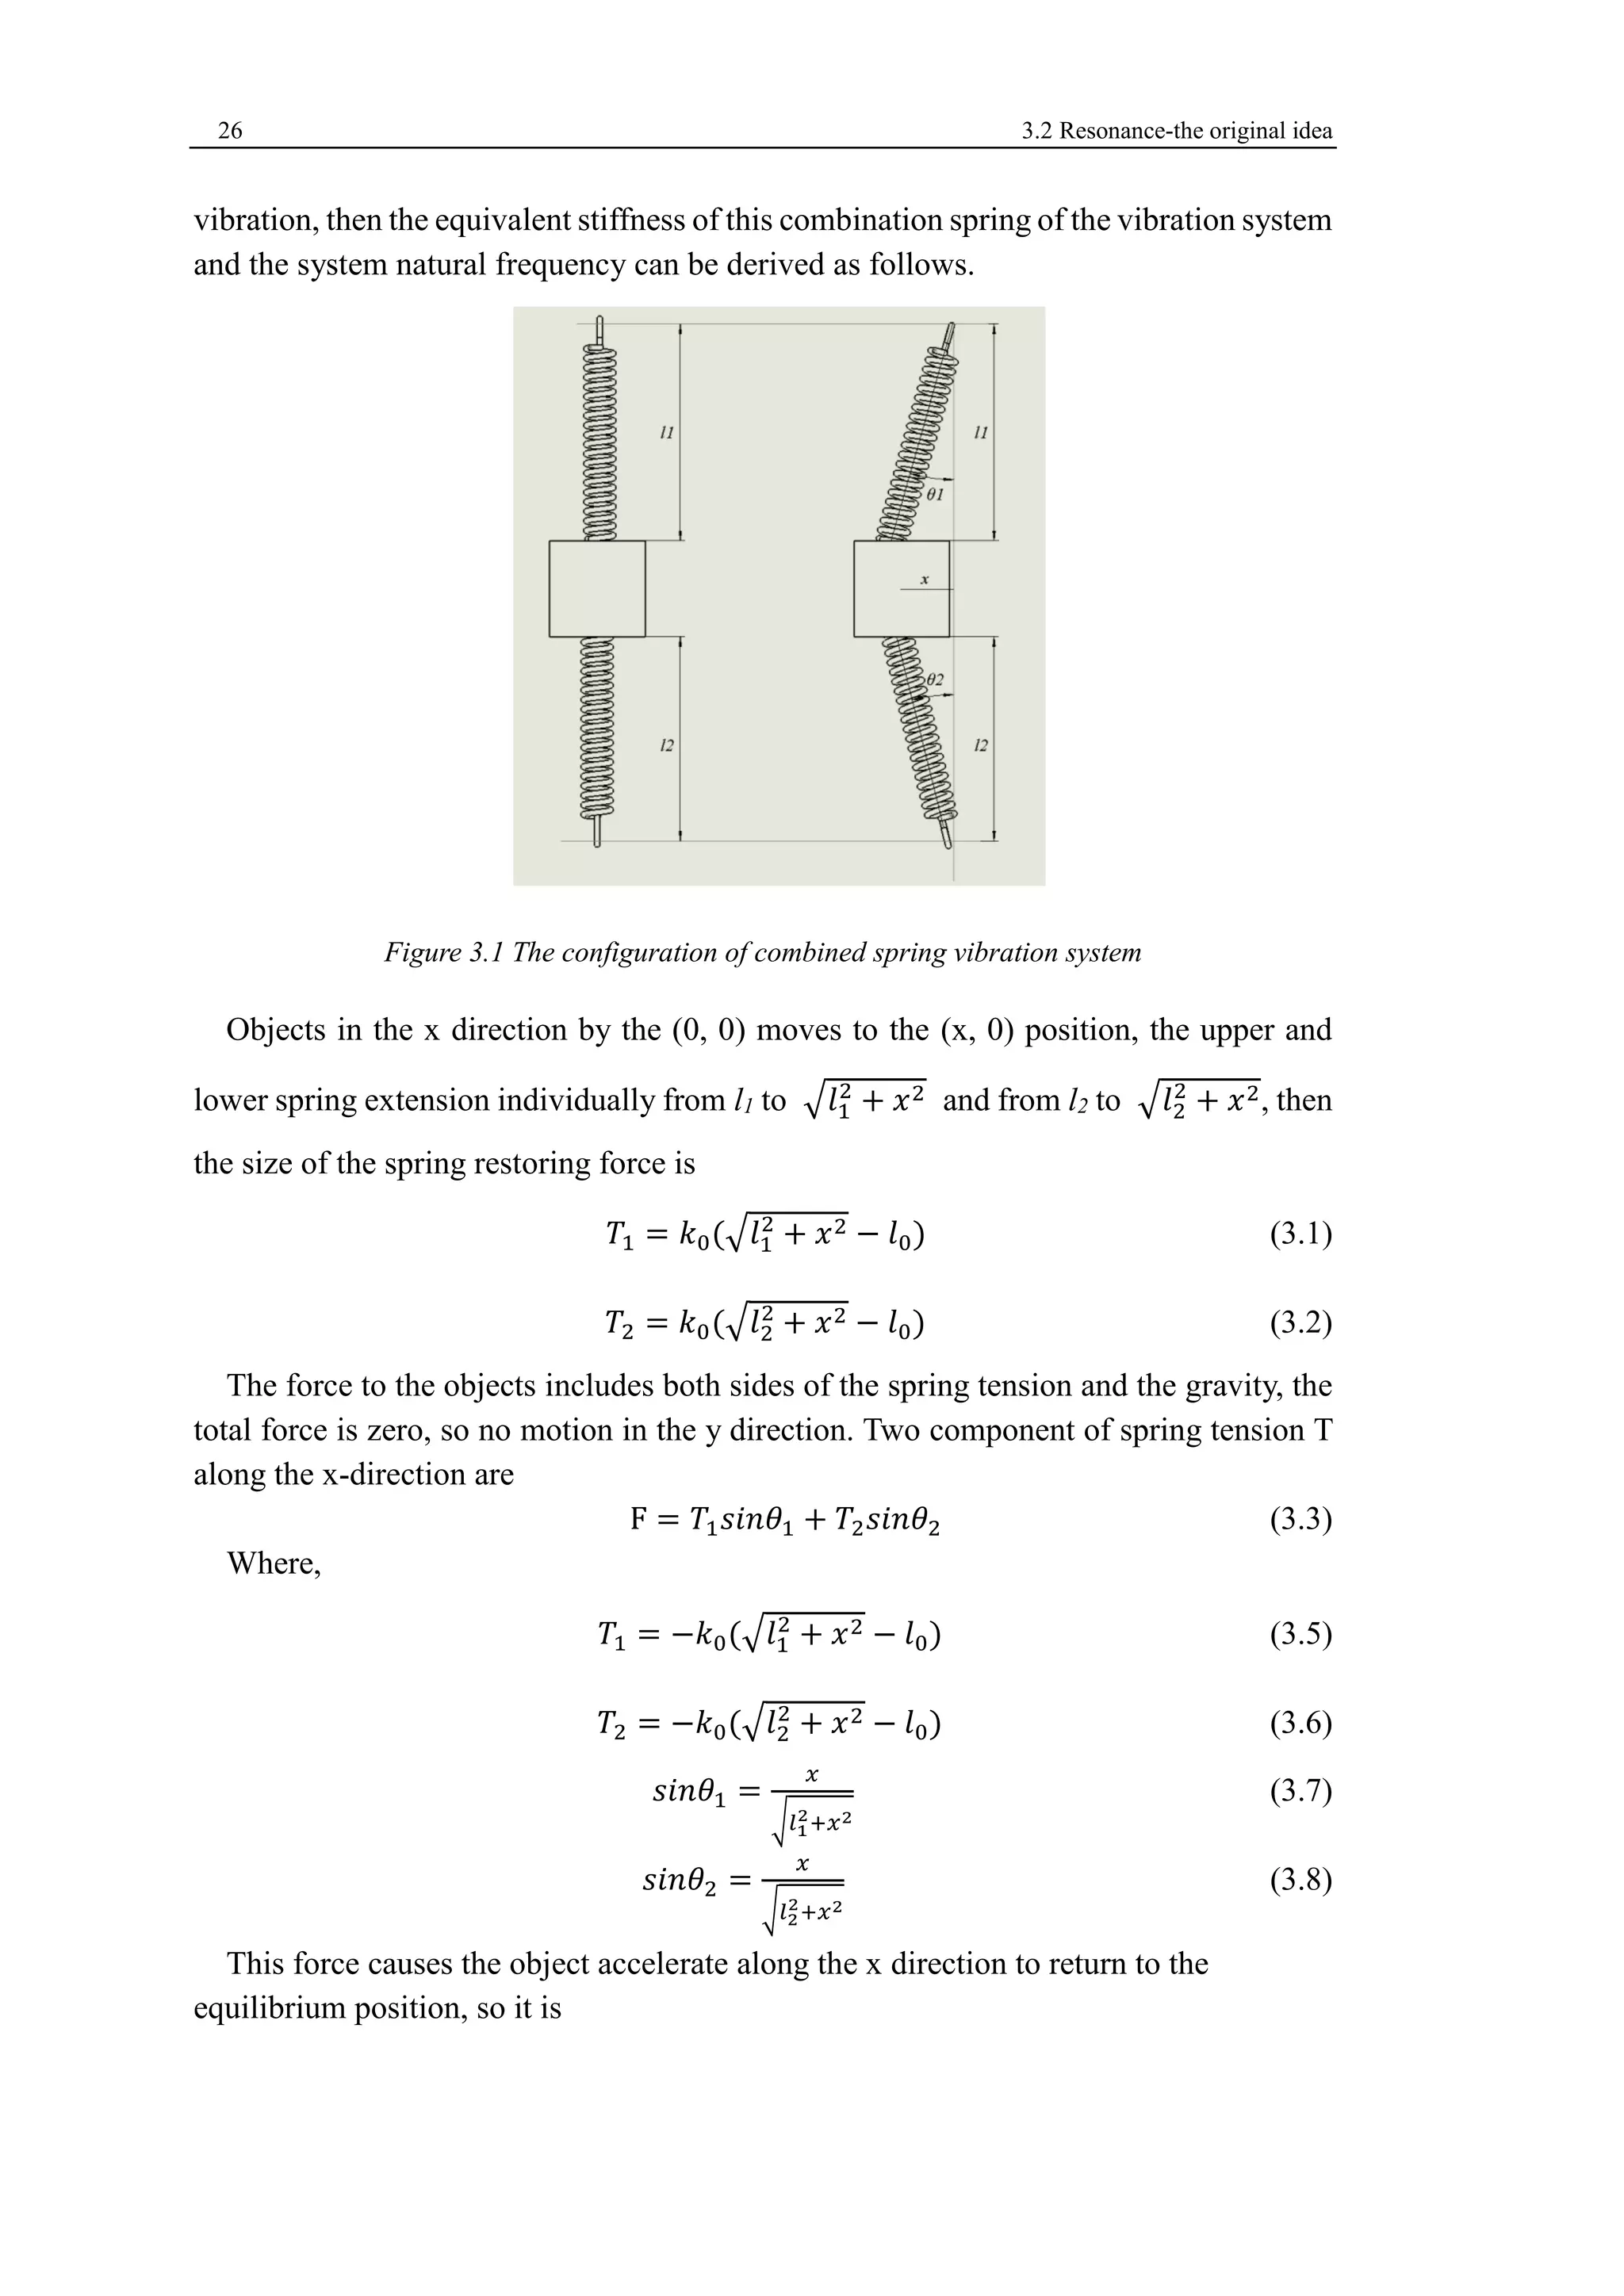
According to this idea, we design a combined spring vibration system, which 
configuration is shown in Figure 3.1. The square object with the mass m is the vibration 
source, which makes the upper and lower two springs vibrate in the landscape 
orientation in small range. Both springs have same stiffness k0, the original length is l0. 
At the equilibrium position, they are elongated to l1 and l2, both sides of the object under 
tension T1 and T2. Now the object in the lateral direction (the x direction) for a slight
26 3.2 Resonance-the original idea 
vibration, then the equivalent stiffness of this combination spring of the vibration system 
and the system natural frequency can be derived as follows. 
Figure 3.1 The configuration of combined spring vibration system 
Objects in the x direction by the (0, 0) moves to the (x, 0) position, the upper and 
lower spring extension individually from l1 to √푙1 
2 + 푥2 and from l2 to √푙2 
2 + 푥2, then 
the size of the spring restoring force is 
푇1 = 푘0(√푙1 
2 + 푥2 − 푙0) (3.1) 
푇2 = 푘0(√푙2 
2 + 푥2 − 푙0) (3.2) 
The force to the objects includes both sides of the spring tension and the gravity, the 
total force is zero, so no motion in the y direction. Two component of spring tension T 
along the x-direction are 
F = 푇1푠푖푛휃1 + 푇2푠푖푛휃2 (3.3) 
Where, 
푇1 = −푘0(√푙1 
2 + 푥2 − 푙0) (3.5) 
푇2 = −푘0(√푙2 
2 + 푥2 − 푙0) (3.6) 
푠푖푛휃1 = 
푥 
√푙1 
2+푥2 
(3.7) 
푠푖푛휃2 = 
푥 
√푙2 
2+푥2 
(3.8) 
This force causes the object accelerate along the x direction to return to the 
equilibrium position, so it is
Chapter 3 Vibrating system - a new mechanical polishing approach 27 
F = 푇1푠푖푛휃1 + 푇2푠푖푛휃2 = −푘0 (1 − 
푙0 
√푙1 
2+푥2 
) 푥−푘0 (1 − 
푙0 
√푙2 
2+푥2 
) 푥 (3.9) 
퐹 = −푘0 (2 − 
푙0 
√푙1 
2+푥2 
− 
푙0 
√푙2 
2+푥2 
) 푥 = 푚 
푑푥2 
푑푡2 (3.10) 
This is the system dynamic equations of vibration. In the x and l take the same order 
of magnitude of value, this is a second-order nonlinear differential equation. This 
equation can be seen that the lateral vibration spring oscillator does not belong to simple 
harmonic motion, but when the object vibrate in small laterally, that x << l so 
√푙1 
2 + 푥2 ≈ 푙1, 푎푛푑 √푙2 
2 + 푥2 ≈ 푙2 established, the force F acting on the object is 
proportional to the displacement x of the object, namely 
퐹 = −푘0 (2 − 
푙0 
푙1 
− 
푙0 
푙2 
) 푥 = −푘푥 (3.11) 
Where, 
x is the displacement in laterally; k is the equivalent stiffness of the system, 
equal to 푘0 (2 − 
푙0 
푙1 
− 
푙0 
푙2 
). Vibration dynamic equations are as 
푑푥2 
푑푡2 + 
푘 
푚 
푥 = 0 (3.12) 
This is the dynamic equations of simple harmonic motion. This equation can be 
obtained natural circular frequency of the system 
휔0 = √ 푘 
푚 
= √ 
푘0 
푚 
(2 − 
푙0 
푙1 
− 
푙0 
푙2 
) (3.13) 
And the system natural frequency is 
휈0 = 
1 
2휋 
√ 
푘0 
푚 
(2 − 
푙0 
푙1 
− 
푙0 
푙2 
) (3.14) 
The natural frequency not only relies on the system oscillator mass m, the spring 
parameters l0, k0, but also on the initial state of the system l. 
3.3 Experiment with small vibrator 
The first experiment 
There is no information reported till date in tumbling process using vibrator technique 
for cavities in SRF field. Transferring the idea into reality often takes some time and it 
will not know the eventual result until a large number of tests been done. 
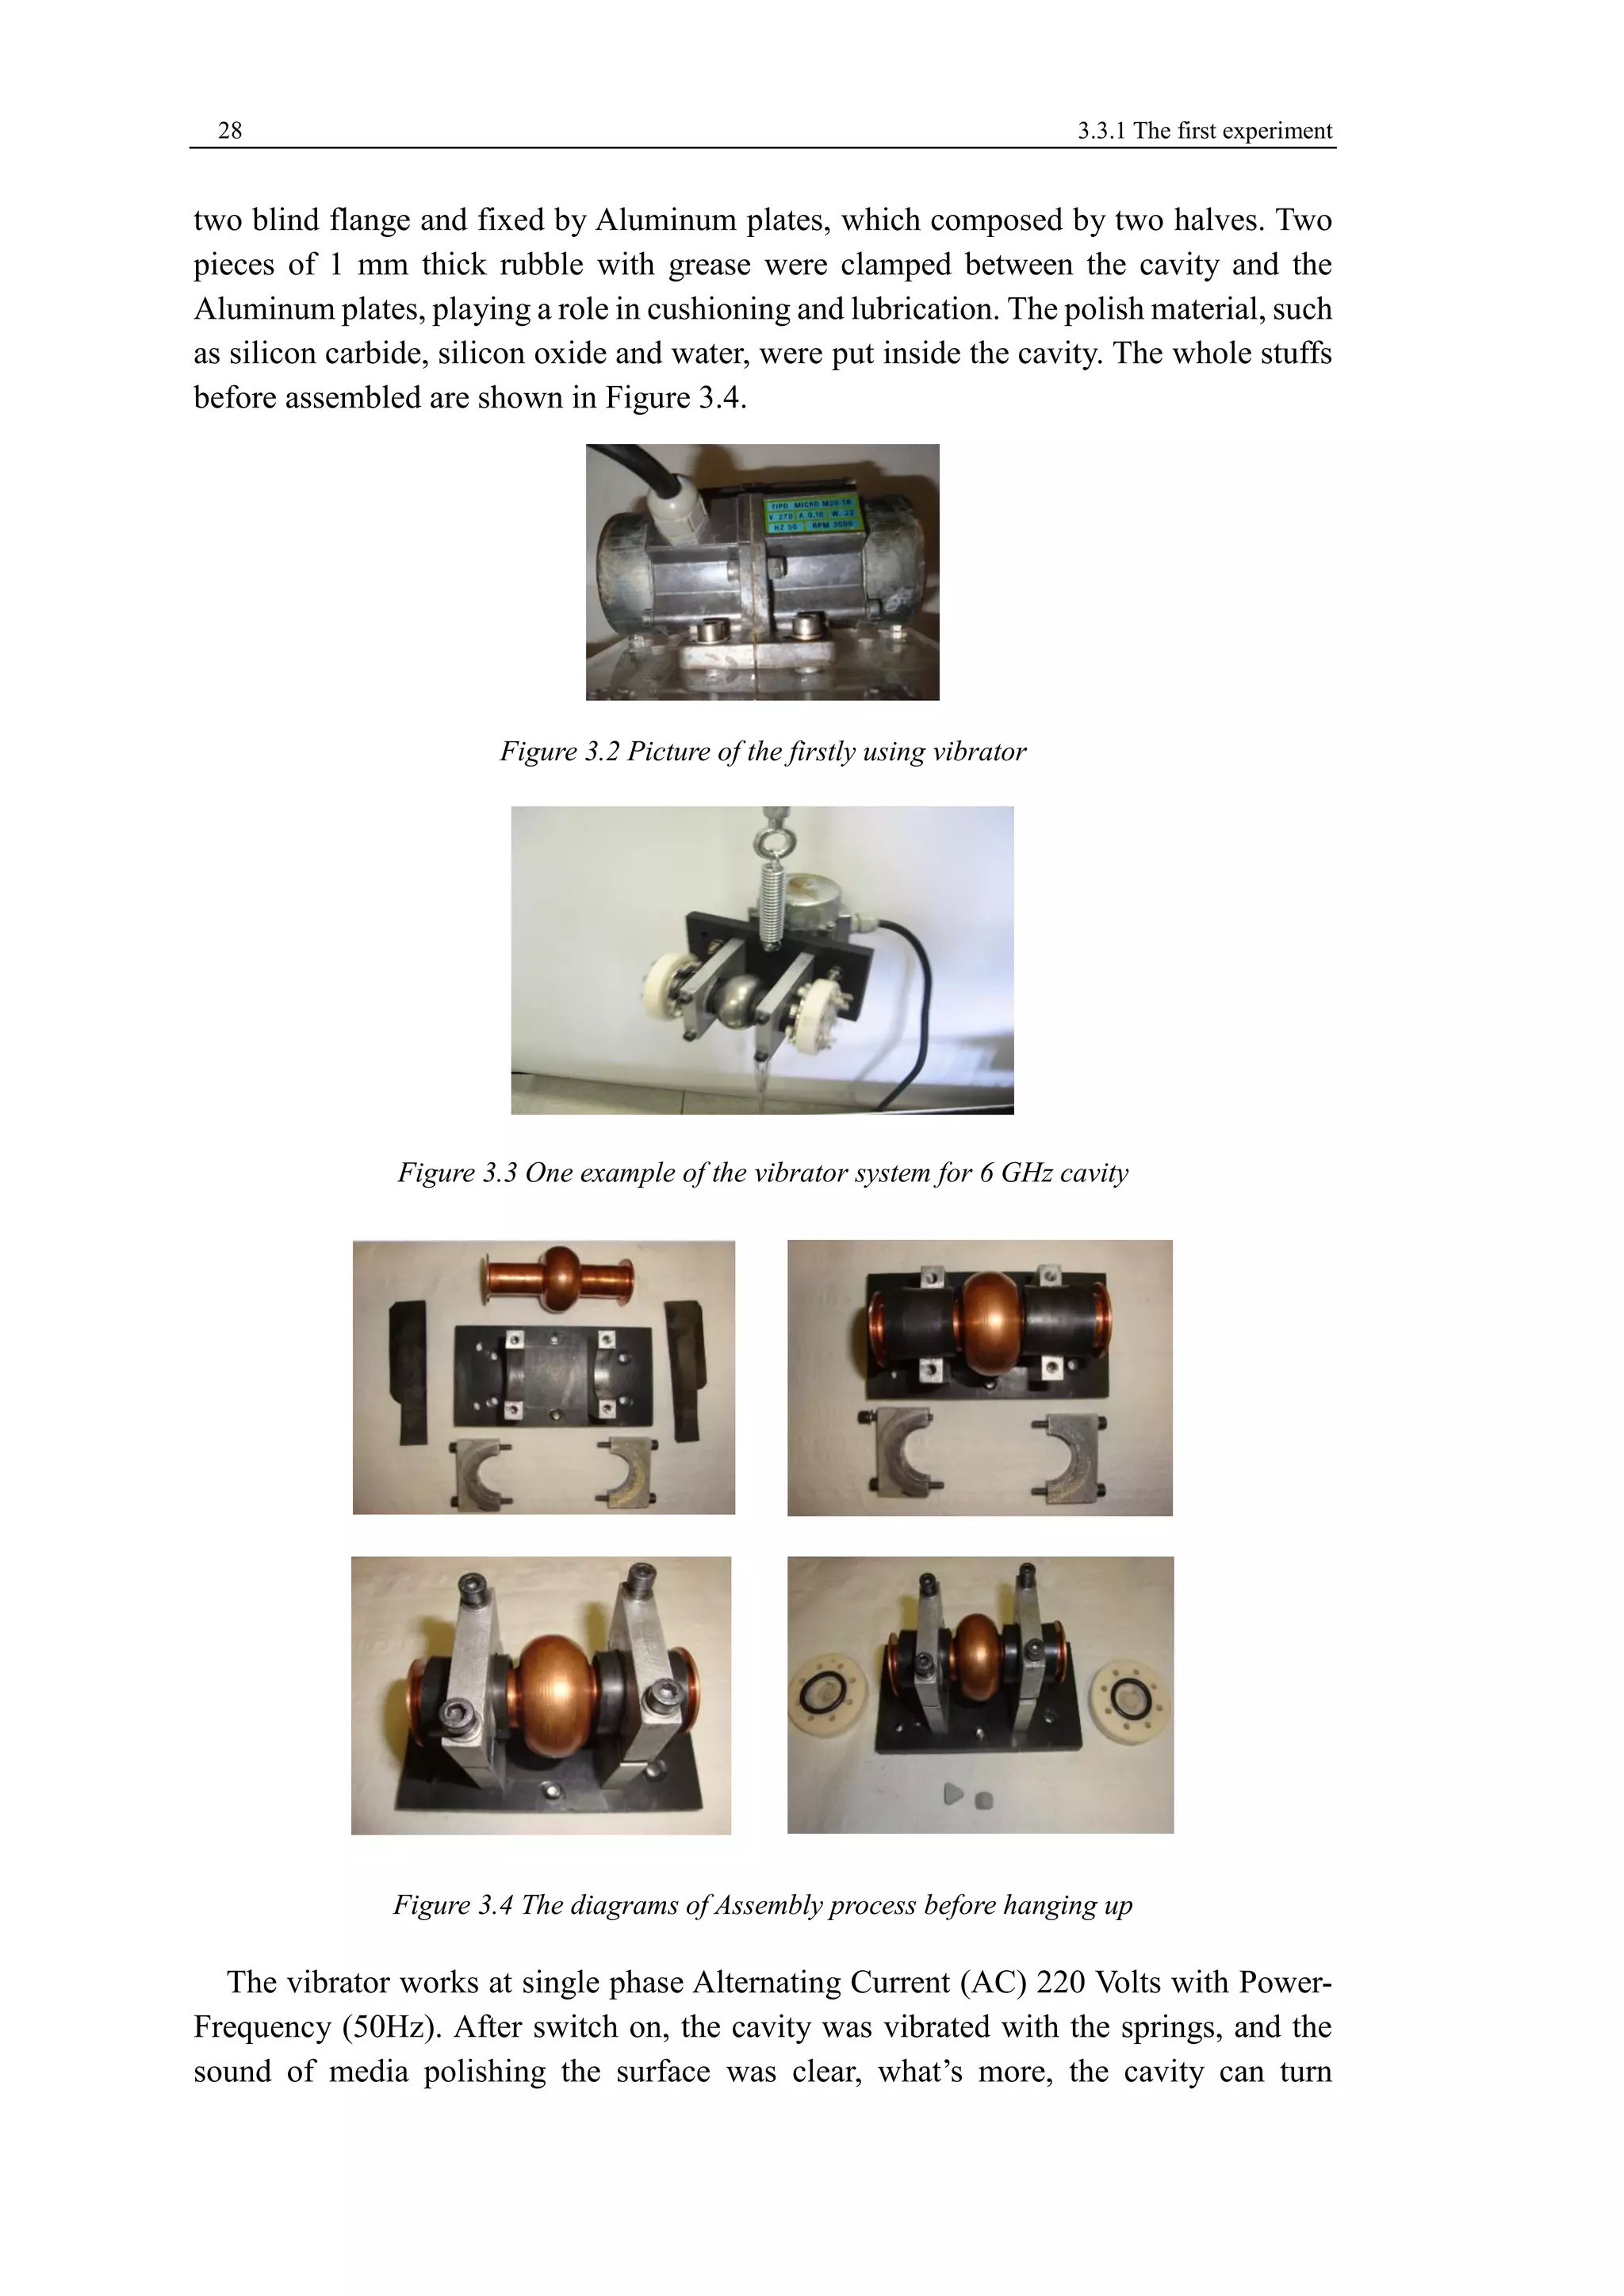
Firstly, an idle vibrator with small dimension and power of 22 Watts was tested 
(Figure 3.2). The components of the system were assembled in a very easy way. 
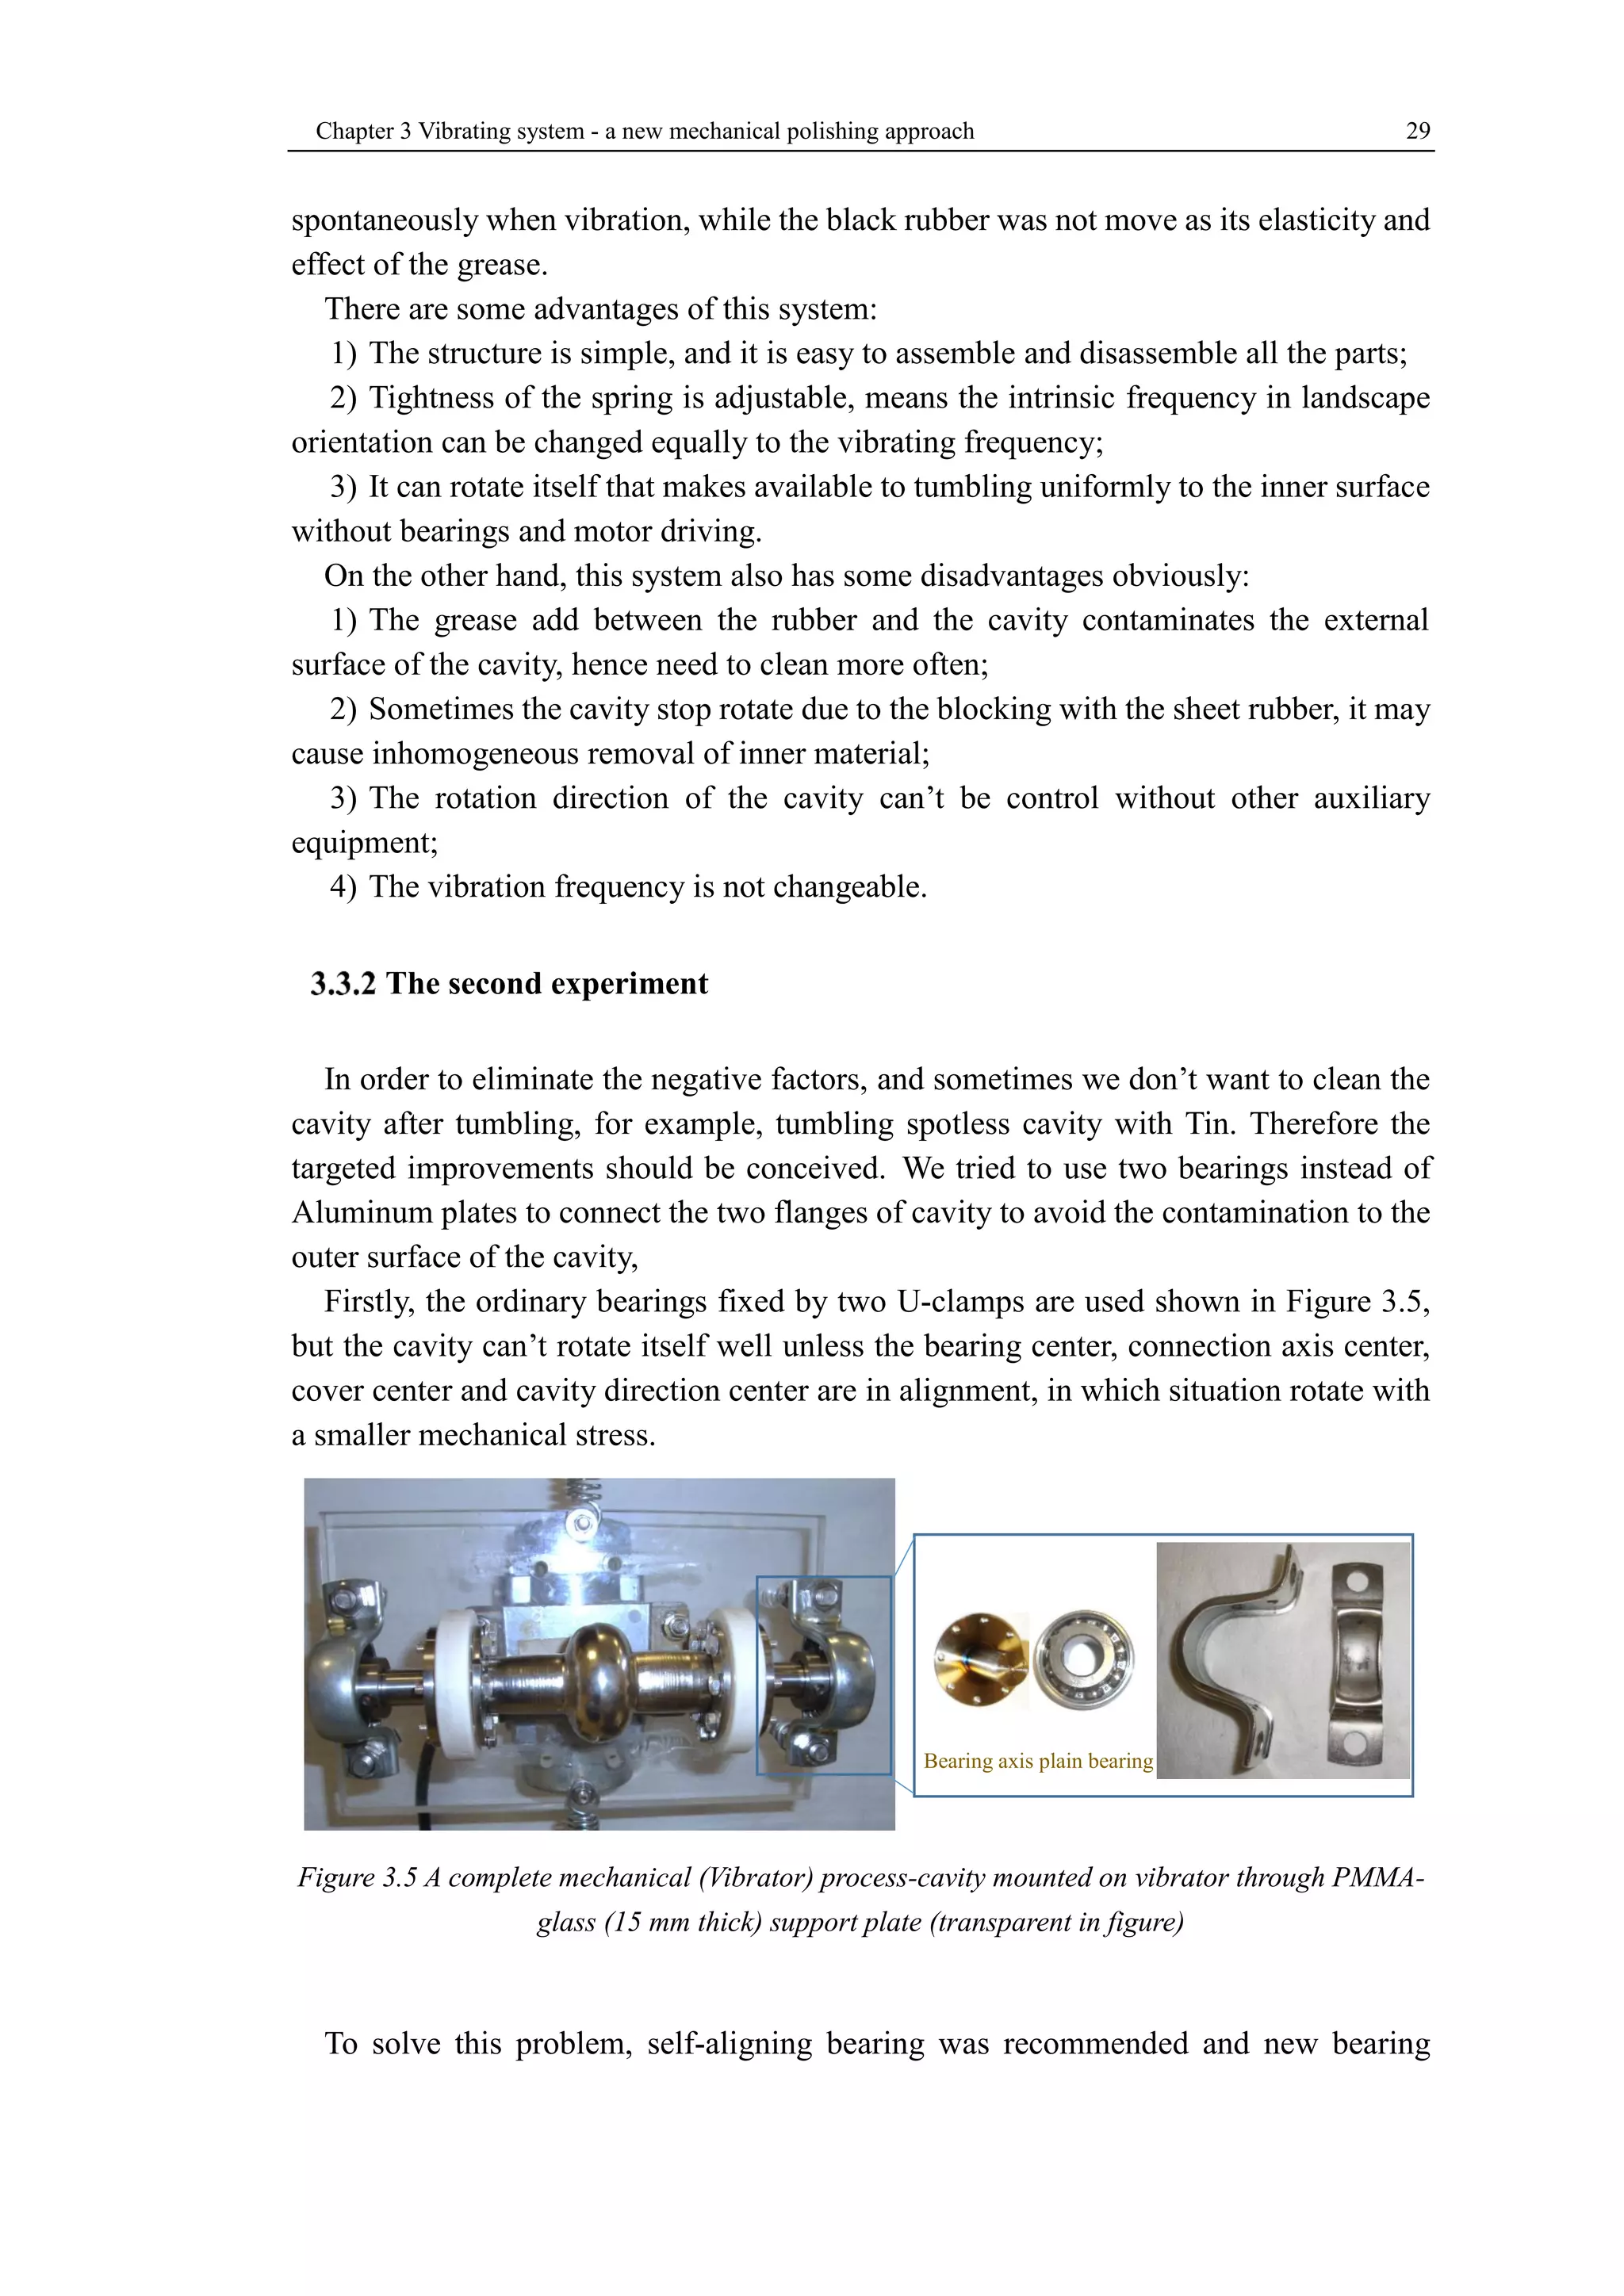
The vibrator and the cavity are hung by two springs and a piece of plastic plate, shown 
in Figure 3.3. The springs connected with two adjustable rod. The cavity is closed by
28 3.3.1 The first experiment 
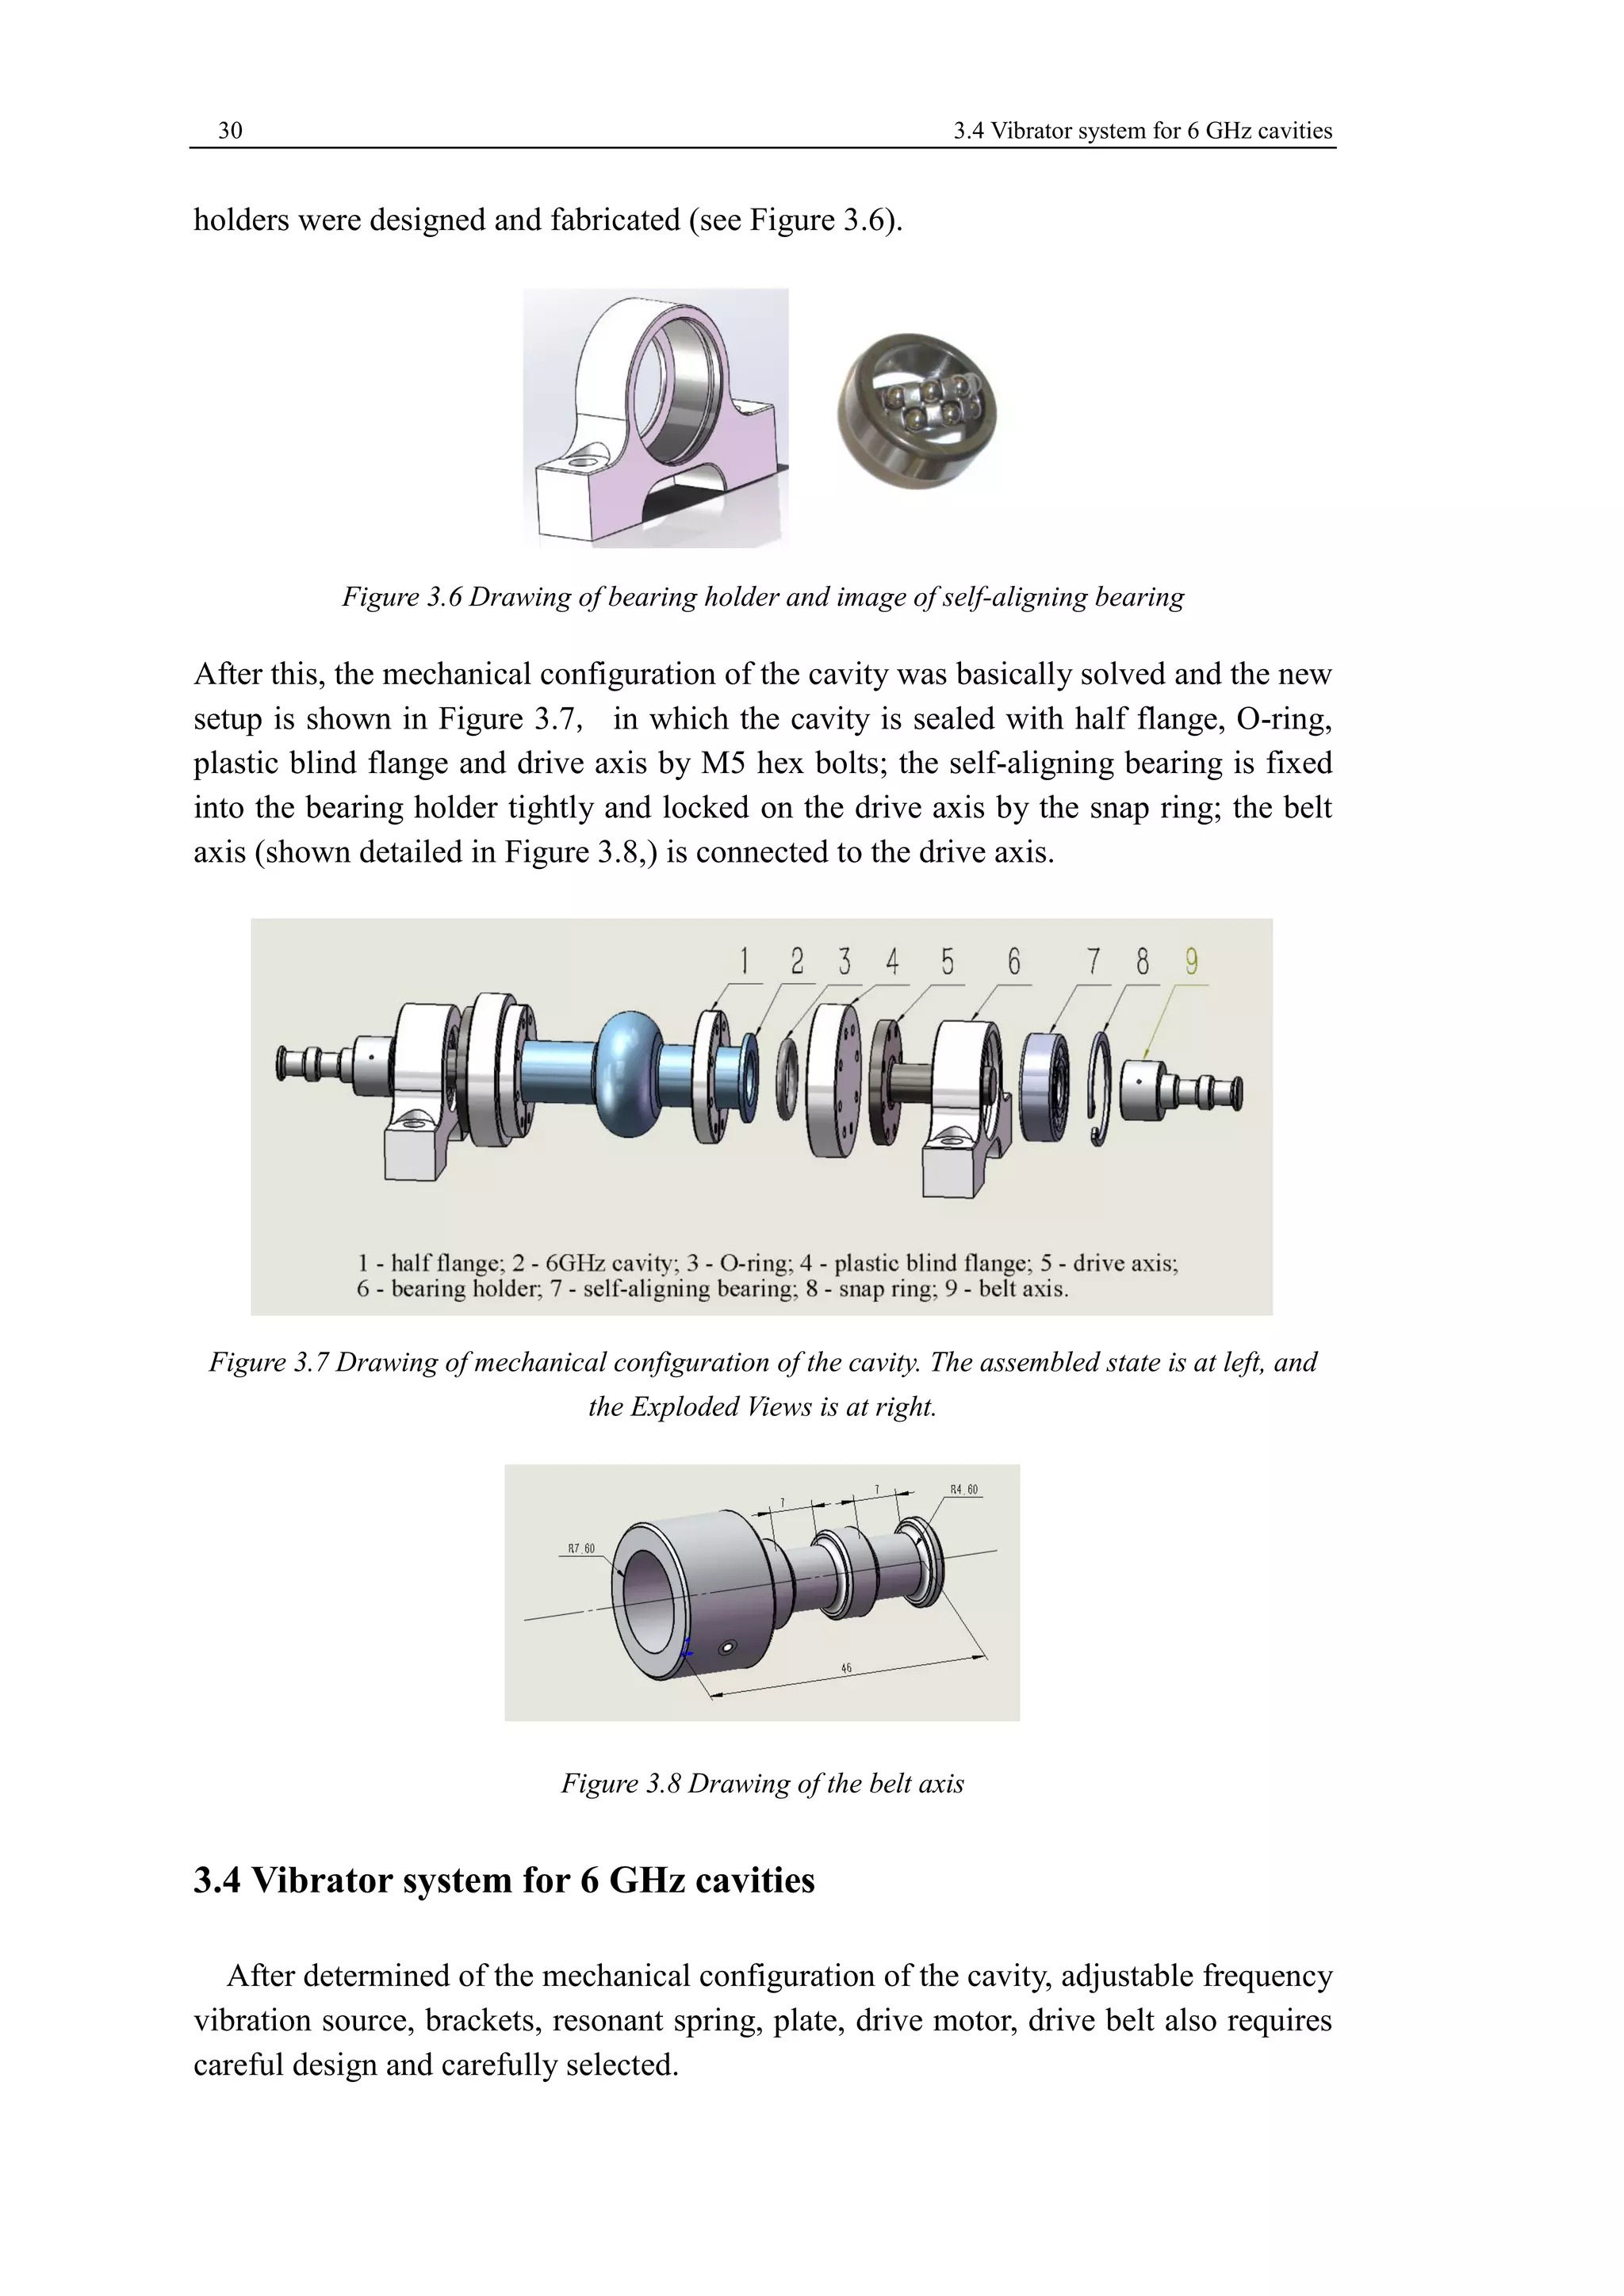
two blind flange and fixed by Aluminum plates, which composed by two halves. Two 
pieces of 1 mm thick rubble with grease were clamped between the cavity and the 
Aluminum plates, playing a role in cushioning and lubrication. The polish material, such 
as silicon carbide, silicon oxide and water, were put inside the cavity. The whole stuffs 
before assembled are shown in Figure 3.4. 
Figure 3.2 Picture of the firstly using vibrator 
Figure 3.3 One example of the vibrator system for 6 GHz cavity 
Figure 3.4 The diagrams of Assembly process before hanging up 
The vibrator works at single phase Alternating Current (AC) 220 Volts with Power- 
Frequency (50Hz). After switch on, the cavity was vibrated with the springs, and the 
sound of media polishing the surface was clear, what’s more, the cavity can turn
Chapter 3 Vibrating system - a new mechanical polishing approach 29 
spontaneously when vibration, while the black rubber was not move as its elasticity and 
effect of the grease. 
There are some advantages of this system: 
1) The structure is simple, and it is easy to assemble and disassemble all the parts; 
2) Tightness of the spring is adjustable, means the intrinsic frequency in landscape 
orientation can be changed equally to the vibrating frequency; 
3) It can rotate itself that makes available to tumbling uniformly to the inner surface 
without bearings and motor driving. 
On the other hand, this system also has some disadvantages obviously: 
1) The grease add between the rubber and the cavity contaminates the external 
surface of the cavity, hence need to clean more often; 
2) Sometimes the cavity stop rotate due to the blocking with the sheet rubber, it may 
cause inhomogeneous removal of inner material; 
3) The rotation direction of the cavity can’t be control without other auxiliary 
equipment; 
4) The vibration frequency is not changeable. 
The second experiment 
In order to eliminate the negative factors, and sometimes we don’t want to clean the 
cavity after tumbling, for example, tumbling spotless cavity with Tin. Therefore the 
targeted improvements should be conceived. We tried to use two bearings instead of 
Aluminum plates to connect the two flanges of cavity to avoid the contamination to the 
outer surface of the cavity, 
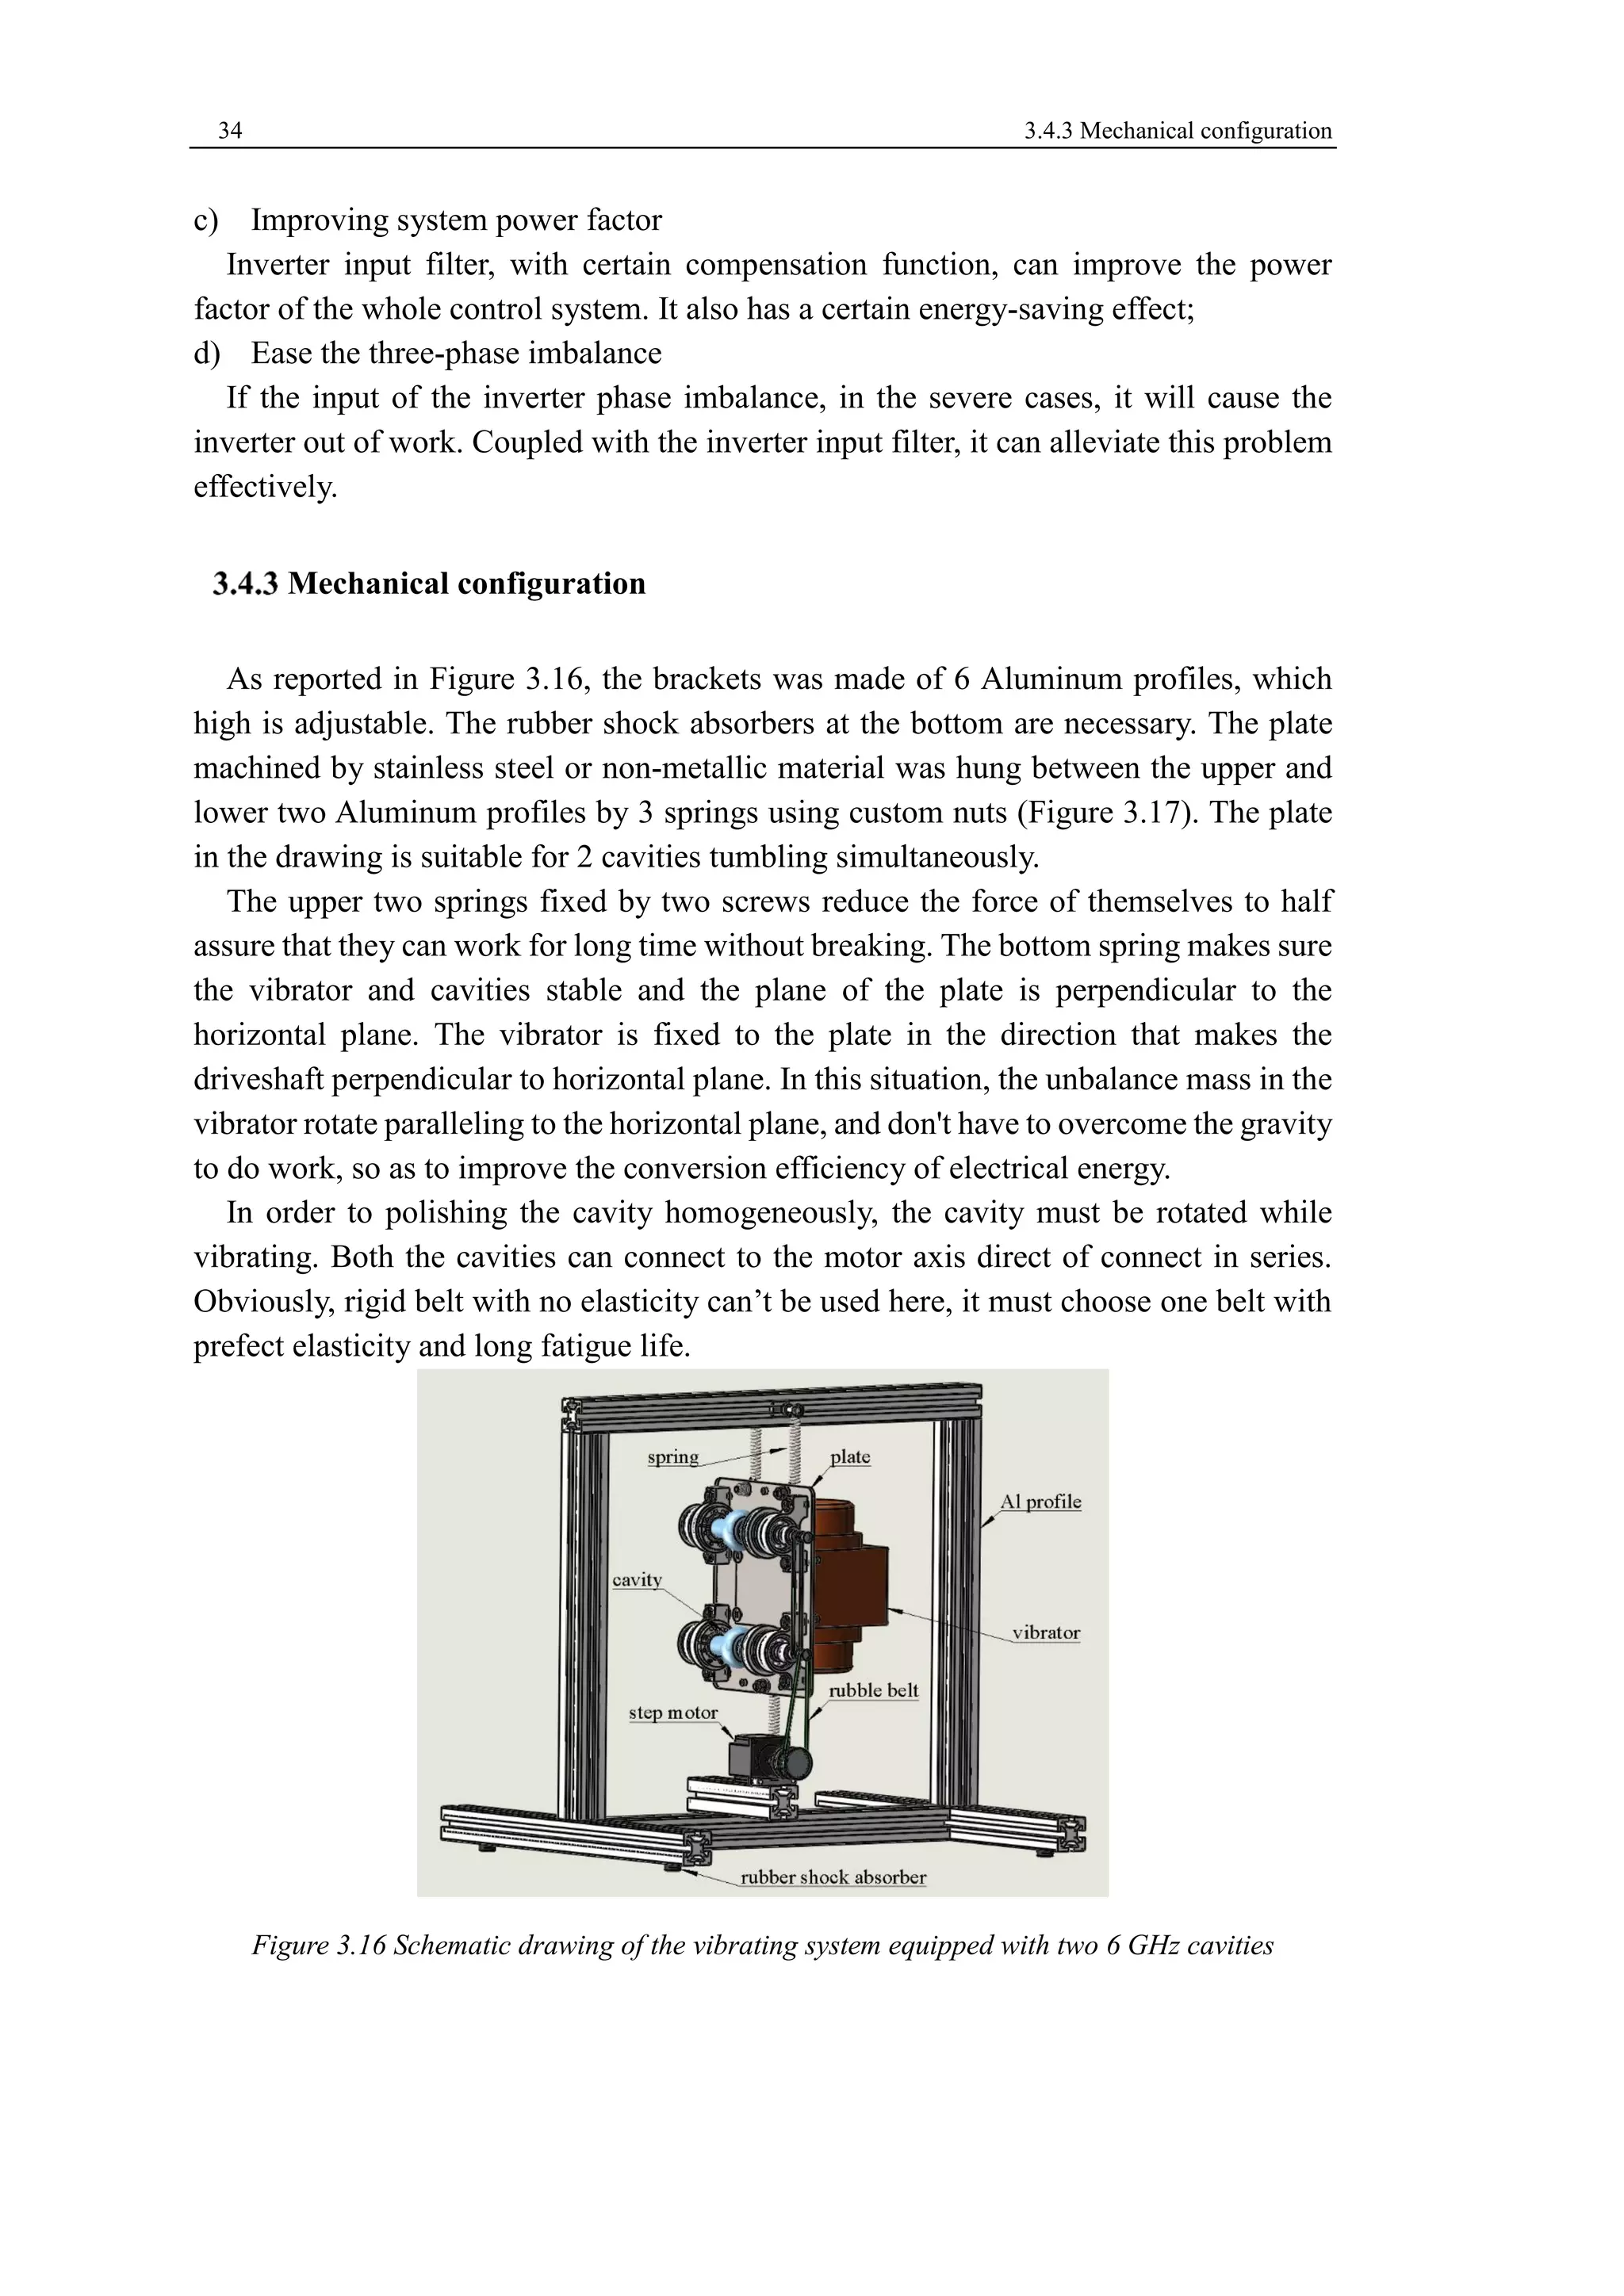
Firstly, the ordinary bearings fixed by two U-clamps are used shown in Figure 3.5, 
but the cavity can’t rotate itself well unless the bearing center, connection axis center, 
cover center and cavity direction center are in alignment, in which situation rotate with 
a smaller mechanical stress. 
Figure 3.5 A complete mechanical (Vibrator) process-cavity mounted on vibrator through PMMA-glass 
(15 mm thick) support plate (transparent in figure) 
To solve this problem, self-aligning bearing was recommended and new bearing 
Bearing axis plain bearing
30 3.4 Vibrator system for 6 GHz cavities 
holders were designed and fabricated (see Figure 3.6). 
Figure 3.6 Drawing of bearing holder and image of self-aligning bearing 
After this, the mechanical configuration of the cavity was basically solved and the new 
setup is shown in Figure 3.7, in which the cavity is sealed with half flange, O-ring, 
plastic blind flange and drive axis by M5 hex bolts; the self-aligning bearing is fixed 
into the bearing holder tightly and locked on the drive axis by the snap ring; the belt 
axis (shown detailed in Figure 3.8,) is connected to the drive axis. 
Figure 3.7 Drawing of mechanical configuration of the cavity. The assembled state is at left, and 
the Exploded Views is at right. 
Figure 3.8 Drawing of the belt axis 
3.4 Vibrator system for 6 GHz cavities 
After determined of the mechanical configuration of the cavity, adjustable frequency 
vibration source, brackets, resonant spring, plate, drive motor, drive belt also requires 
careful design and carefully selected.
Chapter 3 Vibrating system - a new mechanical polishing approach 31 
Vibrator 
Figure 3.9 is the internal structures images of one commercial foot mounted electric 
vibrator which was chosen in the system. The type is MVSI 15/35 – S02, with 
centrifugal force 30.2kg, weight 5.6kg, max input power 85W, max current 0.21A at 
50Hz. Power supply in our case is three-phase voltage ~400V. 
Figure 3.9 The internal structures images of one commercial vibrator 
Due to the strong and fast vibration during the polishing processor, everything refers 
to the vibrator should be designed specially. For example, the power supply cable at the 
connection box should be isolated by sponge, otherwise the cable may be broken-down 
(see Figure 3.10) after a long time impact to the box or some harder place. 
Figure 3.10 Images in first line is the consequence after neglecting the sponge, while in second 
line is the wright connecting way. (a) The cable was broken-down; (b) the cable was hurt by the 
shroud; (c) the cable was hurt by the cable jointing sleeve; (d) using the sponge to save the cable; 
(e) using electrical adhesive tape to protect the cable. 
control box 
The main role of the control box is to provide a three-phase adjustable frequency 
(a) (b) (c) 
(d) (e)
32 3.4.2 control box 
power to vibrators, and power supply to the rotating motor and cooling fan. In the front 
panel, it allows to start, stop, and change the frequency etc., the rear panel is a power 
supply input and output interfaces. 
Only the Variable-frequency drive (VFD) and filter are arranged in the chassis, so 
space for heat dissipation is much enough. 
Figure 3.11 Sectional view of the inner and chassis dimensions 
Figure 3.12 is one part of the internal electrical wiring diagram. 
f 
nf 
M 
Vibrator 
Three-phase 
Power 
supply 
L1 
L2 
L3 
N 
G G 
L1 
L2 
L3 
U 
V 
W 
Fi lter Inverter 
Figure 3.12 Diagram of the electrical connection 
 VFD 
As described in the 3.1, commercial vibrators work at fixed frequency, mostly at 50Hz, 
our vibrator is work at or close to the system resonant frequency, which depend on the 
springs, the mass of the load and the material and the thickness of the plate. 
Figure 3.13 The main principle diagram of the VFD [22] 
A VFD (also termed adjustable frequency drive, variable speed drive, AC drive, 
micro drive or inverter drive) is a type of adjustable-speed drive used in electro-mechanical 
drive systems to control AC motor speed and torque by varying motor input 
frequency and voltage[23] 
Frequency converter (Figure 3.13) is mainly composed of rectifier (ac to dc), inverter
Chapter 3 Vibrating system - a new mechanical polishing approach 33 
(dc to ac), brake unit, drive unit, detection unit, micro processing unit, and drive operator 
interface. In addition, the inverter contains many protective functions, such as over-current, 
over-voltage protection, overload protection, etc. 
In the vibrator system, we choose the product from Fuji Electric Co., Ltd, the inverter 
type is FRN4.0E1S-4E (Figure 3.14), which is a standard type without EMC filter built-in. 
The maximum frequency it can supply is 400Hz. 
Figure 3.14 Picture of real products FRN4.0E1S-4E which keypad can install to the front panel of 
the control unit of the vibrating system by the cable with RJ-45 connectors 
 Inverter input filter 
Inverter input filter shown in Figure 3.15 is one kind of the special inverter filter, 
whose mainly function includes the following aspects: 
Figure 3.15 3 phase RFI Filter 
a) Inhibition of high order harmonic frequency of converter 
The process of rectifying of frequency converter is the equivalent of a high speed 
switch, therefore, it will produce large amounts of high order harmonic. These higher 
harmonics, with the flow of power, are brought into the grid, which led to sensitive 
equipment using the same grid interference; 
b) Preventing frequency converter from interference 
Frequency converter is an interference source, is also an interfered source, or also 
called sensitive equipment. If harmonic in the power grid is too high, and harmonic 
content is too large, the inverter will sent over voltage, over current, overload and other 
false alarm;
34 3.4.3 Mechanical configuration 
c) Improving system power factor 
Inverter input filter, with certain compensation function, can improve the power 
factor of the whole control system. It also has a certain energy-saving effect; 
d) Ease the three-phase imbalance 
If the input of the inverter phase imbalance, in the severe cases, it will cause the 
inverter out of work. Coupled with the inverter input filter, it can alleviate this problem 
effectively. 
Mechanical configuration 
As reported in Figure 3.16, the brackets was made of 6 Aluminum profiles, which 
high is adjustable. The rubber shock absorbers at the bottom are necessary. The plate 
machined by stainless steel or non-metallic material was hung between the upper and 
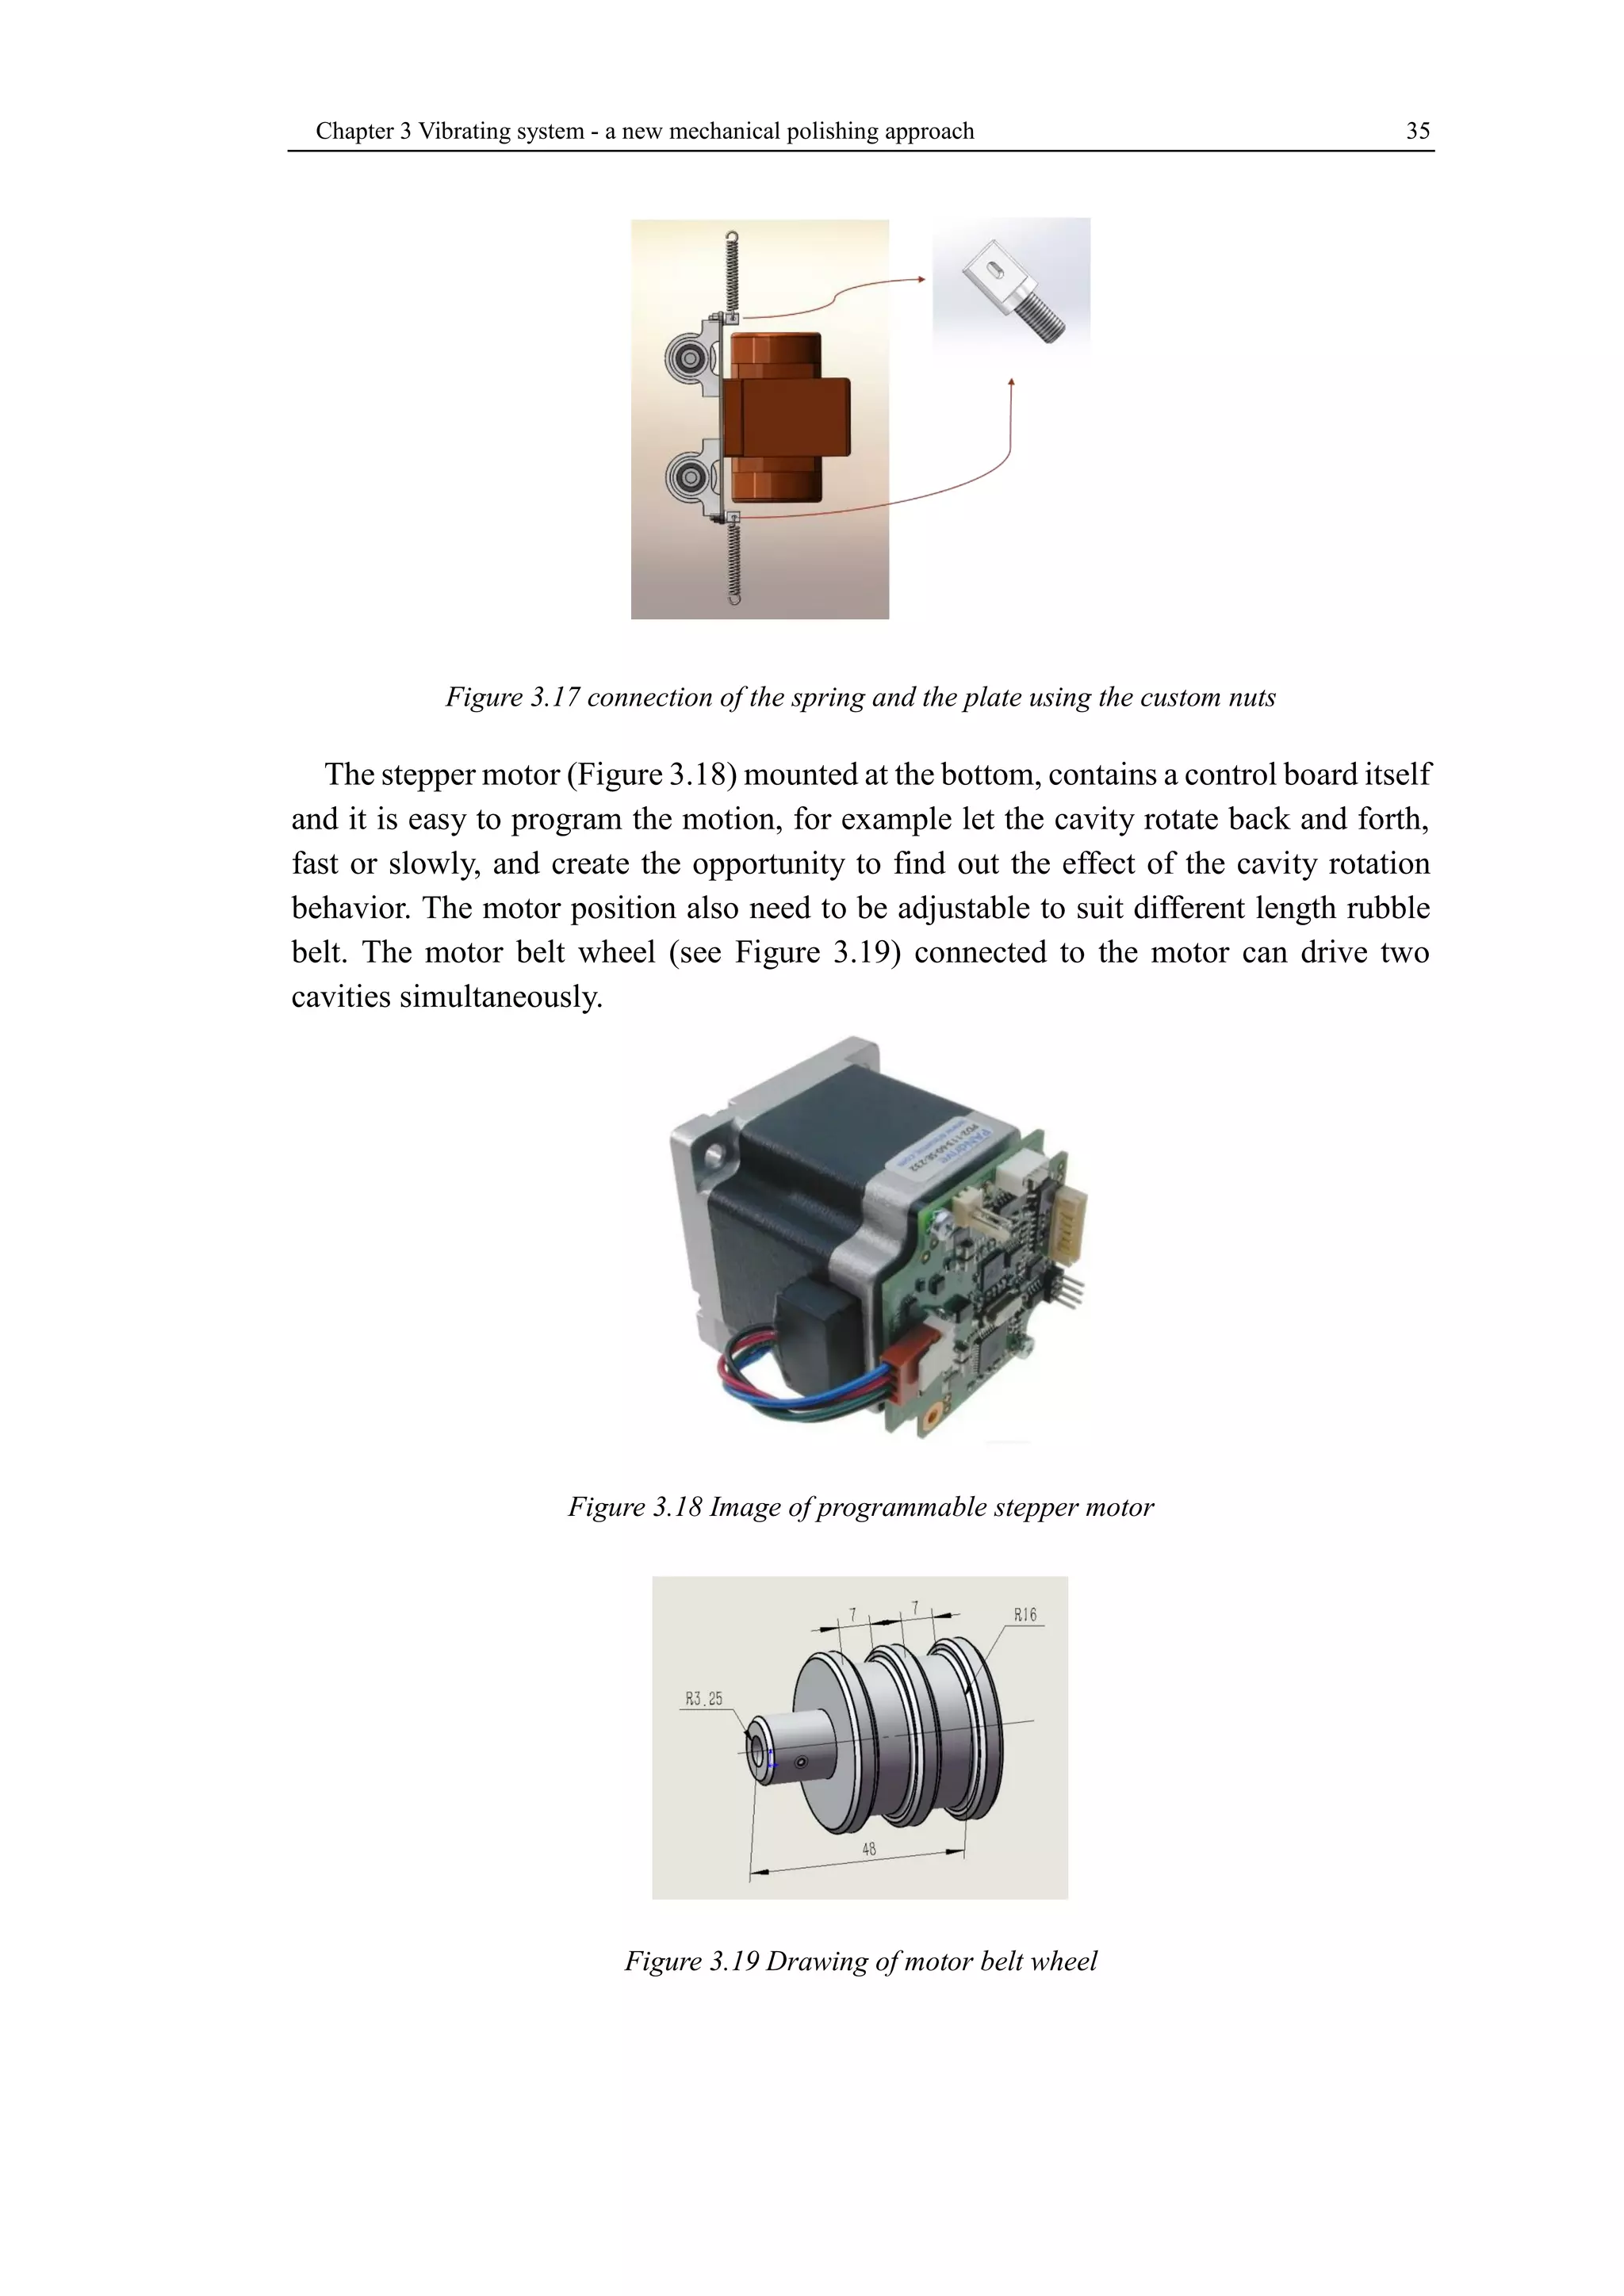
lower two Aluminum profiles by 3 springs using custom nuts (Figure 3.17). The plate 
in the drawing is suitable for 2 cavities tumbling simultaneously. 
The upper two springs fixed by two screws reduce the force of themselves to half 
assure that they can work for long time without breaking. The bottom spring makes sure 
the vibrator and cavities stable and the plane of the plate is perpendicular to the 
horizontal plane. The vibrator is fixed to the plate in the direction that makes the 
driveshaft perpendicular to horizontal plane. In this situation, the unbalance mass in the 
vibrator rotate paralleling to the horizontal plane, and don't have to overcome the gravity 
to do work, so as to improve the conversion efficiency of electrical energy. 
In order to polishing the cavity homogeneously, the cavity must be rotated while 
vibrating. Both the cavities can connect to the motor axis direct of connect in series. 
Obviously, rigid belt with no elasticity can’t be used here, it must choose one belt with 
prefect elasticity and long fatigue life. 
Figure 3.16 Schematic drawing of the vibrating system equipped with two 6 GHz cavities
Chapter 3 Vibrating system - a new mechanical polishing approach 35 
Figure 3.17 connection of the spring and the plate using the custom nuts 
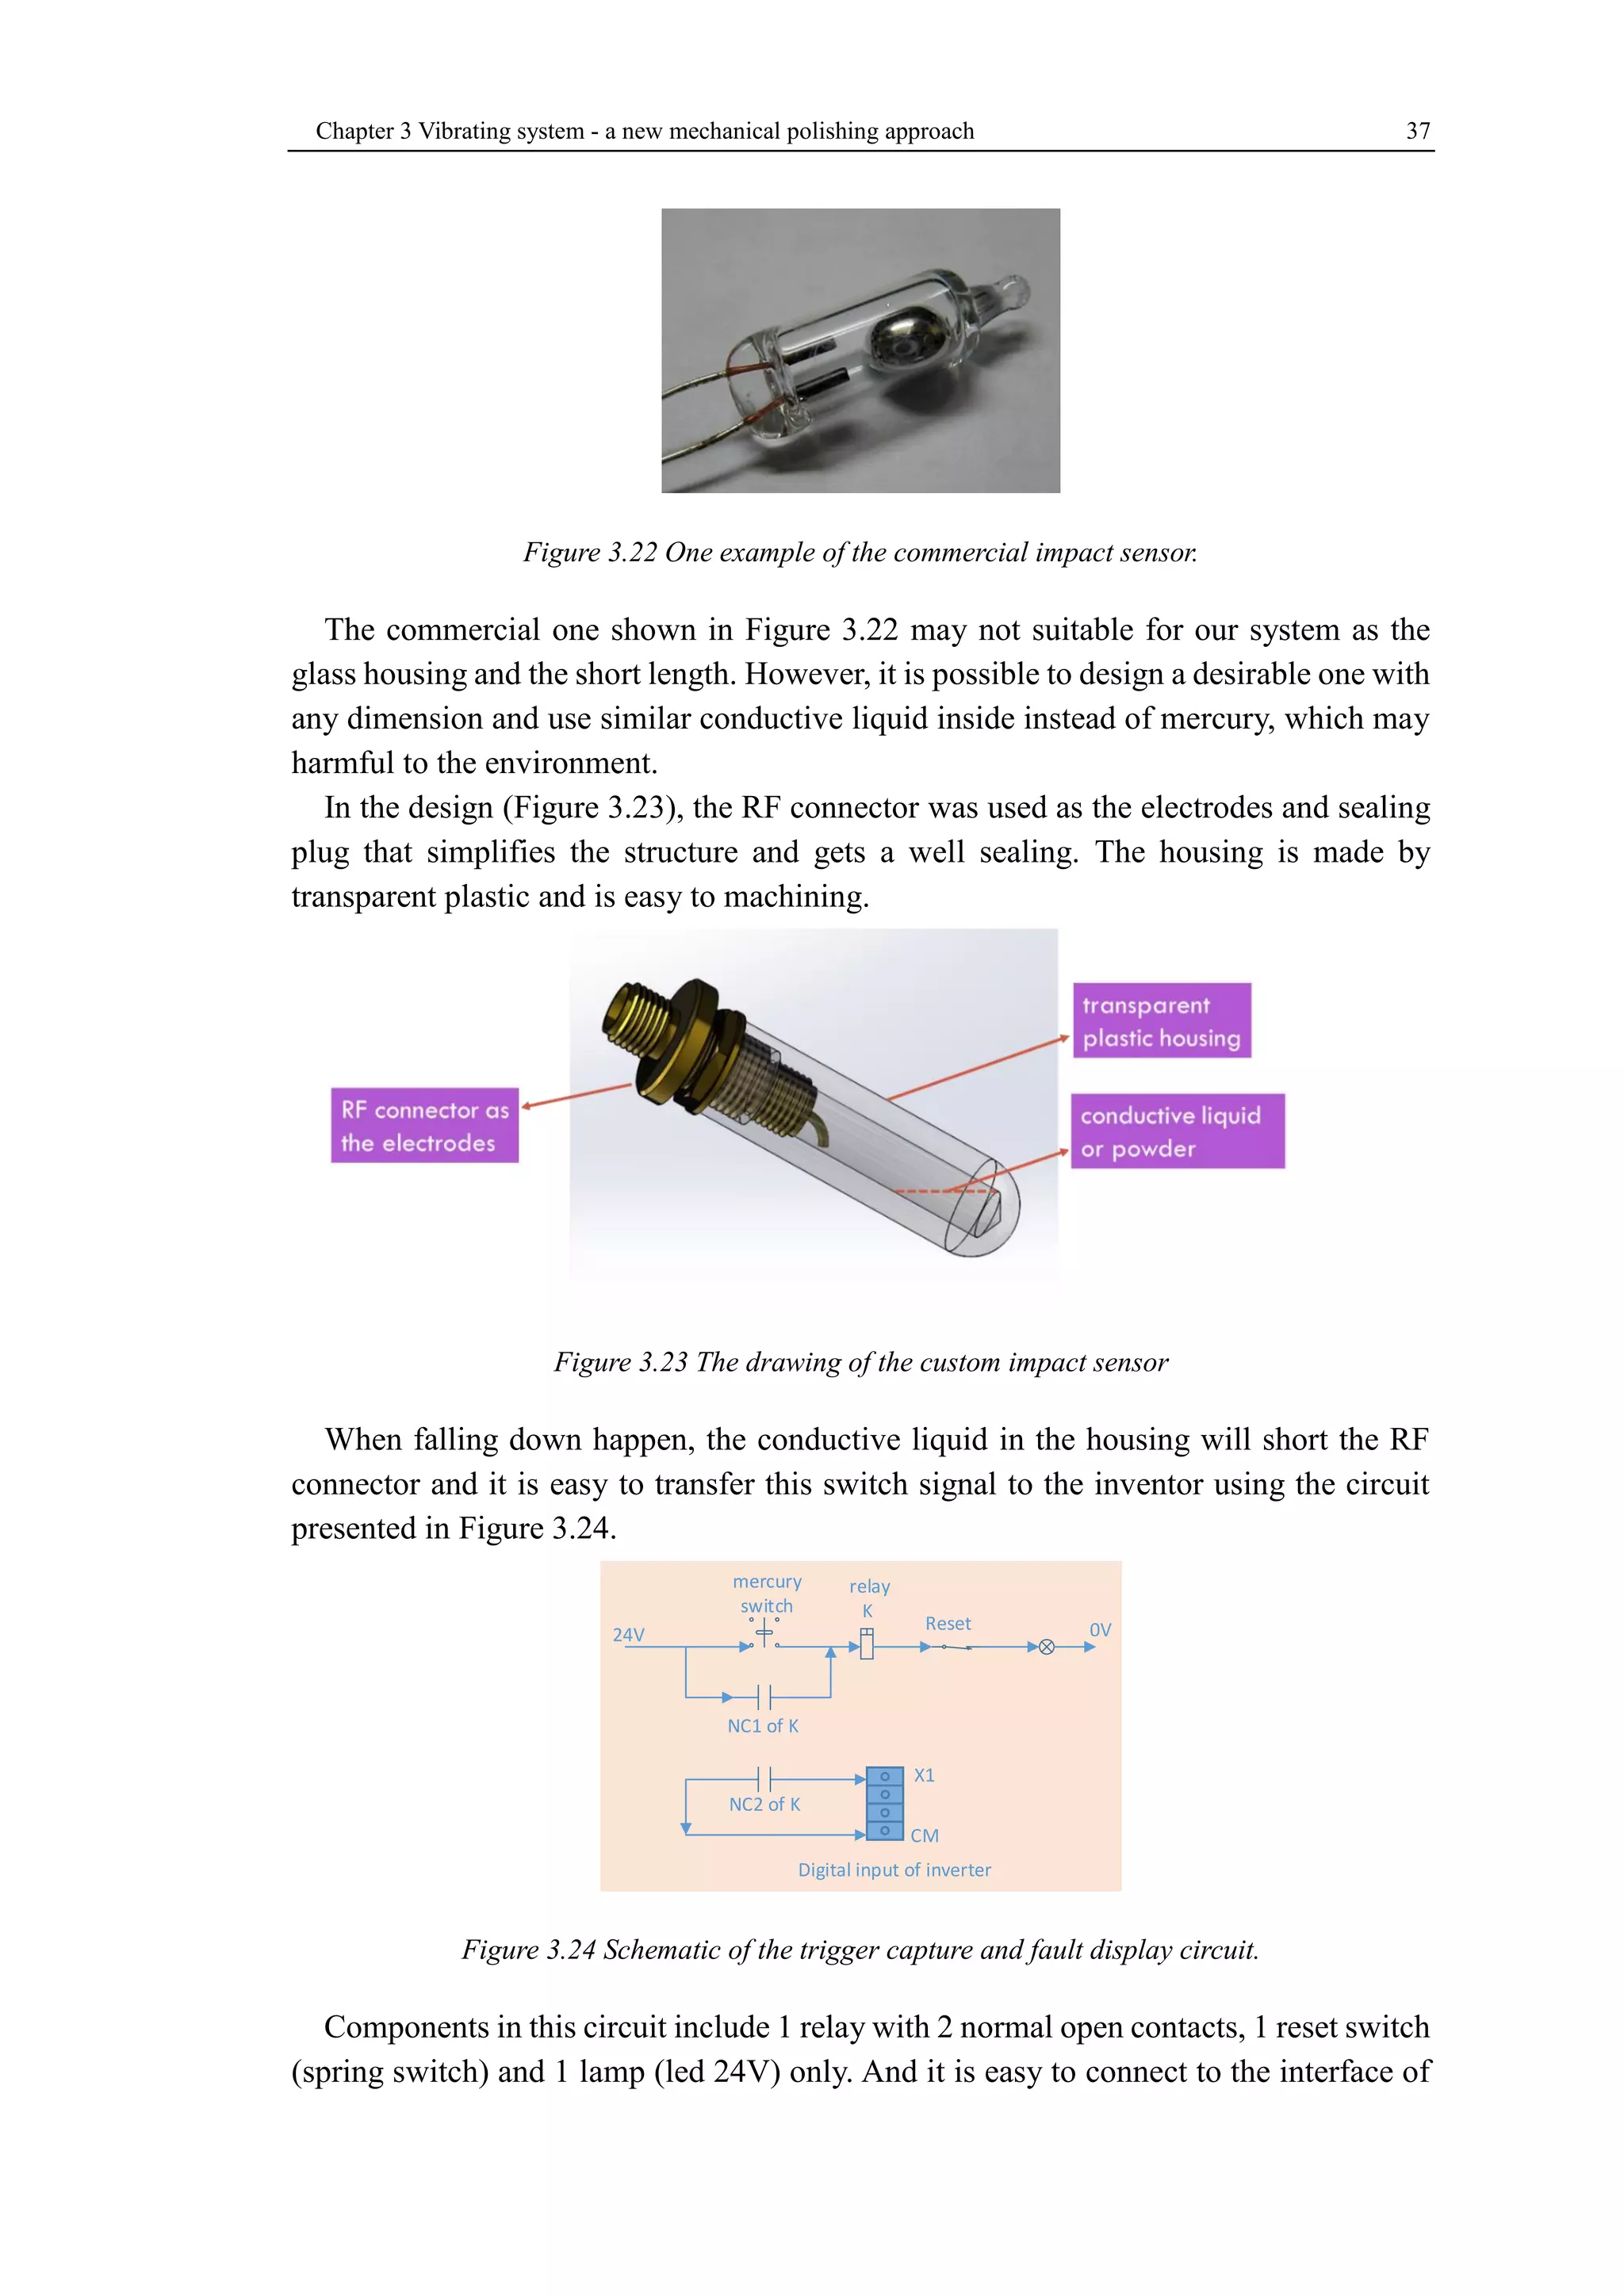
The stepper motor (Figure 3.18) mounted at the bottom, contains a control board itself 
and it is easy to program the motion, for example let the cavity rotate back and forth, 
fast or slowly, and create the opportunity to find out the effect of the cavity rotation 
behavior. The motor position also need to be adjustable to suit different length rubble 
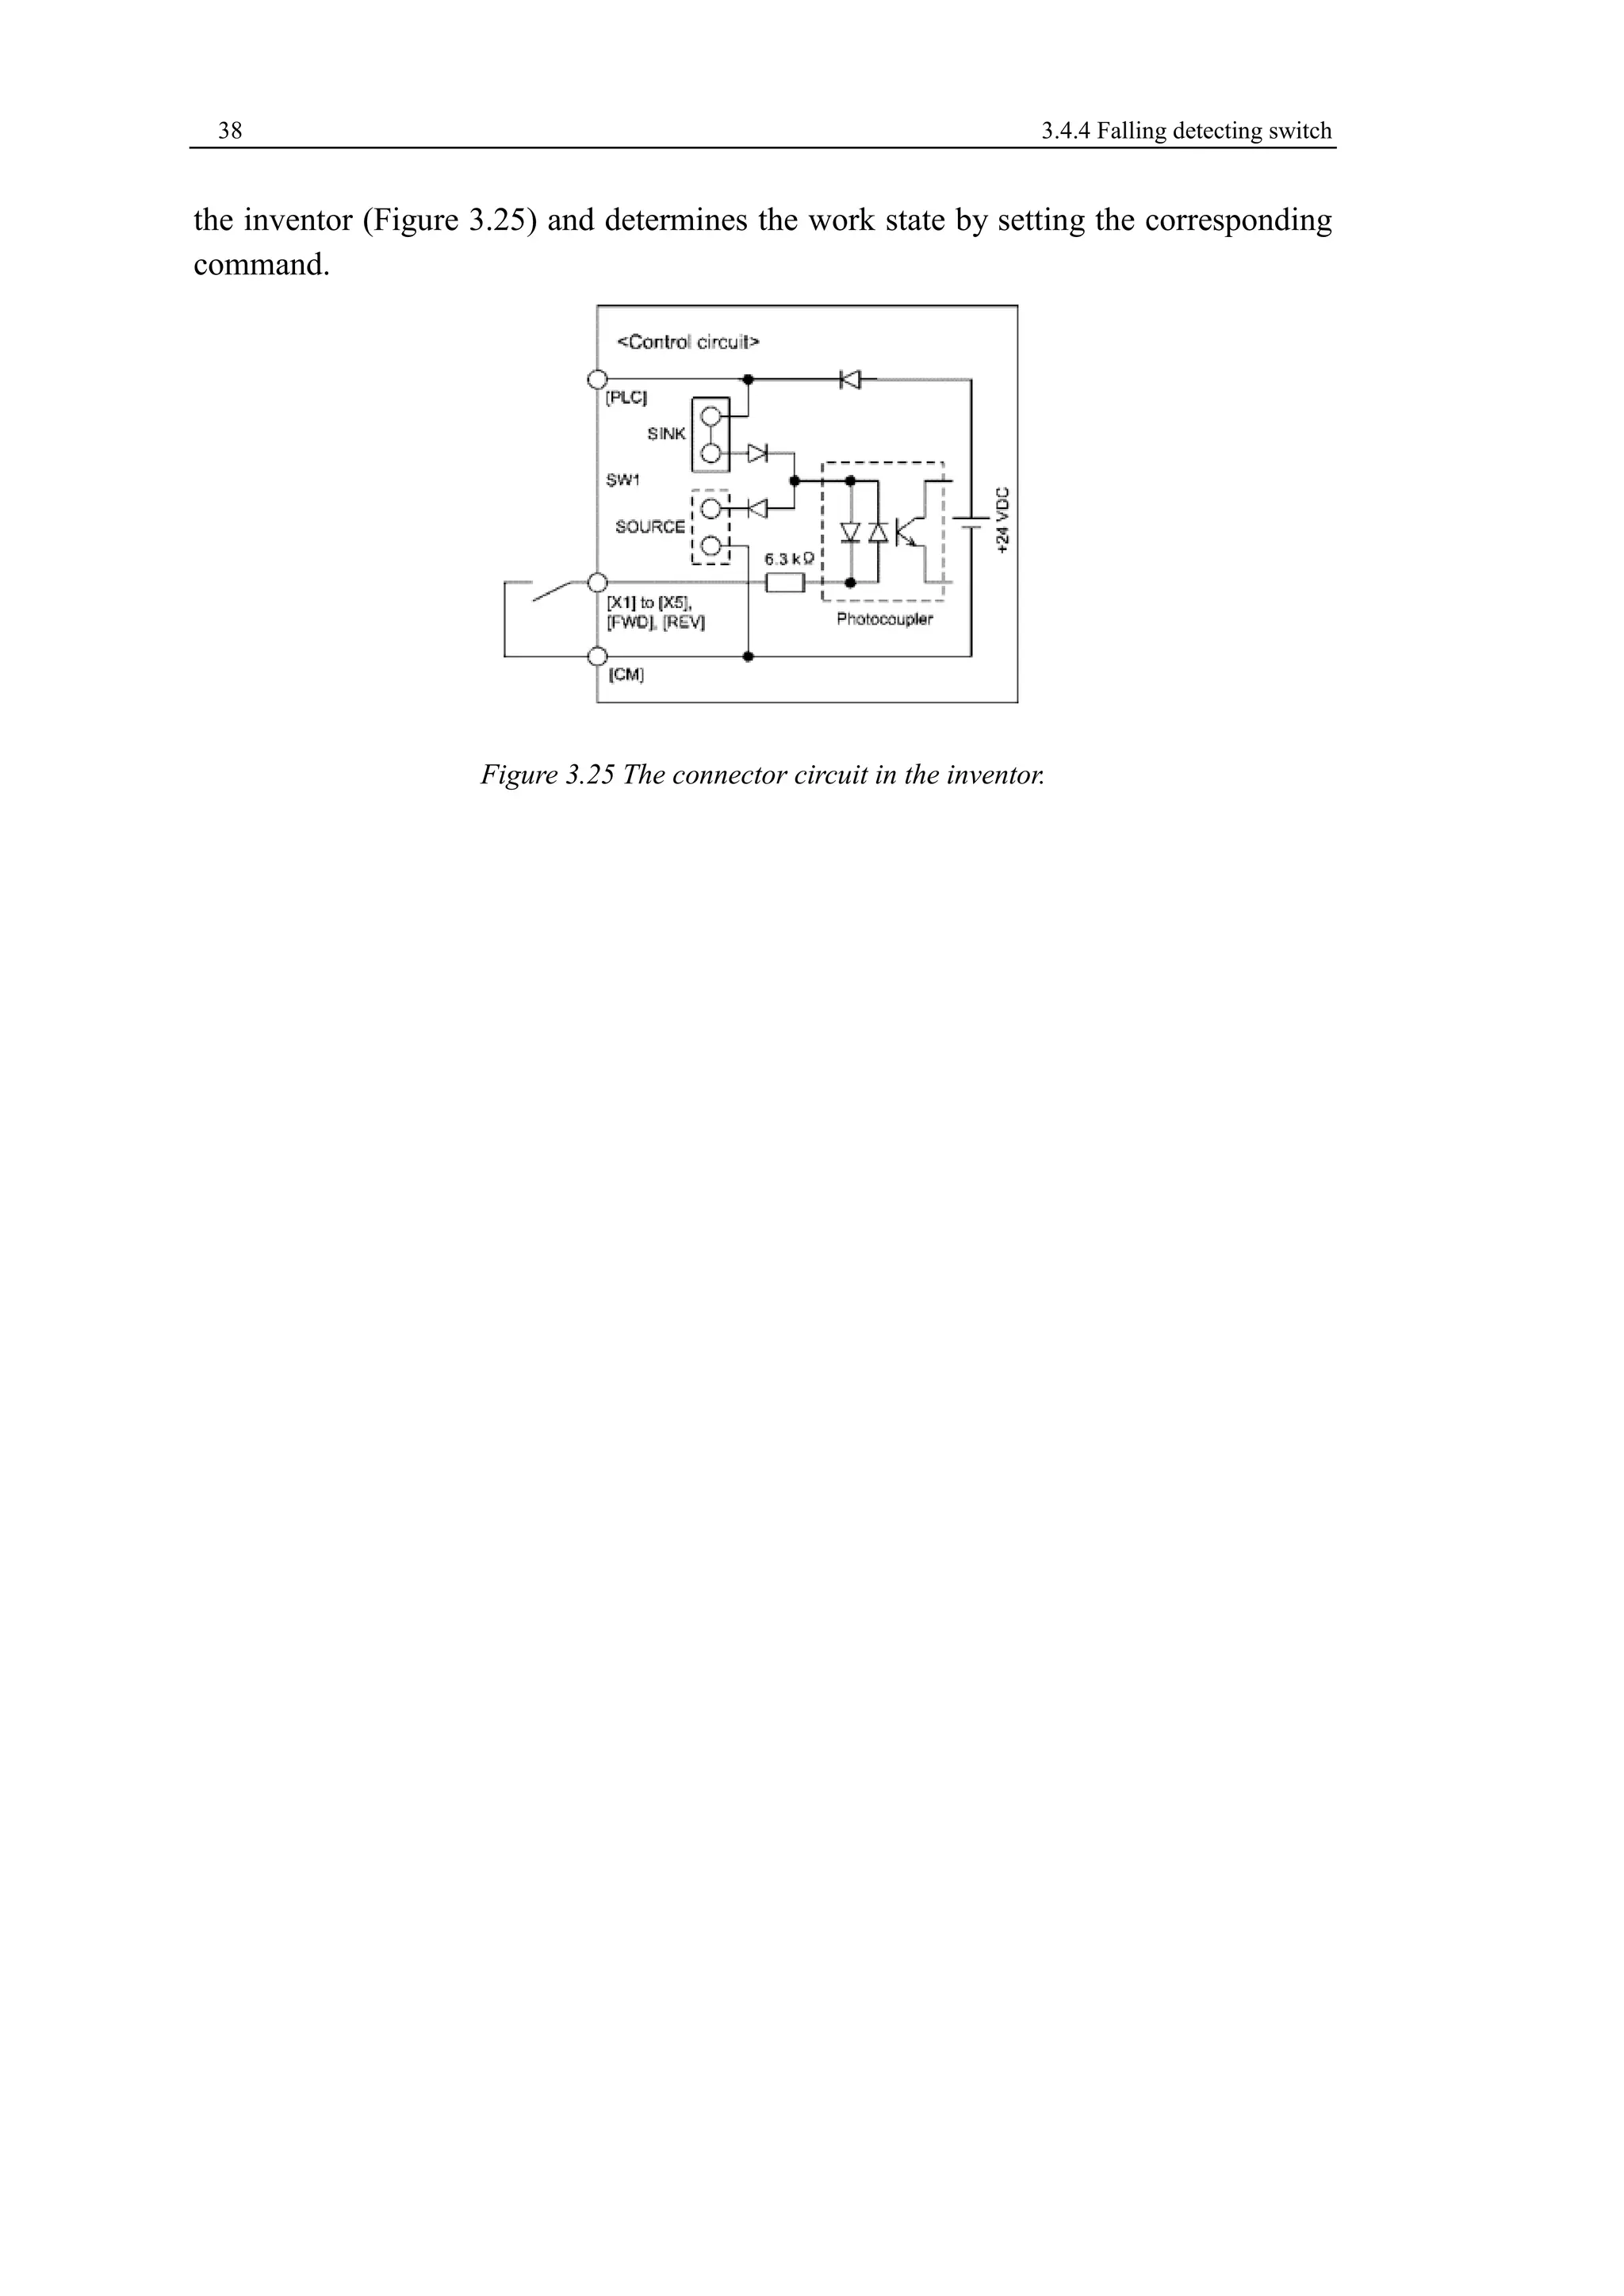
belt. The motor belt wheel (see Figure 3.19) connected to the motor can drive two 
cavities simultaneously. 
Figure 3.18 Image of programmable stepper motor 
Figure 3.19 Drawing of motor belt wheel
36 3.4.4 Falling detecting switch 
Falling detecting switch 
The vibrator is very powerful especially work at high frequency. The springs as one 
part of the resonance system has the limited fatigue life. It is uncertain when it will break, 
the direct result of which is the cavity and vibrator fall down to the fall without giving 
signal to the control system. So spring broken is one potential threaten that may induce 
the cavities falling down while the vibrator is still working. Such situation happened 
during the polishing process before. It is certainly need an effective mechanism to detect 
the falling action and stop the system running, otherwise it may cause secondary damage. 
There are two proposed scheme in our case. The first one is piezo-electric 
accelerometer, which principle diagram is shown in Figure 3.20. It measures proper 
acceleration (rate of change of velocity), which is the acceleration it experiences relative 
to freefall and is the acceleration felt by people and objects. 
The acceleration of the cavities bound with the accelerometer will change at the 
moment when they fall to the floor. But measure this acceleration is not the ultimate 
aim, it need to transfer this value to a digital level (0V or 24V) which as the input to the 
control system, and it is different to do this without special conversion circuit, which 
will increase the complexity of system and also may cost much money. 
Figure 3.20 The cross section view of the accelerometer [24]. 
The idea of second scheme comes from the impact sensor which is usually used in 
the car as the switch of the air bag. The principle is easily understand, and the structure 
is not complicated (Figure 3.21). 
Figure 3.21 The schematic diagram of impact sensor. 
1-Mercury (static position); 2-Housing; 3-Mercury 
(dynamic position); 4-Ring; 5-Electrodes (contacts 
firearms); 6-Electrode (connected to power); 7-Sealing 
plug; α- deceleration; F1-mercury movement direction 
component; F2-level component; a- the angle between 
mercury movement direction and the horizontal direction
Chapter 3 Vibrating system - a new mechanical polishing approach 37 
Figure 3.22 One example of the commercial impact sensor. 
The commercial one shown in Figure 3.22 may not suitable for our system as the 
glass housing and the short length. However, it is possible to design a desirable one with 
any dimension and use similar conductive liquid inside instead of mercury, which may 
harmful to the environment. 
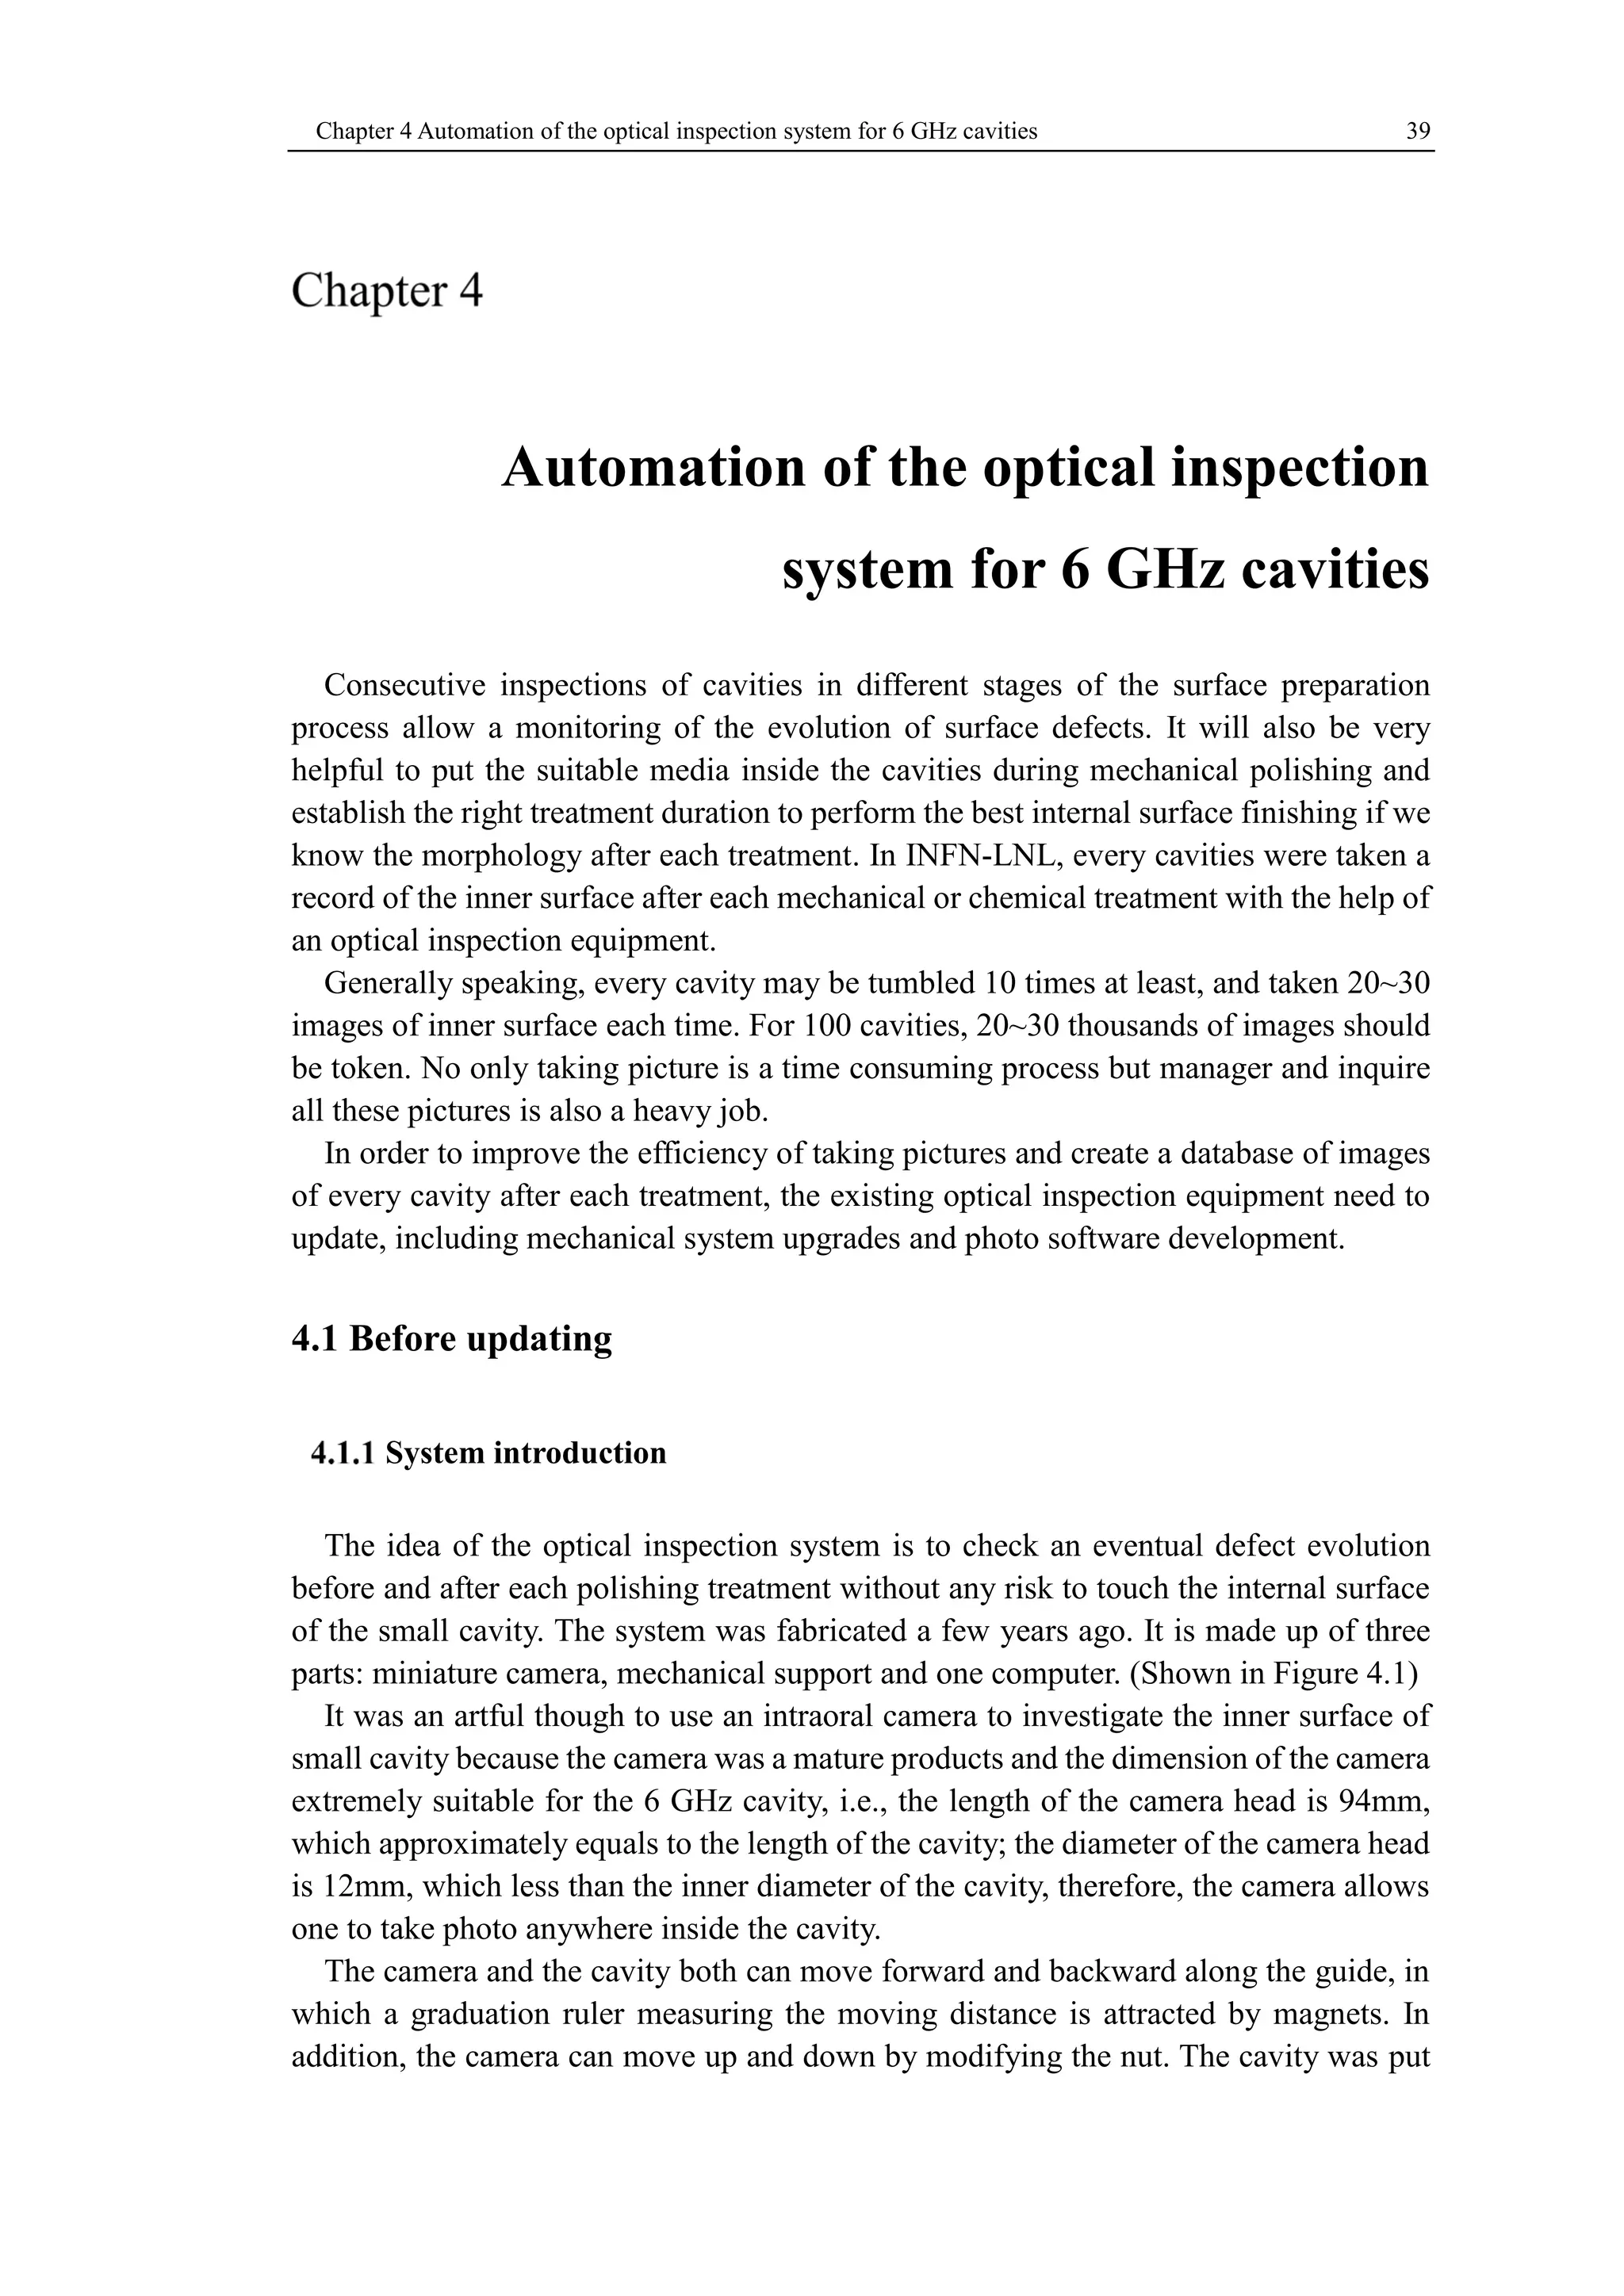
In the design (Figure 3.23), the RF connector was used as the electrodes and sealing 
plug that simplifies the structure and gets a well sealing. The housing is made by 
transparent plastic and is easy to machining. 
Figure 3.23 The drawing of the custom impact sensor 
When falling down happen, the conductive liquid in the housing will short the RF 
connector and it is easy to transfer this switch signal to the inventor using the circuit 
presented in Figure 3.24. 
Figure 3.24 Schematic of the trigger capture and fault display circuit. 
Components in this circuit include 1 relay with 2 normal open contacts, 1 reset switch 
(spring switch) and 1 lamp (led 24V) only. And it is easy to connect to the interface of 
24V 0V 
mercury 
switch 
relay 
K 
NC1 of K 
Reset 
NC2 of K 
X1 
CM 
Digital input of inverter
38 3.4.4 Falling detecting switch 
the inventor (Figure 3.25) and determines the work state by setting the corresponding 
command. 
Figure 3.25 The connector circuit in the inventor.
Chapter 4 Automation of the optical inspection system for 6 GHz cavities 39 
Automation of the optical inspection 
system for 6 GHz cavities 
Consecutive inspections of cavities in different stages of the surface preparation 
process allow a monitoring of the evolution of surface defects. It will also be very 
helpful to put the suitable media inside the cavities during mechanical polishing and 
establish the right treatment duration to perform the best internal surface finishing if we 
know the morphology after each treatment. In INFN-LNL, every cavities were taken a 
record of the inner surface after each mechanical or chemical treatment with the help of 
an optical inspection equipment. 
Generally speaking, every cavity may be tumbled 10 times at least, and taken 20~30 
images of inner surface each time. For 100 cavities, 20~30 thousands of images should 
be token. No only taking picture is a time consuming process but manager and inquire 
all these pictures is also a heavy job. 
In order to improve the efficiency of taking pictures and create a database of images 
of every cavity after each treatment, the existing optical inspection equipment need to 
update, including mechanical system upgrades and photo software development. 
4.1 Before updating 
System introduction 
The idea of the optical inspection system is to check an eventual defect evolution 
before and after each polishing treatment without any risk to touch the internal surface 
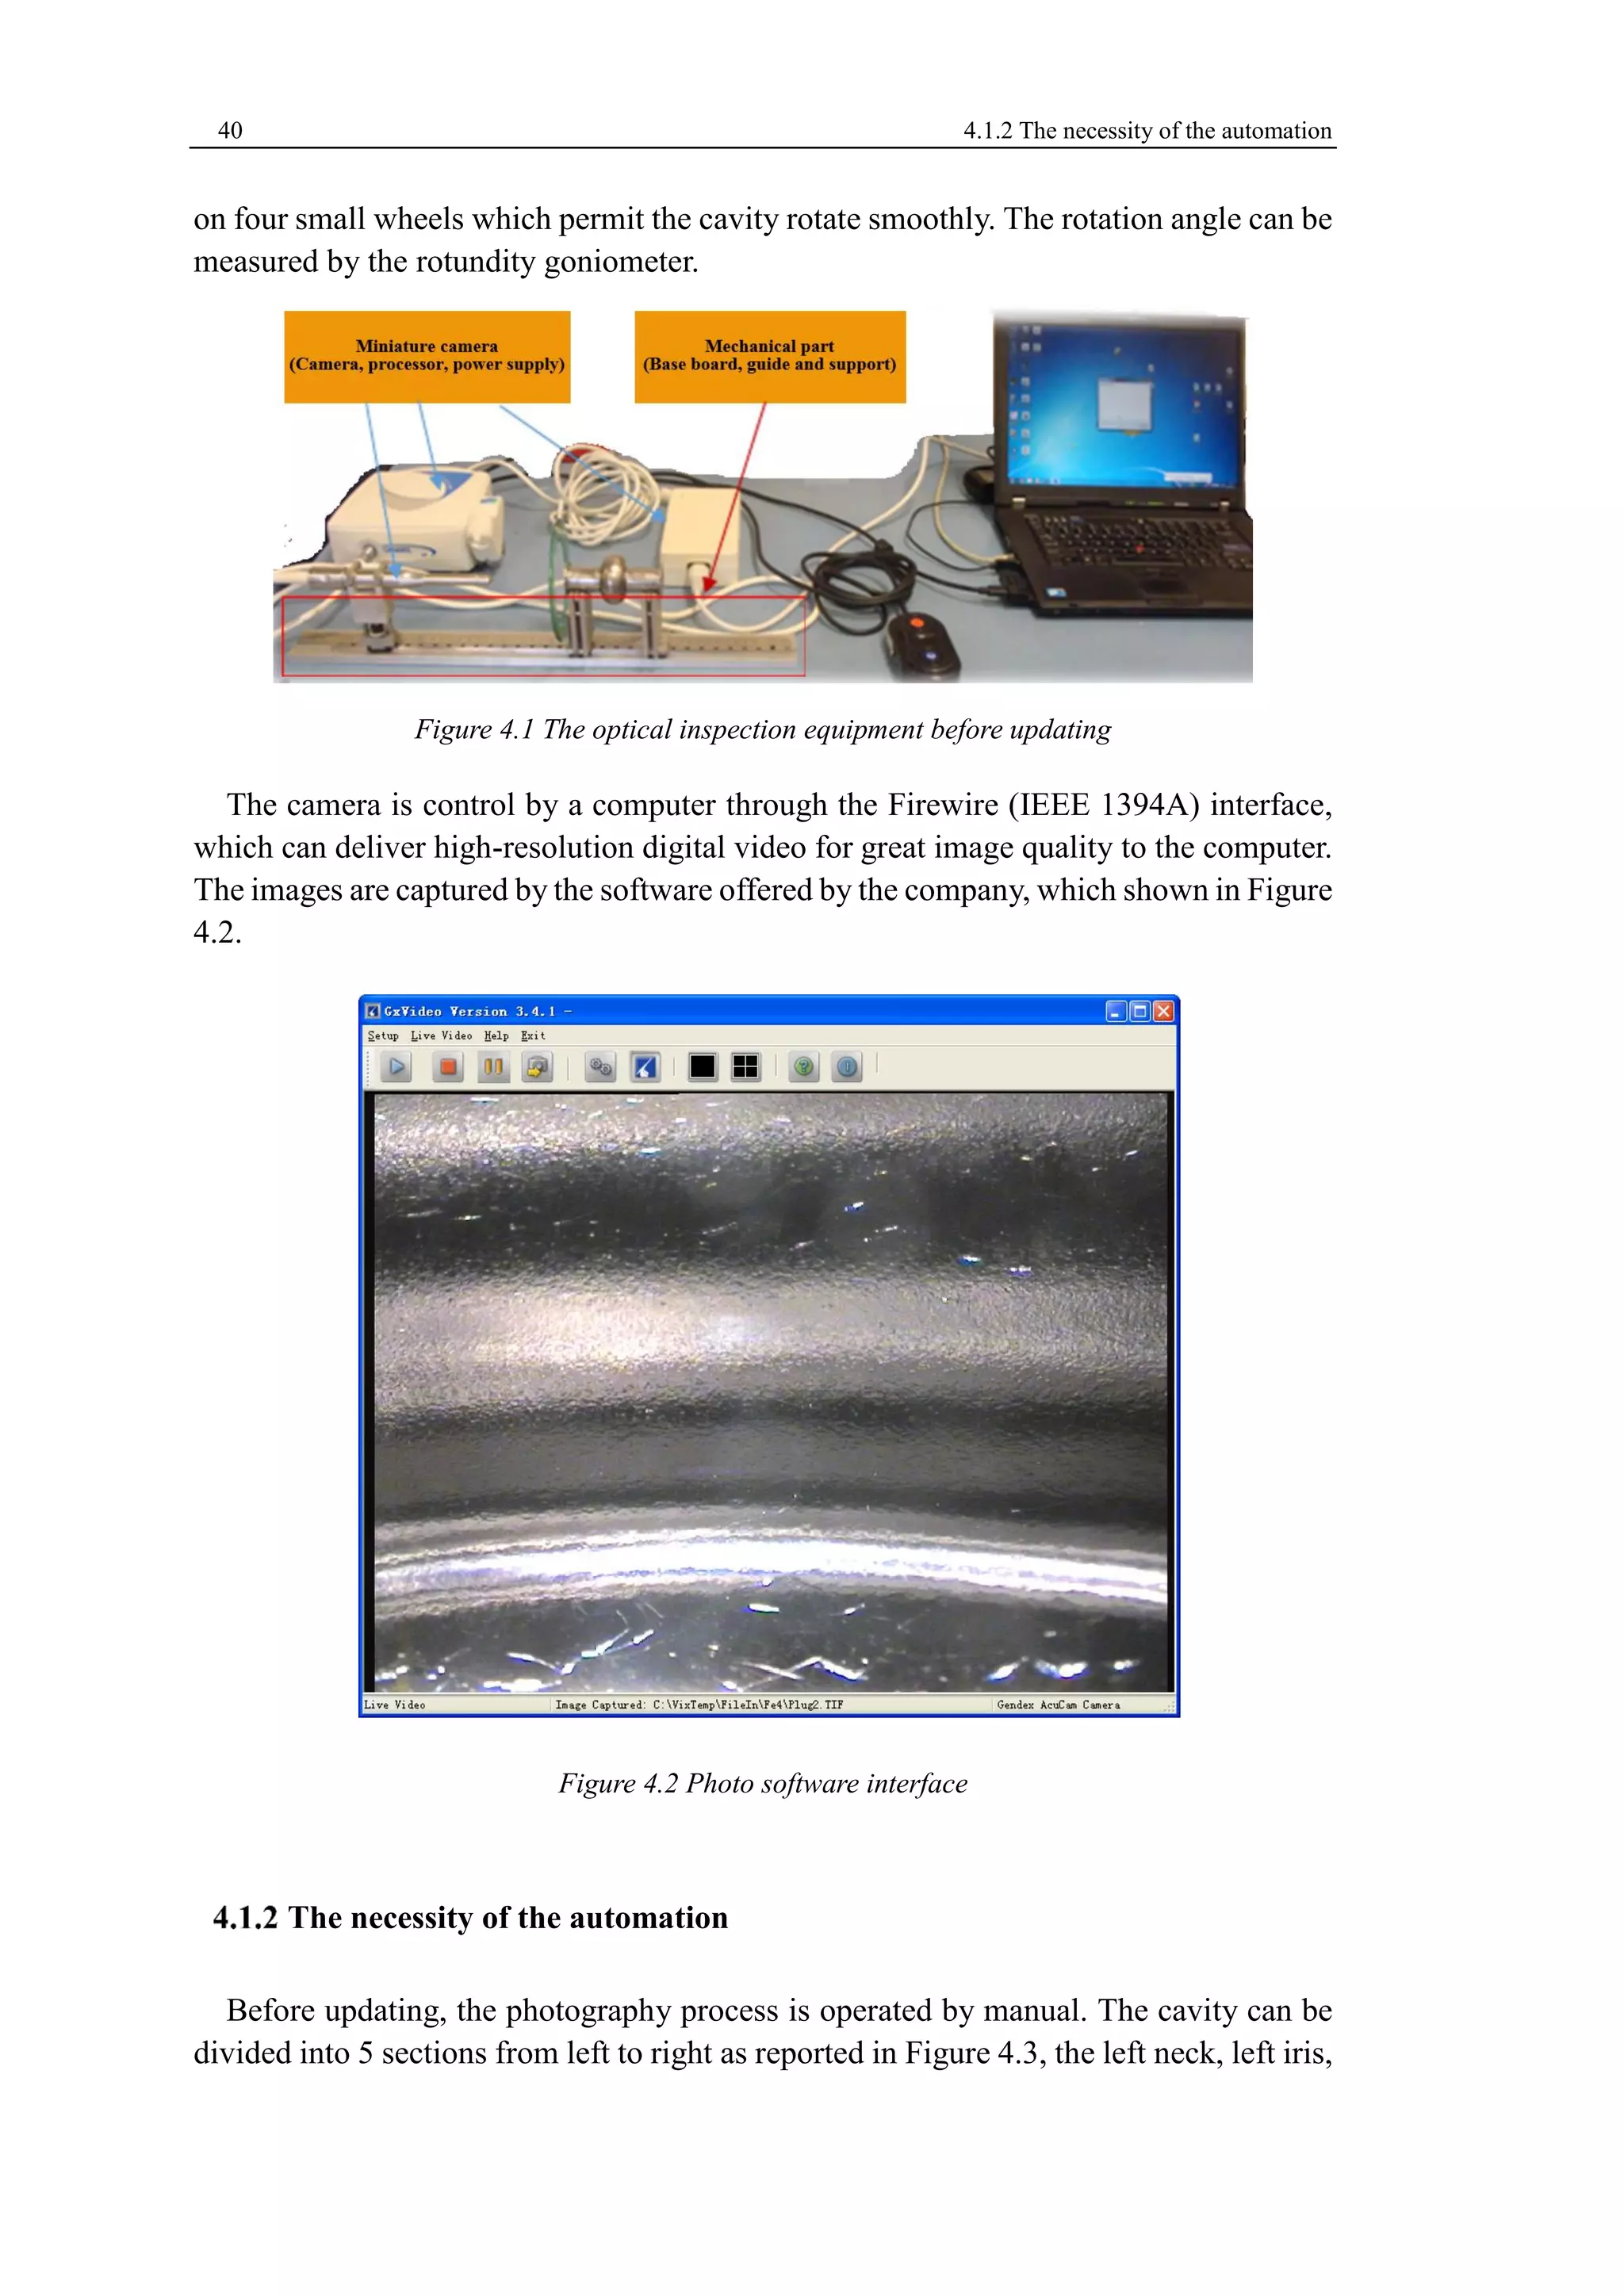
of the small cavity. The system was fabricated a few years ago. It is made up of three 
parts: miniature camera, mechanical support and one computer. (Shown in Figure 4.1) 
It was an artful though to use an intraoral camera to investigate the inner surface of 
small cavity because the camera was a mature products and the dimension of the camera 
extremely suitable for the 6 GHz cavity, i.e., the length of the camera head is 94mm, 
which approximately equals to the length of the cavity; the diameter of the camera head 
is 12mm, which less than the inner diameter of the cavity, therefore, the camera allows 
one to take photo anywhere inside the cavity. 
The camera and the cavity both can move forward and backward along the guide, in 
which a graduation ruler measuring the moving distance is attracted by magnets. In 
addition, the camera can move up and down by modifying the nut. The cavity was put
40 4.1.2 The necessity of the automation 
on four small wheels which permit the cavity rotate smoothly. The rotation angle can be 
measured by the rotundity goniometer. 
Figure 4.1 The optical inspection equipment before updating 
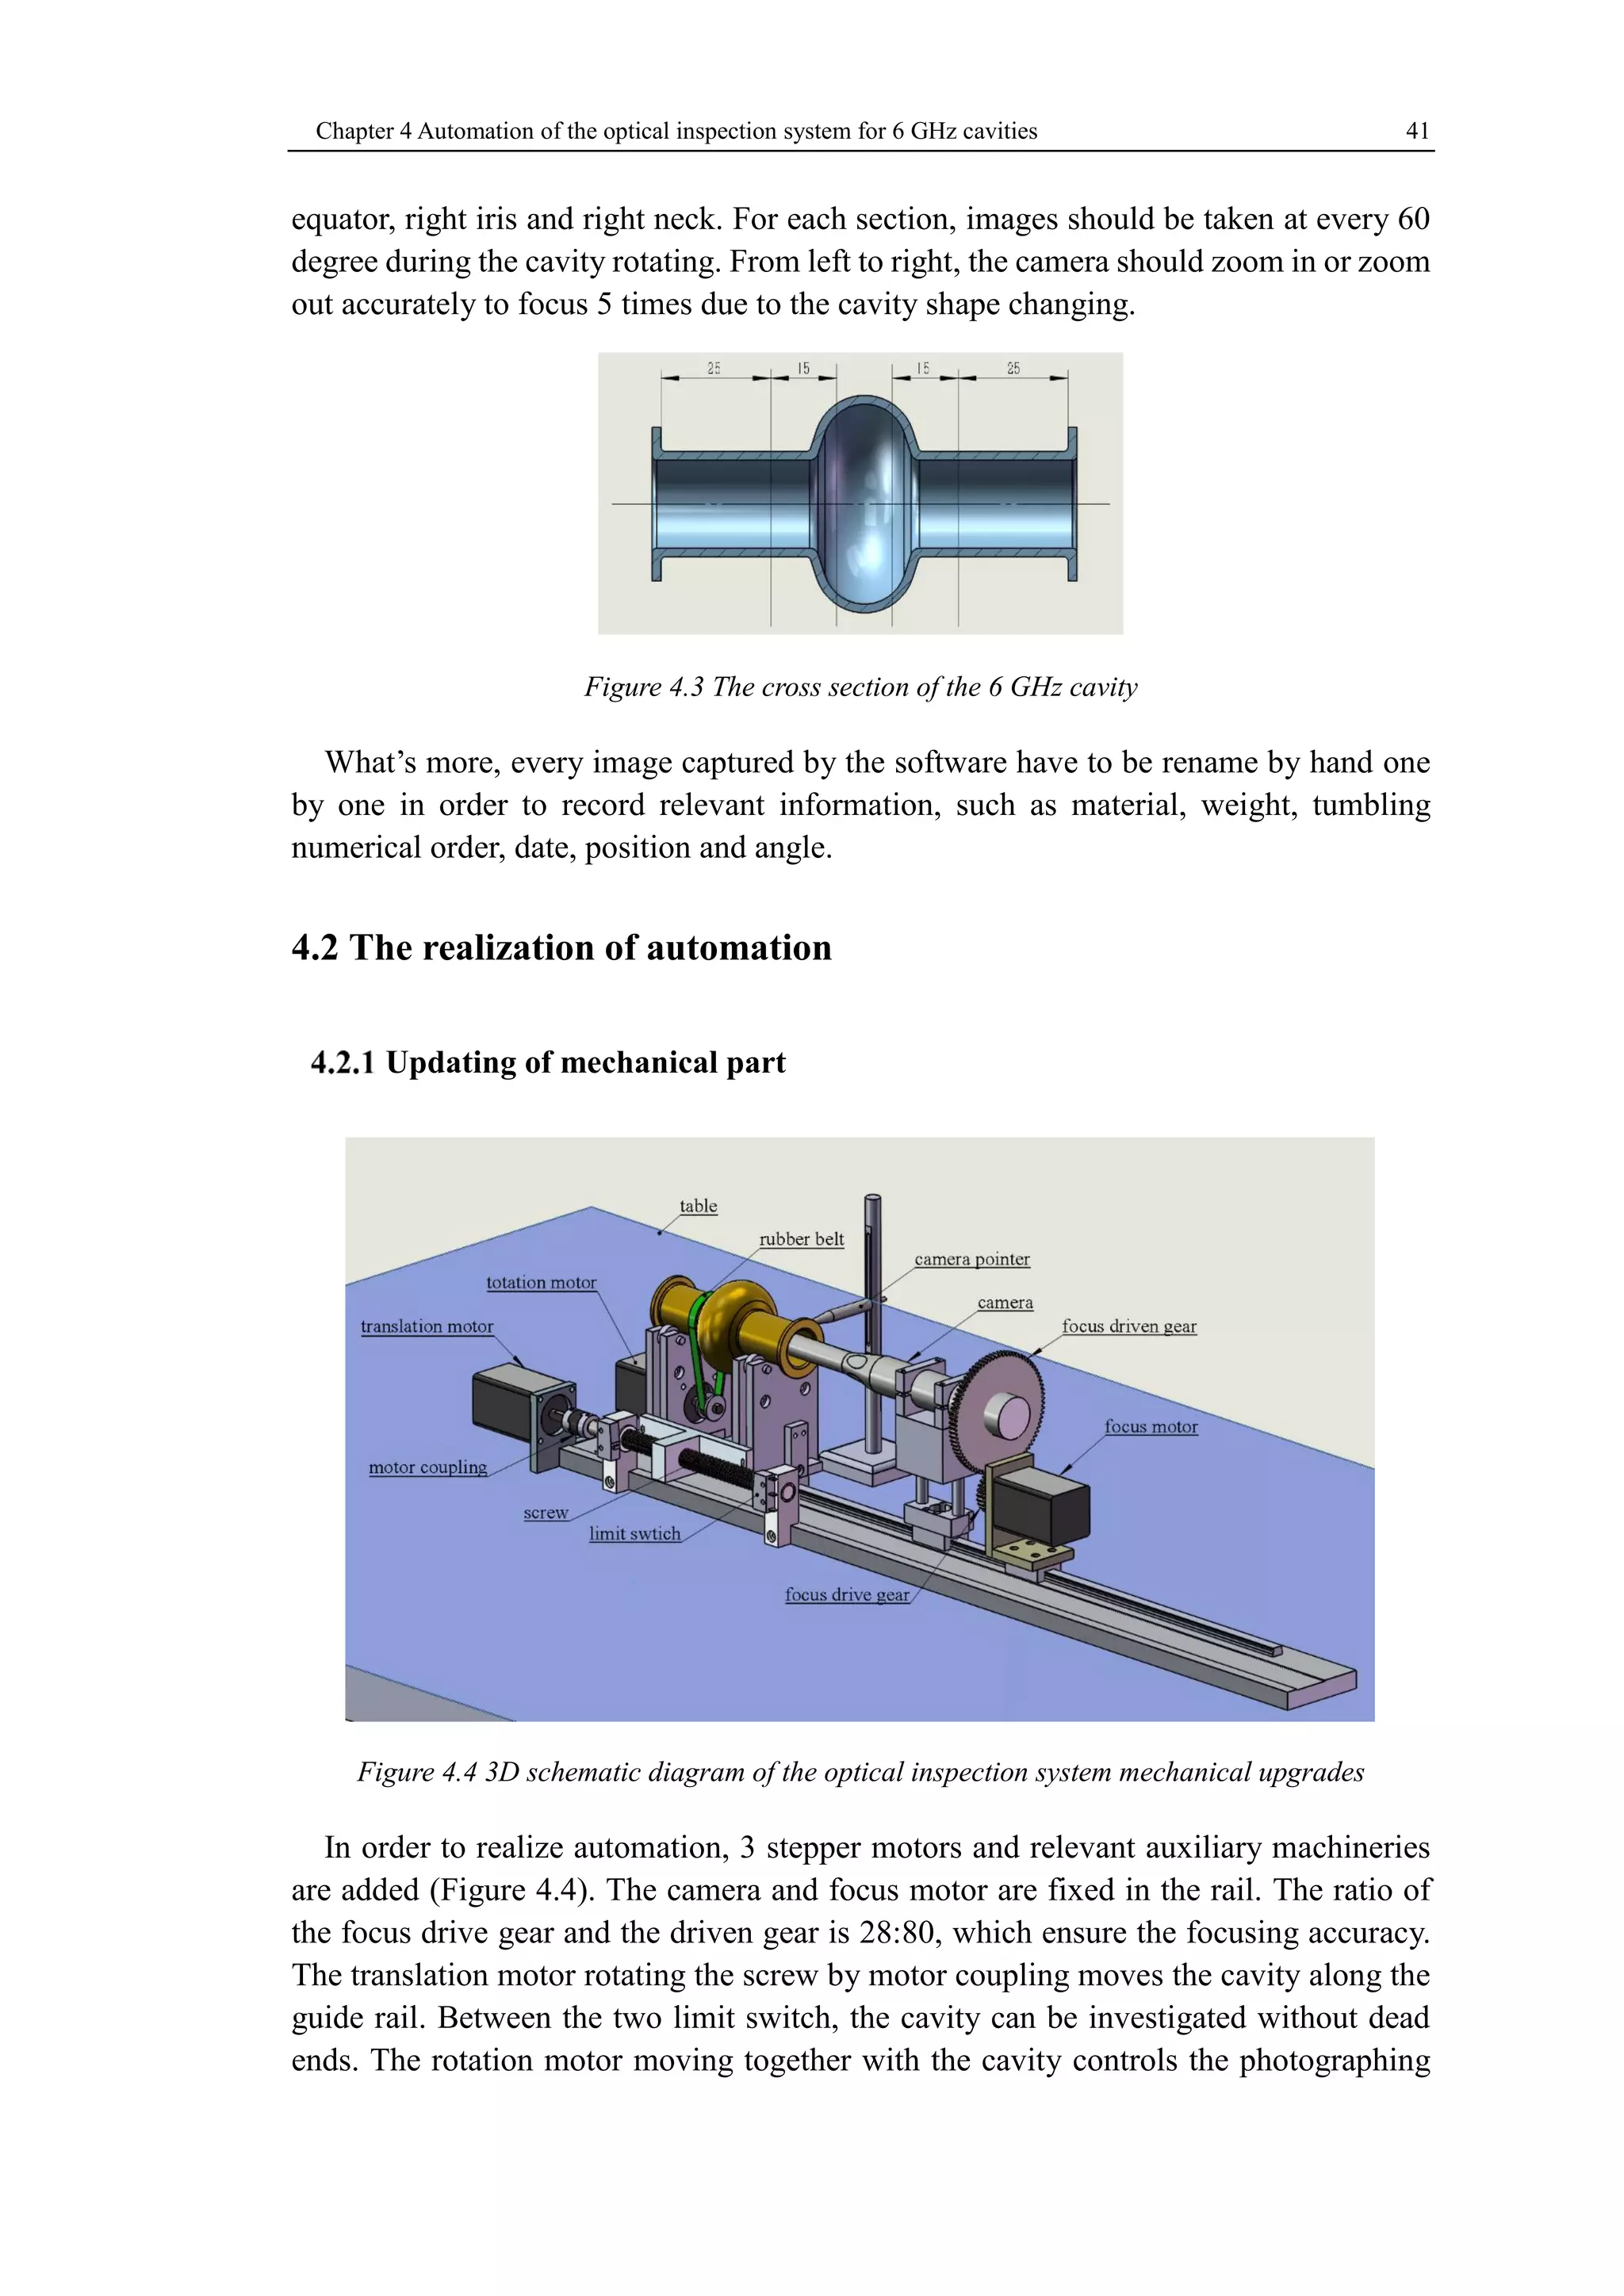
The camera is control by a computer through the Firewire (IEEE 1394A) interface, 
which can deliver high-resolution digital video for great image quality to the computer. 
The images are captured by the software offered by the company, which shown in Figure 
4.2. 
Figure 4.2 Photo software interface 
The necessity of the automation 
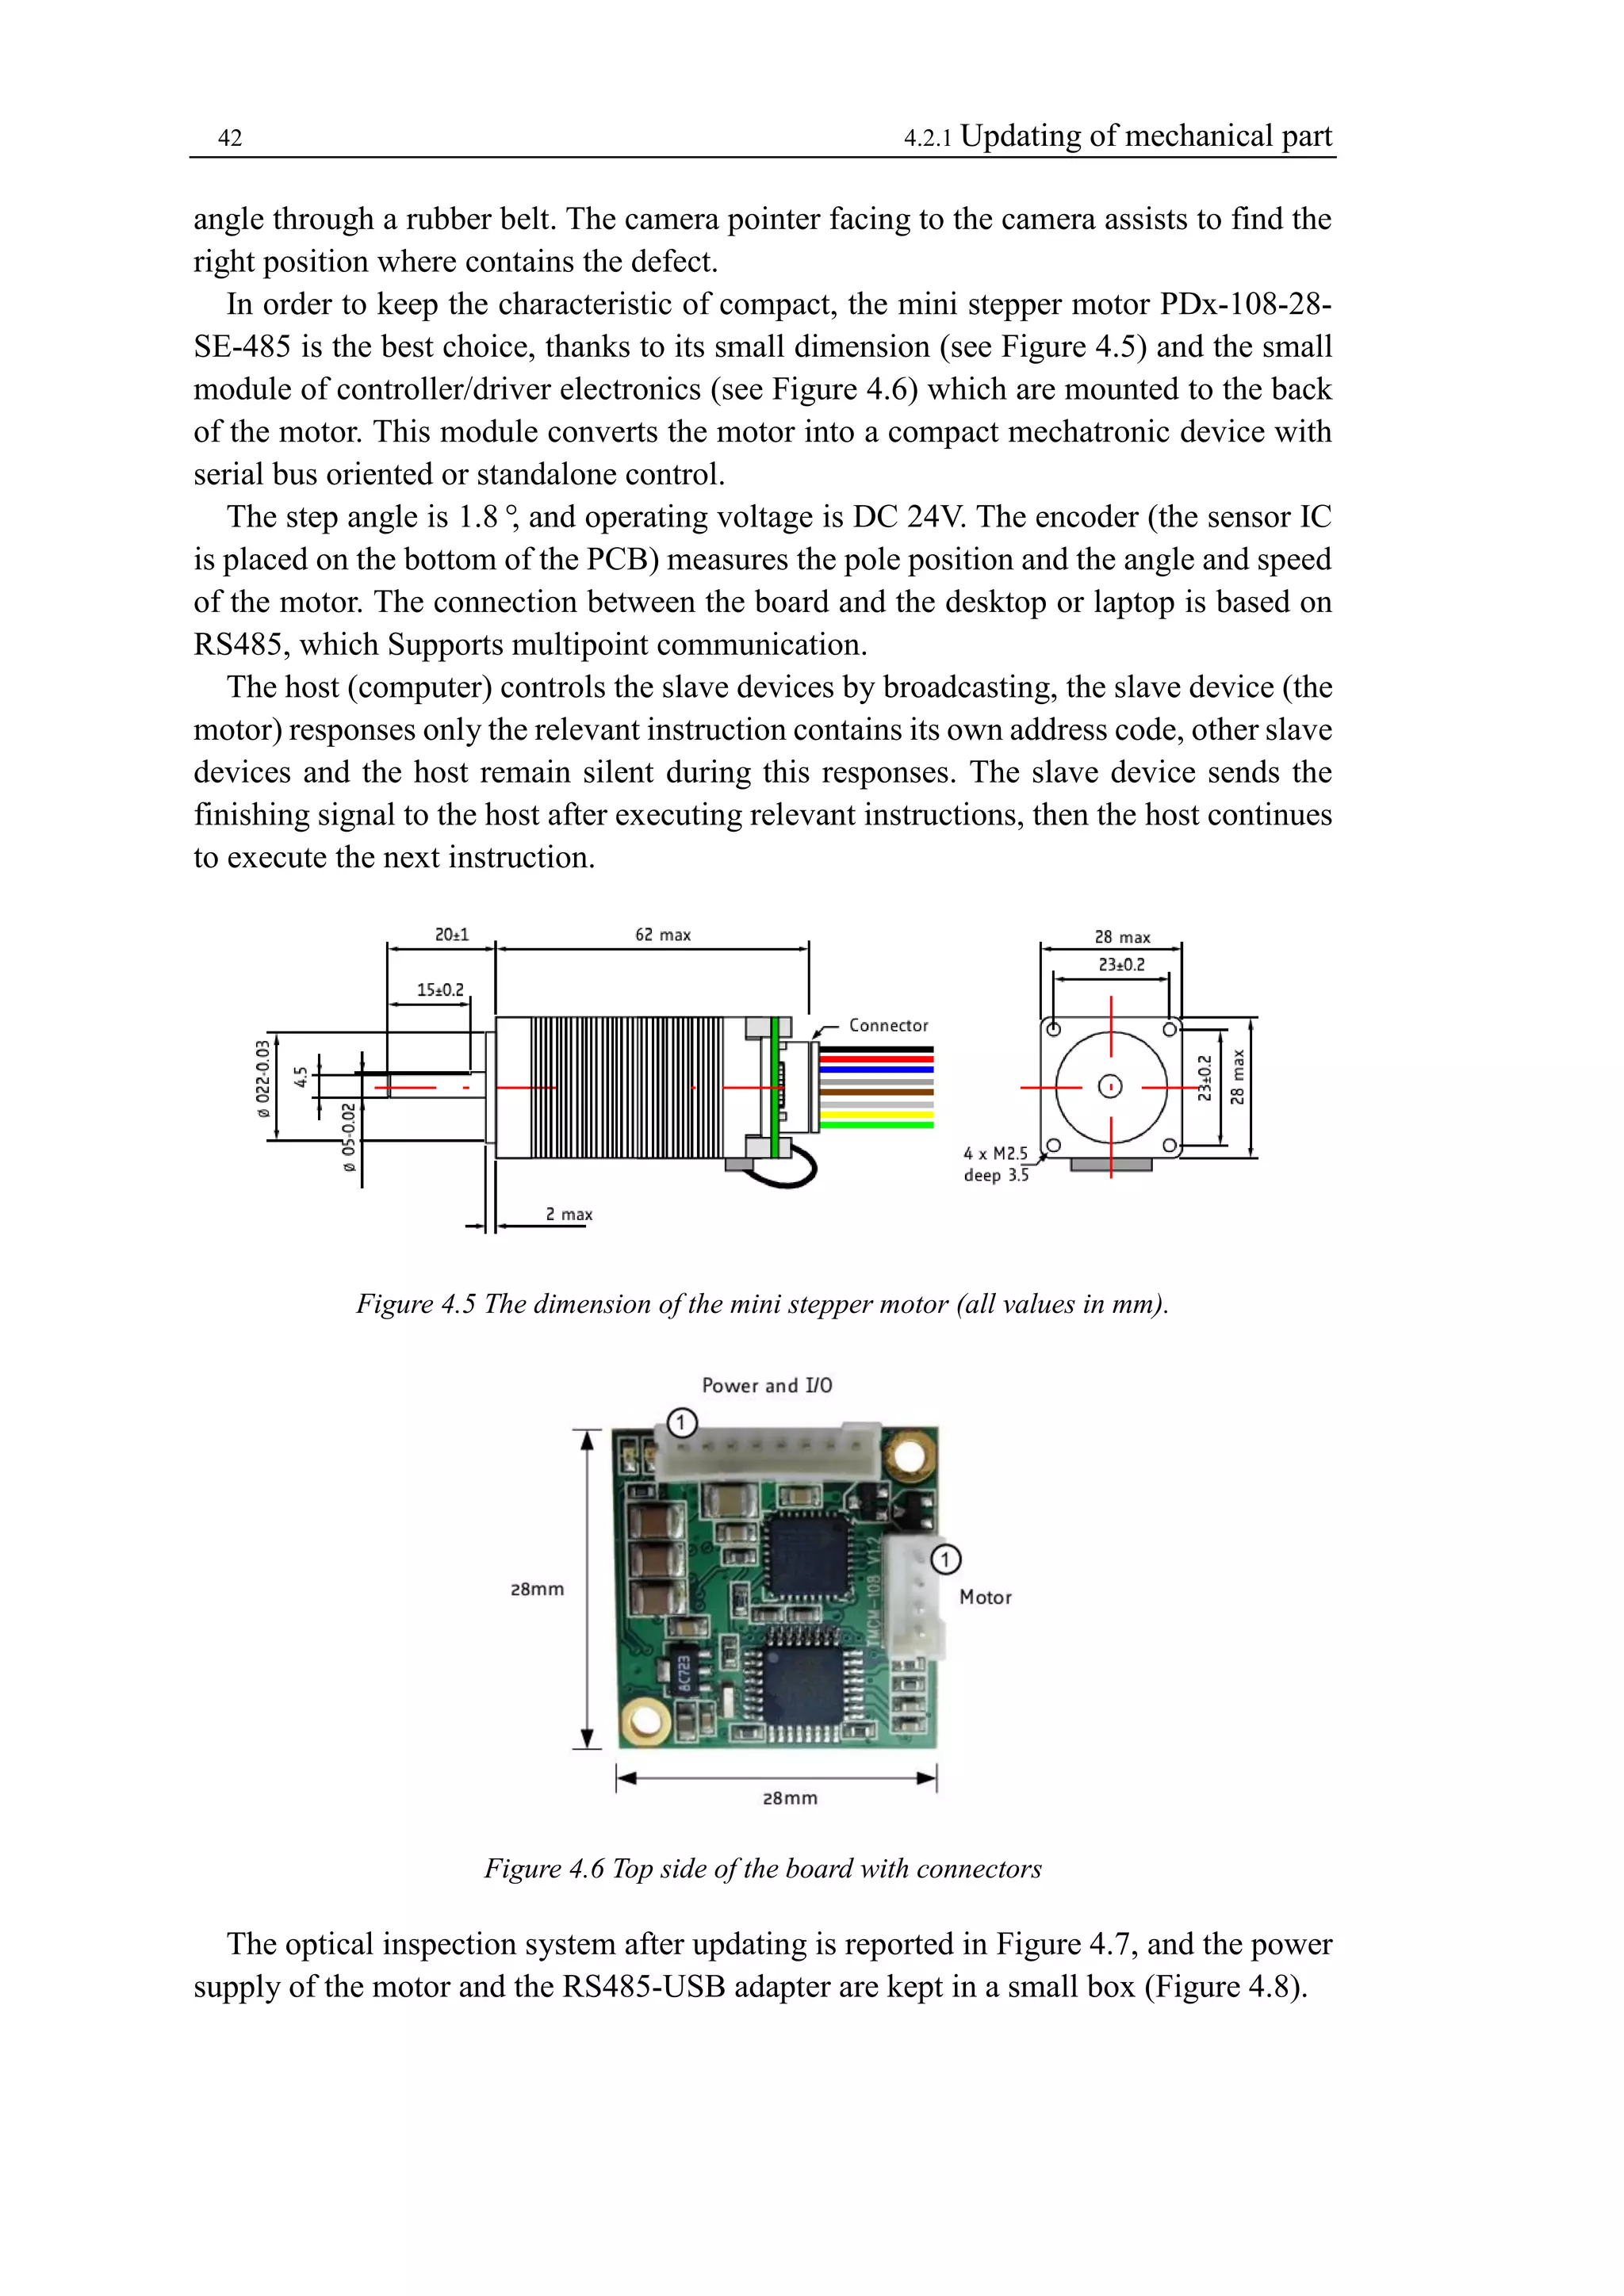
Before updating, the photography process is operated by manual. The cavity can be 
divided into 5 sections from left to right as reported in Figure 4.3, the left neck, left iris,
Chapter 4 Automation of the optical inspection system for 6 GHz cavities 41 
equator, right iris and right neck. For each section, images should be taken at every 60 
degree during the cavity rotating. From left to right, the camera should zoom in or zoom 
out accurately to focus 5 times due to the cavity shape changing. 
Figure 4.3 The cross section of the 6 GHz cavity 
What’s more, every image captured by the software have to be rename by hand one 
by one in order to record relevant information, such as material, weight, tumbling 
numerical order, date, position and angle. 
4.2 The realization of automation 
Updating of mechanical part 
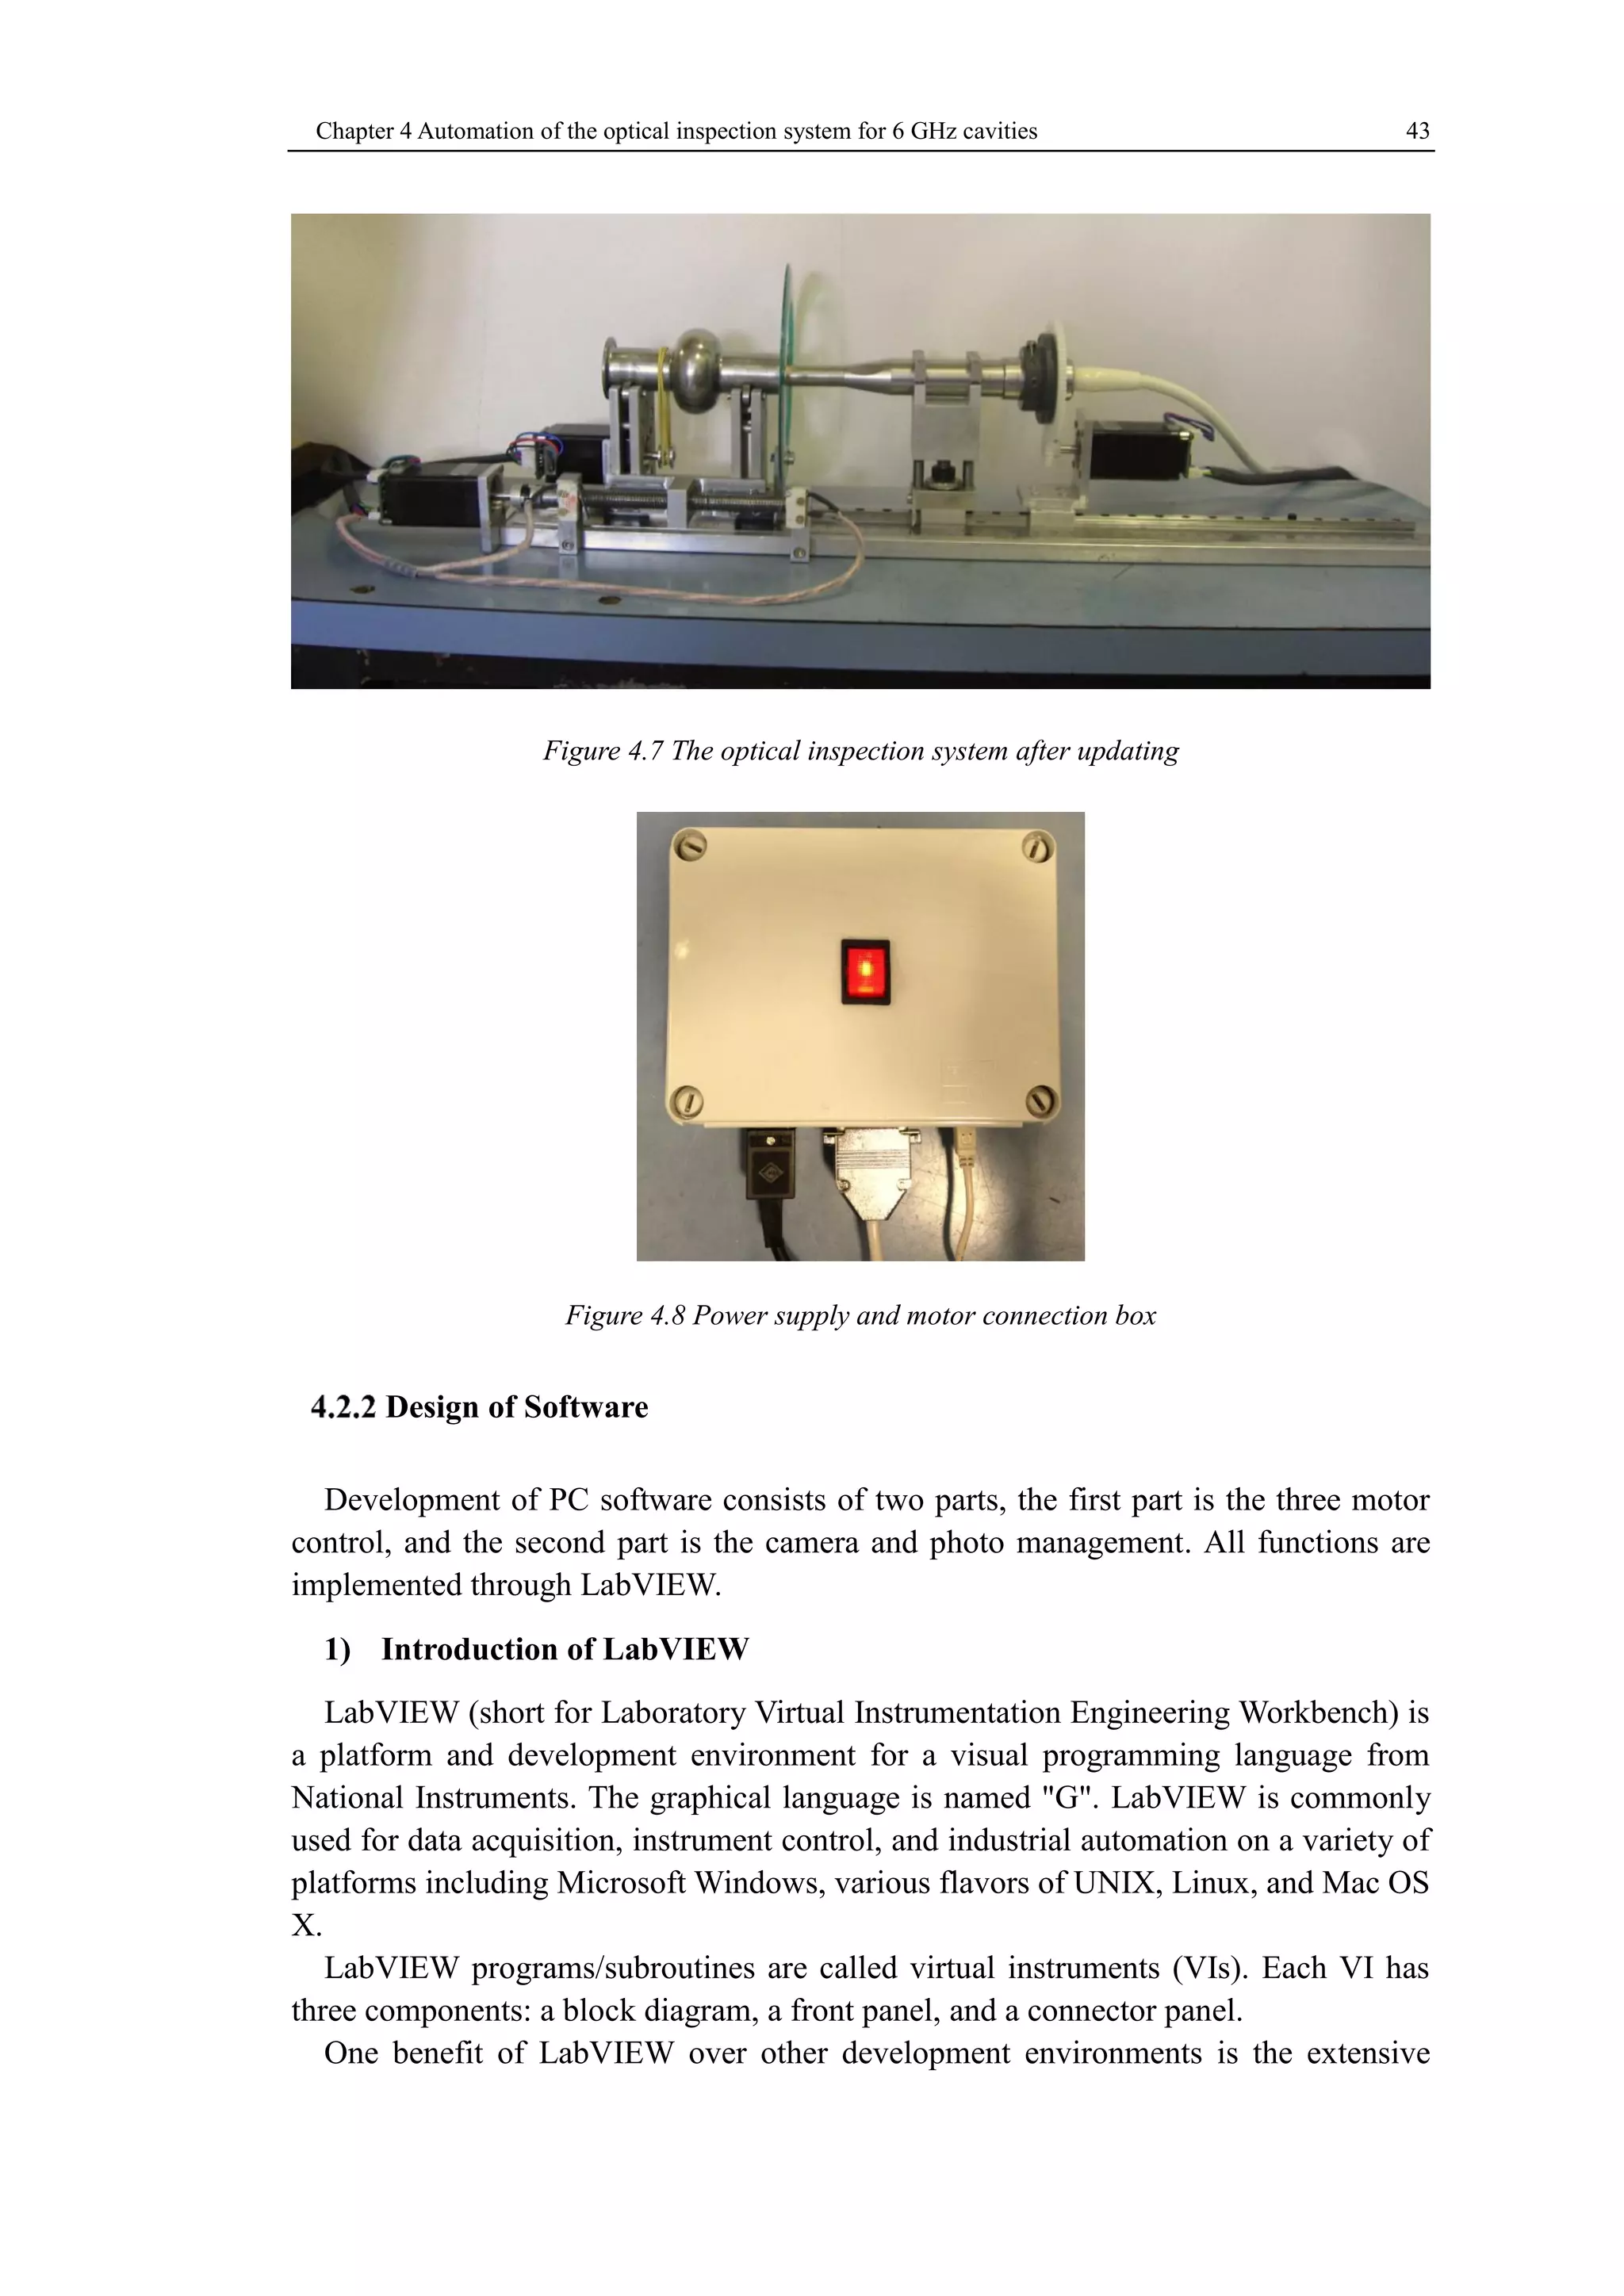
Figure 4.4 3D schematic diagram of the optical inspection system mechanical upgrades 
In order to realize automation, 3 stepper motors and relevant auxiliary machineries 
are added (Figure 4.4). The camera and focus motor are fixed in the rail. The ratio of 
the focus drive gear and the driven gear is 28:80, which ensure the focusing accuracy. 
The translation motor rotating the screw by motor coupling moves the cavity along the 
guide rail. Between the two limit switch, the cavity can be investigated without dead 
ends. The rotation motor moving together with the cavity controls the photographing
42 4.2.1 Updating of mechanical part 
angle through a rubber belt. The camera pointer facing to the camera assists to find the 
right position where contains the defect. 
In order to keep the characteristic of compact, the mini stepper motor PDx-108-28- 
SE-485 is the best choice, thanks to its small dimension (see Figure 4.5) and the small 
module of controller/driver electronics (see Figure 4.6) which are mounted to the back 
of the motor. This module converts the motor into a compact mechatronic device with 
serial bus oriented or standalone control. 
The step angle is 1.8°, and operating voltage is DC 24V. The encoder (the sensor IC 
is placed on the bottom of the PCB) measures the pole position and the angle and speed 
of the motor. The connection between the board and the desktop or laptop is based on 
RS485, which Supports multipoint communication. 
The host (computer) controls the slave devices by broadcasting, the slave device (the 
motor) responses only the relevant instruction contains its own address code, other slave 
devices and the host remain silent during this responses. The slave device sends the 
finishing signal to the host after executing relevant instructions, then the host continues 
to execute the next instruction. 
Figure 4.5 The dimension of the mini stepper motor (all values in mm). 
Figure 4.6 Top side of the board with connectors 
The optical inspection system after updating is reported in Figure 4.7, and the power 
supply of the motor and the RS485-USB adapter are kept in a small box (Figure 4.8).
Chapter 4 Automation of the optical inspection system for 6 GHz cavities 43 
Figure 4.7 The optical inspection system after updating 
Figure 4.8 Power supply and motor connection box 
Design of Software 
Development of PC software consists of two parts, the first part is the three motor 
control, and the second part is the camera and photo management. All functions are 
implemented through LabVIEW. 
1) Introduction of LabVIEW 
LabVIEW (short for Laboratory Virtual Instrumentation Engineering Workbench) is 
a platform and development environment for a visual programming language from 
National Instruments. The graphical language is named "G". LabVIEW is commonly 
used for data acquisition, instrument control, and industrial automation on a variety of 
platforms including Microsoft Windows, various flavors of UNIX, Linux, and Mac OS 
X. 
LabVIEW programs/subroutines are called virtual instruments (VIs). Each VI has 
three components: a block diagram, a front panel, and a connector panel. 
One benefit of LabVIEW over other development environments is the extensive
44 4.2.2 Design of Software 
support for accessing instrumentation hardware. Drivers and abstraction layers for many 
different types of instruments and buses are included or are available for inclusion. 
These present themselves as graphical nodes. The abstraction layers offer standard 
software interfaces to communicate with hardware devices. The provided driver 
interfaces save program development time. Therefore, even people with limited coding 
experience can write programs and deploy test solutions in a reduced time frame when 
compared to more conventional or competing systems. 
Using the LabVIEW, one new control system was built, the operation interface is 
presented in Figure 4.9. The left part is the real time video of the inner surface of the 
cavity, while the right-up part displays the caputered image. In the right top show the 
connection state of the motor and camera. In the right bottom half of the panel is the 
cavities information input elements and motor control functions which will be explained 
in the following. 
Figure 4.9 The operation interface of 6 GHz cavities optical inspection is developed using 
LabVIEW 
2) Image Capture and save 
Before taking the images, the operator should select a path to save them and input the 
cavity information, such as material of the cavity, cavity ID, weight and the format of 
the image, then the soft will save the images automatically, take the situation in the 
Figure 4.10 for example, to the path “..Nb120160g19mm_0degreen” after execution 
of the capture, in which “19mm” is the length of cavity from the right, “0degreen” is 
the longitude angle.
Chapter 4 Automation of the optical inspection system for 6 GHz cavities 45 
Figure 4.10 Front panel of image capture and save function 
Figure 4.11 is the block diagram of image capture and save function, which is 
compose of camera scanning, open camera, configure and create images, capture and 
save images. 
Figure 4.11 Block diagram of image capture and save function 
3) Motor control 
The motor controlling is made of tab controls. The setting page contains the interface 
parameter and the manual setting of three motors. In the motion page is the motor move 
and image capture activities. 
Every command sent to the motor is used the sub-function “TMCL_sub.vi”, which 
was shown in Figure 4.12. 
(a)
46 4.2.2 Design of Software 
(b) 
Figure 4.12 The front panel (a) and the block diagram (b) of the TMCL_sub.vi 
In the block diagram of setting page, every motor commands are send by the “event 
structure” (Figure 4.13), while in the motion page, the commands are send by message 
queue (Figure 4.14). 
Figure 4.13 One instance of setting page 
Figure 4.14 Commands in the motion page are send by message queue
Chapter 4 Automation of the optical inspection system for 6 GHz cavities 47 
a) translation motor 
In this panel, the operator can move the cavity forward and backward along the guide 
rail and set 5 zones that he wants to investigate, the blue vernier shows the camera 
position, which is zero when cavity move to the left limit switch (Figure 4.15). 
Figure 4.15 Translation motor control panel 
b) rotation motor 
At each zone of the cavity, 6 images are captured. In this rotation motor panel one 
should calibrate the position versus angle using the goniometer. 
Figure 4. 16 Rotation motor control panel 
c) focus motor 
Due to the symmetry of the cavity, only 3 focus position should be set. Note that there 
is no limit switch for the focus motor, so be careful and watch the position in the panel 
when press zoom in or zoom out button. Otherwise, the focus function of the camera 
may be damaged. 
Figure 4.17 Focus motor control panel 
d) manual and auto capture 
After setting every motor in the desired position, the operator can capture the images
48 4.2.2 Design of Software 
step by step pressing every button in order or press the “Auto Mode” button only and 
just leave the computer to execute the whole process (Figure 4.18 and Figure 4.19). 
Figure 4.18 Manual and auto capture control panel 
Figure 4.19 The block diagram of the auto mode function
Chapter 5 Results 49 
Results 
We developed a new mechanical surface treatment for the internal finishing of 6 GHz 
superconducting cavities. It utilizes the principle of resonance of the spring with the 
vibrator to polish the inner surface of cavities, pushing the erosion efficiency to a new 
level, which is surpassing the CBP polishing efficiency. 
In the research and development process, a complete set of mechanical polishing 
process was explored. Influences of abrasive materials type, quantity and mixing ratio, 
tumbling time, spatial arrangement of the vibrator on the polishing efficiency are 
discussed. It also compared the polishing efficiency of single cavity and that of multi-cavities 
using the same system. 
5.1 Mechanical polishing process 
Ultrasonic cleaning 
Ultrasonic cleaning is the process of ultrasound in the liquid using cavitation effects, 
the acceleration effect, and straight flow effect to the liquids and dirt directly or 
indirectly, which makes the dirt layer disperse, emulsify, peel and achieves the purpose 
of cleaning. 
(a) (b) (c) 
Figure 5.1 Preparation before tumbling: (a) Ultrasonic cleaning; (b) dry with nitrogen after 
rinsing with ethanol and acetone; (c) weight by electronic balance. 
The ultrasonic cleaning is a physical cleaning technology, which frequency is above 
20 kHz. It simplifies many traditional cleaning process and greatly improves the 
cleaning quality and production efficiency. 
Ultrasonic cleaning aims at degreasing as the first step after the cavity being 
manufactured from the factory and proposes to removal residual media and material
50 5.1.3 Cavity mounting and polishing 
attaching to the inner surface of the cavity after each tumbling. The temperature is 60℃ 
and wash time is 1 hour. After ultrasonic cleaning, the cavity is needed to rinse with 
ethanol and acetone, dry with nitrogen gun, weight by electronic balance (reported in 
Figure 5.1). 
Media selecting 
In the vibrating process the cavity is filled approximately 50% by volume with a 
mixture of different media. The media is typically used with water and liquid soap to 
cool the cavity and remove material from the surface to allow for further polishing. 
Media selecting is the most difficult part to achieving the final desired properties of 
the niobium surface. The fact that the exact condition needed or desired for the niobium 
surface is not known presents additional challenges. 
Figure 5.2 shows three different types of abrasive media used in INFN-LNL. Small 
SiC triangular shaped blocks are extensively used in mechanical polishing, it is a very 
aggressive ceramic media and it can be used for the first low level mechanical 
polishing.5 mm sphere of zirconium dioxide is a high density material and can be used 
for the intermediate smoothing. Al2O3 plus SiO2 (in PET) flakes are soft and can be used 
for the final surface finishing. 
1 - SiC, 2 - ZrO2. 
Figure 5.2 Three different types of abrasive media. 
Cavity mounting and polishing 
Figure 5.3 Leakage occurs on the not sealed well cavity during vibration 
As shown in Figure 3.7, the cavity should be sealed up in both sides with the plastic 
blind flange. Since the mechanical polishing is a process of electric energy converted to 
mechanical energy, and part of mechanical energy is converted into heat. As the
Chapter 5 Results 51 
vibration goes on, the temperature of the cavity with the grinding fluid will rise, the 
volume of the internal gas expands, the muddy thing will erupt out as shown in Figure 
5.3 if the O-ring is forgotten even the cavity close tightly. 
The physical vibrating system is reported in Figure 5.4, the processes of how to start 
and stop vibrating is following, 
a) It is necessary to check whether the vibrator is fixed with the spring washer which 
is very important for defending nut loosing before mounted cavities to the vibration 
system 
b) The well-sealed signal or two or three cavities are then mounted to the vibration 
system by bolts. Make sure that the cavity can rotate itself freely after triggering by 
hand. 
c) Modify the position of the motor to ensure the cavity rotation axis and the motor 
driven shaft to form belt cooperate. 
d) Connect cavities and the motor with rubber belts, which are different length and 
may need to change a new one after several runs. 
e) Power on the control box, the stepper motors start to sun, check if the cavities can 
rotate smoothly and the rubber belts can run in the slot rather than run out. 
f) Set a low frequency, usually 60Hz in the control panel (Figure 5.5), and press the 
run key, alter the frequency until the noise comes from the cavity inside is big enough, 
which means the media grinding the cavity forcefully at high speed. 
g) Check the polishing processing every half an hour if it work properly or not, and 
one can stop the system just pushing the stop key in the control panel if want to 
investigate the treatment result . 
h) Disconnect the rubber belt, and detach the cavity from the plate. 
i) Open the cavity and clean. 
Figure 5.4 Picture of physical vibrating system
52 5.2.1 Different material cavities 
Figure 5.5 the control panel 
5.2 The statistics of cavity tumbling 
Different material cavities 
Till now, eighteen 6 GHz cavities shown in Table 5.1 have been polished by vibrator, 
including eight 3mm and three 2mm thickness (which cavity ID with “L”) Niobium 
cavities, 4 Ion cavities and 3 Copper cavities. The comparison of the inner surface 
condition before and after polishing are displayed in the Table 5.2. 
Table 5.1 The statistics of cavity tumbling 
Material Cavity ID 
Initial weight 
[g] 
Final weight 
[g] 
Total removed 
[g] 
Tumbling 
time (h) 
Niobium 
Nb127 191.352 181.378 9.974 305 
Nb128 177.775 167.365 10.41 380 
Nb129 184.483 174.05 10.433 353 
Nb130 170.209 159.937 10.272 101 
Nb131 175.812 165.686 10.126 59 
Nb132 167.89 157.82 10.07 35.5 
Nb133 174.381 164.83 9.551 100.5 
Nb134 168.378 157.964 10.414 69.13 
Iron 
Fe1 149.576 144.316 5.26 66 
Fe2 141.112 134.368 6.744 66.1 
Fe3 142.8 135.253 7.547 95.6 
Fe4 154.431 145.828 8.603 98 
Niobium 
Nb-L148 119.26 110.919 8.341 81.05 
Nb-L149 112.923 105.509 7.414 70.09 
Nb-L150 117.073 109.795 7.278 70.09 
Copper 
Cu1 151.139 145.567 5.572 137 
Cu2 166.285 158.845 7.44 481.5 
Cu3 179.9 175.921 3.979 5.45
Chapter 5 Results 53 
Table 5.2 The images of inner surface for different material cavities before and after tumbling 
Nb 
Fe 
CU 
material Before tumbling After tumbling 
The highest erosion rate till now 
The latest experiment result with Copper cavity Cu3: Erosion rate of 1 gram/hour was 
reached(as shown in Figure 5.6), which means 13 microns depth of inner surface 
materials was removed per hour (the Nb Density is 8.57g/cm3, and the area of inner 
surface of 6 GHz is 88 cm2). The erosion rate decreased with the time, but in Run 3 the 
media must be blocked a while which cause the erosion rate smaller than Run 2.
54 5.4.1 Effect of tumbling time 
Figure 5.6 The latest tumbling result with Cu3 cavity 
5.3 The RF test result 
After treated by the standard surface polishing techniques which started from the new 
mechanical polishing, the cavity is experienced once or several UHV (ultra-high 
vacuum) annealing, and characterized by the cryogenic RF test eventually. 
The RF test result (Figure 5.7) proves the effectiveness of the vibration therapy. 
(a) (b) 
Figure 5.7 (a) the annealing cycle after tumbling and EP. (b) Q-factor versus accelerating field at 
4.2K and 1.8K after mechanical polished by vibration. 
5.4 Discussion 
Effect of tumbling time 
SiC stone getting smaller, and angular shape ( shown in Figure 5.8) gradually been 
polished to a smaller ball with the grinding time, not only the impact force reduce, but 
also the resulting powder with water to form a mixture, and these mixtures will hinder 
emery friction with the cavity, so the polishing effect will be getting worse.
Chapter 5 Results 55 
However, short time grinding means frequent disassembly and assembly, will 
increase the manpower time, so it is very important to control the grinding time 
reasonably. 
Figure 5.8 The new media and the used media (SiC) 
Figure 5.9 shows the curve of erosion efficiency vs. time. 
Figure 5.9 The erosion rate versus tumbling time. 
Effect of media 
In order to study the media effect on the erosion rate, the cavity Nb130 was tumbled 
with different number of media in each run (Figure 5.10), in which the tumbling time is 
the same (3 hours). The erosion rate reach the maximum value (above 300mg/h) when 
the cavity filled with 18 new SiC media while other conditions were the same. And it 
also shows that the Zirconia balls have no contribution to the erosion rate by comparison 
of run 2 and run 3, but it may be useful for polishing inner surface.
56 5.4.3 Single and multi-cavities tumbling 
Figure 5.10 The erosion rate versus number of SiC 
Usually, it is better to fill the cavity with some new media and some used media (SiC) 
together, which may increase the valid contact area and also ensure the enough polishing 
force. 
Single and multi-cavities tumbling 
(a) (b) (c) 
Figure 5.11 Different plate used in the polishing processes. (a) Triple cavities plate; (b) double 
cavities plate; (c) signal cavities plate. 
Is it possible to polish more cavities in one run? The answer is sure. Using different 
size plate (Figure 5.11), signal, double and triple cavities can be tumbled in one run. But 
the vibration frequency will be a little bit different, because the load of the spring i.e. 
the total mass of the cavities and the vibrator are changed, the reason of which is 
explained in section 3.2. 
Another different point is that it will cost double or triple time to dismount and mount, 
open and close two or three cavities in one run. However, in the same condition the 
result may be the one we expected, the erosion rate for each cavities in one run is not 
the same in the signal cavity tumbling (the erosion rate was 378mg/h in 3 hours) while 
just the total erosion rate is slightly higher than that in the later. It is clear in the Table 
5.3 and Table 5.4. So it can induce that the conversion of electrical power to total 
mechanical power is nearly the same in three configuration, no matter how many 
cavities are tumbled in one run. 
0 
50 
100 
150 
200 
250 
300 
350 
8 10 10 12 14 16 18 
Erosion Rate [mg/h] 
Number of SiC 
Cavity Nb130 was tumbled for 3 hours with different number of media in each run. 
+20 ZrO2
Chapter 5 Results 57 
Table 5.3 The erosion rate in double cavity tumbling 
Run Top Down Total 
1 
(3hrs) 
Cavity ID Nb129 Nb130 
Erosion rate [mg/h] 213.33 224.33 437 
2 
(6hrs) 
Cavity ID Nb127 Nb134 
Erosion rate [mg/h] 120.83 154.5 275.33 
3 
(3.5hrs) 
Cavity ID Nb129 Nb130 
Erosion rate [mg/h] 216.86 177.43 394.29 
Table 5.4 The erosion rate in triple cavity tumbling 
Run Top Middle Down Total 
1 
(3hrs) 
Cavity ID Nb128 Nb130 Nb127 
Erosion rate [mg/h] 164.67 96.33 146.66 407.66 
2 
(4hrs) 
Cavity ID Nb134 Nb129 Nb133 
Erosion rate [mg/h] 185 43.25 176.25 404.5 
3 
(3.5hrs) 
Cavity ID Nb128 Nb127 Nb130 
Erosion rate [mg/h] 191.43 41 125.43 357.86 
4 
(4.33hrs) 
Cavity ID Nb134 Nb133 Nb129 
Erosion rate [mg/h] 189.61 *1 137.64 327.25+ 
5 
(17.75hrs) 
Cavity ID Nb127 Nb133 Nb128 
Erosion rate [mg/h] 89.74 28.82 77.63 196.19 
6 
(6hrs) 
Cavity ID Nb134 Nb129 Nb130 
Erosion rate [mg/h] 217.5 32.83 159.5 409.83 
7 
(15hrs) 
Cavity ID Nb127 Nb133 Nb128 
Erosion rate [mg/h] 84.6 50.67 69.4 204.67 
Effect of plate direction 
In order to study the effect of plate direction on the erosion rate, the triple cavity 
vibration system was taken into experiment. The configuration was shown in Figure 
5.12 and the result is reported in the Table 5.5. The system worked around 185 Hz at its 
own frequency the noise is highest. And the tumbling time is 4 hours. 
The erosion rate for each cavity in vertical run is lower than that in the signal cavity 
tumbling; the erosion rate of the cavity in the middle is one third of that at top or down 
one due to its vibration amplitude is smallest among the three cavity; the total erosion 
rate in the horizontal condition is the lowest (see Figure 5.13) for the vibrator have to 
overcome the gravity of its own and the cavities and loss half of the mechanical power 
converted from the electrical power. 
1 * The cavity here at this run was not opened and gone on next vibration.
58 5.4.4 Effect of plate direction 
(a) (b) (c) 
Figure 5.12 Triple cavity vibration system with three plate direction. (a) Horizontal; (b) Inclined 
(~60º); (c) Vertical. 
Table 5.5 The erosion rate of triple-cavity tumbling in different plate direction. 
Figure 5.13 Erosion efficiency in different plate direction 
0 100 200 300 400 500 
vertical 
incline 
horizontal 
Average erosion efficiency [mg/h] 
Plate direction
Chapter 5 Results 59 
5.5 Summery 
After a lot of tests and analysis, we can sum up the experience of following, 
1) Tumbling only one cavity in one run and stop it around 2 hours; 
2) Like in the Figure 5.14, put some (~6) used (smaller) SiC in the bottom necklace 
and the new ones (~12) and (~20) ZrO2 in the center, and put some(~6) used SiC 
again, fill deionized water up to the green line; 
3) Shake the cavity by hand and feel that no block in it and then put it the vibration 
stand; 
4) Fix the vibrator to the plate with screw and spring cushion; 
5) Connect the springs up and down tightly and directly to the transom with less 
transition, and try to make the spring in vertical; 
6) It is also useful to add 2 rubber belt up and down to ensure the balance during 
the shaking; 
7) Set frequency around 200Hz. At this frequency it is very powerful for polishing 
but also to the bearings which should change when it work not well(can’t rotate 
smooth), otherwise, it may block and it (polishing contain part overly) is very 
bad for the cavity 
8) Every half hour, go and check the operating state. 
Figure 5.14 Diagram of the media filling into the cavity
60 5.5 Summery
Chapter 6 Conclusions and next plan 61 
Conclusions and next plan 
6.1 Mechanical polishing treatment for 6GHz cavities 
Mechanical polishing bases on the resonance principle for 6GHz superconducting 
cavity of the inner surface finish is a new attempt, the results show that the method is 
effective. 
A low cost, simple structure, convenient operation, and efficiency considerable 
mechanical polishing systems were developed as a result of carefully designed and 
systematic study. 
Therefore, one cavity will be ready for next treatment in 20 hours’ tumbling, after this 
short period of mechanical treatment, 10 grams of inner surface materials are removed 
and the bump indentations disappear, which satisfy our goal. 
6.2 Idea for 1.3GHz mono-cell cavities vibration polishing system 
Figure 6.1 the conceived drawing of the 1.3GHz mono-cell cavities vibration polishing system 
The idea of our design derives from the principle of vibrating screen, which is used 
for selection of the small matter from the mass. 
The vibrator is placed horizontally as it is very difficult to balance the whole system 
if set in verticality as the same with the 6 GHz cavities vibrating system due to the heavy 
weight of vibrator and cavity; the springs and the shock absorber feet make the system 
stable. What’s more, it is possible to find the best resonance frequency with different
62 6.2 Idea for 1.3GHz mono-cell cavities vibration polishing system 
springs; it is convenient to mount and dismount the cavity without uninstalling the 
cavity holders, compared to previous integral design; the cavity is rotated by the belt, 
tightness of which is adjustable along with the vibrating using a spring.
Bibliography 63 
Bibliography 
[1] B. Anne, et al. Superconducting TESLA Cavities, Physical Review special 
Topics-Accelerators and Beams, Volume 3, 092001(2000). 
[2] H. Padamsee, J. Knobloch, T. Hays, RF Superconductivity for Accelerators, John 
Wiley & Sons, Plenum Press, San Diego, 1998. 
[3] TESLA, Technical Design Report, The Accelerator, Eds. R. Brinkmann, K. 
Flӧttmann, J. Rossbach, P. Schmu¨ser, N. Walker, H. Weise, DESY report 2001- 
23 (2001) 
[4] International linear collider reference design report, ILC global design effort and 
worldwide study, August, 2007 
[5] D. Proch, P. Schmueser, W. Singer, et al., Niobium in superconducting RF 
cavities, Niobium 2001 International Symposium, DEC 02-05, 2001 Orlando, 
Florida, USA 
[6] P. Schmüser, “Basic principles of RF superconductivity and superconducting 
cavities”, Workshop ‘Pushing the Limits of RF Superconductivity’, September 
22-24, Argon National Laboratory, USA, 2004 
A. Matheisen, "Improvements on standard Fabrication methods", ibid ref. 5 
[7] J. Brawley, J. Mammosser, L. Phillips, “Electron beam weld parameter 
development and cavity production costs”, Proceedings of the 1997 Workshop 
on RF Superconductivity. 
[8] V. Palmieri “Seamless Cavities: the most creative topic in RF Superconductivity,” 
8th Workshop on RF Superconductivity, Abano Terme (Italy), October 1999. 
[9] V. Palmieri, “Advancements on spinning of seamless multi-cell reentrant 
cavities”, Proc of the 11th Workshop on RF Superconductivity SRF2003.8-12 
September 2003, Luebeck, Germany, TuP26. 
[10] P. Kneisel, V. Palmieri, K. Saito, “Development of Seamless Niobium Cavities 
for Accelerator Application”, Proceedings of the 1999 IEEE Particle Accelerator 
Conference. 29 Mar - 2 Apr 1999, New York, New York. 18th IEEE Particle 
Accelerator Conference, p.943-945 
[11] L. Badan, C. Durand, V. Palmieri, R. Preciso, S. Stark, F. Stivanello, W. Venturini, 
“R.F. characterization of small scale cavities”, Proceedings of the 1997 
Workshop on RF Superconductivity, Abano Terme (Padova), Italy 
[12] V. Palmieri, “Spinning of TESLA-Type Cavities: Status of Art”., Proc. of the 9th 
Workshop on RF superconductivity, Santa Fe, USA, Nov. 1999, pp 532-537. 
[13] V. Palmieri, R. Preciso, V.L. Ruzinov, S.Yu. Stark, S. Gambalonga, Forming of 
seamless high beta accelerating cavities By the spinning technique, Nuclear 
Instruments and Methods in PhysicsResearchA342(1994)353-356,North- 
Holland
64 
[14] D. Bloess, “Chemistry and Surface Treatment”, SRF-84, Geneva, July 1984, 
Proceedings pp. 409-425. 
[15] K. Saito et al., “Superiority of Electropolishing over Chemical Polishing on High 
Gradients” SRF-97, Italy, October 1997, Proceedings pp. 795-813. 
[16] Michigan State University internal note. 
[17] TESLA Technical Design Report R. Brinkmann, et al., Editors. 2001, DESY: 
Hamburg. 
[18] http://www.glenmills.com/powder-blending/turbula-shaker-mixer/ 
[19] C. Cooper et al., “Centrifugal Barrel Polishing of Cavities Worldwide”, 15th 
International Conf. on RF Supercond., Chicago, IL (2011) WEIOA02. 
[20] http://en.wikipedia.org/wiki/Vibrator_(mechanical) 
[21] Siskind, Charles S. (1963). Electrical Control Systems in Industry. New York: 
McGraw-Hill, Inc. p. 224.ISBN 0-07-057746-3. 
[22] https://en.wikipedia.org/wiki/File:VFD_System.png. 
[23] http://www.acu-vib.com.au/accelerometers.htm 
Bibliography
List of Figures 65 
List of Figures 
Figure 1.1 A TESLA nine-cell 1.3 GHz superconducting niobium cavity [4]. ...... 3 
Figure 1.2 Measured surface resistance of a 9-cell TESLA cavity. The residual ... 4 
Figure 1.3 General fabrication steps of standard fabrication technique for s.c. 
Cavities ........................................................................................................... 5 
Figure 1.4 Spinning of a seamless mono-cell resonator from a circular blank. No 
intermediate annealing is required during forming. ....................................... 8 
Figure 1.5 Process comparison of conventional and seamless cavity Fabrication 
........................................................................................................................ 9 
Figure 1.6 Picture of 6 GHz cavities made by different material. From left to right 
are Niobium cavity (thickness 3mm), lighten Niobium cavity (thickness 
2mm), Cooper cavity, Iron cavity and Lead cavity. ..................................... 10 
Figure 1.7 The 6 GHz cavity geometry ................................................................ 11 
Figure 1.8 (a)Drawings of the die, which is composed of two cylinders and a shell, 
assembled and ready for the spinning operation; (b)Disassembled when 
partially extracted after spinning; (c)Exploded view of the nylon shell of the 
die with all its ten sectors. ............................................................................ 11 
Figure 1.9 Image of inner surface at the center of the cavity, two evident vertical 
scratches shown in the red rectangles........................................................... 12 
Figure 1.10 Metallographic polishing machine with sandpaper .......................... 13 
Figure 1.11 The stand for BCP and EP................................................................. 13 
Figure 1.12 The schematic diagram of EP ........................................................... 14 
Figure 1.13 HPR for 6 GHz cavities in LNL-INF ................................................ 14 
Figure 2.1 TURBULA® Shaker-Mixer (model T2F) and 6 GHz cavity ............. 15 
Figure 2.2 The section of the configuration of cavity before mounting to the 
TURBULA® Shaker-Mixer ......................................................................... 16 
Figure 2.3 Schematic diagram of the Centrifugal barrel polishing (CBP). The red 
point is the reference point when the angular velocity of the barrel related to 
the turntable 휔2 equals to zero. .................................................................. 17 
Figure 2.4 (a) Photograph of the CBP system in INFN-LNL. (b) The configuration 
of the cavities. .............................................................................................. 18 
Figure 2.5 Industrial centrifugal barrel polishing machine .................................. 18 
Figure 2.6: Schematic of main shaft and 2 barrels of a centrifugal barrel polishing 
machine denoting the directions of rotation. This is a model of the Fermilab 
machine with a 9-cell Tesla – type cavity and counterweight shown in the 
barrels . ......................................................................................................... 18
66 List of Figures 
Figure 2.7 The 3D drawing (a) and entity (b) of the zigzag tumbler ................... 19 
Figure 2.8 Polishing brush on the market ............................................................ 20 
Figure 2.9 3D drawings of “flower brush”. .......................................................... 20 
Figure 2.10 Photograph of “flower brush”. .......................................................... 20 
Figure 2.11 Abrasive material. (a) Sand paper; (b) Scotch Brite ......................... 21 
Figure 2.12 “flower brush” with abrasive material. ............................................. 21 
Figure 2.13 The way of putting “flower brush” into the cavity. .......................... 22 
Figure 2.14 The “flower brush” was polishing the cavity on the lathe. ............... 22 
Figure 2.15 The petals were spreading in high rotating speed ............................. 22 
Figure 2.16 Polish the inner surface of cavity by pneumatic hand held polisher 
using “flower brush”. ................................................................................... 23 
Figure 3.1 The configuration of combined spring vibration system .................... 26 
Figure 3.2 Picture of the firstly using vibrator ..................................................... 28 
Figure 3.3 One example of the vibrator system for 6 GHz cavity ....................... 28 
Figure 3.4 The diagrams of Assembly process before hanging up ...................... 28 
Figure 3.5 A complete mechanical (Vibrator) process-cavity mounted on vibrator 
through PMMA-glass (15 mm thick) support plate (transparent in figure) . 29 
Figure 3.6 Drawing of bearing holder and image of self-aligning bearing .......... 30 
Figure 3.7 Drawing of mechanical configuration of the cavity. The assembled state 
is at left, and the Exploded Views is at right. ............................................... 30 
Figure 3.8 Drawing of the belt axis ...................................................................... 30 
Figure 3.9 The internal structures images of one commercial vibrator ................ 31 
Figure 3.10 Images in first line is the consequence after neglecting the sponge, 
while in second line is the wright connecting way. (a) The cable was broken-down; 
(b) the cable was hurt by the shroud; (c) the cable was hurt by the cable 
jointing sleeve; (d) using the sponge to save the cable; (e) using electrical 
adhesive tape to protect the cable. ................................................................ 31 
Figure 3.11 Sectional view of the inner and chassis dimensions ......................... 32 
Figure 3.12 Diagram of the electrical connection ................................................ 32 
Figure 3.13 The main principle diagram of the VFD ......................................... 32 
Figure 3.14 Picture of real products FRN4.0E1S-4E which keypad can install to 
the front panel of the control unit of the vibrating system by the cable with 
RJ-45 connectors .......................................................................................... 33 
Figure 3.15 3 phase RFI Filter ............................................................................. 33 
Figure 3.16 Schematic drawing of the vibrating system equipped with two 6 GHz 
cavities .......................................................................................................... 34 
Figure 3.17 connection of the spring and the plate using the custom nuts .......... 35 
Figure 3.18 Image of programmable stepper motor ............................................. 35 
Figure 3.19 Drawing of motor belt wheel ............................................................ 35 
Figure 3.20 The cross section view of the accelerometer . .................................. 36 
Figure 3.21 The schematic diagram of impact sensor. ......................................... 36
List of Figures 67 
Figure 3.22 One example of the commercial impact sensor. ............................... 37 
Figure 3.23 The drawing of the custom impact sensor ........................................ 37 
Figure 3.24 Schematic of the trigger capture and fault display circuit. ............... 37 
Figure 3.25 The connector circuit in the inventor. ............................................... 38 
Figure 4.1 The optical inspection equipment before updating ............................. 40 
Figure 4.2 Photo software interface ..................................................................... 40 
Figure 4.3 The cross section of the 6 GHz cavity ................................................ 41 
Figure 4.4 3D schematic diagram of the optical inspection system mechanical 
upgrades ....................................................................................................... 41 
Figure 4.5 The dimension of the mini stepper motor (all values in mm). ............ 42 
Figure 4.6 Top side of the board with connectors ................................................ 42 
Figure 4.7 The optical inspection system after updating ...................................... 43 
Figure 4.8 Power supply and motor connection box ............................................ 43 
Figure 4.9 The operation interface of 6 GHz cavities optical inspection is 
developed using LabVIEW .......................................................................... 44 
Figure 4.10 Front panel of image capture and save function ............................... 45 
Figure 4.11 Block diagram of image capture and save function .......................... 45 
Figure 4.12 The front panel (a) and the block diagram (b) of the TMCL_sub.vi 46 
Figure 4.13 One instance of setting page ............................................................. 46 
Figure 4.14 Commands in the motion page are send by message queue ............. 46 
Figure 4.15 Translation motor control panel ........................................................ 47 
Figure 4. 16 Rotation motor control panel ........................................................... 47 
Figure 4.17 Focus motor control panel ................................................................ 47 
Figure 4.18 Manual and auto capture control panel ............................................. 48 
Figure 4.19 The block diagram of the auto mode function .................................. 48 
Figure 5.1 Preparation before tumbling: (a) Ultrasonic cleaning; (b) dry with 
nitrogen after rinsing with ethanol and acetone; (c) weight by electronic 
balance. ......................................................................................................... 49 
Figure 5.2 Three different types of abrasive media. ............................................. 50 
Figure 5.3 Leakage occurs on the not sealed well cavity during vibration .......... 50 
Figure 5.4 Picture of physical vibrating system ................................................... 51 
Figure 5.5 the control panel .................................................................................. 52 
Figure 5.6 The latest tumbling result with Cu3 cavity ......................................... 54 
Figure 5.7 (a) the annealing cycle after tumbling and EP. (b) Q-factor versus 
accelerating field at 4.2K and 1.8K after mechanical polished by vibration. 
...................................................................................................................... 54 
Figure 5.8 The new media and the used media (SiC) .......................................... 55 
Figure 5.9 The erosion rate versus tumbling time. ............................................... 55 
Figure 5.10 The erosion rate versus number of SiC ............................................. 56 
Figure 5.11 Different plate used in the polishing processes. (a) Triple cavities plate;
68 List of Figures 
(b) double cavities plate; (c) signal cavities plate. ....................................... 56 
Figure 5.12 Triple cavity vibration system with three plate direction. (a) Horizontal; 
(b) Inclined (~60º); (c) Vertical. ................................................................... 58 
Figure 5.13 Erosion efficiency in different plate direction .................................. 58 
Figure 5.14 Diagram of the media filling into the cavity ..................................... 59 
Figure 6.1 the conceived drawing of the 1.3GHz mono-cell cavities vibration 
polishing system ........................................................................................... 61
List of Tables 69 
List of Tables 
Table 5.1 The statistics of cavity tumbling ........................................................... 52 
Table 5.2 The images of inner surface for different material cavities before and 
after tumbling ............................................................................................... 53 
Table 5.3 The erosion rate in double cavity tumbling .......................................... 57 
Table 5.4 The erosion rate in triple cavity tumbling ............................................ 57 
Table 5.5 The erosion rate of triple-cavity tumbling in different plate direction. 58
70 List of Tables
Acknowledgements 71 
Acknowledgements 
First of all, I would like to extend my sincere gratitude to my supervisor, Prof. V. 
Palmieri, for his instructive advice and useful suggestions on my thesis. I am deeply 
grateful of his offering me the opportunity to learn this Master course. And in this 
academic year, he arranged our course with mature deliberation and taught us tirelessly, 
which let us grasp the theory also provided us with more opportunities to practice. All 
of these expanded my horizon and knowledge and my capacity of scholarship has been 
tested and benefited; thank him for his concern for me care for me in life, he is kind and 
humility, a scholarly mentor and beneficial friend; thank him providing me with a great 
convenience; thank him for his confidence in me, giving me the opportunity to play 
freely at work, I voracious sucked knowledge nutrition like a just born infant, and was 
fearless with difficulty like a newborn calf. 
High tribute shall be paid to Ms. Silvia Martin, who provided me with all aspects of 
care and help, let me live and study in a foreign country without problems. 
I am deeply indebted to my tutor, Antonio Rossi, who was my guide in terms of low-temperature 
superconductivity, I am impressed on his young and promising, modesty, 
kindness and helpfulness. 
Special thanks should go to Alex, a young and powerful man, who gave me much 
support in my work. Without his help in the machining, my work would be difficult to 
make progress. 
I also owe my sincere gratitude to thank Ram Krishna Thakur, who gave me a very 
big help in my work, and carefully guided me to understanding of daily laboratory 
operations step by step. 
And I also want to thank all the other colleagues in the laboratory, the moments of 
working with them is destined to become a good memory my life. 
I should finally like to express my gratitude to my beloved family, especially my 
mother-in-law, who is helping me to take good care my three years old son in Beijing 
during my abroad. I also owe my sincere gratitude to my lovely wife Yue Lin, whose 
understanding and supporting without a word of complaint motivated me to work hard.

Tesi master Goulong yu

  • 1.
    UNIVERSITA’ DEGLI STUDIISTITUTO NAZIONALE DI PADOVA DI FISICA NUCLEARE Dipartimento di Fisica e Astronomia Dipartimento di Ingegneria Industriale Laboratori Nazionali di Legnaro Under the Auspice of the TESLA TECHNOLOGY COLLABORATION MASTER THESIS in “Surface Treatments for Industrial Applications” Development of a new mechanical surface treatment for the internal finishing of 6 GHz superconducting cavities Supervisor: Prof. V. Palmieri Co-Supervisor: Dott. A.A.Rossi Student: Yu Guolong N. Matr.: 1064843 Academic Year 2012-2013
  • 2.
    有志者,事竟成。 Where thereis a will, there is a way. 谨以此文献给我的妻子和儿子 二零一二年九月~二零一三年九月于意大利
  • 3.
    Contents I Contents CONTENTS ....................................................................................................................................... I ABSTRACT ....................................................................................................................................... V ACRONYM ..................................................................................................................................... VII ...................................................................................................................................... 1 INTRODUCTION .............................................................................................................................. 1 0.1 BACKGROUND AND PURPOSE ......................................................................................................... 1 0.2 ORGANIZATION OF THE THESIS ....................................................................................................... 1 ...................................................................................................................................... 3 6 GHZ SPUN SEAMLESS CAVITIES .................................................................................................... 3 1.1 TEV ENERGY SUPERCONDUCTING LINEAR ACCELERATOR (TESLA) CAVITIES ............................................ 3 Key parameters and limitations .......................................................................................... 3 Standard fabrication techniques [1] ................................................................................... 5 Disadvantages and limitation ............................................................................................. 7 1.2 SEAMLESS CAVITIES ..................................................................................................................... 7 Description of Spinning technique ...................................................................................... 8 RF measurements and results of seamless cavities ............................................................ 9 1.3 6 GHZ CAVITIES .......................................................................................................................... 9 Advantages of 6 GHz cavities ........................................................................................... 10 Drawback.......................................................................................................................... 11 Standard surface polishing techniques ............................................................................. 12 .................................................................................................................................... 15 MECHANICAL POLISHING APPROACHES ........................................................................................ 15 2.1 TURBULA® SHAKER-MIXER ...................................................................................................... 15 2.2 CENTRIFUGAL BARREL POLISHING (CBP) ........................................................................................ 16 2.3 ZIGZAG TUMBLER ...................................................................................................................... 18 2.4 “FLOWER BRUSH” ..................................................................................................................... 19 “Flower brush” design for polishing 6 GHz cavities .......................................................... 19 Polishing test .................................................................................................................... 21 .................................................................................................................................... 25 VIBRATING SYSTEM - A NEW MECHANICAL POLISHING APPROACH .............................................. 25 3.1 INDUSTRIAL APPLICATION OF VIBRATOR .......................................................................................... 25 3.2 RESONANCE-THE ORIGINAL IDEA .................................................................................................. 25 3.3 EXPERIMENT WITH SMALL VIBRATOR ............................................................................................. 27 The first experiment .......................................................................................................... 27
  • 4.
    II Contents Thesecond experiment ..................................................................................................... 29 3.4 VIBRATOR SYSTEM FOR 6 GHZ CAVITIES ......................................................................................... 30 Vibrator ............................................................................................................................. 31 control box ........................................................................................................................ 31 Mechanical configuration ................................................................................................. 34 Falling detecting switch .................................................................................................... 36 .....................................................................................................................................39 AUTOMATION OF THE OPTICAL INSPECTION SYSTEM FOR 6 GHZ CAVITIES ....................................39 4.1 BEFORE UPDATING..................................................................................................................... 39 System introduction .......................................................................................................... 39 The necessity of the automation ....................................................................................... 40 4.2 THE REALIZATION OF AUTOMATION ............................................................................................... 41 Updating of mechanical part ............................................................................................ 41 Design of Software ............................................................................................................ 43 .....................................................................................................................................48 RESULTS .........................................................................................................................................49 5.1 MECHANICAL POLISHING PROCESS ................................................................................................ 49 Ultrasonic cleaning ........................................................................................................... 49 Media selecting ................................................................................................................. 50 Cavity polishing ................................................................................................................. 50 5.2 THE STATISTICS OF CAVITY TUMBLING............................................................................................. 52 Different material cavities ................................................................................................ 52 The highest erosion rate till now ...................................................................................... 53 5.3 THE RF TEST RESULT .................................................................................................................. 54 5.4 DISCUSSION ............................................................................................................................. 54 Effect of tumbling time ..................................................................................................... 54 Effect of media .................................................................................................................. 55 Single and multi-cavities tumbling .................................................................................... 56 Effect of plate direction ..................................................................................................... 57 5.5 SUMMERY ............................................................................................................................... 59 .....................................................................................................................................61 CONCLUSIONS AND NEXT PLAN .....................................................................................................61 6.1 MECHANICAL POLISHING TREATMENT FOR 6GHZ CAVITIES ................................................................. 61 6.2 IDEA FOR 1.3GHZ MONO-CELL CAVITIES VIBRATION POLISHING SYSTEM ............................................... 61 BIBLIOGRAPHY ..............................................................................................................................63 LIST OF FIGURES ............................................................................................................................65 LIST OF TABLES ..............................................................................................................................69 ACKNOWLEDGEMENTS ..................................................................................................................71
  • 5.
  • 6.
  • 7.
    Abstract V Abstract 6 GHz spun seamless Superconducting Radio Frequency (SRF) cavities are a very useful tool for testing alternative surface treatments in the fabrication of TESLA cavity. However, the spinning technique has also some drawbacks like contamination, surface damage in internal part due to the collapsible mandrel line. The first important step of the surface treatments is the mechanical polishing. For this purpose, a new, cheap, easy and highly efficient tumbling approach based on vibration was developed. Before this approach was conceived, a few other methods, such as Turbula, Centrifugal Barrel Polishing (CBP), custom Zigzag tumbler and “flower brush” have been studied and tested. But the result was not so satisfactory neither for the low erosion rate nor for the unstableness of the system nor for the complicated polishing process. At last, a vibration system with a simple structure, working stably was created after two experiments. Another important task of the thesis is to update the optical inspection system for 6 GHz cavities. 3 stepper motors motor was added to move and rotate the cavity and realized auto focus of the miniature camera. A software was developed to achieve a full cavity photographed by one key operation using LabVIEW. A high-efficiency mechanical polishing system is generally judged by two aspects: one is whether the surface property satisfies the demand after polishing; the other is whether the erosion rate can reach and be stabilized at a high value which is comparable or greater than the existing products. The Radio Frequency (RF) test result indicates that the vibration system is feasible. The latest erosion rate 1 gram/hour i.e. removing 13 microns depth of inner surface materials per hour exceeds the performance of CBP, which is widely used in other laboratories in the world. The mechanical polishing process is elaborated and cavities that have been polished are listed. Several influencing factors on the erosion rate, such as tumbling time, media, signal and multi-cavities and plate direction are discussed at the end. A preliminary design of 1.3 GHz vibration system as the future development is provided for the next plan.
  • 8.
  • 9.
    Acronym VII Acronym The acronyms used in this thesis are listed in the following, ILC = International Linear Collider INFN-LNL = Istituto Nazionale di Fisica Nucleare - Laboratori Nazionali di Legnaro (Padova) TESLA = TeV Energy Superconducting Linear Accelerator SRF = Superconducting Radio Frequency RF = Radio Frequency BCP = Buffered Chemical Polishing CBP = Centrifugal Barrel Polishing PCB = Printed Circuit Board rpm = revolutions per minute EB = Electron Beam EP = Electro Polishing HPR = High Pressure Water Rinsing VFD = Variable-Frequency Drive UHV = Ultra-High Vacuum
  • 10.
  • 11.
    Chapter 0 Introduction1 Introduction 0.1 Background and purpose Advantages of SRF cavities for accelerators are well known and a large number of 9- cells TESLA cavities is needed for the International Linear Collider (ILC). The fabrication of these cavities using the traditional way will cost much time and expensive. The spinning technology for seamless cavities invented in INFN-LNL is an answer for this challenge. Using this technology not only multi-cell 1.3 GHz resonators but also the 6 GHz cavity can be produced. The mechanical polish for 6 GHz cavity is the first and important step, it will remove the defects and scratches of the inner surface due to using collapsible mandrel. A high efficient mechanical treatment for the micro-cavities is a key to accelerate the process of studying the thin film deposition techniques and new superconducting materials for RF applications. The purpose of this thesis is to develop a new, cheap, easy and highly efficient tumbling approach. 0.2 Organization of the thesis The first chapter introduces the origin of research. It gives a briefly introduction of TESLA cavities and the standard fabrication techniques, then expounds the seamless cavities technique, 6 GHz cavities and standard surface polishing techniques. The second chapter describes the learning and trying of some mechanical polishing means for 6GHz resonator, including Turbula, Zigzag tumbler, CBP and polishing brush. In chapter 3, the development of a new mechanical polishing approach and treatment is described in detail. It encompasses everything from birth of the ideas to the preliminary tests, from the working principle to the system structure. Chapter 4 is an overview of the upgrading of cavity inner surface optical inspection system, involving both hardware and software, which is also an important part of this thesis. The chapter 5 gives the results. It summarizes the mechanical polishing process, presents the statistics for the different materials cavity polished results, shows the highest polishing efficiency so far, states the RF test data, and finally discusses the impacts of abrasive materials type, quantity and mixing ratio, tumbling time, spatial arrangement of the vibrator on the polishing efficiency. It also compared the polishing efficiency of single cavity and multi-cavities in the same system.
  • 12.
    2 0.2 Organizationof the thesis The last part of the thesis is the conclusions and one idea for 1.3GHz mono-cell cavities vibration polishing system is proposed.
  • 13.
    Chapter 1 6GHz spun seamless cavities 3 6 GHz spun seamless cavities 1.1 TeV Energy Superconducting Linear Accelerator (TESLA) cavities In the past 40 years, electron-positron collisions have played a central role in the discovery and detailed investigation of new elementary particles and their interactions. But some important fundamental questions still remain to be answered, which force the High Energy Physics community to build the next generation facility- the International Linear Collider (ILC) [1]. Superconducting radio-frequency (SRF) resonating cavity can operate in continuous-wave mode or long macro pulse mode, providing high acceleration gradients [2], therefore, it was chosen by the ILC. The international TESLA project [3] uses nine-cell 1.3 GHz niobium cavities (shown in Figure 1.1), which reduce the cost per MeV by a factor of 20 over the then (year 1992) state-of-the-art SRF installation (CEBAF) by increasing the operating accelerating gradient by a factor of five from 5 MV/m to 25 MV/m, and reducing the cost per meter of the complete accelerating module by a factor of four for large-scale production [4]. Figure 1.1 A TESLA nine-cell 1.3 GHz superconducting niobium cavity [4]. The TESLA 9-cell cavity is a standing wave structure of about 1 m length whose fundamental π -mode has a frequency of 1.3 GHz. It is made from 2.8mm thick high quality niobium sheets by deep drawing of half-cells, followed by trimming and electron beam welding. Key parameters and limitations  Surface resistance
  • 14.
    4 1.1.1 Keyparameters and limitations There is an energy dissipation in superconductors in microware fields who penetrates a thin surface layer and induces oscillations of the electrons which are not bound in Cooper pairs. In the two-fluid model of superconductors one can derive an expression for the surface resistance 푅퐵퐶푆 = 퐴푒− 푠 2 푇푐 푇 (1.1) Here 퐴 is constant, s is strong coupling factor, approximate 3.8 for Niobium, is critical temperature, 푇 is the bath temperature. In addition to the BCS term there is a residual resistance 푅푟푒푠 caused by impurities (Figure 1.2), frozen-in magnetic flux, or lattice distortions. This term is temperature independent and amounts to a few nΩ for very pure niobium but may readily increase if the surface is contaminated. Figure 1.2 Measured surface resistance of a 9-cell TESLA cavity. The residual resistance of 3 nΩ corresponds to a quality factor of 1011 The fundamental advantage of superconducting niobium cavities is the extremely low surface resistance of a few nano-ohms at 2 Kelvin as compared to several milli-ohms in copper cavities.  Heat conduction in niobium The heat produced at the inner surface of the cavity should be guided to the superfluid helium bath through the cavity wall. The thermal conductivity of the bulk Niobium and the temperature drop at the niobium-helium interface caused by the Kapitza resistance are two quantities that characterize the heat flow. The RRR (residual resistivity ratio) value indirectly indicates the purity of the bulk metal as well as interstitial contamination that can affect the performance of the superconducting properties. An RRR value of 300 is considered desirable as its good thermal conductivity.  Thermal instability and field emission
  • 15.
    Chapter 1 6GHz spun seamless cavities 5 One basic limitation of the maximum field in a superconducting cavity is thermal instability. The heating by RF losses is not uniform over the whole surface but that certain spots where the defects locate exhibit larger temperature rises, often beyond the critical temperature of the superconductor. Hence the cavity becomes partially normal conducting, associated with strongly enhanced power dissipation. Because of the exponential increase of surface resistance with temperature, this may result in a runaway effect and eventually a quench of the entire cavity. The tolerable defect size depends on the RRR of the material and the desired field level. As a typical number, the diameter of a normal-conducting spot must exceed 50 μm to be able to initiate a thermal instability at 25 MV/m for RRR>200 [5]. There have been many attempts to identify defects which were localized by temperature mapping. Examples of defects are drying spots, fibers from tissues, foreign material inclusions, weld splatter, and cracks in the welds. There are two obvious and successful methods for reducing the danger of thermal instability: (i) avoid defects by preparing and cleaning the cavity surface with extreme care (ii) increase the thermal conductivity of the superconductor. Field emission of electrons from sharp tips is the most severe limitation in high-gradient superconducting cavities. In field-emission loaded cavities, the quality factor drops exponentially above a certain threshold and x rays are observed. Small particles on the cavity surface (e.g., dust) is confirmed by the experimental that they act as field emitters [6]. Therefore, perfect cleaning, such as High-Pressure water Rinsing (HPR), is the most effective remedy against field emission. By applying this technique it has been possible to raise the threshold for field emission in multi-cell cavities from about 10 MV/m to more than 20 MV /m in the past few years. Standard fabrication techniques [1] The classic fabrication of a superconducting resonator consist of three major activities (see Figure 1.3[7]) Figure 1.3 General fabrication steps of standard fabrication technique for s.c. Cavities Niobium •Electron Beam Melting of Ingot in UHV oven •Rolling of sheets from Ingot •Cutting of circular or rectangular plates Cavity parts •Forming by deep drawing •Facing on turning machine •Preparation by chemical etching Welding •Electron beam welding machine/set up and vacuum •Electron beam welding parameter set •Preparation and sequence of welding
  • 16.
    6 1.1.2 Standardfabrication techniques [1]  Fabrication of Niobium The 9-cell resonators are made from 2.8 mm thick sheet niobium by deep drawing of half-cells, followed by trimming and electron beam welding. Niobium of high purity is needed. Tantalum with a typical concentration of 500 ppm is the most important metallic impurity. Among the interstitially dissolved impurities, oxygen is dominant due to the high affinity of Nb for O2 above 200℃. Interstitial atoms act as scattering centers for the unpaired electrons and reduce the RRR and the thermal conductivity. The niobium ingot is highly purified by several remelting steps in a high vacuum electron beam furnace. This procedure reduces the interstitial oxygen, nitrogen, and carbon contamination to a few ppm. After forging and sheet rolling, the 2.8 mm thick Nb sheets are degreased, a 5 mm surface layer is removed by etching, and then the sheets are annealed for 1-2h at 700℃ -800℃ in a vacuum oven at a pressure of 10-5-10-6 mbar to achieve full recrystallization and a uniform grain size of about 50 μm.  Fabrication of Cavity parts and welding Cups are produced by deep drawing. The dies are usually made from a high yield strength aluminum alloy. To achieve the small curvature required at the iris, an additional step of forming, e.g., coining, may be needed. The half-cells are machined at the iris and the equator. At the iris the cup is cut to the specified length (allowing for weld shrinkage) while at the equator an extra length of 1 mm is left to retain the possibility of a precise length trimming of the dumbbell after frequency measurement. The accuracy of the shape is controlled by sandwiching the cups between two metal plates and measuring the resonance frequency. The cups are thoroughly cleaned by ultrasonic degreasing, 20mm chemical etching, and ultrapure water rinsing. Two cups are then joined at the iris with an EB weld to form a “dumbbell.” The EB welding is usually done from the inside to ensure a smooth weld seam at the location of the highest electric field in the resonator. Since niobium is a strong getter material for oxygen, it is important to carry out the EB welds in a sufficiently good vacuum. Tests have shown that RRR=300 niobium is not degraded by welding at a pressure of less than 5×10⁻⁵ mbar. The next step is the welding of the stiffening ring. Here the weld shrinkage may lead to a slight distortion of the cell shape which needs to be corrected. Afterwards, frequency measurements are made on the dumbbells to determine the correct amount of trimming at the equators. After proper cleaning by a 30mm etching, the dumbbells are visually inspected. Defects and foreign material imprints from previous fabrication steps are removed by grinding. After the inspection and proper cleaning (a few mm etching followed by ultraclean water rinsing and clean room drying), eight dumbbells and two beam-pipe sections with attached end cups are stacked in a precise fixture to carry out the equator welds which are done from the outside.
  • 17.
    Chapter 1 6GHz spun seamless cavities 7  Cavity treatment The completed cavity has both internal and external chemistry to further remove the damage layer from the fabrication steps of both welding and handling. A smooth outer surface is necessary to provide good thermal contact with the cryogenic bath. In total about 150-250 m of niobium material is removed from the interior RF surface of the cavity through several cleaning steps. After each of these acid etchings the cavity has a new superconducting RF surface and can have different RF performance and a different gradient limitation. Disadvantages and limitation The two primary issues with cavity fabrication are quality assurance on the niobium materials and on the electron beam welds. Niobium materials must be scanned to detect and eliminate surface defects, and then protected with care throughout the manufacturing process. Contaminated or defected material will ultimately limit the gradient performance of a completed cavity. As with the surface defects, impurities in the welds and heat a defected zones next to welds will also limit the gradient performance. Welds must have a smooth under bead and form no surface irregularities, in particular, sharp edges where the weld puddle meets the bulk material. Defects in the equator welds will limit the gradient by thermal quenches due to the high magnetic fields there. Thermal mapping of quench locations suggests that they are typically located at or near the equator region. Cavity fabrication by electron-beam welding of deep-drawn half-cells is a delicate procedure [5], requiring intermediate cleaning steps and a careful choice of the weld parameters to achieve full penetration of the joints. First, two half cells are connected at the iris; the stiffening rings are welded in next. At this point weld shrinkage may lead to a slight distortion of the cell shape which needs to be corrected. Particularly critical are the equator welds, which are made from the outside, and a reliable method for obtaining a smooth weld seam at the inner cavity surface was required. 1.2 Seamless cavities 20,000 nine-cell resonators would be required for the ILC [4]. A great many physicists believe that a so huge amount of resonators could be manufacturable using the standard fabrication technique [8], and the bare bulk Niobium cavity costs roughly include material costs and fabrication costs. 500 tons of high purity Niobium will be need; the procedure of EB welding is very complicated as described in the previous section and longtime costs. For this reason there is a trend to research on alternative fabrication technology [9] At the National Institute of Nuclear Physics in Legnaro (INFN-LNL) the well-known spinning technique has been adapted to form a fully seamless resonator without electron
  • 18.
    8 1.2.1 Descriptionof Spinning technique beam welding [13]. In this way, starting from a disk or a seamless tube, it is possible to build seamless cavities with no intermediate annealing, more rapidly, simply, and with a uniform thickness. Both 1.3 GHz niobium and copper cavities can be easily manufactured with high reproducibility and significant savings in manufacture costs. Description of Spinning technique Spinning of a seamless mono-cell resonator from a circular blank is depicted on Figure 1.4. The process is mainly divided in four steps [10]. A circular disk of 400 mm diameter and 3 mm thickness is first preformed onto a frustum shaped mandrel, then the first half-cell is formed and a cylindrical shape is given to the remaining part of the piece, by means of a second pre-mandrel. The third step consists in spinning the obtained manufacture onto a collapsible mandrel that has exactly the same shape of the cavity interior, up to when the roller overcomes the equator and fixes the piece to spin onto the mandrel. Then the fourth and last step consists in inserting a further frustum-shaped collapsible mandrel in order to guide the material when spinning the second half-cell. Both collapsible mandrels are then removed. Figure 1.4 Spinning of a seamless mono-cell resonator from a circular blank. No intermediate annealing is required during forming. Figure 1.5 shows schematically the various manufacturing steps needed for conventional cavity fabrication and the reduced number of manufacturing steps for fabrication of seamless cavities.
  • 19.
    Chapter 1 6GHz spun seamless cavities 9 Inspect Material Deep Draw Half Cell Assemble For Trimming Trimming For EBW Degreasing Buffered Chemical Polishing EWB Of Dumbbells Leak Checking Inspection Of Weld + Surface Mech. Grinding Of Dumbbell Degreasing Buffered Chemical Polishing N × EBW Of Dumbbells EBW Of Beampipes / Fianges Weld Inspection Leak Checking Conventional cavity fabrication Inspect Material Deep Draw Tube Grinding Of Tube Degreasing Spin Cavity On Mandrel Remove Mandrel Inspect Cavity ( Grind ) EBW Beampipe / Flanges Leak Check Cavity Seamless cavity fabrication Figure 1.5 Process comparison of conventional and seamless cavity Fabrication [11] RF measurements and results of seamless cavities Cavities after spinning must be internally tumbled or mechanically grinded, then simply chemical polished. Low temperature radiofrequency tests have proofed that the seamless approach and in particular spinning is a solution worthwhile to pursue. Spun cavities was sent to CERN, DESY, TJNAF and to KEK for characterization. CERN proved that spun copper mono-cells are superior to hydro-formed ones, because of lower losses and lower Q-slope. Accelerating fields up to 25 MV/m was measured at DESY on 1.3 GHz Niobium mono-cell cavity; At KEK and CERNM, the accelerating fields achieved 40MV/m on mono-cell and 25MV/m on 3-cell cavity, a 9-cell has not been tested yet. 1.3 6 GHz cavities The R.F. characterization of samples is a useful diagnostic tool to accurately investigate local properties of superconducting materials. However the most common limitation of such a system, consists often in the difficulty of scaling the measured results to the real resonator [12]. Using 1.3/1.5 GHz resonant structures cavities is obviously the most direct way, but
  • 20.
    10 1.3.1 Advantagesof 6 GHz cavities would be too onerous both for the material cost and the cryogenic expense. Instead, the micro-cavities that completely equal in shape to the real scale model would be the best and most direct way for measuring material R.F. properties. Using the spinning technique, it becomes feasible to produce small scale resonators in little time, negligible cost and in large quantity. In INFN-LNL, large number of 6 GHz cavities made of Niobium, Cooper, Lead, even Iron (Figure 1.6) have been produced by spinning technique to study the effectiveness of innovative surface treatments, new thin film deposition techniques, new superconducting materials for RF applications. Figure 1.6 Picture of 6 GHz cavities made by different material. From left to right are Niobium cavity (thickness 3mm), lighten Niobium cavity (thickness 2mm), Cooper cavity, Iron cavity and Lead cavity. Advantages of 6 GHz cavities 6 GHz cavities, which geometry shown in Figure 1.7 are made from the remaining material of larger cavities fabrication using spinning technology, they don’t need welding (even for flanges) and finally they can be directly measured inside a liquid helium Dewar. With 6 GHz cavities it is possible to perform more than one RF test per day, while 1.3/1.5 GHz cavities need no less than 1 week time preparation for the RF test. With a tool like this it is possible to study traditional and innovative surface treatments and to perform RF tests on a large amount of cavities with a research budget much lower than the one necessary to treat and tests real cavities. It is also possible to study new thin film superconducting materials grown for example by sputtering or thermal diffusion.
  • 21.
    Chapter 1 6GHz spun seamless cavities 11 Figure 1.7 The 6 GHz cavity geometry Summarily, the spinning seamless technology has several advantages in comparison with welding one [13]:  no welding;  short fabrication time;  equipment could be adapted for any size of the cavity, and any quantity of cells;  comparably low fabrication costs;  no intermediate annealing;  almost no scraps; Drawback A die (see Figure 1.8(a)) has exactly the same shape of the cavity interior, composed of three collapsible mandrels is used to guide the material when spinning. (a) (b) (c) Figure 1.8 (a)Drawings of the die, which is composed of two cylinders and a shell, assembled and ready for the spinning operation; (b)Disassembled when partially extracted after spinning; (c)Exploded view of the nylon shell of the die with all its ten sectors.[14] In order to extract the die from the final resonator, two things are taken into account: 1) The central mandrel is Nylon shell, which composed of eight sectors (Figure 1.8(c)), locked together by the two steel cylinders. It is cut symmetrically along a longitudinal plane two four pairs of identical and opposite sectors. 2) Pure motor oil is used as the lubricant between the die and resonator.
  • 22.
    12 1.3.3 Standardsurface polishing techniques Evident vertical scratches (see Figure 1.9) were extruded in the inner surface of the cavity due to the using central mandrel; cavity must be electropolished or chemical polished of the internal surface immediately after spinning, and then immersed in an ultrasonic bath to remove oil contamination. Figure 1.9 Image of inner surface at the center of the cavity, two evident vertical scratches shown in the red rectangles. Standard surface polishing techniques The spinning process implies material surface defects, stress and dislocations. The cavity cell is characterized by the presence of evident vertical scratches due to the used mandrel. Obviously the internal surface finishing of a resonant structure is directly correlated to its performance, especially at high fields. Moreover, the lubricant, necessary for the metal mechanical processing can contaminate the used material. The idea is to make the surface smooth and free from contaminants. There are four techniques used for material removal in 6 GHz cavities: Tumbling, Lapping, Buffered Chemical Polishing (BCP) [15] and Electro-Polishing (EP) [16].  Tumbling Tumbling is one of the mechanical polishing treatment, using the abrasive media to remove the defects. Usually it is done by Centrifugal barrel polishing (CBP) machine. During mechanical treatment, it is necessary to monitor the weight and the morphology of inner surface changing after each tumbling for each cavity. Mechanical polishing treatment of 6 GHz cavities is the core content of this thesis that will be discussed in detail in later chapters.  Lapping After finishing the mechanical polishing of internal surface of cavity, the flanges needs to be lapped flatly using the metallographic polishing machine (Figure 1.10). The
  • 23.
    Chapter 1 6GHz spun seamless cavities 13 aim of this step is to avoid the vacuum leaking during the cryogenic RF test. At the beginning of lapping, the big roughness abrasive paper would be better for the burrs. Then change to low roughness one, which will increasing the smoothness of the flanges. Finally, using the alcohol as the polishing liquid instead of water. After lapping, it is necessary to make precise washing of cavity in ultrasound bath with soap in few steps and rinsing with acetone and ethanol. Figure 1.10 Metallographic polishing machine with sandpaper  BCP Buffered Chemical Polishing (BCP), in use for over 20 years, is recognized to be the most reliable and stable process. The composition of the mixture is 1:1:2 in volume of hydrofluoric (HF 49%wt), nitric (HNO3 69.5%wt) and ortho-phosphoric (H3PO4 85%wt) acids, with a viscosity, at room temperature, of 0.022 Pa-s and a density of 1545 kg/m3 [17]. Figure 1.11 The stand for BCP and EP As one of chemical treatments, BCP, performed using the standard mixture of acids, removes the possible niobium sub-oxide and contaminants, resulting in a smoother inner surface of the cavity. In our case, 6 GHz cavity is treated by a small system as the one present in Figure
  • 24.
    14 1.3.3 Standardsurface polishing techniques 1.11, which designed for both traditional surface chemical treatments: BCP(does not require cathode) and EP (require cathode) in INFN-LNL. After the BCP, 300μm thickness corresponding to around 30 grams damage layer is removed.  EP Electro-Polishing is believed to be the most desirable treatment for SRF cavities [18], the principle of which is presented in Figure 1.12. EP is an anodic electrochemical treatment carried out in concentrated hydrofluoric-sulfuric (HF-H2SO4) acids electrolytes in proportions 1-9. Figure 1.12 The schematic diagram of EP  HPR High pressure rinsing (HPR) is nowadays routinely used in the process of superconducting RF cavities assembly to remove residuals from the resonator wall. The pressure of high pure water is about 100 MPa. It is successful in improving cavity performances, mainly reducing field emission. It is usually done before the RF test. Figure 1.13 HPR for 6 GHz cavities in LNL-INF
  • 25.
    Chapter 2 Mechanicalpolishing approaches 15 Mechanical polishing approaches Cavity defects compromise the achievable values of Q-factor and accelerating fields. Mechanical polishing is the first and impartment step to eliminate defects in the cavity interior. In order to develop a high erosion rate, stable, cheap and safe apparatus, many commercial product like Turbula and some custom designed devices like Zigzag tumbler, CBP and polishing brush have been applied and studied to polish the 6 GHz spun seamless cavities. Some of them run with unsatisfying erosion rate, while other works unstable for long time and it will cost more time and money to repair them when problem happens. But finally, a new mechanical polishing system based on vibrator, with good performance was invented. It will be detailed introduction in the next chapter. 2.1 TURBULA® Shaker-Mixer Figure 2.1 TURBULA® Shaker-Mixer (model T2F) and 6 GHz cavity TURBULA® Shaker-Mixer presented in Figure 2.1 is one product from Glen Mills Inc., it is used in many exacting powder blending and mixing applications [19], such as used for homogeneous mixing of powders or different wet components with differing specific weights and particle sizes. But it also includes the application for metal finishing, intricate precision parts can be deburred and polished without damage. It is composed of plastic container, elastic bands, crowns, and tensioning tool. The mixing container is set into three-dimensional movement that exposes the product to
  • 26.
    16 2.2 Centrifugalbarrel polishing (CBP) always changing, rhythmically pulsing motion; the exceptional efficiency comes from use of rotation, translation and inversion according to the Schatz geometric theory; the speed change is by the step pulley. The cavity was filled with the abrasive media and assembled to the plastic cylinder shell with the configuration shown in Figure 2.2. Then the cylinder was mounted to the tumbling container utilizing its unique clamping system. It is available to modify the frequency of tumbling and set the run time. The characteristics of this tumbler are safe, quiet, but low erosion efficient, 15mg/h is of the maximum value up to now. It could be ascribed to the frequency of the movement, which could not be set at very high, otherwise the system would be very unstable and easily broken. Figure 2.2 The section of the configuration of cavity before mounting to the TURBULA® Shaker- Mixer 2.2 Centrifugal barrel polishing (CBP) CBP is considered a valuable method that limits the use of harsh chemicals, which would decrease the environmental impact of the surface treatment process while increasing the smoothness of the surface. The studying of the centrifugal barrel polishing began in the mid to late 1990s. As one of the mechanical polishing equipment, the first CBP system was first build at KEK, High Energy Accelerator Research Organization (KEK) by Kenji Saito & Tamawo Higuchi, and adopted by many other laboratories around the world, the Thomas Jefferson National Accelerator Facility (JLab), the Raja Ramanna Centre for Advanced Technology (RRCAT), Fermi National Accelerator Lab (Fermilab) and so on. A mirror like finishes on the 1.3GHz Tesla-type cavity SRF surface has been produced in Fermilab. All these labs designed their own system or bought industrial machines based on the same principle: mechanically polished the inner surface of the SRF cavities by rotating them at high speeds while filled with abrasive media, which is shown in the Figure 2.3.
  • 27.
    Chapter 2 Mechanicalpolishing approaches 17 R Turntable Equation of cavity Media R Fmedia Vmedia r Figure 2.3 Schematic diagram of the Centrifugal barrel polishing (CBP). The red point is the reference point when the angular velocity of the barrel related to the turntable 휔2 equals to zero. The tangential speed of the media sliding on cavity wall was calculated with the formula 푉푚푒푑푖푎 = (휔1 + 휔2) × 푟 (2.1) Where,  휔1 - Angular velocity of turntable;  휔2 - Angular velocity of cavity related to the turntable;  r - Radius of the cavity. The centrifugal force of the media is 퐹푚푒푑푖푎 = 푚푉푚푒푑푖푎 2 푅+푟 (2.2) Where,  푚 - Mass of the media;  푅 - Radius of the trajectory of cavity. In INFN-LNL, one CBP system presented in Figure 2.4(a) was developed several years ago, in which the 휔2 = 0, worked properly and with high erosion rate. The dimension was not so big that it save much lab space. In this system, six 6 GHz cavities were tumbled together by fixing them in two groups like the way shown in Figure 2.4(b). But in the CBP process the whole system was shaken due to only one barrel spin around a central shaft. In this situation, the central shaft endured a big tensile force when work at high revolving speed and would be broken after a long time working. At present, the CBP machine has been industrialized (Figure 2.5), which used for 9 cells TESLA-type cavities tumbling. There are two or four barrels at axial symmetry position. Each barrel spins around its own axis at the same speed and in the opposite direction as the main shaft. This secondary rotation of the barrel around its own axis greatly reduces processing time (Figure 2.6). ω1 ω2
  • 28.
    18 2.3 Zigzagtumbler (a) (b) Figure 2.4 (a) Photograph of the CBP system in INFN-LNL. (b) The configuration of the cavities. Figure 2.5 Industrial centrifugal barrel polishing machine Figure 2.6: Schematic of main shaft and 2 barrels of a centrifugal barrel polishing machine denoting the directions of rotation. This is a model of the Fermilab machine with a 9-cell Tesla – type cavity and counterweight shown in the barrels [20]. 2.3 Zigzag tumbler The tumbler presented in Figure 2.7, which named zigzag tumbler, was another
  • 29.
    Chapter 2 Mechanicalpolishing approaches 19 attempting to polish the cavity in an easy, cheap way. The cavity was filled with abrasive media and blocked off by two plastic plugs in both terminals, then put into the tumbler and sealed by the cap (Figure 2.7 (c)). When the tumbler turned by pivoting its center shaft with a high speed, the cavity was rotated by the zigzag style. The media in the cavity was not rotated so fast as the cavity due to the force of gravity itself, therefore a relative movement is exit between the cavity and the media. (a) (b) (c) Figure 2.7 The 3D drawing (a) and entity (b) of the zigzag tumbler Two different way which called dry polishing without water and wet polishing with water were tested, but there is no essential difference between the two results. In both situation, the erosion rate of zigzag tumbler was not as high as expected due to the small force inflicting to the inner surface of the cavity, although with a very high turning speed. 2.4 “Flower brush” “Flower brush” design for polishing 6 GHz cavities Polishing brush is one product that mainly used for deburring, fine grinding and other processing for the parabolic surface. It is mainly composed of the iron wire as a skeleton, with lots of neat rows of fine brush filaments stretching outwards (Figure 2.8). The material of brush wire is nylon yarn, fiber hair, bristle, steel wire, copper wire, abrasive wire and so on, have different scope respectively. The polishing brush on the market was usually used to polish the inner surface of tube, whose diameter equal everywhere. For 6 GHz cavities, the dimension of two terminals are small and the center is bigger, while the center is the aim region should be mainly polished, therefore, the brush mentioned above is not suitable obviously. So it needs to design a customized brush that can go to the center of the cavity and can change the angle in order to polish the whole area inside. Base on this idea, a brush was machined and assembled, whose 3D drawings was shown in Figure 2.9. As its special shape of the head and angle changeable leafs look like one flower, we call it “flower brush”. The whole “flower” is made in stainless steel (Figure 2.10), and the holes in the “leaves” was used to fix the abrasive material (shown in Figure 2.11), which is suggested to be wear-resistant material.
  • 30.
    20 2.4.1 “Flowerbrush” design for polishing 6 GHz cavities Figure 2.8 Polishing brush on the market Figure 2.9 3D drawings of “flower brush”. Figure 2.10 Photograph of “flower brush”.
  • 31.
    Chapter 2 Mechanicalpolishing approaches 21 (a) (b) Figure 2.11 Abrasive material. (a) Sand paper; (b) Scotch Brite Before putting the “flower brush” into the cavity, the abrasive material were fixed to the leaves of the “flower”, which presented in the Figure 2.12. We can test different abrasive material just by changing the “leaves” conveniently. (a) (b) (c) Figure 2.12 “flower brush” with abrasive material. When the leaves are ready, the petals are drawn in together as shown in the Figure 2.9(a) and pushed into the cavity, which is fixed on workbench well, then the brush is rotated by the driving of a handing , due to the centrifugal effect, the blades open automatically Figure 2.9 (b, c). Its angle can be changed by a thin line pulling wire by adjusting the position of the nut (Figure 2.9(d), the line is not shown). Thus it ensures each place of the interior surface of the cavity can be brushed, i.e., the inner surface of the center part of the cavity can be polished back and forth. Polishing test Test on lathe with abrasive paper a) The cavity was clean in the ultrasonic bath, flushed with the ethanol and dried with nitrogen before polishing; b) Fixed the cavity on one terminal of the lathe, which can move back and forth; c) Fixed the “flower brush” on the other terminal of the lathe, which can rotate; d) Put the “flower brush” into the cavity like Figure 2.13, then run the lathe, which
  • 32.
    22 2.4.2 Polishingtest rotation speed was 750 rpm, shown in the Figure 2.14. Figure 2.13 The way of putting “flower brush” into the cavity. Figure 2.14 The “flower brush” was polishing the cavity on the lathe. Polishing test driven by the pneumatic hand held polisher. The pneumatic hand held polisher was driven by air and its rotating speed was much higher than the lathe. a) Mounted the “flower brush” to the pneumatic hand held polisher (Figure 2.15). b) Fix the cavity on the workbench. c) Put the “flower brush” into the cavity and launch the pneumatic hand held polisher (Figure 2.16). Figure 2.15 The petals were spreading in high rotating speed
  • 33.
    Chapter 2 Mechanicalpolishing approaches 23 Figure 2.16 Polish the inner surface of cavity by pneumatic hand held polisher using “flower brush”.  summary of “flower brush” tests (i) In the lathe test, the polishing effect was not good due to the low rotating speed. (ii) But with a higher speed in the test 2, the sand paper was nearly broken in a short time with the high rotating speed and should be changed frequently. (iii) Scotch Brite in Figure 2.12 (c) is thick, so it is permitted to mount only 4 pieces, otherwise, the head of brush can’t be put into the cavity. (iv) In a short time, the Scotch Brite was also nearly broken. (v) 0.134g internal material of cavity removed in 2 minutes, which seems promising.
  • 34.
  • 35.
    Chapter 3 Vibratingsystem - a new mechanical polishing approach 25 Vibrating system - a new mechanical polishing approach After a long time exploration, a vibrating system was realized and studied to improve the erosion rate for different material cavities. This chapter will focus on how this system was developed step by step. 3.1 Industrial application of vibrator A vibrator is a mechanical device to generate vibrations by an electric motor with an unbalanced mass on its driveshaft. Vibrators are used in many different industrial applications both as components and as individual pieces of equipment [21]. Vibratory feeders and vibrating hoppers are used widely in the pharmaceutical, food, and chemical industries to move and position bulk material or small component parts. The application of vibration working with the force of gravity can often move materials through a process more effectively than other methods. Vibrating screens are used to separate bulk materials in a mixture of different sized particles. Vibrating compactors are used for soil compaction especially in foundations for roads, railways, and buildings. Concrete vibrators consolidate freshly poured concrete so that trapped air and excess water are released and the concrete settles firmly in place in the formwork. 3.2 Resonance-the original idea Resonance phenomenon is refers to the mechanical system by excitation frequency and the system of a certain natural frequency were close, system amplitude increase significantly. And this excitation frequency is called resonance frequency. The input energy of motivate to the mechanical system is the largest when resonance. A system of many objects can have more than one resonance frequency. According to this idea, we design a combined spring vibration system, which configuration is shown in Figure 3.1. The square object with the mass m is the vibration source, which makes the upper and lower two springs vibrate in the landscape orientation in small range. Both springs have same stiffness k0, the original length is l0. At the equilibrium position, they are elongated to l1 and l2, both sides of the object under tension T1 and T2. Now the object in the lateral direction (the x direction) for a slight
  • 36.
    26 3.2 Resonance-theoriginal idea vibration, then the equivalent stiffness of this combination spring of the vibration system and the system natural frequency can be derived as follows. Figure 3.1 The configuration of combined spring vibration system Objects in the x direction by the (0, 0) moves to the (x, 0) position, the upper and lower spring extension individually from l1 to √푙1 2 + 푥2 and from l2 to √푙2 2 + 푥2, then the size of the spring restoring force is 푇1 = 푘0(√푙1 2 + 푥2 − 푙0) (3.1) 푇2 = 푘0(√푙2 2 + 푥2 − 푙0) (3.2) The force to the objects includes both sides of the spring tension and the gravity, the total force is zero, so no motion in the y direction. Two component of spring tension T along the x-direction are F = 푇1푠푖푛휃1 + 푇2푠푖푛휃2 (3.3) Where, 푇1 = −푘0(√푙1 2 + 푥2 − 푙0) (3.5) 푇2 = −푘0(√푙2 2 + 푥2 − 푙0) (3.6) 푠푖푛휃1 = 푥 √푙1 2+푥2 (3.7) 푠푖푛휃2 = 푥 √푙2 2+푥2 (3.8) This force causes the object accelerate along the x direction to return to the equilibrium position, so it is
  • 37.
    Chapter 3 Vibratingsystem - a new mechanical polishing approach 27 F = 푇1푠푖푛휃1 + 푇2푠푖푛휃2 = −푘0 (1 − 푙0 √푙1 2+푥2 ) 푥−푘0 (1 − 푙0 √푙2 2+푥2 ) 푥 (3.9) 퐹 = −푘0 (2 − 푙0 √푙1 2+푥2 − 푙0 √푙2 2+푥2 ) 푥 = 푚 푑푥2 푑푡2 (3.10) This is the system dynamic equations of vibration. In the x and l take the same order of magnitude of value, this is a second-order nonlinear differential equation. This equation can be seen that the lateral vibration spring oscillator does not belong to simple harmonic motion, but when the object vibrate in small laterally, that x << l so √푙1 2 + 푥2 ≈ 푙1, 푎푛푑 √푙2 2 + 푥2 ≈ 푙2 established, the force F acting on the object is proportional to the displacement x of the object, namely 퐹 = −푘0 (2 − 푙0 푙1 − 푙0 푙2 ) 푥 = −푘푥 (3.11) Where, x is the displacement in laterally; k is the equivalent stiffness of the system, equal to 푘0 (2 − 푙0 푙1 − 푙0 푙2 ). Vibration dynamic equations are as 푑푥2 푑푡2 + 푘 푚 푥 = 0 (3.12) This is the dynamic equations of simple harmonic motion. This equation can be obtained natural circular frequency of the system 휔0 = √ 푘 푚 = √ 푘0 푚 (2 − 푙0 푙1 − 푙0 푙2 ) (3.13) And the system natural frequency is 휈0 = 1 2휋 √ 푘0 푚 (2 − 푙0 푙1 − 푙0 푙2 ) (3.14) The natural frequency not only relies on the system oscillator mass m, the spring parameters l0, k0, but also on the initial state of the system l. 3.3 Experiment with small vibrator The first experiment There is no information reported till date in tumbling process using vibrator technique for cavities in SRF field. Transferring the idea into reality often takes some time and it will not know the eventual result until a large number of tests been done. Firstly, an idle vibrator with small dimension and power of 22 Watts was tested (Figure 3.2). The components of the system were assembled in a very easy way. The vibrator and the cavity are hung by two springs and a piece of plastic plate, shown in Figure 3.3. The springs connected with two adjustable rod. The cavity is closed by
  • 38.
    28 3.3.1 Thefirst experiment two blind flange and fixed by Aluminum plates, which composed by two halves. Two pieces of 1 mm thick rubble with grease were clamped between the cavity and the Aluminum plates, playing a role in cushioning and lubrication. The polish material, such as silicon carbide, silicon oxide and water, were put inside the cavity. The whole stuffs before assembled are shown in Figure 3.4. Figure 3.2 Picture of the firstly using vibrator Figure 3.3 One example of the vibrator system for 6 GHz cavity Figure 3.4 The diagrams of Assembly process before hanging up The vibrator works at single phase Alternating Current (AC) 220 Volts with Power- Frequency (50Hz). After switch on, the cavity was vibrated with the springs, and the sound of media polishing the surface was clear, what’s more, the cavity can turn
  • 39.
    Chapter 3 Vibratingsystem - a new mechanical polishing approach 29 spontaneously when vibration, while the black rubber was not move as its elasticity and effect of the grease. There are some advantages of this system: 1) The structure is simple, and it is easy to assemble and disassemble all the parts; 2) Tightness of the spring is adjustable, means the intrinsic frequency in landscape orientation can be changed equally to the vibrating frequency; 3) It can rotate itself that makes available to tumbling uniformly to the inner surface without bearings and motor driving. On the other hand, this system also has some disadvantages obviously: 1) The grease add between the rubber and the cavity contaminates the external surface of the cavity, hence need to clean more often; 2) Sometimes the cavity stop rotate due to the blocking with the sheet rubber, it may cause inhomogeneous removal of inner material; 3) The rotation direction of the cavity can’t be control without other auxiliary equipment; 4) The vibration frequency is not changeable. The second experiment In order to eliminate the negative factors, and sometimes we don’t want to clean the cavity after tumbling, for example, tumbling spotless cavity with Tin. Therefore the targeted improvements should be conceived. We tried to use two bearings instead of Aluminum plates to connect the two flanges of cavity to avoid the contamination to the outer surface of the cavity, Firstly, the ordinary bearings fixed by two U-clamps are used shown in Figure 3.5, but the cavity can’t rotate itself well unless the bearing center, connection axis center, cover center and cavity direction center are in alignment, in which situation rotate with a smaller mechanical stress. Figure 3.5 A complete mechanical (Vibrator) process-cavity mounted on vibrator through PMMA-glass (15 mm thick) support plate (transparent in figure) To solve this problem, self-aligning bearing was recommended and new bearing Bearing axis plain bearing
  • 40.
    30 3.4 Vibratorsystem for 6 GHz cavities holders were designed and fabricated (see Figure 3.6). Figure 3.6 Drawing of bearing holder and image of self-aligning bearing After this, the mechanical configuration of the cavity was basically solved and the new setup is shown in Figure 3.7, in which the cavity is sealed with half flange, O-ring, plastic blind flange and drive axis by M5 hex bolts; the self-aligning bearing is fixed into the bearing holder tightly and locked on the drive axis by the snap ring; the belt axis (shown detailed in Figure 3.8,) is connected to the drive axis. Figure 3.7 Drawing of mechanical configuration of the cavity. The assembled state is at left, and the Exploded Views is at right. Figure 3.8 Drawing of the belt axis 3.4 Vibrator system for 6 GHz cavities After determined of the mechanical configuration of the cavity, adjustable frequency vibration source, brackets, resonant spring, plate, drive motor, drive belt also requires careful design and carefully selected.
  • 41.
    Chapter 3 Vibratingsystem - a new mechanical polishing approach 31 Vibrator Figure 3.9 is the internal structures images of one commercial foot mounted electric vibrator which was chosen in the system. The type is MVSI 15/35 – S02, with centrifugal force 30.2kg, weight 5.6kg, max input power 85W, max current 0.21A at 50Hz. Power supply in our case is three-phase voltage ~400V. Figure 3.9 The internal structures images of one commercial vibrator Due to the strong and fast vibration during the polishing processor, everything refers to the vibrator should be designed specially. For example, the power supply cable at the connection box should be isolated by sponge, otherwise the cable may be broken-down (see Figure 3.10) after a long time impact to the box or some harder place. Figure 3.10 Images in first line is the consequence after neglecting the sponge, while in second line is the wright connecting way. (a) The cable was broken-down; (b) the cable was hurt by the shroud; (c) the cable was hurt by the cable jointing sleeve; (d) using the sponge to save the cable; (e) using electrical adhesive tape to protect the cable. control box The main role of the control box is to provide a three-phase adjustable frequency (a) (b) (c) (d) (e)
  • 42.
    32 3.4.2 controlbox power to vibrators, and power supply to the rotating motor and cooling fan. In the front panel, it allows to start, stop, and change the frequency etc., the rear panel is a power supply input and output interfaces. Only the Variable-frequency drive (VFD) and filter are arranged in the chassis, so space for heat dissipation is much enough. Figure 3.11 Sectional view of the inner and chassis dimensions Figure 3.12 is one part of the internal electrical wiring diagram. f nf M Vibrator Three-phase Power supply L1 L2 L3 N G G L1 L2 L3 U V W Fi lter Inverter Figure 3.12 Diagram of the electrical connection  VFD As described in the 3.1, commercial vibrators work at fixed frequency, mostly at 50Hz, our vibrator is work at or close to the system resonant frequency, which depend on the springs, the mass of the load and the material and the thickness of the plate. Figure 3.13 The main principle diagram of the VFD [22] A VFD (also termed adjustable frequency drive, variable speed drive, AC drive, micro drive or inverter drive) is a type of adjustable-speed drive used in electro-mechanical drive systems to control AC motor speed and torque by varying motor input frequency and voltage[23] Frequency converter (Figure 3.13) is mainly composed of rectifier (ac to dc), inverter
  • 43.
    Chapter 3 Vibratingsystem - a new mechanical polishing approach 33 (dc to ac), brake unit, drive unit, detection unit, micro processing unit, and drive operator interface. In addition, the inverter contains many protective functions, such as over-current, over-voltage protection, overload protection, etc. In the vibrator system, we choose the product from Fuji Electric Co., Ltd, the inverter type is FRN4.0E1S-4E (Figure 3.14), which is a standard type without EMC filter built-in. The maximum frequency it can supply is 400Hz. Figure 3.14 Picture of real products FRN4.0E1S-4E which keypad can install to the front panel of the control unit of the vibrating system by the cable with RJ-45 connectors  Inverter input filter Inverter input filter shown in Figure 3.15 is one kind of the special inverter filter, whose mainly function includes the following aspects: Figure 3.15 3 phase RFI Filter a) Inhibition of high order harmonic frequency of converter The process of rectifying of frequency converter is the equivalent of a high speed switch, therefore, it will produce large amounts of high order harmonic. These higher harmonics, with the flow of power, are brought into the grid, which led to sensitive equipment using the same grid interference; b) Preventing frequency converter from interference Frequency converter is an interference source, is also an interfered source, or also called sensitive equipment. If harmonic in the power grid is too high, and harmonic content is too large, the inverter will sent over voltage, over current, overload and other false alarm;
  • 44.
    34 3.4.3 Mechanicalconfiguration c) Improving system power factor Inverter input filter, with certain compensation function, can improve the power factor of the whole control system. It also has a certain energy-saving effect; d) Ease the three-phase imbalance If the input of the inverter phase imbalance, in the severe cases, it will cause the inverter out of work. Coupled with the inverter input filter, it can alleviate this problem effectively. Mechanical configuration As reported in Figure 3.16, the brackets was made of 6 Aluminum profiles, which high is adjustable. The rubber shock absorbers at the bottom are necessary. The plate machined by stainless steel or non-metallic material was hung between the upper and lower two Aluminum profiles by 3 springs using custom nuts (Figure 3.17). The plate in the drawing is suitable for 2 cavities tumbling simultaneously. The upper two springs fixed by two screws reduce the force of themselves to half assure that they can work for long time without breaking. The bottom spring makes sure the vibrator and cavities stable and the plane of the plate is perpendicular to the horizontal plane. The vibrator is fixed to the plate in the direction that makes the driveshaft perpendicular to horizontal plane. In this situation, the unbalance mass in the vibrator rotate paralleling to the horizontal plane, and don't have to overcome the gravity to do work, so as to improve the conversion efficiency of electrical energy. In order to polishing the cavity homogeneously, the cavity must be rotated while vibrating. Both the cavities can connect to the motor axis direct of connect in series. Obviously, rigid belt with no elasticity can’t be used here, it must choose one belt with prefect elasticity and long fatigue life. Figure 3.16 Schematic drawing of the vibrating system equipped with two 6 GHz cavities
  • 45.
    Chapter 3 Vibratingsystem - a new mechanical polishing approach 35 Figure 3.17 connection of the spring and the plate using the custom nuts The stepper motor (Figure 3.18) mounted at the bottom, contains a control board itself and it is easy to program the motion, for example let the cavity rotate back and forth, fast or slowly, and create the opportunity to find out the effect of the cavity rotation behavior. The motor position also need to be adjustable to suit different length rubble belt. The motor belt wheel (see Figure 3.19) connected to the motor can drive two cavities simultaneously. Figure 3.18 Image of programmable stepper motor Figure 3.19 Drawing of motor belt wheel
  • 46.
    36 3.4.4 Fallingdetecting switch Falling detecting switch The vibrator is very powerful especially work at high frequency. The springs as one part of the resonance system has the limited fatigue life. It is uncertain when it will break, the direct result of which is the cavity and vibrator fall down to the fall without giving signal to the control system. So spring broken is one potential threaten that may induce the cavities falling down while the vibrator is still working. Such situation happened during the polishing process before. It is certainly need an effective mechanism to detect the falling action and stop the system running, otherwise it may cause secondary damage. There are two proposed scheme in our case. The first one is piezo-electric accelerometer, which principle diagram is shown in Figure 3.20. It measures proper acceleration (rate of change of velocity), which is the acceleration it experiences relative to freefall and is the acceleration felt by people and objects. The acceleration of the cavities bound with the accelerometer will change at the moment when they fall to the floor. But measure this acceleration is not the ultimate aim, it need to transfer this value to a digital level (0V or 24V) which as the input to the control system, and it is different to do this without special conversion circuit, which will increase the complexity of system and also may cost much money. Figure 3.20 The cross section view of the accelerometer [24]. The idea of second scheme comes from the impact sensor which is usually used in the car as the switch of the air bag. The principle is easily understand, and the structure is not complicated (Figure 3.21). Figure 3.21 The schematic diagram of impact sensor. 1-Mercury (static position); 2-Housing; 3-Mercury (dynamic position); 4-Ring; 5-Electrodes (contacts firearms); 6-Electrode (connected to power); 7-Sealing plug; α- deceleration; F1-mercury movement direction component; F2-level component; a- the angle between mercury movement direction and the horizontal direction
  • 47.
    Chapter 3 Vibratingsystem - a new mechanical polishing approach 37 Figure 3.22 One example of the commercial impact sensor. The commercial one shown in Figure 3.22 may not suitable for our system as the glass housing and the short length. However, it is possible to design a desirable one with any dimension and use similar conductive liquid inside instead of mercury, which may harmful to the environment. In the design (Figure 3.23), the RF connector was used as the electrodes and sealing plug that simplifies the structure and gets a well sealing. The housing is made by transparent plastic and is easy to machining. Figure 3.23 The drawing of the custom impact sensor When falling down happen, the conductive liquid in the housing will short the RF connector and it is easy to transfer this switch signal to the inventor using the circuit presented in Figure 3.24. Figure 3.24 Schematic of the trigger capture and fault display circuit. Components in this circuit include 1 relay with 2 normal open contacts, 1 reset switch (spring switch) and 1 lamp (led 24V) only. And it is easy to connect to the interface of 24V 0V mercury switch relay K NC1 of K Reset NC2 of K X1 CM Digital input of inverter
  • 48.
    38 3.4.4 Fallingdetecting switch the inventor (Figure 3.25) and determines the work state by setting the corresponding command. Figure 3.25 The connector circuit in the inventor.
  • 49.
    Chapter 4 Automationof the optical inspection system for 6 GHz cavities 39 Automation of the optical inspection system for 6 GHz cavities Consecutive inspections of cavities in different stages of the surface preparation process allow a monitoring of the evolution of surface defects. It will also be very helpful to put the suitable media inside the cavities during mechanical polishing and establish the right treatment duration to perform the best internal surface finishing if we know the morphology after each treatment. In INFN-LNL, every cavities were taken a record of the inner surface after each mechanical or chemical treatment with the help of an optical inspection equipment. Generally speaking, every cavity may be tumbled 10 times at least, and taken 20~30 images of inner surface each time. For 100 cavities, 20~30 thousands of images should be token. No only taking picture is a time consuming process but manager and inquire all these pictures is also a heavy job. In order to improve the efficiency of taking pictures and create a database of images of every cavity after each treatment, the existing optical inspection equipment need to update, including mechanical system upgrades and photo software development. 4.1 Before updating System introduction The idea of the optical inspection system is to check an eventual defect evolution before and after each polishing treatment without any risk to touch the internal surface of the small cavity. The system was fabricated a few years ago. It is made up of three parts: miniature camera, mechanical support and one computer. (Shown in Figure 4.1) It was an artful though to use an intraoral camera to investigate the inner surface of small cavity because the camera was a mature products and the dimension of the camera extremely suitable for the 6 GHz cavity, i.e., the length of the camera head is 94mm, which approximately equals to the length of the cavity; the diameter of the camera head is 12mm, which less than the inner diameter of the cavity, therefore, the camera allows one to take photo anywhere inside the cavity. The camera and the cavity both can move forward and backward along the guide, in which a graduation ruler measuring the moving distance is attracted by magnets. In addition, the camera can move up and down by modifying the nut. The cavity was put
  • 50.
    40 4.1.2 Thenecessity of the automation on four small wheels which permit the cavity rotate smoothly. The rotation angle can be measured by the rotundity goniometer. Figure 4.1 The optical inspection equipment before updating The camera is control by a computer through the Firewire (IEEE 1394A) interface, which can deliver high-resolution digital video for great image quality to the computer. The images are captured by the software offered by the company, which shown in Figure 4.2. Figure 4.2 Photo software interface The necessity of the automation Before updating, the photography process is operated by manual. The cavity can be divided into 5 sections from left to right as reported in Figure 4.3, the left neck, left iris,
  • 51.
    Chapter 4 Automationof the optical inspection system for 6 GHz cavities 41 equator, right iris and right neck. For each section, images should be taken at every 60 degree during the cavity rotating. From left to right, the camera should zoom in or zoom out accurately to focus 5 times due to the cavity shape changing. Figure 4.3 The cross section of the 6 GHz cavity What’s more, every image captured by the software have to be rename by hand one by one in order to record relevant information, such as material, weight, tumbling numerical order, date, position and angle. 4.2 The realization of automation Updating of mechanical part Figure 4.4 3D schematic diagram of the optical inspection system mechanical upgrades In order to realize automation, 3 stepper motors and relevant auxiliary machineries are added (Figure 4.4). The camera and focus motor are fixed in the rail. The ratio of the focus drive gear and the driven gear is 28:80, which ensure the focusing accuracy. The translation motor rotating the screw by motor coupling moves the cavity along the guide rail. Between the two limit switch, the cavity can be investigated without dead ends. The rotation motor moving together with the cavity controls the photographing
  • 52.
    42 4.2.1 Updatingof mechanical part angle through a rubber belt. The camera pointer facing to the camera assists to find the right position where contains the defect. In order to keep the characteristic of compact, the mini stepper motor PDx-108-28- SE-485 is the best choice, thanks to its small dimension (see Figure 4.5) and the small module of controller/driver electronics (see Figure 4.6) which are mounted to the back of the motor. This module converts the motor into a compact mechatronic device with serial bus oriented or standalone control. The step angle is 1.8°, and operating voltage is DC 24V. The encoder (the sensor IC is placed on the bottom of the PCB) measures the pole position and the angle and speed of the motor. The connection between the board and the desktop or laptop is based on RS485, which Supports multipoint communication. The host (computer) controls the slave devices by broadcasting, the slave device (the motor) responses only the relevant instruction contains its own address code, other slave devices and the host remain silent during this responses. The slave device sends the finishing signal to the host after executing relevant instructions, then the host continues to execute the next instruction. Figure 4.5 The dimension of the mini stepper motor (all values in mm). Figure 4.6 Top side of the board with connectors The optical inspection system after updating is reported in Figure 4.7, and the power supply of the motor and the RS485-USB adapter are kept in a small box (Figure 4.8).
  • 53.
    Chapter 4 Automationof the optical inspection system for 6 GHz cavities 43 Figure 4.7 The optical inspection system after updating Figure 4.8 Power supply and motor connection box Design of Software Development of PC software consists of two parts, the first part is the three motor control, and the second part is the camera and photo management. All functions are implemented through LabVIEW. 1) Introduction of LabVIEW LabVIEW (short for Laboratory Virtual Instrumentation Engineering Workbench) is a platform and development environment for a visual programming language from National Instruments. The graphical language is named "G". LabVIEW is commonly used for data acquisition, instrument control, and industrial automation on a variety of platforms including Microsoft Windows, various flavors of UNIX, Linux, and Mac OS X. LabVIEW programs/subroutines are called virtual instruments (VIs). Each VI has three components: a block diagram, a front panel, and a connector panel. One benefit of LabVIEW over other development environments is the extensive
  • 54.
    44 4.2.2 Designof Software support for accessing instrumentation hardware. Drivers and abstraction layers for many different types of instruments and buses are included or are available for inclusion. These present themselves as graphical nodes. The abstraction layers offer standard software interfaces to communicate with hardware devices. The provided driver interfaces save program development time. Therefore, even people with limited coding experience can write programs and deploy test solutions in a reduced time frame when compared to more conventional or competing systems. Using the LabVIEW, one new control system was built, the operation interface is presented in Figure 4.9. The left part is the real time video of the inner surface of the cavity, while the right-up part displays the caputered image. In the right top show the connection state of the motor and camera. In the right bottom half of the panel is the cavities information input elements and motor control functions which will be explained in the following. Figure 4.9 The operation interface of 6 GHz cavities optical inspection is developed using LabVIEW 2) Image Capture and save Before taking the images, the operator should select a path to save them and input the cavity information, such as material of the cavity, cavity ID, weight and the format of the image, then the soft will save the images automatically, take the situation in the Figure 4.10 for example, to the path “..Nb120160g19mm_0degreen” after execution of the capture, in which “19mm” is the length of cavity from the right, “0degreen” is the longitude angle.
  • 55.
    Chapter 4 Automationof the optical inspection system for 6 GHz cavities 45 Figure 4.10 Front panel of image capture and save function Figure 4.11 is the block diagram of image capture and save function, which is compose of camera scanning, open camera, configure and create images, capture and save images. Figure 4.11 Block diagram of image capture and save function 3) Motor control The motor controlling is made of tab controls. The setting page contains the interface parameter and the manual setting of three motors. In the motion page is the motor move and image capture activities. Every command sent to the motor is used the sub-function “TMCL_sub.vi”, which was shown in Figure 4.12. (a)
  • 56.
    46 4.2.2 Designof Software (b) Figure 4.12 The front panel (a) and the block diagram (b) of the TMCL_sub.vi In the block diagram of setting page, every motor commands are send by the “event structure” (Figure 4.13), while in the motion page, the commands are send by message queue (Figure 4.14). Figure 4.13 One instance of setting page Figure 4.14 Commands in the motion page are send by message queue
  • 57.
    Chapter 4 Automationof the optical inspection system for 6 GHz cavities 47 a) translation motor In this panel, the operator can move the cavity forward and backward along the guide rail and set 5 zones that he wants to investigate, the blue vernier shows the camera position, which is zero when cavity move to the left limit switch (Figure 4.15). Figure 4.15 Translation motor control panel b) rotation motor At each zone of the cavity, 6 images are captured. In this rotation motor panel one should calibrate the position versus angle using the goniometer. Figure 4. 16 Rotation motor control panel c) focus motor Due to the symmetry of the cavity, only 3 focus position should be set. Note that there is no limit switch for the focus motor, so be careful and watch the position in the panel when press zoom in or zoom out button. Otherwise, the focus function of the camera may be damaged. Figure 4.17 Focus motor control panel d) manual and auto capture After setting every motor in the desired position, the operator can capture the images
  • 58.
    48 4.2.2 Designof Software step by step pressing every button in order or press the “Auto Mode” button only and just leave the computer to execute the whole process (Figure 4.18 and Figure 4.19). Figure 4.18 Manual and auto capture control panel Figure 4.19 The block diagram of the auto mode function
  • 59.
    Chapter 5 Results49 Results We developed a new mechanical surface treatment for the internal finishing of 6 GHz superconducting cavities. It utilizes the principle of resonance of the spring with the vibrator to polish the inner surface of cavities, pushing the erosion efficiency to a new level, which is surpassing the CBP polishing efficiency. In the research and development process, a complete set of mechanical polishing process was explored. Influences of abrasive materials type, quantity and mixing ratio, tumbling time, spatial arrangement of the vibrator on the polishing efficiency are discussed. It also compared the polishing efficiency of single cavity and that of multi-cavities using the same system. 5.1 Mechanical polishing process Ultrasonic cleaning Ultrasonic cleaning is the process of ultrasound in the liquid using cavitation effects, the acceleration effect, and straight flow effect to the liquids and dirt directly or indirectly, which makes the dirt layer disperse, emulsify, peel and achieves the purpose of cleaning. (a) (b) (c) Figure 5.1 Preparation before tumbling: (a) Ultrasonic cleaning; (b) dry with nitrogen after rinsing with ethanol and acetone; (c) weight by electronic balance. The ultrasonic cleaning is a physical cleaning technology, which frequency is above 20 kHz. It simplifies many traditional cleaning process and greatly improves the cleaning quality and production efficiency. Ultrasonic cleaning aims at degreasing as the first step after the cavity being manufactured from the factory and proposes to removal residual media and material
  • 60.
    50 5.1.3 Cavitymounting and polishing attaching to the inner surface of the cavity after each tumbling. The temperature is 60℃ and wash time is 1 hour. After ultrasonic cleaning, the cavity is needed to rinse with ethanol and acetone, dry with nitrogen gun, weight by electronic balance (reported in Figure 5.1). Media selecting In the vibrating process the cavity is filled approximately 50% by volume with a mixture of different media. The media is typically used with water and liquid soap to cool the cavity and remove material from the surface to allow for further polishing. Media selecting is the most difficult part to achieving the final desired properties of the niobium surface. The fact that the exact condition needed or desired for the niobium surface is not known presents additional challenges. Figure 5.2 shows three different types of abrasive media used in INFN-LNL. Small SiC triangular shaped blocks are extensively used in mechanical polishing, it is a very aggressive ceramic media and it can be used for the first low level mechanical polishing.5 mm sphere of zirconium dioxide is a high density material and can be used for the intermediate smoothing. Al2O3 plus SiO2 (in PET) flakes are soft and can be used for the final surface finishing. 1 - SiC, 2 - ZrO2. Figure 5.2 Three different types of abrasive media. Cavity mounting and polishing Figure 5.3 Leakage occurs on the not sealed well cavity during vibration As shown in Figure 3.7, the cavity should be sealed up in both sides with the plastic blind flange. Since the mechanical polishing is a process of electric energy converted to mechanical energy, and part of mechanical energy is converted into heat. As the
  • 61.
    Chapter 5 Results51 vibration goes on, the temperature of the cavity with the grinding fluid will rise, the volume of the internal gas expands, the muddy thing will erupt out as shown in Figure 5.3 if the O-ring is forgotten even the cavity close tightly. The physical vibrating system is reported in Figure 5.4, the processes of how to start and stop vibrating is following, a) It is necessary to check whether the vibrator is fixed with the spring washer which is very important for defending nut loosing before mounted cavities to the vibration system b) The well-sealed signal or two or three cavities are then mounted to the vibration system by bolts. Make sure that the cavity can rotate itself freely after triggering by hand. c) Modify the position of the motor to ensure the cavity rotation axis and the motor driven shaft to form belt cooperate. d) Connect cavities and the motor with rubber belts, which are different length and may need to change a new one after several runs. e) Power on the control box, the stepper motors start to sun, check if the cavities can rotate smoothly and the rubber belts can run in the slot rather than run out. f) Set a low frequency, usually 60Hz in the control panel (Figure 5.5), and press the run key, alter the frequency until the noise comes from the cavity inside is big enough, which means the media grinding the cavity forcefully at high speed. g) Check the polishing processing every half an hour if it work properly or not, and one can stop the system just pushing the stop key in the control panel if want to investigate the treatment result . h) Disconnect the rubber belt, and detach the cavity from the plate. i) Open the cavity and clean. Figure 5.4 Picture of physical vibrating system
  • 62.
    52 5.2.1 Differentmaterial cavities Figure 5.5 the control panel 5.2 The statistics of cavity tumbling Different material cavities Till now, eighteen 6 GHz cavities shown in Table 5.1 have been polished by vibrator, including eight 3mm and three 2mm thickness (which cavity ID with “L”) Niobium cavities, 4 Ion cavities and 3 Copper cavities. The comparison of the inner surface condition before and after polishing are displayed in the Table 5.2. Table 5.1 The statistics of cavity tumbling Material Cavity ID Initial weight [g] Final weight [g] Total removed [g] Tumbling time (h) Niobium Nb127 191.352 181.378 9.974 305 Nb128 177.775 167.365 10.41 380 Nb129 184.483 174.05 10.433 353 Nb130 170.209 159.937 10.272 101 Nb131 175.812 165.686 10.126 59 Nb132 167.89 157.82 10.07 35.5 Nb133 174.381 164.83 9.551 100.5 Nb134 168.378 157.964 10.414 69.13 Iron Fe1 149.576 144.316 5.26 66 Fe2 141.112 134.368 6.744 66.1 Fe3 142.8 135.253 7.547 95.6 Fe4 154.431 145.828 8.603 98 Niobium Nb-L148 119.26 110.919 8.341 81.05 Nb-L149 112.923 105.509 7.414 70.09 Nb-L150 117.073 109.795 7.278 70.09 Copper Cu1 151.139 145.567 5.572 137 Cu2 166.285 158.845 7.44 481.5 Cu3 179.9 175.921 3.979 5.45
  • 63.
    Chapter 5 Results53 Table 5.2 The images of inner surface for different material cavities before and after tumbling Nb Fe CU material Before tumbling After tumbling The highest erosion rate till now The latest experiment result with Copper cavity Cu3: Erosion rate of 1 gram/hour was reached(as shown in Figure 5.6), which means 13 microns depth of inner surface materials was removed per hour (the Nb Density is 8.57g/cm3, and the area of inner surface of 6 GHz is 88 cm2). The erosion rate decreased with the time, but in Run 3 the media must be blocked a while which cause the erosion rate smaller than Run 2.
  • 64.
    54 5.4.1 Effectof tumbling time Figure 5.6 The latest tumbling result with Cu3 cavity 5.3 The RF test result After treated by the standard surface polishing techniques which started from the new mechanical polishing, the cavity is experienced once or several UHV (ultra-high vacuum) annealing, and characterized by the cryogenic RF test eventually. The RF test result (Figure 5.7) proves the effectiveness of the vibration therapy. (a) (b) Figure 5.7 (a) the annealing cycle after tumbling and EP. (b) Q-factor versus accelerating field at 4.2K and 1.8K after mechanical polished by vibration. 5.4 Discussion Effect of tumbling time SiC stone getting smaller, and angular shape ( shown in Figure 5.8) gradually been polished to a smaller ball with the grinding time, not only the impact force reduce, but also the resulting powder with water to form a mixture, and these mixtures will hinder emery friction with the cavity, so the polishing effect will be getting worse.
  • 65.
    Chapter 5 Results55 However, short time grinding means frequent disassembly and assembly, will increase the manpower time, so it is very important to control the grinding time reasonably. Figure 5.8 The new media and the used media (SiC) Figure 5.9 shows the curve of erosion efficiency vs. time. Figure 5.9 The erosion rate versus tumbling time. Effect of media In order to study the media effect on the erosion rate, the cavity Nb130 was tumbled with different number of media in each run (Figure 5.10), in which the tumbling time is the same (3 hours). The erosion rate reach the maximum value (above 300mg/h) when the cavity filled with 18 new SiC media while other conditions were the same. And it also shows that the Zirconia balls have no contribution to the erosion rate by comparison of run 2 and run 3, but it may be useful for polishing inner surface.
  • 66.
    56 5.4.3 Singleand multi-cavities tumbling Figure 5.10 The erosion rate versus number of SiC Usually, it is better to fill the cavity with some new media and some used media (SiC) together, which may increase the valid contact area and also ensure the enough polishing force. Single and multi-cavities tumbling (a) (b) (c) Figure 5.11 Different plate used in the polishing processes. (a) Triple cavities plate; (b) double cavities plate; (c) signal cavities plate. Is it possible to polish more cavities in one run? The answer is sure. Using different size plate (Figure 5.11), signal, double and triple cavities can be tumbled in one run. But the vibration frequency will be a little bit different, because the load of the spring i.e. the total mass of the cavities and the vibrator are changed, the reason of which is explained in section 3.2. Another different point is that it will cost double or triple time to dismount and mount, open and close two or three cavities in one run. However, in the same condition the result may be the one we expected, the erosion rate for each cavities in one run is not the same in the signal cavity tumbling (the erosion rate was 378mg/h in 3 hours) while just the total erosion rate is slightly higher than that in the later. It is clear in the Table 5.3 and Table 5.4. So it can induce that the conversion of electrical power to total mechanical power is nearly the same in three configuration, no matter how many cavities are tumbled in one run. 0 50 100 150 200 250 300 350 8 10 10 12 14 16 18 Erosion Rate [mg/h] Number of SiC Cavity Nb130 was tumbled for 3 hours with different number of media in each run. +20 ZrO2
  • 67.
    Chapter 5 Results57 Table 5.3 The erosion rate in double cavity tumbling Run Top Down Total 1 (3hrs) Cavity ID Nb129 Nb130 Erosion rate [mg/h] 213.33 224.33 437 2 (6hrs) Cavity ID Nb127 Nb134 Erosion rate [mg/h] 120.83 154.5 275.33 3 (3.5hrs) Cavity ID Nb129 Nb130 Erosion rate [mg/h] 216.86 177.43 394.29 Table 5.4 The erosion rate in triple cavity tumbling Run Top Middle Down Total 1 (3hrs) Cavity ID Nb128 Nb130 Nb127 Erosion rate [mg/h] 164.67 96.33 146.66 407.66 2 (4hrs) Cavity ID Nb134 Nb129 Nb133 Erosion rate [mg/h] 185 43.25 176.25 404.5 3 (3.5hrs) Cavity ID Nb128 Nb127 Nb130 Erosion rate [mg/h] 191.43 41 125.43 357.86 4 (4.33hrs) Cavity ID Nb134 Nb133 Nb129 Erosion rate [mg/h] 189.61 *1 137.64 327.25+ 5 (17.75hrs) Cavity ID Nb127 Nb133 Nb128 Erosion rate [mg/h] 89.74 28.82 77.63 196.19 6 (6hrs) Cavity ID Nb134 Nb129 Nb130 Erosion rate [mg/h] 217.5 32.83 159.5 409.83 7 (15hrs) Cavity ID Nb127 Nb133 Nb128 Erosion rate [mg/h] 84.6 50.67 69.4 204.67 Effect of plate direction In order to study the effect of plate direction on the erosion rate, the triple cavity vibration system was taken into experiment. The configuration was shown in Figure 5.12 and the result is reported in the Table 5.5. The system worked around 185 Hz at its own frequency the noise is highest. And the tumbling time is 4 hours. The erosion rate for each cavity in vertical run is lower than that in the signal cavity tumbling; the erosion rate of the cavity in the middle is one third of that at top or down one due to its vibration amplitude is smallest among the three cavity; the total erosion rate in the horizontal condition is the lowest (see Figure 5.13) for the vibrator have to overcome the gravity of its own and the cavities and loss half of the mechanical power converted from the electrical power. 1 * The cavity here at this run was not opened and gone on next vibration.
  • 68.
    58 5.4.4 Effectof plate direction (a) (b) (c) Figure 5.12 Triple cavity vibration system with three plate direction. (a) Horizontal; (b) Inclined (~60º); (c) Vertical. Table 5.5 The erosion rate of triple-cavity tumbling in different plate direction. Figure 5.13 Erosion efficiency in different plate direction 0 100 200 300 400 500 vertical incline horizontal Average erosion efficiency [mg/h] Plate direction
  • 69.
    Chapter 5 Results59 5.5 Summery After a lot of tests and analysis, we can sum up the experience of following, 1) Tumbling only one cavity in one run and stop it around 2 hours; 2) Like in the Figure 5.14, put some (~6) used (smaller) SiC in the bottom necklace and the new ones (~12) and (~20) ZrO2 in the center, and put some(~6) used SiC again, fill deionized water up to the green line; 3) Shake the cavity by hand and feel that no block in it and then put it the vibration stand; 4) Fix the vibrator to the plate with screw and spring cushion; 5) Connect the springs up and down tightly and directly to the transom with less transition, and try to make the spring in vertical; 6) It is also useful to add 2 rubber belt up and down to ensure the balance during the shaking; 7) Set frequency around 200Hz. At this frequency it is very powerful for polishing but also to the bearings which should change when it work not well(can’t rotate smooth), otherwise, it may block and it (polishing contain part overly) is very bad for the cavity 8) Every half hour, go and check the operating state. Figure 5.14 Diagram of the media filling into the cavity
  • 70.
  • 71.
    Chapter 6 Conclusionsand next plan 61 Conclusions and next plan 6.1 Mechanical polishing treatment for 6GHz cavities Mechanical polishing bases on the resonance principle for 6GHz superconducting cavity of the inner surface finish is a new attempt, the results show that the method is effective. A low cost, simple structure, convenient operation, and efficiency considerable mechanical polishing systems were developed as a result of carefully designed and systematic study. Therefore, one cavity will be ready for next treatment in 20 hours’ tumbling, after this short period of mechanical treatment, 10 grams of inner surface materials are removed and the bump indentations disappear, which satisfy our goal. 6.2 Idea for 1.3GHz mono-cell cavities vibration polishing system Figure 6.1 the conceived drawing of the 1.3GHz mono-cell cavities vibration polishing system The idea of our design derives from the principle of vibrating screen, which is used for selection of the small matter from the mass. The vibrator is placed horizontally as it is very difficult to balance the whole system if set in verticality as the same with the 6 GHz cavities vibrating system due to the heavy weight of vibrator and cavity; the springs and the shock absorber feet make the system stable. What’s more, it is possible to find the best resonance frequency with different
  • 72.
    62 6.2 Ideafor 1.3GHz mono-cell cavities vibration polishing system springs; it is convenient to mount and dismount the cavity without uninstalling the cavity holders, compared to previous integral design; the cavity is rotated by the belt, tightness of which is adjustable along with the vibrating using a spring.
  • 73.
    Bibliography 63 Bibliography [1] B. Anne, et al. Superconducting TESLA Cavities, Physical Review special Topics-Accelerators and Beams, Volume 3, 092001(2000). [2] H. Padamsee, J. Knobloch, T. Hays, RF Superconductivity for Accelerators, John Wiley & Sons, Plenum Press, San Diego, 1998. [3] TESLA, Technical Design Report, The Accelerator, Eds. R. Brinkmann, K. Flӧttmann, J. Rossbach, P. Schmu¨ser, N. Walker, H. Weise, DESY report 2001- 23 (2001) [4] International linear collider reference design report, ILC global design effort and worldwide study, August, 2007 [5] D. Proch, P. Schmueser, W. Singer, et al., Niobium in superconducting RF cavities, Niobium 2001 International Symposium, DEC 02-05, 2001 Orlando, Florida, USA [6] P. Schmüser, “Basic principles of RF superconductivity and superconducting cavities”, Workshop ‘Pushing the Limits of RF Superconductivity’, September 22-24, Argon National Laboratory, USA, 2004 A. Matheisen, "Improvements on standard Fabrication methods", ibid ref. 5 [7] J. Brawley, J. Mammosser, L. Phillips, “Electron beam weld parameter development and cavity production costs”, Proceedings of the 1997 Workshop on RF Superconductivity. [8] V. Palmieri “Seamless Cavities: the most creative topic in RF Superconductivity,” 8th Workshop on RF Superconductivity, Abano Terme (Italy), October 1999. [9] V. Palmieri, “Advancements on spinning of seamless multi-cell reentrant cavities”, Proc of the 11th Workshop on RF Superconductivity SRF2003.8-12 September 2003, Luebeck, Germany, TuP26. [10] P. Kneisel, V. Palmieri, K. Saito, “Development of Seamless Niobium Cavities for Accelerator Application”, Proceedings of the 1999 IEEE Particle Accelerator Conference. 29 Mar - 2 Apr 1999, New York, New York. 18th IEEE Particle Accelerator Conference, p.943-945 [11] L. Badan, C. Durand, V. Palmieri, R. Preciso, S. Stark, F. Stivanello, W. Venturini, “R.F. characterization of small scale cavities”, Proceedings of the 1997 Workshop on RF Superconductivity, Abano Terme (Padova), Italy [12] V. Palmieri, “Spinning of TESLA-Type Cavities: Status of Art”., Proc. of the 9th Workshop on RF superconductivity, Santa Fe, USA, Nov. 1999, pp 532-537. [13] V. Palmieri, R. Preciso, V.L. Ruzinov, S.Yu. Stark, S. Gambalonga, Forming of seamless high beta accelerating cavities By the spinning technique, Nuclear Instruments and Methods in PhysicsResearchA342(1994)353-356,North- Holland
  • 74.
    64 [14] D.Bloess, “Chemistry and Surface Treatment”, SRF-84, Geneva, July 1984, Proceedings pp. 409-425. [15] K. Saito et al., “Superiority of Electropolishing over Chemical Polishing on High Gradients” SRF-97, Italy, October 1997, Proceedings pp. 795-813. [16] Michigan State University internal note. [17] TESLA Technical Design Report R. Brinkmann, et al., Editors. 2001, DESY: Hamburg. [18] http://www.glenmills.com/powder-blending/turbula-shaker-mixer/ [19] C. Cooper et al., “Centrifugal Barrel Polishing of Cavities Worldwide”, 15th International Conf. on RF Supercond., Chicago, IL (2011) WEIOA02. [20] http://en.wikipedia.org/wiki/Vibrator_(mechanical) [21] Siskind, Charles S. (1963). Electrical Control Systems in Industry. New York: McGraw-Hill, Inc. p. 224.ISBN 0-07-057746-3. [22] https://en.wikipedia.org/wiki/File:VFD_System.png. [23] http://www.acu-vib.com.au/accelerometers.htm Bibliography
  • 75.
    List of Figures65 List of Figures Figure 1.1 A TESLA nine-cell 1.3 GHz superconducting niobium cavity [4]. ...... 3 Figure 1.2 Measured surface resistance of a 9-cell TESLA cavity. The residual ... 4 Figure 1.3 General fabrication steps of standard fabrication technique for s.c. Cavities ........................................................................................................... 5 Figure 1.4 Spinning of a seamless mono-cell resonator from a circular blank. No intermediate annealing is required during forming. ....................................... 8 Figure 1.5 Process comparison of conventional and seamless cavity Fabrication ........................................................................................................................ 9 Figure 1.6 Picture of 6 GHz cavities made by different material. From left to right are Niobium cavity (thickness 3mm), lighten Niobium cavity (thickness 2mm), Cooper cavity, Iron cavity and Lead cavity. ..................................... 10 Figure 1.7 The 6 GHz cavity geometry ................................................................ 11 Figure 1.8 (a)Drawings of the die, which is composed of two cylinders and a shell, assembled and ready for the spinning operation; (b)Disassembled when partially extracted after spinning; (c)Exploded view of the nylon shell of the die with all its ten sectors. ............................................................................ 11 Figure 1.9 Image of inner surface at the center of the cavity, two evident vertical scratches shown in the red rectangles........................................................... 12 Figure 1.10 Metallographic polishing machine with sandpaper .......................... 13 Figure 1.11 The stand for BCP and EP................................................................. 13 Figure 1.12 The schematic diagram of EP ........................................................... 14 Figure 1.13 HPR for 6 GHz cavities in LNL-INF ................................................ 14 Figure 2.1 TURBULA® Shaker-Mixer (model T2F) and 6 GHz cavity ............. 15 Figure 2.2 The section of the configuration of cavity before mounting to the TURBULA® Shaker-Mixer ......................................................................... 16 Figure 2.3 Schematic diagram of the Centrifugal barrel polishing (CBP). The red point is the reference point when the angular velocity of the barrel related to the turntable 휔2 equals to zero. .................................................................. 17 Figure 2.4 (a) Photograph of the CBP system in INFN-LNL. (b) The configuration of the cavities. .............................................................................................. 18 Figure 2.5 Industrial centrifugal barrel polishing machine .................................. 18 Figure 2.6: Schematic of main shaft and 2 barrels of a centrifugal barrel polishing machine denoting the directions of rotation. This is a model of the Fermilab machine with a 9-cell Tesla – type cavity and counterweight shown in the barrels . ......................................................................................................... 18
  • 76.
    66 List ofFigures Figure 2.7 The 3D drawing (a) and entity (b) of the zigzag tumbler ................... 19 Figure 2.8 Polishing brush on the market ............................................................ 20 Figure 2.9 3D drawings of “flower brush”. .......................................................... 20 Figure 2.10 Photograph of “flower brush”. .......................................................... 20 Figure 2.11 Abrasive material. (a) Sand paper; (b) Scotch Brite ......................... 21 Figure 2.12 “flower brush” with abrasive material. ............................................. 21 Figure 2.13 The way of putting “flower brush” into the cavity. .......................... 22 Figure 2.14 The “flower brush” was polishing the cavity on the lathe. ............... 22 Figure 2.15 The petals were spreading in high rotating speed ............................. 22 Figure 2.16 Polish the inner surface of cavity by pneumatic hand held polisher using “flower brush”. ................................................................................... 23 Figure 3.1 The configuration of combined spring vibration system .................... 26 Figure 3.2 Picture of the firstly using vibrator ..................................................... 28 Figure 3.3 One example of the vibrator system for 6 GHz cavity ....................... 28 Figure 3.4 The diagrams of Assembly process before hanging up ...................... 28 Figure 3.5 A complete mechanical (Vibrator) process-cavity mounted on vibrator through PMMA-glass (15 mm thick) support plate (transparent in figure) . 29 Figure 3.6 Drawing of bearing holder and image of self-aligning bearing .......... 30 Figure 3.7 Drawing of mechanical configuration of the cavity. The assembled state is at left, and the Exploded Views is at right. ............................................... 30 Figure 3.8 Drawing of the belt axis ...................................................................... 30 Figure 3.9 The internal structures images of one commercial vibrator ................ 31 Figure 3.10 Images in first line is the consequence after neglecting the sponge, while in second line is the wright connecting way. (a) The cable was broken-down; (b) the cable was hurt by the shroud; (c) the cable was hurt by the cable jointing sleeve; (d) using the sponge to save the cable; (e) using electrical adhesive tape to protect the cable. ................................................................ 31 Figure 3.11 Sectional view of the inner and chassis dimensions ......................... 32 Figure 3.12 Diagram of the electrical connection ................................................ 32 Figure 3.13 The main principle diagram of the VFD ......................................... 32 Figure 3.14 Picture of real products FRN4.0E1S-4E which keypad can install to the front panel of the control unit of the vibrating system by the cable with RJ-45 connectors .......................................................................................... 33 Figure 3.15 3 phase RFI Filter ............................................................................. 33 Figure 3.16 Schematic drawing of the vibrating system equipped with two 6 GHz cavities .......................................................................................................... 34 Figure 3.17 connection of the spring and the plate using the custom nuts .......... 35 Figure 3.18 Image of programmable stepper motor ............................................. 35 Figure 3.19 Drawing of motor belt wheel ............................................................ 35 Figure 3.20 The cross section view of the accelerometer . .................................. 36 Figure 3.21 The schematic diagram of impact sensor. ......................................... 36
  • 77.
    List of Figures67 Figure 3.22 One example of the commercial impact sensor. ............................... 37 Figure 3.23 The drawing of the custom impact sensor ........................................ 37 Figure 3.24 Schematic of the trigger capture and fault display circuit. ............... 37 Figure 3.25 The connector circuit in the inventor. ............................................... 38 Figure 4.1 The optical inspection equipment before updating ............................. 40 Figure 4.2 Photo software interface ..................................................................... 40 Figure 4.3 The cross section of the 6 GHz cavity ................................................ 41 Figure 4.4 3D schematic diagram of the optical inspection system mechanical upgrades ....................................................................................................... 41 Figure 4.5 The dimension of the mini stepper motor (all values in mm). ............ 42 Figure 4.6 Top side of the board with connectors ................................................ 42 Figure 4.7 The optical inspection system after updating ...................................... 43 Figure 4.8 Power supply and motor connection box ............................................ 43 Figure 4.9 The operation interface of 6 GHz cavities optical inspection is developed using LabVIEW .......................................................................... 44 Figure 4.10 Front panel of image capture and save function ............................... 45 Figure 4.11 Block diagram of image capture and save function .......................... 45 Figure 4.12 The front panel (a) and the block diagram (b) of the TMCL_sub.vi 46 Figure 4.13 One instance of setting page ............................................................. 46 Figure 4.14 Commands in the motion page are send by message queue ............. 46 Figure 4.15 Translation motor control panel ........................................................ 47 Figure 4. 16 Rotation motor control panel ........................................................... 47 Figure 4.17 Focus motor control panel ................................................................ 47 Figure 4.18 Manual and auto capture control panel ............................................. 48 Figure 4.19 The block diagram of the auto mode function .................................. 48 Figure 5.1 Preparation before tumbling: (a) Ultrasonic cleaning; (b) dry with nitrogen after rinsing with ethanol and acetone; (c) weight by electronic balance. ......................................................................................................... 49 Figure 5.2 Three different types of abrasive media. ............................................. 50 Figure 5.3 Leakage occurs on the not sealed well cavity during vibration .......... 50 Figure 5.4 Picture of physical vibrating system ................................................... 51 Figure 5.5 the control panel .................................................................................. 52 Figure 5.6 The latest tumbling result with Cu3 cavity ......................................... 54 Figure 5.7 (a) the annealing cycle after tumbling and EP. (b) Q-factor versus accelerating field at 4.2K and 1.8K after mechanical polished by vibration. ...................................................................................................................... 54 Figure 5.8 The new media and the used media (SiC) .......................................... 55 Figure 5.9 The erosion rate versus tumbling time. ............................................... 55 Figure 5.10 The erosion rate versus number of SiC ............................................. 56 Figure 5.11 Different plate used in the polishing processes. (a) Triple cavities plate;
  • 78.
    68 List ofFigures (b) double cavities plate; (c) signal cavities plate. ....................................... 56 Figure 5.12 Triple cavity vibration system with three plate direction. (a) Horizontal; (b) Inclined (~60º); (c) Vertical. ................................................................... 58 Figure 5.13 Erosion efficiency in different plate direction .................................. 58 Figure 5.14 Diagram of the media filling into the cavity ..................................... 59 Figure 6.1 the conceived drawing of the 1.3GHz mono-cell cavities vibration polishing system ........................................................................................... 61
  • 79.
    List of Tables69 List of Tables Table 5.1 The statistics of cavity tumbling ........................................................... 52 Table 5.2 The images of inner surface for different material cavities before and after tumbling ............................................................................................... 53 Table 5.3 The erosion rate in double cavity tumbling .......................................... 57 Table 5.4 The erosion rate in triple cavity tumbling ............................................ 57 Table 5.5 The erosion rate of triple-cavity tumbling in different plate direction. 58
  • 80.
    70 List ofTables
  • 81.
    Acknowledgements 71 Acknowledgements First of all, I would like to extend my sincere gratitude to my supervisor, Prof. V. Palmieri, for his instructive advice and useful suggestions on my thesis. I am deeply grateful of his offering me the opportunity to learn this Master course. And in this academic year, he arranged our course with mature deliberation and taught us tirelessly, which let us grasp the theory also provided us with more opportunities to practice. All of these expanded my horizon and knowledge and my capacity of scholarship has been tested and benefited; thank him for his concern for me care for me in life, he is kind and humility, a scholarly mentor and beneficial friend; thank him providing me with a great convenience; thank him for his confidence in me, giving me the opportunity to play freely at work, I voracious sucked knowledge nutrition like a just born infant, and was fearless with difficulty like a newborn calf. High tribute shall be paid to Ms. Silvia Martin, who provided me with all aspects of care and help, let me live and study in a foreign country without problems. I am deeply indebted to my tutor, Antonio Rossi, who was my guide in terms of low-temperature superconductivity, I am impressed on his young and promising, modesty, kindness and helpfulness. Special thanks should go to Alex, a young and powerful man, who gave me much support in my work. Without his help in the machining, my work would be difficult to make progress. I also owe my sincere gratitude to thank Ram Krishna Thakur, who gave me a very big help in my work, and carefully guided me to understanding of daily laboratory operations step by step. And I also want to thank all the other colleagues in the laboratory, the moments of working with them is destined to become a good memory my life. I should finally like to express my gratitude to my beloved family, especially my mother-in-law, who is helping me to take good care my three years old son in Beijing during my abroad. I also owe my sincere gratitude to my lovely wife Yue Lin, whose understanding and supporting without a word of complaint motivated me to work hard.