GeoGebra 3D App AR Guide Doc
•Download as DOCX, PDF•
0 likes•226 views

Doc ver. of the guide

Recommended
More Related Content
What's hot
What's hot (11)
Similar to GeoGebra 3D App AR Guide Doc
Similar to GeoGebra 3D App AR Guide Doc (20)
Recently uploaded
Recently uploaded (17)
GeoGebra 3D App AR Guide Doc
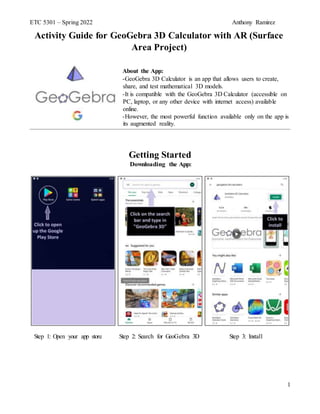
- 1. ETC 5301 – Spring 2022 Anthony Ramirez 1 Activity Guide for GeoGebra 3D Calculator with AR (Surface Area Project) About the App: -GeoGebra 3D Calculator is an app that allows users to create, share, and test mathematical 3D models. -It is compatible with the GeoGebra 3D Calculator (accessible on PC, laptop, or any other device with internet access) available online. -However, the most powerful function available only on the app is its augmented reality. Getting Started
- 2. ETC 5301 – Spring 2022 Anthony Ramirez 2 Opening the App: store phone’s home screen Using the App As a 3D model app, the GeoGebra 3D Calculator’s creative potential is endless! While we will go on to make our own models in future lessons, in this intro activity we will focus on the following: 1. How to open pre-made projects 2. How to use AR 3. How to experiment with sliders and variables in the algebra tool The 3D calculator uses a hyperplane with three axes: the x-axis, y-axis, and z-axis The project we will be using this time will help strengthen our understanding of surface area.
- 3. ETC 5301 – Spring 2022 Anthony Ramirez 3 How to Open a Pre-made Project
- 4. ETC 5301 – Spring 2022 Anthony Ramirez 4 If you have selected the correct project, the project will load, and your screen will now look like this: Note: Each GeoGebra 3D project can be identified by two ways: the project title and the project code. There are many pre-made projects with similar project titles, so while we are in class, the easiest way to search for the project we want is by inputting the project code. However, if you feel like exploring other projects in your free time, searching by project title (ex. typing “Surface Area” into the search bar) can pull up lots of interesting projects!
- 5. ETC 5301 – Spring 2022 Anthony Ramirez 5 How to Use AR Step 1: Click on the AR button For the AR to work, the app must use your front-view camera, so if you forgot to give the app media permissions earlier, go ahead and click “Allow” now. Step 2: Detect a surface The AR needs a floor to “place” 3D figure on. Point your camera at the ground and walk around slowly until you see the white grid on the screen above. Then tap the screen where you want the figure to go. Step 3: Explore the figure in AR Now that you have placed the figure, feel free to explore. Walk around to see the prism’s six surface faces, view it from the top, and even try stepping “inside” to see it from the interior!
- 6. ETC 5301 – Spring 2022 Anthony Ramirez 6 How to Experiment with Sliders and Variables in the Algebra Tool Each project created in GeoGebra 3D can be built with any quantity of variables. This project has five changeable variables that change how the rectangular prism model looks. To adjust these variables, open the Algebra tool. button The screen will display only the first three variables, but there are many written into this project (however, most are fixed and cannot be changed). Touch the variables screen and slide your finger up or down to go further down or back up the list.
- 7. ETC 5301 – Spring 2022 Anthony Ramirez 7 “LENGTH”,“WIDTH”, and “HEIGHT” are all self-explanatory variables, as they change the dimensions of the prism as well as the surface area in the process. To experiment with these,grab the grey-and-black dot in the middle of the slider and move it to the left (to decrease the number) or right (to increase). LENGTH dot WIDTH dot HEIGHT dot As you may have noticed when you explored the rectangular prism earlier, this rectangular prism model is color- coded, with each pair of opposite faces sharing the same color (pink and yellow sides with a white pair of bases). The transparency of these colors can be adjusted using the “Filler” variable.
- 8. ETC 5301 – Spring 2022 Anthony Ramirez 8 Finally, the “e” variable unpacks surface area for us by transforming our 3D rectangular prism into a 2D net. Scroll down the variables screen until you reach e. At e=0, the rectangular prism is fully “closed” and still 3D. Slide the grey-and-black dot to the right. When you slide the grey-and- black dot anywhere between 0 and 1, the rectangular prism begins to “open”, and you can begin to see the net. At e=1, the rectangular prism has been fully “opened” into a net. Each face is now flat on the floor, making it easier to visualize as “area”.
- 9. ETC 5301 – Spring 2022 Anthony Ramirez 9 Student Assignment Play around with the variables in the app to answer the following questions. 1. What is the relationship between opposite faces (faces that share the same color)? 2. When you increase/decrease the length of the rectangular prism, which faces change? By how much do they increase/decrease? How can you relate this to width/height? 3. When you increase/decrease the width of the rectangular prism, which faces change? By how much do they increase/decrease? How can you relate this to length/height? 4. When you increase/decrease the height of the rectangular prism, which faces change? By how much do they increase/decrease? How can you relate this to length/width?
- 10. ETC 5301 – Spring 2022 Anthony Ramirez 10 Reflection on Using this AR App in the Classroom I was pleased to discover this app because it works in conjunction with the GeoGebra site and the cell phone technology that the students are already familiar with. Its level and rigor are high enough for me to consider including it in a geometry lesson. In addition, the AR component can grab students’ interest and help them visualize 3-dimensional math far better than the traditional textbook, which is limited to 2-dimensional models. I appreciate the “collaboration” aspect of the app where users can share the projects they’ve created with others, especially since it helps new users by granting them access to projects they can explore and use while they build up the skills necessary to create their own projects.