First Aid, Emergency and
Disaster Management
MNUR 106: 3 Credits
COURSE DESCRIPTION
This course focuses on teaching students
about simple life saving techniques to prevent
complications and death.
This course will prepare the students with
knowledge and skills to identify the need for
emergency care and be able to render care
before referral to the health care centres.
Course Objectives
• By the end of the course, the student will be able
to:
•  Identify potential emergency situations.
•  Discuss principles of first aid
•  Discuss safety measures
•  Define conditions under emergency services
•  Discuss the various appliances in emergency
situations
COURSE CONTENT
Aims and objectives of first aid;
2. Principles of first aid;
3. Emergency Nursing; abdominal pain; motor vehicle collision;
poison; overdose; Head injuries;
4. Definition and scope of first aid;
Emergency situations.
a. Airway and pulmonary resuscitation (various methods of artificial
respiration) cardio-pulmonary resuscitation,
b. Shock (types of shock, prevention of shock)
c. Haemorrhages: types, signs and symptoms, special haemorrhages
(epistaxis, haemoptysis, haematemesis, bleeding from tooth socket,
bleeding from varicose vein, rectal bleeding).
d. Wounds: types of wounds
COURSE CONTENT
• e. Burns and scalds: definition and classification
• f. Fractures: Definition, types; specific examples (fractured mandible,
clavicle, spine, ribs, pelvis, and skull).
• g. Sprains and dislocations
• h. Unconsciousness: types, apoplexy/stroke, epileptic fits,
• i. Convulsive attacks, diabetic and insulin comas.
• j. Asphyxia: definition and causes
• k. Poisons: definition, classification, mode of entry into body, and effects.
• l. Foreign bodies in the eye, ear, nose; throat, etc. Bites and stings: dog
bite, snake bite, stings from bees, wasps and scorpions,
• m. Disaster. Types of Disasters: Natural e.g. earthquake, flood; Man-made
e.g. Road-traffic and other accidents involving many people and fire
outbreak.
• n. Disaster management
FIRST AID EMERGENCY AND DISASTER
NURSING
First aid definition: first aid is the initial
and immediate treatment given to
someone who is injured or fallen ill
suddenly.
Emergency definition: this is a situation
that requires immediate attention. E.g.
asthmatic attack, head trauma and
poisoning.
RESPONSIBILITIES OF THE FIRST AIDER
The responsibilities of the first aider are always clearly defined as
follows:
1. Prompt and effective assessment of the situation
2. Protection of casualties and others at the scene from possible danger
3. Identification of extent of injury or nature of illness affecting a
casualty.
4. Early and appropriate treatment of all casualties, treating the most
serious conditions first.
5. Arrangement for casualty’s removal or transfer to hospital or into the
care of the doctor or another care provider
6. Casualties must never be left alone - stay with them until further care
is available
7. Report all observations made on casualty when handing over to
another care giver
8. Prevention of cross - infection between self and casualty as much as
possible.
QUALITIES OF A FIRST AIDER
The following are the qualities, which a trained
first-aider, should possess:
1. Prompt and Quick: As soon as an accident or
injury takes place, the first aider should be prompt
and quick, to render help to the victim, without
delay.
2. Calm and Controlled: He should be a calm and
controlled sort of man because he has to take
immediate action, without any fuss or panic.
3. Wise and Intelligent: He should be intelligent
and wise enough to decide the immediate treatment
even before a complete diagnosis, especially in
case of serious injuries and severe bleeding, etc.
QUALITIES OF A FIRST AIDER
• 4. Resourceful: He should be resourceful enough to
make available his first aid material at once or get
the required things on the spot, for giving
immediate relief to the victim.
QUALITIES OF A FIRST
AIDER
• 6. Skillful and Tactful: The first aider should be skillful and tactful to
judge the symptoms and history of the case without wasting any time. If
need be, he should be able to muster requisite support from the crowd.
• 7. Dexterous and Clever: Should be able to help the injured without
causing and/or aggravating pain, and to use the appliances and/or
procedure efficiently and effectively.
• 8. Confidence and Perseverance: The first aider should have full faith in
his skill to administer whatever assistance the situation demands, even
if there is no response initially. He should have perseverance and should
not give up. It may take time for the patient to respond to his handling.
• Remember, an efficient and resourceful first aider may be the link
between life and death.
AIMS AND OBJECTIVES OF FIRST AID
First aid treatment involves giving immediate temporal
care that subsequently preserve the live of the casualty;
prevent deformity or disabilities and find a more
appropriate and permanent treatment for the casualty
(referral)
The following therefore are aims/objectives of first aid
1. To save life
2. To prevent illness and injuries becoming worse
3. To relieve pain as far as possible: extreme or
excessive pain results in shock and sometimes death.
Injured people must be relieved of all forms of pain as
much as possible.
PRINCIPLES OF FIRST AID
1. ASSESSMENT
 Remove the patient from further danger or remove danger from patient (e.g.
fire, water)
 Check signs (what is seen like bleeding, swelling) and symptoms (what the
patient complains of like headache)
 History: find out if the patient has asthma, heart condition or is allergic to
anything e.t.c.
DIAGNOSIS: Impression and conclusion after assessment
TREATMENT: the most urgent condition first. E.g.
Apparent cessation of breathing
 Severe haemorrhage
 Shock etc.
 Poisoning
 Specific injury
CAUTION
I. Clear airway and start emergency resuscitation when victims stop breathing
II. The most suitable/appropriate position required by unconsciousness is prone,
recumbent or lateral.
III. Unconscious victims must never be given anything to drink.
IV. Alcoholic beverages and stimulants e.g. coffee, should not be given to
unconscious victims as it depresses the functions of vital organs such as
brain.
V. Organize unskilled by standers/onlookers or survivors of the accident to help
in any way possible
VI. Control by standers/onlookers and prevent them from exciting the patient
VII.Sensible assessment of the situation must be done concerning transportation
to hospitals.
VIII.
Do not lift casualty, unless there are sufficient helpers
IX. Ensure there is no further danger to the casualty or to you
X. Always remove garments from the uninjured part first; this enables the
garment to be slipped off the injured part.
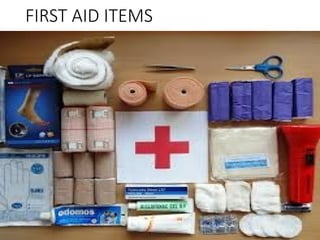
FIRST AID KIT
The following are important items to have in a Health First Aid Kit:
 Sterile adhesive bandages in assorted sizes - for simple cuts or abrasions
 Butterfly bandages and narrow adhesive strips - to hold the edges of a cut
together to allow it to heal
 Individually wrapped, sterile gauze pads (2" and 4") - to control bleeding or
secretions and prevent contamination
 Hypoallergenic adhesive tape - to hold a dressing or splint in place
 Roll of absorbent cotton - as padding for a splint
 Sterile roller bandages (2" and 3"), at least 3 rolls - to lend support to sprained or
sore muscles
 Cotton-tipped swabs
 Thermometer
 Anti-itch lotion or cream - for relief of insect bites, itching and minor skin
irritations
 Eye drops
 Syrup of ipecac - to induce vomiting only if instructed by a poison control center
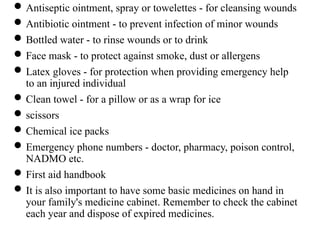
Antiseptic ointment, spray or towelettes - for cleansing wounds
Antibiotic ointment - to prevent infection of minor wounds
Bottled water - to rinse wounds or to drink
Face mask - to protect against smoke, dust or allergens
Latex gloves - for protection when providing emergency help
to an injured individual
Clean towel - for a pillow or as a wrap for ice
scissors
Chemical ice packs
Emergency phone numbers - doctor, pharmacy, poison control,
NADMO etc.
First aid handbook
It is also important to have some basic medicines on hand in
your family's medicine cabinet. Remember to check the cabinet
each year and dispose of expired medicines.
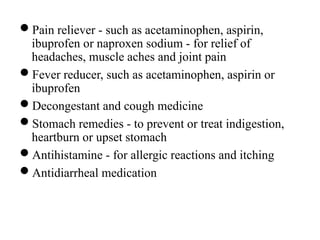
Pain reliever - such as acetaminophen, aspirin,
ibuprofen or naproxen sodium - for relief of
headaches, muscle aches and joint pain
Fever reducer, such as acetaminophen, aspirin or
ibuprofen
Decongestant and cough medicine
Stomach remedies - to prevent or treat indigestion,
heartburn or upset stomach
Antihistamine - for allergic reactions and itching
Antidiarrheal medication
FIRST AID ITEMS
For first aid treatment to be successful, clear recognition of life-
threatening condition must be intelligently and promptly
diagnosed for appropriate management and referral. Some of the
conditions will be dealt with in this topic.
SHOCK
Definition: shock is a life-threatening condition which occurs when
the circulatory system (which distributes oxygen to the body
tissues and removes waste product) fails and as a result, vital
organs such as the heart, brain and the kidneys are deprived of
oxygen.
This condition requires immediate/emergency treatment to
prevent permanent damage to those organs and their subsequent
death.
TYPES OF SHOCK
HYPOVOLEMIC SHOCK: it is also known as oligemic shock. This is
the most common type of shock that results from severe blood
loss. Hypovolemic shock can also occur as a result of excessive
loss of other body fluids like vomiting, diarrhea and burns.
If in any situation a casualty loose blood exceeding 1.2L which is
about (1/5) one-fifth of the normal total blood volume, shock
occurs. Bleeding leading to shock may be external or internal of
the body.
 ANAPHYLACTIC SHOCK/ANAPHYLASIS: anaphylaxis occurs when
there is an allergic reaction to certain substance e.g. pollen from
plants, sting form insects, certain foods & drugs e.g. of these
drugs:
In anaphylactic reaction, chemicals are released into the blood
stream that dilate the vessels and constricts the air passages in
the throats; the tongue also swells leading o difficulty in
breathing.
 CARDIOGENIC SHOCK: this is the failure of the heart to
effectively circulate blood to all parts of the body; this
occurs commonly with heart attack due to defects in the
valves of the heart.
 NEUROGENIC SHOCK: a disruption of the autonomic
nervous system, which results in the blood vessels
expanding and creating a drop in blood pressure. It can be
caused by fluid loss, trauma to the nervous system or
emotional shock. E.g. of this type of shock is fainting.
 SEPTIC SHOCK: this occurs when toxins caused by severe
infection cause blood vessels to dilate.
GENERAL SIGNS & SYMPTOMS OF SHOCK
Initially:
there is rapid weak pulse (tachycardia),
pale
cold clammy skin
As shock develops:
Cyanosis (grayish-blue discoloration of the skin) especially inside the lips,
earlobe & fingernails.
weakness
dizziness
Nausea and possible vomiting
Thirst or a dry mouth
Rapid, shallow breathing (tachypnaea)
Low blood pressure
Decreased to subnormal temperature
Eyes lack luster and may seem to stare. Sometimes the pupils are dilated.
Management of Shock
 As oxygen supplies to the brain diminishes:
 restlessness
 aggressiveness
 yawning and gasping for air
 Light-headedness
 Confusion and disorientation
 unconsciousness
 and finally the heart will cease to function
Management of Shock
Aims
The aims of managing and treating shock are as follows:
 to treat any obvious cause of shock
 to improve blood supply to the brain, heart and lungs
 to arrange for urgent transfer of casualty to hospital
 With these in mind, prioritized actions must be taken
Action
 Call for help e.g. ambulance (dial 191)
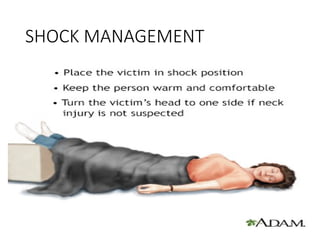
 Have the person lie down on his or her back (on a blanket to
prevent coldness from the ground) with feet about a foot higher
than the head to improve blood supply to the brain; heart and
lungs (Trendelenburg). If raising the legs will cause pain or further
injury, keep him or her flat. Keep the person still.
 Check for signs of circulation (breathing, coughing or movement)
and if absent, begin CPR.
Keep the person warm and comfortable by loosening any
belts or tight clothing and covering the person with a
blanket.
Even if the person complains of thirst, give nothing by
mouth.
Turn the person on his or her side to prevent choking if the
person vomits or bleeds from the mouth.
Treat any possible cause of shock that can be detected.
E.g. arrest haemorrhage if there is severe obvious
bleeding.
Monitor and record vital signs as well as of consciousness.
Remain with casualty until appropriate care is obtained
Handover all observation, treatment and any other
information to the hospital or police station.
SHOCK MANAGEMENT
Specific signs and symptoms of
anaphylactic shock and management
 Difficulty breathing or wheezing
 Tightness in the throat or a feeling that the airways are closing
 Hoarseness or trouble speaking
 Swollen lips, tongue, or throat
 Nausea, abdominal pain, or vomiting
 Fast heartbeat or pulse
 Skin that itches, tingles, swells, or develops raised red areas
(hives)
 Anxiety or dizziness
 Loss of consciousness
Management
Call for help and stay with the person
put casualty in sitting position to prevent difficulty in
breathing (use blankets or pillows)
Find out about type of allergy
Find out whether casualty has any medication e.g.:
adrenaline, salbutamol spray.
Give any medicines for mild reactions that the person has
been prescribed e.g. anti-histamine
Monitor vital signs sand record until casualty reaches the
hospital
For a child, contact the parent/guardian
Haemorrhage (Excessive Bleeding)
Definition: bleeding is the escape of blood from arteries, veins or
capillaries (blood vessels). Haemorrhage can be internal or
external depending on the type of injury and location of the injury.
External bleeding is usually obvious because it is visible and comes
from wounds or cuts.
Internal bleeding on the other hand is concealed and often difficult
to recognize because it occurs inside the body from a damaged
organ into cavities or tissues.
SIGNS AND SYMPTOMS OF EXTERNAL BLEEDING
It is not all types of external bleeding that are dangerous, however
a good and competent first aider should be able to observe and
recognize the vessel from which blood is escaping from to
determine its severity.
Life threatening signs and symptoms of external bleeding includes:
a. Blood spurting from a wound or cut
b. Bleeding that fails to stop after all measures have been taken to stop the
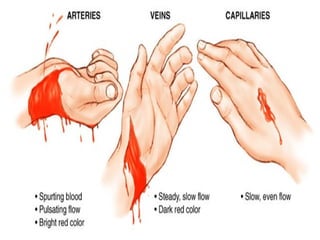
Each type of blood vessel bleeds, differently.
i.Arterial bleeding (bleeding from the arteries) is often:
 Bright red in colour due to high concentration of oxygen.
 Arterial bleeding also spurts/gush out due to the pressure from
the heart muscles.
 Generally, arterial blood does not clot easily due to its pressure
and flow of the blood
 This type of bleeding becomes difficult to control.
ii.Venous bleeding (bleeding from the vein) is rather:
 Dark red in colour because of very little amount of oxygen
present.
 Venous blood is under less pressure than arterial blood
therefore flows steadily without spurting or gushing.
 Venous bleeding generally is easier to control.
iii. Capillary bleeding is the most common type of bleeding:
It is usually slow because the vessel is small and the blood is
under low pressure.
 It is often described as “oozing” from the wound.
Clothing easily occurs and it is less red than arterial blood.
c.The skin: changes in the skin is quiet marked, there is ;
Paleness/pallor
Cold and clammy
Temperature of the body is below 350C (subnormal)
d. Pulse is weak and rapid, intensity of the rapid pulse and its
weakness depends on the severity of bleeding and amount of
blood loss. When severe bleeding occurs, the heart tries to
compensate by pumping faster but gradually losing the strength
in the pulse. Pulse may be as rapid as 140bpm.
e. Respiration: the casualties breathing pattern can be described as
“air-hunger respirations”. Patient sighs and gasps for air because the
blood in the system at that particular moment lacks enough oxygen.
f. The casualty becomes anxious, afraid and very restless. There may
be sweating
g. Patient/casualty complains of thirst. This reaction of the body is
not only due to the bleeding but to the fact that, tissue fluid is
withdrawn into the blood stream to compensate for the decreased
circulating volume.
h. Effects on the brain: due to poor blood supply to the brain, the
patient experiences;
Blurred vision
Buzzing or ringing in the ears
Dilated pupils
Confusion /mental confusion
Unconsciousness and subsequent death of brain cells
First aid management of external bleeding
 External bleeding is usually easy to control, the following
steps are helpful:
 Wash hands well before administering to patient
 Wear synthetic gloves
 Make the victim lie down
 Slightly elevate the legs
 keep the affected area elevated above the level of the heart
 Remove any obvious debris/particle
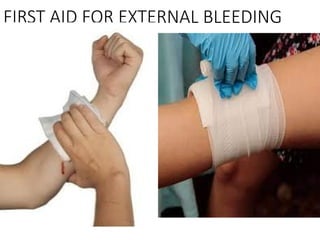
 Apply direct pressure using clean cloth, gauze/bandage
 Use hand if cloth is not available
 Apply pressure continuously for at least 20 minutes
 Do not remove the cloth to check the bleeding
 Hold the bandage in place using an adhesive tape
 If bleeding seeps through bandage, do not remove it
 Add extra gauze/bandage on top of the first one
 Apply direct pressure on the artery if necessary
 The pressure points for arm--below arm- pit/above elbow
 For leg--behind knee/near groin
 Squeeze the artery keeping finger flat
 Continue applying pressure on the wound
 Once bleeding stops immobilize the affected part
 Use a tourniquet for severe bleeding
 Monitor vital signs and as well as level of consciousness of the casualty
 Reassure casualty/patient and stay with the person
 Arrange for casualty’s removal to hospital or if already in the hospital,
call doctor to see patient immediately. If patient is being removed or
transported to the hospital, call ambulance, police, red cross or arrange
for a safe and quick private or public transport to send patient to the
hospital
FIRST AID FOR EXTERNAL BLEEDING
Signs and symptoms of internal bleeding
Internal bleeding is more difficult to recognize than external bleeding
because the signs and symptoms are not obvious and may take some time to
appear. These signs and symptoms include:
 Tenderness at the affected area
 Anxiety and restlessness
 Rapid and weak pulse
 Rapid breathing and shortness of breath
 pain
 Nausea or vomiting, vomiting blood
 Discoloration of the skin (bruising) in the injured area.
 Skin feels cold and moist, looks pale or bluish
 Excessive thirst
 Decreased level of consciousness
 Severe headache.
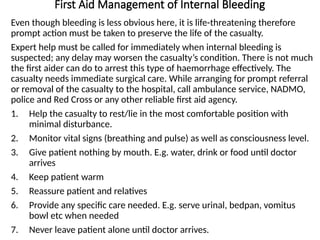
First Aid Management of Internal Bleeding
Even though bleeding is less obvious here, it is life-threatening therefore
prompt action must be taken to preserve the life of the casualty.
Expert help must be called for immediately when internal bleeding is
suspected; any delay may worsen the casualty’s condition. There is not much
the first aider can do to arrest this type of haemorrhage effectively. The
casualty needs immediate surgical care. While arranging for prompt referral
or removal of the casualty to the hospital, call ambulance service, NADMO,
police and Red Cross or any other reliable first aid agency.
1. Help the casualty to rest/lie in the most comfortable position with
minimal disturbance.
2. Monitor vital signs (breathing and pulse) as well as consciousness level.
3. Give patient nothing by mouth. E.g. water, drink or food until doctor
arrives
4. Keep patient warm
5. Reassure patient and relatives
6. Provide any specific care needed. E.g. serve urinal, bedpan, vomitus
bowl etc when needed
7. Never leave patient alone until doctor arrives.
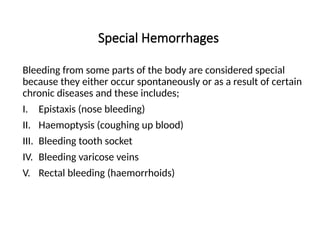
Special Hemorrhages
Bleeding from some parts of the body are considered special
because they either occur spontaneously or as a result of certain
chronic diseases and these includes;
I. Epistaxis (nose bleeding)
II. Haemoptysis (coughing up blood)
III. Bleeding tooth socket
IV. Bleeding varicose veins
V. Rectal bleeding (haemorrhoids)
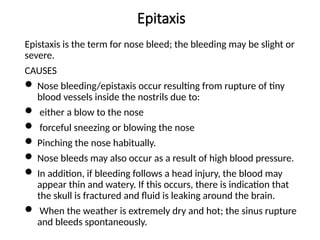
Epitaxis
Epistaxis is the term for nose bleed; the bleeding may be slight or
severe.
CAUSES
 Nose bleeding/epistaxis occur resulting from rupture of tiny
blood vessels inside the nostrils due to:
 either a blow to the nose
 forceful sneezing or blowing the nose
 Pinching the nose habitually.
 Nose bleeds may also occur as a result of high blood pressure.
 In addition, if bleeding follows a head injury, the blood may
appear thin and watery. If this occurs, there is indication that
the skull is fractured and fluid is leaking around the brain.
 When the weather is extremely dry and hot; the sinus rupture
and bleeds spontaneously.
Epitaxis cont'd
Medical conditions like:Allergic Rhinitis, Viral Rhinitis,
Leukemia, Tumors, Hemophilia, Hypertension
Certain medications like: Inhaled Steroids (usually causes
trauma), Cocaine Use, Blood Thinners (Aspirin, Plavix,
Warfarin)
Low Platelets (ITP, TTP)
SIGNS AND SYMPTOMS
Obvious bleeding through the nose and breathing through the
nose becomes difficult.
Dizziness
Weakness
Confusion
fainting
First Aid Management and Care
Aims:
a. Control blood loss
b. Maintain an open airway
Action
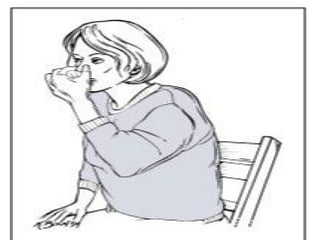
1. Casualty must be in sitting position with the head tilt forward to allow
the blood to drain from the nostrils.
2. Ask the casualty to breathe through the mouth and pinch the bridges of
the nose with the forefinger and the thumb.
3. Loosen any tight clothes around the head, neck and chest
4. Cold compress can be applied to the bridge of the nose to constrict the
blood vessels.
5. Clean/mop up blood with a piece of clean cloth, handkerchief or tissue
6. Reassure casualty and encourage him/her to remain calm and quiet
7. Children may be anxious and worried by nose bleed so they must not be
left alone. Constant reassurance helps a lot
8. If bleeding continuous after 10 to 15 minutes of the above measures,
refer casualty to the hospital for expect care
Haemoptysis
This term means, “Coughing up blood”. The blood may be coming from
any part of the respiratory tract. Quite often, it is the lungs
SIGNS AND SYMPTOMS
The coughed up blood is bright red in colour due to concentration of
oxygen from the lungs
The blood is also “frothy” because it is mixed up with air
When bleeding is mild, only speck or steaks of blood is found in the
sputum however, large amount of blood may be coughed up which
may be life –threatening.
Chest pain
Dyspnea (shortness of breath, even without exercise)
Fever
Nausea
Tachypnea (rapid breathing)
Vomiting
First Aid Management
Put casualty in sitting position
Tight clothing around the chest and waist should be
loosened.
Reassure casualty and instruct him/her to keep calm and
quiet
Ice cube if available may be given to suck on
Provide warmth if patient is cold
Arrange for referral to hospital or call doctor if already in
the hospital
Keep all sputum specimens for doctor’s inspection and
possible examination and diagnosis.
Haematemesis
This term means vomiting blood. The blood may be coming from
any part of the upper alimentary/gastrointestinal tract.
Sometimes, the bleeding is from gastric ulcer or duodenal ulcer
or the esophagus.
SIGNS AND SYMPTOMS
There is vomiting of gritty and dark brown blood, due to
mixing of food and gastric juices
If bleeding is mild, only specks of blood may be seen in the
vomitus resulting from perhaps erosion of the mucosal lining
of the intestine
There may be large amount of blood vomited if bleeding is
severe.
Signs and symptoms of shock
First Aid Management
 Remove tight clothing around the chest and abdomen
 Give noting by mouth because casualty may be bleeding
from a damaged organ into the abdominal cavity which
might be causing the haematemesis.
 Reassure client and stay with him/her
 Assess amount of blood loss and keep sputum for doctor’s
inspection and examination
 Keep client absolutely calm and quiet to prevent further
vomiting and bleeding
 Water may be given to rinse the mouth but not to swallow
 Call doctor or arrange for transport to the hospital.
Bleeding tooth socket
Causes
 Blow to the tooth
 Tooth extraction
SYMPTOMS AND SIGNS – not all may be present
 bleeding from the mouth, lips, tongue or tooth socket
 pain around or in the mouth following an injury
 a broken or displaced tooth
 swelling in the mouth or around the jaw
Treatment
 Reassure the person
 Wash hands and use wear gloves
 Apply direct pressure in the socket: using a gauze pad, press on the
affected part and let the adult bite on it for 10-15min.
 If the bleeding does not stop, use gauze that has been placed in cold water
and apply it to the affected area.
 Do not rinse mouth or drink warm water until you are very sure bleeding
has ceased.
FIRST AID FOR BLEEDING TOOTH
SOCKET
Bleeding varicose veins
The expression varicose veins are the medical terminology for describing dilated and
tortuous veins normally visible on the surface of the body. The most common site for the
occurrence of varicose veins is the lower limb although they can also occur anywhere on
the surface of the body or within the body itself. It is usually caused by pressure.
CAUSES
 Pregnancy
 Obesity
 Jobs that require long standing e.g. police, soldiers, nurses, chefs.
S/S
 Enlarged twisted veins on legs
 Pain
 The veins may rupture and ulcerate
TREATMENT
 Lay the patient down and elevate the lower extremities
 If there is no ulcer, apply external pressure by means of elastic stockings or a crepe
bandage
 Transport to hospital
 Observe for shock and monitor vital signs
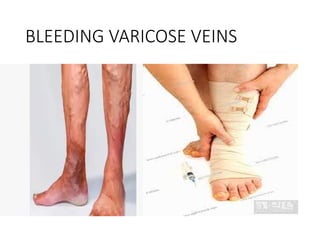
BLEEDING VARICOSE VEINS
Wounds
Definition: a wound is a break in the continuity of the skin or mucous
membrane. Wound can be sterile depending on the cause until invasion
of the wound by micro organisms occurs and it becomes infected or
septic. Wounds can be minor but sometimes may involve large areas of
the body base on type of injury.
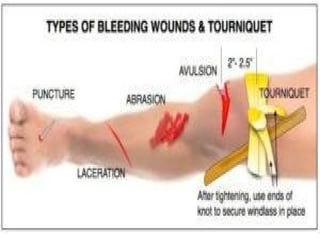
TYPES OF WOUNDS
Generally, there are four (4) main types of wounds
Abrasions
Lacerations
Avulsions
Punctures
ABRASIONS
This is the most commonly occurring type of open wound
characterized by skin that has been scrapped off. It is usually
superficial and painful because the sensitive nerve endings
are exposed when the outer skin is scrapped off during the
injury. Bleeding is not severe and easily controlled. The
nature of this type of wound pre-disposes to infection.
SIGNS AND SYMPTOMS
 There is an open wound with minimal
 Bleeding
 Pain
 Swelling depending on the type of injury
 Wound appears rough at the edges.
First Aid Management
Aims
The aim here is to:
 Prevent infection of the wound
 Reduce pain and
 Control bleeding
Action
 Immediately following the injury the wound must be
cleaned with copious water and an antiseptic lotion
 Cover wound with sterile gauze pad, clean, ironed piece of
cloth, bandaged firmly in position.
 Reassure casualty and refer to the clinic or hospital.
LACERATIONS
 A laceration is a cut, usually from sharp objects. The cut may have
either rough or smooth edges depending on which object caused the
cut. The common sharp-edged object that usually causes lacerations is
knives, scissor, broken edges, blades etc.
 A laceration can also result when a blunt objects splits the skin at areas
where bones lies directly underneath the skin’s surface. E.g. chin, skull.
 Lacerations can be deep affecting the layers of fat and muscle,
damaging nerves and blood vessel. Lacerations usually bleed freely
and depending on the organs/structures involved, heavy bleeding can
occur.
SIGNS AND SYMPTOMS
 There is an obvious cut in the skin involving the fat layers of the skin,
muscles, nerves and blood vessels.
 Bleeding may be mild or heavy depending on the structures involved
 There may or may not be pain; when the nerves are severely damaged
during the injury, pain signal cannot be transmitted to the brain
COMPLICATIONS
 Lacerations can easily become infected if not cared
for properly. When lacerations are not treated well
and it becomes infected, the infection spreads to
other parts of the body manifesting in
 High body temperature (fever) and
 Shock can result out of excessive uncontrolled
bleeding
First Aid Management
The aim is to
a. Prevent infection
b. Control bleeding
Action
1. Assess wound for presence of objects such as broken glass, pieces of
metal or blade
2. Monitor vital signs (temperature, pulse, respiration and blood
pressure)
3. Monitor signs of shock (such as cold and clammy skin, decreased Bp,
temperature, weak and rapid pulse e.t. c)
4. Reassure casualty
5. Clean wound with lots water and antiseptic lotions.
6. Apply sterile gauze and bandage firmly
7. Call for ambulance
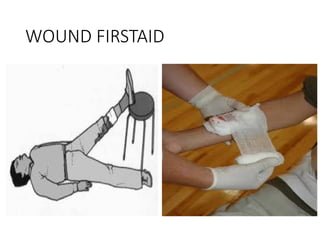
WOUND FIRSTAID
Avulsion
It is an injury in which a portion of the skin and sometimes the
muscles beneath is completely torn away. A partially avulsed piece
of skin may remain attached but hangs like a flap. Bleeding is
usually significant because avulsions often involve deeper soft
tissue layers such as muscles and tissues and blood vessels.
Sometimes a body part such as the finger or toes may be severed or
chopped off. Such an injury is called amputated.
SIGNS AND SYMPTOMS
 Although damage to the tissue in avulsion is severe but somehow
usually, bleeding is not as bad as one might expect. The blood
vessels usually constrict and retract (pull in) at the point of injury,
slowing bleeding and making it relatively easy to control.
 There is intense pain due to damage to nerve endings
 There is tear of muscles/skin at the injured body part
 There is obvious bleeding.
First Aid Management and Care
Any break in the skin provides an entry point for diseases – causing
micro organisms. Wounds may generally seem clean and fresh but has
the potential to become the site of an infection that can rage from
being unpleasant to being life-threatening. In the past, completely
severed/chopped off body part could not be successful but must not
delay.
Aim
The aim of care is to control bleeding and prevent infection.
Action
 Do not waste time to wash the wound
 Call/arrange for transportation to hospital or clinic
 While waiting for transport to arrive, quickly control bleeding using
sterile gauze pad and pressure. If gauze is not available, any clean
cloth or handkerchief may be used.
 If gloves are not available, ask casualty to use his/her hand to
support the area; avoid having direct contact with casualty’s blood
 Apply bandage over dressing to maintain pressure on the wound
 Wash hands after procedure and reassure patient
Cont'd
 Help him/her into a comfortable position
 If a body part is completely severed, try to retrieve the
severed body part. Wrap the part in sterile gauze or any
clean material
 Place the wrapped part in a plastic bag; if possible keep
the part cool by placing ice pack on the plastic bag
containing the severed body part. NB: do not place the
bag on dry ice or in water.
 Make sure the body part is transported to the hospital
with the victim without delay.
 Surgical management follows in the hospital involving
reattaching and stitching the body part by the doctor.
Sometimes, avulsion wounds later require plastic
surgery/cosmetic surgery to prevent conspicuous scar
Puncture wounds
A puncture wound results when the skin is pierced with a pointed object,
such as nail, a piece of glass or a knife. A gunshot wound is also a
punctured wound. The skin at site of puncture wound is usually closed
around the penetrating object. An object may remain embedded in the
wound.
SIGNS AND SYMPTOMS
 Penetrating object may be in site
 Usually external bleeding is minimal
 Internal bleeding can be severe if penetrating object causes damage to
blood vessels or internal organs.
 An object may pass completely through a body part, creating two open
wounds one at the entry point and another at the exits point
 Casualty may be anxious
 Signs of internal being may be present such as thirst, cold clammy
skin, if damaged is caused to deep internal organs in the thoracic or
abdominal cavities
 There is pain and tenderness at the site
First Aid Management
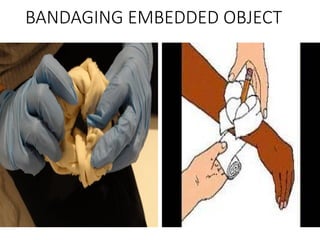
 Reassure casualty/victim and if an embedded object is in the wound
 Do not remove the piercing object
 Use bulky dressings to stabilize object in place, unnecessary
movement can result in further damage to tissues /organs.
 Control bleeding by bandaging the dressing in place around the
object
 Quickly transport casualty/victim to the hospital safely
 Monitor vital signs and keep record of them
 Hand over casualty and records of vital signs to the hospital staff
 Avoid having direct contact with victim’s blood by using disposable
gloves if gloves are not available any clean polythene bag may be
used
 Keep all soaked dressings for doctor’s inspection
 Wash hands thoroughly after procedure.
BANDAGING EMBEDDED OBJECT
Burns And Scalds
REVIEW OF ANATOMY AND PHYSIOLOGY OF THE SKIN
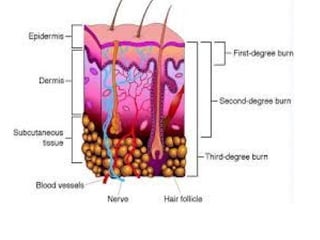
The skin: the skin is one of the largest organs of the body. It
consist of 3 layers namely epidermis (outer layer), the dermis
(the inner layer) and subcutaneous tissue (fatty tissue). The
epidermis is made up of flattened skin cells, which are
constantly shed off and replaced by new cells made in the
lowest part of the epidermis. The epidermis is protected by an
oily substance called sebum, secreted from the sebaceous gland,
which keeps the skin supple and waterproof. The dermis
contains the blood vessels, nervous muscles, sebaceous glands,
sweat glands and hair (roots)
Functions of the skin
One of the major functions of the skin is maintaining body
temperature (warmness and coolness of the body). Another
function for the skin is protecting the underlying tissues such as the
blood vessels, nerves and muscles.
A. Maintenance of body temperature
When the body becomes too cold, changes takes place to prevent
heat from escaping; thus blood vessels at the body surface
constrict (narrow) to keep warm blood at that part of the body.
Activity of the sweat gland is reduced and hairs stand upright and
trap warm air close to the skin. In addition, involuntary muscles
activity such as shivering also traps warm in the body.
On the other hand, when the body becomes too hot, blood vessels
beneath the skin dilates (widen) increasing blood flow to the
surface of the skin, sweat glands become more active and secret
more sweat. The sweat then, evaporates and cools the skin/body.
B. Protection of organ/tissue
When the skin is intact, there is no way blood can escape
through the skin because it forms a barrier or covering to
the blood vessels. Body fluid is also maintained because;
arrangement of the skin cells does not allow tissue fluid to
escape. However, during any injury that takes off large
portion of the skin results in blood and tissue fluid loss and
subsequent exposure to invading microorganism. Burns,
therefore, are such injuries to be discussed.
Definition Of Burns
A damage to the skin by burning from fire such that, it can no longer
function effectively as a natural barrier against infection, loss of blood
and tissue fluid.
Scalds are burning occurring from moist heat e.g. hot water, soups etc.
the severity of burns depends on
 The temperature of the source/what is causing the burns.
 The length of exposure to the source of burns
 The location of the burns – eyes, respiratory organs etc.
 The extent/depth of the burnt area
 The victim’s age and existing medical condition
Generally, the skin of people above the age of 60 years becomes thinner
and more susceptible to severe burn injuries. Young children also have
delicate skin therefore burns in children tends to be more severe than
adults. People with chronic medical problems also tend to have more
complication; for example a diabetic patient may have wound-healing
delayed. Also, malnourished persons may suffer more complications
such as susceptibility to infections. Diabetics may have no sensation and
therefore become burned more easily and severely because they do not
Classification Of Burns
The severity of burns is determined by the depth and extent of
the burn area, the source/cause of the burn, the age of the
patient, body regions burned and other illnesses and injuries.
When classifying burns into categories, minor, moderate and
major is used. These categories take into account all the factors
that determine severity, for example a burn damages all layers
of the skin but affects only a small area of the body.
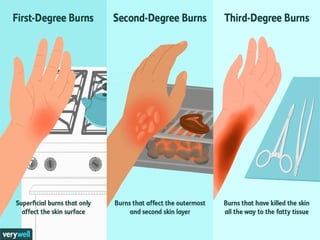
Burns classified according to the depth of skin damage are
called first degree, second degree and third degree. In first
degree burns, the epidermis is damaged and he skin is
reddened. Second degree burns involve damage to the dermis
and a third degree burn damages all skin layers.
Signs and symptoms and Management according to
Classification
A. FIRST – DEGREE
A first degree burns causes pain, reddening of the surrounding skin resembling
sunburn.
B. SECOND DEGREE /PARTIAL THICKNESS OF THE SKIN IS BURNED
It extends deeper into the skin than first degree burns.
 There is blisters formation
 pain
 Redness.
Treatment
For minor burns, including first-degree burns and second-degree burns limited to a
area no larger than 3 inches (7.6 centimeters) in diameter, take the following actio
 Cool the burn. Hold the burned area under cool (not cold) running water for 10
or 15 minutes or until the pain subsides. If this is impractical, immerse the burn
in cool water or cool it with cold compresses. Cooling the burn reduces swelling
by conducting heat away from the skin. Don't put ice on the burn.
Cont'd
 Cover the burn with a sterile gauze bandage.
Don't use fluffy cotton, or other material that may
get lint in the wound. Wrap the gauze loosely to
avoid putting pressure on burned skin. Bandaging
keeps air off the burn reduces pain and protects
blistered skin.
 Take an over-the-counter pain reliever. Example
paracetamol.
 Arrange for victim’s removal to the hospital.
Assess for breathing difficulties if cause of burn is
an open fire.
Minor burns usually heal without further treatment. They may
heal with pigment changes, meaning the healed area may be a
different color from the surrounding skin. Watch for signs of
infection, such as increased pain, redness, fever, swelling or
oozing. If infection develops, seek medical help.
Caution
 Don't use ice. Putting ice directly on a burn can cause a
person's body to become too cold and cause further damage
to the wound.
 Don't apply egg whites, butter or ointments to the burn. This
could cause infection.
 Don't break blisters. Broken blisters are more vulnerable to
infection.
C. THIRD DEGREE/FULL THICKNESS BURNS
The most serious burns involve all layers of the skin and cause
permanent tissue damage. Fat, muscle and even bone may be affected.
Areas may be charred black or appear dry and white. Difficulty inhaling
and exhaling, carbon monoxide poisoning, or other toxic effects may
occur if smoke inhalation accompanies the burn. Third-degree burns
are usually not painful at first because of nerve damage. Third degree
burns such as caused by fires demand immediate emergency
management. .
Call the ambulance and while you wait for the arrival, do the following;
 Remove victim from source of fire
 Do not try to remove burnt clothing that is adhered to the skin
 Don't immerse large severe burns in cold water. Doing so could cause
a drop in body temperature (hypothermia) and deterioration of
blood pressure and circulation (shock).
 Cover the adhered clothing with thick, sterile dressing
 If the arms, hands or legs are burned elevate them above heart level
 Keep victim in a most comfortable position
 Reassure and continue to do so
 Check whether the victim is suffering from smoke inhalation. Signs of
smoke inhalation include difficult breathing (often accompanied by
coughing), smoky-smelly breath or black discoloration of the victim’s
mouth and nose. If any of these signs are present, gently move victim
into a sitting position and monitor breathing
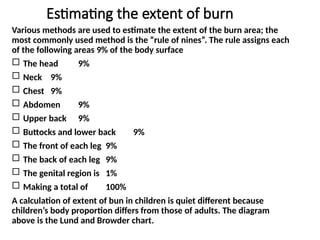
Estimating the extent of burn
Various methods are used to estimate the extent of the burn area; the
most commonly used method is the “rule of nines”. The rule assigns each
of the following areas 9% of the body surface
 The head 9%
 Neck 9%
 Chest 9%
 Abdomen 9%
 Upper back 9%
 Buttocks and lower back 9%
 The front of each leg 9%
 The back of each leg 9%
 The genital region is 1%
 Making a total of 100%
A calculation of extent of bun in children is quiet different because
children’s body proportion differs from those of adults. The diagram
above is the Lund and Browder chart.
Scald
This s is the burns caused by moist heat e.g. hot water, soup
and hot oil.
SIGNS AND SYMPTOMS
 Pain
 Blisters
 Darkening of the area
MANAGEMENT
 Reassure casualty
 Remove clothing as quickly as possible
 Gently flood cold water over the scalded area until pain is
reduced
 Leave any blisters intact, cover with sterile linen and
transport to the hospital.
Chemical Burns
Burns caused by acids caustic alkalis
Management
Reassure casualty
Flood the burned area with copious water to neutralize the
acid
Add sodium bicarbonate to water if burns is caused by acid
Treat for shock and cover with dry dressing and transport to
the hospital
Unconsciousness
This can be defined as a state of unawareness or being
insensitive to ones surroundings.
In any emergency situation, the exact order of steps to take
will vary depending on the victim’s condition in which
he/she was found. The victim may be conscious and
breathing but there may be life – threatening condition.
On the other hand, the victim may be unconscious, and this
is always life-threatening condition that demands
immediate attention.
Although the unconscious victim may not be able to
communicate clearly, he/she can hear you, when you speak.
Unconsciousness can occur in adults, children between 1 –
10 years and infants under one year.
Conditions resulting in altered consciousness or comma may be
varied; generally, it may be medical such as resulting from illness or
may ne surgical and resulting from severe injuries. E.g. head injuries,
tumors of the brain, cerebral malaria, cerebral haemorrhage,
electrical shock epilepsy, diabetic and insulin coma, cerebral
anaemia, alcohol poisoning etc.
LEVELS OF UNCONSCIOUSNESS
Loss of consciousness can be assessed at different levels as follows.
 Stupor: state of partial consciousness characterized by
disorientation to place, time and person inability to respond
verbally but responds to external stimuli such as pain, touch or
heat. Sometimes if supraocular pressure is applied the person
wakes up and sometimes answers questions like “raise up your
arms”.
 Coma: refers to complete state of unconsciousness where all
reflexes are absent and there is inability to respond to any stimuli.
 Coma vigil: this is a state of complete unconsciousness with the
person’s eyes wide open such in an awake and watchful person.
LEVELS OF CONSCIOUSNESS
 Alertness sharp to every stimulus, speaks, answers
every question and responds to pain.
 Lethargy: awake, answers questions but slowly and
confuse about where he/she is.
 Drowsiness: the person is sleepy and not able to
concentrate on what is being said.
 Semiconscious: sleepy and difficult to answer
questions which may be wrong
 unconciousness
General examination and Diagnose of an unconscious
patient
It is sometimes difficult to diagnose the cause of altered consciousness because
the patient or casualty cannot give history about himself/herself. It is therefore
important that relatives and friends cooperate with the first aider to achieve
success of treatment while it is important to find out the cause, time should
not be wasted. Assessment of the victim must be done promptly in addition to
information gathered from significant others. The following facts should be
noted and reported to the doctor when patient is sent to the hospital.
 The position in which the victim was found
 Skin colour must be observed for pallor or cyanosis
 Evidence of cut/wounds particularly on the skull. (possible brain damage)
 Evidence of haemorrhage e.g. blood soaked garments/dresses
 Note any specific odour from the patients breath such as alcohol, any
poisonous chemical or substance or a sickly sweet smell which occurs in
diabetic coma.
 General state such as convulsion/seizure movements or an absolute rigid
still state in which victim was found
 State of vital signs - pulse rate, respiration rate for any abnormality.
Cont'd
 Perform a quick assessment of level of unconsciousness
using the AVPU code
A – Alertness (does casualty open eyes and respond to
questions?)
V – Voice (does the casualty hear and responds to simple
questions and instruction?)
P – Pain (does casualty respond to painful stimulus?)
U – Unresponsive (is casualty unresponsive to any form of
stimulus?)
General care of an unconscious patient
Aims and objectives of this care are to:
 Maintain/ensure a clear open airway
 Asses and record level of response
 Arrange for urgent removal to hospital
 Performing a quick check before embarking on any action is very important. If
there are no obvious injuries but the casualty’s face is pale with cold clammy
skin, he/she must be put in prone position with the head turned to the side.
 Assess for head and neck injury
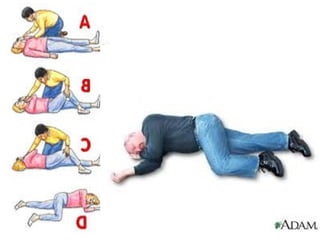
 Position the patient laterally or in a recovery position to clear airway of any
saliva and mucus.
 Gently remove/cut tight clothing around the neck, chest and waist
 Ensure there is good ventilation by preventing too many people coming closer
 Do not give anything by mouth (maintain nil per os)
 Keep patient reasonably warm by covering him/her with a blanket
 Treat obvious cause such as haemorrhage fracture or breathlessness
 Send casualty quickly to the hospital
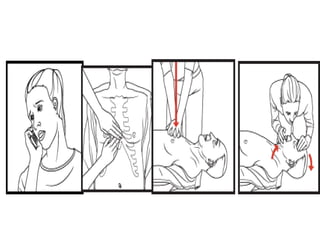
Cardiopulmonary resuscitation
Before you begin
Before starting CPR, check:
Is the person conscious or unconscious?
If the person appears unconscious, tap or shake his or her
shoulder and ask loudly, "Are you OK?"
If the person doesn't respond and two people are available,
one should call 193 or the local emergency number and
one should begin CPR. If you are alone and have immediate
access to a telephone, call 193 before beginning CPR —
unless you think the person has become unresponsive
because of suffocation (such as from drowning). In this
special case, begin CPR for one minute and then call 911 or
the local emergency number.
If an AED is immediately available, deliver one shock if
instructed by the device, then begin CPR.
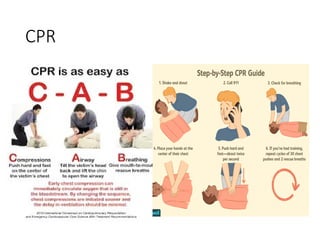
Remember to spell C-A-B
The American Heart Association uses the acronym of CAB — circulation,
airway, breathing — to help people remember the order to perform the
steps of CPR.
Circulation: Restore blood circulation with chest compressions
 Put the person on his or her back on a firm surface.
 Kneel next to the person's neck and shoulders.
 Place the heel of one hand over the centre of the person's chest,
between the nipples. Place your other hand on top of the first hand.
Keep your elbows straight and position your shoulders directly above
your hands.
 Use your upper body weight (not just your arms) as you push straight
down on (compress) the chest at least 2 inches (approximately 5
centimetres). Push hard at a rate of about 100 compressions a
minute.
 If you haven't been trained in CPR, continue chest compressions until
there are signs of movement or until emergency medical personnel
take over. If you have been trained in CPR, go on to checking the
airway and rescue breathing.
Airway: Clear the airway
If you're trained in CPR and you've performed 30 chest
compressions, open the person's airway using the head-tilt,
chin-lift manoeuvre. Put your palm on the person's forehead
and gently tilt the head back. Then with the other hand,
gently lift the chin forward to open the airway.
Check for normal breathing, taking no more than five or 10
seconds. Look for chest motion, listen for normal breath
sounds, and feel for the person's breath on your cheek and
ear. Gasping is not considered to be normal breathing.
If the person isn't breathing normally and you are trained in
CPR, begin mouth-to-mouth breathing. If you believe the
person is unconscious from a heart attack and you haven't
been trained in emergency procedures, skip mouth-to-mouth
rescue breathing and continue chest compressions.
Breathing: Breathe for the person
Rescue breathing can be mouth-to-mouth breathing or
mouth-to-nose breathing if the mouth is seriously injured or
can't be opened.
With the airway open (using the head-tilt, chin-lift
maneuver), pinch the nostrils shut for mouth-to-mouth
breathing and cover the person's mouth with yours, making a
seal.
Prepare to give two rescue breaths. Give the first rescue
breath — lasting one second — and watch to see if the chest
rises. If it does rise, give the second breath. If the chest
doesn't rise, repeat the head-tilt, chin-lift maneuver and then
give the second breath. Thirty chest compressions followed
by two rescue breaths is considered one cycle.
Cont'd
Resume chest compressions to restore circulation.
If the person has not begun moving after five cycles (about two
minutes) and an automatic external defibrillator (AED) is
available, apply it and follow the prompts. Administer one
shock, and then resume CPR — starting with chest
compressions — for two more minutes before administering a
second shock. If you're not trained to use an AED, a 911 or
other emergency medical operator may be able to guide you in
its use. Use pediatric pads, if available, for children ages 1
through 8. Do not use an AED for babies younger than age 1. If
an AED isn't available, go to the next step below.
Continue CPR until there are signs of movement or emergency
medical personnel take over.
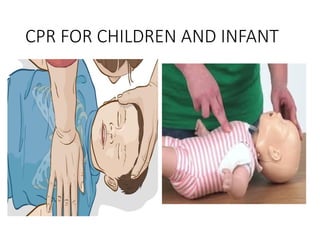
To perform CPR on a child
 The procedure for giving CPR to a child age 1 through 8 is essentially the
same as that for an adult. The differences are as follows:
 If you're alone, perform five cycles of compressions and breaths on the
child — this should take about two minutes — before calling 193 or
your local emergency number or using an AED.
 Use only one hand to perform heart compressions.
 Breathe more gently.
 Use the same compression-breath rate as is used for adults: 30
compressions followed by two breaths. This is one cycle. Following the
two breaths, immediately begin the next cycle of compressions and
breaths.
 After five cycles (about two minutes) of CPR, if there is no response and
an AED is available, apply it and follow the prompts. Use pediatric pads
if available. If pediatric pads aren't available, use adult pads.
 Continue until the child moves or help arrives.
To perform CPR on a baby
 Most cardiac arrests in babies occur from lack of oxygen, such as from
drowning or choking. If you know the baby has an airway obstruction,
perform first aid for choking. If you don't know why the baby isn't
breathing, perform CPR.
 To begin, examine the situation. Stroke the baby and watch for a
response, such as movement, but don't shake the baby.
 If there's no response, follow the CAB procedures below and time the
call for help as follows:
 If you're the only rescuer and CPR is needed, do CPR for two minutes —
about five cycles — before calling 193 or your local emergency number.
 If another person is available, have that person call for help immediately
while you attend to the baby.
CPR
Circulation: Restore blood circulation
 Place the baby on his or her back on a firm, flat surface, such as a
table. The floor or ground also will do.
 Imagine a horizontal line drawn between the baby's nipples.
Place two fingers of one hand just below this line, in the center of
the chest.
 Gently compress the chest about 1.5 inches (about 4 cm).
 Count aloud as you pump in a fairly rapid rhythm. You should
pump at a rate of 100 compressions a minute.
 Airway: Clear the airway
 After 30 compressions, gently tip the head back by lifting the chin
with one hand and pushing down on the forehead with the other
hand.
 In no more than 10 seconds, put your ear near the baby's mouth
and check for breathing: Look for chest motion, listen for breath
sounds, and feel for breath on your cheek and ear
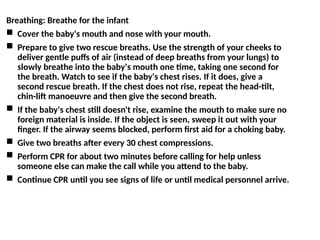
Breathing: Breathe for the infant
 Cover the baby's mouth and nose with your mouth.
 Prepare to give two rescue breaths. Use the strength of your cheeks to
deliver gentle puffs of air (instead of deep breaths from your lungs) to
slowly breathe into the baby's mouth one time, taking one second for
the breath. Watch to see if the baby's chest rises. If it does, give a
second rescue breath. If the chest does not rise, repeat the head-tilt,
chin-lift manoeuvre and then give the second breath.
 If the baby's chest still doesn't rise, examine the mouth to make sure no
foreign material is inside. If the object is seen, sweep it out with your
finger. If the airway seems blocked, perform first aid for a choking baby.
 Give two breaths after every 30 chest compressions.
 Perform CPR for about two minutes before calling for help unless
someone else can make the call while you attend to the baby.
 Continue CPR until you see signs of life or until medical personnel arrive.
CPR FOR CHILDREN AND INFANT
FIRST AID MANAGEMENT OF SPECIFIC UNCONSCIOUS
CONDITIONS
SYNCOPE (FAINTING)
This refers to partial or complete loss of consciousness,
resulting from varied conditions such as
 Decreased blood flow to the brain due to haemorrhage
 Sudden severe pain (as in crush injury)
 Physical exhaustion e.g. standing in the same position for
a long period of time
 Confinement in a hot, stuffy or poorly ventilated place for
a long time
 Emotional disturbance such as extreme panic, fear or
grief.
First Aid Management and Care
If the person’s condition is noticed at the stage of feeling dizzy and sweating,
help the person to sit down and rest the face on knees
1. To improve blood supply to the brain increase ventilation by opening
windows and doors
2. Remove tight clothing around neck, chest and waist.
3. If the person is in a crowd of people remove him/her to an open place to sit
down. but if the person has already fallen on to the ground before you
came across him/her, then, place him/her in prone position
4. Quickly remove tight clothing
5. Keep crowd away from the casualty to allow for fresh air to circulate
6. Check for breathing and pulse
7. Clear airway (nose and mouth) and keep airway open
8. If consciousness does return, allow the person to keep lying for sometime
(avoid getting up too quickly)
9. Find out the cause of fainting and take appropriate steps e.g. advise to seek
medical care.