Manik Barman Int. Journal of Engineering Research and Applications www.ijera.com
ISSN : 2248-9622, Vol. 5, Issue 4, ( Part -5) April 2015, pp.19-23
www.ijera.com 19 | P a g e
Optimization of Process Parameters of Tool Wear in Turning
Operation
Manik Barman1
, Dr. Sudip Mukherjee2
M.Tech Scholar, Department of Mechanical Engineering, Jalpaiguri Government Engineering College,
Jalpaiguri, West Bengal, India
Professor& HOD, Department of Mechanical Engineering, Jalpaiguri Government Engineering College,
Jalpaiguri, West Bengal, India
ABSTRACT
Tool Wear is of great apprehension in machining industries since itaffects the surface quality, dimensional
accuracy and production cost of the materials / components. In the present study twenty seven experiments were
conducted as per 3 parameter 3 level full factorial design for turning operation of a mild steel specimen with
high speed steel (HSS) cutting tool. An experimental investigation on cutting tool wear and a mathematical
model for tool wear estimation is reported in this paper where the model was simulated by computer
programming and it has been found that this model is capable of estimating the wear rate of cutting tool and it
provides an optimum set of process parameters for minimum tool wear.
Keywords: Tool Wear, Spindle speed, Depth of Cut, Feed Rate, DOE etc.
I. INTRODUCTION
Machining operations have been the core of the
manufacturing industry since the industrial
revolution.Increasing the productivity and the quality
of the machined parts are the main challenges of
metal-based industry.There has been increased
interest in monitoring all aspects of the machining
process. Turning is the one most widely used among
all the cutting processes.The most important
machining parameters (cutting speed, feed rate, depth
of cut) accelerate tool wear which in turn affects the
surface finishing. The tool wear is directly related to
the machining parameters. Here regression analysis
have been used to find out the best combination of
process parameters for minimum tool wear in
turning operations in order to improve quality of
machined products.
II. EXPERIMENT
The experiments were performed following full
factorial design of experiments. Design of
experiments is an effective approach to optimize the
parameters in various manufacturing related process,
and one of the best tool for analyzing the effect of
process parameters over some specific ranges. The
selection of such points in design space is commonly
called design of experiments (DOE). In this work
related to turning of Mild steel, the experiments were
conducted by considering three main influencing
process parameters such as spindle speed, Feed Rate
and Depth of Cut at three different levels namely
Low, Medium and High. So according to the selected
parameters a three level full factorial design of
experiments (33
= 27) were designed and experiments
were conducted according to those combinations. The
level designation of various process parameters are
shown in table 1.
Table 1.Limits and levels of control parameters
Control
Parameters
Limits
Low(1) Medium(2) High(3)
Spindle Speed
(V) rpm
250 590 930
Feed Rate
(f) mm/rev
0.16 0.40 0.64
Depth of cut
(d) mm
0.6 0.8 1.0
RESEARCH ARTICLE OPEN ACCESS
Manik Barman Int. Journal of Engineering Research and Applications www.ijera.com
ISSN : 2248-9622, Vol. 5, Issue 4, ( Part -5) April 2015, pp.19-23
www.ijera.com 20 | P a g e
Table 2. Experimental Data
Exp.
No.
Spindle Speed (v)
rpm
Feed Rate (f)
mm/rev
Depth of Cut (d)
mm
Response (T = Tool
Wear) mm
1. 250 0.16 0.6 0.03
2. 250 0.16 0.8 0.06
3. 250 0.16 1.0 0.08
4. 250 0.40 0.6 0.05
5. 250 0.40 0.8 0.07
6. 250 0.40 1.0 0.09
7. 250 0.64 0.6 0.07
8. 250 0.64 0.8 0.08
9. 250 0.64 1.0 0.10
10. 590 0.16 0.6 0.04
11. 590 0.16 0.8 0.06
12. 590 0.16 1.0 0.08
13. 590 0.40 0.6 0. 06
14. 590 0.40 0.8 0.08
15. 590 0.40 1.0 0.10
16. 590 0.64 0.6 0.08
17. 590 0.64 0.8 0.09
18. 590 0.64 1.0 0.11
19. 930 0.16 0.6 0.05
20. 930 0.16 0.8 0.08
21. 930 0.16 1.0 0.10
22. 930 0.40 0.6 0.07
23. 930 0.40 0.8 0.09
24. 930 0.40 1.0 0.12
25. 930 0.64 0.6 0.09
26. 930 0.64 0.8 0.11
27. 930 0.64 1.0 0.16
III. MATHEMATICAL MODEL DEVELOPMENT
The general second order polynomial mathematical model, which analyses the parametric influences on the
various response criteria, can be described as follows:
Tool Wear, T = B0+ 𝑘
𝑖=1 BiXi+ 𝑘
𝑖=1 BiiXi
2
+ 𝑘
𝑖,𝑗=1
𝑖≠𝑗
BijXiXj …………………….. (1)
Where T is Response and Xi(i, j =1, 2, . . . . , k) are levels of k quantitative variables. The coefficient B0 is
the constant term; the coefficients Bi,Bij, Bijare for the Linear, Quadratic and Interaction terms. After putting
actual values from the experiments, 27 equations are formed.
The general equation for this experiment,
T=B0+B1v+B2f+B3 d+ B11 v 2
+B22f 2
+B33d 2
+ B12vf+ B13vd+ B23fd …………………...(2)
Here X1=v, X2=f,X3=d
Theequations formed by using the experimental data are solved by using Least Square Method in Matlab
software and the coefficients are found to be:
B0=-0.0233, B1= -0.0001,
B2 =-0.0449,
B3=-0.0030,
B11= 0.0000,
B22= 0.0133,
B33= 0.0530,
B12= 0.0001,
B13=0.0001,
B23= -0.0174
So the final equation found by regression analysis is as follows:
T=-0.0233 - 0.0001v + 0.0449 f - 0.0030d+0.0000v2
+ 0.0133 f2
+ 0.0530 d2
+ 0.0001 vf + 0.0001vd- 0.0174 fd
IV. RESULTS AND DISCUSSION
Manik Barman Int. Journal of Engineering Research and Applications www.ijera.com
ISSN : 2248-9622, Vol. 5, Issue 4, ( Part -5) April 2015, pp.19-23
www.ijera.com 21 | P a g e
The nonlinear 2nd
order regression equation representing the mathematical model for tool wear is simulated
in computer to determine the effects of individual process parameters on tool wear which is done by varying one
parameter at a time within its range and keeping the other two parameters at their mean value.
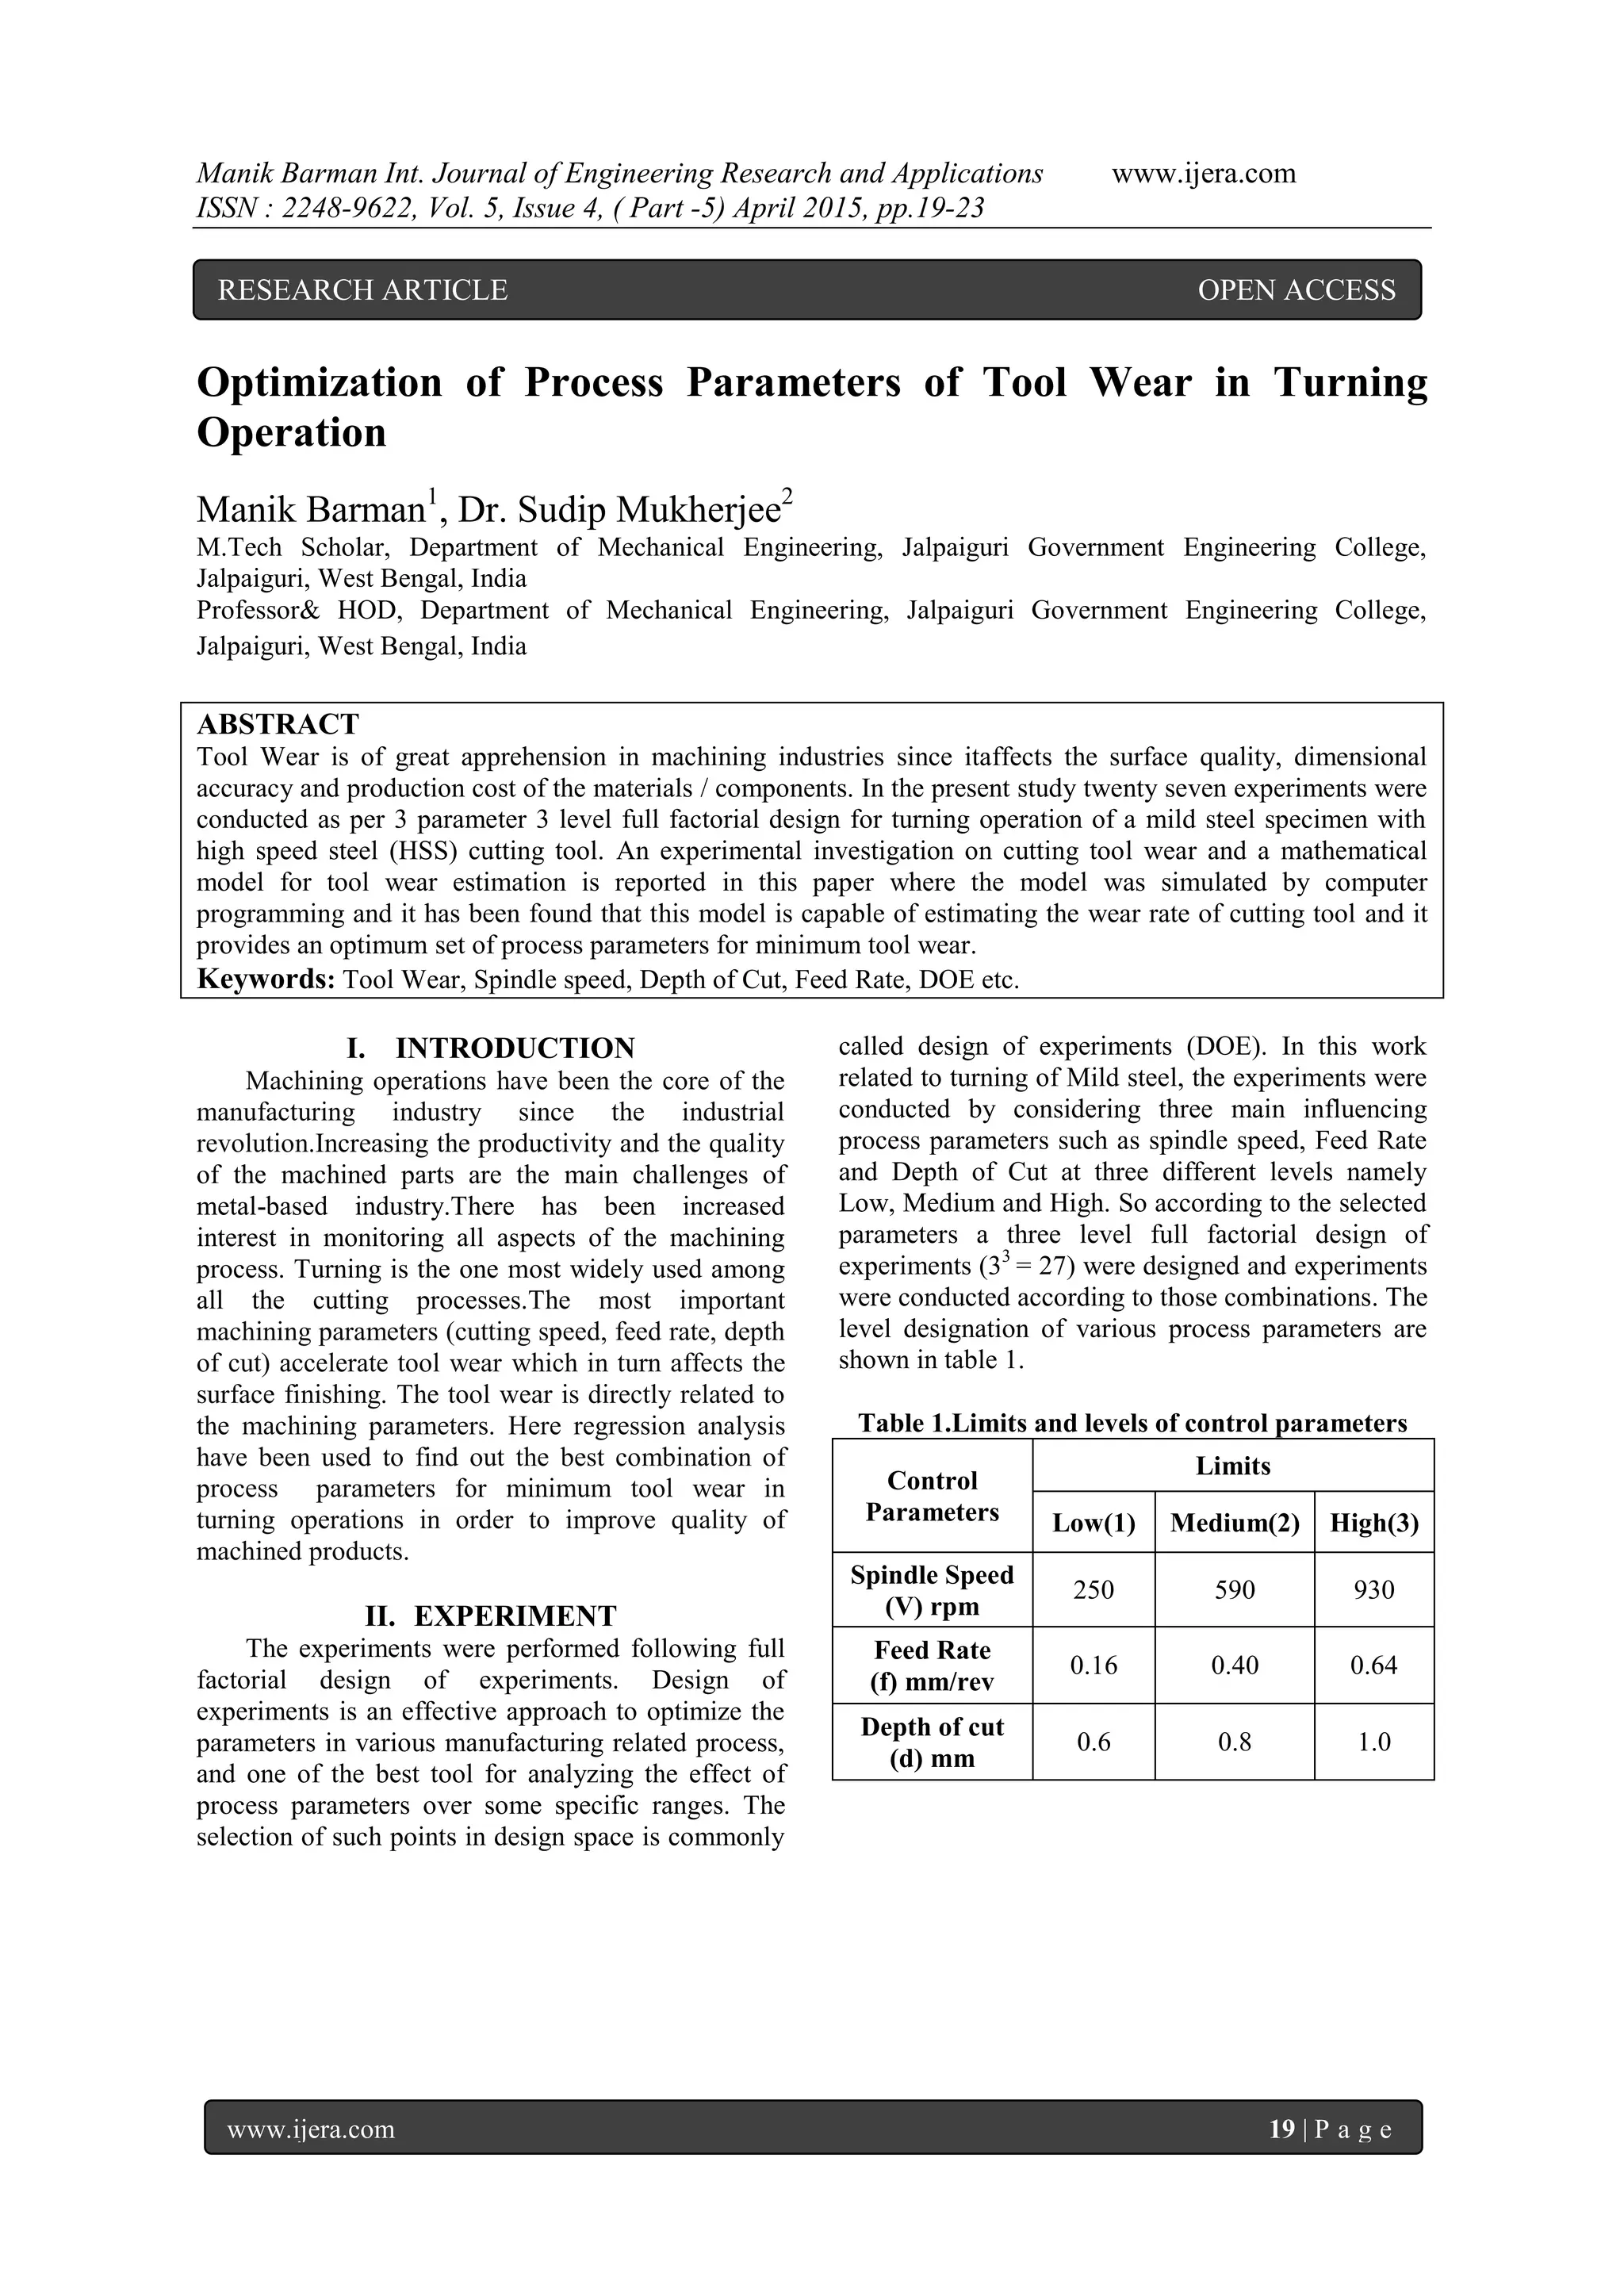
Figure 4.1 shows the variation of tool wear with the change of spindle speed. Spindle speed is made to vary
from 250 RPM to 930 RPM and Feed Rate & Depth of Cut are kept constant at mean values within their ranges,
which are 0.4 mm/rev & 0.8 mm respectively.
Figure 4.1 shows that the tool wear increases with increase of Spindle Speed. It has been found from the
graph that tool wear is minimum at spindle speed of 250 RPM.
Figure 4.1 Tool Wear (mm) vs Spindle Speed (rpm)
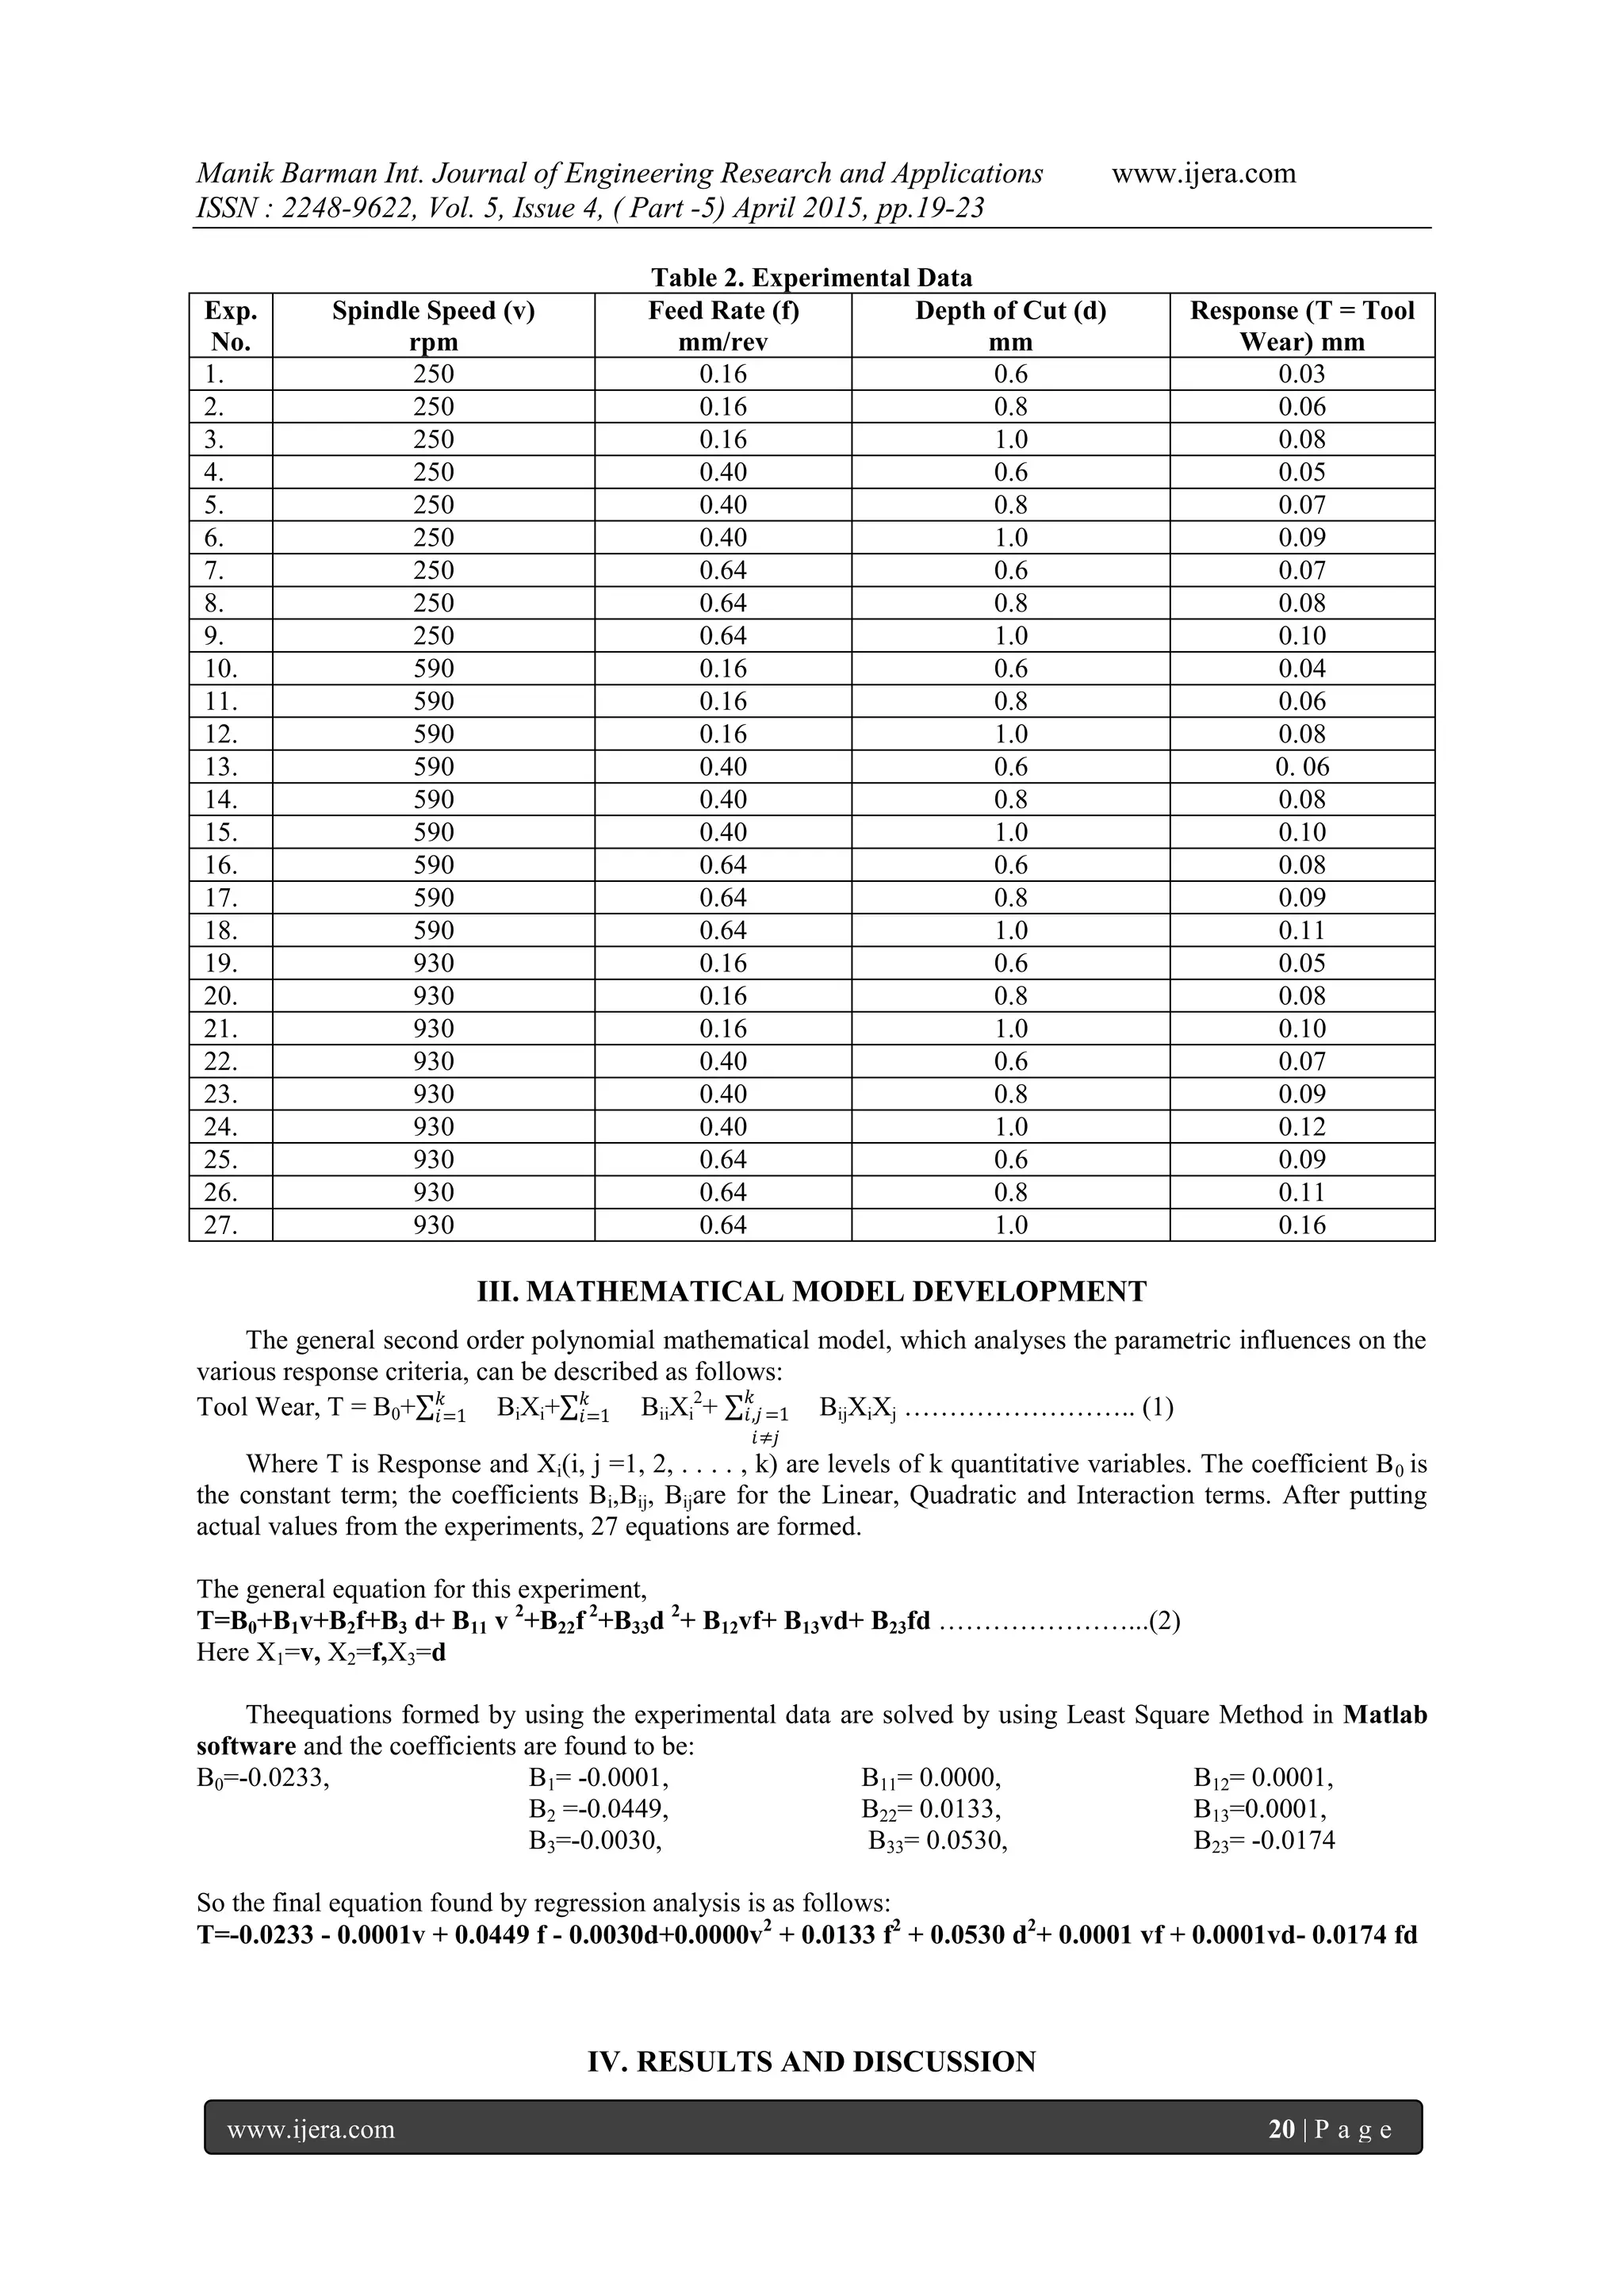
Figure 4.2 shows the variation of tool wear with the change of Feed Rate. Feed Rate is made to vary from
0.16 mm/rev to 0.64 mm/rev and Spindle Speed & Depth of Cut are kept constant at mid values within their
ranges, which are 590 RPM & 0.8 mm respectively.
Figure 4.2 shows that tool wear increases with increase of Feed Rate. It is has been found from the graph
that tool wear is minimum at Feed Rate of 0.16 mm/rev.
Figure 4.2 Tool Wear (mm) vs Feed Rate (mm/rev)
Figure 4.3 shows the variation of tool wear with the change of Depth of Cut. Depth of Cut is made to vary
1000900800700600500400300200
0.0875
0.0850
0.0825
0.0800
0.0775
0.0750
Spindle Speed (rpm)
ToolWear(mm)
Variation of Tool Wear (mm) with Spindle Speed (rpm)
0.60.50.40.30.20.1
0.12
0.11
0.10
0.09
0.08
0.07
Feed Rate (mm/rev)
ToolWear(mm)
Variation of Tool Wear (mm) with Feed Rate (mm/rev)
Manik Barman Int. Journal of Engineering Research and Applications www.ijera.com
ISSN : 2248-9622, Vol. 5, Issue 4, ( Part -5) April 2015, pp.19-23
www.ijera.com 22 | P a g e
from 0.6 mm to 1.0 mm and Spindle Speed & Feed Rate is kept constant at mid values within their ranges,
which are 590 RPM & 0.40 mm/rev respectively.
Figure 4.3 shows that tool wear increases with increase of Depth of Cut. It is has been found from the graph
that tool wear is minimum at Depth of Cut of 0.6 mm.
Figure 4.3 Tool Wear (mm) vs Depth of Cut (mm)
V. CONCLUSION
Analysis of the variation of Tool Wear against
individual process parameters shows that Tool Wear
of the specimen will be best at three distinct values of
the process parameters. Hence the optimum set of
process parameters found from the computer
simulation and the graph for minimum tool wear
within considered ranges are:
Spindle Speed = 250 RPM
Feed Rat = 0.16 mm/rev
Depth of Cut = 0.6 mm
Hence it is possible to limit the tool wear while
machining by choosing the optimum set of process
parameters.
REFERENCE
[1] Design and Analysis of Experiments by
Douglas C. Montgomery.
[2] Statistical Design and Analysis of
Experiments by Robert L. Mason, Richard
F. Gunst, James L. Hess.
[3] A First Course in Design and Analysis of
Experiments by Gary W. Oehlert.
[4] E Paul DeGarmo, J.T. Black,Ronala Kosher,
Material and process in manufacturing.
[5] P. N. Rao, “Manufacturing Technology –
Metal Cutting and Machine Tools”,Tata
McGraw- Hill.
[6] S C Rope Kapakjian, Steven R Schey,
Introduction to manufacturing process.
[7] JhonA.Schey, Introduction to manufacturing
processes.
[8] Vishal S. Sharma · S. K. Sharma · Ajay K.
Sharma (2007), „‟ Cutting tool wear
estimation for turning‟‟, Springer Science +
Business Media.
[9] Viktor P. Astakhov (2006), „‟Effects of
cutting feed, depth of cut, and work piece
(bore) diameter on the tool wear rate„‟,
Springer-Verlag London Limited.
[10] M. Szafarczyk and j. Chrzanowski, „‟Tool
Probe for Measuring Dimensional Wear and
X Co-ordinate Turning Edge‟‟.
[11] M. Krishnan Unni,PG Student, Department
of Mechanical Engineering, RVS College of
Engineering & Technology, Dindigul-624
005; R. Sanjeevkumar, Assistant professor,
Department of Mechanical Engineering;
RVS College of Engineering & Technology,
Dindigul-624 005; M. P. Prabakaran,
Assistant professor, Department of
Mechanical Engineering, SBM College of
Engineering and Technology, Dindigul-624
1.00.90.80.70.6
0.11
0.10
0.09
0.08
0.07
0.06
0.05
Depth of Cut (mm)
ToolWear(mm)
Variation of Tool Wear (mm) with Depth of Cut (mm)
Manik Barman Int. Journal of Engineering Research and Applications www.ijera.com
ISSN : 2248-9622, Vol. 5, Issue 4, ( Part -5) April 2015, pp.19-23
www.ijera.com 23 | P a g e
005; K. Vetrivel Kumar, Assistant professor,
Department of Mechanical Engineering,
SBM College of Engineering and
Technology, Dindigul-624 005 (2014);
„‟Tool Wear Optimization of Aluminum
Alloy using Response Surface
Methodology‟‟; International Journal of
Engineering Research & Technology
(IJERT).
[12] TugrulO¨zel, YigitKarpat , Lu´ısFigueira , J.
Paulo Davim(2007),"Modelling of surface
finish and tool flank wear in turning of AISI
D2 steel with ceramic wiper inserts",Journal
of Materials Processing Technology.
[13] RatchaponMasakasin, Department of
Industrial Engineering, Faculty of
Engineering, Kasetsart University, Bangkok
10900, E-mail: masakasin.r@gmail.com;
ChanaRaksiri, Department of Industrial
Engineering, Faculty of Engineering,
Kasetsart University, Bangkok 10900
(2013), „‟Tool wear condition monitoring in
tapping process by fuzzy logic,
„‟International Conference on Technology
Innovation and Industrial Management.
[14] S. HariVignesh, Assistant Professor,
Department of Mechanical Engineering,
PSNA College of Engineering and
Technology, Dindigul – 624622; R.
Karthikeyan, Assistant Professor,
Department of Mechanical Engineering,
PSNA College of Engineering and
Technology, Dindigul – 624622 (2014);
„‟Analysis of Process Parameters in
Machining of 7075 Aluminium Alloy Using
Response Surface
Methodology‟‟,International Journal of
Engineering Research & Technology
(IJERT)
[15] Krishankant, JatinTaneja, MohitBector,
Rajesh Kumar (2012), „‟Application of
Taguchi Method for Optimizing Turning
Process by the effects of Machining
Parameters‟‟, International Journal of
Engineering and Advanced Technology
(IJEAT)
[16] M.Murugan and V.Radhakrishnan, „‟Indian
Institute of Technology, Madras, Chennai-
600 036, India, ‘’ measurement and sensing
of cutting tool wear‟‟.
[17] Jaharah A. Ghani, Muhammad Rizal,
MohdZakiNuawi, Che Hassan CheHaron,
RizauddinRamli (2010), „‟ Statistical
Analysis for Detection Cutting Tool Wear
Based on Regression Model‟‟, International
Multiconference of Engineers and Computer
Scientists.
[18] P. Sam Paul and S. Mohanasundaram,
School of Mechanical Sciences, Karunya
University, Coimbatore 641114, Tamil
Nadu, India; A.S. Varadarajan, Principal,
Nehru College of Engineering and Research
Centre, Pampady, Thrissur 680597, Kerala,
India (2014); „‟Effect of magnetorheological
fluid on tool wear during hard turning with
minimal fluid application‟‟, Science Direct.

Optimization of Process Parameters of Tool Wear in Turning Operation

  • 1.
    Manik Barman Int.Journal of Engineering Research and Applications www.ijera.com ISSN : 2248-9622, Vol. 5, Issue 4, ( Part -5) April 2015, pp.19-23 www.ijera.com 19 | P a g e Optimization of Process Parameters of Tool Wear in Turning Operation Manik Barman1 , Dr. Sudip Mukherjee2 M.Tech Scholar, Department of Mechanical Engineering, Jalpaiguri Government Engineering College, Jalpaiguri, West Bengal, India Professor& HOD, Department of Mechanical Engineering, Jalpaiguri Government Engineering College, Jalpaiguri, West Bengal, India ABSTRACT Tool Wear is of great apprehension in machining industries since itaffects the surface quality, dimensional accuracy and production cost of the materials / components. In the present study twenty seven experiments were conducted as per 3 parameter 3 level full factorial design for turning operation of a mild steel specimen with high speed steel (HSS) cutting tool. An experimental investigation on cutting tool wear and a mathematical model for tool wear estimation is reported in this paper where the model was simulated by computer programming and it has been found that this model is capable of estimating the wear rate of cutting tool and it provides an optimum set of process parameters for minimum tool wear. Keywords: Tool Wear, Spindle speed, Depth of Cut, Feed Rate, DOE etc. I. INTRODUCTION Machining operations have been the core of the manufacturing industry since the industrial revolution.Increasing the productivity and the quality of the machined parts are the main challenges of metal-based industry.There has been increased interest in monitoring all aspects of the machining process. Turning is the one most widely used among all the cutting processes.The most important machining parameters (cutting speed, feed rate, depth of cut) accelerate tool wear which in turn affects the surface finishing. The tool wear is directly related to the machining parameters. Here regression analysis have been used to find out the best combination of process parameters for minimum tool wear in turning operations in order to improve quality of machined products. II. EXPERIMENT The experiments were performed following full factorial design of experiments. Design of experiments is an effective approach to optimize the parameters in various manufacturing related process, and one of the best tool for analyzing the effect of process parameters over some specific ranges. The selection of such points in design space is commonly called design of experiments (DOE). In this work related to turning of Mild steel, the experiments were conducted by considering three main influencing process parameters such as spindle speed, Feed Rate and Depth of Cut at three different levels namely Low, Medium and High. So according to the selected parameters a three level full factorial design of experiments (33 = 27) were designed and experiments were conducted according to those combinations. The level designation of various process parameters are shown in table 1. Table 1.Limits and levels of control parameters Control Parameters Limits Low(1) Medium(2) High(3) Spindle Speed (V) rpm 250 590 930 Feed Rate (f) mm/rev 0.16 0.40 0.64 Depth of cut (d) mm 0.6 0.8 1.0 RESEARCH ARTICLE OPEN ACCESS
  • 2.
    Manik Barman Int.Journal of Engineering Research and Applications www.ijera.com ISSN : 2248-9622, Vol. 5, Issue 4, ( Part -5) April 2015, pp.19-23 www.ijera.com 20 | P a g e Table 2. Experimental Data Exp. No. Spindle Speed (v) rpm Feed Rate (f) mm/rev Depth of Cut (d) mm Response (T = Tool Wear) mm 1. 250 0.16 0.6 0.03 2. 250 0.16 0.8 0.06 3. 250 0.16 1.0 0.08 4. 250 0.40 0.6 0.05 5. 250 0.40 0.8 0.07 6. 250 0.40 1.0 0.09 7. 250 0.64 0.6 0.07 8. 250 0.64 0.8 0.08 9. 250 0.64 1.0 0.10 10. 590 0.16 0.6 0.04 11. 590 0.16 0.8 0.06 12. 590 0.16 1.0 0.08 13. 590 0.40 0.6 0. 06 14. 590 0.40 0.8 0.08 15. 590 0.40 1.0 0.10 16. 590 0.64 0.6 0.08 17. 590 0.64 0.8 0.09 18. 590 0.64 1.0 0.11 19. 930 0.16 0.6 0.05 20. 930 0.16 0.8 0.08 21. 930 0.16 1.0 0.10 22. 930 0.40 0.6 0.07 23. 930 0.40 0.8 0.09 24. 930 0.40 1.0 0.12 25. 930 0.64 0.6 0.09 26. 930 0.64 0.8 0.11 27. 930 0.64 1.0 0.16 III. MATHEMATICAL MODEL DEVELOPMENT The general second order polynomial mathematical model, which analyses the parametric influences on the various response criteria, can be described as follows: Tool Wear, T = B0+ 𝑘 𝑖=1 BiXi+ 𝑘 𝑖=1 BiiXi 2 + 𝑘 𝑖,𝑗=1 𝑖≠𝑗 BijXiXj …………………….. (1) Where T is Response and Xi(i, j =1, 2, . . . . , k) are levels of k quantitative variables. The coefficient B0 is the constant term; the coefficients Bi,Bij, Bijare for the Linear, Quadratic and Interaction terms. After putting actual values from the experiments, 27 equations are formed. The general equation for this experiment, T=B0+B1v+B2f+B3 d+ B11 v 2 +B22f 2 +B33d 2 + B12vf+ B13vd+ B23fd …………………...(2) Here X1=v, X2=f,X3=d Theequations formed by using the experimental data are solved by using Least Square Method in Matlab software and the coefficients are found to be: B0=-0.0233, B1= -0.0001, B2 =-0.0449, B3=-0.0030, B11= 0.0000, B22= 0.0133, B33= 0.0530, B12= 0.0001, B13=0.0001, B23= -0.0174 So the final equation found by regression analysis is as follows: T=-0.0233 - 0.0001v + 0.0449 f - 0.0030d+0.0000v2 + 0.0133 f2 + 0.0530 d2 + 0.0001 vf + 0.0001vd- 0.0174 fd IV. RESULTS AND DISCUSSION
  • 3.
    Manik Barman Int.Journal of Engineering Research and Applications www.ijera.com ISSN : 2248-9622, Vol. 5, Issue 4, ( Part -5) April 2015, pp.19-23 www.ijera.com 21 | P a g e The nonlinear 2nd order regression equation representing the mathematical model for tool wear is simulated in computer to determine the effects of individual process parameters on tool wear which is done by varying one parameter at a time within its range and keeping the other two parameters at their mean value. Figure 4.1 shows the variation of tool wear with the change of spindle speed. Spindle speed is made to vary from 250 RPM to 930 RPM and Feed Rate & Depth of Cut are kept constant at mean values within their ranges, which are 0.4 mm/rev & 0.8 mm respectively. Figure 4.1 shows that the tool wear increases with increase of Spindle Speed. It has been found from the graph that tool wear is minimum at spindle speed of 250 RPM. Figure 4.1 Tool Wear (mm) vs Spindle Speed (rpm) Figure 4.2 shows the variation of tool wear with the change of Feed Rate. Feed Rate is made to vary from 0.16 mm/rev to 0.64 mm/rev and Spindle Speed & Depth of Cut are kept constant at mid values within their ranges, which are 590 RPM & 0.8 mm respectively. Figure 4.2 shows that tool wear increases with increase of Feed Rate. It is has been found from the graph that tool wear is minimum at Feed Rate of 0.16 mm/rev. Figure 4.2 Tool Wear (mm) vs Feed Rate (mm/rev) Figure 4.3 shows the variation of tool wear with the change of Depth of Cut. Depth of Cut is made to vary 1000900800700600500400300200 0.0875 0.0850 0.0825 0.0800 0.0775 0.0750 Spindle Speed (rpm) ToolWear(mm) Variation of Tool Wear (mm) with Spindle Speed (rpm) 0.60.50.40.30.20.1 0.12 0.11 0.10 0.09 0.08 0.07 Feed Rate (mm/rev) ToolWear(mm) Variation of Tool Wear (mm) with Feed Rate (mm/rev)
  • 4.
    Manik Barman Int.Journal of Engineering Research and Applications www.ijera.com ISSN : 2248-9622, Vol. 5, Issue 4, ( Part -5) April 2015, pp.19-23 www.ijera.com 22 | P a g e from 0.6 mm to 1.0 mm and Spindle Speed & Feed Rate is kept constant at mid values within their ranges, which are 590 RPM & 0.40 mm/rev respectively. Figure 4.3 shows that tool wear increases with increase of Depth of Cut. It is has been found from the graph that tool wear is minimum at Depth of Cut of 0.6 mm. Figure 4.3 Tool Wear (mm) vs Depth of Cut (mm) V. CONCLUSION Analysis of the variation of Tool Wear against individual process parameters shows that Tool Wear of the specimen will be best at three distinct values of the process parameters. Hence the optimum set of process parameters found from the computer simulation and the graph for minimum tool wear within considered ranges are: Spindle Speed = 250 RPM Feed Rat = 0.16 mm/rev Depth of Cut = 0.6 mm Hence it is possible to limit the tool wear while machining by choosing the optimum set of process parameters. REFERENCE [1] Design and Analysis of Experiments by Douglas C. Montgomery. [2] Statistical Design and Analysis of Experiments by Robert L. Mason, Richard F. Gunst, James L. Hess. [3] A First Course in Design and Analysis of Experiments by Gary W. Oehlert. [4] E Paul DeGarmo, J.T. Black,Ronala Kosher, Material and process in manufacturing. [5] P. N. Rao, “Manufacturing Technology – Metal Cutting and Machine Tools”,Tata McGraw- Hill. [6] S C Rope Kapakjian, Steven R Schey, Introduction to manufacturing process. [7] JhonA.Schey, Introduction to manufacturing processes. [8] Vishal S. Sharma · S. K. Sharma · Ajay K. Sharma (2007), „‟ Cutting tool wear estimation for turning‟‟, Springer Science + Business Media. [9] Viktor P. Astakhov (2006), „‟Effects of cutting feed, depth of cut, and work piece (bore) diameter on the tool wear rate„‟, Springer-Verlag London Limited. [10] M. Szafarczyk and j. Chrzanowski, „‟Tool Probe for Measuring Dimensional Wear and X Co-ordinate Turning Edge‟‟. [11] M. Krishnan Unni,PG Student, Department of Mechanical Engineering, RVS College of Engineering & Technology, Dindigul-624 005; R. Sanjeevkumar, Assistant professor, Department of Mechanical Engineering; RVS College of Engineering & Technology, Dindigul-624 005; M. P. Prabakaran, Assistant professor, Department of Mechanical Engineering, SBM College of Engineering and Technology, Dindigul-624 1.00.90.80.70.6 0.11 0.10 0.09 0.08 0.07 0.06 0.05 Depth of Cut (mm) ToolWear(mm) Variation of Tool Wear (mm) with Depth of Cut (mm)
  • 5.
    Manik Barman Int.Journal of Engineering Research and Applications www.ijera.com ISSN : 2248-9622, Vol. 5, Issue 4, ( Part -5) April 2015, pp.19-23 www.ijera.com 23 | P a g e 005; K. Vetrivel Kumar, Assistant professor, Department of Mechanical Engineering, SBM College of Engineering and Technology, Dindigul-624 005 (2014); „‟Tool Wear Optimization of Aluminum Alloy using Response Surface Methodology‟‟; International Journal of Engineering Research & Technology (IJERT). [12] TugrulO¨zel, YigitKarpat , Lu´ısFigueira , J. Paulo Davim(2007),"Modelling of surface finish and tool flank wear in turning of AISI D2 steel with ceramic wiper inserts",Journal of Materials Processing Technology. [13] RatchaponMasakasin, Department of Industrial Engineering, Faculty of Engineering, Kasetsart University, Bangkok 10900, E-mail: masakasin.r@gmail.com; ChanaRaksiri, Department of Industrial Engineering, Faculty of Engineering, Kasetsart University, Bangkok 10900 (2013), „‟Tool wear condition monitoring in tapping process by fuzzy logic, „‟International Conference on Technology Innovation and Industrial Management. [14] S. HariVignesh, Assistant Professor, Department of Mechanical Engineering, PSNA College of Engineering and Technology, Dindigul – 624622; R. Karthikeyan, Assistant Professor, Department of Mechanical Engineering, PSNA College of Engineering and Technology, Dindigul – 624622 (2014); „‟Analysis of Process Parameters in Machining of 7075 Aluminium Alloy Using Response Surface Methodology‟‟,International Journal of Engineering Research & Technology (IJERT) [15] Krishankant, JatinTaneja, MohitBector, Rajesh Kumar (2012), „‟Application of Taguchi Method for Optimizing Turning Process by the effects of Machining Parameters‟‟, International Journal of Engineering and Advanced Technology (IJEAT) [16] M.Murugan and V.Radhakrishnan, „‟Indian Institute of Technology, Madras, Chennai- 600 036, India, ‘’ measurement and sensing of cutting tool wear‟‟. [17] Jaharah A. Ghani, Muhammad Rizal, MohdZakiNuawi, Che Hassan CheHaron, RizauddinRamli (2010), „‟ Statistical Analysis for Detection Cutting Tool Wear Based on Regression Model‟‟, International Multiconference of Engineers and Computer Scientists. [18] P. Sam Paul and S. Mohanasundaram, School of Mechanical Sciences, Karunya University, Coimbatore 641114, Tamil Nadu, India; A.S. Varadarajan, Principal, Nehru College of Engineering and Research Centre, Pampady, Thrissur 680597, Kerala, India (2014); „‟Effect of magnetorheological fluid on tool wear during hard turning with minimal fluid application‟‟, Science Direct.