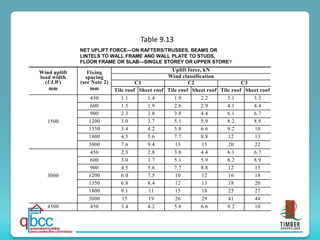
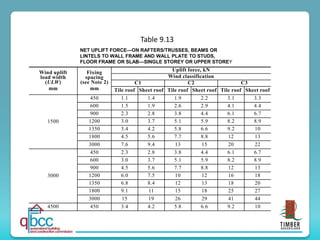
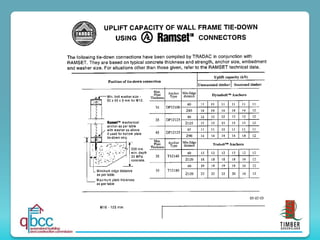
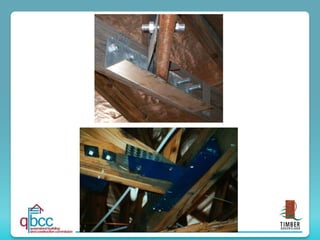
Comprehensive Guide to Timber Tie-Down, Bracing, and Structural Fixings for Wind Resistance
Detailed overview of timber tie-down methods, bracing techniques, corrosion protection, and structural connections to resist wind uplift and shear forces in residential construction.
Comprehensive Guide to Timber Tie-Down, Bracing, and Structural Fixings for Wind Resistance
1.
Tie-down, Bracing
& otherStuff!
Colin MacKenzie
Manager – Timber Application & Use
TIMBER QUEENSLAND
2.
AS 1684 is:-
•A recipe book of generic solutions
designed to cater for most houses, and
• For structural adequacy, based upon
generic wind pressure assumptions
• Coupled with known historical satisfactory
performance
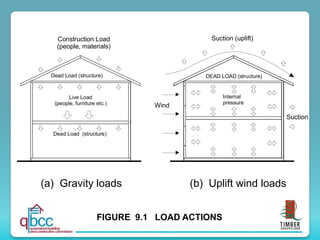
Live Load
(people, furnitureetc.)
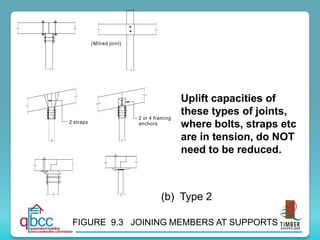
Suction
Internal
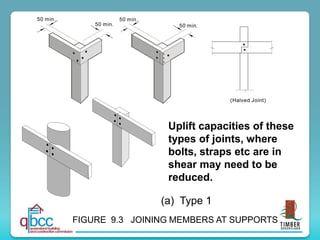
pressure
Suction (uplift)
Wind
Dead Load (structure)
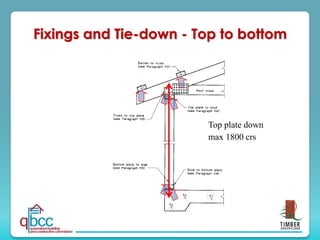
Construction Load
(people, materials)
DEAD LOAD (structure)
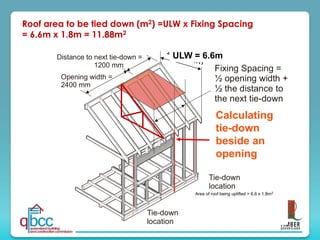
Dead Load (structure)
(a) Gravity loads (b) Uplift wind loads
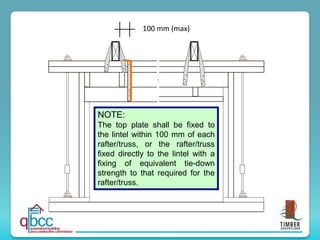
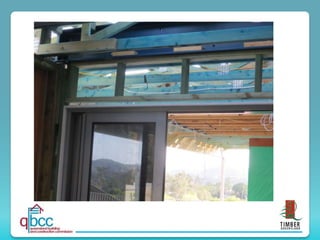
FIGURE 9.1 LOAD ACTIONS
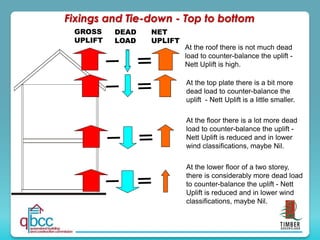
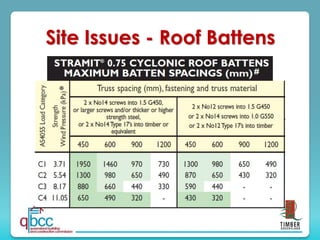
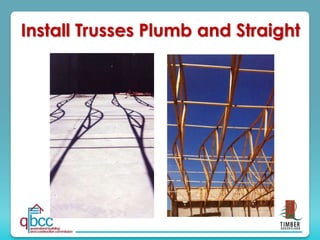
6.
GROSS
UPLIFT
DEAD
LOAD
NET
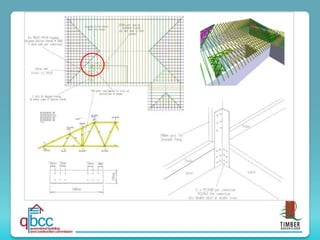
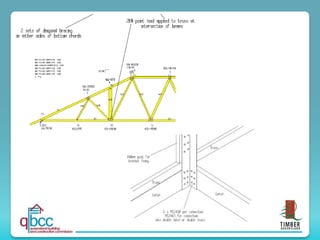
UPLIFT
At the roofthere is not much dead
load to counter-balance the uplift -
Nett Uplift is high.
At the top plate there is a bit more
dead load to counter-balance the
uplift - Nett Uplift is a little smaller.
At the floor there is a lot more dead
load to counter-balance the uplift -
Nett Uplift is reduced and in lower
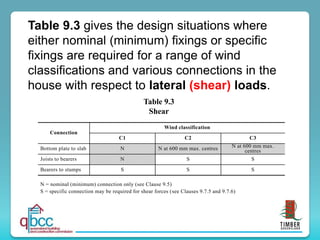
wind classifications, maybe Nil.
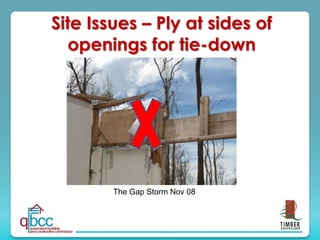
At the lower floor of a two storey,
there is considerably more dead load
to counter-balance the uplift - Nett
Uplift is reduced and in lower wind
classifications, maybe Nil.
Fixings and Tie-down - Top to bottom
1.15 Steel Gradeand
Corrosion protection
• All metal used in structural timber connections shall be provided with
corrosion protection appropriate for the particular conditions of use.
• Where corrosion protection of steel is required it shall be in accordance
with AS/NZS 4791, AS/NZS 4534, AS 1397 and AS 1214.
• The level of corrosion protection provided shall take into consideration
weather exposure, timber treatment, moisture and presence of salt.
• The minimum corrosion protection that shall be applied to metal straps,
framing anchors etc shall be Z 275.
• The min. steel grade for metal strap, framing anchors etc shall be G 300.
Other metal in accordance with the relevant Australian Standards.
10.
Continuity of tie-downshall be provided from
the roof sheeting to the foundations.
Where appropriate, due allowance for the
counterbalancing effects of gravity loads may
be considered.
9.6.1 General
11.
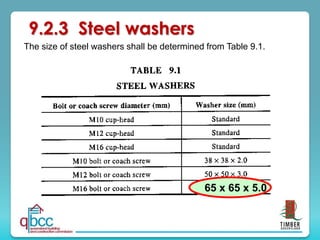
The size ofsteel washers shall be determined from Table 9.1.
9.2.3 Steel washers
65 x 65 x 5.0
12.
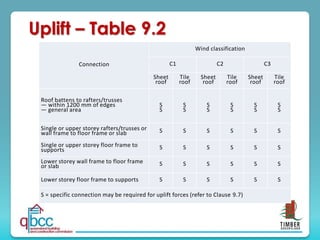
Connection
Wind classification
C1 C2C3
Sheet
roof
Tile
roof
Sheet
roof
Tile
roof
Sheet
roof
Tile
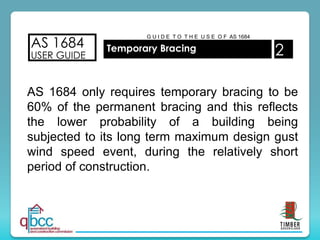
roof
Roof battens to rafters/trusses
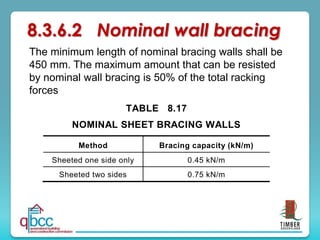
— within 1200 mm of edges
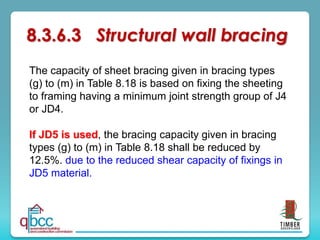
— general area
S
S
S
S
S
S
S
S
S
S
S
S
Single or upper storey rafters/trusses or
wall frame to floor frame or slab S S S S S S
Single or upper storey floor frame to
supports S S S S S S
Lower storey wall frame to floor frame
or slab S S S S S S
Lower storey floor frame to supports S S S S S S
S = specific connection may be required for uplift forces (refer to Clause 9.7)
Uplift – Table 9.2
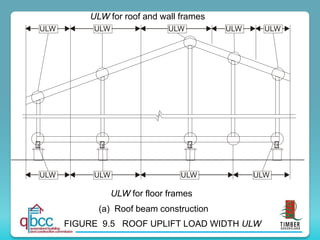
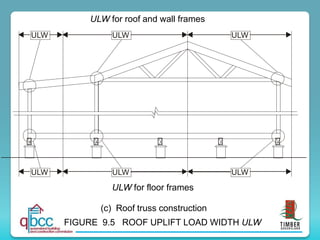
FIGURE 9.5 ROOFUPLIFT LOAD WIDTH ULW
ULW
ULW
ULW
ULW
ULW
ULW
(c) Roof truss construction
ULW for roof and wall frames
ULW for floor frames
17.
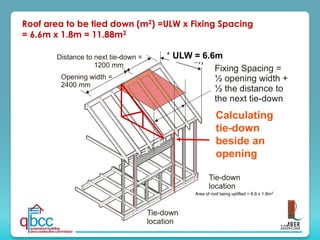
ULW =
4000 mm
Tie-down
location
Tie-down
location
FixingSpacing =
½ opening width +
½ the distance to
the next tie-down
Opening width =
2400 mm
Distance to next tie-down =
1200 mm
Roof area to be tied down (m2) =ULW x Fixing Spacing
= 6.6m x 1.8m = 11.88m2
Calculating
tie-down
beside an
opening
ULW = 6.6m
Area of roof being uplifted = 6.6 x 1.8m2
18.
Where members arejoined over supports, such
as is shown in Figure 9.3(b), (generally
connectors in tension) the uplift capacity shall
be equal to the uplift capacity as if there were
no join over the support as the full strength of
the connection is maintained.
9.2.11 Tie-down of members
joined over supports
19.
(Mitred joint)
2 straps
2or 4 framing
anchors
Uplift capacities of
these types of joints,
where bolts, straps etc
are in tension, do NOT
need to be reduced.
FIGURE 9.3 JOINING MEMBERS AT SUPPORTS
(b) Type 2
20.
NOTE: As ageneral guide, where members are joined
over supports such as is shown in Figure 9.3(a)
(generally connectors in shear) the uplift capacity should
be equal to half the uplift for the number of connectors
(i.e. bolts) shown as the required end distances are
reduced.*
* The uplift capacities in fact should be reduced
proportionally to the actual end distance achieved.
9.2.11 Tie-down of members
joined over supports
21.
50 min. 50min.
50 min. 50 min.
(Halved Joint)
FIGURE 9.3 JOINING MEMBERS AT SUPPORTS
(a) Type 1
Uplift capacities of these
types of joints, where
bolts, straps etc are in
shear may need to be
reduced.
22.
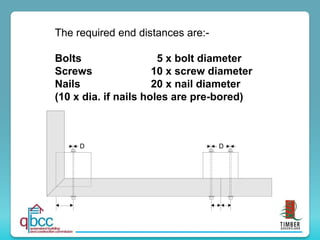
The required enddistances are:-
Bolts 5 x bolt diameter
Screws 10 x screw diameter
Nails 20 x nail diameter
(10 x dia. if nails holes are pre-bored)
D D
24.
This Clause providesdetails for structural connections to
resist uplift and shear forces (lateral loads) in floor
framing, wall framing and roof framing.
Unless otherwise specified, the details provided are in
addition to nominal nailing
(see Clause 9.5).
9.2.6 SPECIFIC TIE-DOWN FIXINGS
9.6.1 General
Where specific tie-down fixings provide equal or
better resistance to gravity or shear loads, then
nominal nailing is not required in addition to the
specific tie-down fixing.
25.
Top plate tie-down
•Remember – the maximum tie-down
spacing for top plates is 1800mm crs
• See the span tables or notes to tie-
down table
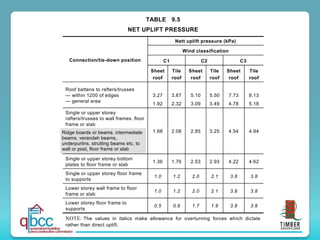
TABLE 9.5
NET UPLIFTPRESSURE
Connection/tie-down position
Nett uplift pressure (kPa)
Wind classification
C1 C2 C3
Sheet
roof
Tile
roof
Sheet
roof
Tile
roof
Sheet
roof
Tile
roof
Roof battens to rafters/trusses
— within 1200 of edges
— general area
3.27
1.92
3.67
2.32
5.10
3.09
5.50
3.49
7.73
4.78
8.13
5.18
Single or upper storey
rafters/trusses to wall frames, floor
frame or slab
1.68 2.08 2.85 3.25 4.54 4.94
Single or upper storey bottom
plates to floor frame or slab
1.36 1.76 2.53 2.93 4.22 4.62
Single or upper storey floor frame
to supports
1.0 1.2 2.0 2.1 3.8 3.8
Lower storey wall frame to floor
frame or slab
1.0 1.2 2.0 2.1 3.8 3.8
Lower storey floor frame to
supports
0.5 0.6 1.7 1.8 3.8 3.8
NOTE: The values in italics make allowance for overturning forces which dictate
rather than direct uplift.
Ridge boards or beams, intermediate
beams, verandah beams,
underpurlins, strutting beams etc. to
wall or post, floor frame or slab
28.
ULW =
4000 mm
Tie-down
location
Tie-down
location
FixingSpacing =
½ opening width +
½ the distance to
the next tie-down
Opening width =
2400 mm
Distance to next tie-down =
1200 mm
Roof area to be tied down (m2) =ULW x Fixing Spacing
= 6.6m x 1.8m = 11.88m2
Calculating
tie-down
beside an
opening
ULW = 6.6m
Area of roof being uplifted = 6.6 x 1.8m2
30.
NOTE:
The top plateshall be fixed to
the lintel within 100 mm of each
rafter/truss, or the rafter/truss
fixed directly to the lintel with a
fixing of equivalent tie-down
strength to that required for the
rafter/truss.
100 mm (max)
31.
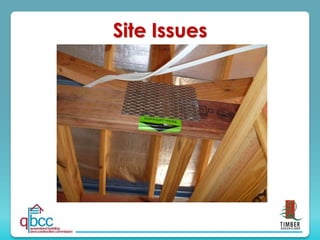
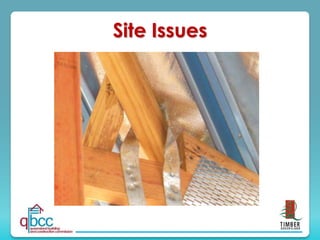
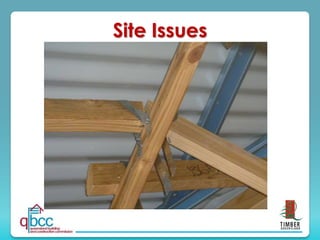
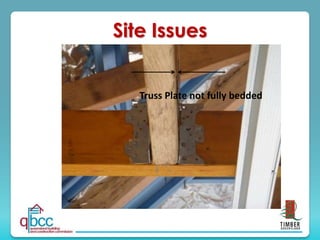
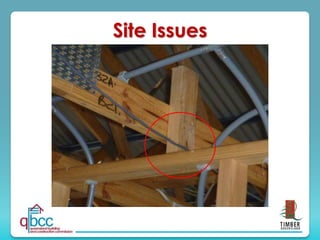
Site Issues
Roof Battens
•Steel Thickness & Grade
• Fixings
• Tested and certified?
• Imported material?
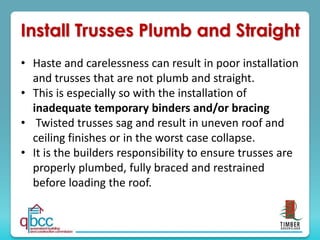
Install Trusses Plumband Straight
• Haste and carelessness can result in poor installation
and trusses that are not plumb and straight.
• This is especially so with the installation of
inadequate temporary binders and/or bracing
• Twisted trusses sag and result in uneven roof and
ceiling finishes or in the worst case collapse.
• It is the builders responsibility to ensure trusses are
properly plumbed, fully braced and restrained
before loading the roof.
36.
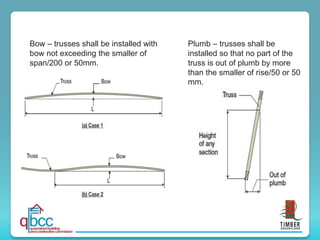
Plumb – trussesshall be
installed so that no part of the
truss is out of plumb by more
than the smaller of rise/50 or 50
mm.
Bow – trusses shall be installed with
bow not exceeding the smaller of
span/200 or 50mm.
37.
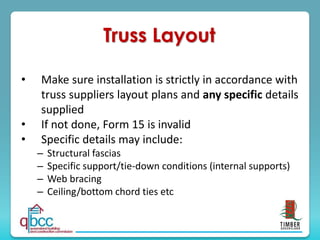
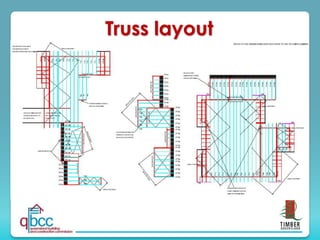
Truss Layout
• Makesure installation is strictly in accordance with
truss suppliers layout plans and any specific details
supplied
• If not done, Form 15 is invalid
• Specific details may include:
– Structural fascias
– Specific support/tie-down conditions (internal supports)
– Web bracing
– Ceiling/bottom chord ties etc
9.7 SHEAR FORCES(‘Sliding’)
9.7.1 General
Shear forces (lateral wind forces) shall be
resisted by connections at each floor level of
the house to prevent ‘sliding’.
For masonry veneer construction for wind
classifications up to N3 or C1, specific
connections to resist shear forces are not
required.
47.
Table 9.3 givesthe design situations where
either nominal (minimum) fixings or specific
fixings are required for a range of wind
classifications and various connections in the
house with respect to lateral (shear) loads.
Connection
Wind classification
C1 C2 C3
Bottom plate to slab N N at 600 mm max. centres N at 600 mm max.
centres
Joists to bearers N S S
Bearers to stumps S S S
N = nominal (minimum) connection only (see Clause 9.5)
S = specific connection may be required for shear forces (see Clauses 9.7.5 and 9.7.6)
Table 9.3
Shear
48.
The Gap StormNov 08
Site Issues – Ply at sides of
openings for tie-down
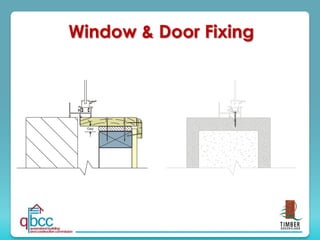
Window & Doorfixings
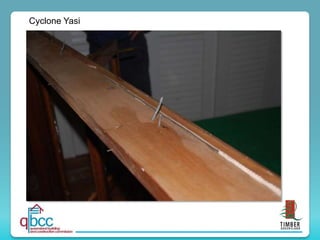
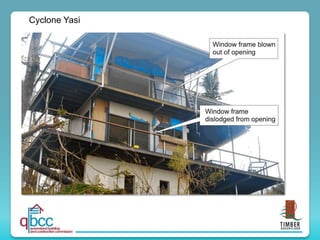
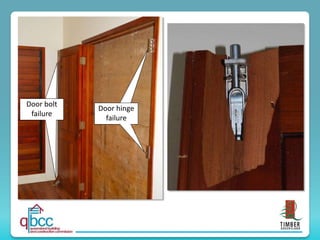
Field studies have identified that
many windows are not being
properly installed.
This was highlighted in the
Brisbane storms, as shown here,
Cyclone Larry and also in Cyclone
Yasi.
This window has not failed but
because of inadequate fixing,
the whole window has been blown in as a unit, thereby
pressurising the building and leading to further damage.
Cyclone Larry, Yasiand the Brisbane storm were
severe events, but the gust wind speeds were
estimated to be less than the design wind speed.
Therefore the window & door fixings should not
have failed.
Window & Door fixings
65.
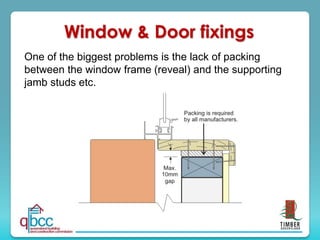
Window & Doorfixings
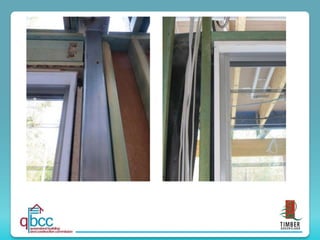
One of the biggest problems is the lack of packing
between the window frame (reveal) and the supporting
jamb studs etc.
66.
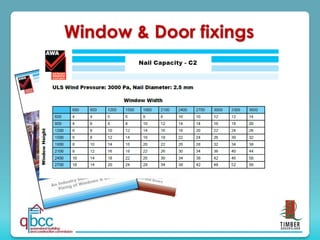
The window industryconsiders that packing is mandatory to any gaps
between the window/door frame and its support, yet windows are often
installed with large gaps and no packing.
There are also problems with the incorrect number and size of nails &
screws.
The AWA ‘Guide to the Correct Fixing of Windows and Doors’ gives the
correct number of nails/screws to be used and this Guide is available on
their website.
NOTE: Fixings must go through the packing.
Window & Door fixings
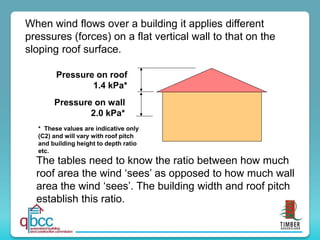
When wind flowsover a building it applies different
pressures (forces) on a flat vertical wall to that on the
sloping roof surface.
* These values are indicative only
(C2) and will vary with roof pitch
and building height to depth ratio
etc.
Pressure on roof
1.4 kPa*
Pressure on wall
2.0 kPa*
The tables need to know the ratio between how much
roof area the wind ‘sees’ as opposed to how much wall
area the wind ‘sees’. The building width and roof pitch
establish this ratio.
81.
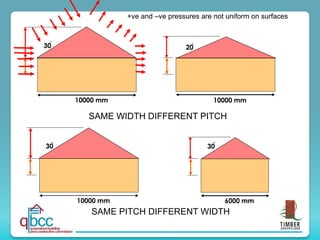
10000 mm
30
O
10000 mm
20
O
SAMEWIDTH DIFFERENT PITCH
10000 mm
30
O
6000 mm
30
O
SAME PITCH DIFFERENT WIDTH
+ve and –ve pressures are not uniform on surfaces
82.
8.3.3 Area ofelevation
Except for very simple L, H or U shapes
where each ‘part’ of the building has an
identical width and pitch and/or contains no
vertical surface in the roof area such as a
gable or skillion, each of the ‘parts’ MUST
be considered individually and NOT added
together.
83.
8.3.3 Area ofelevation
bracing......, shall be distributed
throughout the house approximately in
proportion to the forces (or areas)
relevant to each shape
(see Clause 8.3.6.6 Location and
distribution of bracing walls).
84.
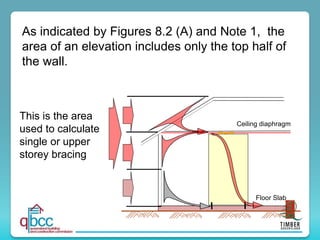
As indicated byFigures 8.2 (A) and Note 1, the
area of an elevation includes only the top half of
the wall.
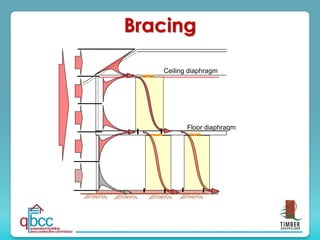
Ceiling diaphragm
Floor Slab
This is the area
used to calculate
single or upper
storey bracing
85.
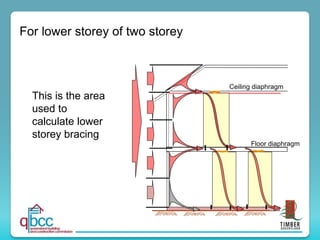
This is thearea
used to
calculate lower
storey bracing
Ceiling diaphragm
Floor diaphragm
For lower storey of two storey
86.
8.3.1 Area ofelevation
If a verandah or the like is present and is to be
enclosed, it shall be included in the ‘area of
elevation’ calculations.
A verandah should be considered enclosed if :-
(a) any part of the main building projects out
into the verandah, or
(b) an end(s) is filled in with lattice or similar.
87.
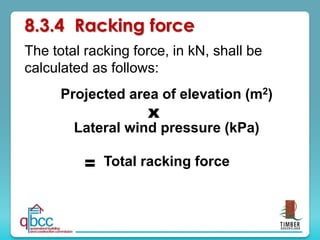
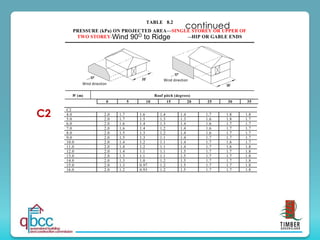
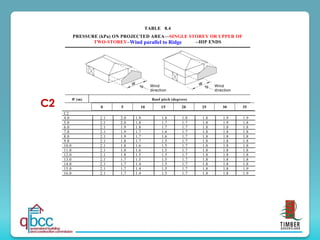
8.3.4 Racking force
Thetotal racking force, in kN, shall be
calculated as follows:
Projected area of elevation (m2)
Lateral wind pressure (kPa)
Total racking force
x
=
88.
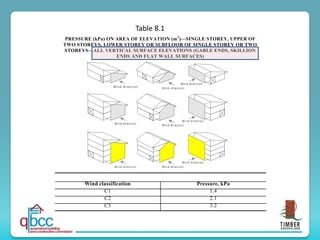
PRESSURE (kPa) ONAREA OF ELEVATION (m2
)—SINGLE STOREY, UPPER OF
TWO STOREYS, LOWER STOREY OR SUBFLOOR OF SINGLE STOREY OR TWO
STOREYS—ALL VERTICAL SURFACE ELEVATIONS (GABLE ENDS, SKILLION
ENDS AND FLAT WALL SURFACES)
Wind classification Pressure, kPa
C1 1.4
C2 2.1
C3 3.2
Table 8.1
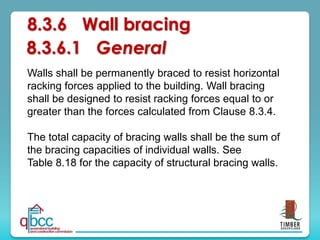
8.3.6 Wall bracing
Wallsshall be permanently braced to resist horizontal
racking forces applied to the building. Wall bracing
shall be designed to resist racking forces equal to or
greater than the forces calculated from Clause 8.3.4.
The total capacity of bracing walls shall be the sum of
the bracing capacities of individual walls. See
Table 8.18 for the capacity of structural bracing walls.
8.3.6.1 General
92.
AS 1684
USER GUIDE
TemporaryBracing 2
G U I D E T O T H E U S E O F AS 1684
AS 1684 only requires temporary bracing to be
60% of the permanent bracing and this reflects
the lower probability of a building being
subjected to its long term maximum design gust
wind speed event, during the relatively short
period of construction.
94.
The minimum lengthof nominal bracing walls shall be
450 mm. The maximum amount that can be resisted
by nominal wall bracing is 50% of the total racking
forces
8.3.6.2 Nominal wall bracing
TABLE 8.17
NOMINAL SHEET BRACING WALLS
Method Bracing capacity (kN/m)
Sheeted one side only 0.45 kN/m
Sheeted two sides 0.75 kN/m
95.
The capacity ofsheet bracing given in bracing types
(g) to (m) in Table 8.18 is based on fixing the sheeting
to framing having a minimum joint strength group of J4
or JD4.
If JD5 is used, the bracing capacity given in bracing
types (g) to (m) in Table 8.18 shall be reduced by
12.5%. due to the reduced shear capacity of fixings in
JD5 material.
8.3.6.3 Structural wall bracing
96.
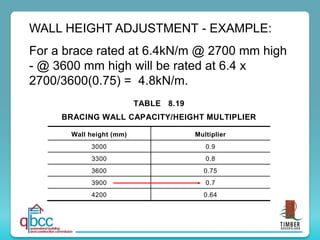
TABLE 8.19
BRACING WALLCAPACITY/HEIGHT MULTIPLIER
Wall height (mm) Multiplier
3000 0.9
3300 0.8
3600 0.75
3900 0.7
4200 0.64
WALL HEIGHT ADJUSTMENT - EXAMPLE:
For a brace rated at 6.4kN/m @ 2700 mm high
- @ 3600 mm high will be rated at 6.4 x
2700/3600(0.75) = 4.8kN/m.
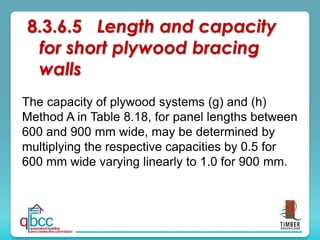
The capacity ofplywood systems (g) and (h)
Method A in Table 8.18, for panel lengths between
600 and 900 mm wide, may be determined by
multiplying the respective capacities by 0.5 for
600 mm wide varying linearly to 1.0 for 900 mm.
8.3.6.5 Length and capacity
for short plywood bracing
walls
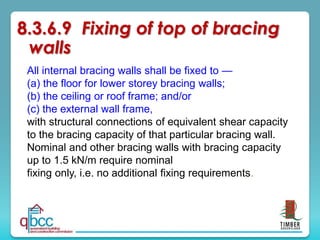
99.
All internal bracingwalls shall be fixed to —
(a) the floor for lower storey bracing walls;
(b) the ceiling or roof frame; and/or
(c) the external wall frame,
with structural connections of equivalent shear capacity
to the bracing capacity of that particular bracing wall.
Nominal and other bracing walls with bracing capacity
up to 1.5 kN/m require nominal
fixing only, i.e. no additional fixing requirements.
8.3.6.9 Fixing of top of bracing
walls
100.
Internal bracing wallscan be connected to the
floor/ceiling/roof diaphragm either directly (a
connection at the actual position of the bracing
wall) or at some other position in the same wall
but away from the actual brace.
AS 1684
USER GUIDE 5
G U I D E T O T H E U S E O F AS 1684
Fixing of Top of Bracing Walls