Contents
Part 1
Course Overview
CourseObjectives
Precourse Preparation
Course Materials
Course Completion Requirements
Science Update
The Chain of Survival
Part 2
Review of BLS and AED for Infants and Children
Learning Objectives
BLS for Infants and Children
AED for Infants and Children Younger Than 8 Years
Part 3
High-Performance Teams
Learning Objective
High-Performance Team Roles and Dynamics
4.
Part 4
Systematic Approachto the Seriously Ill or Injured Child
Learning Objective
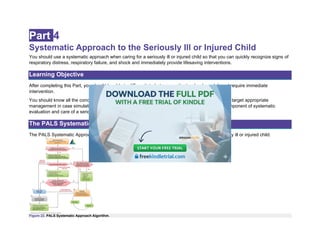
The PALS Systematic Approach Algorithm
Initial Assessment to Identify a Life-Threatening Condition
Initial Assessment
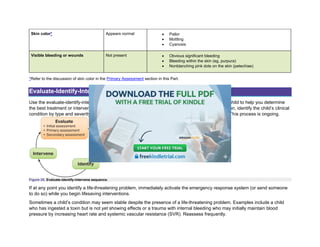
Evaluate-Identify-Intervene
Primary Assessment
Secondary Assessment
Part 5
Recognizing Respiratory Problems
Learning Objective
Fundamental Issues Associated With Respiratory Problems
Summary: Recognizing Respiratory Problems
Part 6
Managing Respiratory Problems
Learning Objective
Rescue Breathing
5.
Initial Management ofRespiratory Problems
Principles of Targeted Management
Managing Upper Airway Obstruction
Managing Lower Airway Obstruction
Managing Lung Tissue Disease
Summary: Managing Respiratory Emergencies
Resources for Managing Respiratory Emergencies
Part 7
Recognizing Shock
Learning Objective
Defining Shock
Pathophysiology of Shock
Identifying Shock by Severity (Compensated vs Hypotensive)
Identifying Shock by Type
Summary: Recognizing Shock
Part 8
Managing Shock
Learning Objective
6.
Goals of ShockManagement
Fundamentals of Shock Management
General Management of Shock
Summary: Managing Shock
Fluid Therapy
Glucose
Management According to Type of Shock
Resources for Managing Circulatory Emergencies
Part 9
Recognizing Arrhythmias
Learning Objective
Bradycardia Definitions
Recognizing Bradycardia
Tachyarrhythmias
Part 10
Managing Arrhythmias
Learning Objective
Principles of Managing Pediatric Arrhythmias
7.
Management: Pediatric BradycardiaWith a Pulse
Managing Tachyarrhythmias
Summary of Emergency Interventions
Pediatric Tachyarrhythmia With a Pulse Algorithm
Part 11
Recognizing and Managing Cardiac Arrest
Learning Objective
Rapidly Intervene to Prevent Cardiac Arrest
Cardiac Arrest in Infants and Children
Definition of Cardiac Arrest
Pathways to Cardiac Arrest
Causes of Cardiac Arrest
Recognizing Cardiac Arrest
Managing Cardiac Arrest
Part 12
Post–Cardiac Arrest Care
Learning Objective
Goals of Therapy
8.
Respiratory System
Cardiovascular System
NeurologicSystem
Appendix
BLS Competency Testing
Child CPR and AED Skills Testing Checklist
Child CPR and AED Skills Testing Critical Skills Descriptors
Infant CPR Skills Testing Checklist
Infant CPR Skills Testing Critical Skills Descriptors
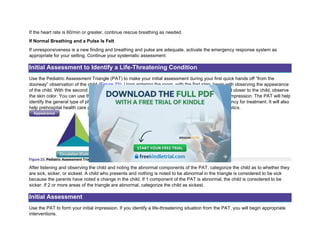
Initial Assessment—Pediatric Assessment Triangle*
Primary Assessment
Skills Station Competency Checklists
Rhythm Recognition Review
Learning Station Competency Checklists and PALS Case Scenario Testing Checklists
9.
Part 1
Course Overview
CourseObjectives
The Pediatric Advanced Life Support (PALS) Provider Course is designed for health care professionals who manage
respiratory or cardiovascular emergencies and cardiopulmonary arrest in pediatric patients. By preparing for the course and
participating in the skills stations and simulated cases, you will enhance the recognition of and intervention for respiratory
emergencies, shock, and cardiopulmonary arrest.
During the course, you will participate in a series of case scenario practices with simulations that reinforce important concepts,
including
• Applying a systematic approach to the pediatric assessment
• Identifying and treating problems that place the child at risk for cardiac arrest
• Using the evaluate-identify-intervene sequence
• Using the PALS algorithms
• Demonstrating effective resuscitation team dynamics
Goal of the PALS Provider Course
The PALS Provider Course aims to improve outcomes for pediatric patients by preparing health care professionals to
effectively recognize and intervene in patients with respiratory emergencies, shock, and cardiopulmonary arrest by using high-
performance team dynamics and high-quality individual skills.
Learning Objectives
After successfully completing this course, you should be able to
• Perform high-quality cardiopulmonary resuscitation (CPR) per American Heart Association (AHA) basic life support
(BLS) recommendations
• Differentiate between patients who do and do not require immediate intervention
• Perform your role as a high-performance team member
• Differentiate between respiratory distress and failure
10.
• Perform earlyinterventions for respiratory distress and failure
• Differentiate between compensated and hypotensive (decompensated) shock
• Perform early interventions for the treatment of shock
• Differentiate between unstable and stable patients with arrhythmias
• Demonstrate treatment of arrhythmias
• Implement postarrest management
Course Description
To help you achieve these objectives, the PALS Provider Course includes
• BLS competency testing
• Skills stations
• Case scenario discussions and simulations
• Case scenario testing stations
• Multiple choice exam
BLS Competency Testing
To receive an AHA PALS Provider Course completion card, you must be proficient in BLS and pass the BLS skills test during
the PALS course assessment: the Child CPR and AED Skills Test and the Infant CPR Skills Test.
The PALS Provider Course does not include detailed instructions on how to perform basic CPR or how to use an automated
external defibrillator (AED), so you must know this in advance. Consider taking a BLS course to prepare, if necessary.
Before taking the PALS Provider Course, read the PALS Provider Manual to prepare for taking the BLS tests.
Skills Stations
The course includes the following skills stations:
• Airway Management
• Vascular Access
• Rhythm Disturbances/Electrical Therapy
In the skills stations, you will use the skills station competency checklists as you practice specific skills and then demonstrate
competency. Your instructor will evaluate your skills by using the criteria in these checklists.
To prepare, see the Appendix for the skills station competency checklists, which list detailed steps for performing each skill.
11.
Airway Management SkillsStation
In the Airway Management Skills Station, you will show your understanding of oxygen (O2) delivery systems and airway
adjuncts. You will practice and demonstrate competency in airway and breathing supports, including
• Inserting an oropharyngeal (oral) airway (OPA)
• Providing effective bag-mask ventilation
• Confirming advanced airway device placement by physical examination and an exhaled carbon dioxide (CO2)
detector device
• Securing the endotracheal (ET) tube
• Suctioning with an OPA and ET tube if it is within your scope of practice; you may be asked to demonstrate
advanced airway skills, including correctly inserting an ET tube or other subglottic airway
Review the Bag-Mask Ventilation section in Part 2 and ET Intubation section in Part 6 of this manual to learn more about
airway management skills.
Vascular Access Skills Station
In the Vascular Access Skills Station, you will practice intraosseous (IO) access and other related skills, including
• Inserting an IO needle
• Summarizing how to confirm that the needle has entered the marrow cavity
• Summarizing/demonstrating the method of giving an intravenous (IV)/IO bolus
• Using color-coded length-based resuscitation tape to calculate correct medication doses
Review the IO Access and Color-Coded Length-Based Resuscitation Tape sections in Resources for Managing Circulatory
Emergencies in Part 8 of this manual to learn more about vascular access skills.
Rhythm Disturbances/Electrical Therapy Skills Station
In the Rhythm Disturbances/Electrical Therapy Skills Station, you will practice and demonstrate competency in operating a
cardiac monitor, identifying different cardiac rhythms, and operating a manual defibrillator. Skills include
• Operating a cardiac monitor
• Correctly placing electrocardiographic (ECG) leads
• Correctly selecting and placing or positioning the paddles or pads
• Identifying rhythms that require defibrillation
• Identifying rhythms that require synchronized cardioversion
• Safely performing manual defibrillation and synchronized cardioversion
12.
Review the followingresources in the PALS Provider Manual before the course to help you with rhythm identification, cardiac
monitoring, and manual defibrillation:
• Pediatric Cardiac Arrest Algorithm in Part 11: Recognizing and Managing Cardiac Arrest
• Rhythm Recognition Review in the Appendix
• Management: Pediatric Bradycardia With a Pulse in Part 10: Managing Arrhythmias
• Managing Tachyarrhythmias in Part 10: Managing Arrhythmias
PALS Case Scenario Discussions and Case Scenario Simulation-Based Practice
In the learning stations, you will participate in a variety of learning activities, including
• Case scenario discussions, using a systematic approach for evaluation and decision-making
• Case scenario simulation-based practice
In these learning stations, you will practice essential skills both individually and as part of a team. Because this course
emphasizes effective team skills as a vital part of the resuscitative effort, you’ll practice as a team member and as a Team
Leader.
The focus of the PALS Provider Course is to teach you to use a systematic approach when caring for a critically ill or injured
child. Read and study the entire PALS Provider Manual to understand all the necessary concepts.
PALS Case Scenario Testing Stations
At the end of the course, your team must pass 2 case scenario testing stations to demonstrate the course objectives. You may
use the PALS Reference Card and the 2025 Handbook of Emergency Cardiovascular Care for Healthcare
Providers (Handbook of ECC). These simulated clinical scenarios will test the following:
• Ability to evaluate and identify specific clinical conditions covered in the course
• Recognition and management of respiratory and shock emergencies
• Interpretation of core arrhythmias and management by using appropriate medications and electrical therapy
• Performance as an effective team member or Team Leader
This evaluation emphasizes your ability to integrate BLS and PALS skills according to your individual scope of practice.
Review the Roles in a High-Performance Team section in Part 3: High-Performance Teams in this manual to prepare yourself
to participate as a team member or Team Leader in the case scenario testing stations.
13.
Exam
The exam measuresyour mastery of cognitive skills. You must score at least 84% on the exam in the classroom-based course
to meet course completion requirements. The AHA has an open-resource policy for exams in eLearning and classroom-based
courses.
Open resource means that students may refer to other resources while completing the exam. These resources could include
the provider manual, either in printed form or as an eBook on a personal device; any notes the student took during the provider
course; the Handbook of ECC; the 2025 AHA Guidelines for CPR and ECC; posters; etc. Open resource does not mean open
discussion with other health care professionals or the instructor.
Precourse Preparation
To pass the PALS Provider Course, you must prepare before the course. Do the following:
• Take the precourse self-assessment and, if requested by your instructor, complete the online video prework
• Make sure you are proficient in BLS skills
• Practice identifying and interpreting core ECG rhythms
• Study basic pharmacology and know when to use each medication
• Practice applying your knowledge to clinical scenarios
Precourse Self-Assessment and Video Prework
Complete the precourse self-assessment at eLearning.heart.org/courses before you take the PALS Provider
Course. (Refer to the Student Resources section for details about how to access this resource.) Print your certificate
of completion and score report and bring them with you to class.
Because the PALS Provider Course does not teach algorithms, ECG recognition, pharmacology, or BLS skills in detail, use the
precourse self-assessment to identify any deficiencies in your knowledge of these topics. The precourse self-assessment will
summarize your strengths and weaknesses. Study the applicable content in the PALS Provider Manual or other supplementary
resources.
If requested by your instructor, also complete the online video prework at eLearning.heart.org/courses. You must pass the
precourse self-assessment before gaining access to video lessons. The video prework will ensure that you are prepared for the
course.
14.
BLS Skills
Strong BLSskills are the foundation of advanced life support (ALS). Everyone who cares for pediatric patients must be able to
perform high-quality CPR, because without it, PALS interventions will fail. For this reason, you must pass the Child CPR and
AED and Infant CPR Skills Tests in the PALS Provider Course. Make sure that you are proficient in BLS skills before attending
the course.
Refer to the BLS Competency Testing section in the Appendix for testing requirements and resources.
ECG Rhythm Identification
You must be able to identify and interpret the following core rhythms during case scenario practice with simulations and case
scenario tests:
• Normal sinus rhythm
• Sinus bradycardia
• Sinus tachycardia (ST)
• Supraventricular tachycardia (SVT)
• Ventricular tachycardia (VT)
• Ventricular fibrillation (VF)
• Asystole
• Pulseless electrical activity (PEA)
The ECG rhythm identification section of the precourse self-assessment will help you evaluate your ability to identify these core
rhythms. If you have difficulty with pediatric rhythm identification, study the Rhythm Recognition Review section in
the Appendix.
Basic Pharmacology
You must know basic information about medications used in the PALS algorithms, including the indications, contraindications,
and methods of administration. You will need to know which medication(s) should be used on the basis of the clinical situation.
The pharmacology section of the precourse self-assessment will help you evaluate and refresh your knowledge of medications
used in the course. If you have difficulty with this section of the precourse self-assessment, study the PALS Provider
Manual and PALS Reference Card. This information can also be found in the Handbook of ECC (sold separately).
15.
Practical Application ofKnowledge to Clinical Scenarios
The practical application section of the precourse self-assessment will help you evaluate your ability to apply your knowledge to
clinical scenarios. You will need to make decisions based on
• The PALS Systematic Approach Algorithm and the evaluate-identify-intervene sequence
• Identification of core rhythms
• Knowledge of core medications
• Knowledge of PALS algorithms
You should understand the PALS Systematic Approach Algorithm and the evaluate-identify-intervene sequence.
Review the core rhythms and medications. Be familiar with the PALS algorithms so that you can apply them to
clinical scenarios but note that the PALS Provider Course does not teach the details of each algorithm. You can find
more information in the PALS Provider Manual, PALS student resources at eLearning.heart.org/courses, and the
Handbook of ECC.
Course Materials
The PALS Provider Course materials consist of the PALS Provider Manual, the PALS Reference Card, and the
student resources at eLearning.heart.org/courses.
Provider Manual
The PALS Provider Manual contains important information that you will use before, during, and after the course. This material
includes concepts of pediatric evaluation and the recognition and management of respiratory, shock, and cardiac emergencies.
Remember to take this manual with you to class. Throughout the PALS Provider Manual, you will find specific information in the
following callout box:
Critical Concepts
These boxes contain the most important information you must know, including specific risks associated with certain
interventions and additional background on key topics this course covers.
Reference Card
The PALS Reference Card is a valuable learning aid that contains the following resources:
16.
• Vital Signsin Children
• PALS Systematic Approach Algorithm
• Pediatric Septic Shock Algorithm
• Medications used in PALS
• Pediatric Color-Coded Length-Based Resuscitation Tape Chart
• Pediatric Cardiac Arrest Algorithm
• Pediatric Bradycardia With a Pulse Algorithm
• Pediatric Tachyarrhythmia With a Pulse Algorithm
• Cardiovascular Management After ROSC Algorithm
• Components of Post–Cardiac Arrest Care
Take your PALS Reference Card with you to the course to use as a reference during the case scenario discussions and the
exam.
Critical Concepts
Meaning of Shapes and Colors in AHA Algorithms
• Red hexagon: decision or question
• Green box: action/steps to consider
• Orange box: assessment
• Gray box: assessment/action
• Blue box: CPR
• White box with gray header: notes
• Red, bold text: possible answers or decisions
Student Resources
Go to eLearning.heart.org/courses to access the precourse self-assessment as well as additional information
about basic PALS concepts. If you haven’t already logged in, the system will ask you to do so. If you haven’t visited
the site before, you’ll be prompted to set up an account. Once logged in, you should find your course name and
select Launch to begin.
The precourse self-assessment is a vital part of your course preparation. Feedback from this assessment will help you identify
gaps in your knowledge so that you can target specific material to study.
The precourse self-assessment has 3 parts:
17.
• ECG rhythmidentification
• Pharmacology
• Practical application
Complete these assessments before the course to identify gaps in and improve your knowledge. Print out your certificate of
completion and take it with you to the course.
Student Resources also include PALS videos, video prework (if assigned), and supplementary information.
Course Completion Requirements
To successfully complete the PALS Provider Course and obtain your course completion card, you must
• Successfully complete the PALS Precourse Self-Assessment (classroom-based course only)
• Actively participate in, practice, and complete all skills stations and learning stations
• Pass the Child CPR and AED and Infant CPR Skills Tests
• Pass an exam with a minimum score of 84% (classroom-based course only)
• Pass 2 PALS case scenario tests
Science Update
We have updated the PALS Provider Course to incorporate the recommendations of the 2025 AHA Guidelines for CPR and
ECC. On an ongoing basis, hundreds of international resuscitation scientists and experts evaluate, discuss, and debate
thousands of scientific publications. Then, they reach consensus on the best treatments based on the evidence, which forms
the basis for developing the guidelines. Some recommendations are new, whereas others modify previous recommendations.
The following list highlights many of the key recommendations for pediatric BLS and ALS.
Major Science Changes in 2025
Some of the major science changes in 2025 include the following:
Pediatric BLS
1. Immediate recognition of cardiac arrest is vital to improving outcomes. For infants and children who are
unresponsive with abnormal breathing (including gasping), rescuers should activate emergency medical services
and initiate high-quality CPR, beginning with chest compressions.
18.
2. High-quality CPRis the foundation of resuscitation. The key components of high-quality CPR include providing
adequate chest compression rate and depth, minimizing interruptions in CPR, allowing complete chest recoil
between compressions, and avoiding excessive ventilation.
3. A respiratory rate of 20 to 30 breaths per minute is recommended for infants and children who are (a) receiving
CPR with an advanced airway in place or (b) receiving breathing and have a pulse.
4. For infants, the recommended compression techniques include the heel-of-1-hand technique or the 2 thumb–
encircling hands technique. The use of 2 fingers along the sternum was eliminated because of ineffectiveness in
achieving proper depth in most recent available data.
5. For out-of-hospital cardiac arrest, ventilation in addition to chest compressions improves survival.
6. For children in cardiac arrest, an AED should be attached as soon as possible by using pediatric pads if available.
7. For children with severe foreign-body airway obstruction (FBAO), guidance is the same as for infants, with repeated
cycles of 5 back blows alternating with 5 abdominal thrusts, as opposed to solely abdominal thrusts.
8. For infants and children with signs of narcotic or opioid overdose, rescuers should administer naloxone if available
in addition to providing breaths or high-quality CPR as needed.
9. Resuscitation does not end with return of spontaneous circulation (ROSC). Excellent post–cardiac arrest care is
critically important for achieving the best patient outcomes. For children who do not regain consciousness after
ROSC, this care includes targeted temperature management and continuous electroencephalography monitoring.
For all children, the prevention and treatment of hypotension, hyperoxia or hypoxia, and hypercapnia or hypocapnia
are important.
10. After discharge from the hospital, cardiac arrest survivors can have physical, cognitive, and emotional challenges
and may need ongoing therapies and interventions.
PALS
1. High-quality CPR is the foundation of ALS resuscitation for health care professionals. We reaffirm the key
components of high-quality CPR: providing adequate chest compression rate and depth, minimizing interruptions in
CPR, allowing complete chest recoil between compressions, and providing sufficient ventilation for the pediatric
patient population while avoiding excessive ventilation.
2. For initial nonshockable rhythms, administering epinephrine as soon as possible is associated with more favorable
outcomes for infants and children in cardiac arrest.
3. Rapid defibrillation remains the priority for cardiac arrest with initial shockable rhythms, although epinephrine
administration should not be delayed if defibrillation is not immediately possible.
19.
4. For infantsand children with continuous invasive arterial blood pressure monitoring in place during CPR, diastolic
blood pressure targets of 25 mm Hg or greater in infants and 30 mm Hg or greater in older children are now
included as hemodynamic goals of high-quality CPR.
5. End-tidal CO2 can be an indicator of CPR quality, although specific end-tidal CO2 cutoff values alone are not a good
measure of when to end resuscitation efforts in infants and children.
6. Preventing hyperthermia is a critical component of post–cardiac arrest care, and avoiding central temperatures
greater than 37.5 °C can improve neurological outcomes in infants and children who remain comatose after cardiac
arrest.
7. For infants and children, new postarrest systolic and mean arterial blood pressure thresholds greater than the 10th
percentile for age and sex are provided.
8. Neuroprognostication after cardiac arrest in infants and children requires multiple modalities at different time points
throughout the postarrest period; single tests should not be used because of concerns for inaccurate prediction of
neurologic outcomes.
9. After discharge from the hospital, cardiac arrest survivors can have ongoing physical, cognitive, and emotional
challenges and need to be evaluated for therapies and interventions.
The Chain of Survival
For many years, the AHA has adopted, supported, and helped develop the concept of emergency cardiovascular care. The
term Chain of Survival provides a useful metaphor for the elements of the emergency cardiovascular care systems-of-care
concept. The Chain of Survival shows the actions that must take place to give the person in cardiac arrest the best chance of
survival. Each link is independent, yet connected, to the links before and after. If any link is broken, the chance for a good
outcome decreases.
Overview
Cardiac arrest can happen anywhere—on the street, at home, or in a hospital emergency department (ED), in-patient bed, or
intensive care unit. A single Chain of Survival that supports the paradigm of prevention and early recognition through recovery
after cardiac arrest has now been standardized across infants, children, adults (Figure 1).
20.
Figure 1. 2025AHA cardiac arrest Chain of Survival.
Chain of Survival Elements
The Chain of Survival includes the following elements:
• Recognition and emergency activation
• High-quality CPR
• Defibrillation
• Advanced resuscitation interventions
• Post–cardiac arrest care
• Recovery
There is a separate newborn Chain of Care that provides a framework for considering essential elements of the health care
system relating to neonatal health. A strong newborn Chain of Care has the potential to improve health in the neonatal period
as well as long-term outcomes. The links in the chain include prevention, recognition and activation, initial steps, ventilation,
advanced resuscitation, postnatal care, and recovery (Figure 2).
Figure 2. 2025 AHA newborn Chain of Care.
21.
Part 2
Review ofBLS and AED for Infants and Children
This Part describes BLS for infants and children and discusses using an AED in infants and children younger than 8 years.
The following age definitions are used in BLS:
• Infants are younger than 1 year (excluding the newly born).
• Children range from 1 year of age to puberty. Signs of puberty include chest or underarm hair on boys and any
breast development in girls.
• When performing BLS for pediatric patients, follow pediatric guidance for infants and children 1 year of age to
puberty. For children with signs of puberty and older, follow BLS guidance.
• When performing ALS for pediatric patients, follow pediatric guidance for infants and children up to 18 years of age,
excluding newborns.
• Resuscitation of the newborn infant typically applies to the newborn infant who is transitioning from a fluid-filled to
air-filled environment. Although pediatric BLS and ALS guidelines may be applied to newborn infants younger than
28 days on the basis of pathophysiology and institutional practice, neonatal guidelines should be followed at birth to
address unique aspects of transitional physiology.
Learning Objectives
After completing this Part, you should be able to
• Perform high-quality CPR for infants and pre- and postpubescent children.
• Describe and demonstrate the importance of early use of an AED for infants and children younger than 8 years.
BLS for Infants and Children
Pediatric BLS Algorithm for Health Care Professionals—Single Rescuer
The Pediatric BLS Algorithm (1 Year of Age to Puberty) for Health Care Professionals—Single Rescuer outlines steps for a
single rescuer of an unresponsive infant or child (Figure 3). Refer to this algorithm as you read the following steps.
22.
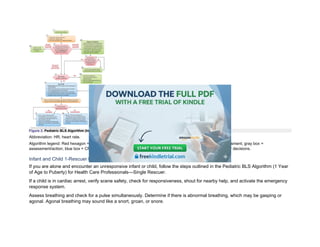
Figure 3. PediatricBLS Algorithm (Infants to Puberty) for Health Care Professionals—Single Rescuer.
Abbreviation: HR, heart rate.
Algorithm legend: Red hexagon = decision or question; green box = action/steps to consider; orange box = assessment; gray box =
assessment/action; blue box = CPR; white box with gray header = notes; and red, bold text = possible answers or decisions.
Infant and Child 1-Rescuer BLS Sequence
If you are alone and encounter an unresponsive infant or child, follow the steps outlined in the Pediatric BLS Algorithm (1 Year
of Age to Puberty) for Health Care Professionals—Single Rescuer.
If a child is in cardiac arrest, verify scene safety, check for responsiveness, shout for nearby help, and activate the emergency
response system.
Assess breathing and check for a pulse simultaneously. Determine if there is abnormal breathing, which may be gasping or
agonal. Agonal breathing may sound like a snort, groan, or snore.
23.
Check Pulse
Infant: Toperform a pulse check in an infant, palpate, or feel for, a brachial pulse (Figure 4A).
Figure 4A. Pulse check. A, In an infant, feel for a brachial pulse.
Child: To perform a pulse check in a child, palpate a carotid (Figure 4B) or femoral pulse (Figure 4C).
Figure 4B. In a child, feel for a carotid pulse.
Figure 4C. Or, a femoral pulse.
24.
It can bedifficult to determine the presence or absence of a pulse. If you do not definitely feel a pulse within 10 seconds in a
child who is unresponsive and not breathing normally, start CPR, beginning with chest compressions. If you are alone, perform
cycles of 30 compressions and 2 breaths.
If the infant or child does not have normal breathing and a pulse is felt, give 1 breath every 2 to 3 seconds, or about 20 to 30
breaths per minute. After 2 minutes, assess the pulse for no more than 10 seconds. If the heart rate is less than 60/min, start
CPR. If the heart rate is 60/min or greater, continue giving breaths and check the pulse every 2 minutes. If no definite pulse is
felt, start CPR.
Infant: Locating the Brachial Artery Pulse
To perform a pulse check in an infant, palpate a brachial pulse (Figure 4A). If you do not definitely feel a pulse in a child who is
unresponsive and not breathing normally within 10 seconds, begin high-quality CPR, starting with chest compressions.
Follow these steps to locate the brachial artery pulse:
• Place 2 or 3 fingers on the inside of the upper arm, midway between the infant’s elbow and shoulder.
• Press the fingers to attempt to feel for the pulse for at least 5 but no more than 10 seconds (Figure 4A).
Child: Locating the Carotid Artery Pulse
To perform a pulse check in a child, feel for a carotid or femoral pulse (Figures 4B and 4C). For a carotid pulse, use 2 or 3
fingers to locate the child’s trachea, and then slide your fingers into the groove just to the side of the trachea. Feeling for the
carotid pulse is usually easier to perform on the child’s side that is closest to you.
Child: Locating the Femoral Artery Pulse
To perform a pulse check in a child, palpate a carotid or femoral pulse. If you do not definitely feel a pulse within 10 seconds,
begin high-quality CPR, starting with chest compressions.
Follow these steps to locate the femoral artery pulse:
1. Place 2 fingers in the inner thigh, midway between the hipbone and the pubic bone and just below the crease
where the leg meets the torso (Figure 4C).
2. Feel for a pulse for at least 5 but no more than 10 seconds.
Next Actions
Determine your next actions according to your assessment of breathing and pulse check.
• If the infant or child has normal breathing and a pulse is felt, monitor them until emergency responders arrive.
25.
• If theinfant or child has abnormal breathing with a pulse, provide breaths.
• If heart rate is less than 60/min with poor perfusion despite oxygenation and ventilation, start CPR.
o –If you are alone and witness the sudden collapse of an infant or child, activate the emergency response
system (if not already done), and retrieve an AED/defibrillator and use it immediately. For example, call
911 from your phone, mobilize the code team, or notify ALS.
o –If you are alone and did not witness the sudden collapse of an infant or child, start high-quality CPR for
2 minutes. After about 2 minutes of CPR, if you are still alone and are unable to activate the emergency
response system (have no mobile phone), leave the infant or child and activate the emergency response
system and get the AED.
Seizure-like activity can also occur with cardiac arrest. If the infant or child is not responsive and not breathing normally, you
should start CPR.
Critical Concepts
Signs of Poor Perfusion
• Temperature: Cool extremities
• Mental status: Continued decline in consciousness/responsiveness
• Pulses: Weak pulses
• Skin: Paleness, mottling (patchy appearance), and later cyanosis (turning blue)
If the collapse was witnessed, leave the infant or child and activate the emergency response system. Retrieve an AED and use
it immediately.
If there is more than one rescuer, have one person activate the emergency response system and find an AED while the other
begins CPR.
If the infant or child is not breathing normally or is only gasping and no pulse is felt, begin chest compressions.
Infant and Child Chest Compressions
Use the following compression-to-ventilation ratios for each population: for prepuberty, use 15:2 with 2 rescuers; for puberty
and older, use 30:2 with 2 rescuers; and for any age, use 30:2 with 1 rescuer.
26.
Chest Compression Technique
Forinfants, rescuers should compress the sternum with the heel of 1 hand or by using the 2 thumb–encircling hands technique.
If the rescuer cannot physically encircle the chest, it is recommended to compress the chest with the heel of 1 hand.
For children, use either 1 or 2 hands to compress the chest, whichever technique allows the rescuer to achieve the desired
compression depth. For the 2-hand technique, place the heel of one hand in the center of the chest and place the heel of other
hand on top of the first hand. For 1-handed compressions, place the heel of one hand in the center of the chest. Compress the
chest at least one third the anteroposterior (AP) diameter of the chest (approximately 2 inches, or 5 cm) with each
compression.
These techniques are described in the next sections.
Infant and Child: Heel-of-1-Hand Technique
Follow these steps to use the heel of 1 hand on an infant or child:
1. Place the infant or child on a firm, flat surface.
2. Place the heel of one hand, just below the nipple line, on the lower half of the sternum. Do not press the tip of the
sternum (Figure 5).
3. Compress at least one third the AP diameter of the chest, approximately 1½ inches (4 cm) for infants and 2 inches
(5 cm) for children, at a rate of 100 to 120/min.
Figure 5. Heel-of-1-hand chest compression technique for an infant.
Infant: 2 Thumb–Encircling Hands Technique
Follow these steps to use the 2 thumb–encircling hands technique on an infant:
27.
• Place theinfant on a firm, flat surface.
• Place both thumbs side by side in the center of the infant’s chest, on the lower half of the sternum. The thumbs may
overlap in very small infants. Encircle the infant’s chest and support the infant’s back with the fingers of both hands
(Figure 6).
• With your hands encircling the chest, use both thumbs to depress the sternum at a rate of 100 to 120/min.
• Compress at least one third the AP diameter of the infant’s chest (approximately 1½ inches [4 cm]).
Figure 6. Two thumb–encircling hands technique for an infant.
Critical Concepts
Compression Depth in Adults vs Children and Infants
• Adults and adolescents: At least 2 inches (5 cm)
• Children: At least one third the AP diameter of the chest or approximately 2 inches (5 cm)
• Infants: At least one third the AP diameter of the chest or approximately 1½ inches (4 cm)
Infant and Child Breaths
Opening the Airway
Open the airway to make breaths effective. Two methods for opening the airway are the head tilt–chin lift and jaw-thrust
maneuvers.
Important: If you suspect a head or neck injury, use the jaw-thrust maneuver to reduce neck and spine movement. If the jaw
thrust does not open the airway, use the head tilt–chin lift maneuver.
28.
To perform thehead tilt–chin lift maneuver, place one hand on the infant or child’s forehead and push with your palm to tilt the
head back. Place the fingers of your other hand under the bony part of the lower jaw, near the chin. Lift the jaw to bring the chin
forward. Avoid pressing the soft tissue under the chin. If you tilt (extend) an infant’s head beyond the neutral (sniffing) position,
the infant’s airway may become blocked. Maximize airway patency by positioning the infant with the neck in a neutral position
so that the external ear canal is level with the top of the infant’s shoulder.
To perform a jaw thrust, position yourself at the infant or child’s head. Place one hand on each side of the infant or child’s head.
Then, place your fingers under the angle of the lower jaw and lift with both hands, displacing the jaw forward. You may rest
your elbows on the surface where they are lying. If the infant or child’s lips close, open them by using your thumbs to push the
lower lip down.
If you suspect a head or spinal injury, use a jaw-thrust maneuver to reduce movement of the spine. If a jaw thrust does not
open the airway, use the head tilt–chin lift maneuver.
Critical Concepts
Jaw Thrust
A properly performed jaw thrust is the most effective means to open the pediatric airway. Health care professionals, however,
are often inexperienced with this technique because it is difficult to practice the skill with some CPR manikins.
Why Breaths Are Important for Infants and Children in Cardiac Arrest
Infants and children who develop cardiac arrest often have respiratory failure or shock that reduces the oxygen content in the
blood before the onset of arrest.
For infants and children in cardiac arrest, the oxygen in the blood is low. Adequate compressions alone will not provide the
necessary oxygen to the heart and brain.
For this reason, it is very important to give both compressions and breaths to infants and children during high-quality CPR.
Ventilation for an Infant or Child With a Barrier Device
Use a barrier device (eg, pocket mask) or a bag-mask device to deliver breaths to an infant or child.
When providing bag-mask ventilation for an infant or child, do the following:
• Select a mask that covers the mouth and nose completely without covering the eyes or overlapping the chin.
• Perform a head tilt–chin lift to open the airway. Press the mask to the face as you lift the jaw, making a seal
between the child’s face and the mask.
29.
• Connect supplementaloxygen when available.
Attempt Defibrillation With the AED
Use the AED as soon as it is available and follow the prompts. Apply pads to bare skin; AED pads must not be placed over any
clothing.
After shock delivery or if no shock is advised, immediately resume high-quality CPR for 2 minutes (until prompted by the AED
to allow for a rhythm check).
Pediatric BLS Algorithm for Health Care Professionals—2 or More Rescuers
Refer to the Pediatric BLS Algorithm (1 Year of Age to Puberty) for Health Care Professionals—2 or More Rescuers as you
read the following steps (Figure 7).
Figure 7. Pediatric BLS Algorithm (Infants to Puberty) for Health Care Professionals—2 or More Rescuers.
Abbreviation: HR, heart rate.
Algorithm legend: Red hexagon = decision or question; green box = action/steps to consider; orange box = assessment; gray box =
assessment/action; blue box = CPR; white box with gray header = notes; and red, bold text = possible answers or decisions.
30.
Infant and Child2-Rescuer BLS Sequence
If the rescuer encounters an unresponsive infant or child and other rescuers are available, follow the steps outlined in the
Pediatric BLS Algorithm (1 Year of Age to Puberty) for Health Care Professionals—2 or More Rescuers (Figure 7). The first
components of the algorithm remain the same whether there are 1 or 2 rescuers. If 2 rescuers are available, send the second
rescuer to activate the emergency response system and obtain an AED (Figure 8). Once the second rescuer arrives, they take
over breaths, and the compression-to-ventilation ratio changes to 15:2 for prepubescent children. Switch compressors about
every 5 cycles or 2 minutes (or earlier if needed) to avoid reducing CPR quality because of fatigue.
Figure 8A. If the arrest of an infant or child was sudden and witnessed, activate the emergency response system in your setting. A, In-facility setting.
Figure 8B. Prehospital setting.
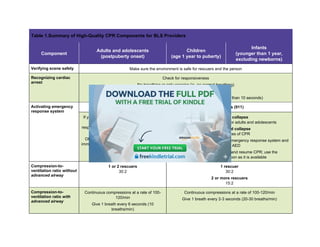
Table 1 summarizes the components of high-quality CPR for all ages.
31.
Table 1.Summary ofHigh-Quality CPR Components for BLS Providers
Component
Adults and adolescents
(postpuberty onset)
Children
(age 1 year to puberty)
Infants
(younger than 1 year,
excluding newborns)
Verifying scene safety Make sure the environment is safe for rescuers and the person
Recognizing cardiac
arrest
Check for responsiveness
No breathing or only gasping (ie, no normal breathing)
No definite pulse felt within 10 seconds
(Breathing and pulse check can be performed simultaneously in less than 10 seconds)
Activating emergency
response system
If a mobile device is available, call emergency services (911)
If you are alone with no mobile phone, leave
the person to activate the emergency
response system and get the AED/defibrillator
before beginning CPR
Otherwise, send someone and begin CPR
immediately; use the AED/defibrillator as soon
as it is available
Witnessed collapse
Follow the same steps as for adults and adolescents
Unwitnessed collapse
Give 2 minutes of CPR
Leave the person to activate the emergency response system and
get the AED
Return to the child or infant and resume CPR; use the
AED/defibrillator as soon as it is available
Compression-to-
ventilation ratio without
advanced airway
1 or 2 rescuers
30:2
1 rescuer
30:2
2 or more rescuers
15:2
Compression-to-
ventilation ratio with
advanced airway
Continuous compressions at a rate of 100-
120/min
Give 1 breath every 6 seconds (10
breaths/min)
Continuous compressions at a rate of 100-120/min
Give 1 breath every 2-3 seconds (20-30 breaths/min)
32.
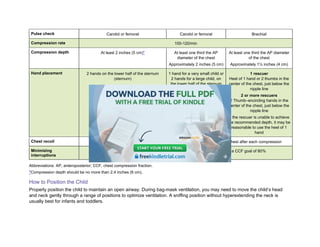
Pulse check Carotidor femoral Carotid or femoral Brachial
Compression rate 100-120/min
Compression depth At least 2 inches (5 cm)* At least one third the AP
diameter of the chest
Approximately 2 inches (5 cm)
At least one third the AP diameter
of the chest
Approximately 1½ inches (4 cm)
Hand placement 2 hands on the lower half of the sternum
(sternum)
1 hand for a very small child or
2 hands for a large child, on
the lower half of the sternum
1 rescuer
Heel of 1 hand or 2 thumbs in the
center of the chest, just below the
nipple line
2 or more rescuers
2 Thumb–encircling hands in the
center of the chest, just below the
nipple line
If the rescuer is unable to achieve
the recommended depth, it may be
reasonable to use the heel of 1
hand
Chest recoil Allow complete recoil of the chest after each compression; do not lean on the chest after each compression
Minimizing
interruptions
Limit interruptions in chest compressions to less than 10 seconds with a CCF goal of 80%
Abbreviations: AP, anteroposterior; CCF, chest compression fraction.
*Compression depth should be no more than 2.4 inches (6 cm).
How to Position the Child
Properly position the child to maintain an open airway. During bag-mask ventilation, you may need to move the child’s head
and neck gently through a range of positions to optimize ventilation. A sniffing position without hyperextending the neck is
usually best for infants and toddlers.
33.
To achieve asniffing position, place the child supine and flex the neck forward at the shoulder level while extending the head.
Position the opening of the external ear canal at the level of or in front of the anterior aspect of the shoulder while the head is
extended. Avoid hyperextending the neck because this may obstruct the airway.
Children older than 2 years may require padding under the occiput, while younger children and infants may need padding
under the shoulders or upper torso to prevent excessive flexion of the neck that can occur when the prominent occiput rests on
a flat surface.
Figure 9 shows these positions. In Figure 9A, the child is on a flat surface (eg, bed, table), and the oral (O), pharyngeal (P), and
tracheal (T) axes pass through 3 divergent planes. In Figure 9B, a folded sheet or towel placed under the occiput aligns the
pharyngeal and tracheal axes. In Figure 9C, extension of the atlanto-occipital joint results in the alignment of the oral,
pharyngeal, and tracheal axes when the head is extended and the chin is lifted.
Note that the external ear canal is anterior to the shoulder. Figure 9D shows the incorrect position with neck flexion, and Figure
9E shows the correct position for ventilation and ET intubation for an infant. Note that the external ear canal is anterior to the
shoulder.
Figure 9A. Correct positioning of the child older than 2 years for ventilation and ET intubation. A, Child on a flat surface (eg, bed, table).
34.
Figure 9B. Afolded sheet or towel under the occiput.
Figure 9C. Extension of the atlanto-occipital joint.
Figure 9D. Incorrect position with neck flexion.
35.
Figure 9E. Correctposition for ventilation and ET intubation for an infant.
Modified from Coté CJ, Todres ID. The pediatric airway. In: Coté CJ, Ryan JF, Todres ID, Goudsouzian NG, eds. A Practice of Anesthesia for
Infants and Children. 2nd ed. WB Saunders Co; 1993:55-83, copyright Elsevier.
Bag-Mask Ventilation
Bag-mask ventilation can adequately oxygenate and ventilate for a child with no or inadequate breathing or inadequate
breathing despite an open/patent airway. Signs of inadequate breathing are apnea, abnormal respiratory rate, inadequate
breath sounds, and hypoxemia despite supplemental O2. When properly performed, bag-mask ventilation is as effective as
ventilation through an ET tube for short periods and may be safer. In the out-of-hospital setting, bag-mask ventilation is
especially useful if the transport time is short or health care professionals are inexperienced in inserting advanced airways or
have insufficient opportunities to maintain competence in this skill.
How to Select and Prepare the Equipment
For ventilation to be effective with a bag-mask device, you must know how to select the face mask, prepare the ventilation bag
(such as the self-inflating or flow-inflating bag), and provide supplemental O2 if needed.
Face Mask
Select a transparent face mask, if available, that extends from the bridge of the child’s nose to the cleft of the chin, covering the
nose and mouth but not compressing the eyes because this may produce a vagal response and decrease the heart rate
(Figure 10). A transparent mask allows you to see the color of the child’s lips and condensation on the mask (which indicates
exhalation) as well as regurgitation. The mask should have a soft rim (eg, flexible cuff) that molds easily to create a tight seal
against the face. If the face-mask seal is not tight, O2 intended for ventilation will escape under the mask and ventilation will not
be effective.
36.
Figure 10. Properarea of the face for face-mask application. Note that no pressure is applied to the eyes.
Bag Size
Use a self-inflating bag with a volume of at least 450 to 500 mL or larger for infants and young children because smaller bags
may not deliver an effective tidal volume over the longer inspiratory times required by full-term neonates and infants. In older
children or adolescents, you may need to use an adult self-inflating bag (1000 mL or larger) to achieve chest rise and minute
ventilation.
How to Test the Bag-Mask Device
To ensure proper function of any bag and mask system, test all components before using by checking
• The bag for leaks by occluding the patient outlet valve with your hand and squeezing the bag
• Gas flow control valves (including any continuous positive airway pressure [CPAP] valve) to verify proper function
• The pop-off valve (if present) to ensure that it can be closed
• That O2 tubing is securely connected to the device and the O2 source
• The sound of O2 flowing into the bag
• That the cuff of the mask (if present) is adequately inflated
How to Perform Bag-Mask Ventilation
One or two health care professionals can operate a bag-mask device while another rescuer provides compressions, but
because effective bag-mask ventilation requires complex steps, it is not recommended for a lone rescuer to perform during
CPR. Instead, the lone rescuer should use the mouth–to–barrier device technique for ventilation during CPR. Bag-mask
ventilation can be provided effectively during 2-rescuer CPR.
37.
1-Person Bag-Mask VentilationTechnique
If a single health care professional is performing bag-mask ventilation, they must open the airway and keep the mask sealed to
the child’s face with one hand (Figure 11) and squeeze the bag with the other hand. Form a tight seal between the mask and
the child’s face and open the airway by using the E-C clamp technique, described in the following steps.
1. If you do not suspect cervical spine injury, tilt the head back and lift the jaw against the mask, pressing and sealing
the mask on the face. This technique moves the tongue away from the posterior pharynx, moves the jaw forward,
and opens the mouth. If possible, the mouth should be open under the mask as a result of either lifting the jaw or
inserting an OPA.
2. With the other hand, squeeze the ventilation bag until the chest rises. Deliver each breath over 1 second. Avoid
excessive ventilation (refer to How to Deliver Effective Ventilation in this Part).
Figure 11. One-handed E-C clamp face-mask application technique. Three fingers of one hand lift the jaw (forming the “E”) while the thumb and index finger
hold the mask to the face (making a “C”).
Critical Concepts
E-C Clamp Technique
The technique of opening the airway and making a seal between the mask and the face is called the E-C clamp technique. The
third, fourth, and fifth fingers of one hand (forming an “E”) are positioned along the jaw to lift it forward; then the thumb and
index finger of the same hand (forming a “C”) make a seal to hold the mask to the face. Avoid pressing on the soft tissues
underneath the chin (the submental area) because this can push the tongue into the posterior pharynx, resulting in airway
compression and obstruction.
38.
2-Person Bag-Mask VentilationTechnique
If 2 health care professionals are available to perform bag-mask ventilation, one professional uses both hands to open the
airway and keep the mask sealed to the child’s face and the other squeezes the bag (Figure 12). Both should ensure that chest
rise is visible. Be careful to avoid delivering too large a tidal volume, which may result in excessive ventilation.
Figure 12. The 2-person bag-mask ventilation technique.
The 2-person technique may provide more effective bag-mask ventilation than a 1-person technique. Also, 2-person bag-mask
ventilation may be necessary when
• Making a seal between the face and the mask is difficult
• The health care professional’s hands are too small to reach from the front of the mask to behind the jaw or to open
the airway and create a seal between the face and the mask
• Significant airway resistance (ie, asthma) or poor lung compliance (ie, pneumonia or pulmonary edema) occur
• Restricting spinal motion is necessary
How to Deliver Effective Ventilation
Avoid excessive ventilation; use only the force and tidal volume necessary to just make the chest rise.
Critical Concepts
Effective Ventilation With a Bag-Mask Device
Give each breath slowly over about 1 second. Watch for chest rise. If the chest does not rise, reopen the airway. Verify that
there is a tight seal between the mask and the face. Reattempt ventilation.
39.
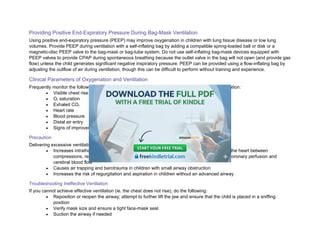
Providing Positive End-ExpiratoryPressure During Bag-Mask Ventilation
Using positive end-expiratory pressure (PEEP) may improve oxygenation in children with lung tissue disease or low lung
volumes. Provide PEEP during ventilation with a self-inflating bag by adding a compatible spring-loaded ball or disk or a
magnetic-disc PEEP valve to the bag-mask or bag-tube system. Do not use self-inflating bag-mask devices equipped with
PEEP valves to provide CPAP during spontaneous breathing because the outlet valve in the bag will not open (and provide gas
flow) unless the child generates significant negative inspiratory pressure. PEEP can be provided using a flow-inflating bag by
adjusting the outflow of air during ventilation, though this can be difficult to perform without training and experience.
Clinical Parameters of Oxygenation and Ventilation
Frequently monitor the following parameters to assess the effectiveness of oxygenation and ventilation:
• Visible chest rise with each breath
• O2 saturation
• Exhaled CO2
• Heart rate
• Blood pressure
• Distal air entry
• Signs of improvement or deterioration (eg, appearance, color, agitation)
Precaution
Delivering excessive ventilation during CPR is harmful because it
• Increases intrathoracic pressure and impedes venous return, thus decreasing filling of the heart between
compressions, reducing blood flow generated by the next compression, and reducing coronary perfusion and
cerebral blood flow
• Causes air trapping and barotrauma in children with small airway obstruction
• Increases the risk of regurgitation and aspiration in children without an advanced airway
Troubleshooting Ineffective Ventilation
If you cannot achieve effective ventilation (ie, the chest does not rise), do the following:
• Reposition or reopen the airway; attempt to further lift the jaw and ensure that the child is placed in a sniffing
position
• Verify mask size and ensure a tight face-mask seal
• Suction the airway if needed
40.
• Check theO2 source
• Check the ventilation bag and mask
• Treat gastric inflation
• Consider using 2-person bag-mask ventilation and inserting an OPA
Detecting for Changes in Lung Compliance
When performing bag-mask ventilation, be aware of the child’s lung compliance. A poorly compliant lung is “stiff” or difficult to
inflate. A sudden increase in lung stiffness during ventilation with a bag may indicate airway obstruction, decreased lung
compliance, or development of a pneumothorax. Lung distention from excessive inflating pressures, PEEP, or rapid assisted
respiratory rates with short exhalation time may also cause the feel of “stiff lungs” during ventilation.
Causes and Prevention of Gastric Inflation
Stomach inflation or distention frequently develops during bag-mask ventilation. Gastric inflation is more likely to develop during
assisted ventilation if
• A partial airway obstruction is present
• High airway pressures are needed, such as in a child with poor lung compliance
• The bag-mask ventilation rate is too fast
• The tidal volume delivered is excessive
• The peak inspiratory pressure created is excessive (eg, more than 30 cm H2O)
• The child is unconscious or is in cardiac arrest (because the gastroesophageal sphincter opens at a lower-than-
normal pressure)
Gastric inflation can impair a child’s ventilation by limiting lung volumes, interfering with effective ventilation, and causing
regurgitation. To minimize gastric inflation
• Ventilate at a rate of 1 breath every 2 to 3 seconds (about 20-30 breaths/min)
• Use a manometer (if available) and, if at all possible, avoid generating excessive peak inspiratory pressures (eg,
more than 30 cm H2O) by delivering each breath over about 1 second
• Deliver enough volume and pressure to produce visible chest rise
• Consider administering cricoid pressure; although cricoid pressure is not routinely recommended during ET
intubation of pediatric patients, it can be considered to reduce the risk of gastric inflation
o –If cricoid pressure is applied, it must be discontinued if
▪ A tracheal obstruction compromises bag-mask ventilation or
▪ The speed or ease of intubation is compromised
41.
Advanced professionals mayperform gastric decompression by inserting a nasogastric or orogastric tube.
Spontaneously Breathing Child
In a spontaneously breathing child who requires bag-mask ventilation, it may be difficult to coordinate the bagged breaths with
the child’s inspirations when using a self-inflating bag. Not only may breaths provided with a self-inflating bag be ineffective, but
poorly timed breaths may stimulate coughing, vomiting, laryngospasm, and gastric inflation, which prevent effective ventilation.
In these situations, a flow-inflating bag (eg, anesthesia bag) may be more beneficial; these bags provide CPAP and flows that
can be manipulated to the needs of the child. If necessary, the health care professional can also augment the child’s
spontaneous inspirations by squeezing the self-inflating bag.
Self-Inflating Bag
A self-inflating bag, typically used for initial resuscitation, consists of a bag with an intake valve and a nonrebreathing outlet
valve. The intake valve allows the bag to fill with either O2 or room air. When you compress the bag, the intake valve closes and
the nonrebreathing outlet valve opens, allowing either room air or an air–O2 gas mixture to flow to the child. When the child
exhales, the nonrebreathing outlet valve closes to prevent the child from rebreathing CO2 and exhaled gases are vented.
Figure 13 demonstrates how these bags work. Figures 13A and 13B show bags with O2 reservoirs. When you release these
bags, O2 flows into the bag from the O2 source and from the reservoir, so the concentration of O2 in the bag remains 100%, and
O2 continuously flows into the reservoir. Figures 13C and 13D show bags without O2 reservoirs. When you release these bags,
O2 flows into the bag from the O2 source, but ambient air is also entrained into the bag. So, the bag becomes filled with a
mixture of O2 and ambient air. With both setups, exhaled patient air flows into the atmosphere near the mask and bag
connection (see the gray arrows coming from the mask in Figures 13A and 13C).
Figure 13A. Self-inflating ventilation bag with face mask, with (A and B) and without (C and D) O2 reservoir. A, Re-expansion of the bag with O2 reservoir.
42.
Figure 13B. Compressingthe bag with O2 reservoir delivers 100% O2 to the patient (purple arrow).
Figure 13C. Re-expansion of the bag without an O2 reservoir.
Figure 13D. Compressing the bag without O2 reservoir delivers O2 mixed with room air (aqua arrow).
43.
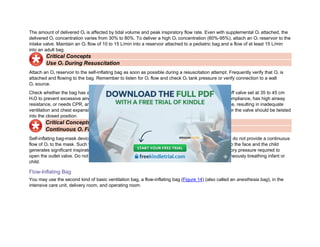
The amount ofdelivered O2 is affected by tidal volume and peak inspiratory flow rate. Even with supplemental O2 attached, the
delivered O2 concentration varies from 30% to 80%. To deliver a high O2 concentration (60%-95%), attach an O2 reservoir to the
intake valve. Maintain an O2 flow of 10 to 15 L/min into a reservoir attached to a pediatric bag and a flow of at least 15 L/min
into an adult bag.
Critical Concepts
Use O2 During Resuscitation
Attach an O2 reservoir to the self-inflating bag as soon as possible during a resuscitation attempt. Frequently verify that O2 is
attached and flowing to the bag. Remember to listen for O2 flow and check O2 tank pressure or verify connection to a wall
O2 source.
Check whether the bag has a pop-off valve. Many self-inflating bags have a pressure-limited pop-off valve set at 35 to 45 cm
H2O to prevent excessive airway pressures from developing. However, if the child has poor lung compliance, has high airway
resistance, or needs CPR, an automatic pop-off valve may prevent delivery of sufficient tidal volume, resulting in inadequate
ventilation and chest expansion. Ventilation bags used during CPR should have no pop-off valve, or the valve should be twisted
into the closed position.
Critical Concepts
Continuous O2 Flow Not Possible With Some Self-Inflating Bags
Self-inflating bag-mask devices with a fish-mouth or leaf-flap–operated nonrebreathing outlet valve do not provide a continuous
flow of O2 to the mask. Such valves open only if the bag is squeezed or the mask is sealed tightly to the face and the child
generates significant inspiratory force to open the valve. Many infants cannot generate the inspiratory pressure required to
open the outlet valve. Do not use this type of bag to provide supplemental O2 or CPAP to a spontaneously breathing infant or
child.
Flow-Inflating Bag
You may use the second kind of basic ventilation bag, a flow-inflating bag (Figure 14) (also called an anesthesia bag), in the
intensive care unit, delivery room, and operating room.
44.
Figure 14A. Flow-inflatingbag with a pressure manometer. A, With a face mask.
Figure 14B. Without a mask.
A flow-inflating bag may require more operator experience to provide safe and effective ventilation than is needed with a self-
inflating bag. To ventilate effectively with a flow-inflating bag, the professional must be able to adjust the flow of O2, adjust the
outlet control valve, ensure a proper seal with the face mask, and deliver the appropriate tidal volume at the correct rate. For
these reasons, only trained and expert professionals should use flow-inflating bags.
AED for Infants and Children Younger Than 8 Years
45.
Be Familiar Withthe AED Equipment in Your Setting
Although all AEDs operate in basically the same way, AED equipment varies according to model and manufacturer. For
instance, some AED models called pediatric-capable AEDS, are designed for both pediatric and adult use. These AEDs deliver
a reduced shock dose when pediatric pads are used. Be familiar with the AED in your particular setting.
Delivering a Pediatric Shock Dose
You may reduce the AED shock dose by using pediatric cables or an attenuator. One commonly used method for reducing a
shock dose is a pediatric dose attenuator (Figure 15). When attached to an AED, it reduces the shock dose by about two thirds.
Typically, you can use child pads to deliver the reduced shock dose.
Figure 15. Example of a pediatric dose attenuator, which reduces the shock dose delivered by an AED. Child pads are also used with this attenuator.
Choosing and Placing the AED Pads
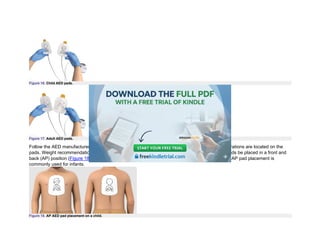
Use child pads (Figure 16), if available, for infants and for prepubescent children. If child pads are not available, use adult pads.
Make sure the pads do not touch each other or overlap. Adult pads deliver a higher shock dose but are preferable to no shock
at all. If the AED has a key or switch to deliver a child shock dose, turn the key or switch. For children who have entered
puberty, use adult pads (Figure 17)—child pads will likely give a shock dose that is too low.
46.
Figure 16. ChildAED pads.
Figure 17. Adult AED pads.
Follow the AED manufacturer’s instructions for pad placement and weight recommendations. Illustrations are located on the
pads. Weight recommendations will be located on the packaging. Some AEDs require that child pads be placed in a front and
back (AP) position (Figure 18), while others require right-left (anterolateral) placement (Figure 19). AP pad placement is
commonly used for infants.
Figure 18. AP AED pad placement on a child.
47.
Figure 19. AnterolateralAED pad placement on a child. Right anterior pad: Should be placed vertically on the child’s right upper chest, with the top of the pad
just below the clavicle. Lateral pad: Should be placed horizontally, centered at the mid-axillary line. The top of the pad should be on the lower ribcage, in line
with the sternal border (inferior portion of the xyphoid process). Do not place the pad on breast tissue or on the abdomen.
Using an AED for Infants
For infants, a manual defibrillator is preferred to an AED for defibrillation because it has more capabilities than an AED and can
provide lower energy doses needed in infants. Operating a manual defibrillator requires advanced training that will be covered
in Part 11 of this course.
• If a manual defibrillator is not available, an AED equipped with a pediatric dose attenuator is preferred.
• If neither is available, you may use an AED without a pediatric dose attenuator.
48.
Part 3
High-Performance Teams
LearningObjective
After completing this Part, you should be able to apply high-performance team dynamics to increase your patients’ chance of
survival.
During the course, you will participate as both the Team Leader and a team member during case simulations, modeling the
behaviors discussed in this Part.
High-performance teams are essential to successful resuscitation attempts, carrying out their roles effectively. This results in
superior performance and timing, translating to improved survival for patients in cardiac arrest. These teams incorporate timing,
quality, coordination, and administration of appropriate procedures during a cardiac arrest. Each team member should be
committed to ensuring high quality performance, not simply following orders. Each member needs to focus on
• Timing (immediate CPR and defibrillation, limiting pre- and postshock pause, emergency response): minimize
interruptions and pauses in chest compressions and increase chest compression fraction (CCF)
• CPR quality: achieve correct rate and depth, allow complete recoil, minimize pause times, avoid hyperventilation
• Coordination (team dynamics): team members working together seamlessly toward a common goal, proficient in
their roles including closed-loop communication and team coordination
• Administration: leadership, planning ahead, obtaining additional resources, tailoring the interventions, continuous
quality improvement measurement, assigned number of members working an arrest
High-performing systems target a CCF of at least 60%, with 80% or higher being a frequent goal. High-performance teams
(Figure 20) will need to incorporate timing, quality, coordination, and administration of the appropriate procedures during a
cardiac arrest. The team will need to consider their overall purpose and goals, skills each team member possesses,
appropriate motivation, and efficacy as well as appropriate conflict resolution and the communication needs of the team. In
addition, high-performance teams measure their performance, evaluate the data, and look for ways to improve performance
and implement the revised strategy.
49.
Figure 20. Keyareas of focus for high-performance teams to increase survival rates.
Critical Concepts
Ways to Decrease Pause Times (Increase CCF)
Whether you are a team member or the Team Leader during a resuscitation attempt, you should understand how a high-
performance team can maximize CCF when performing CPR during a cardiac arrest. The team can achieve key metrics and
increase CCF by doing the following:
• Precharge the defibrillator 15 seconds before a 2-minute rhythm analysis (deliver shock immediately if VF or
pulseless ventricular tachycardia [pVT] on the monitor). This makes it possible to conduct a rhythm analysis and
give a shock (if needed) within 10 seconds or less. If the rhythm analysis shows that a shockable rhythm is not
present, dump the charge. This process will vary by manufacturer.
• Palpate a pulse during the precharge phase in anticipation of an organized rhythm during analysis (a pulse
check during compressions is not a reliable indicator of CPR quality).
• The compressor hovers over the chest (not touching it), ready to start chest compressions immediately after a
shock, a rhythm analysis, or other necessary pauses in compressions.
• Have the next compressor ready to take over immediately.
• If placing an advanced airway, do so without pausing compressions.
• Deliver medications during compressions.
High-Performance Team Roles and Dynamics
50.
Successful resuscitation attemptsoften require health care professionals to simultaneously perform a variety of interventions.
Although a CPR-trained bystander working alone can resuscitate a patient within the first moments after collapse, most
attempts require multiple health care professionals. Effective teamwork divides the tasks while multiplying the chances of a
successful outcome.
Successful high-performance teams not only have medical expertise and mastery of resuscitation skills but also demonstrate
effective communication and team dynamics. This section discusses the importance of team roles, behaviors of effective Team
Leaders and team members, and elements of effective high-performance team dynamics.
Critical Concepts
Understanding Team Roles
Whether you are a team member or a Team Leader during a resuscitation attempt, you should understand your role and the
roles of other members. This awareness will help you anticipate
• What actions will be performed next
• How to communicate and work as a member or as a leader of a high-performance team
Roles in a High-Performance Team
Team Leader Role
Every high-performance team needs a leader who directs the resuscitation, focusing on the comprehensive patient care and
organizing the efforts of the team. Members of a high-performance team should focus on their individual tasks. The Team
Leader
• Organizes the group by delegating roles and tasks
• Monitors individual performance of team members
• Backs up team members
• Models excellent team behavior
• Trains and coaches
• Communicates treatment plan and patient status
• Focuses on comprehensive patient care
• Temporarily designates another team member to take over as Team Leader if their attention is occupied by another
task such as advanced airway placement or speaking to a family
51.
The Team Leaderensures everything is done correctly and timely by monitoring and integrating individual performances. They
help team members understand why certain tasks must be performed in specific ways, such as pushing hard and fast in the
center of the chest, ensuring complete chest recoil, minimizing interruptions in chest compressions, and avoiding excessive
ventilation.
The Team Leader also helps team members understand why they must perform certain tasks in a specific way. While any team
member can perform these skills, the Team Leader is ultimately responsible to explain why it is essential to
• Push hard and fast in the center of the chest
• Ensure complete chest recoil
• Minimize interruptions in chest compressions
• Avoid excessive ventilation
Monitoring for CPR Quality
During the resuscitation attempt, the Team Leader as well as team members should monitor CPR quality. Use of a CPR coach
along with good team communication will ensure that chest compressions are the appropriate depth and rate, that the chest is
allowed to completely recoil after each compression, and that ventilation is not excessive. Elements of high-quality CPR include
the following:
• Push fast: Push at a rate of 100 to 120/min for infants, children, and adults. Feedback devices may be helpful in
assisting team members with correct rate.
• Push hard: Push with enough force to depress the chest at least one third the AP diameter of the chest in pediatric
patients (infants [younger than 1 year] to children up to the onset of puberty). This equates to approximately 1½
inches (4 cm) in infants and 2 inches (5 cm) in children. Once children have reached puberty (ie, adolescents), use
the recommended adult compression depth of at least 2 inches (5 cm), but no greater than 2.4 inches (6 cm).
• Chest compression recoil: Allow rapid and complete chest recoil after each compression; this allows coronary
perfusion and allows the heart to refill with blood.
• Minimize interruptions: Limit interruptions in chest compressions to 10 seconds or less or as needed for
interventions (eg, defibrillation). Ideally, compressions are interrupted only for ventilation (until an advanced airway
is placed), rhythm check, and shock delivery. Once an advanced airway is in place, provide continuous chest
compressions and asynchronous ventilation (ie, without pausing compressions for ventilation).
• Avoid excessive ventilation: Each rescue breath should be given over about 1 second and should result in visible
chest rise. After an advanced airway is in place, deliver 1 breath every 2 to 3 seconds or about 20 to 30 breaths per
minute (in an infant or child), being careful to avoid excessive ventilation.
52.
Team Member Roles
Fora successful resuscitation attempt, high-performance team members must be
• Proficient in performing the skills in their scope of practice
• Clear about role assignments
• Prepared to fulfill their role responsibilities
• Well practiced in resuscitation skills
• Knowledgeable about the algorithms
• Committed to success
• Able to communicate effectively
Team Member Role: CPR Coach
Many resuscitation teams now include the role of CPR Coach. The CPR Coach supports performance of high-quality BLS
skills, allowing the Team Leader to focus on other aspects of clinical care. Studies have shown that resuscitation teams with a
CPR Coach perform higher-quality CPR with higher CCF and shorter pause durations compared with teams that do not use a
CPR Coach. It is important to train specific team members for the role of CPR Coach. The CPR Coach does not need to be a
separate role; they can be most effectively blended into the current responsibilities of the Monitor/Defibrillator. Teams with a
trained CPR Coach tend to perform better CPR and have reduced no-flow time during simulated cardiac arrest.
The CPR Coach’s main responsibilities are to help team members provide high-quality CPR and minimize pauses in
compressions. The CPR Coach needs a direct line of sight to the Compressor, so they should stand directly across from the
Compressor, next to the defibrillator. Below is a description of the CPR Coach’s actions:
Coordinate the start of CPR: As soon as a patient is identified as having no pulse, the CPR Coach says, “I am the CPR
Coach,” and tells rescuers to begin chest compressions. The CPR Coach can adjust the environment to help ensure high-
quality CPR. They can lower the bedrails or the bed, get a step stool, or roll the patient to place a backboard and defibrillator
pads to better facilitate high-quality CPR.
Coach to improve the quality of chest compressions: The CPR Coach gives feedback about performance of compression
depth, rate, and chest recoil. They state the CPR feedback device’s data to help the Compressor improve performance. This is
useful because visual assessment of CPR quality is often inaccurate. When chest compressions are being delivered
appropriately, positive feedback should be provided to promote excellent performance.
53.
State and coachto the midrange targets: The CPR Coach states the specific midrange targets so that compressions and
ventilation are within the recommended range. For example, they should tell the Compressor to compress at a rate of 110/min
instead of a rate between 100 and 120/min.
Coach to improve ventilation: The CPR Coach gives team members feedback about their ventilation rate and volume. If
needed, they also remind the team about compression-to-ventilation ratio.
Help minimize the length of pauses in compressions: The CPR Coach communicates with the team to help minimize the
length of pauses in compressions. Pauses happen when the team defibrillates, switches Compressors, and places an
advanced airway. The CPR Coach should verbally preview when pauses are upcoming and encourage compressors to resume
chest compressions once the task is complete.
Critical Concepts
CPR Coach Role
The CPR Coach role is designed to help a high-performance team achieve the key metrics of high-quality CPR by providing
feedback about
• The Compressor’s rate, depth, and recoil
• Delivery of ventilations (rate and volume)
• Compression pauses
Working closely with the Team Leader, the CPR Coach should facilitate all compression pauses, including intubation. The CPR
Coach should be integrated into the existing role of Monitor/Defibrillator on a high-performance team.
The remaining roles of an effective team and their duties and responsibilities are outlined in Figure 21. Positioning of personnel
is important and highlighted for clinical events.
Figure 21. Suggested locations for the Team Leader and team members during case simulations and clinical events.
54.
Elements of EffectiveTeam Dynamics as Part of a High-Performance Team
Roles
Clear Roles and Responsibilities
When fewer than 6 people are present, Team Leaders must prioritize these tasks and assign them to the health care
professionals present. Figure 21 identifies 6 team roles for resuscitation.
In resource-rich hospitals, the option of having a pharmacist attending a code to assist with medication administration may be
helpful. Table 2 lists some additional information about roles.
Table 2.Clear Roles and Responsibilities
Team member Task
Team Leader • Clearly define all team member roles in the clinical setting
• Distribute tasks evenly to all available team members who are sure of their responsibilities
• Encourage team members to participate actively
Team members • Seek out and perform clearly defined tasks appropriate to their abilities
• Accept only assignments that are within their level of expertise or ask for a new assignment
• Participate actively, not just follow directions
• Communicate ability to handle additional responsibilities
• Notify Team Leader if more help is needed
When roles are unclear, team performance suffers. Signs of unclear roles include
• Performing the same task more than once
• Missing essential tasks
• Assigning team members multiple roles when additional health care professionals are available
Knowing Your Limitations
Everyone on the team should know their own limitations and capabilities, including the Team Leader. This allows the Team
Leader to evaluate resources and call for backup when necessary. High-performance team members should anticipate
situations in which they need help and inform the Team Leader.
55.
During the stressof an attempted resuscitation, do not practice or explore a new skill, especially without seeking advice from
more experienced personnel. If you need extra help, request it early rather than waiting until the patient deteriorates further.
Asking for help is not a sign of weakness or incompetence; it is better to have more help than needed rather than not enough
help, which might negatively affect patient outcome. Table 3 lists some additional information about knowing your limitations.
Table 3.Knowing Your Limitations
Team member Task
Team Leader and team
members
• Call for assistance early rather than waiting until the patient deteriorates
• Seek advice from more experienced personnel when the patient’s condition worsens despite
primary treatment
• Allow others to carry out assigned tasks, especially if the task is essential to treatment
Team members • Seek advice from more experienced personnel before starting an unfamiliar treatment or therapy
• Accept assistance from others when it is readily available
Constructive Interventions
During a resuscitation attempt, anyone on a high-performance team may need to intervene tactfully if a team member is about
to take an inappropriate action. Team Leaders should avoid confrontation with team members and instead debrief afterward if
needed. Table 4 lists some additional information about constructive interventions.
Table 4.Constructive Interventions
Team member Task
Team Leader • Ask that a different intervention be started if it has a higher priority
• Reassign a team member who is trying to function beyond their level of skill
Team members • Suggest an alternative medication or dose confidently
• Question a colleague who is about to make a mistake
• Intervene if a team member is about to administer a medication incorrectly
56.
What to Communicate
KnowledgeSharing
Sharing information is critical to effective team performance. Team Leaders may become fixated on a specific treatment or
diagnostic approach. Examples of these types of fixation errors are:
• “Everything is OK.”
• “This and only this is the correct path.”
• “Do anything but this.”
When resuscitation efforts are ineffective, go back to the basics and talk as a team. Discuss the findings from the primary
assessment and resuscitation and ask, “Is there something we need to reevalute? Is there anything else we need to consider?”
High-performance team members should provide all available information about changes in the patient’s condition to ensure
that the Team Leader makes appropriate decisions. Table 5 lists some additional information about knowledge sharing.
Table 5.Knowledge Sharing
Team
member
Task
Team Leader • Encourage information sharing; share mental model
• Ask for suggestions about interventions, differential diagnoses, and possible overlooked treatments (eg, IV access,
medication treatments)
• Look for clinical signs that are relevant to the treatment
Team
members
• Share information with each other
• Accept information that will improve their roles
Summarizing and Reevaluating
An essential role of the Team Leader is monitoring and reevaluating interventions, assessment findings, and the patient’s
status.
Team Leaders should periodically state this information to the team and announce the plan for the next few steps. Another way
to describe this process is having and sharing a mental model, or the leader’s internal view of what is going on. This allows
team members the opportunity to agree/disagree, ask clarifying questions, and anticipate next steps in care. Remember that
57.
the patient’s conditioncan change. Be flexible to changing treatment plans and ask for information and summaries from the
Timer/Recorder as well. Table 6 lists some additional information about summarizing and reevaluating.
Table 6.Summarizing and Reevaluating
Team member Task
Team Leader • Continuously revisit decisions about differential diagnoses
• Maintain an ongoing record of treatments and the patient’s response
• Change a treatment strategy when new information supports it
• Inform arriving personnel of the current status and plans for further action
Team Leader and team
members
• Note significant changes in the patient’s clinical condition
• Increase monitoring if patient’s condition deteriorates (eg, frequency of respiratory and blood
pressure assessments)
How to Communicate
Closed-Loop Communications
When communicating with high-performance team members, the Team Leader should use these closed-loop communication
steps:
1. Give a message, order, or assignment to a specific team member.
2. Request a clear response and eye contact from the team member to ensure that they understood the message.
3. Confirm that the team member completed the task before you assign them another task.
Table 7 lists some additional information about closed-loop communications.
Table 7.Closed-Loop Communications
Team
member
Task
58.
Team Leader •Always assign tasks by using closed-loop communication, making eye contact with the team member, and stating,
“Give 1 milligram of epinephrine and let me know when it has been given”
• Assign additional tasks to a team member only after receiving confirmation of a completed assignment
Team
members
• After receiving a task, close the loop by informing the Team Leader when the task begins or ends, such as, “The IV
is in”
• Only give medications after verbally confirming the order with the Team Leader and confirm when administered
Clear Messages
Clear messages include concise, calm, and direct instructions. Unclear communication can cause treatment delays or
medication errors, so health care professionals should avoid yelling or shouting, which can impair team interaction. Only one
person should speak at a time. Table 8 lists some additional information about clear messages.
Table 8.Clear Messages
Team member Task
Team Leader • Encourage all team members to speak clearly and use complete sentences
Team Leader and team members • Repeat orders and question them if the slightest doubt exists
• Be careful not to mumble, yell, scream, or shout
• Ensure that only 1 person talks at a time
Mutual Respect
High-performance team members must respect each other and work together in a collegial, supportive manner. Ego must be
abandoned, and respect must be shown during the resuscitation attempt, regardless of any additional training or experience
specific team members may have. Table 9 lists some additional information about mutual respect.
Table 9.Mutual Respect
Team member Task
Team Leader • Acknowledge correctly completed assignments by providing positive feedback
59.
Team Leader andteam members • Show interest and listen to what others say
• Speak in a friendly, controlled tone of voice
• Positively acknowledge team members
• Avoid displaying aggression if teammates do not initially understand each other
• Understand that when one person raises their voice, others will respond similarly
• Try not to confuse directive behavior with aggression
60.
Part 4
Systematic Approachto the Seriously Ill or Injured Child
You should use a systematic approach when caring for a seriously ill or injured child so that you can quickly recognize signs of
respiratory distress, respiratory failure, and shock and immediately provide lifesaving interventions.
Learning Objective
After completing this Part, you should be able to differentiate between patients who do and do not require immediate
intervention.
You should know all the concepts presented in this Part to identify the child’s clinical condition and target appropriate
management in case simulations. The ongoing process of evaluate-identify-intervene is a core component of systematic
evaluation and care of a seriously ill or injured child.
The PALS Systematic Approach Algorithm
The PALS Systematic Approach Algorithm (Figure 22) outlines the approach to caring for a critically ill or injured child.
Figure 22. PALS Systematic Approach Algorithm.
61.
Abbreviation: C-A-B, compressions,airway, breathing.
Algorithm legend: Red hexagon = decision or question; green box = action/steps to consider; orange box = assessment; gray box =
assessment/action; blue box = CPR; white box with gray header = notes; and red, bold text = possible answers or decisions.
Identify a Life-Threatening Condition and Act
The initial assessment helps you to quickly identify a life-threatening condition. If you identify a life-threatening problem,
immediately begin appropriate interventions and activate the emergency response system as indicated in your practice setting.
If the child’s condition is not life threatening, continue with the systematic approach.
Critical Concepts
Life-Threatening Problems
Signs of a life-threatening condition include
• Airway: complete or severe airway obstruction
• Breathing: apnea, significant increased work of breathing, bradypnea
• Circulation: weak or absent pulses, poor perfusion, hypotension, bradycardia
• Disability: unresponsiveness, decreased level of consciousness
• Exposure: significant hypothermia or hyperthermia, significant bleeding, petechiae, or purpura consistent with
septic shock or coagulation problem
Child Who Is Unresponsive and Not Breathing or Is Only Gasping
If the child is unresponsive, shout for help.
If the child is unresponsive with abnormal breathing and a pulse is not felt, activate the emergency response system and begin
CPR. If ROSC, implement the Post–Cardiac Arrest Care checklist.
Check Breathing and Pulse
If Abnormal Breathing, but a Pulse Is Felt, Provide Rescue Breaths
Administer oxygen as soon as it is available. (Refer to Rescue Breathing in Part 6 for more information.) For infants and
children, give 1 breath every 2 to 3 seconds (about 20-30 breaths/min), and give each breath over 1 second.
Check the heart rate. If the heart rate is less than 60/min with signs of poor perfusion despite adequate oxygenation and
ventilation, provide chest compressions and breaths.
62.
If the heartrate is 60/min or greater, continue rescue breathing as needed.
If Normal Breathing and a Pulse Is Felt
If unresponsiveness is a new finding and breathing and pulse are adequate, activate the emergency response system as
appropriate for your setting. Continue your systematic assessment.
Initial Assessment to Identify a Life-Threatening Condition
Use the Pediatric Assessment Triangle (PAT) to make your initial assessment during your first quick hands off “from the
doorway” observation of the child (Figure 23). Upon entering the room, with the first step, begin with observing the appearance
of the child. With the second step, observe the work of breathing; and with the third step as you get closer to the child, observe
the skin color. You can use the PAT immediately on entering the scene to help form your general impression. The PAT will help
identify the general type of physiologic problem (ie, respiratory, circulatory, or neurologic) and urgency for treatment. It will also
help prehospital health care professionals in determining transport priority as well as transport logistics.
Figure 23. Pediatric Assessment Triangle.
After listening and observing the child and noting the abnormal components of the PAT, categorize the child as to whether they
are sick, sicker, or sickest. A child who presents and nothing is noted to be abnormal in the triangle is considered to be sick
because the parents have noted a change in the child. If 1 component of the PAT is abnormal, the child is considered to be
sicker. If 2 or more areas of the triangle are abnormal, categorize the child as sickest.
Initial Assessment
Use the PAT to form your initial impression. If you identify a life-threatening situation from the PAT, you will begin appropriate
interventions.
63.
The PAT usesA-B-C, which stands for appearance, work of breathing, and circulatory status (Figure 24). It begins with
evaluating appearance (A) as an indicator of overall physiologic status, including degree of interactivity, muscle tone, and
verbal response or cry. Use the TICLS (tone, interactivity, consolability, look/gaze, speech/cry) mnemonic as an adjunct. The
second component of the PAT is breathing (B), which determines whether a child has increased work of breathing by
assessing the patients’ position (ie, tripod or sniffing position), work of breathing (ie, retractions), and adventitial breath sounds
(eg, stridor, sonorous respirations). The final component of the PAT evaluates the child’s overall circulatory status (C) based on
general color (eg, pale, mottled, cyanotic). A child with abnormal PAT findings requires prompt evaluation and management.
The findings of the PAT may indicate need for immediate intervention (eg, CPR for a patient who is apneic and pulseless,
tourniquet use for exsanguinating hemorrhage of an extremity).
Figure 24. Initial assessment of the PAT.
Appearance
The first part of the PAT is the child’s appearance, including level of consciousness and ability to interact. Carefully, but quickly,
observe the child’s appearance to evaluate the level of consciousness by observing the child’s TICLS. If the child is
unresponsive, shout for nearby help, assess breathing and pulse, and then activate the rapid response or the emergency
response system as appropriate for your clinical setting.
64.
If the childis crying or upset, it can be difficult to know if they are responding appropriately. Try to keep the child as calm as
possible by letting them remain with their parent or caregiver if practical and use distractions such as toys.
Breathing
The next part of the PAT is evaluating the child’s work of breathing, position, and any audible breath sounds (ie, sounds that
can be heard without a stethoscope) (Table 10). Look for signs of absent or increased respiratory effort. Listen for obvious
sounds of abnormal breathing, such as grunting, stridor, or wheezing. Note whether the patient’s position suggests respiratory
distress, such as the tripod position.
Table 10.Evaluating Work of Breathing
Evaluate Normal Abnormal
Respiratory effort* • Regular breathing, no increased effort
• Passive expiration
• Nasal flaring
• Retractions or use of accessory muscles
• Increased, inadequate, or absent respiratory effort
• Seesaw (abdominal expansion with chest collapse)
• Tripod positioning
Lung and airway sounds* No abnormal respiratory sounds audible Noisy breathing (eg, wheezing, grunting, stridor)
*Refer to detailed discussion of respiratory effort and lung and airway sounds in the Primary Assessment section in this Part.
65.
Circulation (Color)
To completethe third part of the PAT, assess the child’s overall circulatory status. Assess the child’s color, including skin color
and pattern or obvious significant bleeding, which may help you assess how well the child is perfusing. You can often identify
important information about circulatory status just by looking at a child.
Pallor (paleness), mottling (a patchy or lacy discoloration of the skin, often purple or blue appearing), or cyanosis (bluish/gray
skin color) suggests poor perfusion, poor oxygenation, or both. Cyanosis of the lips and fingernails may appear if the child
cannot adequately oxygenate their blood.
Observe the exposed parts of the child, such as the face, arms, and legs. A flushed appearance may suggest fever or
distributive shock such as from sepsis, toxins, or anaphylaxis. A skin inspection may reveal bruising that suggests injury. You
may also see evidence of bleeding within the skin, called petechiae or purpura. This purplish discoloration of the skin may be a
sign of a life-threatening infection.
Evaluate the skin (Table 11). Is it normal or abnormal?
Table 11.Initial Evaluation of the Skin
Evaluate Normal Abnormal
66.
Skin color* Appearsnormal • Pallor
• Mottling
• Cyanosis
Visible bleeding or wounds Not present • Obvious significant bleeding
• Bleeding within the skin (eg, purpura)
• Nonblanching pink dots on the skin (petechiae)
*Refer to the discussion of skin color in the Primary Assessment section in this Part.
Evaluate-Identify-Intervene
Use the evaluate-identify-intervene sequence (Figure 25) when caring for a seriously ill or injured child to help you determine
the best treatment or intervention at any point. From the information gathered during your evaluation, identify the child’s clinical
condition by type and severity. Intervene with appropriate actions, and then repeat the sequence. This process is ongoing.
Figure 25. Evaluate-identify-intervene sequence.
If at any point you identify a life-threatening problem, immediately activate the emergency response system (or send someone
to do so) while you begin lifesaving interventions.
Sometimes a child’s condition may seem stable despite the presence of a life-threatening problem. Examples include a child
who has ingested a toxin but is not yet showing effects or a trauma with internal bleeding who may initially maintain blood
pressure by increasing heart rate and systemic vascular resistance (SVR). Reassess frequently.
67.
Evaluate
Always verify thatthe scene is safe and assess for potential environmental dangers before you evaluate the child, especially in
out-of-hospital settings.
If no life-threatening condition is present, evaluate the child’s condition by using these clinical assessment tools:
• Initial assessment: a first, quick, “from the doorway” observation of the child’s appearance, breathing, and color,
performed within the first few seconds after encountering the child
• Primary assessment: a rapid, hands-on ABCDE approach to evaluate respiratory, cardiac, and neurologic function;
includes assessment of vital signs and pulse oximetry
• Secondary assessment: a focused medical history and a focused physical exam
Identify
Respiratory illness can present as respiratory distress that can progress to respiratory failure:
• Upper airway obstruction
• Lower airway obstruction
• Lung tissue disease, disordered control of breathing
Compensatory shock can progress to hypotensive shock. Shock can be categorized into
• Hypovolemic shock
• Distributive shock
• Cardiogenic shock
• Obstructive shock
Respiratory failure and hypotensive shock can further progress to cardiopulmonary failure and cardiac arrest.
The child’s clinical condition can result from a combination of respiratory and circulatory problems. As a seriously ill or injured
child deteriorates, one problem may lead to others, such as cardiopulmonary failure and cardiac arrest. Note that in the initial
phase of your identification, you may be uncertain about the type or severity of problems.
Identifying the problem will help you determine the best initial interventions. Recognition and management are discussed in
detail later in this manual.
68.
Intervene
Once you identifythe child’s clinical condition, intervene with appropriate actions within your scope of practice. Interventions
may include
• Positioning the child to maintain an open/patent airway
• Activating the emergency response system
• Starting CPR
• Obtaining the code cart and monitor
• Placing the child on a cardiac monitor and pulse oximeter
• Administering O2
• Supporting ventilation
• Starting medications and fluids (eg, nebulizer treatment, IV/IO fluid bolus)
Continuous Sequence
Continue the evaluate-identify-intervene sequence until the child is stable. Use this sequence before and after each
intervention to look for trends in the child’s condition. For example, after you give O2, reevaluate the child. Is the child breathing
a little easier? Are color and mental status improving? After you give a fluid bolus, reassess the child, looking for improvement
in capillary refill, central and peripheral pulses, skin color, and temperature. For example, has capillary refill improved from 5
seconds to 4 seconds? Have peripheral pulses improved in strength, going from weak to strong? Has the skin color improved
from pale to pink? Use the evaluate-identify-intervene sequence to evaluate the need for a second fluid bolus. If capillary refill
is prolonged and the skin perfusion is poor, identify the child remains in shock and intervene by administering another fluid
bolus. After the second fluid bolus, evaluate the same signs to determine improvement. Use the evaluate-identify-intervene
sequence when the child’s condition changes.
Critical Concepts
The Evaluate-Identify-Intervene Sequence Is Continuous
Remember to repeat the evaluate-identify-intervene sequence until the child is stable:
• After each intervention
• When the child’s condition changes or deteriorates
Primary Assessment
69.
The primary assessmentuses a hands-on ABCDE approach and includes assessment of the patient’s vital signs, including
oxygen saturation by pulse oximetry (Figure 26).
• Airway
• Breathing
• Circulation
• Disability
• Exposure
Figure 26. Primary assessment.
As you proceed through each component of the primary assessment, treat life-threatening abnormalities in real time, before
you complete the remainder of the primary assessment. In patients with life-threatening conditions evident, finish the primary
assessment because correcting those conditions takes precedence over establishing baseline vital sign measures such as
blood pressure or pulse oximetry. When you complete the primary assessment and after you address any life-threatening
problems, proceed to the secondary assessment.
Airway
70.
When you assessthe airway, you determine if it is open/patent. To assess airway openness/patency:
• Look for chest or abdomen movement
• Listen for air movement and breath sounds
• Feel for air movement at the nose and mouth
To check for breathing, scan the child’s chest for rise and fall for no less than 5 seconds and no greater than 10 seconds.
• If the child is breathing, monitor until additional help arrives.
• If the child is not breathing or is only gasping, this is abnormal breathing and may be a sign of cardiac arrest.
To minimize delay in starting CPR, you may assess breathing at the same time as you check the pulse. This should take no
less than 5 seconds and no greater than 10 seconds.
The following signs suggest that the upper airway may be obstructed:
• Increased inspiratory effort with retractions
• Abnormal inspiratory sounds (snoring or high-pitched stridor)
• Episodes where no airway or breath sounds are present despite respiratory effort (ie, complete upper airway
obstruction)
If the upper airway is obstructed, determine if you can open and maintain the airway with simple measures or if you need
advanced interventions.
Measures to Maintain the Airway
Measures to open and maintain an open/patent upper airway may include one or more of the following:
Positioning
For a responsive child, allow the child to assume a position of comfort or elevate the head of the bed. For an unresponsive
child, position supine, if you do not suspect cervical injury or use a head tilt–chin lift or jaw thrust to improve airway patency.
Opening the Airway
Open the airway by using the head tilt–chin lift maneuver or jaw thrust without neck extension (see Opening the Airway in Part
2). Avoid overextending the head and neck in infants because this may occlude, or block, the airway. Opening the airway is a
priority. During CPR, stabilize the head and neck manually rather than with immobilization devices.
71.
Suctioning
Suction the noseand oropharynx. Avoid overextending the head and neck in infants because this may occlude the airway.
Managing FBAO
If you suspect an FBAO that is mild (the child is able to make sounds and cough forcefully), do not intervene. Call for help and
allow the child to try to clear the obstruction by coughing. If you suspect that the FBAO is severe (the child or infant makes no
sound, is unable to speak or cough, has poor or no air exchange, makes a high-pitched noise while inhaling or no noise at all,
has increased respiratory difficulty), perform the maneuvers in Table 12.
Table 12.Managing FBAO
Interventions for a responsive infant or child with FBAO
Infant (younger than 1 year) Child (1 year to adolescent [puberty])
• Confirm severe airway obstruction
• Activate the emergency response system in case the infant
becomes unresponsive
• Alternate giving 5 back blows followed by 5 chest thrusts with
the heel of 1 hand until the object is expelled or the infant
becomes unresponsive
• Ask, “Are you choking?” If the child nods or otherwise
indicates “yes,” say you’re going to help
• Activate the emergency response system in case the
child becomes unresponsive
• Perform 5 back blows followed by 5 abdominal thrusts
• Continue alternating 5 back blows followed by 5
abdominal thrusts until the object is dislodged or the
person becomes unresponsive
• To perform back blows, use the heel of your hand and forcefully strike the infant or child’s back in between their shoulder blades.
You’ll do this 5 times. If back blows do not relieve choking, stand or kneel behind the child and perform 5 abdominal thrusts
Child or infant becomes unresponsive
• Shout for help. Send someone to activate the emergency response system
• Place the infant on a firm surface or lower the child to the floor. If the infant or child is unresponsive with no breathing or only gasping,
begin CPR (no pulse check)
• Each time you open the airway to deliver breaths, look into the mouth. If you see an object that can be easily removed, remove it. If
you do not see an object, continue CPR. Note: Do not perform a blind finger sweep to dislodge a foreign body. This may push the
foreign body farther into the airway. It also may cause trauma and bleeding
72.
• Continue CPRfor 5 cycles or about 2 minutes.* If you are alone, leave the child and activate the emergency response system.
Continue CPR until more skilled health care professionals arrive
*Providing effective ventilation by using a bag-mask device on a child with an FBAO may be difficult. Consider using the 2-person bag-mask
ventilation technique.
Effectiveness and safety of suction-based airway clearance devices have not been established in infants and children. There is
insufficient evidence to make a recommendation for infants and children.
Critical Concepts
Infant Chest Thrusts
The heel-of-1-hand technique for chest thrusts is now recommended for infants with severe FBAO because current CPR
literature suggests that it generates greater compression depth than the previously recommended 2-finger technique. While the
heel-of-1-hand technique for chest thrusts resembles chest compressions that are used as part of CPR, there is no focus on
the other components of high-quality CPR chest compressions (eg, rate, recoil).
Choking Relief for Severe FBAO in an Infant
To relieve choking in an infant, follow the steps as outlined in the Infant FBAO Algorithm (Figure 27).
Figure 27. Infant FBAO Algorithm.
73.
Algorithm legend: Redhexagon = decision or question; green box = action/steps to consider; orange box = assessment; gray box =
assessment/action; blue box = CPR; white box with gray header = notes; and red, bold text = possible answers or decisions.
The steps to relieve choking in an infant are similar to those for children, with a few key differences. First, don’t use abdominal
thrusts on infants.
If you find an infant who’s choking but is still responsive, activate the emergency response system. Kneel or sit with the infant in
your lap. Hold the infant facedown with the head slightly lower than the chest, resting on your forearm (Figure 28A). Support
the infant’s head and jaw with your hand. Avoid compressing the soft tissue of the infant’s throat. Rest your forearm on your lap
or thigh to support the infant.
Figure 28A. Relief of choking in an infant. A, Back blows.
With the heel of your other hand, deliver 5 forceful back blows between the infant’s shoulder blades. Deliver each back blow
with sufficient force to attempt to dislodge the object.
After delivering 5 back blows, place your free hand on the infant’s back, supporting their head with the palm of your hand. This
will cradle the infant between your 2 forearms, with the palm of one hand supporting the face and jaw while the palm of the
other hand supports the back of the infant’s head.
Now, turn the infant over while carefully supporting the head and neck. Hold the infant faceup, with your forearm resting on
your thigh. Keep the infant’s head lower than their chest (Figure 28B).
74.
Figure 28B. Chestthrusts.
Provide 5 quick downward chest thrusts with the heel of 1 hand in the middle of the chest, over the lower half of the
breastbone.
Deliver chest thrusts at a rate of about 1 per second, each with enough force to dislodge the object.
Repeat the sequence of up to 5 back blows followed by 5 chest thrusts until the object is dislodged or the infant becomes
unresponsive.
Never perform a blind finger sweep. Only try to remove the object if you can see it. If you can see the object, carefully try to
remove it. If you can’t remove it, continue the sequence of 5 back blows and 5 chest thrusts until the object is dislodged or the
infant becomes unresponsive. If the object comes out, continue to monitor the infant until advanced care arrives.
If a choking infant becomes unresponsive, shout for help and activate the emergency response system if no one has done so
already. Place the infant on a firm, flat surface and begin CPR starting with compressions. Do not perform a pulse check.
To give breaths to an infant who’s choking, the mouth-to-mouth-and-nose technique is preferred. If you can’t cover the infant’s
mouth and nose with your mouth, use the mouth-to-mouth technique instead. Start by opening the infant’s airway with the head
tilt–chin lift maneuver. Each time you open the airway to give breaths, open the infant’s mouth and look for the object.
If you see an object that looks easy to remove, remove it with your fingers. Never perform a blind finger sweep because this
may cause the object to become lodged farther back in the airway.
Next, place your mouth over the infant’s mouth and nose to create an airtight seal. Give 1 breath, blowing for about 1 second.
Watch for the chest to rise as you give the breath.
75.
If the chestdoesn’t rise, repeat the head tilt–chin lift maneuver to reopen the airway, and try to give a breath that makes the
chest rise.
If you’re alone and have no access to a phone, perform 2 minutes or 5 cycles of CPR before you leave. Or carry the infant with
you to activate the emergency response system.
Critical Concepts
No Blind Finger Sweeps
Do not perform a blind finger sweep because it may push the foreign body back into the airway, causing further obstruction or
injury.
Choking Relief For Severe FBAO in a Child
To relieve choking in a child, follow the steps as outlined in the Child FBAO Algorithm (Figure 29).
Figure 29. Child FBAO Algorithm.
Algorithm legend: Red hexagon = decision or question; green box = action/steps to consider; orange box = assessment; gray box =
assessment/action; blue box = CPR; white box with gray header = notes; and red, bold text = possible answers or decisions.
Giving Effective Relief When There Is an Airway Obstruction
If a child indicates that they’re choking and can’t talk, you must take action. Older children who are choking may clutch their
neck with both hands, making the universal choking sign. For a child who has signs of severe choking, ask them, “Are you
76.
choking?” If theynod “yes” and cannot talk, a severe airway obstruction is present, and you need to take steps immediately to
relieve the obstruction.
To relieve choking in a responsive child, perform 5 forceful back blows followed by 5 abdominal thrusts. You should also
activate the emergency response system in case the child becomes unresponsive.
Perform 5 back blows, using the heel of your hand and forcefully strike the child’s back in between their shoulder blades. If
back blows do not relieve choking, perform 5 abdominal thrusts.
Continue alternating 5 back blows followed by 5 abdominal thrusts until the object is dislodged or the child becomes
unresponsive.
If the child becomes unresponsive, gently lower them to the ground, shout for help, and activate the emergency response
system if no one has already done so. Begin CPR with chest compressions. Do not check for a pulse.
Perform CPR as usual, but with one difference. Each time you open the airway to give breaths, open the child’s mouth and look
for the object. If you see an object that looks easy to remove, remove it with your fingers. Don’t perform a blind finger sweep
because this may cause the object to become lodged farther back in the airway. If you don’t see an object, continue CPR.
If the choking child is already unresponsive when you arrive, you probably will not know if an FBAO exists. In this situation, you
should activate the emergency response system and start high-quality CPR.
When a choking child loses consciousness, the muscles in the throat may relax. This could convert a complete or severe
airway obstruction to a partial obstruction. In addition, chest compressions may create at least as much force as abdominal
thrusts, so they may help expel the object. Giving 30 compressions and then removing any object that’s visible in the mouth
may allow you to eventually give effective breaths.
Abdominal Thrusts With the Child Standing or Sitting
Follow these steps to perform abdominal thrusts on a responsive child who is standing or sitting:
1. Stand or kneel behind the child and wrap your arms around the child’s waist (Figure 30). Make a fist with one hand.
2. Place the thumb side of your fist against the child’s abdomen, in the midline, slightly above the navel and well
below the sternum.
3. Grasp your fist with your other hand and press your fist into the child’s abdomen with a quick, forceful upward
thrust.
4. Give each new thrust with a separate, distinct movement to relieve the obstruction.
77.
5. Continue alternating5 back blows followed by 5 abdominal thrusts until the object is dislodged or the child becomes
unresponsive.
Figure 30. Abdominal thrusts with the child standing.
Actions After Choking Relief
You will know you successfully removed an airway obstruction in an unresponsive person if you saw and removed a foreign
body from the person’s mouth and the person starts to breathe. However, you don’t always have to remove the foreign body to
successfully relieve the obstruction. If you can feel air movement and see the chest rise when you give breaths, the airway is
no longer obstructed.
After you relieve choking in a person who is unresponsive, proceed as you would with any unresponsive person. Check again
for responsiveness, check for breathing and a pulse, confirm that someone has activated the emergency response system, and
provide high-quality CPR or breaths as needed.
Encourage a responsive person to seek immediate medical attention. A health care professional should evaluate the person for
potential complications from abdominal thrusts.
Airway Adjuncts
Use airway adjuncts (ie, oral or nasopharyngeal airways) to keep the tongue from falling back and obstructing the airway, but
don’t rely on an adjunct alone to maintain an open airway. You may still need to use a head tilt–chin lift.
Advanced Interventions to Maintain Airway
Openness/patency may include one or more of the following:
78.
• Removing aforeign body; this intervention may require direct laryngoscopy (ie, visualizing the larynx with a
laryngoscope)
• Applying continous positive airway pressure
• ET intubation or placing a supraglottic airway (SGA)
• Cricothyrotomy (a needle puncture or surgical opening through the skin and cricothyroid membrane and into the
trachea below the vocal cords)
Breathing
Assessing breathing includes evaluating
• Respiratory rate and pattern
• Respiratory effort (work of breathing)
• Chest expansion and air movement
• Lung and airway sounds
• O2 saturation by pulse oximetry
Oxygenation and Ventilation
Breathing serves the function of oxygenation and ventilation. A child can be ventilating but not oxygenating and vice versa. If
the child is not oxygenating, placing oxygen will improve their oxygen saturation. If the child is not ventilating, improve
ventilation by bag-mask device. For example, if the pulse ox is 95% but the rate is 6/min, the child is going to need to be
bagged in a very short period of time.
Normal Respiratory Rate
Normal spontaneous breathing is accomplished with minimal work, resulting in quiet breathing with unlabored inspiration and
passive expiration. The normal respiratory rate is inversely related to age (Table 13): rapid in the neonate and decreasing as
the child gets older.
79.
Table 13.Normal RespiratoryRates by Age*
Age Rate (breaths/min)
Infant 30-53
Toddler 22-37
Preschooler 20-28
School-age child 18-25
Adolescent 12-20
*Consider the patient’s normal range. The child’s respiratory rate is expected to increase in the presence of fever or stress
Reproduced from Hazinski MF. Children are different. In: Hazinski MF, ed. Nursing Care of the Critically Ill Child. 3rd ed. Mosby; 2013:1-18,
copyright Elsevier. Data from Fleming S, Thompson M, Stevens R, et al. Lancet.2011;377(9770):1011-1018.
Evaluate respiratory rate before your hands-on assessment because anxiety and agitation commonly alter the baseline rate. If
the child has any condition that causes increased metabolic demand (eg, excitement, anxiety, exercise, pain, fever), it may be
appropriate for the respiratory rate to be higher than normal.
Determine the respiratory rate by counting the number of times the chest rises in 30 seconds and multiplying by 2. Normal
sleeping infants may have irregular (periodic) breathing with pauses lasting up to 10 or even 15 seconds. If you count the
number of times the chest rises for less than 30 seconds, you may estimate the respiratory rate inaccurately. Count the
respiratory rate several times as you assess and reassess the child to detect changes. Alternatively, the respiratory rate may
be displayed continuously on a monitor.
A decreasing respiratory rate from a rapid to a more “normal” rate may indicate overall improvement if it is associated with an
improved level of consciousness and reduced signs of dyspnea and work of breathing. A decreasing or irregular respiratory
rate in a child with a deteriorating level of consciousness, however, often indicates a worsening of the child’s clinical condition.
Critical Concepts
Very Slow or Very Fast Respiratory Rate Is a Warning Sign
A consistent respiratory rate of less than 10 or more than 60 breaths per minute in a child of any age is always abnormal and
warrants further assessment for the presence of a potentially serious condition.
80.
Abnormal Respiratory Rateand Pattern
Abnormal respirations include
• Fast respiratory rate (tachypnea)
• Irregular respiratory pattern
• Slow respiratory rate (bradypnea)
• Apnea
All abnormal respiratory rates have their own set of signs and symptoms and underlying causes. Each type and pattern of
respiratory effort can potentially indicate a specific diagnosis. See Table 14 for a summation of abnormal respiratory rates and
what may be associated with each.
Table 14.Types of Abnormal Respirations
Type Signs and symptoms Underlying causes
Fast respirations
(tachypnea)
• Increased respiratory effort—first sign of
respiratory distress
• Increased rate without increased effort (quiet
tachypnea)
• Stress
• High fever
• Dehydration
• Pain
• Anemia
• Cyanotic congenital heart disease
• Metabolic acidosis
• Sepsis (serious infection)
Irregular • Deep gasping breath followed by periods of
apnea (no breathing/gasping)
• Rapid rate followed by very shallow breathing
or apnea
• Neurological
Slow (bradypnea) • Decreased respiratory rate
• Deteriorating level of consciousness
• Respiratory muscle fatigue
• Severe hypoxia
• Severe shock
• Hypothermia
• Central nervous system injury or problems that
affect the respiratory control center
81.
• Medications thatdepress the respiratory control
center
• Muscle diseases that cause muscle weakness
• Medications that depress the respiratory drive
Apnea • Low oxygen saturation despite high flow
supplemental oxygen
• Inadequate respiratory rate or no rate
• Absent respiratory effort
• Absent distal air movement
• No air movement (silent chest)
• Cyanosis
• Upper airway obstruction
• Lower airway obstruction
• Lung tissue disease
• Disordered control of breathing
Critical Concepts
Bradypnea or Irregular Respiratory Rate Often Signal Impending Arrest
Bradypnea or an irregular respiratory rate in an acutely ill infant or child is an ominous clinical sign and often signals impending
arrest.
Increased Respiratory Effort
Increased respiratory effort results from conditions that increase resistance to airflow (eg, asthma, bronchiolitis) or that cause
the lungs to be stiffer and difficult to inflate (eg, pneumonia, pulmonary edema, pleural effusion). Nonpulmonary conditions that
result in severe metabolic acidosis (eg, shock, diabetic ketoacidosis [DKA], salicylate ingestion, inborn errors of metabolism)
can also cause increased respiratory rate and effort. Signs of increased respiratory effort reflect the child’s attempt to improve
oxygenation, ventilation, or both, so use these signs to assess the severity of the condition and determine the urgency of
intervention. Signs of increased respiratory effort include
• Nasal flaring
• Retractions
• Head bobbing
• Grunting
• Seesaw
• Gasping
82.
Nasal Flaring
Nasal flaringis dilation of the nostrils with each inhalation to maximize airflow. It is most observed in infants and younger
children and is a sign of respiratory distress.
Retractions
Retractions are inward movements of the chest wall or tissues or sternum during inspiration.
Chest retractions signify that the child is trying to move air into the lungs by using the chest muscles, but air movement is
impaired by increased airway resistance or stiff lungs.
Retractions may occur in several areas of the chest. The severity of the retractions generally corresponds with the severity of
the child’s breathing difficulty.
Table 15 describes the location of retractions commonly associated with each level of breathing difficulty.
Table 15.Location of Retractions Commonly Associated With Each Level of Breathing Difficulty
Breathing difficulty
Location of
retraction
Description
Mild to moderate Subcostal Retraction of the abdomen, just below the
rib cage
Mild to moderate Substernal Retraction of the abdomen at the bottom of
the sternum
Mild to moderate Intercostal Retraction between the ribs
Severe (may include the same retractions as seen with mild to
moderate breathing difficulty)
Supraclavicular Retraction in the tissues just above the
collarbone
Severe Suprasternal Retraction in the chest, just above the
sternum
Severe Sternal Retraction of the sternum toward the spine
Retractions accompanied by stridor or an inspiratory snoring sound suggest upper airway obstruction, while retractions
accompanied by expiratory wheezing suggest marked lower airway obstruction (asthma or bronchiolitis), causing obstruction
83.
during both inspirationand expiration. Retractions accompanied by grunting or labored respirations suggest lung tissue
disease. Severe retraction also may be accompanied by head bobbing or seesaw respirations.
Head Bobbing or Seesaw Respirations
Head bobbing and seesaw respirations often indicate that the child has an increased risk for deterioration.
• Head bobbing is caused by using neck muscles to assist breathing. The child lifts the chin and extends the neck
during inspiration and allows the chin to fall forward during expiration. It is most frequently seen in infants and can
be a sign of respiratory failure.
• Seesaw respirations are present when the chest retracts and the abdomen expands during inspiration, and then the
chest expands and the abdomen moves inward during expiration. In most children with neuromuscular disease,
seesaw breathing is caused by weakness of the abdominal and chest wall muscles and by strong contraction of the
diaphragm that dominates the weaker abdominal and chest wall muscles. Seesaw respirations usually indicate
upper airway obstruction, but they also may be observed in severe lower airway obstruction, lung tissue disease,
and states of disordered control of breathing. Seesaw respirations are characteristic of infants and children with
neuromuscular weakness. This inefficient form of ventilation can quickly lead to fatigue.
Inadequate Respiratory Effort
When evaluating respiratory effort, look for signs that respiratory effort is inadequate and be prepared to support airway,
oxygenation, and ventilation. These signs include
• Apnea
• Weak cry or cough
• Bradypnea
• Agonal gasps
Apnea
Apnea is when breathing stops, typically defined as longer than 20 seconds. Apnea may be further classified as central or
obstructive, depending on whether inspiratory muscle activity is present. Central apnea indicates that the child is making no
respiratory effort because of an abnormality or suppression of the brain or spinal cord, whereas obstructive apnea occurs when
the passage of air is impeded. Either can result in hypoxemia, hypercapnia, or both. Furthermore, in mixed apnea, periods of
obstructive apnea and periods of central apnea occur.
Agonal gasps commonly happen in adults after sudden cardiac arrest and may be confused with normal breathing. They also
appear late in the deterioration of a very sick child. Agonal gasps will not produce effective oxygenation and ventilation.
84.
Chest Expansion andAir Movement
Evaluate magnitude of chest wall expansion and air movement to assess adequacy of the child’s tidal volume, the volume of air
inspired with each breath. Normal tidal volume is approximately 6 to 8 mL/kg of ideal body weight throughout life. It is difficult to
measure unless a child is mechanically ventilated, so your clinical assessment is very important.
Auscultation With a Stethoscope
Use a stethoscope to auscultate the following points during a respiratory physical exam:
• Anterior (on either side of the sternum)
• Posterior
• Lateral (under the axillae)
Chest Wall Expansion
Chest expansion (chest rise) during inspiration should be symmetrical. It may be subtle during spontaneous quiet breathing,
especially when clothing covers the chest, but chest expansion should be readily visible when the chest is uncovered. In
normal infants, the abdomen may move more than the chest. Decreased or asymmetrical chest expansion may result from
inadequate effort, airway obstruction, atelectasis, pneumothorax, hemothorax, pleural effusion, mucous plug, or foreign-body
aspiration.
Air Movement
Auscultation for air movement is critical. Listen for the intensity of breath sounds and quality of air movement in the following
areas:
• Anterior, located at mid-chest (just to the left and right of the sternum)
• Lateral, located under the armpits (the best location for evaluating air movement into the lower parts of the lungs)
• Posterior, located on both sides of the back
Critical Concepts
Auscultating Breath Sounds in Infants and Children
Because the chest is small and the chest wall is thin in infants and children, breath sounds readily transmit from one side of the
chest to the other and from the upper airway. To evaluate distal air entry, listen below both axillae. Because these areas are
farther from the larger conducting airways, upper airway sounds are less likely to be transmitted.
Listen to the loudness of the air movement:
85.
• Typical inspiratorysounds can be heard distally as soft, quiet noises occurring simultaneously with observed
inspiratory effort.
• Normal expiratory breath sounds are often short and quieter; sometimes you may not even hear them.
Decreased chest excursion or decreased air movement during auscultation often accompanies poor respiratory effort. In the
child with apparently normal or increased respiratory effort, diminished distal air entry suggests airflow obstruction or lung
tissue disease. If the child’s work of breathing and coughing suggest lower airway obstruction, but you cannot hear wheezes,
the amount and rate of airflow may be insufficient to cause wheezing.
Distal air entry may be difficult to hear in the obese child, so it may be difficult to identify significant airway abnormalities in this
population.
Minute Ventilation
Minute ventilation is the volume of air that moves into or out of the lungs each minute. It is the product of the number of breaths
per minute (respiratory rate) and the volume of each breath (tidal volume).
Minute Ventilation = Respiratory Rate × Tidal Volume
Low minute ventilation (hypoventilation) may result from
• Slow respiratory rate
• Small tidal volume (ie, shallow breathing, high airway resistance, stiff lungs)
• Extremely rapid respiratory rate (resulting in very small tidal volumes)
Lung and Airway Sounds
During the primary assessment, listen for lung and airway sounds. Abnormal sounds include stridor, snoring, grunting, gurgling,
wheezing, crackles, and change in cry/phonation/cough (including barking cough). See Summary: Recognizing Respiratory
Problems in Part 5.
Stridor
Stridor is a coarse, usually higher-pitched breathing sound typically heard on inspiration, though you may hear it during both
inspiration and expiration. Stridor is a sign of upper airway (extra-thoracic) obstruction and may indicate that the obstruction is
critical and requires immediate intervention.
Stridor has many causes including
• A foreign body in the airway
86.
• Infection (eg,croup)
• Congenital airway abnormalities (eg, laryngomalacia)
• Acquired airway abnormalities (eg, tumor, cyst)
• Upper airway edema (eg, allergic reaction, swelling after a medical procedure)
Snoring
Although snoring may be common in children during sleep, it also can be a sign of airway obstruction. Soft tissue swelling or
decreased level of consciousness may cause airway obstruction and snoring.
Grunting
Grunting is typically a short, low-pitched sound heard during expiration that can sometimes be misinterpreted as a soft cry. It
occurs as the child exhales against a partially closed glottis. Although grunting may accompany the response to pain or fever,
infants and young children often grunt to help keep the small airways and alveolar sacs in the lungs open to optimize
oxygenation and ventilation.
Grunting often signifies lung tissue disease resulting from small airway collapse, alveolar collapse, or both. It may indicate
progression of respiratory distress to respiratory failure. Pulmonary conditions that cause grunting include
• Pneumonia
• Pulmonary contusion
• Acute respiratory distress syndrome (ARDS)
• Pulmonary edema (may be caused by cardiac conditions such congestive heart failure [CHF])
• Pain
Identify and treat the cause as quickly as possible, and be prepared to quickly intervene if the child’s condition worsens.
Gurgling
Gurgling is a bubbling sound heard during inspiration or expiration that results from upper airway obstruction due to airway
secretions, vomit, or blood.
Wheezing
Wheezing is a high-pitched or low-pitched whistling or sighing sound heard most often during expiration and less frequently
during inspiration. This sound typically indicates lower (intrathoracic) airway obstruction, especially of the smaller airways.
87.
Common causes ofwheezing are bronchiolitis and asthma. Isolated inspiratory wheezing suggests a foreign body or other
cause of partial obstruction of the trachea or upper airway.
Crackles
Crackles, also known as rales, are sharp, crackling inspiratory sounds. Dry crackles sound similar to the sound made when you
rub several hairs together close to your ear. Dry crackles are more often heard with atelectasis (small airway collapse) and
interstitial lung disease. Moist crackles indicate accumulation of alveolar fluid and are typically associated with lung tissue
disease (eg, pneumonia, pulmonary edema) or interstitial lung disease. Note that you may not hear crackles despite the
presence of pulmonary edema.
Change in Cry/Phonation
If an infant’s cry becomes very soft with only short sounds during expiration (ie, so the cry sounds more like the soft “mewing”
of a cat) or an older child begins to talk in short phrases or single words instead of sentences, this may indicate severe
respiratory distress and shortness of breath.
Identifying Respiratory Distress vs Respiratory Failure
Identifying the severity of a respiratory problem will help you decide the most appropriate interventions. Be alert for signs of
• Respiratory distress
• Respiratory failure
Respiratory Distress
Respiratory distress is a clinical state characterized by increased respiratory rate and effort, spanning a spectrum from mild
tachypnea with increased effort to severe distress with impending respiratory failure. A description of respiratory distress
severity typically includes a description of the respiratory rate and effort, quality of breath sounds, and mental status. These
indicators may vary in severity. Note that signs of severe respiratory distress can indicate respiratory failure.
88.
• Mild respiratorydistress
o –Mild tachypnea
o –Mild increase in respiratory effort (eg, nasal flaring, retractions)
o –Abnormal airway sounds (eg, stridor, wheezing)
• Severe respiratory distress
o –Marked tachypnea
o –Marked increase in respiratory effort (eg, nasal flaring, retractions)
o –Paradoxical thoracoabdominal breathing (eg, seesaw breathing)
o –Accessory muscle use (eg, head bobbing)
o –Abnormal airway sounds (eg, grunting)
o –Decreased level of consciousness (eg, less responsive)
• Impending respiratory arrest
o –Bradypnea, apnea, or respiratory pauses
o –Low oxygen saturation (hypoxemia) despite high-flow supplemental oxygen
o –Inadequate respiratory effort (eg, shallow respirations)
o –Decreased level of consciousness (eg, unresponsive)
o –Bradycardia
Respiratory distress is apparent when a child tries to maintain adequate gas exchange despite airway obstruction, reduced
lung compliance, or lung tissue disease. As the child tires or as respiratory function or effort or both deteriorate, adequate gas
exchange cannot be maintained. When this happens, clinical signs of respiratory failure develop.
Respiratory Failure
Respiratory failure is a clinical state of inadequate oxygenation, ventilation, or both. It is recognized typically by abnormal
appearance (particularly an altered level of consciousness, which may be characterized by agitation or a depressed level of
consciousness), poor color, and reduced responsiveness. Although respiratory failure often results from respiratory distress
progression, it may occur with little or no respiratory effort. At times, recognizing respiratory failure requires laboratory data (eg,
blood gas) to confirm the diagnosis. In other patients, the clinical examination suffices to identify respiratory failure.
Suspect probable respiratory failure if some of the signs in the following list are present.
• Signs of severe respiratory distress
o –Marked tachypnea
o –Increased or decreased respiratory effort
89.
o –Poor distalair movement
o –Tachycardia
o –Low oxygen saturation (hypoxemia) despite high-flow oxygen administration
o –Cyanosis
• Signs of probable respiratory failure
o –Very rapid or inadequate respiratory rate or possible apnea
o –Significant, inadequate, or absent respiratory effort
o –Absent distal air movement
o –Lack of airflow (silent chest)
o –Extreme tachycardia; bradycardia often indicates life-threatening deterioration
o –Low oxygen saturation (hypoxemia) despite high-flow supplemental oxygen
o –Decreased level of consciousness
o –Cyanosis
Respiratory failure can result from upper or lower airway obstruction, lung tissue disease, and disordered control of breathing
(eg, apnea or shallow, slow respirations). When respiratory effort is inadequate, respiratory failure can occur without typical
signs of respiratory distress. Respiratory failure is a clinical state that requires intervention to prevent deterioration to cardiac
arrest.
Strict criteria for respiratory failure is difficult to define because the baseline respiratory function of an infant or child may be
abnormal. For example, an infant with cyanotic congenital heart disease and a baseline arterial O2 saturation (SaO2) of 75% is
not in respiratory failure on the basis of low O2 saturation. But the same degree of hypoxemia would be one sign of respiratory
failure in a child with normal baseline cardiopulmonary physiology.
90.
The difference betweenrespiratory distress and failure may be determined by abnormal components of the PAT. If only the
work of breathing is abnormal, the child is likely in respiratory distress. If both the appearance and work of breathing are
abnormal, the child is likely in respiratory failure (Table 16).
Table 16.Progression of Respiratory Distress to Respiratory Failure
Progression of respiratory distress to respiratory failure*
Respiratory distress Respiratory failure
Airway Open and maintainable Not maintainable
Breathing Tachypnea Bradypnea to apnea
Work of breathing (nasal flaring/retractions) Increased effort progresses to decreased effort and then to apnea
Good air movement Poor to absent air movement
Circulation Tachycardia Bradycardia
Pallor Cyanosis
Disability Anxiety, agitation Lethargy to unresponsiveness
Exposure Variable temperature Variable temperature
*Respiratory failure requires immediate intervention.
Pulse Oximetry
When caring for a seriously ill or injured child, use pulse oximetry to monitor oxygen saturation and trends in oxygen saturation.
Oxygen Saturation by Pulse Oximetry
The O2 saturation is the percent of total hemoglobin that is fully saturated with oxygen (ie, the oxyhemoglobin saturation). This
oxyhemoglobin saturation does not indicate the amount of O2 delivered to the tissues. O2 delivery is the product of arterial
O2 content (oxygen bound to hemoglobin plus dissolved O2) and cardiac output. O2 saturation does not provide information
about ventilation effectiveness (CO2 elimination).
91.
An O2 saturation(SpO2) of 94% or more while a child is breathing room air usually indicates that oxygenation is adequate;
conversely, an SpO2 less than 94% when the child is breathing room air indicates hypoxemia. Consider administering
supplemental O2 if the O2 saturation is below this value in a critically ill or injured child. An SpO2 of less than 90% in a child
receiving 100% O2 is an indication for additional intervention.
When to Use Pulse Oximetry
Use pulse oximetry to monitor oxygen saturation and trends in oxygen saturation. The pulse oximeter measures the percent of
hemoglobin that is fully saturated or bound with oxygen. Because pulse oximetry can indicate low O2 saturation (hypoxemia)
before it causes cyanosis or bradycardia, health care professionals can use pulse oximetry to monitor trends in O2 saturation in
response to treatment. Continuously monitor pulse oximetry for a seriously ill or injured child during stabilization, transportation,
and post–cardiac arrest care.
The pulse oximeter consists of a probe that is linked to a monitor and attached to the child’s finger, toe, or earlobe. The pulse
oximeter has 2 parts that must be placed opposite each other, so they are located on either side of a pulsatile tissue bed. It
must detect a consistent pulsatile signal. Lights of different wave lengths originate from one side of the probe, and the light is
captured on the other side of the tissue by the other side of the probe. A processor in the oximeter calculates the percent of
each light that has been absorbed by the tissues. Hemoglobin that is fully saturated with oxygen absorbs light differently
than hemoglobin that is not fully saturated with oxygen. By determining the absorption of the different wavelengths of light, the
pulse oximeter can estimate the percent of hemoglobin saturated with blood. The unit displays the calculated percentage of
saturated hemoglobin. Most units make an audible sound for each heartbeat at and display the heart rate, while some models
display the quality of the pulse signal as a waveform or with bar.
Correct Use of Oximetry Equipment
Correct probe positioning, typically on a finger or toe, is critical for accurate oxygen saturation values. The probe is to be placed
across an area of pulsatile blood flow. Falsely low values can occur when the probe is not positioned correctly. When this
occurs, repositioning the probe can result in immediate improvement in detecting oxygen saturation by the device. Bright light
in the room can interfere with accurate light absorption detection by the pulse oximeter.
In addition to applying the probe to a finger or toe, the following locations can be used to solve placement problems: If infant
probes are unavailable, use an adult probe around the hand or foot of an infant. If blood flow is significantly reduced and no
signal is detected in the extremities, assess and support systemic perfusion and apply an infant probe to the earlobe.
92.
Confirm the Validityof Oximeter Data
Different brands of pulse oximeters vary in how quickly they reflect hypoxemia development and in their accuracy when the
child has decreased blood flow; all pulse oximetry devices are inaccurate unless the pulse rate displayed by the oximeter is
consistent with the heart rate displayed by the cardiac monitor. Although published studies have resulted in mixed conclusions,
pulse oximetry may have different accuracy/validity across races and ethnicities due to varying levels of skin pigmentation.
Further reviews of the available evidence and recommendations by the AHA will be forthcoming.
Critical Concepts
Validity of Oximeter Data
• Confirm validity of oximeter data by evaluating the child’s appearance. Compare the heart rate displayed by the
pulse oximeter with the heart rate displayed by the bedside cardiorespiratory monitor or counted during physical
examination.
• Immediately evaluate the child if the oximeter fails to detect a signal, displays an inaccurate pulse rate, indicates a
weak signal, or indicates a fall in oxygen saturation.
• If the oximeter fails to detect a signal or indicates a fall in oxygen saturation, immediately evaluate the child. Do not
assume that the pulse oximeter is malfunctioning.
Caution in Interpreting Pulse Oximetry Readings
Be careful to interpret pulse oximetry readings in conjunction with your clinical assessment, including considering signs such as
respiratory rate, respiratory effort, and level of consciousness. A child may be in respiratory distress yet maintain normal
O2 saturation by increasing respiratory rate and effort, especially if receiving supplemental O2.
If the pulse oximeter displays a different heart rate or inaccurate waveform tracing from the one determined by ECG monitoring,
the displayed O2 saturation is not reliable. When the pulse oximeter does not detect a consistent pulse or there is an irregular or
poor waveform, the child may have poor distal perfusion and the pulse oximeter may not be accurate—check the child and
intervene as needed. The pulse oximeter may not be accurate if the child develops severe shock and won’t be accurate during
cardiac arrest.
Pulse oximetry indicates only O2 saturation and not O2 delivery. For example, if the child is profoundly anemic (hemoglobin is
very low), the saturation may be 100%, but O2 content in the blood and O2 delivery may be low.
The pulse oximeter does not accurately recognize methemoglobin or carboxyhemoglobin (hemoglobin bound to carbon
monoxide). If carboxyhemoglobin (from carbon monoxide poisoning) is present, the pulse oximeter will reflect a falsely high
O2 saturation because it counts the carboxyhemoglobin as fully saturated hemoglobin. If methemoglobin concentrations are
93.
above 5%, thepulse oximeter will read approximately 85% regardless of the degree of methemoglobinemia. If you suspect
either of these conditions, obtain a blood gas and send it for laboratory analysis of O2 saturation measurement by co-oximeter.
Errors in pulse oximetry can occur if
• The probe is not placed across an area of pulsatile blood flow
• The pulses are very weak or the extremity is poorly perfused
• The extremity is cold
• The probe is placed so the side emitting light is not directly across from the side that captures the light
• Bright light in the room interferes with accurate light absorption detection
• Carbon monoxide poisoning is present
• The skin has varying levels of pigmentation
Accuracy of Values in Clinical Settings
Pulse oximetry can accurately estimate oxygen saturation but does not provide evidence of oxygen delivery and does not
directly evaluate the effectiveness of ventilation (carbon dioxide concentration).
Pulse oximetry may be inaccurate in some settings (Table 17).
Table 17.Settings Where a Pulse Oximeter May Be Inaccurate
Setting Cause/solution
Cardiac arrest Cause: Absence of blood flow
Solution: None; many devices will not be useful during cardiac arrest
Shock or hypothermia Cause: Decreased blood flow
Solution: Improve blood flow (treat the shock); you may be able to find an alternative site (particularly one
that is closer to the heart) where the device can detect pulsatile blood flow
Motion, shivering, or bright
overhead lighting
Cause: False signals or inaccurate oxygen saturation values
Solution: Move the sensor unit closer to the heart; lightly cover the device in position (ie, if it is placed on a
finger, lightly cover the finger to reduce ambient light)
Problem with the skin probe
interface
Cause: Low or absent pulse signals
Solution: Try an alternate site or alternate skin probe
94.
Misaligning sensor withlight
source
Cause: Low or absent pulse signals
Solution: Reposition the device so that the light source is located directly across the tissue bed from the
sensor
Cardiac arrhythmias with low
cardiac output
Cause: Arrhythmias that interfere with detection of a pulse and calculation of pulse rate
Solution: Assess pulse rate manually; obtain expert consultation for arrhythmia management
Circulation
Circulation is assessed by evaluating
• Heart rate and rhythm
• Pulses (both central and peripheral)
• Capillary refill time
• Skin color and temperature
• Blood pressure
• Urine output (end organ perfusion)
For more information on assessing the level of consciousness, refer to the Disability section later in this Part.
Heart Rate and Rhythm
To determine heart rate, check the pulse rate, listen to the heart, or view a monitor display of the ECG or pulse oximeter
waveform. The heart rate should be appropriate for the child’s age, level of activity, and clinical condition (Table 18). Note the
wide range of normal heart rates. For example, a child who is sleeping or is athletic may have a heart rate lower than the
normal range for age, and a child who is crying or upset may have a higher heart rate than the normal range for age.
95.
Table 18.Normal HeartRates*
Age Awake rate (rate/min) Sleeping rate (rate/min)
Neonate 100-205 90-160
Infant 100-180 90-160
Toddler 98-140 80-120
Preschooler 80-120 65-100
School-age child 75-118 58-90
Adolescent 60-100 50-90
*Always consider the patient’s normal range and clinical condition. Heart rate will normally increase with fever or stress.
Reproduced from Hazinski MF. Children are different. In: Hazinski MF, ed. Nursing Care of the Critically Ill Child. 3rd ed. Mosby; 2013:1-18,
copyright Elsevier.
Consider the following when evaluating the heart rate and rhythm in any seriously ill or injured child:
• The child’s typical heart rate and baseline rhythm
• The child’s level of activity and clinical condition
• The child’s cardiac function and perfusion
Children with congenital heart disease may have conduction abnormalities. Consider the child’s baseline ECG when
interpreting heart rate and rhythm. Children with poor cardiac function are more likely to be symptomatic from cardiac rhythm
disturbances (arrhythmias) than are children with normal cardiac function.
The heart rhythm is typically regular with only small fluctuations in rate. When checking the heart rate, assess for abnormalities
in the monitored ECG. Arrhythmias result from abnormalities in, or insults to, the cardiac conduction system or heart tissue.
Arrhythmias also can result from shock or hypoxia. In the ALS setting, an arrhythmia in a child can be broadly classified
according to the observed heart rate or effect on perfusion, with slow heart rate classified as bradycardia, fast heart rate
classified as tachycardia, and absent heart rate classified as asystole (cardiac arrest).
96.
Bradycardia is aheart rate slower than normal for a child’s age and clinical condition. Slight bradycardia may be normal in
athletic children, but a very slow rate in a child with other symptoms is worrisome and may indicate that cardiac arrest is
imminent. Hypoxia is the most common cause of bradycardia in children. If a child with bradycardia has signs of
cardiopulmonary compromise, immediately support oxygenation and ventilation with a bag and mask and administer
supplemental O2. Start chest compressions if the heart rate remains less than 60/min with signs of cardiopulmonary
compromise despite adequate oxygenation and ventilation. If the child with bradycardia is alert and has no signs of
cardiopulmonary compromise, consider other causes of a slow heart rate, such as heart block or drug overdose.
Tachycardia is a resting heart rate that is faster than the normal range for a child’s age and clinical condition. ST, a common,
nonspecific response to a variety of conditions, is often appropriate when the child is anxious, crying, febrile, or seriously ill or
injured. To determine if the tachycardia is a ST or represents a cardiac rhythm disturbance, evaluate the child’s history, clinical
condition, and ECG. Any tachycardia associated with signs of circulatory compromise, including hypotension, altered mental
status, or signs of shock, requires immediate evaluation and intervention. It is important to track heart rate trends to determine
early signs of life-threatening illness such as shock.
Critical Concepts
Tachycardia Can Be a Sign of a Serious Condition
A heart rate that is greater than 180/min in an infant or toddler and greater than 160/min in a child older than 2 years warrants
further assessment and may be a serious condition.
For more information, refer to Part 9: Recognizing Arrhythmias.
Relationship of Breathing to Heart Rhythm
In healthy children, the heart rate may fluctuate with the respiratory cycle, increasing with inspiration and slowing down with
expiration. This condition is called sinus arrhythmia.
Determine if the child has an irregular rhythm that is not related to breathing. An irregular rhythm may indicate an underlying
rhythm disturbance, such as premature ventricular or atrial contractions or an atrioventricular (AV) block.
Pulses
Evaluating central and peripheral pulses is critical to the assessment of systemic perfusion in an ill or injured child. Central
pulses are ordinarily stronger than peripheral pulses because they are present in vessels of larger size that are located closer
to the heart. An exaggerated difference in quality between central and peripheral pulses occurs when peripheral
vasoconstriction is associated with shock. Central pulses include femoral, brachial (in infants), carotid (in older children), and
97.
axillary. Peripheral pulsesinclude radial, dorsalis pedis, and posterior tibial. These pulses are easily palpable in healthy infants
and children (unless the child is obese or the ambient temperature is cold).
Beat-to-beat fluctuation in pulse volume may occur in children with arrhythmias (eg, premature atrial or ventricular
contractions). Fluctuation in pulse volume with the respiratory cycle (pulsus paradoxus) can occur in children with severe
asthma or pericardial tamponade. In an intubated child receiving positive-pressure ventilatory support, a reduction in pulse
volume with each positive-pressure breath may indicate hypovolemia.
Critical Concepts
Weakening of Pulses as Perfusion Decreases
Weak central pulses are worrisome and indicate the need for rapid intervention to prevent cardiac arrest. When cardiac output
decreases in shock, systemic perfusion decreases incrementally. The decrease in perfusion starts in the extremities with a
decrease in intensity of pulses and then an absence of peripheral pulses. As cardiac output and perfusion decrease further,
central pulses eventually weaken.
Capillary Refill Time
Capillary refill time is the time it takes for blood to return to tissue blanched by pressure. It increases as skin perfusion
decreases. Note that normal capillary refill time is 2 seconds or less, and a prolonged capillary refill time may indicate low
cardiac output.
Evaluate capillary refill in a neutral thermal environment (ie, room temperature) by lifting the extremity slightly above the level of
the heart, pressing on the skin or nailbed, and rapidly releasing the pressure. Note how many seconds it takes for the area to
return to its baseline color.
Common causes of sluggish, delayed, or prolonged capillary refill (a refill time of greater than 2 seconds) are dehydration,
shock, and hypothermia. Note that shock can be present despite a normal (or even brisk) capillary refill time. Children may
have warm skin and extremities with very rapid (less than 2 seconds) capillary refill (often called flash capillary refill). These
children are in shock and need immediate treatment (refer to Part 7: Recognizing Shock).
Skin Color and Temperature
Monitor changes in skin color, temperature, and capillary refill time to assess a child’s perfusion and response to therapy.
Normal skin color and temperature should be consistent over the trunk and extremities. The mucous membranes, nail beds,
palms of the hands, and soles of the feet should be pink. When perfusion deteriorates and O2 delivery to the tissues becomes
98.
inadequate, the handsand feet are typically affected first and become cool, pale, dusky, or mottled. If perfusion becomes
worse, the skin over the trunk and extremities may undergo similar changes.
Consider the temperature of the child’s surroundings (ie, ambient temperature) when evaluating skin color and temperature. If
the ambient temperature is cool, peripheral vasoconstriction may produce mottling or pallor with cool skin and delayed capillary
refill, particularly in the extremities. These changes develop despite normal cardiovascular function. A cold environment can
cause vasoconstriction and a discrepancy between peripheral and central pulses. However, if cardiac output remains
adequate, central pulses should remain strong.
To assess skin temperature, use the back of your hand because it is more sensitive to temperature changes than the palm,
which has thicker skin. Slide the back of your hand up the extremity to determine a line where the skin changes from cool to
warm and monitor this line of demarcation between warm and cool skin over time to determine the child’s response to therapy.
The line should move distally as the child improves.
Carefully monitor for the following skin findings (Table 19), which may indicate inadequate O2 delivery to the tissues:
• Pallor
• Mottling
• Cyanosis
Table 19.Skin Findings, Location, and Causes
Skin color Location Causes
Pallor (paleness; lack of
normal color)
Skin or mucous membranes • Decreased blood supply to the skin (cold; stress; shock,
especially hypovolemic and cardiogenic)
• Decreased number of red blood cells (anemia)
• Decreased skin pigmentation
• Poor perfusion
Mottling (irregular or
patchy discoloration)
Skin • Normal distribution of skin melanin
• Intense vasoconstriction from irregular supply of oxygenated
blood to the skin due to hypoxemia, hypovolemia, or shock
Cyanosis (blue
discoloration)
Skin or mucous membranes
99.
Acrocyanosis (bluish
discoloration)
Hands andfeet and around the
mouth (ie, the skin around the lips)
Normal in the newly born
Peripheral cyanosis
(bluish discoloration)
Hands and feet (beyond newborn
period)
• Shock
• CHF
• Peripheral vascular disease
• Conditions causing venous stasis
Central cyanosis (blue
color)
Lips and other mucous membranes • Ventilation/perfusion imbalance (eg, asthma, bronchiolitis,
acute respiratory distress syndromes)
• Intracardiac shunt (eg, cyanotic congenital heart disease)
• Low ambient O2 tension (eg, high altitude)
• Alveolar hypoventilation (eg, traumatic brain injury, drug
overdose)
• Diffusion defect (eg, pulmonary fibrosis)
You must interpret pallor within the context of other signs and symptoms because it is not necessarily abnormal and can result
from lack of exposure to sunlight or inherited paleness.
Pallor is often difficult to detect in a child with dark skin and in those with thick skin and variation in the vascularity of
subcutaneous tissue. However, family members often can tell you if a child’s color is abnormal. Central pallor (ie, pale color of
the lips and mucous membranes) strongly suggests anemia or poor perfusion. Pallor of the mucous membranes (the lips, lining
of the mouth, tongue, lining of the eyes) and pale palms and soles are more likely to be clinically significant.
• Areas that are mottled may appear as an uneven combination of pink, bluish gray, or pale skin tones.
• Blood saturated with O2 is bright red, whereas unoxygenated blood is dark bluish-red. The location of cyanosis is
important.
• Acrocyanosis is a normal neonatal finding in the first 24 to 48 hours after delivery.
• Peripheral cyanosis can be caused by diminished O2 delivery to the tissues.
• Central cyanosis is a blue color of the lips and other mucous membranes.
Critical Concepts
Variability in Appearance of Central Cyanosis
Cyanosis is not apparent until at least 5 g/dL of hemoglobin are desaturated (not bound to O2). The O2 saturation at which a
child will appear cyanotic depends on the child’s hemoglobin concentration. For example, in a child with a hemoglobin
concentration of 16 g/dL, cyanosis will appear at an O2 saturation of approximately 70% (ie, 30% of the hemoglobin, or 5 g/dL,
100.
is desaturated). Ifthe hemoglobin concentration is low (eg, 8 g/dL), a very low O2 saturation (eg, less than 40%) is required to
produce cyanosis. Thus, cyanosis may be apparent with a milder degree of hypoxemia in a child with polycythemia (increased
amount of hemoglobin and red blood cells, eg, in cyanotic heart disease) but may not be apparent despite significant
hypoxemia if the child is anemic.
Cyanosis may be more obvious in the mucous membranes and nail beds than in the skin, particularly if the skin is dark. It also
can be seen on the soles of the feet, tip of the nose, and earlobes. Children with different hemoglobin levels will be cyanotic at
different levels of O2 saturation; cyanosis is more readily detected at higher O2 saturations if the hemoglobin level is high. The
development of central cyanosis typically indicates the need for emergency intervention, such as O2 administration and
ventilatory support.
Blood Pressure
Accurate blood pressure measurement requires a cuff that extends at least 50% to 75% of the length of the upper arm (from
the axilla to the antecubital fossa) and a cuff bladder that covers about 40% of the mid–upper arm circumference. Use caution
with automatic blood pressure cuffs as they may not accurately measure blood pressure.
Normal Blood Pressures
Table 20 summarizes the normal range of systolic and diastolic blood pressures according to age from 1 standard deviation
below to 1 standard deviation above the mean in the first year of life and from the 50th to 95th percentile (assuming the 50th
percentile for height) for children 1 year or older. As with heart rates, there is a wide range of values within the normal range,
and normal blood pressures may fall outside the ranges listed here.
Table 20.Normal Blood Pressures
Age
Systolic pressure (mm
Hg)*
Diastolic pressure (mm
Hg)*
Mean arterial pressure (mm
Hg)†
Birth (12 hours, <1000 g) 39-59 16-36 28-42‡
Birth (12 hours, 3 kg) 60-76 31-45 48-57
Neonate (96 hours) 67-84 35-53 45-60
Infant (1-12 months) 72-104 37-56 50-62