SlideShare a Scribd company logo
1 of 4
01/05/13 When I started my 3D
environment I began by
designing the road where
the buildings and detail of
my map will be built and
where the main seen will
take place of my post-
apocalyptic city.
02/05/13 I then started to design the
first few building that
would fill the gaps that I
had designed for these
buildings to be placed on
the map the buildings
began to be built with
small details on the roof to
begin with.
03/05/13 I the continued to add
more detail onto the
buildings that had already
been built then I also
continued building more
structures to be placed into
the gaps on the roads
09/05/13 I had completed design my
buildings and then I began
to place detail on the roads
by adding painting yellow
lines for the different sides
of the streets.
10/05/13 I then added street lamps to
the roads to make a more
detailed walk down the
street of my map I then
changed some of the street
lamps so they looked to be
knocked over
15/05/13 I then added to the road a
car that I designed from side
and front models of a car
that I got from Google
images to help me create the
vehicle. I also added bollards
to the ends of each of the
roads; this made it seem as if
the roads had an end rather
than them going on forever.
16/05/13 This day I decided to add
more detail to the buildings
and the roads I changed the
design of the road by
changing the yellow strips
and making them smaller
and adding more
17/05/13 I then decided to design a
bus using the two images
from Google to help me
design the shade and the
bus’ windows and doors. I
also needed to get the
height, length and width
correct to be able to get the
overall size of the bus and to
make I correct.
22/05/13 I then designed a van using
images from Google for the
side and the front and back
to be able to make a good
designed 3D replica of a
modern day van.
23/05/13 I then started to design a
accessible room for a
building so that it can be
seen from the inside in my
fly through. I began by
making a room with some
couches and tables.
24/05/13 When I had finish the
interior of my room I started
to create the door and the
windows for the room so
that they can be looked into
on my fly through.
05/06/13 This is the finished room
with the door and windows
designed and added to the
building. I then started to
give my objects some colour
to make them easier to
texture when I start my fly
through.
24/06/13 I have uploaded my
environment into layout
and I also have
completed the fly
through sequence. It
starts and 0 and is at 25
frames per second and
last until 900 frames.
24/06/13 I have finished the
texturing for the scene
and each object in the
scene. This is a picture of
the finished texture. I
have completed the final
textures for my objects in
my scene and will begin
rendering later on this
year.
24/06/13 I have started to light
my scene. When lighting
my scene I noticed I
needed more than one
light to be able to
capture all the main
aspects of my
environment.

More Related Content

Viewers also liked

Illustrator and bitmap drawing’s
Illustrator and bitmap drawing’sIllustrator and bitmap drawing’s
Illustrator and bitmap drawing’shalo4robo
 
Enabling Restrictions on a Student iPad
Enabling Restrictions on a Student  iPadEnabling Restrictions on a Student  iPad
Enabling Restrictions on a Student iPadmatthewlipstein
 
Grade 4/5 Parent iPad Presentation
Grade 4/5 Parent iPad PresentationGrade 4/5 Parent iPad Presentation
Grade 4/5 Parent iPad Presentationmatthewlipstein
 
Sound programme process
Sound programme processSound programme process
Sound programme processhalo4robo
 
Light bot progression
Light bot progressionLight bot progression
Light bot progressionhalo4robo
 
Production log
Production logProduction log
Production loghalo4robo
 
Technical glossary
Technical glossaryTechnical glossary
Technical glossaryhalo4robo
 
Schedules complete
Schedules completeSchedules complete
Schedules completehalo4robo
 
Graphic types
Graphic typesGraphic types
Graphic typeshalo4robo
 
Technical glossary
Technical glossaryTechnical glossary
Technical glossaryhalo4robo
 
Sidekick(complete)
Sidekick(complete)Sidekick(complete)
Sidekick(complete)halo4robo
 
Blade runner
Blade runnerBlade runner
Blade runnerhalo4robo
 

Viewers also liked (14)

Illustrator and bitmap drawing’s
Illustrator and bitmap drawing’sIllustrator and bitmap drawing’s
Illustrator and bitmap drawing’s
 
Enabling Restrictions on a Student iPad
Enabling Restrictions on a Student  iPadEnabling Restrictions on a Student  iPad
Enabling Restrictions on a Student iPad
 
Grade 4/5 Parent iPad Presentation
Grade 4/5 Parent iPad PresentationGrade 4/5 Parent iPad Presentation
Grade 4/5 Parent iPad Presentation
 
Schedules
SchedulesSchedules
Schedules
 
Sound programme process
Sound programme processSound programme process
Sound programme process
 
Light bot progression
Light bot progressionLight bot progression
Light bot progression
 
Production log
Production logProduction log
Production log
 
Technical glossary
Technical glossaryTechnical glossary
Technical glossary
 
Schedules complete
Schedules completeSchedules complete
Schedules complete
 
Graphic types
Graphic typesGraphic types
Graphic types
 
Moodboard
MoodboardMoodboard
Moodboard
 
Technical glossary
Technical glossaryTechnical glossary
Technical glossary
 
Sidekick(complete)
Sidekick(complete)Sidekick(complete)
Sidekick(complete)
 
Blade runner
Blade runnerBlade runner
Blade runner
 

Similar to Building Post-Apocalyptic 3D City Environment

Similar to Building Post-Apocalyptic 3D City Environment (20)

Production Log
Production LogProduction Log
Production Log
 
Task 3
Task 3Task 3
Task 3
 
Production log for Unit 68 3D Environments
Production log for Unit 68 3D EnvironmentsProduction log for Unit 68 3D Environments
Production log for Unit 68 3D Environments
 
Fmp production log_280114 (1)
Fmp production log_280114 (1)Fmp production log_280114 (1)
Fmp production log_280114 (1)
 
Unit78 production log
Unit78 production logUnit78 production log
Unit78 production log
 
Unit78 production log
Unit78 production logUnit78 production log
Unit78 production log
 
Unit 67 Production Log
Unit 67 Production LogUnit 67 Production Log
Unit 67 Production Log
 
)Production log (models)
)Production log (models))Production log (models)
)Production log (models)
 
Planning and production
Planning and productionPlanning and production
Planning and production
 
Evaluation
EvaluationEvaluation
Evaluation
 
Production log unit 67_1
Production log unit 67_1Production log unit 67_1
Production log unit 67_1
 
Unit78 production log
Unit78 production logUnit78 production log
Unit78 production log
 
Production Log
Production LogProduction Log
Production Log
 
FMP Production log
FMP Production logFMP Production log
FMP Production log
 
Production log
Production logProduction log
Production log
 
Unit66 production log_060314
Unit66 production log_060314Unit66 production log_060314
Unit66 production log_060314
 
Unit66 production log_060314
Unit66 production log_060314Unit66 production log_060314
Unit66 production log_060314
 
Unit66 production log
Unit66 production logUnit66 production log
Unit66 production log
 
Production log
Production logProduction log
Production log
 
Fmp production log_08_05_2013
Fmp production log_08_05_2013Fmp production log_08_05_2013
Fmp production log_08_05_2013
 

More from halo4robo

Evaluation v1
Evaluation v1Evaluation v1
Evaluation v1halo4robo
 
Unit67 land e_checklist_271113
Unit67 land e_checklist_271113Unit67 land e_checklist_271113
Unit67 land e_checklist_271113halo4robo
 
Ig1 task 2 analysis work sheet dead island
Ig1 task 2 analysis work sheet dead islandIg1 task 2 analysis work sheet dead island
Ig1 task 2 analysis work sheet dead islandhalo4robo
 
Ig1 task 2 analysis work sheet assassins creed 3
Ig1 task 2 analysis work sheet assassins creed 3Ig1 task 2 analysis work sheet assassins creed 3
Ig1 task 2 analysis work sheet assassins creed 3halo4robo
 
Ig1 task 2 analysis work sheet assassins creed 4
Ig1 task 2 analysis work sheet assassins creed 4Ig1 task 2 analysis work sheet assassins creed 4
Ig1 task 2 analysis work sheet assassins creed 4halo4robo
 
Ig1 task 2 analysis work sheet bioshock infinite
Ig1 task 2 analysis work sheet bioshock infiniteIg1 task 2 analysis work sheet bioshock infinite
Ig1 task 2 analysis work sheet bioshock infinitehalo4robo
 
Android escape
Android escapeAndroid escape
Android escapehalo4robo
 
Robert h l ig2 task 1 work sheet v3
Robert h l ig2 task 1 work sheet v3Robert h l ig2 task 1 work sheet v3
Robert h l ig2 task 1 work sheet v3halo4robo
 
Evaluation v1
Evaluation v1Evaluation v1
Evaluation v1halo4robo
 
Production log v1
Production log v1Production log v1
Production log v1halo4robo
 
Remedy games
Remedy gamesRemedy games
Remedy gameshalo4robo
 
Data collation from my survey
Data collation from my surveyData collation from my survey
Data collation from my surveyhalo4robo
 
Futuristic city moodboard
Futuristic city moodboardFuturistic city moodboard
Futuristic city moodboardhalo4robo
 
Presentation
PresentationPresentation
Presentationhalo4robo
 

More from halo4robo (20)

Evaluation v1
Evaluation v1Evaluation v1
Evaluation v1
 
Unit67 land e_checklist_271113
Unit67 land e_checklist_271113Unit67 land e_checklist_271113
Unit67 land e_checklist_271113
 
Ig1 task 2 analysis work sheet dead island
Ig1 task 2 analysis work sheet dead islandIg1 task 2 analysis work sheet dead island
Ig1 task 2 analysis work sheet dead island
 
Ig1 task 2 analysis work sheet assassins creed 3
Ig1 task 2 analysis work sheet assassins creed 3Ig1 task 2 analysis work sheet assassins creed 3
Ig1 task 2 analysis work sheet assassins creed 3
 
Ig1 task 2 analysis work sheet assassins creed 4
Ig1 task 2 analysis work sheet assassins creed 4Ig1 task 2 analysis work sheet assassins creed 4
Ig1 task 2 analysis work sheet assassins creed 4
 
Ig1 task 2 analysis work sheet bioshock infinite
Ig1 task 2 analysis work sheet bioshock infiniteIg1 task 2 analysis work sheet bioshock infinite
Ig1 task 2 analysis work sheet bioshock infinite
 
Android escape
Android escapeAndroid escape
Android escape
 
Planning
PlanningPlanning
Planning
 
Robert h l ig2 task 1 work sheet v3
Robert h l ig2 task 1 work sheet v3Robert h l ig2 task 1 work sheet v3
Robert h l ig2 task 1 work sheet v3
 
Evaluation v1
Evaluation v1Evaluation v1
Evaluation v1
 
Production log v1
Production log v1Production log v1
Production log v1
 
Remedy games
Remedy gamesRemedy games
Remedy games
 
Fmp pitch
Fmp pitchFmp pitch
Fmp pitch
 
Data collation from my survey
Data collation from my surveyData collation from my survey
Data collation from my survey
 
Survey
SurveySurvey
Survey
 
Survey
SurveySurvey
Survey
 
Fmp pitch
Fmp pitchFmp pitch
Fmp pitch
 
Brain storm
Brain stormBrain storm
Brain storm
 
Futuristic city moodboard
Futuristic city moodboardFuturistic city moodboard
Futuristic city moodboard
 
Presentation
PresentationPresentation
Presentation
 

Building Post-Apocalyptic 3D City Environment

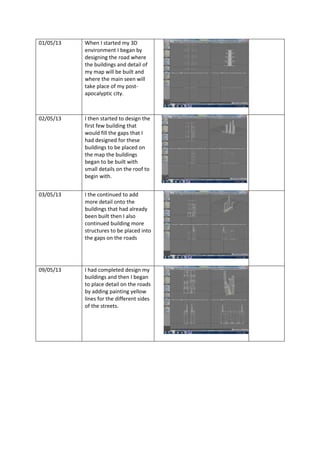
  • 1. 01/05/13 When I started my 3D environment I began by designing the road where the buildings and detail of my map will be built and where the main seen will take place of my post- apocalyptic city. 02/05/13 I then started to design the first few building that would fill the gaps that I had designed for these buildings to be placed on the map the buildings began to be built with small details on the roof to begin with. 03/05/13 I the continued to add more detail onto the buildings that had already been built then I also continued building more structures to be placed into the gaps on the roads 09/05/13 I had completed design my buildings and then I began to place detail on the roads by adding painting yellow lines for the different sides of the streets.
  • 2. 10/05/13 I then added street lamps to the roads to make a more detailed walk down the street of my map I then changed some of the street lamps so they looked to be knocked over 15/05/13 I then added to the road a car that I designed from side and front models of a car that I got from Google images to help me create the vehicle. I also added bollards to the ends of each of the roads; this made it seem as if the roads had an end rather than them going on forever. 16/05/13 This day I decided to add more detail to the buildings and the roads I changed the design of the road by changing the yellow strips and making them smaller and adding more 17/05/13 I then decided to design a bus using the two images from Google to help me design the shade and the bus’ windows and doors. I also needed to get the height, length and width correct to be able to get the overall size of the bus and to make I correct.
  • 3. 22/05/13 I then designed a van using images from Google for the side and the front and back to be able to make a good designed 3D replica of a modern day van. 23/05/13 I then started to design a accessible room for a building so that it can be seen from the inside in my fly through. I began by making a room with some couches and tables. 24/05/13 When I had finish the interior of my room I started to create the door and the windows for the room so that they can be looked into on my fly through. 05/06/13 This is the finished room with the door and windows designed and added to the building. I then started to give my objects some colour to make them easier to texture when I start my fly through.
  • 4. 24/06/13 I have uploaded my environment into layout and I also have completed the fly through sequence. It starts and 0 and is at 25 frames per second and last until 900 frames. 24/06/13 I have finished the texturing for the scene and each object in the scene. This is a picture of the finished texture. I have completed the final textures for my objects in my scene and will begin rendering later on this year. 24/06/13 I have started to light my scene. When lighting my scene I noticed I needed more than one light to be able to capture all the main aspects of my environment.