SlideShare a Scribd company logo
1 of 19
Download to read offline
Building a multi-tier application using OpenStack (PackStack)
Gerard Braad me@gbraad.nl
To setup the environment quickly, we will be using PackStack. PackStack is an installation utility to quickly
deploy an OpenStack cloud. In our case we will use the all-in-one solutiion which allows a single node
environment to test deploying our multi-tier application.
Setup packstack environment
Use a RHEL or CentOS 7 installation.
$ systemctl disable NetworkManager
$ systemctl enable network
$ systemctl stop NetworkManager.service
$ systemctl start network.service
$ yum install -y https://www.rdoproject.org/repos/rdo-release.rpm
$ sudo yum update -y
$ sudo yum install -y openstack-packstack
$ packstack --allinone --os-neutron-lbaas-install=y
Check environment
In order to start using OpenStack, you’ll need to authenticate as a tenant. To do this, run the following
command in order to put the demo user’s credentials in your environment.
$ source ~/keystonerc_admin
The installation automatically creates two networks for you ‘private’ and ‘public’. The ‘public’ network we’ll
use to allocate floating ips out of later. Running openstack network list will show this.
$ openstack network list
+--------------------------------------+---------+--------------------------------------+
| ID | Name | Subnets |
+--------------------------------------+---------+--------------------------------------+
| 84aff6b0-2291-41b5-9871-d3d24906e358 | private | 92432fb8-8c29-4abe-98d8-de8bf161a18b |
| 427becab-54af-4b43-a5d2-e292b13b6a86 | public | 78eff45a-25f2-4904-bab8-a8795d9a7f9b |
+--------------------------------------+---------+--------------------------------------+
Setup security groups
First we’ll create the three security groups we’ll need to contain the members: web, database and ssh.
$ openstack security group create web
1
+-------------+--------------------------------------+
| Field | Value |
+-------------+--------------------------------------+
| description | web |
| id | a98fcd2f-a828-4a88-92aa-36e3c1223a92 |
| name | web |
| rules | [] |
| tenant_id | 3d44af649a1c42fcaa102ed11e3f010f |
+-------------+--------------------------------------+
$ openstack security group create database
+-------------+--------------------------------------+
| Field | Value |
+-------------+--------------------------------------+
| description | database |
| id | cf6c0380-e255-4ba8-9258-bb8e9c062fa7 |
| name | database |
| rules | [] |
| tenant_id | 3d44af649a1c42fcaa102ed11e3f010f |
+-------------+--------------------------------------+
$ openstack security group create ssh
+-------------+--------------------------------------+
| Field | Value |
+-------------+--------------------------------------+
| description | ssh |
| id | 141ed0d0-c004-457d-8efa-45e0fd2dc986 |
| name | ssh |
| rules | [] |
| tenant_id | 3d44af649a1c42fcaa102ed11e3f010f |
+-------------+--------------------------------------+
$ openstack security group list
+--------------------------------------+----------+------------------------+
| ID | Name | Description |
+--------------------------------------+----------+------------------------+
| cf6c0380-e255-4ba8-9258-bb8e9c062fa7 | database | database |
| 379b58b2-7ca3-431e-ae1f-cd6a627a9b30 | default | Default security group |
| 141ed0d0-c004-457d-8efa-45e0fd2dc986 | ssh | ssh |
| a98fcd2f-a828-4a88-92aa-36e3c1223a92 | web | web |
+--------------------------------------+----------+------------------------+
Now we’ll add rules into these security groups for their desired functionality.
Allow all HTTP traffic on port 80 to the web security group:
$ neutron security-group-rule-create --direction ingress --protocol TCP 
> --port-range-min 80 --port-range-max 80 web
2
Created a new security_group_rule:
+-------------------+--------------------------------------+
| Field | Value |
+-------------------+--------------------------------------+
| direction | ingress |
| ethertype | IPv4 |
| id | b293d93a-30c2-4854-a890-5ce65639f870 |
| port_range_max | 80 |
| port_range_min | 80 |
| protocol | tcp |
| remote_group_id | |
| remote_ip_prefix | |
| security_group_id | a98fcd2f-a828-4a88-92aa-36e3c1223a92 |
| tenant_id | 3d44af649a1c42fcaa102ed11e3f010f |
+-------------------+--------------------------------------+
Allow database servers to be accessed from the web servers:
$ neutron security-group-rule-create --direction ingress --protocol TCP 
> --port-range-min 3306 --port-range-max 3306 --remote-group-id web database
Created a new security_group_rule:
+-------------------+--------------------------------------+
| Field | Value |
+-------------------+--------------------------------------+
| direction | ingress |
| ethertype | IPv4 |
| id | dfc77fb6-48a0-41ca-9230-50c2cda27c63 |
| port_range_max | 3306 |
| port_range_min | 3306 |
| protocol | tcp |
| remote_group_id | a98fcd2f-a828-4a88-92aa-36e3c1223a92 |
| remote_ip_prefix | |
| security_group_id | cf6c0380-e255-4ba8-9258-bb8e9c062fa7 |
| tenant_id | 3d44af649a1c42fcaa102ed11e3f010f |
+-------------------+--------------------------------------+
Allow the jump host to ssh into both the database servers and webservers
$ neutron security-group-rule-create --direction ingress --protocol TCP 
> --port-range-min 22 --port-range-max 22 --remote-group-id ssh database
Created a new security_group_rule:
+-------------------+--------------------------------------+
| Field | Value |
+-------------------+--------------------------------------+
| direction | ingress |
| ethertype | IPv4 |
| id | 0c686a2c-304f-42be-9936-cdce46963d46 |
| port_range_max | 22 |
| port_range_min | 22 |
| protocol | tcp |
3
| remote_group_id | 141ed0d0-c004-457d-8efa-45e0fd2dc986 |
| remote_ip_prefix | |
| security_group_id | cf6c0380-e255-4ba8-9258-bb8e9c062fa7 |
| tenant_id | 3d44af649a1c42fcaa102ed11e3f010f |
+-------------------+--------------------------------------+
$ neutron security-group-rule-create --direction ingress --protocol TCP 
> --port-range-min 22 --port-range-max 22 --remote-group-id ssh web
Created a new security_group_rule:
+-------------------+--------------------------------------+
| Field | Value |
+-------------------+--------------------------------------+
| direction | ingress |
| ethertype | IPv4 |
| id | 919a6ede-8dfd-4184-bf2a-f07c0527d5bf |
| port_range_max | 22 |
| port_range_min | 22 |
| protocol | tcp |
| remote_group_id | 141ed0d0-c004-457d-8efa-45e0fd2dc986 |
| remote_ip_prefix | |
| security_group_id | a98fcd2f-a828-4a88-92aa-36e3c1223a92 |
| tenant_id | 3d44af649a1c42fcaa102ed11e3f010f |
+-------------------+--------------------------------------+
Allow the outside world to be able to ssh into the jump host on port 22:
$ neutron security-group-rule-create --direction ingress --protocol tcp 
> --port-range-min 22 --port-range-max 22 ssh
Created a new security_group_rule:
+-------------------+--------------------------------------+
| Field | Value |
+-------------------+--------------------------------------+
| direction | ingress |
| ethertype | IPv4 |
| id | fb8dcbe6-e553-4a92-aed4-aca7f086dca4 |
| port_range_max | 22 |
| port_range_min | 22 |
| protocol | tcp |
| remote_group_id | |
| remote_ip_prefix | |
| security_group_id | 141ed0d0-c004-457d-8efa-45e0fd2dc986 |
| tenant_id | 3d44af649a1c42fcaa102ed11e3f010f |
+-------------------+--------------------------------------+
Setup virtual machines
Now we can boot some virtual machines that will make use of these security groups. Run openstack net
work list to obtain the private network uuid that we are going to be using:
$ openstack network list
4
+--------------------------------------+---------+--------------------------------------+
| ID | Name | Subnets |
+--------------------------------------+---------+--------------------------------------+
| 427becab-54af-4b43-a5d2-e292b13b6a86 | public | 78eff45a-25f2-4904-bab8-a8795d9a7f9b |
| 84aff6b0-2291-41b5-9871-d3d24906e358 | private | 92432fb8-8c29-4abe-98d8-de8bf161a18b |
+--------------------------------------+---------+--------------------------------------+
Then, we’ll run openstack image list to determine the images available to boot our instances with. Since
we’re using packstack, the script automatically uploaded an image to glance for us to use.
$ openstack image list
+--------------------------------------+--------+
| ID | Name |
+--------------------------------------+--------+
| eea0e326-8e2e-41db-80a0-1138a4bdd5a6 | cirros |
+--------------------------------------+--------+
Overview In the next steps we will boot four instances:
• 2 web servers
• 1 database server
• 1 ssh jump host
We will be creating instances using the smallest flavor available.
$ openstack flavor list
+----+-----------+-------+------+-----------+-------+-----------+
| ID | Name | RAM | Disk | Ephemeral | VCPUs | Is Public |
+----+-----------+-------+------+-----------+-------+-----------+
| 1 | m1.tiny | 512 | 1 | 0 | 1 | True |
| 2 | m1.small | 2048 | 20 | 0 | 1 | True |
| 3 | m1.medium | 4096 | 40 | 0 | 2 | True |
| 4 | m1.large | 8192 | 80 | 0 | 4 | True |
| 5 | m1.xlarge | 16384 | 160 | 0 | 8 | True |
+----+-----------+-------+------+-----------+-------+-----------+
So we will be using flavor 1, which means instances are created with 512MB of memory and a disk of 1G.
Note:
We also have to make sure that each instances has an IP address on the private network. For this we are
including the --nic net-id= option specifying the network ID of the private network.
Setup web servers
Boot two instances named web_server1 and web_server2 on the private network using the cirros image
and part of the web security group:
$ nova boot --image cirros --nic net-id=84aff6b0-2291-41b5-9871-d3d24906e358 
> --security_groups web --flavor 1 web_server1
5
+--------------------------------------+-----------------------------------------------+
| Property | Value |
+--------------------------------------+-----------------------------------------------+
| OS-DCF:diskConfig | MANUAL |
| OS-EXT-AZ:availability_zone | |
| OS-EXT-SRV-ATTR:host | - |
| OS-EXT-SRV-ATTR:hypervisor_hostname | - |
| OS-EXT-SRV-ATTR:instance_name | instance-00000001 |
| OS-EXT-STS:power_state | 0 |
| OS-EXT-STS:task_state | scheduling |
| OS-EXT-STS:vm_state | building |
| OS-SRV-USG:launched_at | - |
| OS-SRV-USG:terminated_at | - |
| accessIPv4 | |
| accessIPv6 | |
| adminPass | rijM8RvVKXhd |
| config_drive | |
| created | 2016-02-25T08:21:23Z |
| flavor | m1.tiny (1) |
| hostId | |
| id | be6ec624-07cd-45c1-8260-211f1f2fd786 |
| image | cirros (eea0e326-8e2e-41db-80a0-1138a4bdd5a6) |
| key_name | - |
| metadata | {} |
| name | web_server1 |
| os-extended-volumes:volumes_attached | [] |
| progress | 0 |
| security_groups | web |
| status | BUILD |
| tenant_id | 3d44af649a1c42fcaa102ed11e3f010f |
| updated | 2016-02-25T08:21:24Z |
| user_id | a72ce317d35c47e8b8274995d0a2af92 |
+--------------------------------------+-----------------------------------------------+
$ nova boot --image cirros --nic net-id=84aff6b0-2291-41b5-9871-d3d24906e358 
> --security_groups web --flavor 1 web_server2
+--------------------------------------+-----------------------------------------------+
| Property | Value |
+--------------------------------------+-----------------------------------------------+
| OS-DCF:diskConfig | MANUAL |
| OS-EXT-AZ:availability_zone | |
| OS-EXT-SRV-ATTR:host | - |
| OS-EXT-SRV-ATTR:hypervisor_hostname | - |
| OS-EXT-SRV-ATTR:instance_name | instance-00000002 |
| OS-EXT-STS:power_state | 0 |
| OS-EXT-STS:task_state | scheduling |
| OS-EXT-STS:vm_state | building |
| OS-SRV-USG:launched_at | - |
| OS-SRV-USG:terminated_at | - |
| accessIPv4 | |
| accessIPv6 | |
| adminPass | vyT4575gsqth |
| config_drive | |
6
| created | 2016-02-25T08:22:53Z |
| flavor | m1.tiny (1) |
| hostId | |
| id | 146056ad-e8dc-4ad3-8765-97b753f3d040 |
| image | cirros (eea0e326-8e2e-41db-80a0-1138a4bdd5a6) |
| key_name | - |
| metadata | {} |
| name | web_server2 |
| os-extended-volumes:volumes_attached | [] |
| progress | 0 |
| security_groups | web |
| status | BUILD |
| tenant_id | 3d44af649a1c42fcaa102ed11e3f010f |
| updated | 2016-02-25T08:22:53Z |
| user_id | a72ce317d35c47e8b8274995d0a2af92 |
+--------------------------------------+-----------------------------------------------+
Setup database server
Boot database server
$ nova boot --image cirros --nic net-id=84aff6b0-2291-41b5-9871-d3d24906e358 
> --security_groups database --flavor 1 database_server
+--------------------------------------+-----------------------------------------------+
| Property | Value |
+--------------------------------------+-----------------------------------------------+
| OS-DCF:diskConfig | MANUAL |
| OS-EXT-AZ:availability_zone | |
| OS-EXT-SRV-ATTR:host | - |
| OS-EXT-SRV-ATTR:hypervisor_hostname | - |
| OS-EXT-SRV-ATTR:instance_name | instance-00000003 |
| OS-EXT-STS:power_state | 0 |
| OS-EXT-STS:task_state | scheduling |
| OS-EXT-STS:vm_state | building |
| OS-SRV-USG:launched_at | - |
| OS-SRV-USG:terminated_at | - |
| accessIPv4 | |
| accessIPv6 | |
| adminPass | 9GJgxdvz3eFQ |
| config_drive | |
| created | 2016-02-25T08:23:22Z |
| flavor | m1.tiny (1) |
| hostId | |
| id | d66ced0e-3aaf-4c14-8921-229ac6307ecd |
| image | cirros (eea0e326-8e2e-41db-80a0-1138a4bdd5a6) |
| key_name | - |
| metadata | {} |
| name | database_server |
| os-extended-volumes:volumes_attached | [] |
| progress | 0 |
| security_groups | database |
| status | BUILD |
7
| tenant_id | 3d44af649a1c42fcaa102ed11e3f010f |
| updated | 2016-02-25T08:23:22Z |
| user_id | a72ce317d35c47e8b8274995d0a2af92 |
+--------------------------------------+-----------------------------------------------+
Setup jumphost server
Boot ssh jump host
$ nova boot --image cirros --nic net-id=84aff6b0-2291-41b5-9871-d3d24906e358 
> --security_groups ssh --flavor 1 jumphost
+--------------------------------------+-----------------------------------------------+
| Property | Value |
+--------------------------------------+-----------------------------------------------+
| OS-DCF:diskConfig | MANUAL |
| OS-EXT-AZ:availability_zone | |
| OS-EXT-SRV-ATTR:host | - |
| OS-EXT-SRV-ATTR:hypervisor_hostname | - |
| OS-EXT-SRV-ATTR:instance_name | instance-00000004 |
| OS-EXT-STS:power_state | 0 |
| OS-EXT-STS:task_state | scheduling |
| OS-EXT-STS:vm_state | building |
| OS-SRV-USG:launched_at | - |
| OS-SRV-USG:terminated_at | - |
| accessIPv4 | |
| accessIPv6 | |
| adminPass | jwbUXkmfEK7Y |
| config_drive | |
| created | 2016-02-25T08:23:54Z |
| flavor | m1.tiny (1) |
| hostId | |
| id | e540896e-e148-414a-9588-3b83d3f2b059 |
| image | cirros (eea0e326-8e2e-41db-80a0-1138a4bdd5a6) |
| key_name | - |
| metadata | {} |
| name | jumphost |
| os-extended-volumes:volumes_attached | [] |
| progress | 0 |
| security_groups | ssh |
| status | BUILD |
| tenant_id | 3d44af649a1c42fcaa102ed11e3f010f |
| updated | 2016-02-25T08:23:54Z |
| user_id | a72ce317d35c47e8b8274995d0a2af92 |
+--------------------------------------+-----------------------------------------------+
Client
We will also create a client instance that we will use to access the web servers from.
Note: Since we did not specify a security group this instance will be part of a default security group which
allows the instance to make outgoing connections to anyone but only accept incoming connections from
members of this same security group.
8
$ nova boot --image cirros --nic net-id=84aff6b0-2291-41b5-9871-d3d24906e358 
> --flavor 1 client
+--------------------------------------+-----------------------------------------------+
| Property | Value |
+--------------------------------------+-----------------------------------------------+
| OS-DCF:diskConfig | MANUAL |
| OS-EXT-AZ:availability_zone | |
| OS-EXT-SRV-ATTR:host | - |
| OS-EXT-SRV-ATTR:hypervisor_hostname | - |
| OS-EXT-SRV-ATTR:instance_name | instance-00000005 |
| OS-EXT-STS:power_state | 0 |
| OS-EXT-STS:task_state | scheduling |
| OS-EXT-STS:vm_state | building |
| OS-SRV-USG:launched_at | - |
| OS-SRV-USG:terminated_at | - |
| accessIPv4 | |
| accessIPv6 | |
| adminPass | c63QG7iE3PrY |
| config_drive | |
| created | 2016-02-25T08:24:27Z |
| flavor | m1.tiny (1) |
| hostId | |
| id | 8e0179a3-6bf8-4c07-8035-f8916ca3183d |
| image | cirros (eea0e326-8e2e-41db-80a0-1138a4bdd5a6) |
| key_name | - |
| metadata | {} |
| name | client |
| os-extended-volumes:volumes_attached | [] |
| progress | 0 |
| security_groups | default |
| status | BUILD |
| tenant_id | 3d44af649a1c42fcaa102ed11e3f010f |
| updated | 2016-02-25T08:24:27Z |
| user_id | a72ce317d35c47e8b8274995d0a2af92 |
+--------------------------------------+-----------------------------------------------+
Check virtual machines
Running openstack server list will display the status of the instances. After a few seconds all of the
instances should go to an ACTIVE status.
$ openstack server list
+--------------------------------------+-----------------+--------+------------------+
| ID | Name | Status | Networks |
+--------------------------------------+-----------------+--------+------------------+
| 8e0179a3-6bf8-4c07-8035-f8916ca3183d | client | ACTIVE | private=10.0.0.7 |
| e540896e-e148-414a-9588-3b83d3f2b059 | jumphost | ACTIVE | private=10.0.0.6 |
| d66ced0e-3aaf-4c14-8921-229ac6307ecd | database_server | ACTIVE | private=10.0.0.5 |
| 146056ad-e8dc-4ad3-8765-97b753f3d040 | web_server2 | ACTIVE | private=10.0.0.4 |
| be6ec624-07cd-45c1-8260-211f1f2fd786 | web_server1 | ACTIVE | private=10.0.0.3 |
+--------------------------------------+-----------------+--------+------------------+
9
Setup public IP address for SSH
To make the jumphost publicly accessible on the internet we’ll need to assign a floating IP to it. To do this
first create a floating IP via:
$ neutron floatingip-create public
Created a new floatingip:
+---------------------+--------------------------------------+
| Field | Value |
+---------------------+--------------------------------------+
| fixed_ip_address | |
| floating_ip_address | 172.24.4.228 |
| floating_network_id | 427becab-54af-4b43-a5d2-e292b13b6a86 |
| id | ce6efd31-97e9-428b-a3ac-b5a14e77a305 |
| port_id | |
| router_id | |
| status | DOWN |
| tenant_id | 3d44af649a1c42fcaa102ed11e3f010f |
+---------------------+--------------------------------------+
Next, we need to determine the port id of the jumpbox:
$ neutron port-list
+--------------------------------------+------+-------------------+-------------------------------------
| id | name | mac_address | fixed_ips
+--------------------------------------+------+-------------------+-------------------------------------
| 551cf7bc-802f-4b02-bd3e-c44473ffb1ff | | fa:16:3e:48:a4:d1 | {"subnet_id": "78eff45a-25f2-4904-ba
| 5d98aa79-8bc0-4512-a128-078281aae2bc | | fa:16:3e:0d:4b:55 | {"subnet_id": "92432fb8-8c29-4abe-98
| 6aab05f6-9176-48b4-9b0f-113593945593 | | fa:16:3e:2d:b6:a4 | {"subnet_id": "92432fb8-8c29-4abe-98
| 8941a204-08e7-4547-b720-f9840358929b | | fa:16:3e:5b:a3:c7 | {"subnet_id": "78eff45a-25f2-4904-ba
| 9bd695dc-4e6c-40c5-952d-44269711bd6c | | fa:16:3e:9e:36:8f | {"subnet_id": "92432fb8-8c29-4abe-98
| afd18b4f-c19f-4c03-a049-fe8aeae7da49 | | fa:16:3e:ac:94:5e | {"subnet_id": "92432fb8-8c29-4abe-98
| e63d8edb-f10c-4776-a10e-cba9ec3f3d56 | | fa:16:3e:d4:9c:57 | {"subnet_id": "92432fb8-8c29-4abe-98
| f0d35941-989c-4f2b-b187-872445b0b653 | | fa:16:3e:0c:7f:d5 | {"subnet_id": "92432fb8-8c29-4abe-98
| f9e097b4-4227-49ee-9442-643c4186e587 | | fa:16:3e:a5:36:2c | {"subnet_id": "92432fb8-8c29-4abe-98
+--------------------------------------+------+-------------------+-------------------------------------
and find the id that matches the IP address of the jumphost (10.0.0.6) and associate it via:
# neutron floatingip-associate [floating_ip id] [port-list id]
$ neutron floatingip-associate ce6efd31-97e9-428b-a3ac-b5a14e77a305 
> 5d98aa79-8bc0-4512-a128-078281aae2bc
Associated floating IP ce6efd31-97e9-428b-a3ac-b5a14e77a305
$ neutron floatingip-list
+--------------------------------------+------------------+---------------------+-----------------------
| id | fixed_ip_address | floating_ip_address | port_id
+--------------------------------------+------------------+---------------------+-----------------------
| ce6efd31-97e9-428b-a3ac-b5a14e77a305 | 10.0.0.6 | 172.24.4.228 | 5d98aa79-8bc0-4512-a12
+--------------------------------------+------------------+---------------------+-----------------------
10
Verify SSH connectivity
Now you should be able to ssh to the jumbox via with password cubswin:) :
$ ssh cirros@172.24.4.228
The authenticity of host ’172.24.4.3 (172.24.4.3)’ can’t be established.
RSA key fingerprint is 8b:90:ae:9c:eb:be:83:ae:3c:33:fe:84:7a:88:12:d1.
Are you sure you want to continue connecting (yes/no)? yes
Warning: Permanently added ’172.24.4.3’ (RSA) to the list of known hosts.
cirros@172.24.4.3’s password:
$
After logging into the jumpbox you’ll be able to ssh into your webserver1, webserver2, and database server
via:
$ ssh 10.0.0.3
Host ’10.0.0.3’ is not in the trusted hosts file.
(fingerprint md5 e7:c3:d2:93:0b:eb:65:6d:e6:01:2e:b3:e6:72:fd:c0)
Do you want to continue connecting? (y/n) y
cirros@10.0.0.3’s password:
$ exit
$ ssh 10.0.0.4
...
$ ssh 10.0.0.5
...
None of those instances will be able to ssh to each other. The point of this instance is so that you do not
need to have all of your other instances publicly addressable and directly accessible via the internet.
Simulate web server
Now let’s log in to web_server1 and web_server2 (via ssh or via horizon) and setup a simple web server to
handle requests and reply with who they are:
# On web_server 1 (10.0.0.3)
$ while true; do echo -e ’HTTP/1.0 200 OKrnrn’‘hostname‘ | sudo nc -l -p 80 ; done &
$ exit
# on web_server 2 (10.0.0.4)
$ while true; do echo -e ’HTTP/1.0 200 OKrnrn’‘hostname‘ | sudo nc -l -p 80 ; done &
$ exit
11
Simulate HTTP request
Now, log in to your client virtual machine (from the web console). From there if you run:
$ wget -O - http://10.0.0.3/
Connecting to 10.0.0.3 (10.0.0.3:80)
web-server1
100% |************************************| 12 0:00:00 ETA
$ wget -O - http://10.0.0.4/
Connecting to 10.0.0.4 (10.0.0.4:80)
web-server2
100% |************************************| 12 0:00:00 ETA
This demonstrates that our simple web server is working on our two web server instances.
Optional check
We can demonstrate that the web security group is working correctly by killing our simple web server and
changing the port number. (Note: to kill the web server you may need to hold control + c for a second in
order for it to break out of the while loop before another instance of nc is created.)
# On web_server 1
$ while true; do echo -e ’HTTP/1.0 200 OKrnrn’‘hostname‘ | sudo nc -l -p 81 ; done &
Now on the client run:
$ wget -O - http://10.0.0.3:81
Connecting to 10.0.0.3 (10.0.0.3:81)
wget: can’t connect to remote host (10.0.0.3): Connection timed out
As you can see the request is never answered as expected because our web security group does not allow port
81 ingress. Now let’s set the web server to run on port 80 again.
Provision loadbalancer
At this point were going to provision loadbalancer via neutron in order to load balance requests between our
two web server instances.
$ neutron subnet-list
+--------------------------------------+----------------+-----------------+-----------------------------
| id | name | cidr | allocation_pools
+--------------------------------------+----------------+-----------------+-----------------------------
| 78eff45a-25f2-4904-bab8-a8795d9a7f9b | public_subnet | 172.24.4.224/28 | {"start": "172.24.4.226", "e
| 92432fb8-8c29-4abe-98d8-de8bf161a18b | private_subnet | 10.0.0.0/24 | {"start": "10.0.0.2", "end":
+--------------------------------------+----------------+-----------------+-----------------------------
12
Create a loadbalancer pool:
$ neutron lb-pool-create --name http-pool --lb-method ROUND_ROBIN 
> --protocol HTTP --subnet-id 92432fb8-8c29-4abe-98d8-de8bf161a18b
Created a new pool:
+------------------------+--------------------------------------+
| Field | Value |
+------------------------+--------------------------------------+
| admin_state_up | True |
| description | |
| health_monitors | |
| health_monitors_status | |
| id | 51ca1962-a24a-4f43-920f-162a03a45c51 |
| lb_method | ROUND_ROBIN |
| members | |
| name | http-pool |
| protocol | HTTP |
| provider | haproxy |
| status | PENDING_CREATE |
| status_description | |
| subnet_id | 92432fb8-8c29-4abe-98d8-de8bf161a18b |
| tenant_id | 3d44af649a1c42fcaa102ed11e3f010f |
| vip_id | |
+------------------------+--------------------------------------+
You can verify the creation of the http-pool with the neutron lb-pool-list and neutron lb-pool-show
http-pool command.
$ neutron lb-pool-list
+--------------------------------------+-----------+----------+-------------+----------+----------------
| id | name | provider | lb_method | protocol | admin_state_up
+--------------------------------------+-----------+----------+-------------+----------+----------------
| 51ca1962-a24a-4f43-920f-162a03a45c51 | http-pool | haproxy | ROUND_ROBIN | HTTP | True
+--------------------------------------+-----------+----------+-------------+----------+----------------
$ neutron lb-pool-show http-pool
+------------------------+--------------------------------------+
| Field | Value |
+------------------------+--------------------------------------+
| admin_state_up | True |
| description | |
| health_monitors | |
| health_monitors_status | |
| id | 51ca1962-a24a-4f43-920f-162a03a45c51 |
| lb_method | ROUND_ROBIN |
| members | |
| name | http-pool |
| protocol | HTTP |
| provider | haproxy |
13
| status | ACTIVE |
| status_description | |
| subnet_id | 92432fb8-8c29-4abe-98d8-de8bf161a18b |
| tenant_id | 3d44af649a1c42fcaa102ed11e3f010f |
| vip_id | |
+------------------------+--------------------------------------+
Now, let’s create a health monitor, which checks to make sure our instances are still running and associate
that with the pool:
$ neutron lbaas-healthmonitor-create --delay 3 --type HTTP --max-retries 3 
> --timeout 3 --pool webserver-pool
Adding loadbalancer members
$ neutron lb-member-create --address 10.0.0.3 --protocol-port 80 http-pool
Created a new member:
+--------------------+--------------------------------------+
| Field | Value |
+--------------------+--------------------------------------+
| address | 10.0.0.3 |
| admin_state_up | True |
| id | 36b01f84-a273-417f-9588-15cceea18868 |
| pool_id | 51ca1962-a24a-4f43-920f-162a03a45c51 |
| protocol_port | 80 |
| status | PENDING_CREATE |
| status_description | |
| tenant_id | 3d44af649a1c42fcaa102ed11e3f010f |
| weight | 1 |
+--------------------+--------------------------------------+
$ neutron lb-member-create --address 10.0.0.4 --protocol-port 80 http-pool
Created a new member:
+--------------------+--------------------------------------+
| Field | Value |
+--------------------+--------------------------------------+
| address | 10.0.0.4 |
| admin_state_up | True |
| id | 5d68b992-d09f-408b-8049-353e702cc990 |
| pool_id | 51ca1962-a24a-4f43-920f-162a03a45c51 |
| protocol_port | 80 |
| status | PENDING_CREATE |
| status_description | |
| tenant_id | 3d44af649a1c42fcaa102ed11e3f010f |
| weight | 1 |
+--------------------+--------------------------------------+
After this you can verify the nodes have been added to the loadbalancer pool.
$ neutron lb-member-list
14
+--------------------------------------+----------+---------------+--------+----------------+--------+
| id | address | protocol_port | weight | admin_state_up | status |
+--------------------------------------+----------+---------------+--------+----------------+--------+
| 36b01f84-a273-417f-9588-15cceea18868 | 10.0.0.3 | 80 | 1 | True | ACTIVE |
| 5d68b992-d09f-408b-8049-353e702cc990 | 10.0.0.4 | 80 | 1 | True | ACTIVE |
+--------------------------------------+----------+---------------+--------+----------------+--------+
Add healthmonitor
We need to create a health monitor, which will check our instances to make sure they are still running
$ neutron lb-healthmonitor-create --delay 3 --type HTTP --max-retries 3 
> --timeout 3
Created a new health_monitor:
+----------------+--------------------------------------+
| Field | Value |
+----------------+--------------------------------------+
| admin_state_up | True |
| delay | 3 |
| expected_codes | 200 |
| http_method | GET |
| id | 05cbf7f9-d01b-483b-934e-8955b14a1653 |
| max_retries | 3 |
| pools | |
| tenant_id | 3d44af649a1c42fcaa102ed11e3f010f |
| timeout | 3 |
| type | HTTP |
| url_path | / |
+----------------+--------------------------------------+
Now we have to associate the health monitor to the previously created loadbalancer pool.
$ neutron lb-healthmonitor-associate 05cbf7f9-d01b-483b-934e-8955b14a1653 http-pool
Associated health monitor 05cbf7f9-d01b-483b-934e-8955b14a1653
To make the loadbalancer and associated health monitor available, we need to assign it a Virual IP. The
address will be allocated from the private subnet. This address will redirect the request to either instance
within the pool to handle the request.
$ neutron lb-vip-create --name webserver-vip --protocol-port 80 
> --protocol HTTP --subnet-id 92432fb8-8c29-4abe-98d8-de8bf161a18b http-pool
Created a new vip:
+---------------------+--------------------------------------+
| Field | Value |
+---------------------+--------------------------------------+
| address | 10.0.0.8 |
| admin_state_up | True |
| connection_limit | -1 |
15
| description | |
| id | b9ca33b0-b09c-4e7d-8ab7-77fe5207add6 |
| name | webserver-vip |
| pool_id | 51ca1962-a24a-4f43-920f-162a03a45c51 |
| port_id | ecbadc53-5266-4146-bbb3-d1b6d383be10 |
| protocol | HTTP |
| protocol_port | 80 |
| session_persistence | |
| status | PENDING_CREATE |
| status_description | |
| subnet_id | 92432fb8-8c29-4abe-98d8-de8bf161a18b |
| tenant_id | 3d44af649a1c42fcaa102ed11e3f010f |
+---------------------+--------------------------------------+
Verify loadbalancer
Finally, let’s test out the loadbalancer. From the client instance we should be able to run wget at 10.0.0.8
and see that it loadbalancers our requests.
$ for i in $(seq 1 4) ; do wget -O - http://10.0.0.8/ ; done
Connecting to 10.0.0.8 (10.0.0.8:80)
web-server1
- 100% |************************************| 12 0:00:00 ETA
Connecting to 10.0.0.8 (10.0.0.8:80)
web-server2
- 100% |************************************| 12 0:00:00 ETA
Connecting to 10.0.0.8 (10.0.0.8:80)
web-server1
- 100% |************************************| 12 0:00:00 ETA
Connecting to 10.0.0.8 (10.0.0.8:80)
web-server2
- 100% |************************************| 12 0:00:00 ETA
From the output above you can see that the the requests are being handled by web_server1 then web_server2
in an alternating fashion according to the round robin method.
Setup public IP address for web traffic
Now to make our VIP publicly accessible via the internet we need to create another floating IP:
$ neutron floatingip-create public
Created a new floatingip:
+---------------------+--------------------------------------+
| Field | Value |
+---------------------+--------------------------------------+
| fixed_ip_address | |
| floating_ip_address | 172.24.4.229 |
| floating_network_id | 427becab-54af-4b43-a5d2-e292b13b6a86 |
| id | 3c15f8a4-bdc6-4154-8bfa-e8b0674079ca |
16
| port_id | |
| router_id | |
| status | DOWN |
| tenant_id | 3d44af649a1c42fcaa102ed11e3f010f |
+---------------------+--------------------------------------+
Determine the port_id for the Virtual IP we created earlier:
$ neutron port-list
+--------------------------------------+------------------------------------------+-------------------+-
| id | name | mac_address |
+--------------------------------------+------------------------------------------+-------------------+-
| 54b17392-dce7-4d6a-8cce-153fccb5d441 | | fa:16:3e:f0:c7:cf |
| 551cf7bc-802f-4b02-bd3e-c44473ffb1ff | | fa:16:3e:48:a4:d1 |
| 5d98aa79-8bc0-4512-a128-078281aae2bc | | fa:16:3e:0d:4b:55 |
| 6aab05f6-9176-48b4-9b0f-113593945593 | | fa:16:3e:2d:b6:a4 |
| 8941a204-08e7-4547-b720-f9840358929b | | fa:16:3e:5b:a3:c7 |
| 9bd695dc-4e6c-40c5-952d-44269711bd6c | | fa:16:3e:9e:36:8f |
| afd18b4f-c19f-4c03-a049-fe8aeae7da49 | | fa:16:3e:ac:94:5e |
| e63d8edb-f10c-4776-a10e-cba9ec3f3d56 | | fa:16:3e:d4:9c:57 |
| ecbadc53-5266-4146-bbb3-d1b6d383be10 | vip-b9ca33b0-b09c-4e7d-8ab7-77fe5207add6 | fa:16:3e:41:1a:eb |
| f0d35941-989c-4f2b-b187-872445b0b653 | | fa:16:3e:0c:7f:d5 |
| f9e097b4-4227-49ee-9442-643c4186e587 | | fa:16:3e:a5:36:2c |
+--------------------------------------+------------------------------------------+-------------------+-
Associate VIP port with floating IP:
$ neutron floatingip-associate 3c15f8a4-bdc6-4154-8bfa-e8b0674079ca 
> ecbadc53-5266-4146-bbb3-d1b6d383be10
Associated floating IP 3c15f8a4-bdc6-4154-8bfa-e8b0674079ca
At this point the Virtual IP is a member of the default security group which does not allow ingress traffic
unless you are also part of a security group which allows incoming traffic. We need to update the VIP to be
a member of the web security group so that requests from the internet are allowed to pass (not just from our
client instance).
Get the web security group uuid:
$ neutron security-group-list
+--------------------------------------+----------+-----------------------------------------------------
| id | name | security_group_rules
+--------------------------------------+----------+-----------------------------------------------------
| 141ed0d0-c004-457d-8efa-45e0fd2dc986 | ssh | egress, IPv4
| | | egress, IPv6
| | | ingress, IPv4, 22/tcp
| 379b58b2-7ca3-431e-ae1f-cd6a627a9b30 | default | egress, IPv4
| | | egress, IPv6
| | | ingress, IPv4, remote_group_id: 379b58b2-7ca3-431e-a
| | | ingress, IPv6, remote_group_id: 379b58b2-7ca3-431e-a
17
| 5e0d0d57-2df6-4fbc-ad18-5908aacdf799 | default | egress, IPv4
| | | egress, IPv6
| | | ingress, IPv4, remote_group_id: 5e0d0d57-2df6-4fbc-a
| | | ingress, IPv6, remote_group_id: 5e0d0d57-2df6-4fbc-a
| a98fcd2f-a828-4a88-92aa-36e3c1223a92 | web | egress, IPv4
| | | egress, IPv6
| | | ingress, IPv4, 22/tcp, remote_group_id: 141ed0d0-c00
| | | ingress, IPv4, 80/tcp
| b2c914cb-3bc1-4ee6-9f30-66c459af5f4c | default | egress, IPv4
| | | egress, IPv6
| | | ingress, IPv4, remote_group_id: b2c914cb-3bc1-4ee6-9
| | | ingress, IPv6, remote_group_id: b2c914cb-3bc1-4ee6-9
| cf6c0380-e255-4ba8-9258-bb8e9c062fa7 | database | egress, IPv4
| | | egress, IPv6
| | | ingress, IPv4, 22/tcp, remote_group_id: 141ed0d0-c00
| | | ingress, IPv4, 3306/tcp, remote_group_id: a98fcd2f-a
+--------------------------------------+----------+-----------------------------------------------------
Update VIP port to be a member of the web security group:
$ neutron port-update ecbadc53-5266-4146-bbb3-d1b6d383be10 --security_groups 
> list=true a98fcd2f-a828-4a88-92aa-36e3c1223a92
Updated port: ecbadc53-5266-4146-bbb3-d1b6d383be10
Verify loadbalancer
At this point your VIP is publicly addressable:
$ for i in $(seq 1 4) ; do wget -O - http://172.24.4.229/ ; done
Connecting to 172.24.4.229 (172.24.4.229:80)
web-server1
- 100% |************************************| 12 0:00:00 ETA
Connecting to 172.24.4.229 (172.24.4.229:80)
web-server2
- 100% |************************************| 12 0:00:00 ETA
Connecting to 172.24.4.229 (172.24.4.229:80)
web-server1
- 100% |************************************| 12 0:00:00 ETA
Connecting to 172.24.4.229 (172.24.4.229:80)
web-server2
- 100% |************************************| 12 0:00:00 ETA
To demonstration high availability, we’ll go and delete our web_server1 instance to simulate a failure.
$ openstack server delete web_server1
After the health monitor detects the host is not responding it will stop sending requests to web_server1.
Now web_server2 is handling all the requests.
18
$ for i in $(seq 1 4) ; do wget -O - http://172.24.4.229/ ; done
Connecting to 172.24.4.229 (172.24.4.229:80)
web-server2
- 100% |************************************| 12 0:00:00 ETA
Connecting to 172.24.4.229 (172.24.4.229:80)
web-server2
- 100% |************************************| 12 0:00:00 ETA
Connecting to 172.24.4.229 (172.24.4.229:80)
web-server2
- 100% |************************************| 12 0:00:00 ETA
Connecting to 172.24.4.229 (172.24.4.229:80)
web-server2
- 100% |************************************| 12 0:00:00 ETA
Note: the first request might take longer to handle. This is because of the timeout before it notices the host
is not responding.
This work is licensed under a Creative Commons Attribution-ShareAlike 4.0 International License.
19

More Related Content

More from Gerard Braad

Cultural dimensions - Asia
Cultural dimensions - AsiaCultural dimensions - Asia
Cultural dimensions - AsiaGerard Braad
 
'Continuous Integration / Continuous Deployment' using Docker to achieve Cons...
'Continuous Integration / Continuous Deployment' using Docker to achieve Cons...'Continuous Integration / Continuous Deployment' using Docker to achieve Cons...
'Continuous Integration / Continuous Deployment' using Docker to achieve Cons...Gerard Braad
 
F19 slidedeck (OpenStack^H^H^H^Hhift, what the)
F19 slidedeck (OpenStack^H^H^H^Hhift, what the)F19 slidedeck (OpenStack^H^H^H^Hhift, what the)
F19 slidedeck (OpenStack^H^H^H^Hhift, what the)Gerard Braad
 
MeeGo on ARM (preview)
MeeGo on ARM (preview)MeeGo on ARM (preview)
MeeGo on ARM (preview)Gerard Braad
 

More from Gerard Braad (6)

Cultural dimensions - Asia
Cultural dimensions - AsiaCultural dimensions - Asia
Cultural dimensions - Asia
 
'Continuous Integration / Continuous Deployment' using Docker to achieve Cons...
'Continuous Integration / Continuous Deployment' using Docker to achieve Cons...'Continuous Integration / Continuous Deployment' using Docker to achieve Cons...
'Continuous Integration / Continuous Deployment' using Docker to achieve Cons...
 
F/OSS slidedeck
F/OSS slidedeckF/OSS slidedeck
F/OSS slidedeck
 
F19 slidedeck (OpenStack^H^H^H^Hhift, what the)
F19 slidedeck (OpenStack^H^H^H^Hhift, what the)F19 slidedeck (OpenStack^H^H^H^Hhift, what the)
F19 slidedeck (OpenStack^H^H^H^Hhift, what the)
 
MeeGo on ARM (preview)
MeeGo on ARM (preview)MeeGo on ARM (preview)
MeeGo on ARM (preview)
 
.NET Introduction
.NET Introduction.NET Introduction
.NET Introduction
 

Recently uploaded

What's New in Teams Calling, Meetings and Devices March 2024
What's New in Teams Calling, Meetings and Devices March 2024What's New in Teams Calling, Meetings and Devices March 2024
What's New in Teams Calling, Meetings and Devices March 2024Stephanie Beckett
 
Passkey Providers and Enabling Portability: FIDO Paris Seminar.pptx
Passkey Providers and Enabling Portability: FIDO Paris Seminar.pptxPasskey Providers and Enabling Portability: FIDO Paris Seminar.pptx
Passkey Providers and Enabling Portability: FIDO Paris Seminar.pptxLoriGlavin3
 
TeamStation AI System Report LATAM IT Salaries 2024
TeamStation AI System Report LATAM IT Salaries 2024TeamStation AI System Report LATAM IT Salaries 2024
TeamStation AI System Report LATAM IT Salaries 2024Lonnie McRorey
 
The State of Passkeys with FIDO Alliance.pptx
The State of Passkeys with FIDO Alliance.pptxThe State of Passkeys with FIDO Alliance.pptx
The State of Passkeys with FIDO Alliance.pptxLoriGlavin3
 
Transcript: New from BookNet Canada for 2024: Loan Stars - Tech Forum 2024
Transcript: New from BookNet Canada for 2024: Loan Stars - Tech Forum 2024Transcript: New from BookNet Canada for 2024: Loan Stars - Tech Forum 2024
Transcript: New from BookNet Canada for 2024: Loan Stars - Tech Forum 2024BookNet Canada
 
Nell’iperspazio con Rocket: il Framework Web di Rust!
Nell’iperspazio con Rocket: il Framework Web di Rust!Nell’iperspazio con Rocket: il Framework Web di Rust!
Nell’iperspazio con Rocket: il Framework Web di Rust!Commit University
 
SALESFORCE EDUCATION CLOUD | FEXLE SERVICES
SALESFORCE EDUCATION CLOUD | FEXLE SERVICESSALESFORCE EDUCATION CLOUD | FEXLE SERVICES
SALESFORCE EDUCATION CLOUD | FEXLE SERVICESmohitsingh558521
 
New from BookNet Canada for 2024: Loan Stars - Tech Forum 2024
New from BookNet Canada for 2024: Loan Stars - Tech Forum 2024New from BookNet Canada for 2024: Loan Stars - Tech Forum 2024
New from BookNet Canada for 2024: Loan Stars - Tech Forum 2024BookNet Canada
 
SAP Build Work Zone - Overview L2-L3.pptx
SAP Build Work Zone - Overview L2-L3.pptxSAP Build Work Zone - Overview L2-L3.pptx
SAP Build Work Zone - Overview L2-L3.pptxNavinnSomaal
 
What is DBT - The Ultimate Data Build Tool.pdf
What is DBT - The Ultimate Data Build Tool.pdfWhat is DBT - The Ultimate Data Build Tool.pdf
What is DBT - The Ultimate Data Build Tool.pdfMounikaPolabathina
 
Connect Wave/ connectwave Pitch Deck Presentation
Connect Wave/ connectwave Pitch Deck PresentationConnect Wave/ connectwave Pitch Deck Presentation
Connect Wave/ connectwave Pitch Deck PresentationSlibray Presentation
 
The Fit for Passkeys for Employee and Consumer Sign-ins: FIDO Paris Seminar.pptx
The Fit for Passkeys for Employee and Consumer Sign-ins: FIDO Paris Seminar.pptxThe Fit for Passkeys for Employee and Consumer Sign-ins: FIDO Paris Seminar.pptx
The Fit for Passkeys for Employee and Consumer Sign-ins: FIDO Paris Seminar.pptxLoriGlavin3
 
Dev Dives: Streamline document processing with UiPath Studio Web
Dev Dives: Streamline document processing with UiPath Studio WebDev Dives: Streamline document processing with UiPath Studio Web
Dev Dives: Streamline document processing with UiPath Studio WebUiPathCommunity
 
Generative AI for Technical Writer or Information Developers
Generative AI for Technical Writer or Information DevelopersGenerative AI for Technical Writer or Information Developers
Generative AI for Technical Writer or Information DevelopersRaghuram Pandurangan
 
DevEX - reference for building teams, processes, and platforms
DevEX - reference for building teams, processes, and platformsDevEX - reference for building teams, processes, and platforms
DevEX - reference for building teams, processes, and platformsSergiu Bodiu
 
A Deep Dive on Passkeys: FIDO Paris Seminar.pptx
A Deep Dive on Passkeys: FIDO Paris Seminar.pptxA Deep Dive on Passkeys: FIDO Paris Seminar.pptx
A Deep Dive on Passkeys: FIDO Paris Seminar.pptxLoriGlavin3
 
Ensuring Technical Readiness For Copilot in Microsoft 365
Ensuring Technical Readiness For Copilot in Microsoft 365Ensuring Technical Readiness For Copilot in Microsoft 365
Ensuring Technical Readiness For Copilot in Microsoft 3652toLead Limited
 
Moving Beyond Passwords: FIDO Paris Seminar.pdf
Moving Beyond Passwords: FIDO Paris Seminar.pdfMoving Beyond Passwords: FIDO Paris Seminar.pdf
Moving Beyond Passwords: FIDO Paris Seminar.pdfLoriGlavin3
 
From Family Reminiscence to Scholarly Archive .
From Family Reminiscence to Scholarly Archive .From Family Reminiscence to Scholarly Archive .
From Family Reminiscence to Scholarly Archive .Alan Dix
 

Recently uploaded (20)

What's New in Teams Calling, Meetings and Devices March 2024
What's New in Teams Calling, Meetings and Devices March 2024What's New in Teams Calling, Meetings and Devices March 2024
What's New in Teams Calling, Meetings and Devices March 2024
 
Passkey Providers and Enabling Portability: FIDO Paris Seminar.pptx
Passkey Providers and Enabling Portability: FIDO Paris Seminar.pptxPasskey Providers and Enabling Portability: FIDO Paris Seminar.pptx
Passkey Providers and Enabling Portability: FIDO Paris Seminar.pptx
 
TeamStation AI System Report LATAM IT Salaries 2024
TeamStation AI System Report LATAM IT Salaries 2024TeamStation AI System Report LATAM IT Salaries 2024
TeamStation AI System Report LATAM IT Salaries 2024
 
The State of Passkeys with FIDO Alliance.pptx
The State of Passkeys with FIDO Alliance.pptxThe State of Passkeys with FIDO Alliance.pptx
The State of Passkeys with FIDO Alliance.pptx
 
Transcript: New from BookNet Canada for 2024: Loan Stars - Tech Forum 2024
Transcript: New from BookNet Canada for 2024: Loan Stars - Tech Forum 2024Transcript: New from BookNet Canada for 2024: Loan Stars - Tech Forum 2024
Transcript: New from BookNet Canada for 2024: Loan Stars - Tech Forum 2024
 
Nell’iperspazio con Rocket: il Framework Web di Rust!
Nell’iperspazio con Rocket: il Framework Web di Rust!Nell’iperspazio con Rocket: il Framework Web di Rust!
Nell’iperspazio con Rocket: il Framework Web di Rust!
 
SALESFORCE EDUCATION CLOUD | FEXLE SERVICES
SALESFORCE EDUCATION CLOUD | FEXLE SERVICESSALESFORCE EDUCATION CLOUD | FEXLE SERVICES
SALESFORCE EDUCATION CLOUD | FEXLE SERVICES
 
New from BookNet Canada for 2024: Loan Stars - Tech Forum 2024
New from BookNet Canada for 2024: Loan Stars - Tech Forum 2024New from BookNet Canada for 2024: Loan Stars - Tech Forum 2024
New from BookNet Canada for 2024: Loan Stars - Tech Forum 2024
 
SAP Build Work Zone - Overview L2-L3.pptx
SAP Build Work Zone - Overview L2-L3.pptxSAP Build Work Zone - Overview L2-L3.pptx
SAP Build Work Zone - Overview L2-L3.pptx
 
What is DBT - The Ultimate Data Build Tool.pdf
What is DBT - The Ultimate Data Build Tool.pdfWhat is DBT - The Ultimate Data Build Tool.pdf
What is DBT - The Ultimate Data Build Tool.pdf
 
DMCC Future of Trade Web3 - Special Edition
DMCC Future of Trade Web3 - Special EditionDMCC Future of Trade Web3 - Special Edition
DMCC Future of Trade Web3 - Special Edition
 
Connect Wave/ connectwave Pitch Deck Presentation
Connect Wave/ connectwave Pitch Deck PresentationConnect Wave/ connectwave Pitch Deck Presentation
Connect Wave/ connectwave Pitch Deck Presentation
 
The Fit for Passkeys for Employee and Consumer Sign-ins: FIDO Paris Seminar.pptx
The Fit for Passkeys for Employee and Consumer Sign-ins: FIDO Paris Seminar.pptxThe Fit for Passkeys for Employee and Consumer Sign-ins: FIDO Paris Seminar.pptx
The Fit for Passkeys for Employee and Consumer Sign-ins: FIDO Paris Seminar.pptx
 
Dev Dives: Streamline document processing with UiPath Studio Web
Dev Dives: Streamline document processing with UiPath Studio WebDev Dives: Streamline document processing with UiPath Studio Web
Dev Dives: Streamline document processing with UiPath Studio Web
 
Generative AI for Technical Writer or Information Developers
Generative AI for Technical Writer or Information DevelopersGenerative AI for Technical Writer or Information Developers
Generative AI for Technical Writer or Information Developers
 
DevEX - reference for building teams, processes, and platforms
DevEX - reference for building teams, processes, and platformsDevEX - reference for building teams, processes, and platforms
DevEX - reference for building teams, processes, and platforms
 
A Deep Dive on Passkeys: FIDO Paris Seminar.pptx
A Deep Dive on Passkeys: FIDO Paris Seminar.pptxA Deep Dive on Passkeys: FIDO Paris Seminar.pptx
A Deep Dive on Passkeys: FIDO Paris Seminar.pptx
 
Ensuring Technical Readiness For Copilot in Microsoft 365
Ensuring Technical Readiness For Copilot in Microsoft 365Ensuring Technical Readiness For Copilot in Microsoft 365
Ensuring Technical Readiness For Copilot in Microsoft 365
 
Moving Beyond Passwords: FIDO Paris Seminar.pdf
Moving Beyond Passwords: FIDO Paris Seminar.pdfMoving Beyond Passwords: FIDO Paris Seminar.pdf
Moving Beyond Passwords: FIDO Paris Seminar.pdf
 
From Family Reminiscence to Scholarly Archive .
From Family Reminiscence to Scholarly Archive .From Family Reminiscence to Scholarly Archive .
From Family Reminiscence to Scholarly Archive .
 

Building mult-itier application using OpenStack (PackStack)

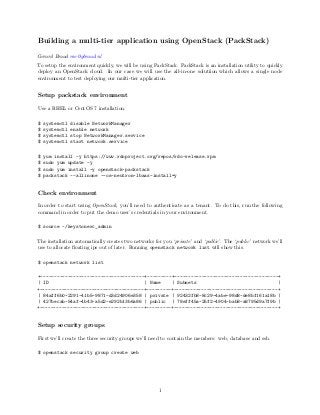
  • 1. Building a multi-tier application using OpenStack (PackStack) Gerard Braad me@gbraad.nl To setup the environment quickly, we will be using PackStack. PackStack is an installation utility to quickly deploy an OpenStack cloud. In our case we will use the all-in-one solutiion which allows a single node environment to test deploying our multi-tier application. Setup packstack environment Use a RHEL or CentOS 7 installation. $ systemctl disable NetworkManager $ systemctl enable network $ systemctl stop NetworkManager.service $ systemctl start network.service $ yum install -y https://www.rdoproject.org/repos/rdo-release.rpm $ sudo yum update -y $ sudo yum install -y openstack-packstack $ packstack --allinone --os-neutron-lbaas-install=y Check environment In order to start using OpenStack, you’ll need to authenticate as a tenant. To do this, run the following command in order to put the demo user’s credentials in your environment. $ source ~/keystonerc_admin The installation automatically creates two networks for you ‘private’ and ‘public’. The ‘public’ network we’ll use to allocate floating ips out of later. Running openstack network list will show this. $ openstack network list +--------------------------------------+---------+--------------------------------------+ | ID | Name | Subnets | +--------------------------------------+---------+--------------------------------------+ | 84aff6b0-2291-41b5-9871-d3d24906e358 | private | 92432fb8-8c29-4abe-98d8-de8bf161a18b | | 427becab-54af-4b43-a5d2-e292b13b6a86 | public | 78eff45a-25f2-4904-bab8-a8795d9a7f9b | +--------------------------------------+---------+--------------------------------------+ Setup security groups First we’ll create the three security groups we’ll need to contain the members: web, database and ssh. $ openstack security group create web 1
  • 2. +-------------+--------------------------------------+ | Field | Value | +-------------+--------------------------------------+ | description | web | | id | a98fcd2f-a828-4a88-92aa-36e3c1223a92 | | name | web | | rules | [] | | tenant_id | 3d44af649a1c42fcaa102ed11e3f010f | +-------------+--------------------------------------+ $ openstack security group create database +-------------+--------------------------------------+ | Field | Value | +-------------+--------------------------------------+ | description | database | | id | cf6c0380-e255-4ba8-9258-bb8e9c062fa7 | | name | database | | rules | [] | | tenant_id | 3d44af649a1c42fcaa102ed11e3f010f | +-------------+--------------------------------------+ $ openstack security group create ssh +-------------+--------------------------------------+ | Field | Value | +-------------+--------------------------------------+ | description | ssh | | id | 141ed0d0-c004-457d-8efa-45e0fd2dc986 | | name | ssh | | rules | [] | | tenant_id | 3d44af649a1c42fcaa102ed11e3f010f | +-------------+--------------------------------------+ $ openstack security group list +--------------------------------------+----------+------------------------+ | ID | Name | Description | +--------------------------------------+----------+------------------------+ | cf6c0380-e255-4ba8-9258-bb8e9c062fa7 | database | database | | 379b58b2-7ca3-431e-ae1f-cd6a627a9b30 | default | Default security group | | 141ed0d0-c004-457d-8efa-45e0fd2dc986 | ssh | ssh | | a98fcd2f-a828-4a88-92aa-36e3c1223a92 | web | web | +--------------------------------------+----------+------------------------+ Now we’ll add rules into these security groups for their desired functionality. Allow all HTTP traffic on port 80 to the web security group: $ neutron security-group-rule-create --direction ingress --protocol TCP > --port-range-min 80 --port-range-max 80 web 2
  • 3. Created a new security_group_rule: +-------------------+--------------------------------------+ | Field | Value | +-------------------+--------------------------------------+ | direction | ingress | | ethertype | IPv4 | | id | b293d93a-30c2-4854-a890-5ce65639f870 | | port_range_max | 80 | | port_range_min | 80 | | protocol | tcp | | remote_group_id | | | remote_ip_prefix | | | security_group_id | a98fcd2f-a828-4a88-92aa-36e3c1223a92 | | tenant_id | 3d44af649a1c42fcaa102ed11e3f010f | +-------------------+--------------------------------------+ Allow database servers to be accessed from the web servers: $ neutron security-group-rule-create --direction ingress --protocol TCP > --port-range-min 3306 --port-range-max 3306 --remote-group-id web database Created a new security_group_rule: +-------------------+--------------------------------------+ | Field | Value | +-------------------+--------------------------------------+ | direction | ingress | | ethertype | IPv4 | | id | dfc77fb6-48a0-41ca-9230-50c2cda27c63 | | port_range_max | 3306 | | port_range_min | 3306 | | protocol | tcp | | remote_group_id | a98fcd2f-a828-4a88-92aa-36e3c1223a92 | | remote_ip_prefix | | | security_group_id | cf6c0380-e255-4ba8-9258-bb8e9c062fa7 | | tenant_id | 3d44af649a1c42fcaa102ed11e3f010f | +-------------------+--------------------------------------+ Allow the jump host to ssh into both the database servers and webservers $ neutron security-group-rule-create --direction ingress --protocol TCP > --port-range-min 22 --port-range-max 22 --remote-group-id ssh database Created a new security_group_rule: +-------------------+--------------------------------------+ | Field | Value | +-------------------+--------------------------------------+ | direction | ingress | | ethertype | IPv4 | | id | 0c686a2c-304f-42be-9936-cdce46963d46 | | port_range_max | 22 | | port_range_min | 22 | | protocol | tcp | 3
  • 4. | remote_group_id | 141ed0d0-c004-457d-8efa-45e0fd2dc986 | | remote_ip_prefix | | | security_group_id | cf6c0380-e255-4ba8-9258-bb8e9c062fa7 | | tenant_id | 3d44af649a1c42fcaa102ed11e3f010f | +-------------------+--------------------------------------+ $ neutron security-group-rule-create --direction ingress --protocol TCP > --port-range-min 22 --port-range-max 22 --remote-group-id ssh web Created a new security_group_rule: +-------------------+--------------------------------------+ | Field | Value | +-------------------+--------------------------------------+ | direction | ingress | | ethertype | IPv4 | | id | 919a6ede-8dfd-4184-bf2a-f07c0527d5bf | | port_range_max | 22 | | port_range_min | 22 | | protocol | tcp | | remote_group_id | 141ed0d0-c004-457d-8efa-45e0fd2dc986 | | remote_ip_prefix | | | security_group_id | a98fcd2f-a828-4a88-92aa-36e3c1223a92 | | tenant_id | 3d44af649a1c42fcaa102ed11e3f010f | +-------------------+--------------------------------------+ Allow the outside world to be able to ssh into the jump host on port 22: $ neutron security-group-rule-create --direction ingress --protocol tcp > --port-range-min 22 --port-range-max 22 ssh Created a new security_group_rule: +-------------------+--------------------------------------+ | Field | Value | +-------------------+--------------------------------------+ | direction | ingress | | ethertype | IPv4 | | id | fb8dcbe6-e553-4a92-aed4-aca7f086dca4 | | port_range_max | 22 | | port_range_min | 22 | | protocol | tcp | | remote_group_id | | | remote_ip_prefix | | | security_group_id | 141ed0d0-c004-457d-8efa-45e0fd2dc986 | | tenant_id | 3d44af649a1c42fcaa102ed11e3f010f | +-------------------+--------------------------------------+ Setup virtual machines Now we can boot some virtual machines that will make use of these security groups. Run openstack net work list to obtain the private network uuid that we are going to be using: $ openstack network list 4
  • 5. +--------------------------------------+---------+--------------------------------------+ | ID | Name | Subnets | +--------------------------------------+---------+--------------------------------------+ | 427becab-54af-4b43-a5d2-e292b13b6a86 | public | 78eff45a-25f2-4904-bab8-a8795d9a7f9b | | 84aff6b0-2291-41b5-9871-d3d24906e358 | private | 92432fb8-8c29-4abe-98d8-de8bf161a18b | +--------------------------------------+---------+--------------------------------------+ Then, we’ll run openstack image list to determine the images available to boot our instances with. Since we’re using packstack, the script automatically uploaded an image to glance for us to use. $ openstack image list +--------------------------------------+--------+ | ID | Name | +--------------------------------------+--------+ | eea0e326-8e2e-41db-80a0-1138a4bdd5a6 | cirros | +--------------------------------------+--------+ Overview In the next steps we will boot four instances: • 2 web servers • 1 database server • 1 ssh jump host We will be creating instances using the smallest flavor available. $ openstack flavor list +----+-----------+-------+------+-----------+-------+-----------+ | ID | Name | RAM | Disk | Ephemeral | VCPUs | Is Public | +----+-----------+-------+------+-----------+-------+-----------+ | 1 | m1.tiny | 512 | 1 | 0 | 1 | True | | 2 | m1.small | 2048 | 20 | 0 | 1 | True | | 3 | m1.medium | 4096 | 40 | 0 | 2 | True | | 4 | m1.large | 8192 | 80 | 0 | 4 | True | | 5 | m1.xlarge | 16384 | 160 | 0 | 8 | True | +----+-----------+-------+------+-----------+-------+-----------+ So we will be using flavor 1, which means instances are created with 512MB of memory and a disk of 1G. Note: We also have to make sure that each instances has an IP address on the private network. For this we are including the --nic net-id= option specifying the network ID of the private network. Setup web servers Boot two instances named web_server1 and web_server2 on the private network using the cirros image and part of the web security group: $ nova boot --image cirros --nic net-id=84aff6b0-2291-41b5-9871-d3d24906e358 > --security_groups web --flavor 1 web_server1 5
  • 6. +--------------------------------------+-----------------------------------------------+ | Property | Value | +--------------------------------------+-----------------------------------------------+ | OS-DCF:diskConfig | MANUAL | | OS-EXT-AZ:availability_zone | | | OS-EXT-SRV-ATTR:host | - | | OS-EXT-SRV-ATTR:hypervisor_hostname | - | | OS-EXT-SRV-ATTR:instance_name | instance-00000001 | | OS-EXT-STS:power_state | 0 | | OS-EXT-STS:task_state | scheduling | | OS-EXT-STS:vm_state | building | | OS-SRV-USG:launched_at | - | | OS-SRV-USG:terminated_at | - | | accessIPv4 | | | accessIPv6 | | | adminPass | rijM8RvVKXhd | | config_drive | | | created | 2016-02-25T08:21:23Z | | flavor | m1.tiny (1) | | hostId | | | id | be6ec624-07cd-45c1-8260-211f1f2fd786 | | image | cirros (eea0e326-8e2e-41db-80a0-1138a4bdd5a6) | | key_name | - | | metadata | {} | | name | web_server1 | | os-extended-volumes:volumes_attached | [] | | progress | 0 | | security_groups | web | | status | BUILD | | tenant_id | 3d44af649a1c42fcaa102ed11e3f010f | | updated | 2016-02-25T08:21:24Z | | user_id | a72ce317d35c47e8b8274995d0a2af92 | +--------------------------------------+-----------------------------------------------+ $ nova boot --image cirros --nic net-id=84aff6b0-2291-41b5-9871-d3d24906e358 > --security_groups web --flavor 1 web_server2 +--------------------------------------+-----------------------------------------------+ | Property | Value | +--------------------------------------+-----------------------------------------------+ | OS-DCF:diskConfig | MANUAL | | OS-EXT-AZ:availability_zone | | | OS-EXT-SRV-ATTR:host | - | | OS-EXT-SRV-ATTR:hypervisor_hostname | - | | OS-EXT-SRV-ATTR:instance_name | instance-00000002 | | OS-EXT-STS:power_state | 0 | | OS-EXT-STS:task_state | scheduling | | OS-EXT-STS:vm_state | building | | OS-SRV-USG:launched_at | - | | OS-SRV-USG:terminated_at | - | | accessIPv4 | | | accessIPv6 | | | adminPass | vyT4575gsqth | | config_drive | | 6
  • 7. | created | 2016-02-25T08:22:53Z | | flavor | m1.tiny (1) | | hostId | | | id | 146056ad-e8dc-4ad3-8765-97b753f3d040 | | image | cirros (eea0e326-8e2e-41db-80a0-1138a4bdd5a6) | | key_name | - | | metadata | {} | | name | web_server2 | | os-extended-volumes:volumes_attached | [] | | progress | 0 | | security_groups | web | | status | BUILD | | tenant_id | 3d44af649a1c42fcaa102ed11e3f010f | | updated | 2016-02-25T08:22:53Z | | user_id | a72ce317d35c47e8b8274995d0a2af92 | +--------------------------------------+-----------------------------------------------+ Setup database server Boot database server $ nova boot --image cirros --nic net-id=84aff6b0-2291-41b5-9871-d3d24906e358 > --security_groups database --flavor 1 database_server +--------------------------------------+-----------------------------------------------+ | Property | Value | +--------------------------------------+-----------------------------------------------+ | OS-DCF:diskConfig | MANUAL | | OS-EXT-AZ:availability_zone | | | OS-EXT-SRV-ATTR:host | - | | OS-EXT-SRV-ATTR:hypervisor_hostname | - | | OS-EXT-SRV-ATTR:instance_name | instance-00000003 | | OS-EXT-STS:power_state | 0 | | OS-EXT-STS:task_state | scheduling | | OS-EXT-STS:vm_state | building | | OS-SRV-USG:launched_at | - | | OS-SRV-USG:terminated_at | - | | accessIPv4 | | | accessIPv6 | | | adminPass | 9GJgxdvz3eFQ | | config_drive | | | created | 2016-02-25T08:23:22Z | | flavor | m1.tiny (1) | | hostId | | | id | d66ced0e-3aaf-4c14-8921-229ac6307ecd | | image | cirros (eea0e326-8e2e-41db-80a0-1138a4bdd5a6) | | key_name | - | | metadata | {} | | name | database_server | | os-extended-volumes:volumes_attached | [] | | progress | 0 | | security_groups | database | | status | BUILD | 7
  • 8. | tenant_id | 3d44af649a1c42fcaa102ed11e3f010f | | updated | 2016-02-25T08:23:22Z | | user_id | a72ce317d35c47e8b8274995d0a2af92 | +--------------------------------------+-----------------------------------------------+ Setup jumphost server Boot ssh jump host $ nova boot --image cirros --nic net-id=84aff6b0-2291-41b5-9871-d3d24906e358 > --security_groups ssh --flavor 1 jumphost +--------------------------------------+-----------------------------------------------+ | Property | Value | +--------------------------------------+-----------------------------------------------+ | OS-DCF:diskConfig | MANUAL | | OS-EXT-AZ:availability_zone | | | OS-EXT-SRV-ATTR:host | - | | OS-EXT-SRV-ATTR:hypervisor_hostname | - | | OS-EXT-SRV-ATTR:instance_name | instance-00000004 | | OS-EXT-STS:power_state | 0 | | OS-EXT-STS:task_state | scheduling | | OS-EXT-STS:vm_state | building | | OS-SRV-USG:launched_at | - | | OS-SRV-USG:terminated_at | - | | accessIPv4 | | | accessIPv6 | | | adminPass | jwbUXkmfEK7Y | | config_drive | | | created | 2016-02-25T08:23:54Z | | flavor | m1.tiny (1) | | hostId | | | id | e540896e-e148-414a-9588-3b83d3f2b059 | | image | cirros (eea0e326-8e2e-41db-80a0-1138a4bdd5a6) | | key_name | - | | metadata | {} | | name | jumphost | | os-extended-volumes:volumes_attached | [] | | progress | 0 | | security_groups | ssh | | status | BUILD | | tenant_id | 3d44af649a1c42fcaa102ed11e3f010f | | updated | 2016-02-25T08:23:54Z | | user_id | a72ce317d35c47e8b8274995d0a2af92 | +--------------------------------------+-----------------------------------------------+ Client We will also create a client instance that we will use to access the web servers from. Note: Since we did not specify a security group this instance will be part of a default security group which allows the instance to make outgoing connections to anyone but only accept incoming connections from members of this same security group. 8
  • 9. $ nova boot --image cirros --nic net-id=84aff6b0-2291-41b5-9871-d3d24906e358 > --flavor 1 client +--------------------------------------+-----------------------------------------------+ | Property | Value | +--------------------------------------+-----------------------------------------------+ | OS-DCF:diskConfig | MANUAL | | OS-EXT-AZ:availability_zone | | | OS-EXT-SRV-ATTR:host | - | | OS-EXT-SRV-ATTR:hypervisor_hostname | - | | OS-EXT-SRV-ATTR:instance_name | instance-00000005 | | OS-EXT-STS:power_state | 0 | | OS-EXT-STS:task_state | scheduling | | OS-EXT-STS:vm_state | building | | OS-SRV-USG:launched_at | - | | OS-SRV-USG:terminated_at | - | | accessIPv4 | | | accessIPv6 | | | adminPass | c63QG7iE3PrY | | config_drive | | | created | 2016-02-25T08:24:27Z | | flavor | m1.tiny (1) | | hostId | | | id | 8e0179a3-6bf8-4c07-8035-f8916ca3183d | | image | cirros (eea0e326-8e2e-41db-80a0-1138a4bdd5a6) | | key_name | - | | metadata | {} | | name | client | | os-extended-volumes:volumes_attached | [] | | progress | 0 | | security_groups | default | | status | BUILD | | tenant_id | 3d44af649a1c42fcaa102ed11e3f010f | | updated | 2016-02-25T08:24:27Z | | user_id | a72ce317d35c47e8b8274995d0a2af92 | +--------------------------------------+-----------------------------------------------+ Check virtual machines Running openstack server list will display the status of the instances. After a few seconds all of the instances should go to an ACTIVE status. $ openstack server list +--------------------------------------+-----------------+--------+------------------+ | ID | Name | Status | Networks | +--------------------------------------+-----------------+--------+------------------+ | 8e0179a3-6bf8-4c07-8035-f8916ca3183d | client | ACTIVE | private=10.0.0.7 | | e540896e-e148-414a-9588-3b83d3f2b059 | jumphost | ACTIVE | private=10.0.0.6 | | d66ced0e-3aaf-4c14-8921-229ac6307ecd | database_server | ACTIVE | private=10.0.0.5 | | 146056ad-e8dc-4ad3-8765-97b753f3d040 | web_server2 | ACTIVE | private=10.0.0.4 | | be6ec624-07cd-45c1-8260-211f1f2fd786 | web_server1 | ACTIVE | private=10.0.0.3 | +--------------------------------------+-----------------+--------+------------------+ 9
  • 10. Setup public IP address for SSH To make the jumphost publicly accessible on the internet we’ll need to assign a floating IP to it. To do this first create a floating IP via: $ neutron floatingip-create public Created a new floatingip: +---------------------+--------------------------------------+ | Field | Value | +---------------------+--------------------------------------+ | fixed_ip_address | | | floating_ip_address | 172.24.4.228 | | floating_network_id | 427becab-54af-4b43-a5d2-e292b13b6a86 | | id | ce6efd31-97e9-428b-a3ac-b5a14e77a305 | | port_id | | | router_id | | | status | DOWN | | tenant_id | 3d44af649a1c42fcaa102ed11e3f010f | +---------------------+--------------------------------------+ Next, we need to determine the port id of the jumpbox: $ neutron port-list +--------------------------------------+------+-------------------+------------------------------------- | id | name | mac_address | fixed_ips +--------------------------------------+------+-------------------+------------------------------------- | 551cf7bc-802f-4b02-bd3e-c44473ffb1ff | | fa:16:3e:48:a4:d1 | {"subnet_id": "78eff45a-25f2-4904-ba | 5d98aa79-8bc0-4512-a128-078281aae2bc | | fa:16:3e:0d:4b:55 | {"subnet_id": "92432fb8-8c29-4abe-98 | 6aab05f6-9176-48b4-9b0f-113593945593 | | fa:16:3e:2d:b6:a4 | {"subnet_id": "92432fb8-8c29-4abe-98 | 8941a204-08e7-4547-b720-f9840358929b | | fa:16:3e:5b:a3:c7 | {"subnet_id": "78eff45a-25f2-4904-ba | 9bd695dc-4e6c-40c5-952d-44269711bd6c | | fa:16:3e:9e:36:8f | {"subnet_id": "92432fb8-8c29-4abe-98 | afd18b4f-c19f-4c03-a049-fe8aeae7da49 | | fa:16:3e:ac:94:5e | {"subnet_id": "92432fb8-8c29-4abe-98 | e63d8edb-f10c-4776-a10e-cba9ec3f3d56 | | fa:16:3e:d4:9c:57 | {"subnet_id": "92432fb8-8c29-4abe-98 | f0d35941-989c-4f2b-b187-872445b0b653 | | fa:16:3e:0c:7f:d5 | {"subnet_id": "92432fb8-8c29-4abe-98 | f9e097b4-4227-49ee-9442-643c4186e587 | | fa:16:3e:a5:36:2c | {"subnet_id": "92432fb8-8c29-4abe-98 +--------------------------------------+------+-------------------+------------------------------------- and find the id that matches the IP address of the jumphost (10.0.0.6) and associate it via: # neutron floatingip-associate [floating_ip id] [port-list id] $ neutron floatingip-associate ce6efd31-97e9-428b-a3ac-b5a14e77a305 > 5d98aa79-8bc0-4512-a128-078281aae2bc Associated floating IP ce6efd31-97e9-428b-a3ac-b5a14e77a305 $ neutron floatingip-list +--------------------------------------+------------------+---------------------+----------------------- | id | fixed_ip_address | floating_ip_address | port_id +--------------------------------------+------------------+---------------------+----------------------- | ce6efd31-97e9-428b-a3ac-b5a14e77a305 | 10.0.0.6 | 172.24.4.228 | 5d98aa79-8bc0-4512-a12 +--------------------------------------+------------------+---------------------+----------------------- 10
  • 11. Verify SSH connectivity Now you should be able to ssh to the jumbox via with password cubswin:) : $ ssh cirros@172.24.4.228 The authenticity of host ’172.24.4.3 (172.24.4.3)’ can’t be established. RSA key fingerprint is 8b:90:ae:9c:eb:be:83:ae:3c:33:fe:84:7a:88:12:d1. Are you sure you want to continue connecting (yes/no)? yes Warning: Permanently added ’172.24.4.3’ (RSA) to the list of known hosts. cirros@172.24.4.3’s password: $ After logging into the jumpbox you’ll be able to ssh into your webserver1, webserver2, and database server via: $ ssh 10.0.0.3 Host ’10.0.0.3’ is not in the trusted hosts file. (fingerprint md5 e7:c3:d2:93:0b:eb:65:6d:e6:01:2e:b3:e6:72:fd:c0) Do you want to continue connecting? (y/n) y cirros@10.0.0.3’s password: $ exit $ ssh 10.0.0.4 ... $ ssh 10.0.0.5 ... None of those instances will be able to ssh to each other. The point of this instance is so that you do not need to have all of your other instances publicly addressable and directly accessible via the internet. Simulate web server Now let’s log in to web_server1 and web_server2 (via ssh or via horizon) and setup a simple web server to handle requests and reply with who they are: # On web_server 1 (10.0.0.3) $ while true; do echo -e ’HTTP/1.0 200 OKrnrn’‘hostname‘ | sudo nc -l -p 80 ; done & $ exit # on web_server 2 (10.0.0.4) $ while true; do echo -e ’HTTP/1.0 200 OKrnrn’‘hostname‘ | sudo nc -l -p 80 ; done & $ exit 11
  • 12. Simulate HTTP request Now, log in to your client virtual machine (from the web console). From there if you run: $ wget -O - http://10.0.0.3/ Connecting to 10.0.0.3 (10.0.0.3:80) web-server1 100% |************************************| 12 0:00:00 ETA $ wget -O - http://10.0.0.4/ Connecting to 10.0.0.4 (10.0.0.4:80) web-server2 100% |************************************| 12 0:00:00 ETA This demonstrates that our simple web server is working on our two web server instances. Optional check We can demonstrate that the web security group is working correctly by killing our simple web server and changing the port number. (Note: to kill the web server you may need to hold control + c for a second in order for it to break out of the while loop before another instance of nc is created.) # On web_server 1 $ while true; do echo -e ’HTTP/1.0 200 OKrnrn’‘hostname‘ | sudo nc -l -p 81 ; done & Now on the client run: $ wget -O - http://10.0.0.3:81 Connecting to 10.0.0.3 (10.0.0.3:81) wget: can’t connect to remote host (10.0.0.3): Connection timed out As you can see the request is never answered as expected because our web security group does not allow port 81 ingress. Now let’s set the web server to run on port 80 again. Provision loadbalancer At this point were going to provision loadbalancer via neutron in order to load balance requests between our two web server instances. $ neutron subnet-list +--------------------------------------+----------------+-----------------+----------------------------- | id | name | cidr | allocation_pools +--------------------------------------+----------------+-----------------+----------------------------- | 78eff45a-25f2-4904-bab8-a8795d9a7f9b | public_subnet | 172.24.4.224/28 | {"start": "172.24.4.226", "e | 92432fb8-8c29-4abe-98d8-de8bf161a18b | private_subnet | 10.0.0.0/24 | {"start": "10.0.0.2", "end": +--------------------------------------+----------------+-----------------+----------------------------- 12
  • 13. Create a loadbalancer pool: $ neutron lb-pool-create --name http-pool --lb-method ROUND_ROBIN > --protocol HTTP --subnet-id 92432fb8-8c29-4abe-98d8-de8bf161a18b Created a new pool: +------------------------+--------------------------------------+ | Field | Value | +------------------------+--------------------------------------+ | admin_state_up | True | | description | | | health_monitors | | | health_monitors_status | | | id | 51ca1962-a24a-4f43-920f-162a03a45c51 | | lb_method | ROUND_ROBIN | | members | | | name | http-pool | | protocol | HTTP | | provider | haproxy | | status | PENDING_CREATE | | status_description | | | subnet_id | 92432fb8-8c29-4abe-98d8-de8bf161a18b | | tenant_id | 3d44af649a1c42fcaa102ed11e3f010f | | vip_id | | +------------------------+--------------------------------------+ You can verify the creation of the http-pool with the neutron lb-pool-list and neutron lb-pool-show http-pool command. $ neutron lb-pool-list +--------------------------------------+-----------+----------+-------------+----------+---------------- | id | name | provider | lb_method | protocol | admin_state_up +--------------------------------------+-----------+----------+-------------+----------+---------------- | 51ca1962-a24a-4f43-920f-162a03a45c51 | http-pool | haproxy | ROUND_ROBIN | HTTP | True +--------------------------------------+-----------+----------+-------------+----------+---------------- $ neutron lb-pool-show http-pool +------------------------+--------------------------------------+ | Field | Value | +------------------------+--------------------------------------+ | admin_state_up | True | | description | | | health_monitors | | | health_monitors_status | | | id | 51ca1962-a24a-4f43-920f-162a03a45c51 | | lb_method | ROUND_ROBIN | | members | | | name | http-pool | | protocol | HTTP | | provider | haproxy | 13
  • 14. | status | ACTIVE | | status_description | | | subnet_id | 92432fb8-8c29-4abe-98d8-de8bf161a18b | | tenant_id | 3d44af649a1c42fcaa102ed11e3f010f | | vip_id | | +------------------------+--------------------------------------+ Now, let’s create a health monitor, which checks to make sure our instances are still running and associate that with the pool: $ neutron lbaas-healthmonitor-create --delay 3 --type HTTP --max-retries 3 > --timeout 3 --pool webserver-pool Adding loadbalancer members $ neutron lb-member-create --address 10.0.0.3 --protocol-port 80 http-pool Created a new member: +--------------------+--------------------------------------+ | Field | Value | +--------------------+--------------------------------------+ | address | 10.0.0.3 | | admin_state_up | True | | id | 36b01f84-a273-417f-9588-15cceea18868 | | pool_id | 51ca1962-a24a-4f43-920f-162a03a45c51 | | protocol_port | 80 | | status | PENDING_CREATE | | status_description | | | tenant_id | 3d44af649a1c42fcaa102ed11e3f010f | | weight | 1 | +--------------------+--------------------------------------+ $ neutron lb-member-create --address 10.0.0.4 --protocol-port 80 http-pool Created a new member: +--------------------+--------------------------------------+ | Field | Value | +--------------------+--------------------------------------+ | address | 10.0.0.4 | | admin_state_up | True | | id | 5d68b992-d09f-408b-8049-353e702cc990 | | pool_id | 51ca1962-a24a-4f43-920f-162a03a45c51 | | protocol_port | 80 | | status | PENDING_CREATE | | status_description | | | tenant_id | 3d44af649a1c42fcaa102ed11e3f010f | | weight | 1 | +--------------------+--------------------------------------+ After this you can verify the nodes have been added to the loadbalancer pool. $ neutron lb-member-list 14
  • 15. +--------------------------------------+----------+---------------+--------+----------------+--------+ | id | address | protocol_port | weight | admin_state_up | status | +--------------------------------------+----------+---------------+--------+----------------+--------+ | 36b01f84-a273-417f-9588-15cceea18868 | 10.0.0.3 | 80 | 1 | True | ACTIVE | | 5d68b992-d09f-408b-8049-353e702cc990 | 10.0.0.4 | 80 | 1 | True | ACTIVE | +--------------------------------------+----------+---------------+--------+----------------+--------+ Add healthmonitor We need to create a health monitor, which will check our instances to make sure they are still running $ neutron lb-healthmonitor-create --delay 3 --type HTTP --max-retries 3 > --timeout 3 Created a new health_monitor: +----------------+--------------------------------------+ | Field | Value | +----------------+--------------------------------------+ | admin_state_up | True | | delay | 3 | | expected_codes | 200 | | http_method | GET | | id | 05cbf7f9-d01b-483b-934e-8955b14a1653 | | max_retries | 3 | | pools | | | tenant_id | 3d44af649a1c42fcaa102ed11e3f010f | | timeout | 3 | | type | HTTP | | url_path | / | +----------------+--------------------------------------+ Now we have to associate the health monitor to the previously created loadbalancer pool. $ neutron lb-healthmonitor-associate 05cbf7f9-d01b-483b-934e-8955b14a1653 http-pool Associated health monitor 05cbf7f9-d01b-483b-934e-8955b14a1653 To make the loadbalancer and associated health monitor available, we need to assign it a Virual IP. The address will be allocated from the private subnet. This address will redirect the request to either instance within the pool to handle the request. $ neutron lb-vip-create --name webserver-vip --protocol-port 80 > --protocol HTTP --subnet-id 92432fb8-8c29-4abe-98d8-de8bf161a18b http-pool Created a new vip: +---------------------+--------------------------------------+ | Field | Value | +---------------------+--------------------------------------+ | address | 10.0.0.8 | | admin_state_up | True | | connection_limit | -1 | 15
  • 16. | description | | | id | b9ca33b0-b09c-4e7d-8ab7-77fe5207add6 | | name | webserver-vip | | pool_id | 51ca1962-a24a-4f43-920f-162a03a45c51 | | port_id | ecbadc53-5266-4146-bbb3-d1b6d383be10 | | protocol | HTTP | | protocol_port | 80 | | session_persistence | | | status | PENDING_CREATE | | status_description | | | subnet_id | 92432fb8-8c29-4abe-98d8-de8bf161a18b | | tenant_id | 3d44af649a1c42fcaa102ed11e3f010f | +---------------------+--------------------------------------+ Verify loadbalancer Finally, let’s test out the loadbalancer. From the client instance we should be able to run wget at 10.0.0.8 and see that it loadbalancers our requests. $ for i in $(seq 1 4) ; do wget -O - http://10.0.0.8/ ; done Connecting to 10.0.0.8 (10.0.0.8:80) web-server1 - 100% |************************************| 12 0:00:00 ETA Connecting to 10.0.0.8 (10.0.0.8:80) web-server2 - 100% |************************************| 12 0:00:00 ETA Connecting to 10.0.0.8 (10.0.0.8:80) web-server1 - 100% |************************************| 12 0:00:00 ETA Connecting to 10.0.0.8 (10.0.0.8:80) web-server2 - 100% |************************************| 12 0:00:00 ETA From the output above you can see that the the requests are being handled by web_server1 then web_server2 in an alternating fashion according to the round robin method. Setup public IP address for web traffic Now to make our VIP publicly accessible via the internet we need to create another floating IP: $ neutron floatingip-create public Created a new floatingip: +---------------------+--------------------------------------+ | Field | Value | +---------------------+--------------------------------------+ | fixed_ip_address | | | floating_ip_address | 172.24.4.229 | | floating_network_id | 427becab-54af-4b43-a5d2-e292b13b6a86 | | id | 3c15f8a4-bdc6-4154-8bfa-e8b0674079ca | 16
  • 17. | port_id | | | router_id | | | status | DOWN | | tenant_id | 3d44af649a1c42fcaa102ed11e3f010f | +---------------------+--------------------------------------+ Determine the port_id for the Virtual IP we created earlier: $ neutron port-list +--------------------------------------+------------------------------------------+-------------------+- | id | name | mac_address | +--------------------------------------+------------------------------------------+-------------------+- | 54b17392-dce7-4d6a-8cce-153fccb5d441 | | fa:16:3e:f0:c7:cf | | 551cf7bc-802f-4b02-bd3e-c44473ffb1ff | | fa:16:3e:48:a4:d1 | | 5d98aa79-8bc0-4512-a128-078281aae2bc | | fa:16:3e:0d:4b:55 | | 6aab05f6-9176-48b4-9b0f-113593945593 | | fa:16:3e:2d:b6:a4 | | 8941a204-08e7-4547-b720-f9840358929b | | fa:16:3e:5b:a3:c7 | | 9bd695dc-4e6c-40c5-952d-44269711bd6c | | fa:16:3e:9e:36:8f | | afd18b4f-c19f-4c03-a049-fe8aeae7da49 | | fa:16:3e:ac:94:5e | | e63d8edb-f10c-4776-a10e-cba9ec3f3d56 | | fa:16:3e:d4:9c:57 | | ecbadc53-5266-4146-bbb3-d1b6d383be10 | vip-b9ca33b0-b09c-4e7d-8ab7-77fe5207add6 | fa:16:3e:41:1a:eb | | f0d35941-989c-4f2b-b187-872445b0b653 | | fa:16:3e:0c:7f:d5 | | f9e097b4-4227-49ee-9442-643c4186e587 | | fa:16:3e:a5:36:2c | +--------------------------------------+------------------------------------------+-------------------+- Associate VIP port with floating IP: $ neutron floatingip-associate 3c15f8a4-bdc6-4154-8bfa-e8b0674079ca > ecbadc53-5266-4146-bbb3-d1b6d383be10 Associated floating IP 3c15f8a4-bdc6-4154-8bfa-e8b0674079ca At this point the Virtual IP is a member of the default security group which does not allow ingress traffic unless you are also part of a security group which allows incoming traffic. We need to update the VIP to be a member of the web security group so that requests from the internet are allowed to pass (not just from our client instance). Get the web security group uuid: $ neutron security-group-list +--------------------------------------+----------+----------------------------------------------------- | id | name | security_group_rules +--------------------------------------+----------+----------------------------------------------------- | 141ed0d0-c004-457d-8efa-45e0fd2dc986 | ssh | egress, IPv4 | | | egress, IPv6 | | | ingress, IPv4, 22/tcp | 379b58b2-7ca3-431e-ae1f-cd6a627a9b30 | default | egress, IPv4 | | | egress, IPv6 | | | ingress, IPv4, remote_group_id: 379b58b2-7ca3-431e-a | | | ingress, IPv6, remote_group_id: 379b58b2-7ca3-431e-a 17
  • 18. | 5e0d0d57-2df6-4fbc-ad18-5908aacdf799 | default | egress, IPv4 | | | egress, IPv6 | | | ingress, IPv4, remote_group_id: 5e0d0d57-2df6-4fbc-a | | | ingress, IPv6, remote_group_id: 5e0d0d57-2df6-4fbc-a | a98fcd2f-a828-4a88-92aa-36e3c1223a92 | web | egress, IPv4 | | | egress, IPv6 | | | ingress, IPv4, 22/tcp, remote_group_id: 141ed0d0-c00 | | | ingress, IPv4, 80/tcp | b2c914cb-3bc1-4ee6-9f30-66c459af5f4c | default | egress, IPv4 | | | egress, IPv6 | | | ingress, IPv4, remote_group_id: b2c914cb-3bc1-4ee6-9 | | | ingress, IPv6, remote_group_id: b2c914cb-3bc1-4ee6-9 | cf6c0380-e255-4ba8-9258-bb8e9c062fa7 | database | egress, IPv4 | | | egress, IPv6 | | | ingress, IPv4, 22/tcp, remote_group_id: 141ed0d0-c00 | | | ingress, IPv4, 3306/tcp, remote_group_id: a98fcd2f-a +--------------------------------------+----------+----------------------------------------------------- Update VIP port to be a member of the web security group: $ neutron port-update ecbadc53-5266-4146-bbb3-d1b6d383be10 --security_groups > list=true a98fcd2f-a828-4a88-92aa-36e3c1223a92 Updated port: ecbadc53-5266-4146-bbb3-d1b6d383be10 Verify loadbalancer At this point your VIP is publicly addressable: $ for i in $(seq 1 4) ; do wget -O - http://172.24.4.229/ ; done Connecting to 172.24.4.229 (172.24.4.229:80) web-server1 - 100% |************************************| 12 0:00:00 ETA Connecting to 172.24.4.229 (172.24.4.229:80) web-server2 - 100% |************************************| 12 0:00:00 ETA Connecting to 172.24.4.229 (172.24.4.229:80) web-server1 - 100% |************************************| 12 0:00:00 ETA Connecting to 172.24.4.229 (172.24.4.229:80) web-server2 - 100% |************************************| 12 0:00:00 ETA To demonstration high availability, we’ll go and delete our web_server1 instance to simulate a failure. $ openstack server delete web_server1 After the health monitor detects the host is not responding it will stop sending requests to web_server1. Now web_server2 is handling all the requests. 18
  • 19. $ for i in $(seq 1 4) ; do wget -O - http://172.24.4.229/ ; done Connecting to 172.24.4.229 (172.24.4.229:80) web-server2 - 100% |************************************| 12 0:00:00 ETA Connecting to 172.24.4.229 (172.24.4.229:80) web-server2 - 100% |************************************| 12 0:00:00 ETA Connecting to 172.24.4.229 (172.24.4.229:80) web-server2 - 100% |************************************| 12 0:00:00 ETA Connecting to 172.24.4.229 (172.24.4.229:80) web-server2 - 100% |************************************| 12 0:00:00 ETA Note: the first request might take longer to handle. This is because of the timeout before it notices the host is not responding. This work is licensed under a Creative Commons Attribution-ShareAlike 4.0 International License. 19