SlideShare a Scribd company logo
1 of 20
Download to read offline
E-Publishing Conversion Process
            for NMSU Extension Numbered Publications
            by Ana Henke and Frank Sholedice

                                                                          (Revised September 2011)


                                                   Converting InDesign file to

                                                   •	 Open InDesign file and make sure all
                                                   HTML using Dreamweaver

                                                      links are connected properly (VERY
                                                      IMPORTANT!).
                                                   •	 File > Export for Dreamweaver


File > Export for Dreamweaver


                                                   •	 Save as HTML


Save As HTML

                                               1
General: select document;
                               leave bullets and numbers
                               at its default.


Export Options: General


                               Copy Images (select optimized),
                               Images:

                               Image conversion (select JPEG)
                               JPEG Options (select High)


Export Options: Images


                               Advanced: select Empty
                               CSS Declarations


                               Then click Export


Export Options: Advanced


                           2
Before you start developing the HTML file, you’ll need to
convert the PDF of masthead into JPEG graphic.


Open pub PDF in
Photoshop. The Import
PDF box is displayed.
Make sure that the
first page of the
document is selected.


Leave the resolution at
300 so that the file size
is still large. Click OK.


Go to Image > Canvas
Size. You’ll need to
enlarge the size of the
canvas (or page) to
8 x 10 so that you can
have a small margin
around the page.
Click OK.


Once the canvas size
is reset, crop out the
masthead from the
page. Then, select
Layer and then
Flatten Image (that
is what gives you the
white background
instead of the gray
checkered pattern).

                              3
Use the eraser tool to erase
                   the superscript next to the
                   author name.


    Select Image, then Image Size and change
    the resolution to 72dpi and save the file as
    a JPEG.


    Make sure that NONE of the buttons
    at the botton are checked.


    Save at the highest quality JPEG setting.


    Remember to size the masthead to

    You need to SAVE the file, then reopen
    a width of 785 pixels.

    Image size—click all the boxes, so that
    you can access pixels.


4
Masthead from publication should be made
Overview of new HTML format for pubs

into graphic.


Remove the superscript regarding author
titles in Photoshop.
Don’t forget to add the word “Author(s):”
followed by author(s) information below
masthead (text should be BOLD). Also
add the word “Respectively” when there
is more than one author as shown here.

Apply basic subhead styles to text
(start with sub 2).


Bold photo captions.


Add lead author photo and bio before
the closing information to all new/revised
publications.


Place ACES contact information, copyright
permission and EEO statement at the end
of file in this order.


Place “Printed and electronically
distributed” line at the end of the
HTML file in BOLD.


 5
After you export a file for Dreamweaver, an image folder is automatically generated
along with an HTML file. Remember ALL styles have been stripped out of this HTML file. You’ll be
	

applying styles to this file in Dreamweaver, which will be transfered into the eBook formats.


                                                        Open the HTML file in Dreamweaver.
                                                        Delete masthead shell graphic and
                                                        the text what would fill it like pub

                                                        and replace with masthead graphic you
                                                        title, pub number, authors names, etc.

                                                        developed from PDF in Photoshop. If the
                                                        masthead has superscripts, go back into
                                                        Photoshop and delete them.


                                                        Insert new masthead graphic by
                                                        clicking Insert > Image.


                                                        After you’ve selected which image you
                                                        want to insert, this Image Tag box comes
                                                        up—just click OK. Since you’ve sized the
                                                        graphic in Photoshop, all you need to do
                                                        is insert it in the document.


                                                6
It is important to keep the author’s
    New graphic inserted.

    title line in its own separate cell. If
    you don’t, it appears much too close
    to the masthead on the web. The rest of
    the content should be one cell.


    Highlight the subhead text and click
    the appropriate style throughout the
    publication (remember the styles have
    been stripped out).

    Apply the heading styles the way you
    would for any publication, but you must
    start with HEADING 2!


    TIP: If subheads are in ALL CAPS,
    use MS Word “change case” option
    to correct. Select “title” option.


    If this formatting tools panel doesn’t
    appear, go to the pull-down menu under
    Modify > Selection Properties.


    NOTE: Tables are more clearly/easily
    displayed online and in the iPad (ePub
    format) by using the table grid option.


    To insert a table, click the Table button on
    the side menu options.

    Then type in the number of rows and
    columns desired.


7
Using Photoshop to resize and insert photos into HTML file—
after they were converted for Dreamweaver from InDesign.


                                    When you export a document for
                                    Dreamweaver, the software creates
                                    an HTML file and resizes the photos/
                                    graphics. It also puts all the graphics
                                    into one folder.


                                    Because we use high resolution photos
                                    for our publications, when Dreamweaver
                                    converts our photos into JPG files it ends
                                    up increasing the “Document size.” So,
                                    you’ll need to open the files in Photoshop
                                    to resize them.


                                    Click Image > Image Size

                                    When resizing a photo, you must check
                                    all of the following boxes: Scale Styles,
                                    Constrain Proportions and Resample
                                    Image. Next, type in 400 pixels in the
                                    width box for all photos. If you want to
                                    group photos together, just make them
                                    two-photos wide. Hopefully, the photo
                                    will have a high enough resolution for the
                                    400 pixel width. If not, 350 will be fine.

                                    When you open the document in Dream-
                                    weaver again, the resized photos will
                                    automatically be updated in the HTML file.

                                    Note: If you are inserting a lineart im-
                                    age/illustration that contains text, the
                                    image width should be 600 pixels.


                              8
To insert the horizontal rule, just put the cursor where you’d like to place the rule
and click the horizontal rule button on the right side panel.


After formatting your publication, you’ll need to add the head tags to the
HTML code (keywords, meta description and alt tags).


                                                            Place your cursor directly after
                                                            <head>. This is where you’ll be
                                                            inserting the head tags.


Insert > HTML > Head Tags > Keywords


                                                   9
Copy and paste the
                                                                     keywords into this
                                                                     box and click OK.


                                                                     Make sure that
                                                                     “NMSU Extension”
                                                                     is a keyword to
                                                                     ALL Extension
                                                                     pubs! and “NMSU
                                                                     Experiment Station”
                                                                     is a keyword for
                                                                     AES pubs.


The keywords are then inserted into the html code. The same method allows you to insert
the description as well (Insert > HTML > Head Tags > Descriptions).


                                           10
Now, you need to add
                                                                   the Alt tag (or photo
                                                                   description)


                                                                   First, click the photo.


                                                                   Then copy and
                                                                   past the Alt tag
                                                                   information into the
                                                                   Alt box located on
                                                                   the bottom toolbar.


                                                                   After it is pasted in,
                                                                   the information is
                                                                   inserted into the
                                                                   HTML code.


                                                                   Note: ONLY figures
                                                                   require alt tags!
                                                                   Also, if you replace a
                                                                   figure, you’ll need to
                                                                   reinsert the alt tags!!


                                                                   You are DONE with
                                                                   the Head tags!!


After this step, give to editor to review content. After you make his corrections let
supervisor know HTML file is ready for review.


                                          11
You will need to save two HTML files. One for the web and the other for the e-publishing conversion
process. The HTML file for the web includes everything you just added to the file. The file name should
be the publication number (EX: B218.html).

For the HTML file for e-publishing, delete the masthead graphic because you are going to create
a cover for the eBooks. The file name should be the publication number with eBook added
(EX: B218eBook.html).

From now on each electronic publication folder should have four folders: (Main folder: B218;
Subfolders: B218eBook, B218HTML, B218InDesign) plus the B218.PDF file.


                                                  12
Before converting the HTML file into an ePub or Mobi file,
you’ll need to typeset the pub’s cover page.
                                       I’ve set up an eBook cover template
                                       in InDesign with character styles.


                                       After you layout the eBook
                                       cover, let editor review it
                                       for text accuracy and have
                                       supervisor review the layout.
                                       A hard copy or PDF version
                                       is fine.


                                       Don’t forget to insert the pub
                                       name, number, author’s name(s)
                                       and title(s) before the publication
                                       content! This is necessary because
                                       the Kindle often skips the cover
                                       page when displaying an eBook.


                              13
After you typeset the cover, save it as
     a graphic like you did the masthead by
     rasterizing it in Photoshop.

     Remember that the resolution needs
     to be 300 AND leave the image size
     AS IS. It is not necessary to enlarge the
     canvas to 8 X 10 like for the masthead.


     CROP the image so that it appears to
     have a FULL BLEED!!


     Then Flatten the image and save as a
     JPEG. This is the image file that will be
     added to eBook in calibre.


14
Calibre Tools
   Add      Edit   Convert                Save     Remove     User’s
  books   metadata books     View        to disk    books     manual     Preferences


Converting HTML file to ePUB & MOBI formats using Calibre

                                                   Before converting the HTML file
                                                   into an ePUB or MOBI format, you
                                                   need to open the file in Calibre
                                                   by clicking the Add books button
                                                   at top left and selecting the HTML
                                                   file and clicking Open.


                                    15
• 	 The first thing you need to
                                                               do is create the metadata for
                                                               the publication. Click the Edit
                                                               metadata button at the top
                                                               left corner and then just start
                                                               filling in the information.

                                                           • 	 Remember to add in pub
                                                               number BEFORE title!

                                                           • 	 Copy and paste keywords that
                                                               have been provided by editors
                                                               for this publication.

                                                           •	 Once you are done with this,
                                                              you’ll need to replace the
                                                              generic book cover with the
                                                              cover you typeset.


Publisher: New Mexico State University Cooperative Extension Service


                                                           • 	 Click the “Change cover image”
                                                               button and select the file.


                                            16
Once you have updated the
     metadata and inserted the
     cover graphic, you are ready to
     convert the file.

     Click the “Convert Books”
     button.

     Click Table of Contents icon
     at left. Make sure the box Do

     to the Table of Contents IS
     not add detected chapters

     CHECKED


     Click Look & Feel icon at left,
     In the Look & Feel menu, click
     the drop-down menu to the
     right of Text justification:
     and select Left align


     Once these steps are
     completed, you need to decide
     if you want the book to be in
     EPUB or MOBI format.


17
For MOBI format
     Click MOBI on the Output
     format button at top right
     corner.

     Make sure the box Do not

     book IS CHECKED.
     add Table of Contents to


     Also click the MOBI Output
     button on the left side
     panel.


     Click OK at bottom right to
     convert file.


     For EPUB format
     Click EPUB on the Output
     format button at top right
     corner.

     Click Do not split on

     step! If this is not checked,
     page breaks. Important

     blank pages will appear
     throughout your eBook on
     the iPad!

     Also click the EPUB Output
     button on the left side
     panel.

     Click OK at bottom right to
     convert file.


18
After it is converted into
     an ePUB or Mobi, it shows
     up on the list of e-books
     available in your library.


     Now, you can view it via
     Calibre, by clicking the title
     you want and clicking the
     view button.


     View of eBook.


     After eBook file is done,
     upload the eBooks to our
     office eReaders to see
     how the files are work-
     ing. Have supervisor
     and editor double check
     eBooks on readers
     as well.

     If they work properly
     on all eReaders, you can
     forward eBook files to
     webmaster for posting.


19
Once you are ready to send the eBook
                                and html files to webmaster, remember
IMPORTANT: This is how your

                                all you need to send is the MOBI file and
files should be organized and

                                the EPUB file. You don’t need to send
named once you have completed

                                her the eBook cover grraphic OR the
publication.

                                eBook HTML file. Everything is already
                                included in the MOBI/EPUB formats!

                                When you are done with the HTML files,
                                you can just email her the HTML file
                                along with the individual graphics files.
                                I’ve had no problem emailing the files
                                like I’ve shown above.

                                REMEMBER: ONLY send the
                                webmaster the one HTML file to
                                be posted to the web and NOT the
                                eBook HTML file!


CONGRATUATIONS! You’ve converted an Extension print publication
into HTML and eBook versions!

                                20

More Related Content

Viewers also liked

Andy warhol (italian)
Andy warhol (italian)Andy warhol (italian)
Andy warhol (italian)Vito Di Bari
 
Planning social media
Planning social mediaPlanning social media
Planning social mediaBrad West
 
Best Buy Investor and Analyst Day
Best Buy Investor and Analyst DayBest Buy Investor and Analyst Day
Best Buy Investor and Analyst Dayfinance7
 
Biocombustibles en méxico
Biocombustibles en méxicoBiocombustibles en méxico
Biocombustibles en méxicoblancariva
 
Proyecto TIC en un centro educativo
Proyecto TIC en un centro educativoProyecto TIC en un centro educativo
Proyecto TIC en un centro educativomilagros75
 
Long term outcome in liver transplantation
Long term outcome in liver transplantationLong term outcome in liver transplantation
Long term outcome in liver transplantationGülüm Altaca
 
Influencia musical
Influencia musicalInfluencia musical
Influencia musicalIsraelmck
 
Cambio climatico cep
Cambio climatico cepCambio climatico cep
Cambio climatico cepcpinedaf
 
Darwin
DarwinDarwin
Darwinjafec
 
A caixa de leite
A caixa de leiteA caixa de leite
A caixa de leiteFer Nanda
 
El Agua Mundial
El Agua MundialEl Agua Mundial
El Agua Mundialvaquitas
 
Funny Vegetables
Funny VegetablesFunny Vegetables
Funny Vegetablesashok kumar
 
Cómo colaborar en GNOME
Cómo colaborar en GNOMECómo colaborar en GNOME
Cómo colaborar en GNOMEJuanjo Marin
 
Sagrada familia a 2013 reflexión evangélica
Sagrada familia a 2013 reflexión evangélicaSagrada familia a 2013 reflexión evangélica
Sagrada familia a 2013 reflexión evangélicasanpablobaeza
 

Viewers also liked (20)

Andy warhol (italian)
Andy warhol (italian)Andy warhol (italian)
Andy warhol (italian)
 
Planning social media
Planning social mediaPlanning social media
Planning social media
 
Best Buy Investor and Analyst Day
Best Buy Investor and Analyst DayBest Buy Investor and Analyst Day
Best Buy Investor and Analyst Day
 
Biocombustibles en méxico
Biocombustibles en méxicoBiocombustibles en méxico
Biocombustibles en méxico
 
Proyecto TIC en un centro educativo
Proyecto TIC en un centro educativoProyecto TIC en un centro educativo
Proyecto TIC en un centro educativo
 
Long term outcome in liver transplantation
Long term outcome in liver transplantationLong term outcome in liver transplantation
Long term outcome in liver transplantation
 
Inglaterra
InglaterraInglaterra
Inglaterra
 
Influencia musical
Influencia musicalInfluencia musical
Influencia musical
 
Redes sociales
Redes socialesRedes sociales
Redes sociales
 
Cambio climatico cep
Cambio climatico cepCambio climatico cep
Cambio climatico cep
 
La granja
La granja La granja
La granja
 
INFLUENCIAS
INFLUENCIASINFLUENCIAS
INFLUENCIAS
 
Propuesta OVA
Propuesta OVAPropuesta OVA
Propuesta OVA
 
Darwin
DarwinDarwin
Darwin
 
A caixa de leite
A caixa de leiteA caixa de leite
A caixa de leite
 
El Agua Mundial
El Agua MundialEl Agua Mundial
El Agua Mundial
 
Funny Vegetables
Funny VegetablesFunny Vegetables
Funny Vegetables
 
Cómo colaborar en GNOME
Cómo colaborar en GNOMECómo colaborar en GNOME
Cómo colaborar en GNOME
 
Sagrada familia a 2013 reflexión evangélica
Sagrada familia a 2013 reflexión evangélicaSagrada familia a 2013 reflexión evangélica
Sagrada familia a 2013 reflexión evangélica
 
Trabajo dinamica
Trabajo dinamicaTrabajo dinamica
Trabajo dinamica
 

Similar to Converting Publications to eBooks, Step by step

Cms poster template48x36
Cms poster template48x36Cms poster template48x36
Cms poster template48x36Patrick McQuaid
 
Website image editing tutorial: WordPress, Paint.NET and PowerPoint(!)
Website image editing tutorial: WordPress, Paint.NET and PowerPoint(!)Website image editing tutorial: WordPress, Paint.NET and PowerPoint(!)
Website image editing tutorial: WordPress, Paint.NET and PowerPoint(!)Jukka Niiranen
 
36x48 Horizontal Template2
36x48 Horizontal Template236x48 Horizontal Template2
36x48 Horizontal Template2Jay Buckley
 
36x48 Vertical Template2
36x48 Vertical Template236x48 Vertical Template2
36x48 Vertical Template2Jay Buckley
 
Creating a PBWorks space
Creating a PBWorks spaceCreating a PBWorks space
Creating a PBWorks spaceebertsheri
 
15 Howto Customization Look And Feel
15 Howto Customization Look And Feel15 Howto Customization Look And Feel
15 Howto Customization Look And FeelSWING Software
 
Photoshop_CS_Tutorial
Photoshop_CS_TutorialPhotoshop_CS_Tutorial
Photoshop_CS_Tutorialtutorialsruby
 
Photoshop_CS_Tutorial
Photoshop_CS_TutorialPhotoshop_CS_Tutorial
Photoshop_CS_Tutorialtutorialsruby
 
Basic Web Design In Dreamweaver
Basic Web Design In DreamweaverBasic Web Design In Dreamweaver
Basic Web Design In Dreamweaverjcharnin
 
HTML5 - Insert images and Apply page backgrounds
HTML5 - Insert images and Apply page backgroundsHTML5 - Insert images and Apply page backgrounds
HTML5 - Insert images and Apply page backgroundsGrayzon Gonzales, LPT
 
Word beginning practice activities
Word beginning practice activitiesWord beginning practice activities
Word beginning practice activitiesjcatto01
 
How to Design a Logo. User Guide for Logo Templates
How to Design a Logo. User Guide for Logo TemplatesHow to Design a Logo. User Guide for Logo Templates
How to Design a Logo. User Guide for Logo TemplatesMaxim Logoswish
 
Logo with photoshop
Logo with photoshopLogo with photoshop
Logo with photoshopSung Woo Yoo
 

Similar to Converting Publications to eBooks, Step by step (20)

Cms poster template48x36
Cms poster template48x36Cms poster template48x36
Cms poster template48x36
 
Website image editing tutorial: WordPress, Paint.NET and PowerPoint(!)
Website image editing tutorial: WordPress, Paint.NET and PowerPoint(!)Website image editing tutorial: WordPress, Paint.NET and PowerPoint(!)
Website image editing tutorial: WordPress, Paint.NET and PowerPoint(!)
 
36x48 Horizontal Template2
36x48 Horizontal Template236x48 Horizontal Template2
36x48 Horizontal Template2
 
36x48 Vertical Template2
36x48 Vertical Template236x48 Vertical Template2
36x48 Vertical Template2
 
Fms Web Cms Training
Fms Web Cms TrainingFms Web Cms Training
Fms Web Cms Training
 
Creating a PBWorks space
Creating a PBWorks spaceCreating a PBWorks space
Creating a PBWorks space
 
15 Howto Customization Look And Feel
15 Howto Customization Look And Feel15 Howto Customization Look And Feel
15 Howto Customization Look And Feel
 
Fms Web Cms Training
Fms Web Cms TrainingFms Web Cms Training
Fms Web Cms Training
 
Photoshop by Shannon
Photoshop by ShannonPhotoshop by Shannon
Photoshop by Shannon
 
Photoshop_CS_Tutorial
Photoshop_CS_TutorialPhotoshop_CS_Tutorial
Photoshop_CS_Tutorial
 
Photoshop_CS_Tutorial
Photoshop_CS_TutorialPhotoshop_CS_Tutorial
Photoshop_CS_Tutorial
 
Photoshop cs tutorial
Photoshop cs tutorialPhotoshop cs tutorial
Photoshop cs tutorial
 
Photoshop
PhotoshopPhotoshop
Photoshop
 
Basic Web Design In Dreamweaver
Basic Web Design In DreamweaverBasic Web Design In Dreamweaver
Basic Web Design In Dreamweaver
 
IEEE-Template.doc
IEEE-Template.docIEEE-Template.doc
IEEE-Template.doc
 
HTML5 - Insert images and Apply page backgrounds
HTML5 - Insert images and Apply page backgroundsHTML5 - Insert images and Apply page backgrounds
HTML5 - Insert images and Apply page backgrounds
 
Word beginning practice activities
Word beginning practice activitiesWord beginning practice activities
Word beginning practice activities
 
How to Design a Logo. User Guide for Logo Templates
How to Design a Logo. User Guide for Logo TemplatesHow to Design a Logo. User Guide for Logo Templates
How to Design a Logo. User Guide for Logo Templates
 
Class 20
Class 20Class 20
Class 20
 
Logo with photoshop
Logo with photoshopLogo with photoshop
Logo with photoshop
 

Recently uploaded

"ML in Production",Oleksandr Bagan
"ML in Production",Oleksandr Bagan"ML in Production",Oleksandr Bagan
"ML in Production",Oleksandr BaganFwdays
 
What's New in Teams Calling, Meetings and Devices March 2024
What's New in Teams Calling, Meetings and Devices March 2024What's New in Teams Calling, Meetings and Devices March 2024
What's New in Teams Calling, Meetings and Devices March 2024Stephanie Beckett
 
From Family Reminiscence to Scholarly Archive .
From Family Reminiscence to Scholarly Archive .From Family Reminiscence to Scholarly Archive .
From Family Reminiscence to Scholarly Archive .Alan Dix
 
Developer Data Modeling Mistakes: From Postgres to NoSQL
Developer Data Modeling Mistakes: From Postgres to NoSQLDeveloper Data Modeling Mistakes: From Postgres to NoSQL
Developer Data Modeling Mistakes: From Postgres to NoSQLScyllaDB
 
unit 4 immunoblotting technique complete.pptx
unit 4 immunoblotting technique complete.pptxunit 4 immunoblotting technique complete.pptx
unit 4 immunoblotting technique complete.pptxBkGupta21
 
SIP trunking in Janus @ Kamailio World 2024
SIP trunking in Janus @ Kamailio World 2024SIP trunking in Janus @ Kamailio World 2024
SIP trunking in Janus @ Kamailio World 2024Lorenzo Miniero
 
A Journey Into the Emotions of Software Developers
A Journey Into the Emotions of Software DevelopersA Journey Into the Emotions of Software Developers
A Journey Into the Emotions of Software DevelopersNicole Novielli
 
Ensuring Technical Readiness For Copilot in Microsoft 365
Ensuring Technical Readiness For Copilot in Microsoft 365Ensuring Technical Readiness For Copilot in Microsoft 365
Ensuring Technical Readiness For Copilot in Microsoft 3652toLead Limited
 
Passkey Providers and Enabling Portability: FIDO Paris Seminar.pptx
Passkey Providers and Enabling Portability: FIDO Paris Seminar.pptxPasskey Providers and Enabling Portability: FIDO Paris Seminar.pptx
Passkey Providers and Enabling Portability: FIDO Paris Seminar.pptxLoriGlavin3
 
TrustArc Webinar - How to Build Consumer Trust Through Data Privacy
TrustArc Webinar - How to Build Consumer Trust Through Data PrivacyTrustArc Webinar - How to Build Consumer Trust Through Data Privacy
TrustArc Webinar - How to Build Consumer Trust Through Data PrivacyTrustArc
 
Nell’iperspazio con Rocket: il Framework Web di Rust!
Nell’iperspazio con Rocket: il Framework Web di Rust!Nell’iperspazio con Rocket: il Framework Web di Rust!
Nell’iperspazio con Rocket: il Framework Web di Rust!Commit University
 
New from BookNet Canada for 2024: BNC CataList - Tech Forum 2024
New from BookNet Canada for 2024: BNC CataList - Tech Forum 2024New from BookNet Canada for 2024: BNC CataList - Tech Forum 2024
New from BookNet Canada for 2024: BNC CataList - Tech Forum 2024BookNet Canada
 
Training state-of-the-art general text embedding
Training state-of-the-art general text embeddingTraining state-of-the-art general text embedding
Training state-of-the-art general text embeddingZilliz
 
Transcript: New from BookNet Canada for 2024: BNC CataList - Tech Forum 2024
Transcript: New from BookNet Canada for 2024: BNC CataList - Tech Forum 2024Transcript: New from BookNet Canada for 2024: BNC CataList - Tech Forum 2024
Transcript: New from BookNet Canada for 2024: BNC CataList - Tech Forum 2024BookNet Canada
 
Gen AI in Business - Global Trends Report 2024.pdf
Gen AI in Business - Global Trends Report 2024.pdfGen AI in Business - Global Trends Report 2024.pdf
Gen AI in Business - Global Trends Report 2024.pdfAddepto
 
Merck Moving Beyond Passwords: FIDO Paris Seminar.pptx
Merck Moving Beyond Passwords: FIDO Paris Seminar.pptxMerck Moving Beyond Passwords: FIDO Paris Seminar.pptx
Merck Moving Beyond Passwords: FIDO Paris Seminar.pptxLoriGlavin3
 
A Deep Dive on Passkeys: FIDO Paris Seminar.pptx
A Deep Dive on Passkeys: FIDO Paris Seminar.pptxA Deep Dive on Passkeys: FIDO Paris Seminar.pptx
A Deep Dive on Passkeys: FIDO Paris Seminar.pptxLoriGlavin3
 
Digital Identity is Under Attack: FIDO Paris Seminar.pptx
Digital Identity is Under Attack: FIDO Paris Seminar.pptxDigital Identity is Under Attack: FIDO Paris Seminar.pptx
Digital Identity is Under Attack: FIDO Paris Seminar.pptxLoriGlavin3
 
DevEX - reference for building teams, processes, and platforms
DevEX - reference for building teams, processes, and platformsDevEX - reference for building teams, processes, and platforms
DevEX - reference for building teams, processes, and platformsSergiu Bodiu
 
WordPress Websites for Engineers: Elevate Your Brand
WordPress Websites for Engineers: Elevate Your BrandWordPress Websites for Engineers: Elevate Your Brand
WordPress Websites for Engineers: Elevate Your Brandgvaughan
 

Recently uploaded (20)

"ML in Production",Oleksandr Bagan
"ML in Production",Oleksandr Bagan"ML in Production",Oleksandr Bagan
"ML in Production",Oleksandr Bagan
 
What's New in Teams Calling, Meetings and Devices March 2024
What's New in Teams Calling, Meetings and Devices March 2024What's New in Teams Calling, Meetings and Devices March 2024
What's New in Teams Calling, Meetings and Devices March 2024
 
From Family Reminiscence to Scholarly Archive .
From Family Reminiscence to Scholarly Archive .From Family Reminiscence to Scholarly Archive .
From Family Reminiscence to Scholarly Archive .
 
Developer Data Modeling Mistakes: From Postgres to NoSQL
Developer Data Modeling Mistakes: From Postgres to NoSQLDeveloper Data Modeling Mistakes: From Postgres to NoSQL
Developer Data Modeling Mistakes: From Postgres to NoSQL
 
unit 4 immunoblotting technique complete.pptx
unit 4 immunoblotting technique complete.pptxunit 4 immunoblotting technique complete.pptx
unit 4 immunoblotting technique complete.pptx
 
SIP trunking in Janus @ Kamailio World 2024
SIP trunking in Janus @ Kamailio World 2024SIP trunking in Janus @ Kamailio World 2024
SIP trunking in Janus @ Kamailio World 2024
 
A Journey Into the Emotions of Software Developers
A Journey Into the Emotions of Software DevelopersA Journey Into the Emotions of Software Developers
A Journey Into the Emotions of Software Developers
 
Ensuring Technical Readiness For Copilot in Microsoft 365
Ensuring Technical Readiness For Copilot in Microsoft 365Ensuring Technical Readiness For Copilot in Microsoft 365
Ensuring Technical Readiness For Copilot in Microsoft 365
 
Passkey Providers and Enabling Portability: FIDO Paris Seminar.pptx
Passkey Providers and Enabling Portability: FIDO Paris Seminar.pptxPasskey Providers and Enabling Portability: FIDO Paris Seminar.pptx
Passkey Providers and Enabling Portability: FIDO Paris Seminar.pptx
 
TrustArc Webinar - How to Build Consumer Trust Through Data Privacy
TrustArc Webinar - How to Build Consumer Trust Through Data PrivacyTrustArc Webinar - How to Build Consumer Trust Through Data Privacy
TrustArc Webinar - How to Build Consumer Trust Through Data Privacy
 
Nell’iperspazio con Rocket: il Framework Web di Rust!
Nell’iperspazio con Rocket: il Framework Web di Rust!Nell’iperspazio con Rocket: il Framework Web di Rust!
Nell’iperspazio con Rocket: il Framework Web di Rust!
 
New from BookNet Canada for 2024: BNC CataList - Tech Forum 2024
New from BookNet Canada for 2024: BNC CataList - Tech Forum 2024New from BookNet Canada for 2024: BNC CataList - Tech Forum 2024
New from BookNet Canada for 2024: BNC CataList - Tech Forum 2024
 
Training state-of-the-art general text embedding
Training state-of-the-art general text embeddingTraining state-of-the-art general text embedding
Training state-of-the-art general text embedding
 
Transcript: New from BookNet Canada for 2024: BNC CataList - Tech Forum 2024
Transcript: New from BookNet Canada for 2024: BNC CataList - Tech Forum 2024Transcript: New from BookNet Canada for 2024: BNC CataList - Tech Forum 2024
Transcript: New from BookNet Canada for 2024: BNC CataList - Tech Forum 2024
 
Gen AI in Business - Global Trends Report 2024.pdf
Gen AI in Business - Global Trends Report 2024.pdfGen AI in Business - Global Trends Report 2024.pdf
Gen AI in Business - Global Trends Report 2024.pdf
 
Merck Moving Beyond Passwords: FIDO Paris Seminar.pptx
Merck Moving Beyond Passwords: FIDO Paris Seminar.pptxMerck Moving Beyond Passwords: FIDO Paris Seminar.pptx
Merck Moving Beyond Passwords: FIDO Paris Seminar.pptx
 
A Deep Dive on Passkeys: FIDO Paris Seminar.pptx
A Deep Dive on Passkeys: FIDO Paris Seminar.pptxA Deep Dive on Passkeys: FIDO Paris Seminar.pptx
A Deep Dive on Passkeys: FIDO Paris Seminar.pptx
 
Digital Identity is Under Attack: FIDO Paris Seminar.pptx
Digital Identity is Under Attack: FIDO Paris Seminar.pptxDigital Identity is Under Attack: FIDO Paris Seminar.pptx
Digital Identity is Under Attack: FIDO Paris Seminar.pptx
 
DevEX - reference for building teams, processes, and platforms
DevEX - reference for building teams, processes, and platformsDevEX - reference for building teams, processes, and platforms
DevEX - reference for building teams, processes, and platforms
 
WordPress Websites for Engineers: Elevate Your Brand
WordPress Websites for Engineers: Elevate Your BrandWordPress Websites for Engineers: Elevate Your Brand
WordPress Websites for Engineers: Elevate Your Brand
 

Converting Publications to eBooks, Step by step

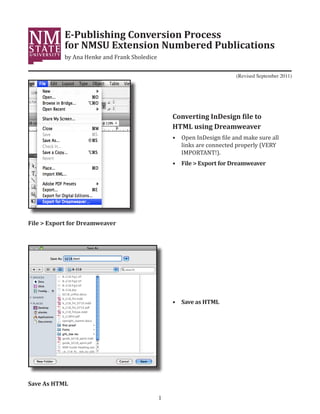
  • 1. E-Publishing Conversion Process for NMSU Extension Numbered Publications by Ana Henke and Frank Sholedice (Revised September 2011) Converting InDesign file to • Open InDesign file and make sure all HTML using Dreamweaver links are connected properly (VERY IMPORTANT!). • File > Export for Dreamweaver File > Export for Dreamweaver • Save as HTML Save As HTML 1
  • 2. General: select document; leave bullets and numbers at its default. Export Options: General Copy Images (select optimized), Images: Image conversion (select JPEG) JPEG Options (select High) Export Options: Images Advanced: select Empty CSS Declarations Then click Export Export Options: Advanced 2
  • 3. Before you start developing the HTML file, you’ll need to convert the PDF of masthead into JPEG graphic. Open pub PDF in Photoshop. The Import PDF box is displayed. Make sure that the first page of the document is selected. Leave the resolution at 300 so that the file size is still large. Click OK. Go to Image > Canvas Size. You’ll need to enlarge the size of the canvas (or page) to 8 x 10 so that you can have a small margin around the page. Click OK. Once the canvas size is reset, crop out the masthead from the page. Then, select Layer and then Flatten Image (that is what gives you the white background instead of the gray checkered pattern). 3
  • 4. Use the eraser tool to erase the superscript next to the author name. Select Image, then Image Size and change the resolution to 72dpi and save the file as a JPEG. Make sure that NONE of the buttons at the botton are checked. Save at the highest quality JPEG setting. Remember to size the masthead to You need to SAVE the file, then reopen a width of 785 pixels. Image size—click all the boxes, so that you can access pixels. 4
  • 5. Masthead from publication should be made Overview of new HTML format for pubs into graphic. Remove the superscript regarding author titles in Photoshop. Don’t forget to add the word “Author(s):” followed by author(s) information below masthead (text should be BOLD). Also add the word “Respectively” when there is more than one author as shown here. Apply basic subhead styles to text (start with sub 2). Bold photo captions. Add lead author photo and bio before the closing information to all new/revised publications. Place ACES contact information, copyright permission and EEO statement at the end of file in this order. Place “Printed and electronically distributed” line at the end of the HTML file in BOLD. 5
  • 6. After you export a file for Dreamweaver, an image folder is automatically generated along with an HTML file. Remember ALL styles have been stripped out of this HTML file. You’ll be applying styles to this file in Dreamweaver, which will be transfered into the eBook formats. Open the HTML file in Dreamweaver. Delete masthead shell graphic and the text what would fill it like pub and replace with masthead graphic you title, pub number, authors names, etc. developed from PDF in Photoshop. If the masthead has superscripts, go back into Photoshop and delete them. Insert new masthead graphic by clicking Insert > Image. After you’ve selected which image you want to insert, this Image Tag box comes up—just click OK. Since you’ve sized the graphic in Photoshop, all you need to do is insert it in the document. 6
  • 7. It is important to keep the author’s New graphic inserted. title line in its own separate cell. If you don’t, it appears much too close to the masthead on the web. The rest of the content should be one cell. Highlight the subhead text and click the appropriate style throughout the publication (remember the styles have been stripped out). Apply the heading styles the way you would for any publication, but you must start with HEADING 2! TIP: If subheads are in ALL CAPS, use MS Word “change case” option to correct. Select “title” option. If this formatting tools panel doesn’t appear, go to the pull-down menu under Modify > Selection Properties. NOTE: Tables are more clearly/easily displayed online and in the iPad (ePub format) by using the table grid option. To insert a table, click the Table button on the side menu options. Then type in the number of rows and columns desired. 7
  • 8. Using Photoshop to resize and insert photos into HTML file— after they were converted for Dreamweaver from InDesign. When you export a document for Dreamweaver, the software creates an HTML file and resizes the photos/ graphics. It also puts all the graphics into one folder. Because we use high resolution photos for our publications, when Dreamweaver converts our photos into JPG files it ends up increasing the “Document size.” So, you’ll need to open the files in Photoshop to resize them. Click Image > Image Size When resizing a photo, you must check all of the following boxes: Scale Styles, Constrain Proportions and Resample Image. Next, type in 400 pixels in the width box for all photos. If you want to group photos together, just make them two-photos wide. Hopefully, the photo will have a high enough resolution for the 400 pixel width. If not, 350 will be fine. When you open the document in Dream- weaver again, the resized photos will automatically be updated in the HTML file. Note: If you are inserting a lineart im- age/illustration that contains text, the image width should be 600 pixels. 8
  • 9. To insert the horizontal rule, just put the cursor where you’d like to place the rule and click the horizontal rule button on the right side panel. After formatting your publication, you’ll need to add the head tags to the HTML code (keywords, meta description and alt tags). Place your cursor directly after <head>. This is where you’ll be inserting the head tags. Insert > HTML > Head Tags > Keywords 9
  • 10. Copy and paste the keywords into this box and click OK. Make sure that “NMSU Extension” is a keyword to ALL Extension pubs! and “NMSU Experiment Station” is a keyword for AES pubs. The keywords are then inserted into the html code. The same method allows you to insert the description as well (Insert > HTML > Head Tags > Descriptions). 10
  • 11. Now, you need to add the Alt tag (or photo description) First, click the photo. Then copy and past the Alt tag information into the Alt box located on the bottom toolbar. After it is pasted in, the information is inserted into the HTML code. Note: ONLY figures require alt tags! Also, if you replace a figure, you’ll need to reinsert the alt tags!! You are DONE with the Head tags!! After this step, give to editor to review content. After you make his corrections let supervisor know HTML file is ready for review. 11
  • 12. You will need to save two HTML files. One for the web and the other for the e-publishing conversion process. The HTML file for the web includes everything you just added to the file. The file name should be the publication number (EX: B218.html). For the HTML file for e-publishing, delete the masthead graphic because you are going to create a cover for the eBooks. The file name should be the publication number with eBook added (EX: B218eBook.html). From now on each electronic publication folder should have four folders: (Main folder: B218; Subfolders: B218eBook, B218HTML, B218InDesign) plus the B218.PDF file. 12
  • 13. Before converting the HTML file into an ePub or Mobi file, you’ll need to typeset the pub’s cover page. I’ve set up an eBook cover template in InDesign with character styles. After you layout the eBook cover, let editor review it for text accuracy and have supervisor review the layout. A hard copy or PDF version is fine. Don’t forget to insert the pub name, number, author’s name(s) and title(s) before the publication content! This is necessary because the Kindle often skips the cover page when displaying an eBook. 13
  • 14. After you typeset the cover, save it as a graphic like you did the masthead by rasterizing it in Photoshop. Remember that the resolution needs to be 300 AND leave the image size AS IS. It is not necessary to enlarge the canvas to 8 X 10 like for the masthead. CROP the image so that it appears to have a FULL BLEED!! Then Flatten the image and save as a JPEG. This is the image file that will be added to eBook in calibre. 14
  • 15. Calibre Tools Add Edit Convert Save Remove User’s books metadata books View to disk books manual Preferences Converting HTML file to ePUB & MOBI formats using Calibre Before converting the HTML file into an ePUB or MOBI format, you need to open the file in Calibre by clicking the Add books button at top left and selecting the HTML file and clicking Open. 15
  • 16. • The first thing you need to do is create the metadata for the publication. Click the Edit metadata button at the top left corner and then just start filling in the information. • Remember to add in pub number BEFORE title! • Copy and paste keywords that have been provided by editors for this publication. • Once you are done with this, you’ll need to replace the generic book cover with the cover you typeset. Publisher: New Mexico State University Cooperative Extension Service • Click the “Change cover image” button and select the file. 16
  • 17. Once you have updated the metadata and inserted the cover graphic, you are ready to convert the file. Click the “Convert Books” button. Click Table of Contents icon at left. Make sure the box Do to the Table of Contents IS not add detected chapters CHECKED Click Look & Feel icon at left, In the Look & Feel menu, click the drop-down menu to the right of Text justification: and select Left align Once these steps are completed, you need to decide if you want the book to be in EPUB or MOBI format. 17
  • 18. For MOBI format Click MOBI on the Output format button at top right corner. Make sure the box Do not book IS CHECKED. add Table of Contents to Also click the MOBI Output button on the left side panel. Click OK at bottom right to convert file. For EPUB format Click EPUB on the Output format button at top right corner. Click Do not split on step! If this is not checked, page breaks. Important blank pages will appear throughout your eBook on the iPad! Also click the EPUB Output button on the left side panel. Click OK at bottom right to convert file. 18
  • 19. After it is converted into an ePUB or Mobi, it shows up on the list of e-books available in your library. Now, you can view it via Calibre, by clicking the title you want and clicking the view button. View of eBook. After eBook file is done, upload the eBooks to our office eReaders to see how the files are work- ing. Have supervisor and editor double check eBooks on readers as well. If they work properly on all eReaders, you can forward eBook files to webmaster for posting. 19
  • 20. Once you are ready to send the eBook and html files to webmaster, remember IMPORTANT: This is how your all you need to send is the MOBI file and files should be organized and the EPUB file. You don’t need to send named once you have completed her the eBook cover grraphic OR the publication. eBook HTML file. Everything is already included in the MOBI/EPUB formats! When you are done with the HTML files, you can just email her the HTML file along with the individual graphics files. I’ve had no problem emailing the files like I’ve shown above. REMEMBER: ONLY send the webmaster the one HTML file to be posted to the web and NOT the eBook HTML file! CONGRATUATIONS! You’ve converted an Extension print publication into HTML and eBook versions! 20