How to connect database file to a 3-Tier Architecture Application and obtain the Connection String...
•
0 likes•880 views

This is a tutorial for connecting the database file to a 3 Layer Architecture Project and obtain the connection string on the run time so that you can deploy your project

Recommended
More Related Content
What's hot
What's hot (20)
Similar to How to connect database file to a 3-Tier Architecture Application and obtain the Connection String...
Similar to How to connect database file to a 3-Tier Architecture Application and obtain the Connection String... (20)
More from Syed Farjad Zia Zaidi
More from Syed Farjad Zia Zaidi (20)
Recently uploaded
Recently uploaded (20)
How to connect database file to a 3-Tier Architecture Application and obtain the Connection String...
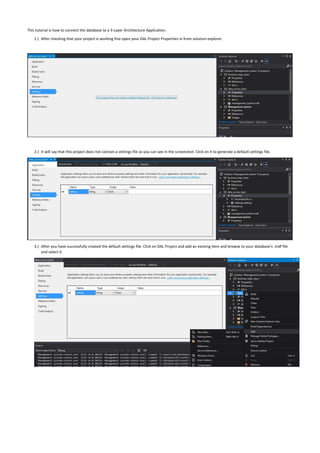
- 1. This tutorial is how to connect the database to a 3-Layer Architecture Application. 1.) After checking that your project is working fine open your DAL Project Properties in from solution explorer. 2.) It will say that this project does not contain a settings file as you can see in the screenshot. Click on it to generate a default settings file. 3.) After you have successfully created the default settings file. Click on DAL Project and add an existing item and browse to your database’s .mdf file and select it.
- 2. 4.) When you successfully added the .mdf in your DAL project you will be able to see it in the solution explorer. Now go back to Properties -> Settings and write “ConString” under the Name column. Select (Connection String) from the Type drop down. Select Application from the Scope drop down. Now in the Value column click to select the Database file. First select Server Name and then Attach a Database file -> Select your .mdf file you just added to your DAL Project.
- 3. 5.) Now go to your code… 6.) You can see that the Connection String is hard coded and thus it will have to be changed for every PC. Let’s just go with the flow now and we will come back later to see what the differences in hard coded connection string vs. Connection strings that are obtained on the runtime are. Now change this: string ConnectionString = "Data Source=(LocalDB)v11.0;AttachDbFilename=C:UsersFarjadDownloadsManagement sysManagement systemManagement systemmanagement_system.mdf;Integrated Security=True"; To this: string ConnectionString = Properties.Settings.Default.ConString; 7.) Now run your project...
- 4. And as you can see it is working fine… 8.) Now that everything is working fine let’s see what we just did and how does it work… First this is the hard coded connection string: "Data Source=(LocalDB)v11.0;AttachDbFilename=C:UsersFarjadDownloadsManagement sysManagement systemManagement systemmanagement_system.mdf;Integrated Security=True" Now this is the connection string that we created in Properties->Settings: “Data Source=GAMING;AttachDbFilename=|DataDirectory|management_system.mdf;Integrated Security=True” As you can see that both are very different but the difference that I want to point out to you guys is after the “AttachDbFilename=”. You can see that the first connection string contains the path to .mdf file which will obviously not available on other PCs whereas second connection string contain |DataDirectory| which is obtained at the run time or more specifically when you deploy your software a DataDirectory is automatically created and your .mdf file will be stored there. Now you have a working software… You can deploy it on any PC you want and it will work just fine if the software requirements are fulfilled. Remember me in your prayers. Regards Syed Farjad Zia Zaidi