6. Step One: Install WampServer Keep with the Default location 1. Click Next I like to Keep my Desktop clean So I leave these Unchecked, Plus it should start automatically on start up Click Next
11. You will be taken to this Page. Now set Privileges ! Step Two: Configure WampServer 1.Click Add New User
12. Step Two: Configure WampServer Step 1: Fill in all four blocks and pick your Password Step 2: Click Check All Step 3: Click Go
13. Step Two: Configure WampServer Congratulations the WampServer is ready Now it is time to Install WordPress
14. Step Three: Install WordPress Extract WordPress Files to Desktop Step 1: Right Click Extract all Step 2: Make sure it is going to the desktop Step 3: Check this box Step 4: Click Extract
15. Step Three: Install WordPress Step 1 Wait Step 2 Open wordpress by double clicking
17. Step Three: Install WordPress Click the Window Button + E Or open windows Explorer Step 1 Double Click C: Step 2 Double Click Wamp
18. Step Three: Install WordPress Step 1 Double Click www Step 2 Right Click New Folder
19. Step Three: Install WordPress Step 1 Name you Folder the sites Name Step 2 Double Click the sites folder Step 3 Click Ctrl + V Make sure the folder looks like this
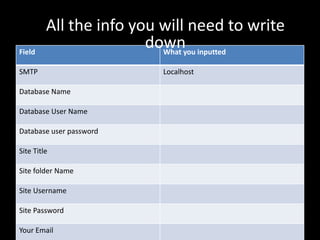
20. Step Three: Install WordPress Step 1: Open FireFox or Windows Explorer Step 2: In the address bar type http://localhost/BloatFreeLife/wp-admin Replace BloatFreeLife with your sites Name Step 3: Hit Enter Step 4: Click Create Configuration File
23. Step Three: Install WordPress Step 1:Click Run the Install Step 2: Fill In your sites name Username Password And you email address Step 3:Click Install WordPress
24. Step Three: Install WordPress Step 1:Click Log In Step 2: You are ready to log in