How to perform quick action for a specific record from the map using dynamics crm map integration
•
0 likes•30 views

A technical blog for the users of our tool MappyField 365 - a Dynamics 365 map integration. Learn how to perform quick actions for entity records individually from the map using MappyField 365 for the DynamicsCRM users.

Recommended
More Related Content
Similar to How to perform quick action for a specific record from the map using dynamics crm map integration
Similar to How to perform quick action for a specific record from the map using dynamics crm map integration (20)
More from AppJetty
More from AppJetty (20)
Recently uploaded
Recently uploaded (20)
How to perform quick action for a specific record from the map using dynamics crm map integration
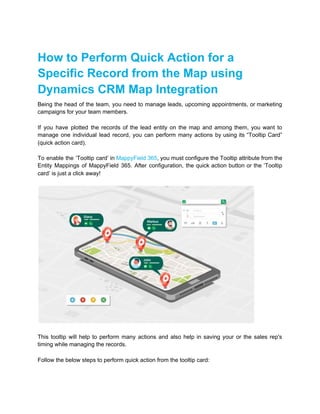
- 1. How to Perform Quick Action for a Specific Record from the Map using Dynamics CRM Map Integration Being the head of the team, you need to manage leads, upcoming appointments, or marketing campaigns for your team members. If you have plotted the records of the lead entity on the map and among them, you want to manage one individual lead record, you can perform many actions by using its “Tooltip Card” (quick action card). To enable the ‘Tooltip card’ in MappyField 365, you must configure the Tooltip attribute from the Entity Mappings of MappyField 365. After configuration, the quick action button or the ‘Tooltip card’ is just a click away! This tooltip will help to perform many actions and also help in saving your or the sales rep's timing while managing the records. Follow the below steps to perform quick action from the tooltip card:
- 2. - Plot the records on the map - Enable the entity records’ label to find a required record - Open tooltip by clicking on a specific record - Perform different actions Step 1: Navigate to MappyField 365 Select “MappyField 365” from the Dynamics 365 dashboard or app list from the header. Step 2: Plot the records on the map By selecting the ‘Entity’ and its ‘View’, plot the records on the map. Here, three entities are selected: Accounts, Contacts, and Leads to plot the records.
- 3. After selecting the entity (entities), click on the Search button to plot all the records of the selected entities on the map. From the left side of the map, you will find the ‘Advanced Options’ to manage the records on the map. Step 3: Search the record by enabling the labels
- 4. By clicking on the first option- “Layer Card”, you will get the details of the entities which are plotted on the map. You can enable/disable the records of any entity on the map and you can show/hide the records’ label (name) of any entity. By enabling the record’s label of any specific entity, you can search your required records. Here the labels of the ‘Lead’ entity records are shown.
- 5. Step 4: Click on one pushpin (record) on which you want to perform the action Once you find your record on the map, by clicking on any specific record (pin), you will get a slider of the tooltip from the right side. You will get the details in the tooltip related to that record which was configured from the backend (Entity Mappings → Tooltip attribute). From the ‘tooltip’, you can perform many actions for the selected record.
- 6. Step 5: Perform different actions From this tooltip card, you can manage and perform different actions for that selected record. Note: You will get the quick actions in the tooltip card of the selected records based on the tooltip attribution in the Entity mappings. The different entities could have different quick actions.
- 7. > Record’s Title: By clicking on the Title, it will open the record from the CRM.
- 8. > Directions: You can set that record’s address as ‘origin’ or ‘destination’. ● Add to Origin: By clicking this option, the selected record will add to ‘Origin’. ● Add to Destination: By clicking this option the selected record will add to ‘Destination’. When you click on ‘Add to Origin’, you will navigate to the ‘Routes’ tab where you can see the record’s address added into the Origin (If you have selected the ‘Destination’, the address would be added to the Destination).
- 9. On the map, the ‘Starting Point’ will be assigned as “A” with the address of that record displayed. - Share & Assign: You can send the Email, Assign the Owner, and Add to Marketing List. ● Send Email: You can send an email directly to the selected record. Select the Email Template from the list and send the email.
- 10. ● Assign Owner: You can assign the selected record to a specific user or team by clicking on the “Assign Owner” option. You need to select the user from the CRM user list to whom you want to assign this record. ● Add to Marketing List: You can add any record to a specific Marketing List by clicking on “Add to Marketing List” by selecting ‘Add to an existing list’ or ‘Add to a new list’. You can perform other actions as follows:
- 11. - Proximity Search: You can search the record which is covered within the defined proximity of that record. - Related record: Find the related records for that particular record. - Point of Interest: You can explore the nearby places (Hospital/Pharmacy/Hotel/Restaurant etc;) - Knowledge Article: You can refer to the available knowledge article in CRM. - Delete Record: You can delete that particular record. - Add Task: You can add a task for that particular record - Add Appointment: Add an appointment for the record from the map. - If the records belong to the lead entity, you can select the lead records as Qualify or Disqualify. So, using quick actions (Tooltip card), you will not require to navigate the menu for a specific action/change from the CRM manually every time, you just need to configure the tooltip attribute and display the action in the tooltip card to manage the current activities for a specific record on the map.
- 12. Alternative to MapPoint If you are facing any issues with any feature, feel free to reach out to us at sales@appjetty.com or you can also tweet at us at @appjetty. Source:https://www.appjetty.com/blog/perform-quick-action-specific-record-from-map-using-dyn amicscrm-map-integration/