SlideShare a Scribd company logo
1 of 13
Firstly, I had to find out how to download a font onto the computer for future editing. By asking around, a fellow companion from my group was able to direct me in how to succeed in downloading a font. (This tutorial is made for fonts from  www.dafont.com )  1. 2. Find a font you like then click “Download” As shown above, click “Open”. This will open the font in a specific folder.
3. 4. 5. File    Extract all. This will enable you to extract the file into a folder of your choice.  The next two steps are simple, click next both times as there is no need for any change.
The fonts will then appear in an unzipped folder, which enables you to copy them into a folder of your choice. Once again, no need for change so click “next”  6. 7.
Now, Help    Help and Support Centre then type “Fonts” in the search bar. The computer will then search for all requests about fonts. 8. 9.
Click on the “Full-text Search Matches” followed by clicking No. 5 – Add a new font to your computer    then click No.1 and open the fonts folder then you’re almost done. 10. 11.
Last two steps. File    Install New Font. Then once you have located your folder of where you’ve saved the fonts in, click on the “True type”, un-tick the box at the bottom and click ok. Congratulations the font is now installed. 12. 13.
How I created the front cover
Using the scale tool, I was able to skew my graphic to become a final design. Create a box graphic  Insert text and choose font and colour Edit the text and graphic with a drop shadow and glow Final design.
I wanted to get the image to be in front of the masthead. To do this I had to make a copy of the image and cut out the head, then insert the head as a new layer to overlap the masthead. I used the lasoo tool to cut out part of the image which I then copied. I pasted the new image as a new layer which overlapped the masthead. I slowly cut out the black that I didn’t need which just left the head so the image looked as if it had never been edited.
How I created my contents
To create the signature, I simply downloaded another font of  www.dafont.com  by using the previous tutorial Firstly, I created a box using the rectangle tool.  I then added the text “Cover Story” and edited the graphic with a drop shadow and a black outline.
How I created the double page spread.
By adjusting the transparency, I was able to maintain the image’s appearance in the background without it being too distorted. I adjusted the image to keep the continuity of the house style. To do this, I had to crop the image, and then with the Scale tool, flip my image in a mirrors reflection.

More Related Content

What's hot

Computer Generated Flannel Boards
Computer Generated Flannel BoardsComputer Generated Flannel Boards
Computer Generated Flannel BoardsFantasy BookLover
 
Intranet Online Tutorial
Intranet Online TutorialIntranet Online Tutorial
Intranet Online Tutorialgrandmamj
 
Manage your life more effectively with
Manage your life more effectively withManage your life more effectively with
Manage your life more effectively withHaiti1
 
Embed an ePaper into your website
Embed an ePaper into your websiteEmbed an ePaper into your website
Embed an ePaper into your websiteDanielle Eubanks
 
How to design your own bumper sticker
How to design your own bumper stickerHow to design your own bumper sticker
How to design your own bumper stickerSameDay Printing
 
Photoshop tutorial: how to add text to an image.
Photoshop tutorial: how to add text to an image.Photoshop tutorial: how to add text to an image.
Photoshop tutorial: how to add text to an image.manonm
 
Dreamweaver-Day 03: AP Elements & Text Formatting
Dreamweaver-Day 03: AP Elements & Text FormattingDreamweaver-Day 03: AP Elements & Text Formatting
Dreamweaver-Day 03: AP Elements & Text FormattingJoe Prindiville
 
Windows 7 and Office 2010
Windows 7 and Office 2010Windows 7 and Office 2010
Windows 7 and Office 2010Jenna Cooper
 
How to use Canva in the classroom
How to use Canva in the classroomHow to use Canva in the classroom
How to use Canva in the classroomFiona Beal
 
Week 1 lesson 4 for Intro to tech class
Week 1 lesson 4 for Intro to tech classWeek 1 lesson 4 for Intro to tech class
Week 1 lesson 4 for Intro to tech classrdubroy
 
Production diary – ancillary task 1
Production diary – ancillary task 1Production diary – ancillary task 1
Production diary – ancillary task 1michellegrace95
 
A2WPress Woodberry Theme Documentation
A2WPress Woodberry Theme DocumentationA2WPress Woodberry Theme Documentation
A2WPress Woodberry Theme DocumentationA2WPress
 
Instructions course English Unplugged
Instructions course English UnpluggedInstructions course English Unplugged
Instructions course English Unpluggedoaktree
 
Instructions
InstructionsInstructions
Instructionsoaktree
 
An Intro To Image Editing With PowerPoint
An Intro To Image Editing With PowerPointAn Intro To Image Editing With PowerPoint
An Intro To Image Editing With PowerPointGarry Davis
 

What's hot (20)

Benefits Of Using Canva
Benefits Of Using CanvaBenefits Of Using Canva
Benefits Of Using Canva
 
Computer Generated Flannel Boards
Computer Generated Flannel BoardsComputer Generated Flannel Boards
Computer Generated Flannel Boards
 
How to use Canva
How to use CanvaHow to use Canva
How to use Canva
 
Intranet Online Tutorial
Intranet Online TutorialIntranet Online Tutorial
Intranet Online Tutorial
 
Manage your life more effectively with
Manage your life more effectively withManage your life more effectively with
Manage your life more effectively with
 
Embed an ePaper into your website
Embed an ePaper into your websiteEmbed an ePaper into your website
Embed an ePaper into your website
 
Training proper
Training properTraining proper
Training proper
 
Weebly set up
Weebly set upWeebly set up
Weebly set up
 
How to design your own bumper sticker
How to design your own bumper stickerHow to design your own bumper sticker
How to design your own bumper sticker
 
Photoshop tutorial: how to add text to an image.
Photoshop tutorial: how to add text to an image.Photoshop tutorial: how to add text to an image.
Photoshop tutorial: how to add text to an image.
 
Dreamweaver-Day 03: AP Elements & Text Formatting
Dreamweaver-Day 03: AP Elements & Text FormattingDreamweaver-Day 03: AP Elements & Text Formatting
Dreamweaver-Day 03: AP Elements & Text Formatting
 
Windows 7 and Office 2010
Windows 7 and Office 2010Windows 7 and Office 2010
Windows 7 and Office 2010
 
How to use Canva in the classroom
How to use Canva in the classroomHow to use Canva in the classroom
How to use Canva in the classroom
 
Week 1 lesson 4 for Intro to tech class
Week 1 lesson 4 for Intro to tech classWeek 1 lesson 4 for Intro to tech class
Week 1 lesson 4 for Intro to tech class
 
Production diary – ancillary task 1
Production diary – ancillary task 1Production diary – ancillary task 1
Production diary – ancillary task 1
 
A2WPress Woodberry Theme Documentation
A2WPress Woodberry Theme DocumentationA2WPress Woodberry Theme Documentation
A2WPress Woodberry Theme Documentation
 
Instructions course English Unplugged
Instructions course English UnpluggedInstructions course English Unplugged
Instructions course English Unplugged
 
Instructions
InstructionsInstructions
Instructions
 
Instructions
InstructionsInstructions
Instructions
 
An Intro To Image Editing With PowerPoint
An Intro To Image Editing With PowerPointAn Intro To Image Editing With PowerPoint
An Intro To Image Editing With PowerPoint
 

Viewers also liked

Audience Identification A2
Audience Identification A2Audience Identification A2
Audience Identification A2MFJ
 
Our production final
Our production finalOur production final
Our production finalMFJ
 
Magazines
MagazinesMagazines
MagazinesMFJ
 
Vybir 61
Vybir 61Vybir 61
Vybir 61Vybir+
 
Primary Data
Primary DataPrimary Data
Primary DataMFJ
 
Evalation of jouralism
Evalation of jouralismEvalation of jouralism
Evalation of jouralismMFJ
 
Journalism
JournalismJournalism
JournalismMFJ
 
Slideshow Of Sketches
Slideshow Of SketchesSlideshow Of Sketches
Slideshow Of SketchesMFJ
 

Viewers also liked (9)

Audience Identification A2
Audience Identification A2Audience Identification A2
Audience Identification A2
 
Our production final
Our production finalOur production final
Our production final
 
Magazines
MagazinesMagazines
Magazines
 
Vybir 61
Vybir 61Vybir 61
Vybir 61
 
Primary Data
Primary DataPrimary Data
Primary Data
 
Evalation of jouralism
Evalation of jouralismEvalation of jouralism
Evalation of jouralism
 
Journalism
JournalismJournalism
Journalism
 
Slideshow Of Sketches
Slideshow Of SketchesSlideshow Of Sketches
Slideshow Of Sketches
 
GIS - Regulamin
GIS - RegulaminGIS - Regulamin
GIS - Regulamin
 

Similar to How to download and install fonts on your computer

6. What have you learnt about technologies from the process of constructing t...
6. What have you learnt about technologies from the process of constructing t...6. What have you learnt about technologies from the process of constructing t...
6. What have you learnt about technologies from the process of constructing t...caitlinhulse
 
Technology
TechnologyTechnology
TechnologyBigSOzza
 
Magazine task 8
Magazine task 8Magazine task 8
Magazine task 8kannkarry
 
6. production reflection
6. production reflection6. production reflection
6. production reflectionDaniel Thompson
 
6. What have you learnt about technologies from the process of constructing t...
6. What have you learnt about technologies from the process of constructing t...6. What have you learnt about technologies from the process of constructing t...
6. What have you learnt about technologies from the process of constructing t...caitlinhulse
 
Preliminary task and planning & research
Preliminary task and planning & researchPreliminary task and planning & research
Preliminary task and planning & researchjudemunday_3092
 
The use of technology
The use of technologyThe use of technology
The use of technologygeorgebligh
 
Process of animating company ident “Planetary Quarantine”
Process of animating company ident “Planetary Quarantine”Process of animating company ident “Planetary Quarantine”
Process of animating company ident “Planetary Quarantine”MarianD
 
How To Make a Business Card on Photoshop
How To Make a Business Card on PhotoshopHow To Make a Business Card on Photoshop
How To Make a Business Card on PhotoshopDesign and Printing
 
The use of technology
The use of technologyThe use of technology
The use of technologygeorgebligh
 
Question 6 AS Media Studies evaluation
Question 6 AS Media Studies evaluationQuestion 6 AS Media Studies evaluation
Question 6 AS Media Studies evaluationQuantumEvo
 
Illustrator portrait project-final
Illustrator portrait project-finalIllustrator portrait project-final
Illustrator portrait project-finalDaniel Downs
 
Perliminary task
Perliminary taskPerliminary task
Perliminary taskzarif7861
 
Career Brochure
Career BrochureCareer Brochure
Career Brochurevsarfin
 
6. production reflection
6. production reflection6. production reflection
6. production reflectionDaniel Thompson
 

Similar to How to download and install fonts on your computer (20)

6. What have you learnt about technologies from the process of constructing t...
6. What have you learnt about technologies from the process of constructing t...6. What have you learnt about technologies from the process of constructing t...
6. What have you learnt about technologies from the process of constructing t...
 
Technology
TechnologyTechnology
Technology
 
Magazine task 8
Magazine task 8Magazine task 8
Magazine task 8
 
6. production reflection
6. production reflection6. production reflection
6. production reflection
 
6. What have you learnt about technologies from the process of constructing t...
6. What have you learnt about technologies from the process of constructing t...6. What have you learnt about technologies from the process of constructing t...
6. What have you learnt about technologies from the process of constructing t...
 
Preliminary task and planning & research
Preliminary task and planning & researchPreliminary task and planning & research
Preliminary task and planning & research
 
The use of technology
The use of technologyThe use of technology
The use of technology
 
Process of animating company ident “Planetary Quarantine”
Process of animating company ident “Planetary Quarantine”Process of animating company ident “Planetary Quarantine”
Process of animating company ident “Planetary Quarantine”
 
Client evaulation
Client evaulationClient evaulation
Client evaulation
 
How To Make a Business Card on Photoshop
How To Make a Business Card on PhotoshopHow To Make a Business Card on Photoshop
How To Make a Business Card on Photoshop
 
The use of technology
The use of technologyThe use of technology
The use of technology
 
Question 6
Question 6Question 6
Question 6
 
Question 6
Question 6Question 6
Question 6
 
Question 6 AS Media Studies evaluation
Question 6 AS Media Studies evaluationQuestion 6 AS Media Studies evaluation
Question 6 AS Media Studies evaluation
 
Illustrator portrait project-final
Illustrator portrait project-finalIllustrator portrait project-final
Illustrator portrait project-final
 
Perliminary task
Perliminary taskPerliminary task
Perliminary task
 
Career Brochure
Career BrochureCareer Brochure
Career Brochure
 
Technologies learnt
Technologies learntTechnologies learnt
Technologies learnt
 
Unit 14 LO3 PowerPoint
Unit 14 LO3 PowerPointUnit 14 LO3 PowerPoint
Unit 14 LO3 PowerPoint
 
6. production reflection
6. production reflection6. production reflection
6. production reflection
 

More from MFJ

Journalism analysis
Journalism analysisJournalism analysis
Journalism analysisMFJ
 
Front cover analysiss
Front cover analysissFront cover analysiss
Front cover analysissMFJ
 
Double page analysiss
Double page analysissDouble page analysiss
Double page analysissMFJ
 
Contents analysis
Contents analysisContents analysis
Contents analysisMFJ
 
Use of Technology
Use of TechnologyUse of Technology
Use of TechnologyMFJ
 
Front cover analysis
Front cover analysisFront cover analysis
Front cover analysisMFJ
 
Double page analysis
Double page analysisDouble page analysis
Double page analysisMFJ
 
Contents analysis
Contents analysisContents analysis
Contents analysisMFJ
 
Evalation of front cover
Evalation of front coverEvalation of front cover
Evalation of front coverMFJ
 
Evalation of double spread page
Evalation of double spread pageEvalation of double spread page
Evalation of double spread pageMFJ
 
Production Phase[1]
Production Phase[1]Production Phase[1]
Production Phase[1]MFJ
 
Radial Analysis
Radial  AnalysisRadial  Analysis
Radial AnalysisMFJ
 

More from MFJ (12)

Journalism analysis
Journalism analysisJournalism analysis
Journalism analysis
 
Front cover analysiss
Front cover analysissFront cover analysiss
Front cover analysiss
 
Double page analysiss
Double page analysissDouble page analysiss
Double page analysiss
 
Contents analysis
Contents analysisContents analysis
Contents analysis
 
Use of Technology
Use of TechnologyUse of Technology
Use of Technology
 
Front cover analysis
Front cover analysisFront cover analysis
Front cover analysis
 
Double page analysis
Double page analysisDouble page analysis
Double page analysis
 
Contents analysis
Contents analysisContents analysis
Contents analysis
 
Evalation of front cover
Evalation of front coverEvalation of front cover
Evalation of front cover
 
Evalation of double spread page
Evalation of double spread pageEvalation of double spread page
Evalation of double spread page
 
Production Phase[1]
Production Phase[1]Production Phase[1]
Production Phase[1]
 
Radial Analysis
Radial  AnalysisRadial  Analysis
Radial Analysis
 

How to download and install fonts on your computer

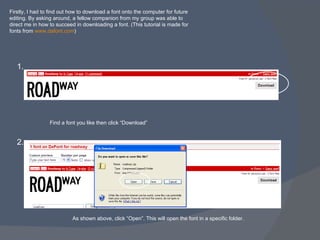
  • 1. Firstly, I had to find out how to download a font onto the computer for future editing. By asking around, a fellow companion from my group was able to direct me in how to succeed in downloading a font. (This tutorial is made for fonts from www.dafont.com ) 1. 2. Find a font you like then click “Download” As shown above, click “Open”. This will open the font in a specific folder.
  • 2. 3. 4. 5. File  Extract all. This will enable you to extract the file into a folder of your choice. The next two steps are simple, click next both times as there is no need for any change.
  • 3. The fonts will then appear in an unzipped folder, which enables you to copy them into a folder of your choice. Once again, no need for change so click “next” 6. 7.
  • 4. Now, Help  Help and Support Centre then type “Fonts” in the search bar. The computer will then search for all requests about fonts. 8. 9.
  • 5. Click on the “Full-text Search Matches” followed by clicking No. 5 – Add a new font to your computer  then click No.1 and open the fonts folder then you’re almost done. 10. 11.
  • 6. Last two steps. File  Install New Font. Then once you have located your folder of where you’ve saved the fonts in, click on the “True type”, un-tick the box at the bottom and click ok. Congratulations the font is now installed. 12. 13.
  • 7. How I created the front cover
  • 8. Using the scale tool, I was able to skew my graphic to become a final design. Create a box graphic Insert text and choose font and colour Edit the text and graphic with a drop shadow and glow Final design.
  • 9. I wanted to get the image to be in front of the masthead. To do this I had to make a copy of the image and cut out the head, then insert the head as a new layer to overlap the masthead. I used the lasoo tool to cut out part of the image which I then copied. I pasted the new image as a new layer which overlapped the masthead. I slowly cut out the black that I didn’t need which just left the head so the image looked as if it had never been edited.
  • 10. How I created my contents
  • 11. To create the signature, I simply downloaded another font of www.dafont.com by using the previous tutorial Firstly, I created a box using the rectangle tool. I then added the text “Cover Story” and edited the graphic with a drop shadow and a black outline.
  • 12. How I created the double page spread.
  • 13. By adjusting the transparency, I was able to maintain the image’s appearance in the background without it being too distorted. I adjusted the image to keep the continuity of the house style. To do this, I had to crop the image, and then with the Scale tool, flip my image in a mirrors reflection.