
Recommended
More Related Content
What's hot
What's hot (9)
Similar to Complete config of payroll
Similar to Complete config of payroll (20)
Recently uploaded
Recently uploaded (20)
Complete config of payroll
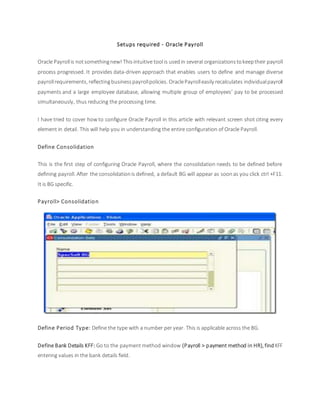
- 1. Setups required - Oracle Payroll Oracle Payrollis notsomethingnew! Thisintuitive tool is usedin several organizationstokeeptheir payroll process progressed. It provides data-driven approach that enables users to define and manage diverse payrollrequirements, reflectingbusinesspayrollpolicies. OraclePayrolleasily recalculates individualpayroll payments and a large employee database, allowing multiple group of employees’ pay to be processed simultaneously, thus reducing the processing time. I have tried to cover how to configure Oracle Payroll in this article with relevant screen shot citing every element in detail. This will help you in understanding the entire configuration of Oracle Payroll. Define Consolidation This is the first step of configuring Oracle Payroll, where the consolidation needs to be defined before defining payroll. After the consolidationis defined, a default BG will appear as soonas you click ctrl +F11. It is BG specific. Payroll> Consolidation Define Period Type: Define the type with a number per year. This is applicable across the BG. Define Bank Details KFF: Go to the payment method window (Payroll > payment method in HR), find KFF entering values in the bank details field.
- 2. Define Payment Method: This is also BG specific. It is a lookup code, find it under Payrollsection (Payroll> Payment methods). Enter all the bank details KFF. Skipping this step may lead to reconciliation issues with CE. Define Payroll: Find this option under Payroll section (Payroll > Description). All you need to do is define a statutory information before defining the entire setup. Here are a few simple steps to help you define Payroll: Step 1: Fill all the fields that are displayed as mandatory Step 2: Now define Payroll (you will not see an error message here) Step 3: This needs to be defined per BG. (Payroll will not be visible if it’s defined in another BG) Step 4: Select the period type defined in earlier step in period type field. Step 5: Now define statutory information Define GL Flexfield MAP: To load legislation code, use create_element_entry API. Define Element Classification:TotalCompensation >Basic>Classification. Ifyouwish tomakethepayment, enable the check box with payment option, else you can enable check box with non-payment option. For deduction like national insurance (NI), we can use credit as follows Define elements – Total Compensation>Basic>Element description (this is done across the BG) Now, click input values button. Element Link This is the path to follow element link - Total Compensation > Basic > Link. This link will help you get the actual link of element to organization, job, position, payroll, salary basis etc. There is also an optional element to give link to all payrolls. If youwish to give this element link to a particularly payroll, then don’t enable the check box link to all payrolls.
- 3. If you want the element to be costed, then enable the radio box costed, enter the FF combinations for costing and balancing and enable the check box transfer to GL Select the element created in the previous step from LOV Salary basis Usethe Salary Basiswindow todefine a salary basis foreachsalary element that needsto be used by salary administration. Thisestablishes adurationforwhich thesalary is quoted, beit hourly, monthly orannually. Find the path to salary basis here - Total compensation > Basic > Salary basis Create employee: Create an employee field by entering the details as required, and maintain the data. Mentionaddress of an employee usingthe addressbutton seen at the header section window. Attach this employee in User Window. Here are a few steps to follow while creating an employee: While creating an employee record, attach payroll to the employee Attach the salary basis – this is important as it defines the salary rate for various elements Enter salary details for each element defined in the salary basis section, click salary button Enter the element entries and click the Entries button Enter entry values and click the button Enter Values Now run a quick pay (select the quick pay option listen under Others button) Input the values and click Start Run button Now, click the button View Results and click SOE (Statement of Earnings) report Youcan alsomake external paymentby clicking the External Payment button and enter the check details. Finally, you can go to people form, select an employee, check the assignments, click others, Select Quick Pay to run payrollfor that employee, before thatensure payrollperiods are open. In somecases youneed to run Quick Prepayments. Once these payroll concurrent requests are completed normal, then can view the payroll results in the view payroll results, if SOE is configured and enabled, then you get complete paystub details. SOE can look as good as Pay slip.
- 4. PS: Thanks for reading the post. Drop an email with your views and suggestions -madhavan.pongoru@suneratech.com. You can also view related posts, SuneraTech products and services in detail here - http://www.suneratech.com/.