Generative AI - Gitex v1Generative AI - Gitex v1.pptx
Microsoft Movie Making 101 with MSP Lead Lim Cheng Lei
1. Windows Live™ Movie Maker
Step-by-step
Get Windows Live™ Movie Maker
Download
Download Windows Live Movie Maker at http://windowslive.com/desktop/moviemaker
Run
After the program is finished downloading, click Start in the lower-left corner of your screen and
type “Movie Maker” in the Search programs and files field. Windows Live Movie Maker will
appear at the top of the list under Programs. Click it to run the program.
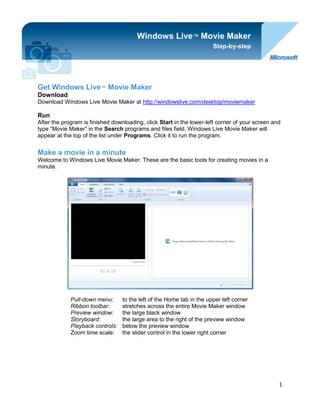
Make a movie in a minute
Welcome to Windows Live Movie Maker. These are the basic tools for creating movies in a
minute.
Pull-down menu: to the left of the Home tab in the upper left corner
Ribbon toolbar: stretches across the entire Movie Maker window
Preview window: the large black window
Storyboard: the large area to the right of the preview window
Playback controls: below the preview window
Zoom time scale: the slider control in the lower right corner
1
2. Add videos and photos
When adding your photos and videos to Windows Live Movie Maker, you have a few options.
If you are starting a new project, you can add content by clicking Drag videos and photos here
or click to browse for them. Or, you can click Add videos and photos on the Home tab in
the ribbon.
When adding videos and photos, you can add multiple files at once by holding the CTRL or
SHIFT keys to select multiple files, and then clicking the Open button.
Watch a video on how to add photos and videos at
http://windowslive.com/Tutorial/MovieMaker/ImportFromPC/Video.
Save your work
Use the pull-down menu on the left and select Save project to save your movie.
Play your movie
To play your movie, you can either press the Play button or press the SPACEBAR
(pressing the SPACEBAR again stops playback).
More Movie Maker magic
AutoMovie
AutoMovie is the simplest way to add “wow” to your content. Once your photos and videos are
in your project, clicking AutoMovie on the Home tab automatically adds crossfade transitions,
automatic pan-and-zoom effects, a title and credit slide, and it asks you if you want to add a
soundtrack. If you click yes, AutoMovie automatically fits your content to your music.
2
3. And even after you click AutoMovie, you can still go back and fine-tune edit your project. Think
of AutoMovie as doing all the hard labor, letting you relax and be the creative director.
Add easy transitions and effects
If you want to add transitions to your content, click the Animations tab on the ribbon to display
options for transitioning from one photo or video to the next. AutoMovie automatically adds a
crossfade transition to each piece of content, but changing the transition is as simple as
selecting the photo or video, navigating to the Animations tab, and clicking another transition to
apply it to your content.
You can mouse-over the options to see a live preview of how one photo or video will transition
into another in the preview window. To see more options, click the down arrow in the lower-right
corner.
More options: For more transition options, click in the lower-
right corner.
When you find a transition you like, click it and it’s automatically added to your video. To add
this transition to multiple items, select a range by clicking the photo or video you want to start
with, then hold down the SHIFT key and click the one you’d like to end your movie with. Then
click the transition you’d like to use and it is applied to the selected range.
Watch a video on easy transitions and effects at
http://windowslive.com/Tutorial/MovieMaker/TransitionsAndEffects/Video.
Add photo effects
Click the Animations tab on the ribbon to display options for panning and zooming individual
photos when they are displayed. To see more options, click the down arrow in the lower-right
corner. AutoMovie automatically adds various pan-and-zoom effects to your photos. If you want
to change the pan-and-zoom effect, simply navigate to the Animations tab, and with your
photo(s) selected click any one of the pan-and-zoom effects to add it to your photos.
3
4. Click the Visual Effects tab on the ribbon to display effects that can be applied to photos and
videos. Mouse-over each effect to see what it would look like before adding it to your photo or
video. When you find one you like, click it, and it is automatically added. To remove that effect
so that it is not applied to your content, click No effect on the visual effects menu (the first one
on the left), and it’s gone.
Watch a video on photo effects at
http://windowslive.com/Tutorial/MovieMaker/PhotoEffects/Video.
Add a movie soundtrack
Click Add Music on the Home tab on the ribbon. Select the song of your choice, and click the
Open button. Once you’ve added music, the Music Tools-Options tab now becomes available.
Note: AutoMovie asks if you would like to add a soundtrack to your movie, if you select no you
can always add one later.
If you want to split a song at a particular point in your storyboard, select the photo or video
before which you’d like the split. Click Split on the Music Tools-Options tab on the ribbon.
Then drag and move the song track anywhere on the storyboard that you’d like.
If you’d like to add more than one song to your movie, select the photo or video where you’d like
to add the new song. Click the down arrow in the lower-right corner of the Add music button on
the Home tab to access the drop-down menu. Click Add music at a current point. Select
another song.
One thing to note, Windows Live Movie Maker only allows you to have one soundtrack playing
at a time. This means you cannot have the audio from your movie, a soundtrack, and a
narration track all at once. If you want to add narration and have a soundtrack along with the
audio from your movie in the background, there are some steps to accomplishing that task.
4
5. Adding narration (assuming your movie maker project has the content in the proper order):
Click Start in Windows Vista or Windows 7 and open up Sound Recorder in the Accessories
folder.
With your Windows Live Movie Maker project open in the background, click Start Recording
in Sound Recorder and immediately click the Play control in your Movie Maker project.
Narrate your movie. If you mess up, stop the playback of your Movie Maker project, click Stop
Recording in Sound Recorder (don’t save the file) and start again.
When you finish narrating, click Stop Recording in Sound Recorder and save the audio file in
a location on your computer that is easy for you to locate.
Go back to Windows Live Movie Maker, find the point in the Storyboard timeline that you
would like to add your narration (from the beginning or at a current point), and click Add
music below the music note in the Home tab. Navigate to your audio file and add it to your
project.
You can edit your narrative track by clicking the Music Tools tab in the ribbon. Start by
aligning the audio track to the place in your movie you want the narration to start. Then start
playing your movie. The audio and video is probably not synced, for the moment do not pay
attention to the video, listen for the point in the narration where you want the audio to start and
click Set Start Point. This adjusts the audio so that the start point begins where you originally
placed the audio track, effectively syncing your audio with your movie.
Adding a soundtrack and narration
Make your movie as you would (using AutoMovie or manually) and add a soundtrack. Export
the movie (depending on your resolution, we always recommend 1080p).
Once your movie is exported and saved, open a new project in Windows Live Movie Maker.
Click Add videos and photos; add the recently exported movie.
Click Add music. Follow the steps above to add a narrative track.
If you need to adjust audio levels, click Audio mix in the Home tab to make the movie or the
audio track (narrative in this case) louder than one another by sliding the bar left or right.
Watch a video on how to add and edit audio at
http://windowslive.com/Tutorial/MovieMaker/Audio/Video.
Add titles, captions, and credits
Select the photo or video before which you’d to see the title screen. Click the Title button on the
Home tab of the ribbon. Enter your movie title in the area that states [Enter text here].
You may change your title’s font, size, color, effects, and more using the Text Tools-Format
tab on the ribbon. You may also use text duration to determine how many seconds you’d like
the title to appear.
You can also add captions to any part of your movie. Play the movie and at the desired point,
click the Caption button on the Home tab of the ribbon. You can edit how the caption appears,
enters the screen, and more using the Text Tools-Format tab.
5