Hands-on Lab: Managed Database Basics
•
1 like•756 views

Hands-on Lab to set up and use RDS and Aurora. You’ll need a laptop with a Firefox or Chrome browser.

Recommended
Recommended
More Related Content
More from Amazon Web Services
More from Amazon Web Services (20)
Hands-on Lab: Managed Database Basics
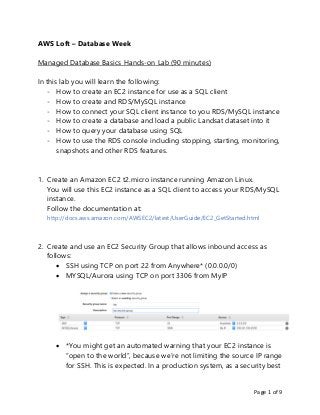
- 1. Page 1 of 9 AWS Loft – Database Week Managed Database Basics Hands-on Lab (90 minutes) In this lab you will learn the following: - How to create an EC2 instance for use as a SQL client - How to create and RDS/MySQL instance - How to connect your SQL client instance to you RDS/MySQL instance - How to create a database and load a public Landsat dataset into it - How to query your database using SQL - How to use the RDS console including stopping, starting, monitoring, snapshots and other RDS features. 1. Create an Amazon EC2 t2.micro instance running Amazon Linux. You will use this EC2 instance as a SQL client to access your RDS/MySQL instance. Follow the documentation at: http://docs.aws.amazon.com/AWSEC2/latest/UserGuide/EC2_GetStarted.html 2. Create and use an EC2 Security Group that allows inbound access as follows: SSH using TCP on port 22 from Anywhere* (0.0.0.0/0) MYSQL/Aurora using TCP on port 3306 from MyIP *You might get an automated warning that your EC2 instance is “open to the world”, because we’re not limiting the source IP range for SSH. This is expected. In a production system, as a security best
- 2. Page 2 of 9 practice, you must only provide a limited IP range for allowed SSH access. For this lab however, you can disregard the warning. Make a note of the MyIP address. We’ll need to update the RDS Security Group later to allow inbound access from this IP address.
- 3. Page 3 of 9 3. Access the Linux console on the t2.micro instance See documentation at: http://docs.aws.amazon.com/AWSEC2/latest/UserGuide/AccessingInstances.html At this point Linux/OSX and Windows users should have successfully connected to their EC2 instance and be at a $ command prompt. 4. Install MySQL development client $ sudo yum install mysql-devel
- 4. Page 4 of 9 5. Create an Amazon RDS MySQL db.t2.micro instance See documentation at: http://docs.aws.amazon.com/AmazonRDS/latest/UserGuide/CHAP_GettingStarted.Cr eatingConnecting.MySQL.html Name the instance sql-lab. Be sure to choose MySQL (not Aurora and not MariaDB) and the db.t2.micro instance size Choose a username and a password (and don’t forget them!) Do not create a database (we will do that later) Wait a few minutes until the RDS instance status is ‘Available’. Once the RDS instance is available, find your instance’s DNS endpoint. We’ll use this endpoint in step 6 to connect the MySQL client to your RDS instance. i. On the AWS Console, in the AWS Services box, type ‘RDS’ and press enter. ii. On the RDS Dashboard, choose DB Instances
- 5. Page 5 of 9 iii. Select your DB Instance iv. Scroll down and find your endpoint name. You will need it later! Note: When using the endpoint name, you usually should not use the port extension (:3306), just the name.
- 6. Page 6 of 9 v. Update your RDS Security Group (shown above) to allow inbound access from your EC2 instance. Select the Security Group and update the source IP with the IP address of your EC2 instance (MyIP from step 2).
- 7. Page 7 of 9 6. Verify you can access your RDS/MySQL instance from your EC2 instance: $ mysql –h <mysql endpoint> -u <user name> -p Example: $ mysql -h sql-lab.cxpjiluqq0c9.us-west-2.rds.amazonaws.com -u awsuser -p Enter password: Welcome to the MySQL monitor. Commands end with ; or g. Your MySQL connection id is 9999 Server version: 5.6.27-log MySQL Community Server (GPL) Type 'help;' or 'h' for help. Type 'c' to clear the current input statement. mysql> To exit from the mysql> prompt, use CTRL-D Note: if you cannot connect to your RDS/MySQL instance, verify that you have updated the RDS Security Group to allow traffic from your EC2 instance’s IP address.
- 8. Page 8 of 9 7. Download and Prepare Landsat scenes See documentation at https://aws.amazon.com/public-data-sets/landsat/ From your EC2 instance, download the Landsat scenes $ wget http://landsat-pds.s3.amazonaws.com/scene_list.gz Unzip the scene list $ gunzip scene_list.gz Trim the list to the last 250,000 scenes $ cp scene_list scene_list.orig $ tail -n 250000 scene_list.orig > scene_list 8. Create a database and load the Landsat data Log into the mysql> console as you did in step 6. Create a Landsat database mysql> CREATE DATABASE landsat; mysql> USE landsat; Create the scene_list table mysql> CREATE TABLE scene_list (entityId VARCHAR(64), acquisitionDate DATETIME,cloudCover DECIMAL(5,2),processingLevel VARCHAR(8),path INT,row INT,min_lat DECIMAL(8,5),min_lon DECIMAL(8,5),max_lat DECIMAL(8,5),max_lon DECIMAL(8,5),download_url VARCHAR(128)); Load the landsat data mysql> LOAD DATA LOCAL INFILE 'scene_list' INTO TABLE scene_list FIELDS TERMINATED BY ','; 9. Run a SQL query mysql> SELECT DISTINCT(a.entityId) AS Id, a.cloudCover FROM scene_list a INNER JOIN ( SELECT entityId, acquisitionDate FROM scene_list WHERE acquisitionDate > ( SELECT MAX(acquisitionDate) FROM scene_list WHERE acquisitionDate < CURDATE() - INTERVAL 1 YEAR) ) b ON a.entityId = b.entityId AND a.acquisitionDate = b.acquisitionDate WHERE cloudCover < 50 ORDER BY Id; This generates a list of all the satellite images during the last year which have less than 50% cloud cover Note how long it takes to get an answer
- 9. Page 9 of 9 10. Experiment with RDS features Stop the database and restart it Enable Multi-AZ for failover Take a snapshot Review the various monitoring metrics available