1. 66
Drawing101 Stilllifedrawing
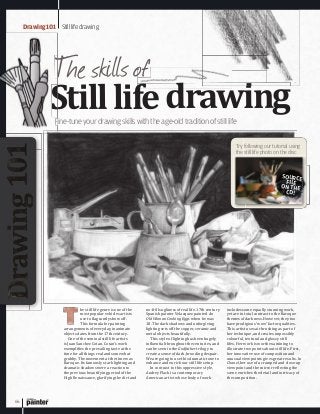
Fine-tuneyourdrawingskillswiththeage-oldtraditionofstilllife
Stilllifedrawing
The skills of
Fine-tuneyourdrawingskillswiththeage-oldtraditionofstilllife
Stilllifedrawing
The skills of
he still life genre is one of the
most popular vehicles artists
use to �lagrantly show off.
This formula for painting
arrangements of everyday, inanimate
objects dates from the 17th century.
One of the seminal still life artists
is Juan Sanchez Cotan. Cotan’s work
exempli�ies the prevailing taste at the
time for all things real and somewhat
grubby. The movement at the time was
Baroque. Its famously stark lighting and
dramatic shadows were a reaction to
the previous beautifying period of the
High Renaissance, glorifying the dirt and
no-frills ugliness of real life. 17th century
Spanish painter Velazquez painted An
Old Woman Cooking Eggs when he was
18. The dark shadows and unforgiving
lighting sets off the copper, ceramic and
metal objects beautifully.
This style of lighting has been hugely
in�luential throughout the centuries, and
can be seen in the Godfather trilogy to
create a sense of dark, brooding despair.
We are going to use this dramatic tone to
enhance and enrich our still life setup.
In contrast to this oppressive style,
Audrey Flack is a contemporary
American artist whose body of work
StilllifedrawingStilllifedrawing
Try following our tutorial using
the still life photo on the disc
SOURCE
FILE
ON THE
CD!
includes some equally stunning work,
yet are in total contrast to the Baroque
themes of darkness. However, they too
have prodigious ‘wow’ factor qualities.
This artist uses air brushing as part of
her technique, and creates impossibly
colourful, textural and glossy still
lifes. Her work is worth examining to
illustrate two points about still life. First,
her innovative use of composition and
unusual viewpoints gives great results. In
Chanel, her use of a cramped and close-up
viewpoint and the mirror re�lecting the
scene enriches the detail and intricacy of
the composition.
066-071_OPM_05_drawing.indd 66 31/5/07 17:13:29
2. What works and what doesn’t in this genre
Still life scenarios
67
Drawing101StilllifedrawingSecond, Flack illustrates another
purpose of still life, which is worth
mentioning here because it may in�luence
your choice of objects. In her piece,
Marilyn Vanitas, she refers to the 17th
century theme of still life known as
Vanitas paintings.
Objects are chosen and arranged
because of their meaning. These
paintings were composed speci�ically
so as to subtly remind people that life
and beauty is �leeting. Typically, a small
or partially hidden symbol would lurk
within a stunningly beautiful setup. For
example, in Cornelis de Heem’s Vanitas
Contrast
and definition
Emphasise the
visual qualities
of your objects.
Spotlights create
more highlights
and shadows than
fluorescent light.
Make sure your
objects show off
their best features.
Use a good quality
image and avoid
pixellation
and blurring
Still Life With Musical Instruments, the
jam-packed virtuoso performance by this
Dutch artist is a picture of disarray and
excess, and at the very bottom, if you look
carefully, a snail hungrily eyes the fruit.
So now it is our turn to rise to the
formidable challenge of still life. Over the
next few pages we will break the task
down into steps, troubleshoot potential
mistakes and list important tips to
help you on your way. This tradition
allows you to explore the elements of
art – line, form, shape, tone, texture and
composition – and enhance your skills of
observation. We will go through several
different ways to help you ‘see’ what is
really there rather than ‘look/glance’ at
what appears to be there. The next few
exercises will help build your con�idence
to enjoy drawing successfully.
When it comes to setting up your own
still life, there are alphabetical pointers
to consider: accuracy, balance, contrast,
de�inition, ellipses and foreshortening.
The images above illustrate how these
principles can affect a still life setup, so
try them all and get a good grounding in
the principles. We’re concentrating on
traditional pencils here, but you can apply
the principles to any format.
Still Life With Musical Instruments, the different ways to help you ‘see’ what isdifferent ways to help you ‘see’ what is
Poor composition
The aim of composition is to show everything off and to really give the illusion
of casual placement, but to actually arrange things pleasingly with a sense of
togetherness. This attempt misses the point, like the scissors
Accuracy and balance
This shot exemplifies a
poorly balanced pyramidal
composition. All the interesting,
differently shaped objects are
positioned on the left, and
the white shirt takes up the
majority of the right. Aim to
compose your objects evenly
throughout the setup
Ellipses and
foreshortening
This unusual shot is
not in keeping with
Baroque Realism.
The scissors and
pens loom bizarrely
towards you and
the circular tape
appears flat.
The stapler is also
disguised by the
foreshortening
and the brush tips
are lost
Chosen composition
All the objects can be clearly
seen and are positioned so they
enhance each other – large with
small, plain with intricate. This
provides a fun and challenging setof tasks
066-071_OPM_05_drawing.indd 67 31/5/07 17:15:33
3. 68
Drawing101 Stilllifedrawing
ow you have a still life photo, it’s
important to consider some of the
common hurdles and traps that
can occur during this task.
There is nothing more daunting than
a blank page, so drawing a grid over the
photo and then one on the paper will help
you position objects accurately.
Another way to begin is to choose an
object near the centre of your composition
and use it to relate to shape, size and
spaces taken up by other objects. This
measurement can be used to ensure that
everything is drawn in proportion to
that measurement. Keep checking the
Drawing normally
Drawingthescene
Drawing101Drawing101Drawing101 Stilllifedrawing
relationships between the objects and
correct them if it goes wrong – don’t keep
blindly trudging forward.
A really clear line drawing can be
sketchy at the outset. Pencil in shapes, but
go over the top of this once again to draw
a bold con�ident line for clear de�inition.
With an accurate line comes accurate
tone. Shading needs layering, subtly and
an appropriate choice of pencil. But, just
as much, it needs really keen observation.
When drawing ellipses, draw the bottom
curve then turn your paper upside down
and re-draw it; it is a much more natural,
controlled and even method.
The mantra ‘less is more’ is always
worth keeping in mind. In art, it
essentially means that some lines and
shades that you think need to be included
don’t. The paintbrushes best exemplify
this. The delicate texture of their bristles
can be lost if you outline them heavily; let
the background do the work for you, leave
the line out, and draw the background
solidly but a bit randomly.
When you are making the marks, bear
in mind the subject you are drawing.
For example, drapery loves curvy, more
circular lines to accentuate the contours,
but use dots and scribbles for sponge.
SQUARING UP
Thisreallyletsyoumapoutyourimagewithoutthinkingaboutthe
relationships,andisexcellentforbuildingyourconfidence.There
isnoshameinusinggrids,sodon’tfeellikeyouarecheating.It’s
agreatstartingpointandusedbymanymorepeoplethanwould
caretoadmitit.
ACCURATE PROPORTIONS
Workoutwardsfromthemiddleusingacrossinthe
centretostartthemeasurements.Thespoonfits
aboutthreetimesintothetophalfofthepictureand
oneofthebrushtipscanbespottedtwo‘spoons’up.
Nowyouknowyouarenotgoingtorunoutofspace
atthetop.
LINE DRAWING
Onceyouarehappywithyoursketchy2Hworkings
thatquietlyoutlineyourobjects,useaHpencilto
produceaclearandconfidentshapethatsortsout
anycomplexareasyoumayhavesecretly
putofftackling,forexample,thescissorbladesor
thebrushes.
SHADING
Withasolidfoundationofdrawing,use2H,HandHBpencilsfor
themidtonesandgreys,and4Band6Bpencilsforthedarkest
backgroundareas.Checkyouhaveareallybroadrangeofcontrast
fromblacktowhite.Circularratherthanstripyshadingcanreally
improvethesmoothnessofyourshadows.
REDUNDANCY
Lookcloselyatthestilllifeand,wherethereisa
meetingofintensedarksandlights,considerhowyou
couldusetheshadowtomaketheoutlineredundant.
Thisreallytestsyourpowersofobservation,soifat
firstyoudon’tsucceed…
MARK MAKING
Experimentwiththemarkstoshowwhatyouand
yourpencilcanreallydo.Themetalsheenisachieved
witharubber,butnothingisimpossible.Smudging,
scribble,rulers,rubbersandgridsallareacceptable
inthenameofthestilllife‘wow’factor!
066-071_OPM_05_drawing.indd 68 31/5/07 17:16:21
4. 69
Drawing101Stilllifedrawing
f you can feel yourself bridling at the
idea of having a go at the ‘serious’
high-brow challenge we have just
rattled off, here is a welcome break!
This is a really entertaining and quite
mind-boggling exercise. It is often far
more effective at helping you actually
lay out a picture than squaring up or
�iguring out proportion measurements.
We are enchanted by the optical and
psychological magic of it, and it once
again helps to dispel that age-old
procrastinatory myth of ‘I can’t draw’!
So prepare to suspend your disbelief and
roll up your sleeves to pull off the best
trick in town!
We have included the still life photo
on the disc. Turn this upside-down and,
starting at either the left or right side,
draw what is in front of you. This can
be on a larger piece of paper, but it must
be approximately the same landscape
shape as the drawing. Keep referring to
your drawing and then the photo. Hold
your nerve and don’t turn it up the right
way until you’ve �inished! Then, with a
�lourish, amaze your audience with the
accuracy of your work.
ne exercise that will de�initely
increase your understanding
of the still life genre and allow
you to express yourself a bit
more freely is to look at the negative space
of your image.
Our brain often fools us into taking
the easy option and only recording
objects as we expect them to be shown.
Think of how easy it is to draw from your
imagination as a child. The brain stores its
own little visual vocabulary based on past
experiences and previous versions, and
it’s much easier to churn out these than
to really apply it. Children’s formulaic
drawings of houses are intrinsically
recognisable as houses.
In the room, the objects themselves
occupy positive space and the space
around them is negative. For this task,
draw lines and shapes to represent the
space that the still life does not take up.
The best example of this is the space
between the handle and jug; it helps you
look at the shape of the handle not just
take it in and jot it down without thought.
Draw as if you have never seen them.
WRONG WAY UP
Try sketching your still life
upside-down. This can
help you with perspective,
as you are concentrating
on the shapes, rather
than the objects.
NEGATIVE ADVICE
By looking at what’s
not in the composition,
you’re forced to look at
the shapes objects make,
rather than what they
actually look like and
focusing on the details.
Negativespace
Upside-downdrawing
066-071_OPM_05_drawing.indd 69 31/5/07 17:17:06
5. 70
Drawing101 Stilllifedrawing
o, armed with some helpful tips,
some interesting ways to test your
powers of drawing, and a con�ident
can-do attitude, it’s time to try showing
off some of your own ‘wow’ factor. The
following steps show a systematic, logical
approach to tackling the task, bit by
methodical bit.
The setup we have used is a randomly
but pleasingly arranged collection of
artroom paraphernalia. They have been
chosen for their variety of textures, forms
and shapes, but are in keeping with the
muted colours of the Baroque artists we
have looked at.
Working from a photograph is a
great way to begin; it’s convenient for
many reasons, especially because it
is �lat already, and takes up much less
space. When you are con�ident using
photographs, push the limits of your
comfort zone and rise to the challenge
of drawing a real still life that is right
in front of you. Enjoy the experience
of �luctuating light conditions and
mysterious shifting of objects, knowledge
of which will be denied by other members
of your household, and the unstoppable
passage of time on objects that are
perishable! But seriously, the sense of
achievement, enjoyment and relaxation is
worth it so do have a go.
Astilllifestep-by-step
Break an image down into sections for triumphant results
Go from photo to a piece of art
Tackling the still life
STARTING POINT
Usearulertomarkthecentreofeachsideanddrawavery
lightordottedcrosswitha‘x’atthecentre.Drawthesame
(ifpossible)onyourpicture.Measurewithyourfingerthe
timesyourspoonfitsalongthetopline(aboutthreetimes)
fromthecentre;dividethislineintoaboutthreeequally.
Drawtheshapeofthespoon.
TOP HALF PROPORTIONS
Usingyourstandardmeasurementofthespoon,workout
wheretherestoftheobjectssitinthetophalf.Forexample,
thetoplipofthejugmaybetwospoonswidewithhalfa
spoonononesideandoneandahalfontheother.Think
join-the-dotsatthisstage.
BOTTOM LEFT QUARTER PROPORTIONS
Payspecialattentiontotheforeshorteningofthescissors;
relyonyourstandardspoonandbereassuredthatitwill
nottryandfoxyou–yesthosescissorsreallyarethatshort!
Concentrateonmakingsuretheoutlinesareclearand
confident–thereisnoneedfortoneatthemoment.
STAGE 1 STAGE 2 STAGE 3
066-071_OPM_05_drawing.indd 70 31/5/07 17:18:01
6. 71
Drawing101Stilllifedrawing
BOTTOM RIGHT
Thereismuchmoredetailinthesetwobottomquarters,
soit’simportanttofeelconfidentthattheyareaccurate.
Takeprideinprovidingyourselfwithaconcretefoundation
toworkwith.It’snotamyththatyoushouldlookmoreat
thestilllifethanyourdrawing.Keeplooking,checkingand
tweakingituntilyouareabsolutelyhappy.
MAPPING TONES ON THE RIGHT SIDE.
Nowyouhaveoutlinedandpositionedtheshapes,itistime
todothesamefortheshadows.Withalight,unlikely-to-
smudge,Hpencillightlydrawtheshapesoftheshadows.
Don’tworrytoomuchifyoudon’tgetthemall,thegeneral
catchmentareawilldofine.
MAPPING TONES ON THE LEFT SIDE.
Atthemomentyouareusingalight,hardpencilthatcan
beenshinyanddifficulttoworkintoifit’susedveryfirmly,
souseitlightlyandit’sveryeasytocorrect,aswellhardly
leavinganymarks.Drawtheoutlinesoftheshadowslightly
onthelefthandside.
BASE COAT OF TONE
Shadeintheareasyouhavedrawnasshadows.Thisjust
needstobeageneralshading;don’tworryoroverwork
it,it’ssimplytogiveyouanideaofhowtheshadowsare
goingtolooksothatyoucancorrecttheirshapeand
position,butnottheirintensity.
MODELLING THE TONES ON THE RIGHT
Workuptherightside,usingtheflattestpartofthe
tipofyourpenciltoavoidscratchymarks,correcting
wherenecessarywitharubber.Enjoythesubtlertones
intheshirtandenhancethefoldswithcurvedlines.The
modellingshouldreallytakeawhile,withlotsofchecking
andcorrecting.
AND SOME MORE
Onceagain,shadetheareasyouhavedesignatedasshadow.
Assesstheshadingincomparisontothephotograph;if
youaretotallyhappy,moveon.Nowcomesthehopefully
foolproofnon-smudgetip.Ihavedonethisasaright-
hander;swaythesidesaroundifyouareleft-handed.
MODELLING THE TONES ON THE LEFT
Aimtoincludethebreadthofcontrastfromblacktowhitein
yourimage,butthisstageisallaboutthefullrangeofgreys.
Workfromlefttorighttopreventyourhandsmudging
previousshadingandreallyenjoyexploringthemarks,
shadowsandshapescreatedbyoverworkingwiththeHB
pencil.Usethepencilandpressuretoitsfullestadvantage.
THE BACKGROUND LINES
AND REDUNDANCY
Lookverycarefullyatthetopofthestaplerandyouwillsee
athingracefulhighlight.Capturethiswhenyoufillinyour
background,andrememberthesketchbutboldbristle
effecttoo.Solidlycolourinthestarkbackgroundandshow
offtheskilloftheforeground.Nowtreatyourself!
STAGE 4 STAGE 5 STAGE 6
STAGE 7 STAGE 8 STAGE 9
STAGE 10 STAGE 11
066-071_OPM_05_drawing.indd 71 31/5/07 17:18:29