SlideShare a Scribd company logo
1 of 92
EXPERIMENT 1
INSTALLING WINDOWS 2003 SERVER AS DOMAIN CONTROLLER & MEMBER SERVER

AIM : Installing windows 2003 server as Domain controller and member server.
PROCEDURE :- Installing Win 2k3 Server As Domain Controller
1. Click Start -> Run...

2. Type "dcpromo" and click "OK"

3. You will see the first window of the wizard. As it suggests, I suggest reading the help associated with
Active Directory. After this, click "Next"

1|Page
4. Click "Next" on the compatibility window, and in the next window keep the default option of "Domain
Controller for a new domain" selected, and click "Next"

5. In this tutorial we will create a domain in a new forest, because it is the first DC, so keep that option
selected

6. Now we have to think of a name for our domain. If you own a web domain like "visualwin.com", you
can use it, but it isn't suggested because computers inside of your domain may not be able to reach the
company website. Active Directory domains don't need to be "real" domains like the one above - they
can be anything you wish. So here I will create "visualwin.testdomain"

2|Page
7. Now in order to keep things simple, we will use the first part of our domain ("visualwin"), which is the
default selection, as the NetBIOS name of the domain

8. The next dialog suggests storing the AD database and log on separate hard disks, and so do I, but for
this tutorial I'll just keep the defaults

9. The SYSVOL folder is a public share, where things like .MSI software packages can be kept when you
will distribute packages (as I said, AD has a lot of different features). Once again, I will keep the default
selection but it can be changed if you wish to use the space of another drive

3|Page
10. Now we will get a message that basically says that you will need a DNS server in order for everything
to work the way we want it (i.e., our "visualwin.testdomain" to be reachable). As I mentioned earlier,
we will install the DNS server on this machine as well, but it can be installed elsewhere. So keep the
default selection of "Install and configure", and click "Next"

11. Because, after all, this is a Windows Server 2003 tutorial website, we'll assume there are no preWindows 2000 servers that will be accessing this domain, so keep the default of "Permissions
compatible only with Windows 2000 or Windows Server 2003 operating systems" and click "Next"

12. The restore mode password is the single password that all administrators hope to never use,
however they should also never forget it because this is the single password that might save a failed
server. Make sure it's easy to remember but difficult to guess

4|Page
13. Now we will see a summary of what will happen. Make sure it's all correct because changing it
afterwards can prove to be difficult

14. After the previous next was clicked, the actual process occurs. This can take several minutes. It's
likely that you will be prompted for your Windows Server 2003 CD (for DNS) so have it handy

15. If your computer has a dynamically assigned address (from DHCP) you will be prompted to give it a
static IP address. Click ok, and then in the Local Area Connection properties, click "Internet Protocol
(TCP/IP)" and then "Properties"

5|Page
16. In the next window select "Use the following IP address" and select the information that you will use
for your domain (and 127.0.0.1 for the primary DNS, because your computer will host DNS. I still
suggest setting up an alternate as well.) Click "OK" and then "Close" on the next window

And after a while you will see

And we're finished.

6|Page
How to install a Member Server or Client Planning for Member Server Installation .
Steps:

One of the main advantages of installing or upgrading to Windows 2000 Server is having the
1.
Logon as Administrator to workgroup computer.Active Directory directory service. However, even
if you delay installing Active Directory, you can
still upgrade member servers to Windows 2000 Server. This way you can access the new and improved
2.
component features and services such as Routing and Remote Access and Terminal Services.
Servers within a Windows 2000 domain can have one of two roles: as a domain controller or as a
member server. A member server is a Microsoft server that can have accounts in a Microsoft®
Windows NT® version 3.51, Windows NT 4.0, or a Windows 2000 domain. However, if they are members
of a Windows 2000 domain, they do not contain any Active Directory objects. Member servers share
common security features such as domain policies and user rights.
Member servers can act as:
File servers
Print servers
Web servers
Proxy servers
Routing and Remote Access servers
Application servers, which include:
Component servers
Terminal servers
Certificate servers
Database servers
E-mail servers

7|Page
Right click on My Computer and click properties.
3.

In the System properties dialog box, select the computer name tab, and click on change.

4. In computer name changes console select the Member of DOMAIN.
5. In the Domain box, type the Domain name and then click ok.
6. And in the user name type administrator and in the password type the password click Ok.
7. Welcome Message appears indicating that the computer was successful in joining the

Domain.

8. Click OK to close the Network Identification message box.
9. Click OK to close the System Properties dialog box. It will ask for restart click yes.
10. After restarting the computer it will become Member Server or Client.RESULT :- Installing windows
2003 server as Domain
controller and member server is successfully completed.

EXPERIMENT 2
8|Page
UPGRADING 2000 SERVER TO 2003

AIM :- Upgrading windows 2000 server to 2003 server.
PROCEDURE :- Choosing to Upgrade or Make a Clean Installation
A major consideration related to a Windows Server 2003 installation is whether to upgrade in-place
servers or do a clean install on a replacement server that will take over the role of a server or servers
already on the network. For example, you might be running Windows 2000 Server on a computer that
you want to replace (it might have seen better days hardware-wise). You can install Windows Server
2003 on a new server and make it a domain controller in the Windows 2000 domain that already exists.
This will allow the new server to replicate all the information in the Active Directory on the Windows
2000 Server (the Windows 2000 Server should have the latest service packs installed). You can then
"retire" the Windows 2000 Server and use the Windows Server 2003 as the domain controller for the
domain.
Whatever your strategy is for bringing new servers online on an existing network, you must deal with
issues related to earlier versions of the Windows network operating system, such as Windows 2000 and
Windows NT. The next two sections discuss issues related to upgrading these two versions of Windows
server.

Planning for a Windows 2000 Upgrade
Upgrading a server (even a domain controller) from Windows 2000 to Windows Server 2003 is a fairly
easy process. Because Windows 2000 and Windows Server 2003 both embrace the Active Directory
hierarchy and DNS namespace, the notion of forests, trees, and domains is common to both network
operating systems. This means that a radical redesign of the network domain structure is not necessary.
However, you need to keep some things in mind when upgrading Windows 2000 Server to Windows
Server 2003. First, you must make sure that the server's hardware is compatible with Windows Server
2003 (as you would for a server that will get a clean installation). It is also important that you have
installed Windows 2000 Server Service Pack 2 (or later, if available) on the server to upgrade the files in
the Windows 2000 Server installation.
Finally, you must prepare the forest and the domain for the upgrade to Windows Server 2003. This is
done using the adprep command-line utility found in the i386 folder on the Windows Server 2003 CDROM. You actually have to run this upgrade program on the Schema Master and the Infrastructure
Master on the domain. The schema is the database template for the Active Directory and defines the
objects that can exist in the Active Directory (such as users, groups, and so on).

Using Supported File Systems
Windows Server 2003 supports the entire range of file systems supported by Microsoft operating
systems. This ability was first introduced with Windows 2000 Server.

9|Page
You can have FAT, FAT32, and NTFS partitions or volumes on your server's hard drives. A description of
each file system follows:
FAT—FAT volumes use a file allocation table that provides the name of the file and the location of
the actual clusters that make up the file on the hard drive. FAT is a holdover from the days of DOS. I
see no compelling reason to use FAT volumes on your servers.
FAT32—FAT32 is an extension of the FAT file system. It uses disk space on a drive more efficiently
than FAT and was designed for Windows 95/98.
NTFS—NTFS 5 is the newest version of the NT file system (NTFS 5 was first introduced with Windows
2000 Server). It provides increased security for files on NTFS volumes and supports more robust file
system recovery. Microsoft recommends that you use NTFS as your file system on your Windows
servers. It is also required if you want to install Active Directory on a server to make it a domain
controller.

Performing an Upgrade
If you are not in a position to do a clean install of Windows Server 2003, you can also upgrade an
existing network operating system, such as Windows NT and Windows 2000. The actual upgrade process
is very straightforward. But as already mentioned in this hour, the upgrade of a domain controller has
consequences for the entire domain. Running mixed environments in which Windows NT servers must
interact with servers running Windows Server 2003 (and perhaps even some Windows 2000 servers)
makes supplying important network resources in the domain more difficult (and quite confusing at
times). In an ideal situation, you will be able to upgrade all servers on the network to Windows Server
2003.
1. To perform an upgrade on a Windows NT or Windows 2000 Server, insert the Windows Server 2003
CD in the server's CD-ROM drive. Then click the Install Windows Server 2003 button on the
Welcome screen that opens.
2. The Welcome to Windows Setup window appears. The Installation Type is set to Upgrade (see
Figure 3.4). Click Next to continue.
Figure 3.4 Select Upgrade as the installation type.

10 | P a g e
3. The Licensing Agreement screen appears. Select I Accept This Agreement (after reading the
agreement) and then click Next to continue.
4. On the next screen, provide your Windows Server product key. Then click next to continue.

5. The next screen provides you with the option of downloading any new setup files that have changed
for Windows Server 2003 since you purchased the installation CD. The default is set to Yes,
Download the Updated Setup Files. Click Next to continue.

11 | P a g e
6. The easiest way to activate the network operating system is to use the option Activate Windows
over the Internet. Select this option and then click Next.
7. The next screen provides you with the option of registering your Windows Server 2003 with
Microsoft as you activate the product. A connection is made to the Internet (and Microsoft), and
your product is activated. Click OK to complete the process.
Windows Server 2003 is now activated, and you can configure the server for its various roles on the
network.

Choosing Between a Workgroup and a Domain
1. To make a server part of a workgroup or to add it as a member server to an existing domain, first
select Start. Then right-click My Computer and select Properties. The System Properties dialog box
opens. Select the Computer Name tab on the System Properties dialog box (see Figure 3.6).You can
view the server's current membership on the Computer Name tab.

2. To change the workgroup membership or to add the server to a domain, click the Change button.
The Computer Name Changes dialog box opens (see Figure 3.7). You can change the computer's
name and its domain or workgroup affiliation.
Figure 3.7 You can change the server's name or membership.

12 | P a g e
3. To add the server to an existing domain, select the Domain option button and then type in the
name of the domain (you need to provide the Fully Qualified Domain Name of the domain, which
includes prefix and suffix). Or, to add the server to a different workgroup, select the Workgroup
option button and type in the name of the workgroup. When you complete either choice, click OK.
It might take a moment, but you then are welcomed to the domain or the workgroup that you have
specified
RESULT :- Upgrading windows 2000 server to 2003 server is successfully completed.

EXPERIMENT – 3
13 | P a g e
INSTALLATION OF WINDOWS SERVER 2003 AS ADC & CDC SERVER
AIM :-Installation Of Windows Server 2003 As Adc & Cdc Server
PROCEDURE :The Windows Server 2003 operating system supports multi-master replication—all of a domain’s
domain controllers can receive changes made to objects and can replicate those changes to all other
domain controllers in that domain. By default, the first domain controller created in a forest is a global
catalog server, which contains a full replica of all objects in the directory for its domain and a partial
replica of all objects stored in the directory of every other domain in the forest.
Replicating Active Directory data among domain controllers provides benefits for information
availability, fault tolerance, load balancing, and performance. In this step-by-step guide, you can take
advantage of the greater fault tolerance provided in the multi-master model by installing multiple
domain controllers. In the event a domain controller stops working, the availability of Active Directory is
not compromised.
If you want to create an additional domain controller in win server 2003 follow this procedure
Note:-Before doing this procedure you need to make sure you have domain controller setup in your win
server 2003 with DNS and you need to install DNS server and don’t configure anything where you are
going to add an additional domain controller.
Click Start, click Run, and then type dcpromo click ok
If you want to open the Active Directory Installation Wizard with the option to create an
additional domain controller from restored backup files.
dcpromo /adv
On the Operating System Compatibility page, read the information and then click Next.
If this is the first time you have installed Active Directory on a server running Windows Server 2003, click
Compatibility Help for more information.
On the Domain Controller Type page, click Additional domain controller for an existing domain,
and then click Next.
On the Copying Domain Information page, do one of the following:
•Click Over the network, and then click Next.
•Click From these restored backup files, and type the location of the restored backup files, or click
Browse to locate the restored files, and then click Next.

14 | P a g e
On the Network Credentials page, type the user name, password, and user domain of the user
account you want to use for this operation, and then click Next.
The user account must be a member of the Domain Admins group for the target domain.
On the Database and Log Folders page, type the location in which you want to install the
database and log folders, or click Browse to choose a location, and then click Next.
On the Shared System Volume page, type the location in which you want to install the Sysvol
folder, or click Browse to choose a location, and then click Next.
On the Directory Services Restore Mode Administrator Password page, type and confirm the
password that you want to assign to the Administrator account for this server, and then click
Next.
Use this password when starting the computer in Directory Services Restore Mode.
Review the Summary page, and then click Next to begin the installation.
Restart your server now.
RESULT: - Installation of Windows Server 2003 as ADC & CDC server is done successfully.

EXPERIMENT – 4
Joining Clients to Domain, Implementation of Group Polices
AIM :- Joining clients to Domain, implementation of Group policies
PROCEDURE :-

15 | P a g e
Joining Clients To Domain
On the Computer Name tab, click Change, and then enter the domain membership information.

If everything is in place (especially the computer's TCP/IP and DNS configuration - read Requirements
when Joining a Domain for more info) then you should receive a username and password dialog box.
Enter the username and password of a user that has enough right to create computer accounts in the
domain (for example - a Domain Admin group member).

If all went ok you'll get a welcome message.

16 | P a g e
If a computer account was already established in the domain then you can enter any username and
password of any valid user (for example - your own domain username and password). This is true if the
Domain Admin that has created the computer account has specified the EVERYONE special group on the
new computer account's permissions box.

Note: Usually, there is no need to manually change the computer's DNS Suffix when joining an Active
Directory domain, because the suffix will automatically be set to mach the DNS name of the domain. So

17 | P a g e
if you plan to join an AD domain, leave the DNS suffix empty.

Note: Home Edition is not designed to join domains; only workgroups. To join domains, use XP
Professional version or above.
A reboot will be necessary to complete this process.

Group Policy is an infrastructure used to deliver and apply one or more desired configurations or policy
settings to a set of targeted users and computers within an Active Directory environment. This

18 | P a g e
infrastructure consists of a Group Policy engine and multiple client-side extensions (CSEs) responsible
for writing specific policy settings on target client computers
Create a Group Policy Object
1. Start the Active Directory Users and Computers snap-in. To do this, click Start, point to
Administrative Tools, and then click Active Directory Users and Computers.
2. In the console tree, right-click your domain, and then click Properties.
3. Click the Group Policy tab, and then click New.
4. Type a name for this new policy (for example, Office XP distribution), and then press ENTER.
5. Click Properties, and then click the Security tab.
6. Click to clear the Apply Group Policy check box for the security groups that you want to prevent
from having this policy applied.
7. Click to select the Apply Group Policy check box for the groups that you want this policy to
apply to.
8. When you are finished, click OK.
RESULT: Joining clients to Domain and implementation of Group policies is done correctly and
successfully.

EXPERIMENT 5
MANAGING HARDWARE USING DEVICE MANAGER

AIM :- Managing hardware using Device Manager.
PROCEDURE :- Using the Computer Manager or Device Manager Console
1. Right-click My Computer, and then click Manage.
2. Double-click System Tools.
3. Click Device Manager to:
o

Troubleshoot devices.

o

Disable or uninstall devices.

o

View driver details or update drivers.

o

View or change resources assigned to devices.

4. You can also double-click System Information, double-click Software Environment, and then
double-click Drivers. This displays the name, description, type, state, and status for each driver.
You cannot administer drivers from this view.Note: If you want to disable a non-hardwarespecific driver, click Show Hidden Devices on the View menu in Device Manager. You can find
and disable under "Non-Plug and Play Drivers" some of the same items that appear in the
19 | P a g e
Devices tool in Control Panel in Windows NT 4.0. If the device is not listed you must use Registry
Editor (Regedt32) to disable the device.

When you use Device Manager, you have a graphical view of the hardware that is installed on your
computer. You can use Device Manager to change the way your hardware is configured, and to change
the way your hardware interacts with your
computer's microprocessor.
When you use Device Manager, you can:
- Determine if the hardware on your computer is working properly.
- Change hardware configuration settings.
- Identify the device drivers that are loaded for each device and obtain information about each device
driver.
- Change advanced settings and properties for devices.
- Install updated device drivers.
- Disable, enable, and uninstall devices.
- Reinstall the previous version of a driver.
- Identify device conflicts and manually configure resource settings.
- Print a summary of the devices that are installed on your computer.
To access Device Manager, use any of the following methods:
- Click Start, click Run, and then type "devmgmt.msc" (without the quotation marks).
- Right-click My Computer, click Manage, and then click Device Manager.
- Right-click My Computer, click Properties, click the Hardware tab, and then click Device Manager.
20 | P a g e
- Type the following command at a command prompt: start devmgmt.msc

If you want to access Device Manager on a local or remote computer:
1. Click Start, click Run, and then type "mmc" (without the quotation marks).
2. Click Add/Remove Snap In on the File menu (or press CTRL+M), click Add, and then click Device
Manager.
When you use this procedure, a shortcut to Device Manager is created that you can use to open Device
Manager.
How to Configure Device Manager to Display Detailed Information
To configure Device Manager to show details:
1. Click Start, click Run, type: cmd.exe, and then press ENTER.
2. Type: set DEVMGR_SHOW_DETAILS=1, and then press ENTER.
3. Type: start devmgmt.msc, and then press ENTER.
In Device Manager the properties for a device should now provide a Details tab that contains additional
information about the device.
You can view the Details tab to see the following device information:
Device Instance ID, Hardware IDs, Compatible IDs, Matching Device ID, Service, Enumerator,
Capabilities, Devnode Flags, Config Flags, CSConfig Flags, Ejection Relations, Removal Relations, Bus
Relations, Device Upper Filters, Device Lower, Filters, Class Upper Filters, Class Lower Filters, Class
Installer, Class Coinstallers, Device Coinstallers, Firmware Revision, Current Power State, Power
Capabilities, Power State Mappings.
NOTE: Not all of these properties will be populated for a given device. In other words, although all of
these properties are listed, some may not contain information when viewing a particular device.
How to Troubleshoot the Display Adapter Driver in Safe Mode
In Safe mode, the computer does not start the display driver that is used during normal operations, so
you need to use Device Manager to discover, update, roll back, or uninstall the display driver instead of
accessing the Display properties.
To locate the display adapter that is used in Normal mode:
1. Click Start, point to Settings, and then click Control Panel.
2. Double-click System, click Hardware, and then click Device Manager.
3. Click the PLUS SIGN to expand Display Adapters.
To run the display troubleshooter:
21 | P a g e
1. Follow steps 1 through 3 to find the display adapter.
2. Double-click the display driver.
3. On the General tab, click Troubleshoot.
To view driver details, and to update, roll back, or uninstall the display driver:
1. Follow steps 1 through 3 to find the display adapter.
2. Double-click the display driver.
3. On the Driver tab, click the appropriate button based on the action that you want to perform:
Driver Details
Update Driver
Roll Back Driver
Uninstall
It is not necessary to start the computer into Safe mode to perform the tasks that are listed in this
article.
When you start the computer in Safe mode, your display resolution and colors may temporarily change
in such a way that the windows and icons on your screen become very large, which may make it difficult
for some windows to fit. This behavior is dependent of the type of video adapter that you are using.
Note: In Safe mode, if you
1. Open the Display properties.
2. Click Settings.
3. Click Advanced.
4. Click Adapter.
5. Click Properties.
6. Click Driver.
You may notice an option to stop the VgaSave service. The VgaSave service should not be stopped while
the computer is in Safe mode because it is a component that allows Windows to display the screen.
]

How to Use the Roll Back Driver Feature
The Roll Back Driver feature enables you to replace a device driver by using a previously installed
version. You can use this feature if you have installed a new device driver that causes your computer to
be unstable. When you use the Roll Back Driver feature, you can restore (or roll back) the previous
device driver, and continue to use the computer.
To use this feature, follow these steps:

22 | P a g e
1. Start Device Manager.
2. Double-click the device for which you want to restore the driver.
3. Click the Driver tab, and then click the Roll Back Driver button.
To Turn Off Windows Update Device Driver Searching by Using Control Panel
1. Click Start, and then either click Control Panel, or point to Settings and then click Control Panel.
2. Double-click System.
3. In System Properties, click the Hardware tab.
4. Click Windows Update.
5. Click Never search Windows Update for drivers.
To Turn Off Windows Update Device Driver Searching by Using Group Policy
1. See Appendix B: Resources for Learning About Group Policy for information about using Group
Policy. Ensure that your Administrative templates have been updated, and then edit an
appropriate GPO.
2. Click Computer Configuration, click Administrative Templates, click System, click Internet
Communication Management, and then click Internet Communication settings.
3. In the details pane, double-click Turn off Windows Update device driver searching, and then
click Enabled.
Manually Configure Devices By Using Device Manager
When you install a non-Plug and Play device, the resource settings for the device are not automatically
configured. Depending on the type of device that you are installing, you may have to manually configure
these settings. Instructions for doing so should be supplied in the manual that came with your device.
WARNING: Changing resource settings improperly can disable your hardware and cause your computer
to malfunction or become inoperable. You should only change resource settings if you are certain that
the new settings do not conflict with other hardware, or if a hardware manufacturer has provided you
with specific resource settings for a device. Use caution before you use the following procedure.
To configure devices:
1. Click Start, click Control Panel, click Performance and Maintenance, and then click System.
2. On the Hardware tab, click Device Manager. Double-click the type of device you want to
change.
23 | P a g e
3. Double-click the specific device you want to change. If the device has resources settings that you
can change, the Resources tab is visible.
4. Click the Resources tab, and then click to clear the Use automatic settings check box. This check
box might be unavailable if you have selected a non-Plug and Play device.
5. In Setting based on, click the hardware configuration you want to change.
6. In the Resource settings box, click the resource type you want to change in the Resource type
column.
7. Click Change Setting, and then type a new value for the resource type

RESULT :- Managing hardware using Device Manager is successfully completed.

EXPERIMENT 6
CREATING AND MANAGING ADS OBJECTS
AIM :- Creating and Managing Active Directory Objects.
PROCEDURE :Organizational Units
Organizational Units are called container objects since they help to organize the directory and can
contain other objects including other OUs. The basic unit of administration is now organizational units
rather than domains. Organizational units allow the creation of subdomains which are also called logical
domains. Microsoft recommends that there should never be more than 10 levels or organizational unit
nesting. Since deeper OU nesting slows directory access, normally there should be no more than three
or four levels of nesting. Organizational units may contain:?

24 | P a g e
Organizational Unit (automatically published) - Used to create a heirarchy of AD objects into
logical business units. Other organizational units may be contained inside organizational units.
User (automatically published) - Individual person
Group (automatically published) - Groups of user accounts. Groups make user management
easier.
Computer (Those in the domain are automatically published) - Specific workstations.
Contact (automatically published) - Administrative contact for specific active directory objects.
Connection - A defined one direction replication path between two domain controllers making
the domain controllers potential replication partners. These objects are maintained on each
server in "Active Directory Sites and Services".
Shared folder - Used to share files and they map to server shares.
Printer (Most are automatically published) - Windows NT shared printers are not published
automatically.
Site - A grouping of machines based on a subnet of TCP/IP addresses. An administrator
determines what a site is. Sites may contain multiple subnets. There can be several domains in a
site. For example, an organization may have branches around the city they are located in. Each
location may be a site.
Site container
Site link - Defines the connection between sites. Can indicate the cost of sending data across a
network in terms of available bandwidth. It is a list of two or more connected sites. Whether the
link will use RPC or SMTP for passing data must be determined before creating the link since it
cannot be changed
Site link bridge - Allows one site in a string of sites to replicate through one or two sites to a
second or third site. These are only used for fine control of how replication will occur across
WAN links.
Site settings
Subnet - A part of a network based on addresses which is usually connected using routers.
Subnets must be created in each site object before it is really active. A network address and
subnet mask is used to define the subnet.
Subnet container
Trusted domain
Pre-installed Container Objects
Pre-installed container objects provide backward compatibility with Windows NT. They look and act like
organizational units and include:
Builtin - Build in local groups.
Computers - Computer accounts created using Windows NT. It is a list of workstations
Computer - Used to manage particular workstations.
Domain Controllers - A list of domain controllers.
Foreign Security Principles - Shows trust relationships with other domains.
Users - Windows NT users.
Object Access
Controlling objects in Active Directory controls access only to objects in Active Directory. Objects outside
Active Directory may have their own access control. Permissions on corresponding objects in Active
25 | P a g e
Directory do not affect permissions on external objects. Therefore, the user must have both Active
Directory and object access.
When setting object permissions, they can be set so the change applies to all children of the object or
only to the object itself. You can also set child objects to inherit permissions from their parent object.
Access to specific object properties can be controlled. Object permissions for users and groups include:
Full Control - Allows full access to the object and its sub objects, with the ability to take
ownership of objects and change permissions of objects and sub objects
Read - Allows object contents and properties to be displayed.
Write - Allows object contents and properties to be changed except for modifying permissions,
configuring auditing, or taking ownership.
Create All Child Objects - Allows creation of any child objects.
Delete All Child Objects - Allows deletion of any child objects.
Object access is controlled using the Active Directory Users and Computers tool by clicking on "View",
"Advanced Features", Click + next to the domain, right click the object, select "Properties", click the
"Security" tab, and continue.
How To Manage Computer Accounts :Add a Computer Account
To perform this procedure, you must be a member of the Account Operators group, the Domain Admins
group, or the Enterprise Admins group in Active Directory, or you must have been delegated the
appropriate authority. As a security best practice, consider using Run as to perform this procedure.
1. Click Start, point to Programs, point to Administrative Tools, and then click Active Directory
Users and Computers.
2. In the console tree, click Computers under the domain node, or click the container in which you
want to add the computer.
3. Right-click Computers or the container in which you want to add the computer, point to New,
and then click Computer.
4. Type the computer name.IMPORTANT: The Default Domain Policy settings allow only members
of the Domain Admins group to add a computer account to a domain. Click Change to specify a
different user or group that can add this computer to the domain.
NOTES:
o

To view or change the full computer name of a computer and the domain that a
computer belongs to, right-click My Computer on the desktop, click Properties, and
then click the Network Identification tab.

26 | P a g e
o

There are two additional ways to give a user or group permission to add a computer to
the domain: use a Group Policy object to grant the right Add computer user, or, for the
organizational unit in which you want to allow them to create computer objects, grant
the user or group the permission to create computer objects.

o

If the computer that is using the account that you are creating is running a version of
Windows earlier than 2000, click to select the Assign this computer account as a preWindows 2000 computer check box.

o

The Assign this computer account as a pre-Windows 2000 computer check box assigns
a password that is based on the new computer name. If you do not select this check
box, you are assigned a random password.

o

If you intend to use the computer with the newly created account as a backup computer
for a domain controller, click Assign this computer account as a backup domain
controller.

To add a computer account by using a command, type the following at a command prompt, and then
press ENTER
dsadd computer ComputerDN
where ComputerDN the distinguished name of the computer you want to add. The distinguished name
specifies the directory location. To view the complete syntax for this command, at a command prompt,
type dsadd computer /?.
NOTE: To modify the properties of a computer account, use the dsmod computer command.
Add a Computer Account to a Group
To perform this procedure, you must be a member of the Account Operators group, the Domain Admins
group, or the Enterprise Admins group in Active Directory, or you must have been delegated the
appropriate authority. As a security best practice, consider using Run as to perform this procedure.
1. Click Start, point to Programs, point to Administrative Tools, and then click Active Directory
Users and Computers.
2. In the console tree, under the domain node, click Computers, or click the folder in which the
computer is located.
3. In the details pane, right-click the computer, and then click Properties.
4. On the Member Of tab, click Add.

27 | P a g e
5. Click the group to which you want to add the computer, and then click Add.
Or, to add the computer to more than one group, press CTRL and click the groups to which you
want to add the computer, and then click Add.NOTES:
o

Adding a computer to a group allows you to grant permissions to all of the computer
accounts in that group and to filter Group Policy settings on all accounts in that group.

o

To add a computer to a group, you can also drag the computer to a specific group.

To add a computer account to a group by using a command, type the following at a command prompt,
and then press ENTER
dsmod group GroupDN -addmbr ComputerDN
where ComputerDN the distinguished name of the computer you want to add (the distinguished name
specifies the directory location), and GroupDN specifies the distinguished names of the group object to
which you want to add the computer object. To view the complete syntax for this command, at a
command prompt, type dsmod group /?.
Delete a Computer Account
1. Click Start, point to Programs, point to Administrative Tools, and then click Active Directory
Users and Computers.
2. In the console tree, click Computers under the domain node, or click the folder in which the
computer is located.
3. In the details pane, right-click the computer, and then click Delete.

RESULT :- Creating and Managing Active Directory Objects is successfully completed.

28 | P a g e
EXPERIMENT 7
IMPLEMENTING DISK QUOTAS

AIM :- Creating home folder, profiles and Implementing Disk Quotas.
PROCEDURE :Assign a home folder , profiles to a domain user
To assign a home folder to a domain user:
1. Click Start, point to Programs, point to Administrative Tools, and then click Active Directory
Users and Computers.
2. In the console tree, click Users.
3. In the Details pane, right-click the user account, and then click Properties.
4. In the Properties dialog box, click Profile.
5. Under the Home folder, type the folder information. To do this, follow these steps:
a.

To assign a home folder on a network server, click Connect, and then specify a

drive letter.
b.
o

In the To box, type a path. This path can be any one of the following types:

Network path, for example:
serveruserstester

o

You can substitute username for the last subfolder in the path, for example:
serverusersusername

29 | P a g e
6. Note In these examples, server is the name of the file server housing the home folders, and
users is the shared folder.
Click OK.
Assign a home folder to a local user
To assign a home folder to a local user:
1. Click Start, click Control Panel, double-click Administrative Tools, and then double-click
Computer Management.
2. In the console tree, click Users in Local Users and Groups.
3. Click the user account.
4. Click the Action menu, and then click Properties.
5. Click the Profile tab, click Connect, and then specify a drive letter.
6. In the To box, type a path. This path can be any of the following types:
o

Network path, for example:
serveruserstester

o

You can substitute username for the last subfolder in the path, for example:
serverusersusername
Where server is the name of the file server housing the home folders, and where
users is the shared folder.

7. Click OK.
Specify a home folder for a terminal server
In Windows Server 2003, you can specify a home folder for a terminal server. Assign each user on a
terminal server a unique home folder. This makes sure that you store the program information
separately for each user in the multi-user environment.
Note: If you specify only the home folder for Windows Server 2003, both Windows 2003 and Terminal
Services use this home folder.
To specify a home folder for a terminal server, use one of the following procedures.

30 | P a g e
Domain user account
1. Click Start, point to Programs, point to Administrative Tools, and then click Active Directory
Users and Computers.
2. In the console tree, expand the domain node, and then click the Users folder.
3. Double-click the user account.
4. Click the Terminal Services Profile tab.
5. If the Terminal Services home folder is on the local server, click Local path, and then type the
path of the profile.
Note If you do not specify the location path in the Terminal Service Home folder pane, the
default local home folder is located at the following path:
system driveDocuments and Settingsusername
6. If the Terminal Services home folder is on a network share, click Connect, select a drive to
connect, and then type the network path.
7. Click OK.
Local user account
1. Click Start, point to Programs, point to Administrative Tools, and then click Computer
Management.
2. In the console tree, click Users in Local Users and Groups.
3. Double-click the user account.
4. Click the Terminal Services Profile tab.
5. If the Terminal Services home folder is on the local server, click Local path, and then type the
path of the profile.
Note If you do not specify the location path in the Terminal Service Home folder pane, the
default local home folder is located at the following path:
system driveDocuments and Settingsusername
6. If the Terminal Services home folder is on a network share, click Connect, select a drive to
connect, and then type the network path.
7. Click OK.
31 | P a g e
Disk quotas overview :Disk quotas track and control disk space usage for NTFS volumes. Administrators can configure Windows
to:
Prevent further disk space use and log an event when a user exceeds a specified disk space limit,
that is, the amount of disk space a user is allowed to use.
Log an event when a user exceeds a specified disk space warning level, that is, the point at
which a user is nearing his or her quota limit.
When you enable disk quotas, you can set two values: the disk quota limit and the disk quota warning
level. For example, you can set a user's disk quota limit to 500 megabytes (MB), and the disk quota
warning level to 450 MB. In this case, the user can store no more than 500 MB of files on the volume. If
the user stores more than 450 MB of files on the volume, you can configure the disk quota system to log
a system event. You must be a member of the Administrators group to administer quotas on a volume.
For instructions on setting disk quota values, see Assign default quota values.
You can specify that users can exceed their quota limit. Enabling quotas and not limiting disk space use
are useful when you do not want to deny users access to a volume but want to track disk space use on a
per-user basis. You can also specify whether or not to log an event when users exceed either their quota
limit or their quota warning level.
When you enable disk quotas for a volume, volume usage is automatically tracked for all users from that
point on.
You can enable quotas on local volumes, network volumes, and removable drives as long as they are
formatted with the NTFS file system. In addition, network volumes must be shared from the volume's
root directory and removable drives must be shared. Volumes formatted with the version of NTFS used
in Windows NT 4.0 are upgraded automatically by Windows Setup.
You cannot use file compression to prevent users from exceeding their quota limits because compressed
files are tracked based on their uncompressed size. For example, if you have a 50 MB file that is 40 MB
after it is compressed, Windows counts the file's original 50 MB size toward the quota limit.
Enabling Quotas on a Disk
By default, disk quotas are disabled in Windows Server 2003. You can enable disk quotas on any volume
that has been assigned a drive letter. To enable quotas on a volume, follow these steps:
1. In Windows Explorer, right-click a drive letter and open the properties of that drive.
2. Click the Quota tab, shown in Figure 19-23, and then click Show Quota Settings.

32 | P a g e
Figure 19-23 The Quota tab of a drive's properties
3. Select the Enable Quota Management check box to enable quotas for the disk, as shown in
Figure 19-24.

Figure 19-24 The Quota Settings dialog box for a disk
4. To enable hard quotas that can't be exceeded, select the Deny Disk Space To Users Exceeding
Quota Limit check box.
5. Set the limits and warning level, as shown in Figure 19-24. You can also enable logging on this
page.
6. Click OK to enable the quotas. You'll be prompted one last time to confirm, as shown in Figure
19-25. Click OK and the quotas will be enabled.

33 | P a g e
Figure 19-25 The Disk Quota confirmation message
Setting Per-User Quotas
You can set quota limits on individual users, or you can have limits apply equally to all nonadministrative users. Unfortunately, you can't set limits on groups of users. And any users who already
own files on the disk will have their quotas initially disabled. New users will have the default quotas for
the disk applied as you would expect when they first save a file on the disk.
To set the quotas for individual users, follow these steps:
1. In Windows Explorer, right-click a drive letter and open the properties of that drive.
2. Click the Quota tab, and then click Show Quota Settings to bring up the Quota Settings dialog
box for that disk.
3. Click Quota Entries to open the Quota Entries dialog box for the disk, as shown in Figure 19-26.

Figure 19-26 The Quota Entries dialog box for a disk
4. To modify the quota for a user already listed, select the user and then click Properties to open
the quota settings for that user, as shown in Figure 19-27. Set the quota for the user and click
OK to return to the Quota Entries dialog box.

34 | P a g e
Figure 19-27 The Quota Settings dialog box for an individual user
5. To create a quota for a user who doesn't have one yet, and who needs a quota different from
the default for the disk, click New Quota Entry.
6. Select the user or users to apply the new quota to, and click OK to bring up the Add New Quota
Entry dialog box, as shown in Figure 19-28.
7. Click OK to add the new entry and return to the Quota Entries dialog box. Close the Quota
Entries dialog box, click OK in the Quota Settings dialog box, and then click OK in the Properties
dialog box for the drive.
8. To manage quotas from the command line, you need to use Fsutil.exe. Even for a determined
command-line type, it's pretty lame. Stick to the GUI, and use import and export whenever
possible.
RESULT :-Creating home folder, profiles and Implementing Disk Quotas is successfully completed.

EXPERIMENT 8
SHARING, SERVING FILES AND FOLDERS ON FAT AND NTFS

35 | P a g e
AIM :- Sharing, Serving Files and Folders on FAT and NTFS.
PROCEDURE :USING WINDOWS EXPLORER TO SHARE A FOLDER ON THE
LOCAL COMPUTER
1. Start Windows Explorer. (SelectStart➪Programs➪Accessories➪Windows Explorer.)
2. In the left pane, expand folders as necessary until the folder you want to share is displayed in the right
pane. In the right pane, highlight that folder. Select File➪ Sharing.(Or,right-click the folder, and select
Sharing from the menu that appears.)
3. The folder’s Properties dialog box appears with the Sharing tab displayed. To share this folder, select
the “Share this folder” option

There are several configurable options on this tab:
Share name: Either accept the default name in the “Share name” text box or type in the name you want
to use for the share.
Comment: You can add a descriptive comment about the share in the Comment text box if you want to.
(This is an optional entry.)
User limit: If you want to limit the number of users who can connect to this share simultaneously
(because of licensing limitations or for other reasons), you can configure the “User limit” section on this
tab. The default “User limit” is “Maximum allowed.”
Permissions: If you want to assign or change share permissions for this shared folder, click Permissions.
Caching: If you want to modify offline file settings for this shared folder, click Caching.
Click OK.
4. In the folder’s Properties dialog box, click OK.
5. Close Windows Explorer
USING COMPUTER MANAGEMENT TO SHARE A FOLDER
1. Start Computer Management. (Right-click My Computer, and select Manage from the menu that
appears.)
2. If you want to share a folder on this computer, skip to Step 4.
If you want to share a folder on a remote computer, in the left pane of the
36 | P a g e
Computer Management dialog box, right-click Computer Management (Local), and select “Connect to
another computer” from the menu that appears.
3. In the Select Computer dialog box, double-click the name of the computer on which you want to
share a folder.
4. In the left pane of the Computer Management dialog box, click the + next to System Tools (if System
Tools is not already expanded). Click the + next to Shared Folders. Highlight Shares. Select Action➪New
File Share.
5. The Create Shared Folder dialog box appears

In this dialog box, enter the full path to the folder you want to share (such
as C:Data). You can browse for this folder if you don’t know its path.
Enter a share name for the share. You can also enter a description for the share if you want to. Click
Next.
6. In the next dialog box, configure the appropriate share permissions for this shared folder. (I’ll cover
share permissions a little later in this chapter.) Click Finish.
7. A dialog box appears, indicating that the folder has been successfully shared. Click Yes if you want to
create another shared folder. Otherwise, click No.
8. The folder you just shared appears in the right pane of the Computer
Management dialog box. Close Computer Management.

USING WINDOWS EXPLORER TO ASSIGN SHARE PERMISSIONS
1. Start Windows Explorer. (SelectStart➪Programs➪Accessories➪Windows Explorer.)
2. In the left pane, expand folders as necessary until the shared folder to which you want to assign share
permissions is displayed in the right pane. In the right pane, highlight that folder. Select File➪Sharing.
(Or, right-click the folder and select Sharing from the menu that appears.)
3. The folder’s Properties dialog box appears with the Sharing tab displayed. Click Permissions.
4. The Permissions dialog box for the shared folder appears. Notice that by default the Everyone group is
allowed the Full Control,
Change, and Read permissions.

37 | P a g e
Also notice the Allow and Deny check boxes.
Allow: When the Allow check box next to a specific permission is selected
for a user or group, the user or group is granted the selected permission to
the share.
Deny: When the Deny check box next to a specific permission is selected
for a user or group, the user or group is specifically denied that permission
to the share, even if the user or group is allowed that permission through
membership in another group.
To add a user or group to the Name box, click Add.
5. In the Select Users, Computers, or Groups dialog box, double-click each user and group you want to
add. (You can also highlight each user or group and then click Add, but double-clicking is faster and
easier.) As you double-click each user or group, the user or group appears in the bottom portion of the
dialog box. Click OK.
6. In the Permissions dialog box for the share, each user or group that you added is automatically
assigned the Read permission to the share. To change the permissions of a user or group you added,
highlight the user or group in the Name box, then select or clear the appropriate check boxes in the
Permissions box. Click OK.
7. In the shared folder’s Properties dialog box, click OK.
8. Close Windows Explorer.
TO STOP SHARING A FOLDER
1. Start Windows Explorer. (SelectStart➪Programs➪Accessories➪Windows Explorer.)
2. In the left pane, expand folders as necessary until the shared folder you want to stop sharing is
displayed in the right pane. In the right pane, highlight that folder. Select File➪Sharing. (Or, right-click
the folder, and select Sharing from the menu that appears.)
3. The folder’s Properties dialog box appears with the Sharing tab displayed. Select the “Do not share
this folder” option. Click OK.
4. Close Windows Explorer.

38 | P a g e
RESULT :Sharing, Serving Files and Folders on FAT and NTFS is successfully completed.

EXPERIMENT 9
SETTING UP 2K3 PRINTING ENVIRONMENT
AIM :- Setting up windows 2003 printing Environment.
PROCEDURE :INSTALL LOCAL PRINTERS :A printer driver is software that your programs and Windows can use to communicate with a
physical printer (which might be attached to your computer, to another computer on the
network or to a "phantom" printer that isn't even there).

39 | P a g e
PowerPoint gets very cranky if you don't have a printer driver installed on your computer and
set as default. You don't really need to have a physical printer, just the driver at a minimum.
This should be a MS-approved standard printer driver, and not a specialty driver like a Fax
driver, Microsoft Office Document Imaging driver, Acrobat or the like.
The driver should be locally installed (ie, the driver should reside on your PC, not on a network,
though you can "connect" a locally installed driver TO a network printer).
I have a printer installed already. Is it local?
If you already have a printer driver installed and need to know whether it's local or not:
Choose Start, Control Panel, Printers and Faxes.
Right-click your printer and choose Properties.
On the General tab of the Properties dialog box, click Print a test page.
Look at the Computer name: listed on the printer test page. If it matches the name
of your computer, then the printer driver is locally installed. If it's some other
name, then you're using a shared driver from that computer, which is liable to
cause problems for PowerPoint.
Install a printer driver locally
Installing a printer driver is a Windows function, not a PowerPoint one. Before installing a
printer driver, quit PowerPoint and your other programs.
Read over the installation instructions that came with your printer. When in doubt, follow the
instructions there rather than the ones below.
Click Start, Settings, Control Panel.
Double-click "Printers & Faxes"
Double-click "Add Printer" to start the Add Printer Wizard

40 | P a g e
The Add Printer Wizard Welcome screen
Click Next

Local or Network Printer
Click "Local Printer"
Make sure there's NO checkmark next to "Automatically detect and install ..."
Click Next

Select a PrinterPort
If your printer is actually attached to the computer, click "Use the following port"
and select the port your printer's attached to.
41 | P a g e
If you're installing a driver only to keep PowerPoint happy, choose LPT1: or FILE: (it
doesn't really matter, since you'll never actually print to the port)
If you're installing a local driver but need to print to a network printer, look for the
printer's port on the network and choose it, if available. If not, choose LPT1: for
now. You can change the setting later.
Click Next

Install Printer Software
If installing a real printer, select your printer manufacturer and printer model here.
If you have an installation disk or CD that came with the printer, click "Have Disk"
and locate the INF file for the printer (check the printer's documentation for
specific instructions).
If installing a printer only to keep PowerPoint happy, choose the HP LaserJet
4V/4MV as we've done here
Click Next

42 | P a g e
Name Your Printer
Give the printer a name (this is the name you'll use to select it later)
If installing a printer just to make PowerPoint happy, you might want to give it a
name that indicates it isn't a real physical printer (PPT Pacifier, or the like)
Click "Yes" under "Do you want to use this printer as the default printer" (this
option may not appear in all Windows versions; see Notes below)
Click Next

Printer Sharing
Click "Do not share this printer"
Click Next

43 | P a g e
Print Test Page
Click No
Click Next

Completing the Add Printer Wizard
Review your choices. Click Back if you need to change anything
Click Finish

If you don't see "Use this printer as the default printer" in the "Name printer" screen, finish
installing the printer, then click Start, Settings, Printers; rightclick the printer you just installed
and click "Set as default printer" from the pop-up menu that appears.
If you have a physical printer installed, you can print a test page to make sure it's working
correctly and to verify that it's a local and not a network-installed driver.
Click Start, then click Printers and Faxes
Right-click the printer you want to test and choose Properties from the pop-up
menu
Click "Print test page" on the Properties dialog box that appears
44 | P a g e
When the test page finishes printing, check the following items on it:
o Computer name: this will be the name of the computer the

printer driver is on. It should be the same as your computer's
name. If it's some other computer's name, then the printer
driver is NOT locally installed.
o Printer name: this should show the name you assigned when

installing the driver; if it shows something like
ComputernamePrintername, the driver's on the network,
not on your PC. Consider removing the network version and
installing a local driver instead.

INSTALLING NETWORK PRINTER :Some of the following configuration steps may require administrative authority.
1.
2.
3.
4.
5.

Logon to the Windows Server 2003 or XP print client as an administrator.
Select Start, then Settings, then Printers and Faxes. You see the Printers and Faxes folder.
Double-click on the Add Printer icon.
In the Add Printer Wizard, click Next.
Click the A network printer or a printer attached to another computer radio button, then click
Next.
6. In the Name entry field, type the name of the shared printer as follows:
machinenameprintersharename
To browse the network for the printer you want to share, click Browse for a printer.
7. Click Next.
8. In the unlikely event that your printer drivers are not downloaded automatically from the print
server, you will be asked if you want to install the printer drivers on the print client.
If this happens, click OK and follow the instructions to install your printer driver. On the IBM
Infoprint 2060ES, 2075ES, 2085, 2090ES, 2105, and 2105ES Printer Software Setup CD-ROM the
Windows XP drivers are in the following directory:
DriversWin2KXPPCL6language
where language is English, French, German, and so on.

45 | P a g e
9. Specify whether you want this printer to be the default printer, then click Next.
10. Click Finish.
Verifying the Configuration
Test the client configuration by printing a test page as follows.
1. Select Start, then Printers and Faxes. You see the Printers and Faxes folder.
2. Right-click on the printer and select Properties.
3. Select Print Test Page.

SHARING A PRINTER :1. Follow this step-by-step instructions to share printer in Windows XP. Go to Start and click
Control Panel. Control Panel Window will appear, then double click Printers and faxes.
2. Printers and Faxes window will appear. Right click the printer you want to share, then click
Sharing…

Note: Make sure you've enabled File and Printer Sharing for Microsoft Networks on network card's
properties.

3.

Select Sharing tab and tick Share this printer to share the printer. You can type in a new name
in the Share name text box to change your printer name on the network, however this will not
change the printer name on your computer. Click Apply.

46 | P a g e
Note: If the other users using different version of Windows to access your printer, they will need to
install printer driver themselves. You can help by installing additional printer drivers on your Windows
XP, so that the printer driver will be installed when other users access the shared printer with different
version of Windows. Click Additional Drivers, tick additional driver you would like to install. You will be
prompted to install those additional drivers after clicking OK.

4. Once you have shared the printer, you will see there is a hand supporting your printer.

RESULT :- Setting up windows 2003 printing Environment is successfully completed.

47 | P a g e
EXPERIMENT 10
INSTALLING AND GONFIGURING DHCP, DNS, IIS 6.0
AIM :- Installing and Configuring DHCP, DNS, IIS 6.0.
PROCEDURE :- DYNAMIC HOST CONFIGURATION PROTOCOL(DHCP):INSTALLING DHCP
1. Select Start➪Settings➪Control Panel.
2. In the Control Panel dialog box, double-click Add/Remove Programs.
3. In the Add/Remove Programs dialog box, click Add/Remove Windows Components.
4. In the Windows Components Wizard dialog box, highlight Networking Services, and click Details.
5. In the Networking Services dialog box, select the check box next to Dynamic Host Configuration
Protocol (DHCP), and click OK.
6. In the Windows Components Wizard dialog box, click Next.
7. Windows 2003 configures components and installs DHCP. In the Completing the Windows
Components Wizard screen, click Finish.
8. Close Add/Remove Programs. Then close Control Panel.

AUTHORIZING A DHCP SERVER
1. Select Start➪Programs➪Administrative Tools➪DHCP.
2. In the left pane of the DHCP dialog box, highlight the DHCP server you want to authorize. Select
Action➪Authorize.
3. Wait a minute or two, then select Action ➪ Refresh.
4. The DHCP Server is now authorized. Notice that the icon next to the DHCP server now contains a
green, upward pointing arrow (instead of a red, downward pointing arrow).
48 | P a g e
5. Close DHCP.

CONFIGURING A DHCP SERVER FOR DNS INTEGRATION
1. Select Start➪Programs➪Administrative Tools➪DHCP.
2. In the left pane of the DHCP dialog box, highlight the DHCP server you want to configure for DNS
integration. Select Action➪Properties.
3. In the DHCP server’s Properties dialog box, click the DNS tab.
4. The DNS tab appears, as shown in Figure 16-4. Notice the blank check box next to “Enable updates for
DNS clients that do not support dynamic update.”
To configure the DHCP server to provide IP address and host name information of Windows-based client
computers to the DNS server, select the check box next to “Enable updates for DNS clients that do not
support dynamic update.”
In addition, if you want the DHCP server to update the DNS server for Windows 2003 client computers,
even if the clients don’t request this update, select the
“Always update DNS” option. Selecting this option ensures that the DNS server has the most recent IP
address and host name information for Windows 2003 client computers, and it also registers reverse
lookup information for Windows 2003 client computers.
Click OK.
5. Close DHCP.

CREATING A SCOPE
1 Select Start➪Programs➪Administrative Tools➪DHCP.
2. In the left pane of the DHCP dialog box, highlight the DHCP server on which you want to a scope.
Select Action➪New Scope.
3. The New Scope wizard starts. Click Next.
49 | P a g e
4. In the Scope Name screen, type in a name and a description for the scope in the text boxes provided.
Click Next.
5. The IP Address Range screen appears. In the “Start IP address” and “End IP address” text ,
enter the IP addresses that will define the range of the scope.
To configure the subnet mask for the scope, you can either type in the subnet mask in the “Subnet
mask” text box, or you can specify the length of the subnet mask as whole number between 1 and 31. If
you enter a number in the Length spin box, the subnet mask is automatically calculated for you. Click
Next. The IP Address Range screen after it has been configured with a range of IP addresses that spans
multiple subnets, and after its subnet mask has been configured.
6. If you configured a range of IP addresses in Step 5 that spans more than one subnet, the Create
Superscope screen is displayed. If you want to create a superscope,select the Yes option and click Next.
If you don’t want to create a superscope,click Back and reconfigure your IP address range to only include
IPaddresses from a single subnet.

If you configured a range of IP addresses in Step 5 from only one subnet, the Add Exclusions screen is
displayed. In this screen, you can specify IP addresses (or ranges of IP addresses) within the scope that
will not be assigned to DHCP client computers by the DHCP server.
To exclude IP addresses, enter the start and end IP address of the range you want to exclude and click
Add. (If you only want to exclude a single IP address, use this IP address as both the start and end IP
address of the exclusion range.)
When you finish configuring exclusions, click Next.
7. In the Lease Duration screen, either accept the default DHCP lease duration of eight days, or configure
a custom lease duration. Click Next.
8. In the Configure DHCP Options screen, choose whether to configure DHCP options for this scope (such
as routers, DNS, and WINS settings) now. For completeness, I’ll assume you choose the Yes option. Click
Next.
9. In the Router (Default Gateway) screen, enter the IP address of the router that will function as the
default gateway for this scope and click Add. Click Next.
10. In the Domain Name and DNS Servers screen, in the “Parent domain” text box, enter the name of
the domain that DHCP client computers that obtain IP addresses from this scope are members of.
Then, either specify the name of the DNS server on your network and click
Resolve, or enter the IP address of the DNS server. Click Add. If you have more than one DNS server, you
can repeat this process and click Add again. If you have more than one DNS server, the first DNS server
in the list becomes the primary DNS server for the DHCP client computers. Click Next.
50 | P a g e
11. In the WINS Servers screen, either specify the name of the WINS server on your network and click
Resolve, or enter the IP address of the WINS server. Click Add. If you have more than one WINS server,
you can repeat this process and click Add again. If you have more than one WINS server, the first WINS
server in the list becomes the primary WINS server for the DHCP client computers. Click Next.
Or, if you don’t have a WINS server on your network, just click Next.
12. In the Activate Scope screen, select whether to activate this scope now. Your options are Yes or No.
A DHCP server can’t assign addresses from a scope until the scope is activated. Make your selection and
click Next.
13. In the Completing the New Scope Wizard screen, click Finish.
14. Windows 2000 creates the scope. It is displayed in the right pane of the DHCP dialog box. Close
DHCP.
DOMAIN NAME SERVICE (DNS) :1.CONFIGURING A STATIC IP ADDRESS
1. Select Start ➪ Settings ➪ Control Panel.
2. In the Control Panel dialog box, double-click the Network and Dial-up Connections folder.
3. In the Network and Dial-up Connections folder, right-click Local Area Connection and select Properties
from the menu that appears.
4. In the Local Area Connection Properties dialog box, highlight Internet Protocol
(TCP/IP) and click Properties.
5. In the Internet Protocol (TCP/IP) Properties dialog box, select the “Use the following IP Address”
option, and type in a static IP address, subnet mask, and default gateway. Click OK.
6. In the Local Area Connection Properties dialog box, click OK.
7. Close the Network and Dial-up Connections folder.
2.CONFIGURING A PRIMARY DNS SUFFIX
1. From the desktop, right-click My Computer and select Properties from the menu that appears.
2. In the System Properties dialog box, click the Network Identification tab.
3. On the Network Identification tab, click Properties.
4. In the Identification Changes dialog box, click More.
5. In the DNS Suffix and NetBIOS Computer Name dialog box, type your company’s FQDN in the “Primary
DNS suffix of this computer” text box (for example, mycompany.com). Click OK.
6. In the Identification Changes dialog box, click OK.
7. In the Network Identification dialog box, click OK.
8. On the Network Identification tab, click OK.
9. In the System Settings Change dialog box, click Yes to restart your computer.

3.INSTALLING THE DNS SERVER SERVICE
1. Place your Windows 2000 Server or Advanced Server compact disc into your computer’s CD-ROM
drive. Select Start ➪ Settings ➪ Control Panel.
51 | P a g e
2. In the Control Panel dialog box, double-click Add/Remove Programs.
3. In the Add/Remove Programs dialog box, click Add/Remove Windows Components.
4. The Windows Components Wizard starts. In the Windows Components screen, scroll down and
highlight Networking Services. Click Details.
5. In the Networking Services dialog box, select the check box next to Domain Name System (DNS). Click
OK.
6. In the Windows Components screen, click Next.
7. Windows 2000 Setup configures components. In the Completing the Windows Components Wizard
screen, click Finish.
8. Close the Add/Remove Programs dialog box. Close Control Panel.
4.CONFIGURING YOUR DNS SERVER TO USE ITSELF
1. From the desktop, select Start➪Settings➪Control Panel.
2. In the Control Panel dialog box, double-click the Network and Dial-up Connections folder.
3. In the Network and Dial-up Connections folder, right-click Local Area Connection and select Properties
from the menu that appears.
4. In the Local Area Connection Properties dialog box, highlight Internet Protocol (TCP/IP) and click
Properties.
5. In the Internet Protocol (TCP/IP) Properties dialog box, ensure that the “Use the following DNS server
addresses” option is selected. Then, in the Preferred DNS server text box, type the IP address of this DNS
server. Click Advanced.
6. In the Advanced TCP/IP Settings dialog box, click the DNS tab.
7. On the DNS tab, type the FQDN of the DNS domain that this DNS server belongs to in the “DNS suffix
for this connection” text box. Generally it’s okay to accept the remaining default settings on this tab.
Click OK.
8. In the Internet Protocol (TCP/IP) Properties dialog box, click OK.
9. In the Local Area Connection Properties dialog box, click OK.
10. Close the Network and Dial-up Connections folder.
5. CONFIGURING A ROOT SERVER
1. Select Start➪Programs➪Administrative Tools➪DNS.
2. In the DNS dialog box, highlight your computer in the left pane.
3. Windows 2000 indicates that your DNS server has not yet been configured Select Action➪Configure
the server.

4. The Configure DNS Server Wizard starts. Click Next.
5. The Root Server screen appears. Notice the two options available in this screen.
52 | P a g e
If you want to configure this server to be a root server, accept the default option of “This is the first DNS
server on this network.” Click Next.
If you want this DNS server to use an existing root server on your network, select the “One or more DNS
servers are running on this network” option, and provide the IP address of a root server on your
network that you want this server to use.
Click Next.
6. In the Forward Lookup Zone screen, you can choose whether or not to create a forward lookup zone
now.
If you select the “Yes, create a forward lookup zone” option and click Next, the New Zone Wizard begins.
Follow the instructions presented on-screen to create your forward lookup zone, and a reverse lookup
zone if desired. When you finish creating zones, skip to Step 7.
If you select the “No, do not create a forward lookup zone” option, click Next.
7. The Completing the Configure DNS Server Wizard screen appears. Click Finish.
8. The DNS dialog box reappears. This completes the configuration of a root server.
Close the DNS dialog box.
6.CREATING A STANDARD PRIMARY FORWARD LOOKUP ZONE
1. Select Start➪Programs➪Administrative Tools➪DNS.
2. In the DNS dialog box, click the + next to the DNS server’s name in the left pane.
3. In the left pane, highlight the Forward Lookup Zones folder. Select Action➪ New Zone.
4. The New Zone Wizard begins. Click Next.
5. The Zone Type screen appear. Notice the three types of zones you can create.

Also notice that the option next to “Active Directory-integrated” is grayed out—this option is only
available after you install Active Directory and the DNS Server service on a Windows 2000
Server/Advanced Server computer.
Accept the default option of “Standard primary” and click Next.
6. In the Zone Name screen, type in the name of the zone you are creating. This name is usually the
FQDN of the DNS domain that the zone will contain, such as microsoft.com. Click Next.
7. The Zone File screen appears. In this screen, you can either create a new zone file for the new zone, or
configure the new zone to use an existing file. I recommend you accept the default option of “Create a
new file with this file name,” and also that you accept the default filename presented. Click Next.
8. The Completing the New Zone Wizard screen appears. Click Finish.
53 | P a g e
9. The DNS dialog box reappears. Notice that the new zone you created appears in the right pane.

7.CREATING A STANDARD PRIMARY REVERSE LOOKUP ZONE
1. Start the DNS administrative tool if it is not already running.
(Select Start➪Programs➪Administrative Tools➪DNS.)
2. In the DNS dialog box, click the + next to the DNS server’s name in the left pane if this computer is not
already expanded.
3. In the left pane, highlight the Reverse Lookup Zones folder. Select
Action➪New Zone.
4. The New Zone Wizard begins. Click Next.
5. The Zone Type screen appears. Accept the default option of “Standard primary” and click Next.
6. The Reverse Lookup Zone screen appears, as shown in Figure 7-9. Notice the two options available on
this screen: you can either identify the reverse lookup zone you’re creating by network ID, or by typing
in a name for the new reverse lookup zone.
Because it’s difficult to construct the correct name for a reverse lookup zone, I recommend that you
select the default “Network ID” option and enter the network ID of the zone. This network ID is really
the network ID of the subnet for which this reverse lookup zone will provide IP address to host name
resolution. Click Next.

7. The Zone File screen appears. In this screen, you can either create a new zone file for the new zone, or
configure the new zone to use an existing file. I recommend you accept the default option of “Create a
new file with this file name,” and also that you accept the default filename presented. Click Next.
8. The Completing the New Zone Wizard screen appears. Click Finish.
9. The DNS dialog box reappears. Notice that the new zone you created appears in the right pane.
INTERNET INFORMATION SERVICES(IIS):ADDING IIS COMPONENTS
1. Select Start➪Settings➪Control Panel.
2. In the Control Panel dialog box, double-click Add/Remove Programs.
3. In the Add/Remove Programs dialog box, click Add/Remove Windows Components.

54 | P a g e
4. In the Windows Components Wizard dialog box, highlight Internet Information Services (IIS), and click
Details.
5. The Internet Information Services (IIS) dialog box appears. Notice that the check box next to many IIS
components is already selected— these components are already installed. The actual components
installed on your
Windows 2000 computer may differ from the ones shown in this figure.
Select the check box next to each IIS component you want to add. Clear the check box next to any IIS
component you want to remove. Click OK.
6. In the Windows Components Wizard dialog box, click Next.
7. If prompted, insert your Windows 2000 compact disc into your computer’s CD-ROM drive and click
OK. Close the Microsoft Windows 2000 CD dialog box. Windows 2000 configures components and
installs the selected IIS components.
In the Completing the Windows Components Wizard screen, click Finish.
8. Close Add/Remove Programs. Then close Control Panel.

RESULT :Installing and Configuring DHCP, DNS, IIS 6.0 is successfully completed.

55 | P a g e
EXPERIMENT 11
INSTALLING AND CONFIGURING WEB SERVER AND FTP SERVER
AIM :- Installing and Configuring Web Server.
PROCEDURE :CONFIGURING THE DEFAULT WEB SITE
1. Select Start➪Programs➪Administrative Tools➪Internet Services Manager.
2. In the left pane of the Internet Information Services dialog box, click the + next tothe server that
contains the Web site you want to configure. Right-click Default
Web Site, and select Properties from the menu that appears.
3. The Default Web Site Properties dialog box appears, as shown in Figure 18-2.
Notice the Description text box. You can change the name of the Default WebSite by typing in a new
name in this text box.

Configure the settings on the various tabs to meet your needs. (I’ll discuss eachof these tabs in the rest
of this section.) Click OK.
4. Close the Internet Information Services dialog box.
WORKING WITH PERSONAL WEB MANAGER
56 | P a g e
1. On your Windows 2000 Professional computer, select Start➪Settings➪
Control Panel.
2. In Control Panel, double-click the Administrative Tools folder.
3. In the Administrative Tools folder, double-click Personal Web Manager.
4. When the “Tip of the day” appears, click Close. The Personal Web Manager main dialog box is
displayed, as shown in Figure 18-6. Notice the statistics displayed inthe Monitoring section of this dialog
box.

To stop the Default Web Site, click Stop.
To view a product tour of IIS, click Tour.
To manage advanced Web site properties, such as enabling and configuring the default document,
configuring access and application permissions, and creatingvirtual directories, click Advanced.
5. Close Personal Web Manager.

Next right-click on the directory to bring up its property page, which should look like the image below.
Make sure to select Execute (including script). But don't click the OK button just yet.

57 | P a g e
Before you select OK you should create an application mapping. Basically this involves telling IIS or PWS
that applications ending with .ivm should be executed by the interpreter. To do this click the
Configuration... button. A Application Configuration dialog box like the image below will appear.

You need to add a mapping for .ivm applications so click the Add button. An Application Extension
Mapping dialog box like the one below will appear. Enter the full path to the interpreter, or use the
Browse button to locate it. Enter the extension being mapped (.ivm).

58 | P a g e
Click OK on all the open dialog boxes and you're finished!
FTP Service
Because FTP depends on Microsoft Internet Information Services (IIS), IIS and the FTP Service must be
installed on the computer. To install IIS and the FTP Service, follow these steps:
1. Click Start, Control Panel, and then click Add or Remove Programs.
2. Click Add/Remove Windows Components.
3. In the Components list, click Application Server, click Internet Information Services (IIS) (but do not
select or clear the check box), and then click Details.
4. Select the following check boxes:
Common Files
File Transfer Protocol (FTP) Service
Internet Information Services Manager
5. Select the check boxes next to any other IIS-related service or subcomponent that you want to install,
and then click OK.
6. Click Next.
7. When you are prompted, insert the Windows Server 2003 CD-ROM into the computer's CD-ROM or
DVD-ROM drive or provide a path to the location of the files, and then click OK.
8. Click Finish.
Configure the FTP Service
To configure the FTP Service to allow only anonymous connections, follow these steps:
1. Start Internet Information Services Manager or open the IIS snap-in.
2. Expand Server_name, where Server_name is the name of the server.
3. Expand FTP Sites
4. Right-click Default FTP Site, and then click Properties.
5. Click the Security Accounts tab.
6. Select the Allow Anonymous Connections check box, and then select the Allow only anonymous
connections check box.
7. Click the Home Directory tab.
8. Select the Read and Log visits check boxes, and then click to clear the Write check box.
9. Click OK.
10. Quit Internet Information Services Manager or close the IIS snap-in.

59 | P a g e
EXPERIMENT -12
1.

INSTALLING AND CONFIGURING TERMINAL SERVER And
RDP ON CLIENTS

To enable Remote Administration Mode Go to SYS1.

2.
Right Click on My Computer  Properties
Aim: To install and configure Terminal Service Server and RDP on clients
3.
Requirements:
1.

A computer running windows 2003 server or Domain Controller.

2.

A computer running windows 2003 server or windows XP.

SYS1

SYS1

SYS2

SYS2

Domain Controller / Terminal Server

Member Server / Client

IP Address

10 .0.0.1

IP Address

10 .0. 0.2

Subnet Mask

25 5.0 .0.0

Subnet Mask

25 5.0 .0.0

Preferred DNS

10 .0.0.1

Preferred DNS 10.0.0.1

Select Remote tab.

60 | P a g e
How to configure terminal server in Remote Administration mode

4.

Check the box Allow users to connect remotely to this computer.

5.

Click OK  Apply  OK.
61 | P a g e
Go to Terminal Client
1. Start 
Program 
Accessories 
Communication Remote Desktop Connection (OR)

Start  type MSTSC.
Run 
2. Specify the IP Address 10.0.0.1 or computer name of terminal server 
Click Connect.

3. Specify username as Administrator and type the password. 
Click OK

4. The Administrator will connect to the Terminal Server Remotely.

62 | P a g e
How to Configure Terminal Server in Application Server Mode
1.

Go to Sys1  Select Start  Settings  Control Panel.

2.

In the Control Panel dialog box, double-click Add/Remove Programs.

3.

In the Add/Remove Programs dialog box, click Add/Remove Windows Components.

4.

In the Windows Components Wizard dialog box, scroll down until Terminal Services is
displayed

5.

Select the check box next to Terminal Services, an configuration warning will appear
 Click YES

6.

Terminal Setup Page appears

 Click Next

63 | P a g e
7.

On the next Terminal Services Setup

screen select the appropriate permissions.

Permissions compatible with Windows 2003 Users click Next
9.

Select Relaxed Security

10.

Click Next  Finish

64 | P a g e
HOW TO RUN TERMINAL SERVICES
Steps:
1.

Logon as administrator go to Active Directory User and Computer.

2.

Create Some User Accounts.

3.

Go to Terminal Client in Run Type MSTSC

4.

Specify the IP Address or computer name of terminal server

10.

In the System Settings Change dialog box, click YES to restart your computer and

 Click OK.



complete the installation of Terminal Services.

65 | P a g e
Click Connect.

 Click OK

5.

Specify username and type the password.

6.

Message: The Local Policy of the System Does not Permit you to Logon Interactively.

66 | P a g e
 Go to Terminal Server (Sys1)

7.

To Allow the User to Logon Locally

8.

Go to Domain Controller Security Policy, Select Local policy

 user right assignment



allow logon through terminal Services and add the appropriate user.
9.

Click Start  Run  type GPUPDATE

10.

On Terminal Client Logon as a User Remotely

11.

Message: You do not have permission to logon to this Session.

12.

On

Terminal Server Start

 Program 

Administrative Tools

 Terminal Services

configuration

67 | P a g e
13.

Select Rdp-Tcp  Properties

14.

Select Permission tab

15.

Click Apply  OK.

 Add the User.

68 | P a g e
16.

On Terminal Client again logon as a user remotely.

HOW TO MONITOR THE USER SESSIONS
Level of Controls: View the Session and Interact with the Session.
1.

On Terminal Server Start

 Program  Administrative tools

 Terminal

Services

Configuration.
2.

Right Click on Rdp - Tcp

 Properties  Remote Control Tab

 Select Use remote

control with the following settings.

69 | P a g e
3.

Check the box Requires Users Permission

 In level of Control Select View the sessions



Apply  ok

4.

To monitor user Session Logon as an Administrator Remotely on Terminal Server.

5.

Start  Program  Administrative Tools

6.

Right Click on the User System name

7.

Select Remote Control

 Terminal Service Manager.

 Select the hot keys  OK

70 | P a g e
8.

Now administrator is

Result: The installation and configuration of Terminal Service Server and RDP on clients is
Successfully completed

71 | P a g e
EXPERIMENT 13
INSTALLING AND CONFIGURING OF ROUTING AND REMOTE ACCESS SERVER

AIM :- Installing and configuring of routing and RAS server.
PROCEDURE :Installing the Routing and Remote Access Service
By default, the Routing and Remote Access service is installed automatically during the Windows Server
2003 installation, but it is disabled.
To Enable the Routing and Remote Access Service
1. Click Start, point to Administrative Tools, and then click Routing and Remote Access.
2. In the left pane of the console, click the server that matches the local server name.
If the icon has a red arrow in the lower-right corner, the Routing and Remote Access service is
not enabled. Go to step 3.
If the icon has a green arrow pointing up in the lower-right corner, the service is enabled. If so,
you may want to reconfigure the server. To reconfigure the server, you must first disable
Routing and Remote Access. To do this, right-click the server, and then click Disable Routing and
Remote Access. Click Yes when you are prompted with an informational message.
3. Right-click the server, and then click Configure and Enable Routing and Remote Access to start
the Routing and Remote Access Server Setup Wizard. Click Next.
4. Click Remote access (dial-up or VPN) to permit remote computers to dial in or connect to this
network through the Internet. Click Next.
5. Click VPN for virtual private access, or click Dial-up for dial-up access, depending on the role you
want to assign to this server.
6. On the VPN Connection page, click the network interface that is connected to the Internet, and
then click Next.
7. On the IP Address Assignment page, do one of the following:
 If a DHCP server will be used to assign addresses to remote clients, click Automatically, and then
click Next. Go to step 8.
72 | P a g e
 To give remote clients addresses only from a pre-defined pool, click From a specified range of
addresses.
NOTE: In most cases, the DHCP option is simpler to administer. However, if DHCP is not available, you
must specify a range of static addresses. Click Next.
The wizard opens the Address Range Assignment page.
Click New.
In the Start IP address box, type the first IP address in the range of addresses that you want to
use.
In the End IP address box, type the last IP address in the range.
Windows calculates the number of addresses automatically.
Click OK to return to the Address Range Assignment page.
Click Next.
Accept the default setting of No, use Routing and Remote Access to authenticate connection
requests, and then click Next.
Click Finish to enable the Routing and Remote Access service and to configure the remote
access server.
After you set up the server to receive dial-up connections, set up a remote access client connection on
the client workstation.
Granting Users Access to Remote Access Servers
You can use remote access policies to grant or deny authorization, based on criteria such as the time of
day, day of the week, the user's membership in Windows Server 2003-based security groups, or the type
of connection that is requested. If a remote access server is a member of a domain, you can configure
these settings by using the user's domain account.
If the server is a stand-alone server or a member of a workgroup, the user must have a local account on
the remote access server.
Grant Remote Access Rights to Individual User Accounts
If you manage remote access on a user account basis, follow these steps to grant remote access rights:
1. Click Start, point to All Programs, point to Administrative Tools, and then click Active Directory
Users and Computers.
2. Right-click the user account that you want to grant remote access rights to, click Properties, and
then click the Dial-in tab.
3. Click Allow access to grant the user permission to dial in, and then click OK.
73 | P a g e
Configure Remote Access Rights Based EXPERIMENT -14on Group Membership
If you manage remote access on a group basis, follow these steps to grant remote access rights:
1. Create a group that contains members who are permitted to create VPN connections.
2. Click Start, point to

EXPERIMENT -14Administrative Tools, and then click

Routing and Remote Access.
3. In the console tree, expand Routing and Remote Access, expand the server name, and then click
Remote Access Policies.
4. Right-click the right pane, point to New, and then click Remote Access Policy.
5. Click Next, type the policy name, and then click Next.
6. Click VPN for virtual private access, or click Dial-up for dial-up access, and then click Next.
7. Click Add, type the name of the group that you created in step 1, and then click Next.
8. Follow the on-screen instructions to complete the wizard.
If the VPN server already permits dial-up networking remote access services, do not delete the default
policy; instead, move it so that it is the last policy to be evaluated.
To Establish a Remote Connection
NOTE: Because there are several versions of Microsoft Windows, the following steps may be different
on your computer. If they are, see your product documentation to complete these steps.
1. On the client workstation, click Start, click Network Connections, and then click the new
connection that you created.
2. In the User Name box, type your user name.
If the network to which you want to connect has multiple domains, you may have to specify a
domain name. If this is the case, use the domain_nameuser name format in the User Name
box.
3. In the Password box, type your password.
4. If you use a dial-up connection, check the phone number that is listed in the Dial box to
RESULT :- Installing and configuring RAS server is successfully completed.

74 | P a g e
EXPERIMENT -14
INSTALLATION AND CONFIGURATION OF RIS & WDS SERVICES
Aim : To install and configure RIS Server and client images
Requirements :
1.

A computer running windows 2003 server Domain Controller, DHCP with Scope, DNS with
Services records.

2.

A computer with or without any Operating system.

SYS1

SYS 1
Domain Controller / RIS Server
IP Address

10 .0.0.1

SYS2

SYS2
RIS Client
IP Address

Subnet Mask

25 5.0 .0.0

Subnet Mask

Preferred DNS

10 .0.0.1

10 .0.0.2

25 5.0 .0.0

Preferred DNS 10.0.0.1

75 | P a g e
How to Install Remote Installation Services
1.

Select Start  Settings  Control Panel.

2.

In the Control Panel dialog box, double-click Add/Remove Programs.

3.

In the Add/Remove Programs dialog box, click Add/Remove Windows Components.

4.

In the Windows Components Wizard dialog box, scroll down until Remote Installation
Services is displayed. Then check the box Remote installation Services and Click Next.

How to take RIS Image of Windows Server 2003 operating system
1.

Select Start  Administrative Tool  Remote Installation Service Setup.

76 | P a g e
2. Remote Installation Service Setup Wizard Will Start, Click Next.

3.

In Remote Installation Folder location, Select the Path For New Share Folder, Click Next.

4.

Initial Setting Page, Check for Respond to the Client Computers Requesting for services,
Click Next.

77 | P a g e
5.

Enter the Path of the C.D Rom Of the 2003 Operating System. Click Next And Finish.

6.

Name of your folder

78 | P a g e
7. Friendly Description

8.

Verify your settings

79 | P a g e
9. Click Finish

10. Click done

80 | P a g e
Verification
1. Boot the Client system With Bootable Floppy or Bootable C.D If it is not PXE NIC
2. Press F12 key when prompted to start the Installation from RIS server.
3. Then mention the Administrator Credentials & follow the instructions.

How to Create Answer file for RIS Client
1. Insert The CD of Windows 2003 Server.
2. Open the CD follow the path SUPPORTTOOLSDEPLOY.CAB and Extract the ETUPMGR.EXE file to
Desktop.
3. Then Open the file SETUPMGR.EXE and follow the wizard.

4. Select create a new file Click Next.

81 | P a g e
5.

Select Remote Installation Service Click Next.

6.

Select the operating System you want to install.

7.

Select Fully Automated, Click Next.

82 | P a g e
8. Accept the License Agreement, Click Next.

9.

Answer the rest of the Wizard.

83 | P a g e
84 | P a g e
10.

In Setup Information File Text Give the Name of the Image Click Finish.

11. Then Save the file as remboot.sif in the RIS share folder(Remote
InstallSetupEnglishImageswindowsi386templates).

85 | P a g e
Installation of WINDOWS DEPLOYMENT SERVICES
Go to add or remove components in control panel and choose windows deployment services
and click ok , a Services setup wizard will begin.

Click “Next” option and give the path to setup the service.

86 | P a g e
Wait for few minutes and setup will complete the wizard.

When finished, you'll have a "Legacy" RIS server. To manage RIS, you'll need to have the Active
Directory Users and Computers snap-in installed. Then right-click your server and select
properties, then the Remote Install tab.

On the images tab, you'll see our "Windows Server 2003, Enterprise" present under description.

87 | P a g e
Now, we'll configure the new WDS, by going to the Windows Deployment Services (withOUT "Legacy")
in Start /Run /Administrative Tools. This will open the WDS management console.

When you expand "Servers" you'll see an icon with your servers name. There will be a yellow bang (!)
triangle, indicating the server is not yet configured. If your server is not there, right click the "Servers"
node and follow the prompts to add it. To configure your server, right click on it and select "Configure
Server" which will display the Welcome Page of the WDS Configuration Wizard, with the WDS
requirements.

88 | P a g e
The next page will display our Remote Installation Folder Location, set previously, DRemoteInstall and
select Next,

Leave the box checked and select Finish. You then browse to the location of your boot.wim and
install.wim files on the Vista DVD. If your DVD is on F: you'll configure this page as below. WDS is
looking for the "Sources" folder which contains the WIM files.

89 | P a g e
If you select "click here" on the pane shown above, the WDS help files will be opened, since adding the
image files will take a few minutes, now's a good time to look. This help file is an outstanding resource
for performing installations of Windows, you'll want to be sure to review it carefully if deployments are
of interest to you. Its default location is %SystemRoot%Helpwds.chm.
After the images are loaded, you'll be prompted to complete, and your WDS console (with the folders
expanded) will look like this. Notice our "VistaImages." You can include as many images into this group
as you like, or create more descriptive groups with their install images. We can change the name, by
right-clicking on the folder.

90 | P a g e
Now we have done with loading images in DEPLOYMENT SERVICE MANAGER.
VERIFICATION OF DEPLOYMENT SERVICES
Now we're ready to begin installation on a network attached system. You may need to modify the
machine's BIOS setting so it will boot from the Preboot Execution Environment ("PXE") network card
installed. Most modern NICs are PXE-enabled, but you may need to install one if not. On boot up, you
should see the following

After pressing F12, you'll be presented with the following options (RIS is the debault)

91 | P a g e
you'll then be presented with the Client Installation Wizard, an you're on your way to installing Windows
2003 server.

Result: Installing and configuring of RIS server, WDS and Client images is successfully completed.

92 | P a g e

More Related Content

What's hot

Windows Server 2008 R2 Active Directory ADFS Claims Base Identity for Windows...
Windows Server 2008 R2 Active Directory ADFS Claims Base Identity for Windows...Windows Server 2008 R2 Active Directory ADFS Claims Base Identity for Windows...
Windows Server 2008 R2 Active Directory ADFS Claims Base Identity for Windows...Tũi Wichets
 
Connections fornewbies
Connections fornewbiesConnections fornewbies
Connections fornewbiesr4ttl3r
 
Installation of Active Directory on Windows 2000 Server
Installation of Active Directory on Windows 2000 ServerInstallation of Active Directory on Windows 2000 Server
Installation of Active Directory on Windows 2000 Server► Supreme Mandal ◄
 
Deployment serviceswd sinwindowsserver2008
Deployment serviceswd sinwindowsserver2008Deployment serviceswd sinwindowsserver2008
Deployment serviceswd sinwindowsserver2008o12
 
Windows server 2012 - installing active directory domain server
Windows server 2012 - installing active directory domain serverWindows server 2012 - installing active directory domain server
Windows server 2012 - installing active directory domain serverahmadbahaj
 
Implementing a network
Implementing a networkImplementing a network
Implementing a networkJaleel James
 
PowerPoint Presentation
PowerPoint PresentationPowerPoint Presentation
PowerPoint Presentationwebhostingguy
 
COC 3 - Setup Computer Systems
COC 3  - Setup Computer SystemsCOC 3  - Setup Computer Systems
COC 3 - Setup Computer SystemsDanilo Anos
 
Installing and configuring a dhcp on windows server 2016 step by step
Installing and configuring a dhcp on windows server 2016 step by stepInstalling and configuring a dhcp on windows server 2016 step by step
Installing and configuring a dhcp on windows server 2016 step by stepAhmed Abdelwahed
 
Migrating to Exchange 2010 and ad 2080 r2
Migrating to Exchange 2010 and ad 2080 r2Migrating to Exchange 2010 and ad 2080 r2
Migrating to Exchange 2010 and ad 2080 r2Nathan Winters
 
Cryoserver Configuring Lotus Notes
Cryoserver Configuring Lotus NotesCryoserver Configuring Lotus Notes
Cryoserver Configuring Lotus Notescryoserver
 
Linux VMWare image with Informatica , Oracle and Rundeck scheduler
Linux VMWare image with Informatica , Oracle and Rundeck schedulerLinux VMWare image with Informatica , Oracle and Rundeck scheduler
Linux VMWare image with Informatica , Oracle and Rundeck schedulerpcherukumalla
 
Windows Deployment Services Tutorial
Windows Deployment Services TutorialWindows Deployment Services Tutorial
Windows Deployment Services TutorialTravis Kench
 
Step by step_linux_guide
Step by step_linux_guideStep by step_linux_guide
Step by step_linux_guidevinod31dec
 
Create and Configure Windows Server 2016 VM in the Azure Step by Step
Create and Configure Windows Server 2016 VM in the Azure Step by StepCreate and Configure Windows Server 2016 VM in the Azure Step by Step
Create and Configure Windows Server 2016 VM in the Azure Step by StepAhmed Abdelwahed
 

What's hot (20)

Windows Server 2008 R2 Active Directory ADFS Claims Base Identity for Windows...
Windows Server 2008 R2 Active Directory ADFS Claims Base Identity for Windows...Windows Server 2008 R2 Active Directory ADFS Claims Base Identity for Windows...
Windows Server 2008 R2 Active Directory ADFS Claims Base Identity for Windows...
 
Connections fornewbies
Connections fornewbiesConnections fornewbies
Connections fornewbies
 
Installation of Active Directory on Windows 2000 Server
Installation of Active Directory on Windows 2000 ServerInstallation of Active Directory on Windows 2000 Server
Installation of Active Directory on Windows 2000 Server
 
Deployment serviceswd sinwindowsserver2008
Deployment serviceswd sinwindowsserver2008Deployment serviceswd sinwindowsserver2008
Deployment serviceswd sinwindowsserver2008
 
Windows server 2012 - installing active directory domain server
Windows server 2012 - installing active directory domain serverWindows server 2012 - installing active directory domain server
Windows server 2012 - installing active directory domain server
 
Implementing a network
Implementing a networkImplementing a network
Implementing a network
 
LS11 Show101
LS11 Show101LS11 Show101
LS11 Show101
 
PowerPoint Presentation
PowerPoint PresentationPowerPoint Presentation
PowerPoint Presentation
 
COC 3 - Setup Computer Systems
COC 3  - Setup Computer SystemsCOC 3  - Setup Computer Systems
COC 3 - Setup Computer Systems
 
Installing and configuring a dhcp on windows server 2016 step by step
Installing and configuring a dhcp on windows server 2016 step by stepInstalling and configuring a dhcp on windows server 2016 step by step
Installing and configuring a dhcp on windows server 2016 step by step
 
Wds
WdsWds
Wds
 
Migrating to Exchange 2010 and ad 2080 r2
Migrating to Exchange 2010 and ad 2080 r2Migrating to Exchange 2010 and ad 2080 r2
Migrating to Exchange 2010 and ad 2080 r2
 
Modul server debian 5
Modul server debian 5Modul server debian 5
Modul server debian 5
 
Cryoserver Configuring Lotus Notes
Cryoserver Configuring Lotus NotesCryoserver Configuring Lotus Notes
Cryoserver Configuring Lotus Notes
 
Linux VMWare image with Informatica , Oracle and Rundeck scheduler
Linux VMWare image with Informatica , Oracle and Rundeck schedulerLinux VMWare image with Informatica , Oracle and Rundeck scheduler
Linux VMWare image with Informatica , Oracle and Rundeck scheduler
 
Changes
ChangesChanges
Changes
 
L2 lotus help
L2 lotus helpL2 lotus help
L2 lotus help
 
Windows Deployment Services Tutorial
Windows Deployment Services TutorialWindows Deployment Services Tutorial
Windows Deployment Services Tutorial
 
Step by step_linux_guide
Step by step_linux_guideStep by step_linux_guide
Step by step_linux_guide
 
Create and Configure Windows Server 2016 VM in the Azure Step by Step
Create and Configure Windows Server 2016 VM in the Azure Step by StepCreate and Configure Windows Server 2016 VM in the Azure Step by Step
Create and Configure Windows Server 2016 VM in the Azure Step by Step
 

Viewers also liked

Active directory domain services
Active directory domain servicesActive directory domain services
Active directory domain servicesIGZ Software house
 
Sample Website Proposal- Airline Example
Sample Website Proposal- Airline ExampleSample Website Proposal- Airline Example
Sample Website Proposal- Airline ExampleDr Matt McDougall
 
Windows Server 2008 R2 Overview
Windows Server 2008 R2 OverviewWindows Server 2008 R2 Overview
Windows Server 2008 R2 OverviewAlexander Schek
 
Windows Server 2008 Active Directory
Windows Server 2008 Active DirectoryWindows Server 2008 Active Directory
Windows Server 2008 Active Directoryanilinvns
 
How to Prepare a Website Redesign Proposal
How to Prepare a Website Redesign ProposalHow to Prepare a Website Redesign Proposal
How to Prepare a Website Redesign ProposalSay WOW Marketing
 
Install Windows Server 2012 Step-by-Step
Install Windows Server 2012 Step-by-StepInstall Windows Server 2012 Step-by-Step
Install Windows Server 2012 Step-by-StepMehdi Poustchi Amin
 

Viewers also liked (10)

Active directory domain services
Active directory domain servicesActive directory domain services
Active directory domain services
 
Mcts chapter 5
Mcts chapter 5Mcts chapter 5
Mcts chapter 5
 
Tpack model
Tpack modelTpack model
Tpack model
 
Sample Website Proposal- Airline Example
Sample Website Proposal- Airline ExampleSample Website Proposal- Airline Example
Sample Website Proposal- Airline Example
 
Web site proposal
Web site proposalWeb site proposal
Web site proposal
 
Windows Server 2008 R2 Overview
Windows Server 2008 R2 OverviewWindows Server 2008 R2 Overview
Windows Server 2008 R2 Overview
 
Windows Server 2008 Active Directory
Windows Server 2008 Active DirectoryWindows Server 2008 Active Directory
Windows Server 2008 Active Directory
 
How to Prepare a Website Redesign Proposal
How to Prepare a Website Redesign ProposalHow to Prepare a Website Redesign Proposal
How to Prepare a Website Redesign Proposal
 
Install Windows Server 2012 Step-by-Step
Install Windows Server 2012 Step-by-StepInstall Windows Server 2012 Step-by-Step
Install Windows Server 2012 Step-by-Step
 
Sample Website Proposal Presentation
Sample Website Proposal PresentationSample Website Proposal Presentation
Sample Website Proposal Presentation
 

Similar to Windows 2003 Server

Ibm connections docs 2 install guide
Ibm connections docs 2 install guideIbm connections docs 2 install guide
Ibm connections docs 2 install guideRoberto Boccadoro
 
3.3_-_Lecture_3_Installing_the_DNS_Server_Role.pdf
3.3_-_Lecture_3_Installing_the_DNS_Server_Role.pdf3.3_-_Lecture_3_Installing_the_DNS_Server_Role.pdf
3.3_-_Lecture_3_Installing_the_DNS_Server_Role.pdfssuserfd0132
 
Setting up computer servers (sucs)
Setting up computer servers (sucs)Setting up computer servers (sucs)
Setting up computer servers (sucs)Melchor Maravillas
 
Introduction_of_ADDS
Introduction_of_ADDSIntroduction_of_ADDS
Introduction_of_ADDSHarsh Sethi
 
Manual 70-410 _Yves
Manual 70-410 _YvesManual 70-410 _Yves
Manual 70-410 _YvesYves Mukusa
 
Install windows server 2003
Install windows server 2003Install windows server 2003
Install windows server 2003Ravi Kumar Lanke
 
Tutorial CentOS 5 untuk Webhosting
Tutorial CentOS 5 untuk WebhostingTutorial CentOS 5 untuk Webhosting
Tutorial CentOS 5 untuk WebhostingBeni Krisbiantoro
 
Oracle 12cR2 Installation On Linux With ASM
Oracle 12cR2 Installation On Linux With ASMOracle 12cR2 Installation On Linux With ASM
Oracle 12cR2 Installation On Linux With ASMArun Sharma
 
Creating child-domain-controller-windows-server-8
Creating child-domain-controller-windows-server-8Creating child-domain-controller-windows-server-8
Creating child-domain-controller-windows-server-8Le Thi
 
Tsm ad restore
Tsm ad restoreTsm ad restore
Tsm ad restoresuwit
 
Understanding Windows Azure’s Active Directory (AD) and PowerShell Tools
Understanding Windows Azure’s Active Directory (AD) and PowerShell ToolsUnderstanding Windows Azure’s Active Directory (AD) and PowerShell Tools
Understanding Windows Azure’s Active Directory (AD) and PowerShell ToolsEPC Group
 
Constructing a Modern Information System for a Small Company: A Real Battle
Constructing a Modern Information System for a Small Company: A Real BattleConstructing a Modern Information System for a Small Company: A Real Battle
Constructing a Modern Information System for a Small Company: A Real Battle"FENG "GEORGE"" YU
 
Active directory installation on windows server 2012
Active directory installation on windows server 2012Active directory installation on windows server 2012
Active directory installation on windows server 2012Ricardo Solís
 
Ctive directory interview question and answers
Ctive directory interview question and answersCtive directory interview question and answers
Ctive directory interview question and answerssankar palla
 
Active Directory Security Assessment ADSA
Active Directory Security Assessment ADSAActive Directory Security Assessment ADSA
Active Directory Security Assessment ADSACarrie Tran
 

Similar to Windows 2003 Server (20)

Ad installation
Ad installationAd installation
Ad installation
 
MCITP
MCITPMCITP
MCITP
 
Ibm connections docs 2 install guide
Ibm connections docs 2 install guideIbm connections docs 2 install guide
Ibm connections docs 2 install guide
 
3.3_-_Lecture_3_Installing_the_DNS_Server_Role.pdf
3.3_-_Lecture_3_Installing_the_DNS_Server_Role.pdf3.3_-_Lecture_3_Installing_the_DNS_Server_Role.pdf
3.3_-_Lecture_3_Installing_the_DNS_Server_Role.pdf
 
Setting up computer servers (sucs)
Setting up computer servers (sucs)Setting up computer servers (sucs)
Setting up computer servers (sucs)
 
Introduction_of_ADDS
Introduction_of_ADDSIntroduction_of_ADDS
Introduction_of_ADDS
 
John
JohnJohn
John
 
Manual 70-410 _Yves
Manual 70-410 _YvesManual 70-410 _Yves
Manual 70-410 _Yves
 
Install windows server 2003
Install windows server 2003Install windows server 2003
Install windows server 2003
 
Tutorial CentOS 5 untuk Webhosting
Tutorial CentOS 5 untuk WebhostingTutorial CentOS 5 untuk Webhosting
Tutorial CentOS 5 untuk Webhosting
 
Oracle 12cR2 Installation On Linux With ASM
Oracle 12cR2 Installation On Linux With ASMOracle 12cR2 Installation On Linux With ASM
Oracle 12cR2 Installation On Linux With ASM
 
Active Directory
Active DirectoryActive Directory
Active Directory
 
Creating child-domain-controller-windows-server-8
Creating child-domain-controller-windows-server-8Creating child-domain-controller-windows-server-8
Creating child-domain-controller-windows-server-8
 
70 640 Lesson02 Ppt 041009
70 640 Lesson02 Ppt 04100970 640 Lesson02 Ppt 041009
70 640 Lesson02 Ppt 041009
 
Tsm ad restore
Tsm ad restoreTsm ad restore
Tsm ad restore
 
Understanding Windows Azure’s Active Directory (AD) and PowerShell Tools
Understanding Windows Azure’s Active Directory (AD) and PowerShell ToolsUnderstanding Windows Azure’s Active Directory (AD) and PowerShell Tools
Understanding Windows Azure’s Active Directory (AD) and PowerShell Tools
 
Constructing a Modern Information System for a Small Company: A Real Battle
Constructing a Modern Information System for a Small Company: A Real BattleConstructing a Modern Information System for a Small Company: A Real Battle
Constructing a Modern Information System for a Small Company: A Real Battle
 
Active directory installation on windows server 2012
Active directory installation on windows server 2012Active directory installation on windows server 2012
Active directory installation on windows server 2012
 
Ctive directory interview question and answers
Ctive directory interview question and answersCtive directory interview question and answers
Ctive directory interview question and answers
 
Active Directory Security Assessment ADSA
Active Directory Security Assessment ADSAActive Directory Security Assessment ADSA
Active Directory Security Assessment ADSA
 

More from Teja Bheemanapally (20)

Teradata
TeradataTeradata
Teradata
 
Teradata
TeradataTeradata
Teradata
 
Linux or unix interview questions
Linux or unix interview questionsLinux or unix interview questions
Linux or unix interview questions
 
Linux notes
Linux notesLinux notes
Linux notes
 
Linux crontab
Linux crontabLinux crontab
Linux crontab
 
Linux basic commands
Linux basic commandsLinux basic commands
Linux basic commands
 
Linux01122011
Linux01122011Linux01122011
Linux01122011
 
Kernel (computing)
Kernel (computing)Kernel (computing)
Kernel (computing)
 
Installing red hat enterprise linux1
Installing red hat enterprise linux1Installing red hat enterprise linux1
Installing red hat enterprise linux1
 
Linux basic commands tutorial
Linux basic commands tutorialLinux basic commands tutorial
Linux basic commands tutorial
 
In a monolithic kerne1
In a monolithic kerne1In a monolithic kerne1
In a monolithic kerne1
 
Common linuxcommandspocketguide07
Common linuxcommandspocketguide07Common linuxcommandspocketguide07
Common linuxcommandspocketguide07
 
50 most frequently used unix
50 most frequently used unix50 most frequently used unix
50 most frequently used unix
 
Basic commands
Basic commandsBasic commands
Basic commands
 
File system hierarchy standard
File system hierarchy standardFile system hierarchy standard
File system hierarchy standard
 
40 basic linux command
40 basic linux command40 basic linux command
40 basic linux command
 
15 practical grep command examples in linux
15 practical grep command examples in linux15 practical grep command examples in linux
15 practical grep command examples in linux
 
25 most frequently used linux ip tables rules examples
25 most frequently used linux ip tables rules examples25 most frequently used linux ip tables rules examples
25 most frequently used linux ip tables rules examples
 
Shell intro
Shell introShell intro
Shell intro
 
6 stages of linux boot process
6 stages of linux boot process6 stages of linux boot process
6 stages of linux boot process
 

Recently uploaded

How to Add Barcode on PDF Report in Odoo 17
How to Add Barcode on PDF Report in Odoo 17How to Add Barcode on PDF Report in Odoo 17
How to Add Barcode on PDF Report in Odoo 17Celine George
 
Choosing the Right CBSE School A Comprehensive Guide for Parents
Choosing the Right CBSE School A Comprehensive Guide for ParentsChoosing the Right CBSE School A Comprehensive Guide for Parents
Choosing the Right CBSE School A Comprehensive Guide for Parentsnavabharathschool99
 
Inclusivity Essentials_ Creating Accessible Websites for Nonprofits .pdf
Inclusivity Essentials_ Creating Accessible Websites for Nonprofits .pdfInclusivity Essentials_ Creating Accessible Websites for Nonprofits .pdf
Inclusivity Essentials_ Creating Accessible Websites for Nonprofits .pdfTechSoup
 
Integumentary System SMP B. Pharm Sem I.ppt
Integumentary System SMP B. Pharm Sem I.pptIntegumentary System SMP B. Pharm Sem I.ppt
Integumentary System SMP B. Pharm Sem I.pptshraddhaparab530
 
Q4-PPT-Music9_Lesson-1-Romantic-Opera.pptx
Q4-PPT-Music9_Lesson-1-Romantic-Opera.pptxQ4-PPT-Music9_Lesson-1-Romantic-Opera.pptx
Q4-PPT-Music9_Lesson-1-Romantic-Opera.pptxlancelewisportillo
 
Influencing policy (training slides from Fast Track Impact)
Influencing policy (training slides from Fast Track Impact)Influencing policy (training slides from Fast Track Impact)
Influencing policy (training slides from Fast Track Impact)Mark Reed
 
ENG 5 Q4 WEEk 1 DAY 1 Restate sentences heard in one’s own words. Use appropr...
ENG 5 Q4 WEEk 1 DAY 1 Restate sentences heard in one’s own words. Use appropr...ENG 5 Q4 WEEk 1 DAY 1 Restate sentences heard in one’s own words. Use appropr...
ENG 5 Q4 WEEk 1 DAY 1 Restate sentences heard in one’s own words. Use appropr...JojoEDelaCruz
 
ICS2208 Lecture6 Notes for SL spaces.pdf
ICS2208 Lecture6 Notes for SL spaces.pdfICS2208 Lecture6 Notes for SL spaces.pdf
ICS2208 Lecture6 Notes for SL spaces.pdfVanessa Camilleri
 
ISYU TUNGKOL SA SEKSWLADIDA (ISSUE ABOUT SEXUALITY
ISYU TUNGKOL SA SEKSWLADIDA (ISSUE ABOUT SEXUALITYISYU TUNGKOL SA SEKSWLADIDA (ISSUE ABOUT SEXUALITY
ISYU TUNGKOL SA SEKSWLADIDA (ISSUE ABOUT SEXUALITYKayeClaireEstoconing
 
Earth Day Presentation wow hello nice great
Earth Day Presentation wow hello nice greatEarth Day Presentation wow hello nice great
Earth Day Presentation wow hello nice greatYousafMalik24
 
4.18.24 Movement Legacies, Reflection, and Review.pptx
4.18.24 Movement Legacies, Reflection, and Review.pptx4.18.24 Movement Legacies, Reflection, and Review.pptx
4.18.24 Movement Legacies, Reflection, and Review.pptxmary850239
 
HỌC TỐT TIẾNG ANH 11 THEO CHƯƠNG TRÌNH GLOBAL SUCCESS ĐÁP ÁN CHI TIẾT - CẢ NĂ...
HỌC TỐT TIẾNG ANH 11 THEO CHƯƠNG TRÌNH GLOBAL SUCCESS ĐÁP ÁN CHI TIẾT - CẢ NĂ...HỌC TỐT TIẾNG ANH 11 THEO CHƯƠNG TRÌNH GLOBAL SUCCESS ĐÁP ÁN CHI TIẾT - CẢ NĂ...
HỌC TỐT TIẾNG ANH 11 THEO CHƯƠNG TRÌNH GLOBAL SUCCESS ĐÁP ÁN CHI TIẾT - CẢ NĂ...Nguyen Thanh Tu Collection
 
Full Stack Web Development Course for Beginners
Full Stack Web Development Course  for BeginnersFull Stack Web Development Course  for Beginners
Full Stack Web Development Course for BeginnersSabitha Banu
 
Visit to a blind student's school🧑‍🦯🧑‍🦯(community medicine)
Visit to a blind student's school🧑‍🦯🧑‍🦯(community medicine)Visit to a blind student's school🧑‍🦯🧑‍🦯(community medicine)
Visit to a blind student's school🧑‍🦯🧑‍🦯(community medicine)lakshayb543
 
Virtual-Orientation-on-the-Administration-of-NATG12-NATG6-and-ELLNA.pdf
Virtual-Orientation-on-the-Administration-of-NATG12-NATG6-and-ELLNA.pdfVirtual-Orientation-on-the-Administration-of-NATG12-NATG6-and-ELLNA.pdf
Virtual-Orientation-on-the-Administration-of-NATG12-NATG6-and-ELLNA.pdfErwinPantujan2
 
Karra SKD Conference Presentation Revised.pptx
Karra SKD Conference Presentation Revised.pptxKarra SKD Conference Presentation Revised.pptx
Karra SKD Conference Presentation Revised.pptxAshokKarra1
 
Difference Between Search & Browse Methods in Odoo 17
Difference Between Search & Browse Methods in Odoo 17Difference Between Search & Browse Methods in Odoo 17
Difference Between Search & Browse Methods in Odoo 17Celine George
 

Recently uploaded (20)

How to Add Barcode on PDF Report in Odoo 17
How to Add Barcode on PDF Report in Odoo 17How to Add Barcode on PDF Report in Odoo 17
How to Add Barcode on PDF Report in Odoo 17
 
Choosing the Right CBSE School A Comprehensive Guide for Parents
Choosing the Right CBSE School A Comprehensive Guide for ParentsChoosing the Right CBSE School A Comprehensive Guide for Parents
Choosing the Right CBSE School A Comprehensive Guide for Parents
 
Raw materials used in Herbal Cosmetics.pptx
Raw materials used in Herbal Cosmetics.pptxRaw materials used in Herbal Cosmetics.pptx
Raw materials used in Herbal Cosmetics.pptx
 
Inclusivity Essentials_ Creating Accessible Websites for Nonprofits .pdf
Inclusivity Essentials_ Creating Accessible Websites for Nonprofits .pdfInclusivity Essentials_ Creating Accessible Websites for Nonprofits .pdf
Inclusivity Essentials_ Creating Accessible Websites for Nonprofits .pdf
 
Integumentary System SMP B. Pharm Sem I.ppt
Integumentary System SMP B. Pharm Sem I.pptIntegumentary System SMP B. Pharm Sem I.ppt
Integumentary System SMP B. Pharm Sem I.ppt
 
Q4-PPT-Music9_Lesson-1-Romantic-Opera.pptx
Q4-PPT-Music9_Lesson-1-Romantic-Opera.pptxQ4-PPT-Music9_Lesson-1-Romantic-Opera.pptx
Q4-PPT-Music9_Lesson-1-Romantic-Opera.pptx
 
Influencing policy (training slides from Fast Track Impact)
Influencing policy (training slides from Fast Track Impact)Influencing policy (training slides from Fast Track Impact)
Influencing policy (training slides from Fast Track Impact)
 
LEFT_ON_C'N_ PRELIMS_EL_DORADO_2024.pptx
LEFT_ON_C'N_ PRELIMS_EL_DORADO_2024.pptxLEFT_ON_C'N_ PRELIMS_EL_DORADO_2024.pptx
LEFT_ON_C'N_ PRELIMS_EL_DORADO_2024.pptx
 
ENG 5 Q4 WEEk 1 DAY 1 Restate sentences heard in one’s own words. Use appropr...
ENG 5 Q4 WEEk 1 DAY 1 Restate sentences heard in one’s own words. Use appropr...ENG 5 Q4 WEEk 1 DAY 1 Restate sentences heard in one’s own words. Use appropr...
ENG 5 Q4 WEEk 1 DAY 1 Restate sentences heard in one’s own words. Use appropr...
 
ICS2208 Lecture6 Notes for SL spaces.pdf
ICS2208 Lecture6 Notes for SL spaces.pdfICS2208 Lecture6 Notes for SL spaces.pdf
ICS2208 Lecture6 Notes for SL spaces.pdf
 
ISYU TUNGKOL SA SEKSWLADIDA (ISSUE ABOUT SEXUALITY
ISYU TUNGKOL SA SEKSWLADIDA (ISSUE ABOUT SEXUALITYISYU TUNGKOL SA SEKSWLADIDA (ISSUE ABOUT SEXUALITY
ISYU TUNGKOL SA SEKSWLADIDA (ISSUE ABOUT SEXUALITY
 
Earth Day Presentation wow hello nice great
Earth Day Presentation wow hello nice greatEarth Day Presentation wow hello nice great
Earth Day Presentation wow hello nice great
 
4.18.24 Movement Legacies, Reflection, and Review.pptx
4.18.24 Movement Legacies, Reflection, and Review.pptx4.18.24 Movement Legacies, Reflection, and Review.pptx
4.18.24 Movement Legacies, Reflection, and Review.pptx
 
HỌC TỐT TIẾNG ANH 11 THEO CHƯƠNG TRÌNH GLOBAL SUCCESS ĐÁP ÁN CHI TIẾT - CẢ NĂ...
HỌC TỐT TIẾNG ANH 11 THEO CHƯƠNG TRÌNH GLOBAL SUCCESS ĐÁP ÁN CHI TIẾT - CẢ NĂ...HỌC TỐT TIẾNG ANH 11 THEO CHƯƠNG TRÌNH GLOBAL SUCCESS ĐÁP ÁN CHI TIẾT - CẢ NĂ...
HỌC TỐT TIẾNG ANH 11 THEO CHƯƠNG TRÌNH GLOBAL SUCCESS ĐÁP ÁN CHI TIẾT - CẢ NĂ...
 
Full Stack Web Development Course for Beginners
Full Stack Web Development Course  for BeginnersFull Stack Web Development Course  for Beginners
Full Stack Web Development Course for Beginners
 
FINALS_OF_LEFT_ON_C'N_EL_DORADO_2024.pptx
FINALS_OF_LEFT_ON_C'N_EL_DORADO_2024.pptxFINALS_OF_LEFT_ON_C'N_EL_DORADO_2024.pptx
FINALS_OF_LEFT_ON_C'N_EL_DORADO_2024.pptx
 
Visit to a blind student's school🧑‍🦯🧑‍🦯(community medicine)
Visit to a blind student's school🧑‍🦯🧑‍🦯(community medicine)Visit to a blind student's school🧑‍🦯🧑‍🦯(community medicine)
Visit to a blind student's school🧑‍🦯🧑‍🦯(community medicine)
 
Virtual-Orientation-on-the-Administration-of-NATG12-NATG6-and-ELLNA.pdf
Virtual-Orientation-on-the-Administration-of-NATG12-NATG6-and-ELLNA.pdfVirtual-Orientation-on-the-Administration-of-NATG12-NATG6-and-ELLNA.pdf
Virtual-Orientation-on-the-Administration-of-NATG12-NATG6-and-ELLNA.pdf
 
Karra SKD Conference Presentation Revised.pptx
Karra SKD Conference Presentation Revised.pptxKarra SKD Conference Presentation Revised.pptx
Karra SKD Conference Presentation Revised.pptx
 
Difference Between Search & Browse Methods in Odoo 17
Difference Between Search & Browse Methods in Odoo 17Difference Between Search & Browse Methods in Odoo 17
Difference Between Search & Browse Methods in Odoo 17
 

Windows 2003 Server

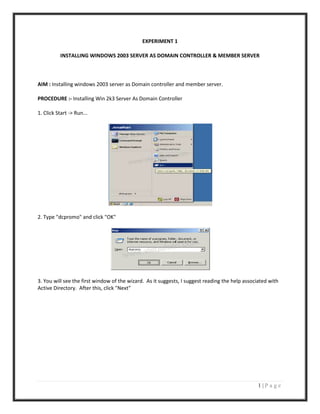
  • 1. EXPERIMENT 1 INSTALLING WINDOWS 2003 SERVER AS DOMAIN CONTROLLER & MEMBER SERVER AIM : Installing windows 2003 server as Domain controller and member server. PROCEDURE :- Installing Win 2k3 Server As Domain Controller 1. Click Start -> Run... 2. Type "dcpromo" and click "OK" 3. You will see the first window of the wizard. As it suggests, I suggest reading the help associated with Active Directory. After this, click "Next" 1|Page
  • 2. 4. Click "Next" on the compatibility window, and in the next window keep the default option of "Domain Controller for a new domain" selected, and click "Next" 5. In this tutorial we will create a domain in a new forest, because it is the first DC, so keep that option selected 6. Now we have to think of a name for our domain. If you own a web domain like "visualwin.com", you can use it, but it isn't suggested because computers inside of your domain may not be able to reach the company website. Active Directory domains don't need to be "real" domains like the one above - they can be anything you wish. So here I will create "visualwin.testdomain" 2|Page
  • 3. 7. Now in order to keep things simple, we will use the first part of our domain ("visualwin"), which is the default selection, as the NetBIOS name of the domain 8. The next dialog suggests storing the AD database and log on separate hard disks, and so do I, but for this tutorial I'll just keep the defaults 9. The SYSVOL folder is a public share, where things like .MSI software packages can be kept when you will distribute packages (as I said, AD has a lot of different features). Once again, I will keep the default selection but it can be changed if you wish to use the space of another drive 3|Page
  • 4. 10. Now we will get a message that basically says that you will need a DNS server in order for everything to work the way we want it (i.e., our "visualwin.testdomain" to be reachable). As I mentioned earlier, we will install the DNS server on this machine as well, but it can be installed elsewhere. So keep the default selection of "Install and configure", and click "Next" 11. Because, after all, this is a Windows Server 2003 tutorial website, we'll assume there are no preWindows 2000 servers that will be accessing this domain, so keep the default of "Permissions compatible only with Windows 2000 or Windows Server 2003 operating systems" and click "Next" 12. The restore mode password is the single password that all administrators hope to never use, however they should also never forget it because this is the single password that might save a failed server. Make sure it's easy to remember but difficult to guess 4|Page
  • 5. 13. Now we will see a summary of what will happen. Make sure it's all correct because changing it afterwards can prove to be difficult 14. After the previous next was clicked, the actual process occurs. This can take several minutes. It's likely that you will be prompted for your Windows Server 2003 CD (for DNS) so have it handy 15. If your computer has a dynamically assigned address (from DHCP) you will be prompted to give it a static IP address. Click ok, and then in the Local Area Connection properties, click "Internet Protocol (TCP/IP)" and then "Properties" 5|Page
  • 6. 16. In the next window select "Use the following IP address" and select the information that you will use for your domain (and 127.0.0.1 for the primary DNS, because your computer will host DNS. I still suggest setting up an alternate as well.) Click "OK" and then "Close" on the next window And after a while you will see And we're finished. 6|Page
  • 7. How to install a Member Server or Client Planning for Member Server Installation . Steps: One of the main advantages of installing or upgrading to Windows 2000 Server is having the 1. Logon as Administrator to workgroup computer.Active Directory directory service. However, even if you delay installing Active Directory, you can still upgrade member servers to Windows 2000 Server. This way you can access the new and improved 2. component features and services such as Routing and Remote Access and Terminal Services. Servers within a Windows 2000 domain can have one of two roles: as a domain controller or as a member server. A member server is a Microsoft server that can have accounts in a Microsoft® Windows NT® version 3.51, Windows NT 4.0, or a Windows 2000 domain. However, if they are members of a Windows 2000 domain, they do not contain any Active Directory objects. Member servers share common security features such as domain policies and user rights. Member servers can act as: File servers Print servers Web servers Proxy servers Routing and Remote Access servers Application servers, which include: Component servers Terminal servers Certificate servers Database servers E-mail servers 7|Page
  • 8. Right click on My Computer and click properties. 3. In the System properties dialog box, select the computer name tab, and click on change. 4. In computer name changes console select the Member of DOMAIN. 5. In the Domain box, type the Domain name and then click ok. 6. And in the user name type administrator and in the password type the password click Ok. 7. Welcome Message appears indicating that the computer was successful in joining the Domain. 8. Click OK to close the Network Identification message box. 9. Click OK to close the System Properties dialog box. It will ask for restart click yes. 10. After restarting the computer it will become Member Server or Client.RESULT :- Installing windows 2003 server as Domain controller and member server is successfully completed. EXPERIMENT 2 8|Page
  • 9. UPGRADING 2000 SERVER TO 2003 AIM :- Upgrading windows 2000 server to 2003 server. PROCEDURE :- Choosing to Upgrade or Make a Clean Installation A major consideration related to a Windows Server 2003 installation is whether to upgrade in-place servers or do a clean install on a replacement server that will take over the role of a server or servers already on the network. For example, you might be running Windows 2000 Server on a computer that you want to replace (it might have seen better days hardware-wise). You can install Windows Server 2003 on a new server and make it a domain controller in the Windows 2000 domain that already exists. This will allow the new server to replicate all the information in the Active Directory on the Windows 2000 Server (the Windows 2000 Server should have the latest service packs installed). You can then "retire" the Windows 2000 Server and use the Windows Server 2003 as the domain controller for the domain. Whatever your strategy is for bringing new servers online on an existing network, you must deal with issues related to earlier versions of the Windows network operating system, such as Windows 2000 and Windows NT. The next two sections discuss issues related to upgrading these two versions of Windows server. Planning for a Windows 2000 Upgrade Upgrading a server (even a domain controller) from Windows 2000 to Windows Server 2003 is a fairly easy process. Because Windows 2000 and Windows Server 2003 both embrace the Active Directory hierarchy and DNS namespace, the notion of forests, trees, and domains is common to both network operating systems. This means that a radical redesign of the network domain structure is not necessary. However, you need to keep some things in mind when upgrading Windows 2000 Server to Windows Server 2003. First, you must make sure that the server's hardware is compatible with Windows Server 2003 (as you would for a server that will get a clean installation). It is also important that you have installed Windows 2000 Server Service Pack 2 (or later, if available) on the server to upgrade the files in the Windows 2000 Server installation. Finally, you must prepare the forest and the domain for the upgrade to Windows Server 2003. This is done using the adprep command-line utility found in the i386 folder on the Windows Server 2003 CDROM. You actually have to run this upgrade program on the Schema Master and the Infrastructure Master on the domain. The schema is the database template for the Active Directory and defines the objects that can exist in the Active Directory (such as users, groups, and so on). Using Supported File Systems Windows Server 2003 supports the entire range of file systems supported by Microsoft operating systems. This ability was first introduced with Windows 2000 Server. 9|Page
  • 10. You can have FAT, FAT32, and NTFS partitions or volumes on your server's hard drives. A description of each file system follows: FAT—FAT volumes use a file allocation table that provides the name of the file and the location of the actual clusters that make up the file on the hard drive. FAT is a holdover from the days of DOS. I see no compelling reason to use FAT volumes on your servers. FAT32—FAT32 is an extension of the FAT file system. It uses disk space on a drive more efficiently than FAT and was designed for Windows 95/98. NTFS—NTFS 5 is the newest version of the NT file system (NTFS 5 was first introduced with Windows 2000 Server). It provides increased security for files on NTFS volumes and supports more robust file system recovery. Microsoft recommends that you use NTFS as your file system on your Windows servers. It is also required if you want to install Active Directory on a server to make it a domain controller. Performing an Upgrade If you are not in a position to do a clean install of Windows Server 2003, you can also upgrade an existing network operating system, such as Windows NT and Windows 2000. The actual upgrade process is very straightforward. But as already mentioned in this hour, the upgrade of a domain controller has consequences for the entire domain. Running mixed environments in which Windows NT servers must interact with servers running Windows Server 2003 (and perhaps even some Windows 2000 servers) makes supplying important network resources in the domain more difficult (and quite confusing at times). In an ideal situation, you will be able to upgrade all servers on the network to Windows Server 2003. 1. To perform an upgrade on a Windows NT or Windows 2000 Server, insert the Windows Server 2003 CD in the server's CD-ROM drive. Then click the Install Windows Server 2003 button on the Welcome screen that opens. 2. The Welcome to Windows Setup window appears. The Installation Type is set to Upgrade (see Figure 3.4). Click Next to continue. Figure 3.4 Select Upgrade as the installation type. 10 | P a g e
  • 11. 3. The Licensing Agreement screen appears. Select I Accept This Agreement (after reading the agreement) and then click Next to continue. 4. On the next screen, provide your Windows Server product key. Then click next to continue. 5. The next screen provides you with the option of downloading any new setup files that have changed for Windows Server 2003 since you purchased the installation CD. The default is set to Yes, Download the Updated Setup Files. Click Next to continue. 11 | P a g e
  • 12. 6. The easiest way to activate the network operating system is to use the option Activate Windows over the Internet. Select this option and then click Next. 7. The next screen provides you with the option of registering your Windows Server 2003 with Microsoft as you activate the product. A connection is made to the Internet (and Microsoft), and your product is activated. Click OK to complete the process. Windows Server 2003 is now activated, and you can configure the server for its various roles on the network. Choosing Between a Workgroup and a Domain 1. To make a server part of a workgroup or to add it as a member server to an existing domain, first select Start. Then right-click My Computer and select Properties. The System Properties dialog box opens. Select the Computer Name tab on the System Properties dialog box (see Figure 3.6).You can view the server's current membership on the Computer Name tab. 2. To change the workgroup membership or to add the server to a domain, click the Change button. The Computer Name Changes dialog box opens (see Figure 3.7). You can change the computer's name and its domain or workgroup affiliation. Figure 3.7 You can change the server's name or membership. 12 | P a g e
  • 13. 3. To add the server to an existing domain, select the Domain option button and then type in the name of the domain (you need to provide the Fully Qualified Domain Name of the domain, which includes prefix and suffix). Or, to add the server to a different workgroup, select the Workgroup option button and type in the name of the workgroup. When you complete either choice, click OK. It might take a moment, but you then are welcomed to the domain or the workgroup that you have specified RESULT :- Upgrading windows 2000 server to 2003 server is successfully completed. EXPERIMENT – 3 13 | P a g e
  • 14. INSTALLATION OF WINDOWS SERVER 2003 AS ADC & CDC SERVER AIM :-Installation Of Windows Server 2003 As Adc & Cdc Server PROCEDURE :The Windows Server 2003 operating system supports multi-master replication—all of a domain’s domain controllers can receive changes made to objects and can replicate those changes to all other domain controllers in that domain. By default, the first domain controller created in a forest is a global catalog server, which contains a full replica of all objects in the directory for its domain and a partial replica of all objects stored in the directory of every other domain in the forest. Replicating Active Directory data among domain controllers provides benefits for information availability, fault tolerance, load balancing, and performance. In this step-by-step guide, you can take advantage of the greater fault tolerance provided in the multi-master model by installing multiple domain controllers. In the event a domain controller stops working, the availability of Active Directory is not compromised. If you want to create an additional domain controller in win server 2003 follow this procedure Note:-Before doing this procedure you need to make sure you have domain controller setup in your win server 2003 with DNS and you need to install DNS server and don’t configure anything where you are going to add an additional domain controller. Click Start, click Run, and then type dcpromo click ok If you want to open the Active Directory Installation Wizard with the option to create an additional domain controller from restored backup files. dcpromo /adv On the Operating System Compatibility page, read the information and then click Next. If this is the first time you have installed Active Directory on a server running Windows Server 2003, click Compatibility Help for more information. On the Domain Controller Type page, click Additional domain controller for an existing domain, and then click Next. On the Copying Domain Information page, do one of the following: •Click Over the network, and then click Next. •Click From these restored backup files, and type the location of the restored backup files, or click Browse to locate the restored files, and then click Next. 14 | P a g e
  • 15. On the Network Credentials page, type the user name, password, and user domain of the user account you want to use for this operation, and then click Next. The user account must be a member of the Domain Admins group for the target domain. On the Database and Log Folders page, type the location in which you want to install the database and log folders, or click Browse to choose a location, and then click Next. On the Shared System Volume page, type the location in which you want to install the Sysvol folder, or click Browse to choose a location, and then click Next. On the Directory Services Restore Mode Administrator Password page, type and confirm the password that you want to assign to the Administrator account for this server, and then click Next. Use this password when starting the computer in Directory Services Restore Mode. Review the Summary page, and then click Next to begin the installation. Restart your server now. RESULT: - Installation of Windows Server 2003 as ADC & CDC server is done successfully. EXPERIMENT – 4 Joining Clients to Domain, Implementation of Group Polices AIM :- Joining clients to Domain, implementation of Group policies PROCEDURE :- 15 | P a g e
  • 16. Joining Clients To Domain On the Computer Name tab, click Change, and then enter the domain membership information. If everything is in place (especially the computer's TCP/IP and DNS configuration - read Requirements when Joining a Domain for more info) then you should receive a username and password dialog box. Enter the username and password of a user that has enough right to create computer accounts in the domain (for example - a Domain Admin group member). If all went ok you'll get a welcome message. 16 | P a g e
  • 17. If a computer account was already established in the domain then you can enter any username and password of any valid user (for example - your own domain username and password). This is true if the Domain Admin that has created the computer account has specified the EVERYONE special group on the new computer account's permissions box. Note: Usually, there is no need to manually change the computer's DNS Suffix when joining an Active Directory domain, because the suffix will automatically be set to mach the DNS name of the domain. So 17 | P a g e
  • 18. if you plan to join an AD domain, leave the DNS suffix empty. Note: Home Edition is not designed to join domains; only workgroups. To join domains, use XP Professional version or above. A reboot will be necessary to complete this process. Group Policy is an infrastructure used to deliver and apply one or more desired configurations or policy settings to a set of targeted users and computers within an Active Directory environment. This 18 | P a g e
  • 19. infrastructure consists of a Group Policy engine and multiple client-side extensions (CSEs) responsible for writing specific policy settings on target client computers Create a Group Policy Object 1. Start the Active Directory Users and Computers snap-in. To do this, click Start, point to Administrative Tools, and then click Active Directory Users and Computers. 2. In the console tree, right-click your domain, and then click Properties. 3. Click the Group Policy tab, and then click New. 4. Type a name for this new policy (for example, Office XP distribution), and then press ENTER. 5. Click Properties, and then click the Security tab. 6. Click to clear the Apply Group Policy check box for the security groups that you want to prevent from having this policy applied. 7. Click to select the Apply Group Policy check box for the groups that you want this policy to apply to. 8. When you are finished, click OK. RESULT: Joining clients to Domain and implementation of Group policies is done correctly and successfully. EXPERIMENT 5 MANAGING HARDWARE USING DEVICE MANAGER AIM :- Managing hardware using Device Manager. PROCEDURE :- Using the Computer Manager or Device Manager Console 1. Right-click My Computer, and then click Manage. 2. Double-click System Tools. 3. Click Device Manager to: o Troubleshoot devices. o Disable or uninstall devices. o View driver details or update drivers. o View or change resources assigned to devices. 4. You can also double-click System Information, double-click Software Environment, and then double-click Drivers. This displays the name, description, type, state, and status for each driver. You cannot administer drivers from this view.Note: If you want to disable a non-hardwarespecific driver, click Show Hidden Devices on the View menu in Device Manager. You can find and disable under "Non-Plug and Play Drivers" some of the same items that appear in the 19 | P a g e
  • 20. Devices tool in Control Panel in Windows NT 4.0. If the device is not listed you must use Registry Editor (Regedt32) to disable the device. When you use Device Manager, you have a graphical view of the hardware that is installed on your computer. You can use Device Manager to change the way your hardware is configured, and to change the way your hardware interacts with your computer's microprocessor. When you use Device Manager, you can: - Determine if the hardware on your computer is working properly. - Change hardware configuration settings. - Identify the device drivers that are loaded for each device and obtain information about each device driver. - Change advanced settings and properties for devices. - Install updated device drivers. - Disable, enable, and uninstall devices. - Reinstall the previous version of a driver. - Identify device conflicts and manually configure resource settings. - Print a summary of the devices that are installed on your computer. To access Device Manager, use any of the following methods: - Click Start, click Run, and then type "devmgmt.msc" (without the quotation marks). - Right-click My Computer, click Manage, and then click Device Manager. - Right-click My Computer, click Properties, click the Hardware tab, and then click Device Manager. 20 | P a g e
  • 21. - Type the following command at a command prompt: start devmgmt.msc If you want to access Device Manager on a local or remote computer: 1. Click Start, click Run, and then type "mmc" (without the quotation marks). 2. Click Add/Remove Snap In on the File menu (or press CTRL+M), click Add, and then click Device Manager. When you use this procedure, a shortcut to Device Manager is created that you can use to open Device Manager. How to Configure Device Manager to Display Detailed Information To configure Device Manager to show details: 1. Click Start, click Run, type: cmd.exe, and then press ENTER. 2. Type: set DEVMGR_SHOW_DETAILS=1, and then press ENTER. 3. Type: start devmgmt.msc, and then press ENTER. In Device Manager the properties for a device should now provide a Details tab that contains additional information about the device. You can view the Details tab to see the following device information: Device Instance ID, Hardware IDs, Compatible IDs, Matching Device ID, Service, Enumerator, Capabilities, Devnode Flags, Config Flags, CSConfig Flags, Ejection Relations, Removal Relations, Bus Relations, Device Upper Filters, Device Lower, Filters, Class Upper Filters, Class Lower Filters, Class Installer, Class Coinstallers, Device Coinstallers, Firmware Revision, Current Power State, Power Capabilities, Power State Mappings. NOTE: Not all of these properties will be populated for a given device. In other words, although all of these properties are listed, some may not contain information when viewing a particular device. How to Troubleshoot the Display Adapter Driver in Safe Mode In Safe mode, the computer does not start the display driver that is used during normal operations, so you need to use Device Manager to discover, update, roll back, or uninstall the display driver instead of accessing the Display properties. To locate the display adapter that is used in Normal mode: 1. Click Start, point to Settings, and then click Control Panel. 2. Double-click System, click Hardware, and then click Device Manager. 3. Click the PLUS SIGN to expand Display Adapters. To run the display troubleshooter: 21 | P a g e
  • 22. 1. Follow steps 1 through 3 to find the display adapter. 2. Double-click the display driver. 3. On the General tab, click Troubleshoot. To view driver details, and to update, roll back, or uninstall the display driver: 1. Follow steps 1 through 3 to find the display adapter. 2. Double-click the display driver. 3. On the Driver tab, click the appropriate button based on the action that you want to perform: Driver Details Update Driver Roll Back Driver Uninstall It is not necessary to start the computer into Safe mode to perform the tasks that are listed in this article. When you start the computer in Safe mode, your display resolution and colors may temporarily change in such a way that the windows and icons on your screen become very large, which may make it difficult for some windows to fit. This behavior is dependent of the type of video adapter that you are using. Note: In Safe mode, if you 1. Open the Display properties. 2. Click Settings. 3. Click Advanced. 4. Click Adapter. 5. Click Properties. 6. Click Driver. You may notice an option to stop the VgaSave service. The VgaSave service should not be stopped while the computer is in Safe mode because it is a component that allows Windows to display the screen. ] How to Use the Roll Back Driver Feature The Roll Back Driver feature enables you to replace a device driver by using a previously installed version. You can use this feature if you have installed a new device driver that causes your computer to be unstable. When you use the Roll Back Driver feature, you can restore (or roll back) the previous device driver, and continue to use the computer. To use this feature, follow these steps: 22 | P a g e
  • 23. 1. Start Device Manager. 2. Double-click the device for which you want to restore the driver. 3. Click the Driver tab, and then click the Roll Back Driver button. To Turn Off Windows Update Device Driver Searching by Using Control Panel 1. Click Start, and then either click Control Panel, or point to Settings and then click Control Panel. 2. Double-click System. 3. In System Properties, click the Hardware tab. 4. Click Windows Update. 5. Click Never search Windows Update for drivers. To Turn Off Windows Update Device Driver Searching by Using Group Policy 1. See Appendix B: Resources for Learning About Group Policy for information about using Group Policy. Ensure that your Administrative templates have been updated, and then edit an appropriate GPO. 2. Click Computer Configuration, click Administrative Templates, click System, click Internet Communication Management, and then click Internet Communication settings. 3. In the details pane, double-click Turn off Windows Update device driver searching, and then click Enabled. Manually Configure Devices By Using Device Manager When you install a non-Plug and Play device, the resource settings for the device are not automatically configured. Depending on the type of device that you are installing, you may have to manually configure these settings. Instructions for doing so should be supplied in the manual that came with your device. WARNING: Changing resource settings improperly can disable your hardware and cause your computer to malfunction or become inoperable. You should only change resource settings if you are certain that the new settings do not conflict with other hardware, or if a hardware manufacturer has provided you with specific resource settings for a device. Use caution before you use the following procedure. To configure devices: 1. Click Start, click Control Panel, click Performance and Maintenance, and then click System. 2. On the Hardware tab, click Device Manager. Double-click the type of device you want to change. 23 | P a g e
  • 24. 3. Double-click the specific device you want to change. If the device has resources settings that you can change, the Resources tab is visible. 4. Click the Resources tab, and then click to clear the Use automatic settings check box. This check box might be unavailable if you have selected a non-Plug and Play device. 5. In Setting based on, click the hardware configuration you want to change. 6. In the Resource settings box, click the resource type you want to change in the Resource type column. 7. Click Change Setting, and then type a new value for the resource type RESULT :- Managing hardware using Device Manager is successfully completed. EXPERIMENT 6 CREATING AND MANAGING ADS OBJECTS AIM :- Creating and Managing Active Directory Objects. PROCEDURE :Organizational Units Organizational Units are called container objects since they help to organize the directory and can contain other objects including other OUs. The basic unit of administration is now organizational units rather than domains. Organizational units allow the creation of subdomains which are also called logical domains. Microsoft recommends that there should never be more than 10 levels or organizational unit nesting. Since deeper OU nesting slows directory access, normally there should be no more than three or four levels of nesting. Organizational units may contain:? 24 | P a g e
  • 25. Organizational Unit (automatically published) - Used to create a heirarchy of AD objects into logical business units. Other organizational units may be contained inside organizational units. User (automatically published) - Individual person Group (automatically published) - Groups of user accounts. Groups make user management easier. Computer (Those in the domain are automatically published) - Specific workstations. Contact (automatically published) - Administrative contact for specific active directory objects. Connection - A defined one direction replication path between two domain controllers making the domain controllers potential replication partners. These objects are maintained on each server in "Active Directory Sites and Services". Shared folder - Used to share files and they map to server shares. Printer (Most are automatically published) - Windows NT shared printers are not published automatically. Site - A grouping of machines based on a subnet of TCP/IP addresses. An administrator determines what a site is. Sites may contain multiple subnets. There can be several domains in a site. For example, an organization may have branches around the city they are located in. Each location may be a site. Site container Site link - Defines the connection between sites. Can indicate the cost of sending data across a network in terms of available bandwidth. It is a list of two or more connected sites. Whether the link will use RPC or SMTP for passing data must be determined before creating the link since it cannot be changed Site link bridge - Allows one site in a string of sites to replicate through one or two sites to a second or third site. These are only used for fine control of how replication will occur across WAN links. Site settings Subnet - A part of a network based on addresses which is usually connected using routers. Subnets must be created in each site object before it is really active. A network address and subnet mask is used to define the subnet. Subnet container Trusted domain Pre-installed Container Objects Pre-installed container objects provide backward compatibility with Windows NT. They look and act like organizational units and include: Builtin - Build in local groups. Computers - Computer accounts created using Windows NT. It is a list of workstations Computer - Used to manage particular workstations. Domain Controllers - A list of domain controllers. Foreign Security Principles - Shows trust relationships with other domains. Users - Windows NT users. Object Access Controlling objects in Active Directory controls access only to objects in Active Directory. Objects outside Active Directory may have their own access control. Permissions on corresponding objects in Active 25 | P a g e
  • 26. Directory do not affect permissions on external objects. Therefore, the user must have both Active Directory and object access. When setting object permissions, they can be set so the change applies to all children of the object or only to the object itself. You can also set child objects to inherit permissions from their parent object. Access to specific object properties can be controlled. Object permissions for users and groups include: Full Control - Allows full access to the object and its sub objects, with the ability to take ownership of objects and change permissions of objects and sub objects Read - Allows object contents and properties to be displayed. Write - Allows object contents and properties to be changed except for modifying permissions, configuring auditing, or taking ownership. Create All Child Objects - Allows creation of any child objects. Delete All Child Objects - Allows deletion of any child objects. Object access is controlled using the Active Directory Users and Computers tool by clicking on "View", "Advanced Features", Click + next to the domain, right click the object, select "Properties", click the "Security" tab, and continue. How To Manage Computer Accounts :Add a Computer Account To perform this procedure, you must be a member of the Account Operators group, the Domain Admins group, or the Enterprise Admins group in Active Directory, or you must have been delegated the appropriate authority. As a security best practice, consider using Run as to perform this procedure. 1. Click Start, point to Programs, point to Administrative Tools, and then click Active Directory Users and Computers. 2. In the console tree, click Computers under the domain node, or click the container in which you want to add the computer. 3. Right-click Computers or the container in which you want to add the computer, point to New, and then click Computer. 4. Type the computer name.IMPORTANT: The Default Domain Policy settings allow only members of the Domain Admins group to add a computer account to a domain. Click Change to specify a different user or group that can add this computer to the domain. NOTES: o To view or change the full computer name of a computer and the domain that a computer belongs to, right-click My Computer on the desktop, click Properties, and then click the Network Identification tab. 26 | P a g e
  • 27. o There are two additional ways to give a user or group permission to add a computer to the domain: use a Group Policy object to grant the right Add computer user, or, for the organizational unit in which you want to allow them to create computer objects, grant the user or group the permission to create computer objects. o If the computer that is using the account that you are creating is running a version of Windows earlier than 2000, click to select the Assign this computer account as a preWindows 2000 computer check box. o The Assign this computer account as a pre-Windows 2000 computer check box assigns a password that is based on the new computer name. If you do not select this check box, you are assigned a random password. o If you intend to use the computer with the newly created account as a backup computer for a domain controller, click Assign this computer account as a backup domain controller. To add a computer account by using a command, type the following at a command prompt, and then press ENTER dsadd computer ComputerDN where ComputerDN the distinguished name of the computer you want to add. The distinguished name specifies the directory location. To view the complete syntax for this command, at a command prompt, type dsadd computer /?. NOTE: To modify the properties of a computer account, use the dsmod computer command. Add a Computer Account to a Group To perform this procedure, you must be a member of the Account Operators group, the Domain Admins group, or the Enterprise Admins group in Active Directory, or you must have been delegated the appropriate authority. As a security best practice, consider using Run as to perform this procedure. 1. Click Start, point to Programs, point to Administrative Tools, and then click Active Directory Users and Computers. 2. In the console tree, under the domain node, click Computers, or click the folder in which the computer is located. 3. In the details pane, right-click the computer, and then click Properties. 4. On the Member Of tab, click Add. 27 | P a g e
  • 28. 5. Click the group to which you want to add the computer, and then click Add. Or, to add the computer to more than one group, press CTRL and click the groups to which you want to add the computer, and then click Add.NOTES: o Adding a computer to a group allows you to grant permissions to all of the computer accounts in that group and to filter Group Policy settings on all accounts in that group. o To add a computer to a group, you can also drag the computer to a specific group. To add a computer account to a group by using a command, type the following at a command prompt, and then press ENTER dsmod group GroupDN -addmbr ComputerDN where ComputerDN the distinguished name of the computer you want to add (the distinguished name specifies the directory location), and GroupDN specifies the distinguished names of the group object to which you want to add the computer object. To view the complete syntax for this command, at a command prompt, type dsmod group /?. Delete a Computer Account 1. Click Start, point to Programs, point to Administrative Tools, and then click Active Directory Users and Computers. 2. In the console tree, click Computers under the domain node, or click the folder in which the computer is located. 3. In the details pane, right-click the computer, and then click Delete. RESULT :- Creating and Managing Active Directory Objects is successfully completed. 28 | P a g e
  • 29. EXPERIMENT 7 IMPLEMENTING DISK QUOTAS AIM :- Creating home folder, profiles and Implementing Disk Quotas. PROCEDURE :Assign a home folder , profiles to a domain user To assign a home folder to a domain user: 1. Click Start, point to Programs, point to Administrative Tools, and then click Active Directory Users and Computers. 2. In the console tree, click Users. 3. In the Details pane, right-click the user account, and then click Properties. 4. In the Properties dialog box, click Profile. 5. Under the Home folder, type the folder information. To do this, follow these steps: a. To assign a home folder on a network server, click Connect, and then specify a drive letter. b. o In the To box, type a path. This path can be any one of the following types: Network path, for example: serveruserstester o You can substitute username for the last subfolder in the path, for example: serverusersusername 29 | P a g e
  • 30. 6. Note In these examples, server is the name of the file server housing the home folders, and users is the shared folder. Click OK. Assign a home folder to a local user To assign a home folder to a local user: 1. Click Start, click Control Panel, double-click Administrative Tools, and then double-click Computer Management. 2. In the console tree, click Users in Local Users and Groups. 3. Click the user account. 4. Click the Action menu, and then click Properties. 5. Click the Profile tab, click Connect, and then specify a drive letter. 6. In the To box, type a path. This path can be any of the following types: o Network path, for example: serveruserstester o You can substitute username for the last subfolder in the path, for example: serverusersusername Where server is the name of the file server housing the home folders, and where users is the shared folder. 7. Click OK. Specify a home folder for a terminal server In Windows Server 2003, you can specify a home folder for a terminal server. Assign each user on a terminal server a unique home folder. This makes sure that you store the program information separately for each user in the multi-user environment. Note: If you specify only the home folder for Windows Server 2003, both Windows 2003 and Terminal Services use this home folder. To specify a home folder for a terminal server, use one of the following procedures. 30 | P a g e
  • 31. Domain user account 1. Click Start, point to Programs, point to Administrative Tools, and then click Active Directory Users and Computers. 2. In the console tree, expand the domain node, and then click the Users folder. 3. Double-click the user account. 4. Click the Terminal Services Profile tab. 5. If the Terminal Services home folder is on the local server, click Local path, and then type the path of the profile. Note If you do not specify the location path in the Terminal Service Home folder pane, the default local home folder is located at the following path: system driveDocuments and Settingsusername 6. If the Terminal Services home folder is on a network share, click Connect, select a drive to connect, and then type the network path. 7. Click OK. Local user account 1. Click Start, point to Programs, point to Administrative Tools, and then click Computer Management. 2. In the console tree, click Users in Local Users and Groups. 3. Double-click the user account. 4. Click the Terminal Services Profile tab. 5. If the Terminal Services home folder is on the local server, click Local path, and then type the path of the profile. Note If you do not specify the location path in the Terminal Service Home folder pane, the default local home folder is located at the following path: system driveDocuments and Settingsusername 6. If the Terminal Services home folder is on a network share, click Connect, select a drive to connect, and then type the network path. 7. Click OK. 31 | P a g e
  • 32. Disk quotas overview :Disk quotas track and control disk space usage for NTFS volumes. Administrators can configure Windows to: Prevent further disk space use and log an event when a user exceeds a specified disk space limit, that is, the amount of disk space a user is allowed to use. Log an event when a user exceeds a specified disk space warning level, that is, the point at which a user is nearing his or her quota limit. When you enable disk quotas, you can set two values: the disk quota limit and the disk quota warning level. For example, you can set a user's disk quota limit to 500 megabytes (MB), and the disk quota warning level to 450 MB. In this case, the user can store no more than 500 MB of files on the volume. If the user stores more than 450 MB of files on the volume, you can configure the disk quota system to log a system event. You must be a member of the Administrators group to administer quotas on a volume. For instructions on setting disk quota values, see Assign default quota values. You can specify that users can exceed their quota limit. Enabling quotas and not limiting disk space use are useful when you do not want to deny users access to a volume but want to track disk space use on a per-user basis. You can also specify whether or not to log an event when users exceed either their quota limit or their quota warning level. When you enable disk quotas for a volume, volume usage is automatically tracked for all users from that point on. You can enable quotas on local volumes, network volumes, and removable drives as long as they are formatted with the NTFS file system. In addition, network volumes must be shared from the volume's root directory and removable drives must be shared. Volumes formatted with the version of NTFS used in Windows NT 4.0 are upgraded automatically by Windows Setup. You cannot use file compression to prevent users from exceeding their quota limits because compressed files are tracked based on their uncompressed size. For example, if you have a 50 MB file that is 40 MB after it is compressed, Windows counts the file's original 50 MB size toward the quota limit. Enabling Quotas on a Disk By default, disk quotas are disabled in Windows Server 2003. You can enable disk quotas on any volume that has been assigned a drive letter. To enable quotas on a volume, follow these steps: 1. In Windows Explorer, right-click a drive letter and open the properties of that drive. 2. Click the Quota tab, shown in Figure 19-23, and then click Show Quota Settings. 32 | P a g e
  • 33. Figure 19-23 The Quota tab of a drive's properties 3. Select the Enable Quota Management check box to enable quotas for the disk, as shown in Figure 19-24. Figure 19-24 The Quota Settings dialog box for a disk 4. To enable hard quotas that can't be exceeded, select the Deny Disk Space To Users Exceeding Quota Limit check box. 5. Set the limits and warning level, as shown in Figure 19-24. You can also enable logging on this page. 6. Click OK to enable the quotas. You'll be prompted one last time to confirm, as shown in Figure 19-25. Click OK and the quotas will be enabled. 33 | P a g e
  • 34. Figure 19-25 The Disk Quota confirmation message Setting Per-User Quotas You can set quota limits on individual users, or you can have limits apply equally to all nonadministrative users. Unfortunately, you can't set limits on groups of users. And any users who already own files on the disk will have their quotas initially disabled. New users will have the default quotas for the disk applied as you would expect when they first save a file on the disk. To set the quotas for individual users, follow these steps: 1. In Windows Explorer, right-click a drive letter and open the properties of that drive. 2. Click the Quota tab, and then click Show Quota Settings to bring up the Quota Settings dialog box for that disk. 3. Click Quota Entries to open the Quota Entries dialog box for the disk, as shown in Figure 19-26. Figure 19-26 The Quota Entries dialog box for a disk 4. To modify the quota for a user already listed, select the user and then click Properties to open the quota settings for that user, as shown in Figure 19-27. Set the quota for the user and click OK to return to the Quota Entries dialog box. 34 | P a g e
  • 35. Figure 19-27 The Quota Settings dialog box for an individual user 5. To create a quota for a user who doesn't have one yet, and who needs a quota different from the default for the disk, click New Quota Entry. 6. Select the user or users to apply the new quota to, and click OK to bring up the Add New Quota Entry dialog box, as shown in Figure 19-28. 7. Click OK to add the new entry and return to the Quota Entries dialog box. Close the Quota Entries dialog box, click OK in the Quota Settings dialog box, and then click OK in the Properties dialog box for the drive. 8. To manage quotas from the command line, you need to use Fsutil.exe. Even for a determined command-line type, it's pretty lame. Stick to the GUI, and use import and export whenever possible. RESULT :-Creating home folder, profiles and Implementing Disk Quotas is successfully completed. EXPERIMENT 8 SHARING, SERVING FILES AND FOLDERS ON FAT AND NTFS 35 | P a g e
  • 36. AIM :- Sharing, Serving Files and Folders on FAT and NTFS. PROCEDURE :USING WINDOWS EXPLORER TO SHARE A FOLDER ON THE LOCAL COMPUTER 1. Start Windows Explorer. (SelectStart➪Programs➪Accessories➪Windows Explorer.) 2. In the left pane, expand folders as necessary until the folder you want to share is displayed in the right pane. In the right pane, highlight that folder. Select File➪ Sharing.(Or,right-click the folder, and select Sharing from the menu that appears.) 3. The folder’s Properties dialog box appears with the Sharing tab displayed. To share this folder, select the “Share this folder” option There are several configurable options on this tab: Share name: Either accept the default name in the “Share name” text box or type in the name you want to use for the share. Comment: You can add a descriptive comment about the share in the Comment text box if you want to. (This is an optional entry.) User limit: If you want to limit the number of users who can connect to this share simultaneously (because of licensing limitations or for other reasons), you can configure the “User limit” section on this tab. The default “User limit” is “Maximum allowed.” Permissions: If you want to assign or change share permissions for this shared folder, click Permissions. Caching: If you want to modify offline file settings for this shared folder, click Caching. Click OK. 4. In the folder’s Properties dialog box, click OK. 5. Close Windows Explorer USING COMPUTER MANAGEMENT TO SHARE A FOLDER 1. Start Computer Management. (Right-click My Computer, and select Manage from the menu that appears.) 2. If you want to share a folder on this computer, skip to Step 4. If you want to share a folder on a remote computer, in the left pane of the 36 | P a g e
  • 37. Computer Management dialog box, right-click Computer Management (Local), and select “Connect to another computer” from the menu that appears. 3. In the Select Computer dialog box, double-click the name of the computer on which you want to share a folder. 4. In the left pane of the Computer Management dialog box, click the + next to System Tools (if System Tools is not already expanded). Click the + next to Shared Folders. Highlight Shares. Select Action➪New File Share. 5. The Create Shared Folder dialog box appears In this dialog box, enter the full path to the folder you want to share (such as C:Data). You can browse for this folder if you don’t know its path. Enter a share name for the share. You can also enter a description for the share if you want to. Click Next. 6. In the next dialog box, configure the appropriate share permissions for this shared folder. (I’ll cover share permissions a little later in this chapter.) Click Finish. 7. A dialog box appears, indicating that the folder has been successfully shared. Click Yes if you want to create another shared folder. Otherwise, click No. 8. The folder you just shared appears in the right pane of the Computer Management dialog box. Close Computer Management. USING WINDOWS EXPLORER TO ASSIGN SHARE PERMISSIONS 1. Start Windows Explorer. (SelectStart➪Programs➪Accessories➪Windows Explorer.) 2. In the left pane, expand folders as necessary until the shared folder to which you want to assign share permissions is displayed in the right pane. In the right pane, highlight that folder. Select File➪Sharing. (Or, right-click the folder and select Sharing from the menu that appears.) 3. The folder’s Properties dialog box appears with the Sharing tab displayed. Click Permissions. 4. The Permissions dialog box for the shared folder appears. Notice that by default the Everyone group is allowed the Full Control, Change, and Read permissions. 37 | P a g e
  • 38. Also notice the Allow and Deny check boxes. Allow: When the Allow check box next to a specific permission is selected for a user or group, the user or group is granted the selected permission to the share. Deny: When the Deny check box next to a specific permission is selected for a user or group, the user or group is specifically denied that permission to the share, even if the user or group is allowed that permission through membership in another group. To add a user or group to the Name box, click Add. 5. In the Select Users, Computers, or Groups dialog box, double-click each user and group you want to add. (You can also highlight each user or group and then click Add, but double-clicking is faster and easier.) As you double-click each user or group, the user or group appears in the bottom portion of the dialog box. Click OK. 6. In the Permissions dialog box for the share, each user or group that you added is automatically assigned the Read permission to the share. To change the permissions of a user or group you added, highlight the user or group in the Name box, then select or clear the appropriate check boxes in the Permissions box. Click OK. 7. In the shared folder’s Properties dialog box, click OK. 8. Close Windows Explorer. TO STOP SHARING A FOLDER 1. Start Windows Explorer. (SelectStart➪Programs➪Accessories➪Windows Explorer.) 2. In the left pane, expand folders as necessary until the shared folder you want to stop sharing is displayed in the right pane. In the right pane, highlight that folder. Select File➪Sharing. (Or, right-click the folder, and select Sharing from the menu that appears.) 3. The folder’s Properties dialog box appears with the Sharing tab displayed. Select the “Do not share this folder” option. Click OK. 4. Close Windows Explorer. 38 | P a g e
  • 39. RESULT :Sharing, Serving Files and Folders on FAT and NTFS is successfully completed. EXPERIMENT 9 SETTING UP 2K3 PRINTING ENVIRONMENT AIM :- Setting up windows 2003 printing Environment. PROCEDURE :INSTALL LOCAL PRINTERS :A printer driver is software that your programs and Windows can use to communicate with a physical printer (which might be attached to your computer, to another computer on the network or to a "phantom" printer that isn't even there). 39 | P a g e
  • 40. PowerPoint gets very cranky if you don't have a printer driver installed on your computer and set as default. You don't really need to have a physical printer, just the driver at a minimum. This should be a MS-approved standard printer driver, and not a specialty driver like a Fax driver, Microsoft Office Document Imaging driver, Acrobat or the like. The driver should be locally installed (ie, the driver should reside on your PC, not on a network, though you can "connect" a locally installed driver TO a network printer). I have a printer installed already. Is it local? If you already have a printer driver installed and need to know whether it's local or not: Choose Start, Control Panel, Printers and Faxes. Right-click your printer and choose Properties. On the General tab of the Properties dialog box, click Print a test page. Look at the Computer name: listed on the printer test page. If it matches the name of your computer, then the printer driver is locally installed. If it's some other name, then you're using a shared driver from that computer, which is liable to cause problems for PowerPoint. Install a printer driver locally Installing a printer driver is a Windows function, not a PowerPoint one. Before installing a printer driver, quit PowerPoint and your other programs. Read over the installation instructions that came with your printer. When in doubt, follow the instructions there rather than the ones below. Click Start, Settings, Control Panel. Double-click "Printers & Faxes" Double-click "Add Printer" to start the Add Printer Wizard 40 | P a g e
  • 41. The Add Printer Wizard Welcome screen Click Next Local or Network Printer Click "Local Printer" Make sure there's NO checkmark next to "Automatically detect and install ..." Click Next Select a PrinterPort If your printer is actually attached to the computer, click "Use the following port" and select the port your printer's attached to. 41 | P a g e
  • 42. If you're installing a driver only to keep PowerPoint happy, choose LPT1: or FILE: (it doesn't really matter, since you'll never actually print to the port) If you're installing a local driver but need to print to a network printer, look for the printer's port on the network and choose it, if available. If not, choose LPT1: for now. You can change the setting later. Click Next Install Printer Software If installing a real printer, select your printer manufacturer and printer model here. If you have an installation disk or CD that came with the printer, click "Have Disk" and locate the INF file for the printer (check the printer's documentation for specific instructions). If installing a printer only to keep PowerPoint happy, choose the HP LaserJet 4V/4MV as we've done here Click Next 42 | P a g e
  • 43. Name Your Printer Give the printer a name (this is the name you'll use to select it later) If installing a printer just to make PowerPoint happy, you might want to give it a name that indicates it isn't a real physical printer (PPT Pacifier, or the like) Click "Yes" under "Do you want to use this printer as the default printer" (this option may not appear in all Windows versions; see Notes below) Click Next Printer Sharing Click "Do not share this printer" Click Next 43 | P a g e
  • 44. Print Test Page Click No Click Next Completing the Add Printer Wizard Review your choices. Click Back if you need to change anything Click Finish If you don't see "Use this printer as the default printer" in the "Name printer" screen, finish installing the printer, then click Start, Settings, Printers; rightclick the printer you just installed and click "Set as default printer" from the pop-up menu that appears. If you have a physical printer installed, you can print a test page to make sure it's working correctly and to verify that it's a local and not a network-installed driver. Click Start, then click Printers and Faxes Right-click the printer you want to test and choose Properties from the pop-up menu Click "Print test page" on the Properties dialog box that appears 44 | P a g e
  • 45. When the test page finishes printing, check the following items on it: o Computer name: this will be the name of the computer the printer driver is on. It should be the same as your computer's name. If it's some other computer's name, then the printer driver is NOT locally installed. o Printer name: this should show the name you assigned when installing the driver; if it shows something like ComputernamePrintername, the driver's on the network, not on your PC. Consider removing the network version and installing a local driver instead. INSTALLING NETWORK PRINTER :Some of the following configuration steps may require administrative authority. 1. 2. 3. 4. 5. Logon to the Windows Server 2003 or XP print client as an administrator. Select Start, then Settings, then Printers and Faxes. You see the Printers and Faxes folder. Double-click on the Add Printer icon. In the Add Printer Wizard, click Next. Click the A network printer or a printer attached to another computer radio button, then click Next. 6. In the Name entry field, type the name of the shared printer as follows: machinenameprintersharename To browse the network for the printer you want to share, click Browse for a printer. 7. Click Next. 8. In the unlikely event that your printer drivers are not downloaded automatically from the print server, you will be asked if you want to install the printer drivers on the print client. If this happens, click OK and follow the instructions to install your printer driver. On the IBM Infoprint 2060ES, 2075ES, 2085, 2090ES, 2105, and 2105ES Printer Software Setup CD-ROM the Windows XP drivers are in the following directory: DriversWin2KXPPCL6language where language is English, French, German, and so on. 45 | P a g e
  • 46. 9. Specify whether you want this printer to be the default printer, then click Next. 10. Click Finish. Verifying the Configuration Test the client configuration by printing a test page as follows. 1. Select Start, then Printers and Faxes. You see the Printers and Faxes folder. 2. Right-click on the printer and select Properties. 3. Select Print Test Page. SHARING A PRINTER :1. Follow this step-by-step instructions to share printer in Windows XP. Go to Start and click Control Panel. Control Panel Window will appear, then double click Printers and faxes. 2. Printers and Faxes window will appear. Right click the printer you want to share, then click Sharing… Note: Make sure you've enabled File and Printer Sharing for Microsoft Networks on network card's properties. 3. Select Sharing tab and tick Share this printer to share the printer. You can type in a new name in the Share name text box to change your printer name on the network, however this will not change the printer name on your computer. Click Apply. 46 | P a g e
  • 47. Note: If the other users using different version of Windows to access your printer, they will need to install printer driver themselves. You can help by installing additional printer drivers on your Windows XP, so that the printer driver will be installed when other users access the shared printer with different version of Windows. Click Additional Drivers, tick additional driver you would like to install. You will be prompted to install those additional drivers after clicking OK. 4. Once you have shared the printer, you will see there is a hand supporting your printer. RESULT :- Setting up windows 2003 printing Environment is successfully completed. 47 | P a g e
  • 48. EXPERIMENT 10 INSTALLING AND GONFIGURING DHCP, DNS, IIS 6.0 AIM :- Installing and Configuring DHCP, DNS, IIS 6.0. PROCEDURE :- DYNAMIC HOST CONFIGURATION PROTOCOL(DHCP):INSTALLING DHCP 1. Select Start➪Settings➪Control Panel. 2. In the Control Panel dialog box, double-click Add/Remove Programs. 3. In the Add/Remove Programs dialog box, click Add/Remove Windows Components. 4. In the Windows Components Wizard dialog box, highlight Networking Services, and click Details. 5. In the Networking Services dialog box, select the check box next to Dynamic Host Configuration Protocol (DHCP), and click OK. 6. In the Windows Components Wizard dialog box, click Next. 7. Windows 2003 configures components and installs DHCP. In the Completing the Windows Components Wizard screen, click Finish. 8. Close Add/Remove Programs. Then close Control Panel. AUTHORIZING A DHCP SERVER 1. Select Start➪Programs➪Administrative Tools➪DHCP. 2. In the left pane of the DHCP dialog box, highlight the DHCP server you want to authorize. Select Action➪Authorize. 3. Wait a minute or two, then select Action ➪ Refresh. 4. The DHCP Server is now authorized. Notice that the icon next to the DHCP server now contains a green, upward pointing arrow (instead of a red, downward pointing arrow). 48 | P a g e
  • 49. 5. Close DHCP. CONFIGURING A DHCP SERVER FOR DNS INTEGRATION 1. Select Start➪Programs➪Administrative Tools➪DHCP. 2. In the left pane of the DHCP dialog box, highlight the DHCP server you want to configure for DNS integration. Select Action➪Properties. 3. In the DHCP server’s Properties dialog box, click the DNS tab. 4. The DNS tab appears, as shown in Figure 16-4. Notice the blank check box next to “Enable updates for DNS clients that do not support dynamic update.” To configure the DHCP server to provide IP address and host name information of Windows-based client computers to the DNS server, select the check box next to “Enable updates for DNS clients that do not support dynamic update.” In addition, if you want the DHCP server to update the DNS server for Windows 2003 client computers, even if the clients don’t request this update, select the “Always update DNS” option. Selecting this option ensures that the DNS server has the most recent IP address and host name information for Windows 2003 client computers, and it also registers reverse lookup information for Windows 2003 client computers. Click OK. 5. Close DHCP. CREATING A SCOPE 1 Select Start➪Programs➪Administrative Tools➪DHCP. 2. In the left pane of the DHCP dialog box, highlight the DHCP server on which you want to a scope. Select Action➪New Scope. 3. The New Scope wizard starts. Click Next. 49 | P a g e
  • 50. 4. In the Scope Name screen, type in a name and a description for the scope in the text boxes provided. Click Next. 5. The IP Address Range screen appears. In the “Start IP address” and “End IP address” text , enter the IP addresses that will define the range of the scope. To configure the subnet mask for the scope, you can either type in the subnet mask in the “Subnet mask” text box, or you can specify the length of the subnet mask as whole number between 1 and 31. If you enter a number in the Length spin box, the subnet mask is automatically calculated for you. Click Next. The IP Address Range screen after it has been configured with a range of IP addresses that spans multiple subnets, and after its subnet mask has been configured. 6. If you configured a range of IP addresses in Step 5 that spans more than one subnet, the Create Superscope screen is displayed. If you want to create a superscope,select the Yes option and click Next. If you don’t want to create a superscope,click Back and reconfigure your IP address range to only include IPaddresses from a single subnet. If you configured a range of IP addresses in Step 5 from only one subnet, the Add Exclusions screen is displayed. In this screen, you can specify IP addresses (or ranges of IP addresses) within the scope that will not be assigned to DHCP client computers by the DHCP server. To exclude IP addresses, enter the start and end IP address of the range you want to exclude and click Add. (If you only want to exclude a single IP address, use this IP address as both the start and end IP address of the exclusion range.) When you finish configuring exclusions, click Next. 7. In the Lease Duration screen, either accept the default DHCP lease duration of eight days, or configure a custom lease duration. Click Next. 8. In the Configure DHCP Options screen, choose whether to configure DHCP options for this scope (such as routers, DNS, and WINS settings) now. For completeness, I’ll assume you choose the Yes option. Click Next. 9. In the Router (Default Gateway) screen, enter the IP address of the router that will function as the default gateway for this scope and click Add. Click Next. 10. In the Domain Name and DNS Servers screen, in the “Parent domain” text box, enter the name of the domain that DHCP client computers that obtain IP addresses from this scope are members of. Then, either specify the name of the DNS server on your network and click Resolve, or enter the IP address of the DNS server. Click Add. If you have more than one DNS server, you can repeat this process and click Add again. If you have more than one DNS server, the first DNS server in the list becomes the primary DNS server for the DHCP client computers. Click Next. 50 | P a g e
  • 51. 11. In the WINS Servers screen, either specify the name of the WINS server on your network and click Resolve, or enter the IP address of the WINS server. Click Add. If you have more than one WINS server, you can repeat this process and click Add again. If you have more than one WINS server, the first WINS server in the list becomes the primary WINS server for the DHCP client computers. Click Next. Or, if you don’t have a WINS server on your network, just click Next. 12. In the Activate Scope screen, select whether to activate this scope now. Your options are Yes or No. A DHCP server can’t assign addresses from a scope until the scope is activated. Make your selection and click Next. 13. In the Completing the New Scope Wizard screen, click Finish. 14. Windows 2000 creates the scope. It is displayed in the right pane of the DHCP dialog box. Close DHCP. DOMAIN NAME SERVICE (DNS) :1.CONFIGURING A STATIC IP ADDRESS 1. Select Start ➪ Settings ➪ Control Panel. 2. In the Control Panel dialog box, double-click the Network and Dial-up Connections folder. 3. In the Network and Dial-up Connections folder, right-click Local Area Connection and select Properties from the menu that appears. 4. In the Local Area Connection Properties dialog box, highlight Internet Protocol (TCP/IP) and click Properties. 5. In the Internet Protocol (TCP/IP) Properties dialog box, select the “Use the following IP Address” option, and type in a static IP address, subnet mask, and default gateway. Click OK. 6. In the Local Area Connection Properties dialog box, click OK. 7. Close the Network and Dial-up Connections folder. 2.CONFIGURING A PRIMARY DNS SUFFIX 1. From the desktop, right-click My Computer and select Properties from the menu that appears. 2. In the System Properties dialog box, click the Network Identification tab. 3. On the Network Identification tab, click Properties. 4. In the Identification Changes dialog box, click More. 5. In the DNS Suffix and NetBIOS Computer Name dialog box, type your company’s FQDN in the “Primary DNS suffix of this computer” text box (for example, mycompany.com). Click OK. 6. In the Identification Changes dialog box, click OK. 7. In the Network Identification dialog box, click OK. 8. On the Network Identification tab, click OK. 9. In the System Settings Change dialog box, click Yes to restart your computer. 3.INSTALLING THE DNS SERVER SERVICE 1. Place your Windows 2000 Server or Advanced Server compact disc into your computer’s CD-ROM drive. Select Start ➪ Settings ➪ Control Panel. 51 | P a g e
  • 52. 2. In the Control Panel dialog box, double-click Add/Remove Programs. 3. In the Add/Remove Programs dialog box, click Add/Remove Windows Components. 4. The Windows Components Wizard starts. In the Windows Components screen, scroll down and highlight Networking Services. Click Details. 5. In the Networking Services dialog box, select the check box next to Domain Name System (DNS). Click OK. 6. In the Windows Components screen, click Next. 7. Windows 2000 Setup configures components. In the Completing the Windows Components Wizard screen, click Finish. 8. Close the Add/Remove Programs dialog box. Close Control Panel. 4.CONFIGURING YOUR DNS SERVER TO USE ITSELF 1. From the desktop, select Start➪Settings➪Control Panel. 2. In the Control Panel dialog box, double-click the Network and Dial-up Connections folder. 3. In the Network and Dial-up Connections folder, right-click Local Area Connection and select Properties from the menu that appears. 4. In the Local Area Connection Properties dialog box, highlight Internet Protocol (TCP/IP) and click Properties. 5. In the Internet Protocol (TCP/IP) Properties dialog box, ensure that the “Use the following DNS server addresses” option is selected. Then, in the Preferred DNS server text box, type the IP address of this DNS server. Click Advanced. 6. In the Advanced TCP/IP Settings dialog box, click the DNS tab. 7. On the DNS tab, type the FQDN of the DNS domain that this DNS server belongs to in the “DNS suffix for this connection” text box. Generally it’s okay to accept the remaining default settings on this tab. Click OK. 8. In the Internet Protocol (TCP/IP) Properties dialog box, click OK. 9. In the Local Area Connection Properties dialog box, click OK. 10. Close the Network and Dial-up Connections folder. 5. CONFIGURING A ROOT SERVER 1. Select Start➪Programs➪Administrative Tools➪DNS. 2. In the DNS dialog box, highlight your computer in the left pane. 3. Windows 2000 indicates that your DNS server has not yet been configured Select Action➪Configure the server. 4. The Configure DNS Server Wizard starts. Click Next. 5. The Root Server screen appears. Notice the two options available in this screen. 52 | P a g e
  • 53. If you want to configure this server to be a root server, accept the default option of “This is the first DNS server on this network.” Click Next. If you want this DNS server to use an existing root server on your network, select the “One or more DNS servers are running on this network” option, and provide the IP address of a root server on your network that you want this server to use. Click Next. 6. In the Forward Lookup Zone screen, you can choose whether or not to create a forward lookup zone now. If you select the “Yes, create a forward lookup zone” option and click Next, the New Zone Wizard begins. Follow the instructions presented on-screen to create your forward lookup zone, and a reverse lookup zone if desired. When you finish creating zones, skip to Step 7. If you select the “No, do not create a forward lookup zone” option, click Next. 7. The Completing the Configure DNS Server Wizard screen appears. Click Finish. 8. The DNS dialog box reappears. This completes the configuration of a root server. Close the DNS dialog box. 6.CREATING A STANDARD PRIMARY FORWARD LOOKUP ZONE 1. Select Start➪Programs➪Administrative Tools➪DNS. 2. In the DNS dialog box, click the + next to the DNS server’s name in the left pane. 3. In the left pane, highlight the Forward Lookup Zones folder. Select Action➪ New Zone. 4. The New Zone Wizard begins. Click Next. 5. The Zone Type screen appear. Notice the three types of zones you can create. Also notice that the option next to “Active Directory-integrated” is grayed out—this option is only available after you install Active Directory and the DNS Server service on a Windows 2000 Server/Advanced Server computer. Accept the default option of “Standard primary” and click Next. 6. In the Zone Name screen, type in the name of the zone you are creating. This name is usually the FQDN of the DNS domain that the zone will contain, such as microsoft.com. Click Next. 7. The Zone File screen appears. In this screen, you can either create a new zone file for the new zone, or configure the new zone to use an existing file. I recommend you accept the default option of “Create a new file with this file name,” and also that you accept the default filename presented. Click Next. 7. The Zone File screen appears. In this screen, you can either create a new zone file for the new zone, or configure the new zone to use an existing file. I recommend you accept the default option of “Create a new file with this file name,” and also that you accept the default filename presented. Click Next. 8. The Completing the New Zone Wizard screen appears. Click Finish. 53 | P a g e
  • 54. 9. The DNS dialog box reappears. Notice that the new zone you created appears in the right pane. 7.CREATING A STANDARD PRIMARY REVERSE LOOKUP ZONE 1. Start the DNS administrative tool if it is not already running. (Select Start➪Programs➪Administrative Tools➪DNS.) 2. In the DNS dialog box, click the + next to the DNS server’s name in the left pane if this computer is not already expanded. 3. In the left pane, highlight the Reverse Lookup Zones folder. Select Action➪New Zone. 4. The New Zone Wizard begins. Click Next. 5. The Zone Type screen appears. Accept the default option of “Standard primary” and click Next. 6. The Reverse Lookup Zone screen appears, as shown in Figure 7-9. Notice the two options available on this screen: you can either identify the reverse lookup zone you’re creating by network ID, or by typing in a name for the new reverse lookup zone. Because it’s difficult to construct the correct name for a reverse lookup zone, I recommend that you select the default “Network ID” option and enter the network ID of the zone. This network ID is really the network ID of the subnet for which this reverse lookup zone will provide IP address to host name resolution. Click Next. 7. The Zone File screen appears. In this screen, you can either create a new zone file for the new zone, or configure the new zone to use an existing file. I recommend you accept the default option of “Create a new file with this file name,” and also that you accept the default filename presented. Click Next. 8. The Completing the New Zone Wizard screen appears. Click Finish. 9. The DNS dialog box reappears. Notice that the new zone you created appears in the right pane. INTERNET INFORMATION SERVICES(IIS):ADDING IIS COMPONENTS 1. Select Start➪Settings➪Control Panel. 2. In the Control Panel dialog box, double-click Add/Remove Programs. 3. In the Add/Remove Programs dialog box, click Add/Remove Windows Components. 54 | P a g e
  • 55. 4. In the Windows Components Wizard dialog box, highlight Internet Information Services (IIS), and click Details. 5. The Internet Information Services (IIS) dialog box appears. Notice that the check box next to many IIS components is already selected— these components are already installed. The actual components installed on your Windows 2000 computer may differ from the ones shown in this figure. Select the check box next to each IIS component you want to add. Clear the check box next to any IIS component you want to remove. Click OK. 6. In the Windows Components Wizard dialog box, click Next. 7. If prompted, insert your Windows 2000 compact disc into your computer’s CD-ROM drive and click OK. Close the Microsoft Windows 2000 CD dialog box. Windows 2000 configures components and installs the selected IIS components. In the Completing the Windows Components Wizard screen, click Finish. 8. Close Add/Remove Programs. Then close Control Panel. RESULT :Installing and Configuring DHCP, DNS, IIS 6.0 is successfully completed. 55 | P a g e
  • 56. EXPERIMENT 11 INSTALLING AND CONFIGURING WEB SERVER AND FTP SERVER AIM :- Installing and Configuring Web Server. PROCEDURE :CONFIGURING THE DEFAULT WEB SITE 1. Select Start➪Programs➪Administrative Tools➪Internet Services Manager. 2. In the left pane of the Internet Information Services dialog box, click the + next tothe server that contains the Web site you want to configure. Right-click Default Web Site, and select Properties from the menu that appears. 3. The Default Web Site Properties dialog box appears, as shown in Figure 18-2. Notice the Description text box. You can change the name of the Default WebSite by typing in a new name in this text box. Configure the settings on the various tabs to meet your needs. (I’ll discuss eachof these tabs in the rest of this section.) Click OK. 4. Close the Internet Information Services dialog box. WORKING WITH PERSONAL WEB MANAGER 56 | P a g e
  • 57. 1. On your Windows 2000 Professional computer, select Start➪Settings➪ Control Panel. 2. In Control Panel, double-click the Administrative Tools folder. 3. In the Administrative Tools folder, double-click Personal Web Manager. 4. When the “Tip of the day” appears, click Close. The Personal Web Manager main dialog box is displayed, as shown in Figure 18-6. Notice the statistics displayed inthe Monitoring section of this dialog box. To stop the Default Web Site, click Stop. To view a product tour of IIS, click Tour. To manage advanced Web site properties, such as enabling and configuring the default document, configuring access and application permissions, and creatingvirtual directories, click Advanced. 5. Close Personal Web Manager. Next right-click on the directory to bring up its property page, which should look like the image below. Make sure to select Execute (including script). But don't click the OK button just yet. 57 | P a g e
  • 58. Before you select OK you should create an application mapping. Basically this involves telling IIS or PWS that applications ending with .ivm should be executed by the interpreter. To do this click the Configuration... button. A Application Configuration dialog box like the image below will appear. You need to add a mapping for .ivm applications so click the Add button. An Application Extension Mapping dialog box like the one below will appear. Enter the full path to the interpreter, or use the Browse button to locate it. Enter the extension being mapped (.ivm). 58 | P a g e
  • 59. Click OK on all the open dialog boxes and you're finished! FTP Service Because FTP depends on Microsoft Internet Information Services (IIS), IIS and the FTP Service must be installed on the computer. To install IIS and the FTP Service, follow these steps: 1. Click Start, Control Panel, and then click Add or Remove Programs. 2. Click Add/Remove Windows Components. 3. In the Components list, click Application Server, click Internet Information Services (IIS) (but do not select or clear the check box), and then click Details. 4. Select the following check boxes: Common Files File Transfer Protocol (FTP) Service Internet Information Services Manager 5. Select the check boxes next to any other IIS-related service or subcomponent that you want to install, and then click OK. 6. Click Next. 7. When you are prompted, insert the Windows Server 2003 CD-ROM into the computer's CD-ROM or DVD-ROM drive or provide a path to the location of the files, and then click OK. 8. Click Finish. Configure the FTP Service To configure the FTP Service to allow only anonymous connections, follow these steps: 1. Start Internet Information Services Manager or open the IIS snap-in. 2. Expand Server_name, where Server_name is the name of the server. 3. Expand FTP Sites 4. Right-click Default FTP Site, and then click Properties. 5. Click the Security Accounts tab. 6. Select the Allow Anonymous Connections check box, and then select the Allow only anonymous connections check box. 7. Click the Home Directory tab. 8. Select the Read and Log visits check boxes, and then click to clear the Write check box. 9. Click OK. 10. Quit Internet Information Services Manager or close the IIS snap-in. 59 | P a g e
  • 60. EXPERIMENT -12 1. INSTALLING AND CONFIGURING TERMINAL SERVER And RDP ON CLIENTS To enable Remote Administration Mode Go to SYS1. 2. Right Click on My Computer  Properties Aim: To install and configure Terminal Service Server and RDP on clients 3. Requirements: 1. A computer running windows 2003 server or Domain Controller. 2. A computer running windows 2003 server or windows XP. SYS1 SYS1 SYS2 SYS2 Domain Controller / Terminal Server Member Server / Client IP Address 10 .0.0.1 IP Address 10 .0. 0.2 Subnet Mask 25 5.0 .0.0 Subnet Mask 25 5.0 .0.0 Preferred DNS 10 .0.0.1 Preferred DNS 10.0.0.1 Select Remote tab. 60 | P a g e
  • 61. How to configure terminal server in Remote Administration mode 4. Check the box Allow users to connect remotely to this computer. 5. Click OK  Apply  OK. 61 | P a g e
  • 62. Go to Terminal Client 1. Start  Program  Accessories  Communication Remote Desktop Connection (OR)  Start  type MSTSC. Run  2. Specify the IP Address 10.0.0.1 or computer name of terminal server  Click Connect. 3. Specify username as Administrator and type the password.  Click OK 4. The Administrator will connect to the Terminal Server Remotely. 62 | P a g e
  • 63. How to Configure Terminal Server in Application Server Mode 1. Go to Sys1  Select Start  Settings  Control Panel. 2. In the Control Panel dialog box, double-click Add/Remove Programs. 3. In the Add/Remove Programs dialog box, click Add/Remove Windows Components. 4. In the Windows Components Wizard dialog box, scroll down until Terminal Services is displayed 5. Select the check box next to Terminal Services, an configuration warning will appear  Click YES 6. Terminal Setup Page appears  Click Next 63 | P a g e
  • 64. 7. On the next Terminal Services Setup screen select the appropriate permissions. Permissions compatible with Windows 2003 Users click Next 9. Select Relaxed Security 10. Click Next  Finish 64 | P a g e
  • 65. HOW TO RUN TERMINAL SERVICES Steps: 1. Logon as administrator go to Active Directory User and Computer. 2. Create Some User Accounts. 3. Go to Terminal Client in Run Type MSTSC 4. Specify the IP Address or computer name of terminal server 10. In the System Settings Change dialog box, click YES to restart your computer and  Click OK.  complete the installation of Terminal Services. 65 | P a g e
  • 66. Click Connect.  Click OK 5. Specify username and type the password. 6. Message: The Local Policy of the System Does not Permit you to Logon Interactively. 66 | P a g e
  • 67.  Go to Terminal Server (Sys1) 7. To Allow the User to Logon Locally 8. Go to Domain Controller Security Policy, Select Local policy  user right assignment  allow logon through terminal Services and add the appropriate user. 9. Click Start  Run  type GPUPDATE 10. On Terminal Client Logon as a User Remotely 11. Message: You do not have permission to logon to this Session. 12. On Terminal Server Start  Program  Administrative Tools  Terminal Services configuration 67 | P a g e
  • 68. 13. Select Rdp-Tcp  Properties 14. Select Permission tab 15. Click Apply  OK.  Add the User. 68 | P a g e
  • 69. 16. On Terminal Client again logon as a user remotely. HOW TO MONITOR THE USER SESSIONS Level of Controls: View the Session and Interact with the Session. 1. On Terminal Server Start  Program  Administrative tools  Terminal Services Configuration. 2. Right Click on Rdp - Tcp  Properties  Remote Control Tab  Select Use remote control with the following settings. 69 | P a g e
  • 70. 3. Check the box Requires Users Permission  In level of Control Select View the sessions  Apply  ok 4. To monitor user Session Logon as an Administrator Remotely on Terminal Server. 5. Start  Program  Administrative Tools 6. Right Click on the User System name 7. Select Remote Control  Terminal Service Manager.  Select the hot keys  OK 70 | P a g e
  • 71. 8. Now administrator is Result: The installation and configuration of Terminal Service Server and RDP on clients is Successfully completed 71 | P a g e
  • 72. EXPERIMENT 13 INSTALLING AND CONFIGURING OF ROUTING AND REMOTE ACCESS SERVER AIM :- Installing and configuring of routing and RAS server. PROCEDURE :Installing the Routing and Remote Access Service By default, the Routing and Remote Access service is installed automatically during the Windows Server 2003 installation, but it is disabled. To Enable the Routing and Remote Access Service 1. Click Start, point to Administrative Tools, and then click Routing and Remote Access. 2. In the left pane of the console, click the server that matches the local server name. If the icon has a red arrow in the lower-right corner, the Routing and Remote Access service is not enabled. Go to step 3. If the icon has a green arrow pointing up in the lower-right corner, the service is enabled. If so, you may want to reconfigure the server. To reconfigure the server, you must first disable Routing and Remote Access. To do this, right-click the server, and then click Disable Routing and Remote Access. Click Yes when you are prompted with an informational message. 3. Right-click the server, and then click Configure and Enable Routing and Remote Access to start the Routing and Remote Access Server Setup Wizard. Click Next. 4. Click Remote access (dial-up or VPN) to permit remote computers to dial in or connect to this network through the Internet. Click Next. 5. Click VPN for virtual private access, or click Dial-up for dial-up access, depending on the role you want to assign to this server. 6. On the VPN Connection page, click the network interface that is connected to the Internet, and then click Next. 7. On the IP Address Assignment page, do one of the following:  If a DHCP server will be used to assign addresses to remote clients, click Automatically, and then click Next. Go to step 8. 72 | P a g e
  • 73.  To give remote clients addresses only from a pre-defined pool, click From a specified range of addresses. NOTE: In most cases, the DHCP option is simpler to administer. However, if DHCP is not available, you must specify a range of static addresses. Click Next. The wizard opens the Address Range Assignment page. Click New. In the Start IP address box, type the first IP address in the range of addresses that you want to use. In the End IP address box, type the last IP address in the range. Windows calculates the number of addresses automatically. Click OK to return to the Address Range Assignment page. Click Next. Accept the default setting of No, use Routing and Remote Access to authenticate connection requests, and then click Next. Click Finish to enable the Routing and Remote Access service and to configure the remote access server. After you set up the server to receive dial-up connections, set up a remote access client connection on the client workstation. Granting Users Access to Remote Access Servers You can use remote access policies to grant or deny authorization, based on criteria such as the time of day, day of the week, the user's membership in Windows Server 2003-based security groups, or the type of connection that is requested. If a remote access server is a member of a domain, you can configure these settings by using the user's domain account. If the server is a stand-alone server or a member of a workgroup, the user must have a local account on the remote access server. Grant Remote Access Rights to Individual User Accounts If you manage remote access on a user account basis, follow these steps to grant remote access rights: 1. Click Start, point to All Programs, point to Administrative Tools, and then click Active Directory Users and Computers. 2. Right-click the user account that you want to grant remote access rights to, click Properties, and then click the Dial-in tab. 3. Click Allow access to grant the user permission to dial in, and then click OK. 73 | P a g e
  • 74. Configure Remote Access Rights Based EXPERIMENT -14on Group Membership If you manage remote access on a group basis, follow these steps to grant remote access rights: 1. Create a group that contains members who are permitted to create VPN connections. 2. Click Start, point to EXPERIMENT -14Administrative Tools, and then click Routing and Remote Access. 3. In the console tree, expand Routing and Remote Access, expand the server name, and then click Remote Access Policies. 4. Right-click the right pane, point to New, and then click Remote Access Policy. 5. Click Next, type the policy name, and then click Next. 6. Click VPN for virtual private access, or click Dial-up for dial-up access, and then click Next. 7. Click Add, type the name of the group that you created in step 1, and then click Next. 8. Follow the on-screen instructions to complete the wizard. If the VPN server already permits dial-up networking remote access services, do not delete the default policy; instead, move it so that it is the last policy to be evaluated. To Establish a Remote Connection NOTE: Because there are several versions of Microsoft Windows, the following steps may be different on your computer. If they are, see your product documentation to complete these steps. 1. On the client workstation, click Start, click Network Connections, and then click the new connection that you created. 2. In the User Name box, type your user name. If the network to which you want to connect has multiple domains, you may have to specify a domain name. If this is the case, use the domain_nameuser name format in the User Name box. 3. In the Password box, type your password. 4. If you use a dial-up connection, check the phone number that is listed in the Dial box to RESULT :- Installing and configuring RAS server is successfully completed. 74 | P a g e
  • 75. EXPERIMENT -14 INSTALLATION AND CONFIGURATION OF RIS & WDS SERVICES Aim : To install and configure RIS Server and client images Requirements : 1. A computer running windows 2003 server Domain Controller, DHCP with Scope, DNS with Services records. 2. A computer with or without any Operating system. SYS1 SYS 1 Domain Controller / RIS Server IP Address 10 .0.0.1 SYS2 SYS2 RIS Client IP Address Subnet Mask 25 5.0 .0.0 Subnet Mask Preferred DNS 10 .0.0.1 10 .0.0.2 25 5.0 .0.0 Preferred DNS 10.0.0.1 75 | P a g e
  • 76. How to Install Remote Installation Services 1. Select Start  Settings  Control Panel. 2. In the Control Panel dialog box, double-click Add/Remove Programs. 3. In the Add/Remove Programs dialog box, click Add/Remove Windows Components. 4. In the Windows Components Wizard dialog box, scroll down until Remote Installation Services is displayed. Then check the box Remote installation Services and Click Next. How to take RIS Image of Windows Server 2003 operating system 1. Select Start  Administrative Tool  Remote Installation Service Setup. 76 | P a g e
  • 77. 2. Remote Installation Service Setup Wizard Will Start, Click Next. 3. In Remote Installation Folder location, Select the Path For New Share Folder, Click Next. 4. Initial Setting Page, Check for Respond to the Client Computers Requesting for services, Click Next. 77 | P a g e
  • 78. 5. Enter the Path of the C.D Rom Of the 2003 Operating System. Click Next And Finish. 6. Name of your folder 78 | P a g e
  • 79. 7. Friendly Description 8. Verify your settings 79 | P a g e
  • 80. 9. Click Finish 10. Click done 80 | P a g e
  • 81. Verification 1. Boot the Client system With Bootable Floppy or Bootable C.D If it is not PXE NIC 2. Press F12 key when prompted to start the Installation from RIS server. 3. Then mention the Administrator Credentials & follow the instructions. How to Create Answer file for RIS Client 1. Insert The CD of Windows 2003 Server. 2. Open the CD follow the path SUPPORTTOOLSDEPLOY.CAB and Extract the ETUPMGR.EXE file to Desktop. 3. Then Open the file SETUPMGR.EXE and follow the wizard. 4. Select create a new file Click Next. 81 | P a g e
  • 82. 5. Select Remote Installation Service Click Next. 6. Select the operating System you want to install. 7. Select Fully Automated, Click Next. 82 | P a g e
  • 83. 8. Accept the License Agreement, Click Next. 9. Answer the rest of the Wizard. 83 | P a g e
  • 84. 84 | P a g e
  • 85. 10. In Setup Information File Text Give the Name of the Image Click Finish. 11. Then Save the file as remboot.sif in the RIS share folder(Remote InstallSetupEnglishImageswindowsi386templates). 85 | P a g e
  • 86. Installation of WINDOWS DEPLOYMENT SERVICES Go to add or remove components in control panel and choose windows deployment services and click ok , a Services setup wizard will begin. Click “Next” option and give the path to setup the service. 86 | P a g e
  • 87. Wait for few minutes and setup will complete the wizard. When finished, you'll have a "Legacy" RIS server. To manage RIS, you'll need to have the Active Directory Users and Computers snap-in installed. Then right-click your server and select properties, then the Remote Install tab. On the images tab, you'll see our "Windows Server 2003, Enterprise" present under description. 87 | P a g e
  • 88. Now, we'll configure the new WDS, by going to the Windows Deployment Services (withOUT "Legacy") in Start /Run /Administrative Tools. This will open the WDS management console. When you expand "Servers" you'll see an icon with your servers name. There will be a yellow bang (!) triangle, indicating the server is not yet configured. If your server is not there, right click the "Servers" node and follow the prompts to add it. To configure your server, right click on it and select "Configure Server" which will display the Welcome Page of the WDS Configuration Wizard, with the WDS requirements. 88 | P a g e
  • 89. The next page will display our Remote Installation Folder Location, set previously, DRemoteInstall and select Next, Leave the box checked and select Finish. You then browse to the location of your boot.wim and install.wim files on the Vista DVD. If your DVD is on F: you'll configure this page as below. WDS is looking for the "Sources" folder which contains the WIM files. 89 | P a g e
  • 90. If you select "click here" on the pane shown above, the WDS help files will be opened, since adding the image files will take a few minutes, now's a good time to look. This help file is an outstanding resource for performing installations of Windows, you'll want to be sure to review it carefully if deployments are of interest to you. Its default location is %SystemRoot%Helpwds.chm. After the images are loaded, you'll be prompted to complete, and your WDS console (with the folders expanded) will look like this. Notice our "VistaImages." You can include as many images into this group as you like, or create more descriptive groups with their install images. We can change the name, by right-clicking on the folder. 90 | P a g e
  • 91. Now we have done with loading images in DEPLOYMENT SERVICE MANAGER. VERIFICATION OF DEPLOYMENT SERVICES Now we're ready to begin installation on a network attached system. You may need to modify the machine's BIOS setting so it will boot from the Preboot Execution Environment ("PXE") network card installed. Most modern NICs are PXE-enabled, but you may need to install one if not. On boot up, you should see the following After pressing F12, you'll be presented with the following options (RIS is the debault) 91 | P a g e
  • 92. you'll then be presented with the Client Installation Wizard, an you're on your way to installing Windows 2003 server. Result: Installing and configuring of RIS server, WDS and Client images is successfully completed. 92 | P a g e