3. Date
OPERATING A PRESENTATION PACKAGE
Page #
Version No. 01 i
HOW TO USE THIS MODULE
Welcome to the Module PC Operations. This module contains training materials and activities for you to complete.
The unit of competency Operate a Presentation Package contains the knowledge, skills and attitudes required for a PC OPERATIONS (NC) Level II.
You are required to go through a series of learning activities in order to complete each of the learning outcomes of the module. Most learning outcome has Information Sheets, Job Sheets, Operation Sheets and Activity Sheets. Follow these activities on your own and answer the Self-Check at the end of each learning activity.
If you have questions, don’t hesitate to ask your teacher for assistance.
Recognition of Prior Learning (RPL)
You have already some basic knowledge and skills covered in this module because you have been working for some time; and already completed training in this area.
If you can demonstrate competence to your teacher in a particular skill, talk to your teacher so you don’t have to undergo the same training again. If you have a qualification or Certificate of Competency from previous trainings show it to him/her. If the skills you acquired are consistent with and relevant to this module, they become part of the evidence. You can present these for RPL. If you are not sure about your competence skills, discuss this with your teacher.
After completing this module, ask your teacher to assess your competence. Result of your assessment will be recorded in your competency profile. All the learning activities are designed for you to complete at your own pace.
In this module, you will find the activities for you to complete and relevant information sheets for each learning outcome. Each learning outcome may have more than one learning activity.
4. Date LO 2. CUSTOMIZE BASIC SETTINGS Page #
Version No. 01 OPERATING A PRESENTATION PACKAGE 2
Program/Course:
PC OPERATIONS NC II
Unit of Competency:
OPERATE A PRESENTATION PACKAGE
Module Title:
Operating a Presentation Package
INTRODUCTION:
This module contains information and suggested learning activities on PC OPERATIONS NC II. It includes instructions and procedure on how Operate a Presentation Package.
Completion of this module will help you better understand the succeeding module on Creating Presentations, customizing basic settings, formatting Presentation, adding slideshow effects and print presentation and notes.
This module consists of five (5) learning outcomes. Each learning outcome contains learning activities supported by instruction sheets. Before you perform the instructions, read the information sheets and answer the self-check and activities provided to ascertain to yourself and your peer/teacher that you have acquired the knowledge necessary to perform the skill portion of the particular learning outcome.
Upon completing this module, report to your instructor for assessment to check your achievement of knowledge and skills requirements of this module. If you pass the assessment, you will be given a certificate of completion.
SUMMARY OF LEARNING OUTCOMES:
Upon completion of the module, the students should be able to:
LO 1. Create Presentations
LO 2. Customize Basic Settings
LO 3. Format Presentation
LO 4. Add Slideshow Effects
LO 5. Print Presentation and Notes
5. Date LO 2. CUSTOMIZE BASIC SETTINGS Page #
Version No. 01 OPERATING A PRESENTATION PACKAGE 3
ASSESSMENT CRITERIA:
LO 1. Create Presentations
1. A simple design is created according to organizational requirements.
2. Text and symbols are added to a blank presentation.
3. Presentation templates and slides are used to create a presentation.
4. Various formatting tools are used to improve the look of the presentation.
5. Presentations are saved in correct folder.
LO 2. Customize Basic Settings
1. Display is adjusted to meet user requirements.
2. Different toolbars are opened and viewed to select options.
3. Font settings are appropriate for the purpose of the presentation.
4. Appropriate slide layout, color schemes, background and design templates are selected.
LO 3. Format Presentation
1. Charts, graphs, bulleted lists are used and modified as required.
2. Objects are inserted/imported and manipulated to meet presentation requirements.
3. Slide layouts are modified including text and colors to meet presentation requirements.
4. Formatting tools are used as required.
5. Slides are added, deleted, duplicated and rearranged to suit presentation needs.
6. Presentation is closed and saved to disk and/or in another format.
LO 4. Add Slide Show Effects
1. Animation and multimedia effects are incorporated into presentation to enhance the presentation.
2. Slide transition effects are added to ensure smooth progression through the presentation.
3. Presentation is tested for correct sequence and overall impact.
4. Onscreen navigation tools are used to start and stop slide show or move between different slides.
6. Date LO 2. CUSTOMIZE BASIC SETTINGS Page #
Version No. 01 OPERATING A PRESENTATION PACKAGE 4
LO 5. Print Presentation and Notes
1. Appropriate print format is selected.
2. Preferred slide orientation and various notes, handouts and color options are selected before printing.
3. Slides are previewed and contents are spell checked.
4. Selected slides, notes and handouts are printed and submitted to appropriate person for feedback.
PREREQUISITES
None
7. Date LO 2. CUSTOMIZE BASIC SETTINGS Page #
Version No. 01 OPERATING A PRESENTATION PACKAGE 5
TECHNICAL TERMS
Terminology
Description
Title bar
The toolbar that displays the name of the document and the program you are working with
Menu bar
Displays the menus with all the commands and groups needed in making a presentation
Toolbars
Contains commands that are frequently used for ease access
Window
Displays the contents of the active cell.
Presentation window
Toggles (switches back and forth) between and among types of views of the presentation that you are working on
Task pane
Lists the names of the menus in presentation.
Maximize button
Sets the screen to its optimum size
Status bar
Displays the address of the active slide or slide number and the number of slides in a presentation
Slide pane
Is a small pop-up box on the left side of the screen that displays the preview of all the slides created
Notes pane
Used to insert a guide in speaking/comments and explanations about a word or words in a slide
Minimize button
Reduces the screen size to a program icon in the task bar
Close button
Used to turn off/exit the application window
8. Date LO 2. CUSTOMIZE BASIC SETTINGS Page #
Version No. 01 OPERATING A PRESENTATION PACKAGE 6
INFORMATION SHEET 1.1
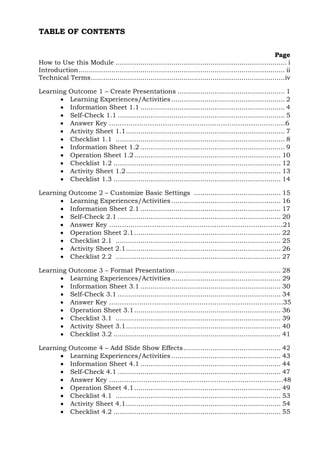
EXPLORING THE POWERPOINT WINDOW
On the Presentation software, you can create overhead slides, speaker notes, audience handouts, and outlines—all in a single presentation file. PowerPoint offers powerful tools to help you create and organize a step by step presentation. In this lesson, you will learn how to get started with PowerPoint, explore the PowerPoint window, and choose a method on how to start a presentation, create a presentation using the AutoContent Wizard as well as save your work.
When the PowerPoint opens, it displays the program window. As with any Microsoft Windows XP program, you can adjust the size of the PowerPoint and presentation windows with the Minimize and Restore Down/Maximize buttons, and you can close PowerPoint or the presentation window with the Close button.
At the right side of the PowerPoint window is the task pane. Task panes let you work with commands without having to display menus or use toolbar buttons. Some task panes display automatically. You can quickly switch from one task pane to another by clicking the Other Task Panes down arrow on any task pane to display the other task panes. When you’ve with a task pane, click the Close button to hide it.
Slide
Menu bar
Toolbar
Outline/Slides Pane
Notes Pane
Slide view tab
Status bar
Type a Question Box
Other Task pane
Task pane
9. Date LO 2. CUSTOMIZE BASIC SETTINGS Page #
Version No. 01 OPERATING A PRESENTATION PACKAGE 7
ACTIVITY SHEET 1.1
EXPLORING THE POWERPOINT WINDOW
Directions: Do the following procedure as directed.
1. On the taskbar, click Start and the Start menu appears.
2. On the Start menu, point to All Programs and the Programs menu appear displaying all the programs on your hard disk drive including Microsoft Office where MS PowerPoint is located.
3. Move your mouse pointer over MS PowerPoint and click it to open the PowerPoint presentation window.
4. Point to the Insert Chart button on the Standard toolbar for a few seconds. A ScreenTip appears displaying the words Insert Chart.
5. Click on the New Slide button on the Formatting toolbar to add another slide. Notice the change that happened to the Task bar when you click it.
6. Choose Title, Text and Clip Art Slide Layout.
7. Type your name to the Click to add text portion of the slide.
8. Click Slide show from current slide on the Slide view tab.
9. Press Esc key when done.
NOTE: Use Observation Checklist no. 1 EXPLORING PRESENTATION WINDOW to assess the performed task.
10. Date LO 2. CUSTOMIZE BASIC SETTINGS Page #
Version No. 01 OPERATING A PRESENTATION PACKAGE 8
Creating and Saving Presentation
The New Presentation task pane can help you work with existing presentations as well as create new ones. If you have already created a presentation, you will find its name listed in the Open a presentation section of the task pane. If you want to create a new presentation, you can simply start adding text to the blank presentation in the Slide pane or use the options in the New section of the task pane.
Three methods to start a new Presentation:
Click Blank Presentation to start a new presentation from scratch.
Click From Design Template/installed templates to apply one of PowerPoint’s design templates to a new, blank presentation.
Click From AutoContent Wizard/installed themes to let PowerPoint help you with both presentation content and a design.
The work you have accomplished so far is stored only in your computer’s temporary memory. To save your work for further use, you must give the presentation a name and store it on your computer’s hard disk drive or any removable storage devices. The first time you save a new presentation, the Save As dialog box opens when you choose the Save command. In the Save As dialog box, you can type the name of the presentation and choose where to save it. Once you name a presentation, you can save changes you made by clicking the Save button on the Standard toolbar or by selecting Save on the File menu. In other words, the newer version overwrites the original version. If you want to keep both the original file and the edited version, you can choose the Save As command on the File menu to save the edited version with another file name.
11. Date LO 2. CUSTOMIZE BASIC SETTINGS Page #
Version No. 01 OPERATING A PRESENTATION PACKAGE 9
OPERATION SHEET 1.2 CREATING AND SAVING A PRESENTATION Objective: In this activity, you start Microsoft PowerPoint from a Blank Presentation. Procedure:
1. On the Windows taskbar, click the Start button, point to All Programs/Microsoft Office, and click Microsoft PowerPoint. PowerPoint opens a blank slide ready for you to use.
2. Click on the Click to add title and type MY FIRST PRESENTATION as the title of your sample presentation.
3. Click on the Click to add subtitle to type your name for your sample presentation.
4. Click Insert/New Slide (Ctrl+M) or click the New Slide button on the
toolbar to add a
new slide.
5. Click on the Click to add title and type MY FIRST DAY IN SCHOOL as the title of the second slide.
6. Click on the Click to add text to type a short paragraph on your first day in school as the content (you can use texts and symbols) of the second slide.
7. Repeat steps 4 to 6 when adding a new slide to continue.
8. On the menu bar, click File/New and click the New From Design template on the Task pane.
12. Date LO 2. CUSTOMIZE BASIC SETTINGS Page #
Version No. 01 OPERATING A PRESENTATION PACKAGE 10
9. Select a desired design from the Apply a design template on the taskbar and repeat steps 2 to 7.
10. On the menu bar, click File/New and click the New From AutoContent wizard.. on the Task pane.
11. Click Next to start the wizard and select a presentation type then click the Next button.
12. Click Next to select the On-screen presentation then click Next again to go to the Presentation options and type the presentation title MY FIRST DAY IN SCHOOL then click Finish.
13. Save the presentations to the correct folder.
13. Date LO 2. CUSTOMIZE BASIC SETTINGS Page #
Version No. 01 OPERATING A PRESENTATION PACKAGE 11
INFORMATION SHEET 2.1 Customizing Basic Settings After opening the Presentation window, you can customize the basic settings in order to help the user easily use the different toolbars, font settings, and different slide format for creating a slide presentation that is appropriate for the given task. When you start a PowerPoint presentation, the Menu bar appears on the next row with the Title bar to save window space and only the most frequently used commands appear on the quick access toolbar. Remember that the toolbars on your computer might display buttons different from the ones shown in the figures in this lesson that is why you have to familiarize yourself with the different versions of Microsoft PowerPoint. To display the rest of the commands on either toolbar, right click the Menu bar where you will see 3 options which help you add commonly used command buttons to the quick access toolbar. The moment you use a button on the Toolbar Options list, it replaces a less frequently used button on the visible part of the toolbar.
The PowerPoint uses personalized menus and toolbars. When you click a menu name, a short menu appears. This short menu contains the most commonly used commands. To make the full long menu appear, you may leave the pointer over the menu name for several seconds, you may double-click the menu name, or you may click the menu name and then click the small double arrow at the bottom of the short menu.
14. Date LO 2. CUSTOMIZE BASIC SETTINGS Page #
Version No. 01 OPERATING A PRESENTATION PACKAGE 12
You can use different font styles, font size, font type, and font effects necessary for your desired presentation in order to enhance the appearance of the slides. In order to do this, click on the Home menu or tab/Font Group to change the settings.
To further enhance the look of your presentation, you can change the format of your slides to fit the layout that is appropriate to the type of presentation of your choice. Furthermore, you can also change the slide designs and background to make the slides appealing to your audience. In this way, you will sustain the interest of your audience. All of these enhancements can be found in the Home menu.
PowerPoint comes with two special slides which is the Slide Master and the Title Master. Thus, it is possible to create more than one Slide Master or Title Master within a presentation. This is useful in creating separate sections within the same presentation. To create several masters within a presentation, you can insert a new Slide Master and Title Master in a presentation or you can apply more than one template to your presentation.
15. Date LO 2. CUSTOMIZE BASIC SETTINGS Page #
Version No. 01 OPERATING A PRESENTATION PACKAGE 13
The Slide Master controls the properties of each slide in the presentation. All the qualities of the Slide Master (background color, text color, font, and font size) appear on every slide in the presentation. Changing the appearance of the Slide Master affects every slide in a presentation. For example, you may want to include a logo or other artwork or even the date on every slide. You may do this by simply placing it on the Slide Master. This is helpful for the Slide Master contains master placeholders for title text, paragraph text, date and time, footer information, and slide numbers. The master title and text placeholders manage the text format for every slide in a presentation; therefore, if you want to make changes throughout your presentation, you should change each slide master or pair of masters.
16. Date LO 2. CUSTOMIZE BASIC SETTINGS Page #
Version No. 01 OPERATING A PRESENTATION PACKAGE 14
OPERATION SHEET 2.1 Title: CUSTOMIZE BASIC SETTINGS Objective: In this activity, you will customize the basic settings in a PowerPoint presentation window display. Procedure:
1. Click the Start button on your Windows taskbar, point to All Programs and locate Microsoft PowerPoint, then open an activity entitled MY FIRST DAY IN SCHOOL.
2. Click Tools/Customize on the menu bar to open the Customize dialog box and tick the box for Show Standard and Formatting toolbars on two rows under the Option tab.
17. Date LO 2. CUSTOMIZE BASIC SETTINGS Page #
Version No. 01 OPERATING A PRESENTATION PACKAGE 15
3. Select a desired view for your presentation by clicking the Outline view or Slide view tab on the Slide pane of the presentation window.
4. Select a slide sub-title then click Format/Font on the menu bar to open the Font dialog box and make the desired font adjustments.
5. Click the Format menu and change the Slide Design, Background, and Slide Layout of your presentation.
Slide Pane
18. Date LO 2. CUSTOMIZE BASIC SETTINGS Page #
Version No. 01 OPERATING A PRESENTATION PACKAGE 16
6. Select Master/Slide Master under the View menu to insert a logo to appear on all slides.
7. Click File/Save As and save it on your folder as CUSTOMIZED SETTINGS.
19. Date LO 2. CUSTOMIZE BASIC SETTINGS Page #
Version No. 01 OPERATING A PRESENTATION PACKAGE 17
ACTIVITY SHEET 2.1
LO 2. Customize Basic Settings
Directions: Do the following procedure as directed.
1. Open Microsoft PowerPoint by clicking Start/All Programs/Microsoft Office from the Taskbar.
2. On the Title Slide, type FIGURES OF SPEECH and then type your Full Name in the subtitle.
3. Select Master/Slide Master on the View menu to insert date in the Date Area and the Slide Title in the Footer Area.
4. Insert other slides and continue typing the contents of your presentation.
5. Select the appropriate Layout for each slide.
6. Select a desired Design and modify the necessary Background color.
7. Make necessary enhancements for the Font type, style, size, and effects.
8. Save the presentation as REPORT in your folder.
20. Date LO 4. ADD SLIDE SHOW EFFECTS Page #
Version No. 01 OPERATING A PRESENTATION PACKAGE 18
INFORMATION SHEET 3.1 Formatting a Presentation and Saving in Different Format In order to help you communicate your message in a variety of ways, you can include different types of data:
1. Text,
2. Images,
3. Graphics
4. numerical information
into your PowerPoint presentation. The most direct way of doing this is to copy and paste information such as texts, objects, and slides within a presentation, among presentations, and into other application programs. Another way of inserting information into a PowerPoint presentation is to use commands on the Insert menu. These commands allow you to insert
1. clip art,
2. picture,
3. photo album
4. smart art,
5. chart,
6. shapes,
When inserting clip art, tables, and other information to your PowerPoint presentation, you normally need to revise the slide layout. If you modify the layout of a slide but then decide that you rather use the original slide layout, you can reapply it by using the Slide Layout command. You may also do this by changing the current slide layout or by selecting a new layout from the Layout command in Home menu.
PowerPoint enables you to insert other graphics, scan photographs, art, photos or objects from a CD-ROM or other removable media into a slide. Using the Picture command on the Insert menu, you may specify the source of the picture, as in From File or Disks.
21. Date LO 4. ADD SLIDE SHOW EFFECTS Page #
Version No. 01 OPERATING A PRESENTATION PACKAGE 19
To add pictures from file on your hard drive, removable disks, or a network, you may use the From File command on the Picture submenu. On the other hand, you may also add a picture from the clip art collection that comes with PowerPoint by selecting the Clip Art command, which opens the Insert ClipArt task pane where you can search for clip arts. You can scan and insert a picture using the From Scanner or Camera command if you have a scanner connected to the computer you are using. The moment you insert clip arts or any graphics into your document, you can modify them by using the Picture toolbar.
You can improve the images by clicking the brightness, contrast, and other options. Then after making changes, you can click the Reset Picture button on the Picture toolbar to reverse all the changes you’ve made. Occasionally, you need only a portion of a picture in the presentation. Using the Crop button on the Picture toolbar, you can mask portions of a picture that you don’t want to show on the screen. Furthermore, you can also select a picture to rotate by positioning the pointer (which changes to the Free Rotate pointer) over the green rotate lever on top of the object, and then drag in order to rotate the object to any angle.
A table organizes information accurately into rows and columns. You can construct a table with standard-sized cells, or draw a custom table with various-sized cells. After you create a table, you can enter text into the cells as you would in a paragraph except when you are using the Tab key because this moves the insertion point from cell to cell instead of indenting the text. The first row in the table is usually used for column headings and the leftmost column is ideal for row labels. You can change and format individual cells as well as the entire table. You can merge or combine cells to form one long cell to accommodate the texts that you enter in the table. This is useful if you wish to spread the text across the top of a table. You can also split a cell into two and you can add color, add borders, and change
22. Date LO 4. ADD SLIDE SHOW EFFECTS Page #
Version No. 01 OPERATING A PRESENTATION PACKAGE 20
text alignment in a table by using the Formatting, and the Tables and Borders toolbars.
PowerPoint makes the process of inserting an Excel chart into a presentation easier by embedding the chart as an object in the slide. An embedded object is an object that maintains a direct connection to its original program, known as the source program. After inserting an embedded object, you can simply do editions by double-clicking it. By doing so will open the program in which it was originally created.
To further give your presentation an enhanced appearance, you can also insert fancy or stylized text into it using WordArt. WordArt allows you to insert visual enhancements to your text that go beyond changing a font or font size. Majority of the users apply WordArt to give emphasis to short phrases or to a single word. You can insert stylized text by simply clicking the Insert WordArt button on the Drawing toolbar or click the Insert/Picture/WordArt on the menu bar and then selecting a style.
23. Date LO 4. ADD SLIDE SHOW EFFECTS Page #
Version No. 01 OPERATING A PRESENTATION PACKAGE 21
There are times where you have to save your presentation in different format in order to meet the users need. By using the File/Save As menu gives you the options to save it as
1. a PowerPoint Presentation file (ppt) = where you can open and edit your presentation in MS-PowerPoint,
2. a PowerPoint Show file (pps)= where you can open your presentation in slideshow mode.
3. Or ppt of lower version,
In addition, you can also save your presentation as :
1. A webpage or package to CD in order to open it in a computer with Windows 98 2nd Edition or later even without MS-PowerPoint installed on it.
24. Date LO 4. ADD SLIDE SHOW EFFECTS Page #
Version No. 01 OPERATING A PRESENTATION PACKAGE 22
OPERATION SHEET 3.1 FORMATTING A PRESENTATION AND SAVING IN DIFFERENT FORMAT Objective: In this activity, you will customize the basic settings in a PowerPoint presentation window display. Procedure:
1. Open your presentation entitled REPORT.
2. Click Slide Design on the Format menu to open the Slide Design task pane.
3. Under the Apply a design template, select a desired design for your presentation.
4. On the Format menu, click Background to open the
Background
dialog box.
5. Click the Background fill drop down arrow and click Fill Effects.
6. On the Gradient tab of the Fill Effects dialog box, tick the Two Colors option and select desired colors.
25. Date LO 4. ADD SLIDE SHOW EFFECTS Page #
Version No. 01 OPERATING A PRESENTATION PACKAGE 23
7. Tick on the Shading styles option, select a desired variant and click OK.
8. Click Apply on the Background dialog box if you want to apply the fill effect to the current slide or Apply to All if you want to apply the fill effect to all slides.
9. Select the Title placeholder on the first slide and click the Font color drop down arrow on the Formatting toolbar or Drawing toolbar to change the color to a desired color (as in yellow).
10. Select the second slide and click Insert/Picture/Clip Art to open the Clip Art task pane.
11. Click Organize clips to open the Microsoft Clip Organizer and click the plus (+) sign on Office Collections to expand the picture category and select an appropriate picture for the slide.
12. Select the picture to show the Picture toolbar (right-click the picture and click Show Picture toolbar if it is not shown).
13. Adjust the contrast, brightness and color of the picture to suit your needs. (You can crop the picture as needed).
14. Select another slide(s) to insert another picture, object, or table as in step #10.
15. Select the last slide and click the New Slide icon on the Formatting toolbar and select a blank layout.
Title Placeholder
26. Date LO 4. ADD SLIDE SHOW EFFECTS Page #
Version No. 01 OPERATING A PRESENTATION PACKAGE 24
16. Click the Insert WordArt icon on the Drawing toolbar to open the WordArt Gallery.
17. Select a WordArt style and click OK.
18. Type END OF SHOW and click OK.
19. Point the tip of the mouse pointer on the corner edge of the WordArt to turn into a double arrow then click and drag the selection to resize the object.
20. Click Save As under the File menu to open the Save As dialog box.
21. In the Save in box, select the folder where you want to save the presentation then click the File name box and type FORMATTED REPORT.
22. Click the drop-down arrow on the Save as type box to select PowerPoint Show then click Save.
27. Date LO 4. ADD SLIDE SHOW EFFECTS Page #
Version No. 01 OPERATING A PRESENTATION PACKAGE 25
INFORMATION SHEET 4.1
Adding Slide Show Effects
Animation plays a major part in a presentation in the sense that it enhances a simple story to create a visual impression. Animations are the effects that you call when an object move within a slide. It is normally used to add focus on important points thereby creating interest to your presentation. The most exciting part is when you can animate text, graphics, diagrams, charts, and other objects on your slides.
Animations are of three kinds: subtle, moderate, and exciting. In saying this, there are two ways of animating objects. One is by means of animation scheme and another is by means of custom animation. Animation scheme gives you one-click access to professionally designed animations while Custom animation is applying a personalized animation for each object or texts. Custom animation on the other hand, gives full control of the slide show. Moreover, different effects can be adjusted for the slides. Aside from these, transition effects help your presentation make more enhanced by varying the way one slide replaces another. It is a visual effect of slides as it moves on and off the screen during a slide show. You can set a transition for a slide or group of slides by selecting the slides in Slide Sorter view or in Normal view. You can also set the time between slides, the direction of transition, and when the transition will take place.
To apply Animation Scheme to a presentation, follow the following procedure:
1. While on the normal view, click to select the slide(s) where you want to apply animation.
2. Click Slide Show on the menu bar, then click animation scheme.
Animation Scheme
28. Date LO 4. ADD SLIDE SHOW EFFECTS Page #
Version No. 01 OPERATING A PRESENTATION PACKAGE 26
3. Choose and click the animation you want to apply.
Click Play button if you want to preview how the animation work.
Click Slide Show button to watch a full screen preview with the animation you choose in effect.
To apply the animation scheme to all slides, click Apply to all Slide button.
To apply Custom Animation, the steps are:
1. From the normal view, select the placeholder where the effect will be applied.
2. From the Slide Show menu, click on Custom Animation.
29. Date LO 4. ADD SLIDE SHOW EFFECTS Page #
Version No. 01 OPERATING A PRESENTATION PACKAGE 27
3. In the Custom Animation, click Add Effect and do one or more of the following:
Point to Entrance then click the effect desired for the text or object.
Point to Emphasis then clicks an effect desired for the text or an object.
Point to Exit then click an effect desired for the text or an object that makes it leave the slides at some point and disappear.
Point to Motion Paths to add a motion path for the animation.
To apply Slide Transition, follow these steps:
1. From the Normal view or Slide Sorter view, select a slide.
2. From the Slide Show menu, click Slide Transition to open the Slide Transition task pane and its options.
3. Select a transition from the selections under Apply to selected slides.
4. Click the Slide Show button to preview the transition effect of the slide.
5. Press Esc key to end the slide show.
6. Under the Modify transition, click the Speed down arrow to select a slower effect. You can also click the Sound down arrow to insert a sound for the current slide.
7. Click the Slide Show button again to preview the slide transition and press Esc key to end the show.
30. Date LO 4. ADD SLIDE SHOW EFFECTS Page #
Version No. 01 OPERATING A PRESENTATION PACKAGE 28
OPERATION SHEET 4.1 ADDING SLIDE SHOW EFFECTS Objective: In this activity, you will add slide show effects in a PowerPoint presentation. Procedure:
1. Open your PowerPoint presentation activity entitled ATOMS.
2. Click Slide Transition under the Slide Show menu to open the Slide Transition task pane.
3. Under Apply to selected slides, select a desired transition effects for the slide(s).
4. Click the Speed drop-down arrow under Modify transition then click the Sounds drop-down arrow if you want to add sound for the slide.
5. Click another slide to do the same step if you want to create different effects or you can click Apply to All Slides.
31. Date LO 4. ADD SLIDE SHOW EFFECTS Page #
Version No. 01 OPERATING A PRESENTATION PACKAGE 29
6. Select the Title placeholder then click Custom Animation under the Slide Show menu to open the Custom Animation task pane.
7. Under the Custom Animation task pane, click Add Effect/Entrance/More Effects to open the Add Entrance Effect tool box.
8. Select an animation effect from Basic, Subtle, Moderate, and Exciting type and make sure that the Preview Effect box is checked to see the effect then click OK to apply.
9. Click the Start drop-down arrow to select how the effects appear on the slides.
32. Date LO 4. ADD SLIDE SHOW EFFECTS Page #
Version No. 01 OPERATING A PRESENTATION PACKAGE 30
10.Click Slide Show to preview the presentation.
11.Repeat steps 6 – 9 for animating other texts and objects.
12.Click Insert/Movies and Sounds/Sound from File to locate sound file from your computer or removable media.
13.Select Action Buttons from the Slide Show menu to choose an action button.
14.Click and drag somewhere on the slide to draw the button. The Action Settings dialog will appear.
33. Date LO 4. ADD SLIDE SHOW EFFECTS Page #
Version No. 01 OPERATING A PRESENTATION PACKAGE 31
15.Click the Hyperlink to drop-down arrow and select slide. The Hyperlink to Slide dialog box will appear.
16.Select Slide 3 and click OK. Click OK again to apply the action settings.
17.Click Slide Show to test the action button.
18.Repeat Steps 13 – 17 to apply it to other slides.
19.Click Set Up Show under the Slide Show menu to open the Set Up Show dialog box.
20.Click Browsed at a kiosk under Show type then click OK.
34. Date LO 4. ADD SLIDE SHOW EFFECTS Page #
Version No. 01 OPERATING A PRESENTATION PACKAGE 32
35. INFORMATION SHEET 5.1 Print Presentation and Notes In PowerPoint, you can print your presentation in several ways: as slides, speaker notes, audience handouts, or an outline. PowerPoint detects the type of printer that you chose either color or black and white. It prints the appropriate version of the presentation. If you decide on using a black and white printer, your presentation will be set to print in grayscale. Based on the settings in the Print dialog box, PowerPoint prints slides and supplements. You can set the print range to define which slides to print. You can select to print multiple copies of a presentation, and you can choose to collate the presentation as you print if you want to print more than one copy of each slide. When you decide to collate the presentation, PowerPoint prints a complete copy before printing the next copy. You can also have the option to Preview any changes you made by selecting the Preview button in the Print dialog box. Setting Print Options:
1. On the File menu, click Page Setup. A dialog box appears as shown.
2. In the Slide sized for list box, click the options you want.
3. If you click Custom, enter the measurements you want in the width and height boxes.
4. Click the Print Preview button to see what your slides will look like when printed.
5. On the Print Preview toolbar, click Print. A dialog box appears as shown.
36. PARTS OF THE PRINT DIALOG BOX
1. Printer – allows you to choose the printer installed in your computer.
2. Print Range – is used to specify the specific slides or range to be printed.
3. Print what – allows choosing what to be printed such as: Slides, Hand- outs, or Outline.
4. Color Gray Scale – allows to choose from colored or black and white print out.
5. Preview – views what the output will be when printed.
6. Scale to Fit Paper – is used to decrease the size of the slide.
7. Print Comments and ink markup– is used to print any comments that you’ve inserted throughout the presentation.
8. Frame Slides – is used to print a border around each slide.
9. Print Hidden Slides –prints hidden slides.
10. Collate – collates (1,2,3, 1,2,3) each printed copy instead of printing all the copies of each page at once (1,1, 2,2, 3,3…)
11. Copies –sets the number of copies to be printed.
12. Print to file – is used to send the output to a file rather than to your printer.
ADDING AND PRINTING NOTES
Notes are very vital because they help you to remember what to say about each slide when you deliver a presentation. Notes are like cue cards that you use when you deliver a speech. They also remind you to tell a joke, make eye contact and include any key points that you want to make. Notes don’t appear in the slide presentation itself, but they can be printed so that you can use them whenever you deliver a presentation.
Here are the procedures in adding Notes to your slides:
37. 1. If you are not in the Normal view, click View on the menu bar, and then click Normal.
2. Select the slides for which you want to add a note.
3. Click, then type the note that you need.
4. Click the Print Preview button to view the notes when printed.
PREPARING HANDOUTS AND NOTES FOR PRINTING Handouts are the miniature pictures of your slides. In order to prepare them, a layout should be made first. The Handout Master can be used to view and select the handout layouts. Procedure in Using the Handout Master
1. Open a saved presentation.
2. From any slide, choose View/Master/Handout Master to open the master as shown in the figure below.
38. OPERATION SHEET 5.1
PRINT PRESENTATION AND NOTES
Objective: In this activity, you will add slide show effects in a PowerPoint presentation.
Procedure:
1. Open a saved PowerPoint activity from your folder.
2. Click Print from the File menu to open the Print dialog box.
3. Click Properties to select the paper size and orientation then click OK.
4. Click Print what option to select the type of presentation to print.
5. Click the Color option, if needed to change the color.
6. Set the number of copies to print.
7. Click OK to continue printing the presentation.