Scanning Instructions
•
0 likes•282 views

Handout from Amy's class on Scanning at Staff Development Day 2013

Recommended
More Related Content
Similar to Scanning Instructions
Similar to Scanning Instructions (20)
More from rowanpubliclibrary
Recently uploaded
Recently uploaded (20)
Scanning Instructions
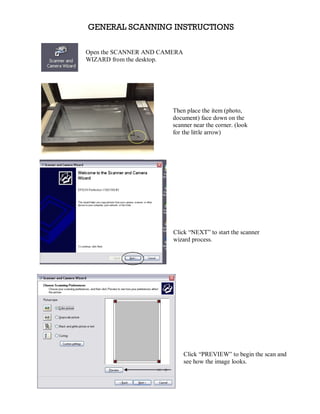
- 1. GENERAL SCANNING INSTRUCTIONS Open the SCANNER AND CAMERA WIZARD from the desktop. Then place the item (photo, document) face down on the scanner near the corner. (look for the little arrow) Click “NEXT” to start the scanner wizard process. Click “PREVIEW” to begin the scan and see how the image looks.
- 2. Use red boxes in corners to add space around edges if needed. If you don’t like the way it looks, you can reposition the item, then click “PREVIEW” again. Once you’re satisfied with the image preview, click “NEXT.”
- 3. Choose a name and file format. The default in the lab is My Pictures/Picture. Click “NEXT.” The file is scanned and saved. The scanner will make some noise as it scans.
- 4. When finished, you will get this screen. If you have more items to scan, click “BACK.” If you don’t have more items to scan, click “NEXT”. Click on the file name to view file. Or click “FINISH” Remember to remove originals from scanner!