SlideShare a Scribd company logo
1 of 180
Download to read offline
✔ Filters ✔ Layers ✔ Tools ✔ Actions ✔ Settings ✔ Techniques

Photoshop
5 Minute Tips Fixes
volume

01

®

Improve photos and work faster in Photoshop
Master
retouching

Enhance your
portraits

Get
creative
T nsform
ra
photos with
Filter effects

Advice for all versions of Photoshop and Photoshop Elements
Welcome to

Photoshop
5 Minute Tips Fixes
P

hotoshop is an amazing piece of software that lets us do
practically anything with our digital photos. It's easy to get
lost for hours, playing around with the tools, tweaking and creating
masterpieces. Sometimes, however, you just want to open the program,
make the change you need and be finished in minutes.
That's exactly what this book is for: making quick fixes and adding creative
effects to your photos. Every project in this book can be completed in just
five minutes, and there are in-depth guides to Photoshop's essential tools
so that you can get more comfortable with using them in a flash. We also
look at how you can use automated options to speed up your workflow,
as well as customise Photoshop to work exactly as you need it.
With over 160 pages of tips, tricks and fixes, it's the ultimate timesaving
guide to Photoshop and Photoshop Elements.

Enjoy the book.
®
Imagine Publishing Ltd
Richmond House
33 Richmond Hill
Bournemouth
Dorset BH2 6EZ
% +44 (0) 1202 586200
Website: www.imagine-publishing.co.uk

Editor in Chief
Jo Cole
Editor
Julie Bassett
Design
Danielle Dixon
Printed by
William Gibbons, 26 Planetary Road, Willenhall, West Midlands, WV13 3XT
Distributed in the UK & Eire by
Imagine Publishing Ltd, www.imagineshop.co.uk. Tel 01202 586200
Distributed in Australia by
Gordon & Gotch, Equinox Centre, 18 Rodborough Road, Frenchs Forest,
NSW 2086. Tel + 61 2 9972 8800
Distributed in the Rest of the World by
Marketforce, Blue Fin Building, 110 Southwark Street, London, SE1 0SU
Disclaimer
The publisher cannot accept responsibility for any unsolicited material lost or damaged in the post. All
text and layout is the copyright of Imagine Publishing Ltd. Nothing in this magazine may be reproduced
in whole or part without the written permission of the publisher. All copyrights are recognised and
used specifically for the purpose of criticism and review. Although the magazine has endeavoured
to ensure all information is correct at time of print, prices and availability may change. This
bookazine is fully independent and not affiliated in any way with the companies mentioned herein.
Photoshop is either a registered trademark or trademark of Adobe Systems Incorporated
in the United States and/or other countries and is used with express permission.
Photoshop 5 minute Tips & Fixes © 2011 Imagine Publishing Ltd
ISBN 978-1-908222-4-42
Contents
08

After
Before

minute fixes

Get started with this collection of quick-fix tips and tricks

Basic corrections
18
28
29
30
32
34
37
38
40
42
45
46

6

50 Photoshop tricks
Correct lens distortion
Flip for better composition
Crop and straighten images
Content-Aware Scaling
Hue, Saturation and Lightness
Brightness/Contrast
Quick Mask
Magic Wand tool
Make quick selections
Making a magic selection
The Extract filter

PHOTOSHOP 5 MINUTE TIPS & FIXES

48
49
50
52
54
56
57
58
60
64
65
66

Fix chromatic aberration
Selectively boost colour
The Patch tool
Spotless backgrounds
Create flawless skin
Remove red eye
Control Unsharp Mask
Use the Color Replacement tool
Fail-safe photo fixes
Add emphasis to eyes
Edit with gradients
Six techniques for perfect pics

88

Get creative
76
84
85
86
88
90
91
92
100

Creative photo retouching
Convert to duotones
Add a faded vignette to photos
Digital makeup
Add textures to photos
Create a dreamy photo effect
Create a lomo effect
Get creative with Blur filters
Create a sunset using
gradient maps
102 Composing with Smart Objects
104 Circular selections
Photoshop
5 Minute Tips Fixes
A dd de p t h ures
usin g t ext

Crea te su perfast sket ch
effe cts

Icons explained:

Before

Quick fix: Speedy tricks to
transform photos in seconds

Tool tricks: In-depth guides to
Photoshop’s key tools

After

92

119
Before

After
105
106
108
109
110
112
114
116
117
118
119
120

Use a gra die nt m a p
for a sp lash of co lo ur

Set off some digital fireworks
Stylish photo frames
Use photos in type
Quick cross processing
Add sparkle to your brushes
Create a silhouette in Photoshop
Create your own optical art
Pop goes Photoshop
Colour effects made easy
Super-quick paint effects
Quick sketch effects
30 digital painting tips

100 42

Work faster

132
136
138
140
142
144
145
146
148
150
151
152

Understanding actions
Making droplets
Automate your workflow
The Preset Manager
Working with tool presets
Organise with layers
Increase History states
The Batch command
Let’s go scripting
Use the Save for Web command
Layer up filters
Photoshop shortcuts

Troubleshooting
156-163 Advice – Elements

The most-pressing Photoshop Elements
questions answered

164-173 Advice – Photoshop

Get help with these answers to common
Photoshop queries

PHOTOSHOP 5 MINUTE TIPS & FIXES

7
5

m
inu
te
fixe
s

Shar
p
detailen

Ph
effe oto
cts

minute fixes

We round up some of the best edits that you can use to
improve your images in a mere five minutes (or less!)

W

hile there is a lot to be said for
settling down to a mammoth
Photoshop session where you
tinker and tweak an image into pristine
glory, there are times when you just want
a quick solution. A lot of common problems
can be sorted out in minutes.

8

PHOTOSHOP 5 MINUTE TIPS & FIXES

Over the next few pages, we are going to
be sharing some of the techniques we use
when time, patience or concentration is in short
supply. We’ll be fixing obvious problems such as
dull colour or soft edges in addition to looking
at creative solutions for pepping up an image.
Sometimes a photo will only ever be okay no

matter how bright its colours or how in focus
it is. However, by giving it a sketch effect, for
example, you can create an entirely different
image that has the ability to really stand out.
We even have a couple of suggestions for
improving your Photoshop workflow, giving
you extra time for more creative projects!
rk
Woar ter
sm

Spring into action
Save time by teaching Photoshop to do repetitive tasks for you

Do you find that you end up performing the same tasks time and time again without ever
changing any settings? Perhaps something like Auto-tone, Sharpen More and adding a vignette
through the Filter>Lens Correction feature. Or maybe there’s a particular type of framing,
watermark or signature you like to add to all your photography. Possibly you are tasked with
rotating and cropping 300 scanned photos and you can feel your soul being crushed beneath
the monotony.
Regardless of what it is, if it’s so repetitive you feel like you could train a monkey to do it, then let
us be the ones to tell you that Photoshop is smarter than that monkey! Instead of you being the
one performing the tasks, define custom actions that can be triggered at a single keystroke and
shave precious minutes off your production time. This allows you to focus your creative attention
on your design work instead of getting tied up with repetitive button pushing.

01

Is this thing on? Open the Actions
palette (Opt/Alt+F9) and select a folder
to place your action in or create a new one using
the ‘Create a new set’ icon at the bottom. Press
the ‘Create new action’ icon also found in the
footer of the palette. Give the action a name for
easily referring back to it later, and then press the
Record button.

to
Pho it
ed

02

One step at a time Carefully go through
each step of your process. You don’t
need to be quick, but you do need to be accurate.
Photoshop isn’t recording time, just menu
selections and tool usage. You can watch the steps
build up in the Actions palette. When you are
finished, press the Stop button in the footer to halt
the recording.

At the press of a button… Now you
can test out the action you have created
by hitting the Play button and watching it work.
Double-click to the right of the action’s name
to get the Action Options box again. Assign a
function key using the drop-down menu, and
now the entire action can be run at the press of a
single button.

Correct colour casts

Pull a natural hue out of a poorly coloured pic

We may not notice the difference between the light generated by
a fluorescent bulb and a halogen one, but photographs taken with
different light sources will show great differences in colour. This is
compensated for by setting the white balance on the camera, or letting
a sensor automatically do that for you. Colour casts are usually the result
of a photograph taken with an inaccurate white balance setting. This
generates an image with a distinct tint due to the error. The way to
correct this is to remap the white, grey or black points, as this allows the
colours to settle back into the more expected values. Follow the steps
below to easily remove all but the most drastic of colour casts and get
the tones just right.

01

03

Adjustments are required Begin by
adding a Curves adjustment layer. Look
for the small icon in the foot of the Layers palette
that looks like a circle that is half black and half
white. Clicking on that icon activates a list of
available adjustment layers, then simply select
the Curves option from there.

02

Black and white points In the
Adjustments palette to the left of the
histogram window you will see three small
eyedropper icons. Begin by clicking the black
eyedropper and sampling a portion of your image
that should be completely black. Likewise, use the
white eyedropper in the same way to sample the
brightest pixels to set the white point.

hues as
Get your uld be by
they sho lour casts
fixing co

03

Kill the colour cast Using the grey
eyedropper is the most effective and
most difficult step in the process. The goal is to use
it to sample a pixel that should be 50% grey. This
may take several attempts before getting a good
setting. If the first click yields poor results, simply
try another area of pixels. Taking the time for a little
trial and error is well worth it here.

PHOTOSHOP 5 MINUTE TIPS & FIXES

9
5

m
inu
te
fixe
s

to
Pho it
ed

Better, brighter skies

Chase away those grey days with this easy sky repair

y
y sk
gre use
let a day – it
’t
Donn your s to fix
rui dient
gra

Top tip: Gradients are also
useful for improving dull
sunset images – pick reds or
oranges for the best effect.

01

Select-a-sky Begin by using the Quick
Selection tool to select your sky area. If the
tool grabs areas of the image you don’t want, hold
down the Opt/Alt key and paint over the area to
remove from the selection. Depending on your
version, the selection can be edited further by
using the Refine Edge button if this is needed.

to
Pho it
ed

02

New masked layer Press the ‘Add new
layer’ button in the foot of the Layers
palette. The selection is automatically converted
into a mask. This will limit the effect to the sky, and
having it on a new layer protects your original
Background layer from any direct alteration. Set
this layer’s blending mode to Overlay.

03

Fade away the grey Set your
Foreground colour to a nice, bright
sky blue. Grab the Gradient tool and use the
Foreground to Transparent preset in the Options
bar. Make sure the mode is set to Linear, click at the
top of your canvas and drag straight down towards
the horizon (or your foreground object) to create a
blue gradient that fades away.

Boost colours and sharpness
Transform a shot from dull and blurry to bright and crisp

Colour and detail: two elements that can make or break any photo. If one is
missing, the other one better be something special to compensate. If both
are weak, you know you are in trouble. But all is not lost! This neat little trick
can do wonders for a shot that is a little too dull as well as being a bit soft. It
can infuse the image with life and give it a pop that demands attention. That
being said, it cannot perform miracles. If the photo is devoid of colour and
detail, this won’t help. There has to be something there to work with. If that is
the case with your image, we encourage you to try this technique out.

01

Pull out the details Create a copy of the
Background layer to work with. Go to
Filter>Sharpen>Unsharp Mask and work with
the settings until you can see some details from
the image being revealed. In this example we
used an Amount of 72%, Radius of 4.8 pixels
and Threshold of 5 levels. Your results may vary
depending on the image.

10

PHOTOSHOP 5 MINUTE TIPS & FIXES

02

Add Vibrance Add a Vibrance
adjustment layer by clicking the
Vibrance icon in the Adjustments palette.
Pump up the Vibrance slider, then increase
the saturation. Beware of blowing out the
colour tones. If needed, use the layer mask
that’s automatically added to paint out the
adjustment where it is not required.

e pop
Make an imag ntion
by turning atte
to the colour

03

Final pop Now create a composite
layer on the top of the stack by pressing
Cmd/Ctrl+Alt+Shift+E, and then on this new
layer go to Filter>Other>High Pass. Enter a
setting of 3 pixels and press OK. Change the
layer’s blending mode to Overlay to give a final
touch of edge sharpening, and your image
should be infinitely improved.
rk
Woar ter
sm

GPU settings

Get the most out of those advanced features by using GPU
You may have heard other users rave about some of the slick new features
found in Photoshop CS5, only to be confused as to why you can’t seem to
find them. We’re talking about features such as the Rotate View tool, Scrubby
Zoom, the ability to resize your brush right on the canvas or even that
mysterious Repousse tool. All could be hidden from your experience. Perhaps
you’ve even checked to make sure you have a graphics card capable of heavy
lifting, yet you still seem to be missing out on the joy of these new features.
The most likely reason for your deflated performance is because you don’t
have your GPU or Graphics Processing Unit set up correctly. All of these
features and more rely on something called OpenGL drawing, and they won’t
appear without it. Once you do turn it on, it can transform your Photoshop
experience in minutes, so read on and we’ll show you what you need to do.

01

Performance preferences Go to Edit>
Preferences>Performance and look for the
GPU Settings box. It will list your graphics card and
you should see a checkbox for Enable OpenGL
Drawing. Place a check in that box and then hit
the Advanced Settings box. Select a mode of your
choice. We recommend Normal.

to
Pho it
ed

02

Give it a whirl You will need to close
down any documents you have open
in Photoshop and then open them again to take
advantage of the newly enabled OpenGL settings.
To test if things are working, hold down the R key
and then drag your mouse in a circle. The canvas
should spin around as you move your cursor.

Repousse fun Just to see the true power
of the advanced CS5 extended features
and OpenGL, try this. Put down some text on your
canvas. Make it something big and bold in a large,
fat font. Then go to 3D>Repousse>Text Layer to
have Photoshop transform your text into a real,
honest to goodness 3D object!

Remove unwanted elements
Clean up photos with the Clone Stamp tool

This is the tool that Photoshop is arguably the best known for. It is the
technique that tabloids use to remove people from one picture and
deftly place them into another. While we don’t condone the practice
of personal slander on a celebrity, we fully embrace the idea of altering
a photo to create a better shot aesthetically. In this example, we begin
with a peaceful and serene beach shot that would be even more
peaceful and serene if it didn’t contain the handful of people on the
shore line and a tacky, fruit-themed bus cluttering up the horizon. The
process for cloning out items is pretty straightforward, but we will say
that it does take a practised eye to do it well. The trick is learning where
to best set the source point to avoid obvious repetition or paint strokes,
but even those can be cleaned up afterwards.

01

03

Clone Stamp setup Begin by creating
a copy of the Background layer to work
with, then grab the Clone Stamp tool and set
the brush tip to a soft round brush. Find an area
that looks similar in content and colour value
to the area you wish to clone out, then hold
down the Opt/Alt key and click once to set the
source point for your cloning.

02

ct
erfe
ur p
e yo g the ool
at
Cre ta usin mp t
vis ne Sta
Clo

Selective source When selecting a
source point, use an area that’s easy to
match. For example, setting our source point
to the horizon makes alignment simple for the
new painted area. After setting the source point,
Photoshop gives you a helpful overlay on the
brush so you can see what pixels you are about
to lay down on the image before you commit.

03

Clone away Use short, gentle strokes
to remove the unwanted element. If
necessary, select another source point to help
avoid visible repetition within the image. If the
colour tones are not matching up well and your
brushstrokes are too obvious, try reducing the
brush opacity, set a different source point and
then clone out the visible lines for a smooth result.

PHOTOSHOP 5 MINUTE TIPS & FIXES

11
5

m
inu
te
fixe
s

tal
igi t
D ar

in time
Travel back ur
by giving yo ed look
ag
image an

Easy aged photo effect
Age a photo 50 years in five minutes

Aged photos have their own
special charm and personality.
The condition of the photo itself
tells a story with the way it fades
and cracks with time. It makes you
wonder if the story of the photo
paper is more interesting than
the story of the photograph. We’ll
show you how to easily capture that
effect quickly and painlessly. This
technique makes use of adjustment
layers, smart filters and layer styles,
so, even though the whole idea is
to destroy the photo, this effect is
really non-destructive. Grab a photo
you want to push back in time and
follow along with these steps.

Top tip: If you have a photo that you love but
that suffers from awkward colour or tonal
problems, save yourself editing time by
transforming it into an aged image.

01

Smart Object Right-click on the
Background layer in the Layers palette
and select Convert to Smart Object. Next,
create a rectangular selection just inside the
frame and press the ‘Add layer mask’ icon (the
white circle in a grey box). Add a new layer
beneath the photo and fill it with an off-white
shade to begin altering the tones of your image.

04

Smart filters Go to the photo Smart
Object and add a Gaussian Blur
(Filter>Blur>Gaussian Blur) of 4 pixels. Then go
to Filter>Noise>Add Noise and set the Amount
to 14%, Distribution to Gaussian and check the
Monochromatic box. This makes sure the photo
doesn’t have that sleek, modern crispness to it.

12

PHOTOSHOP 5 MINUTE TIPS & FIXES

02

03

05

06

Black and white Add a Channel Mixer
adjustment layer above the photograph
original. Tick the Monochrome box and adjust
the sliders to give a high contrast effect. You
want blown out highlights and strong shadows
to make the photo look faded.

Layer styles Next add a new layer
to the top of the stack and assign the
following layer styles: Drop Shadow with
Opacity at 45%, Distance at 12, Spread at 0 and
Size at 29; Bevel and Emboss with Style set to
Outer Bevel, Depth set to 52%, Size at 9 pixels,
Soften at 5 pixels and Highlight/Shadow at 50%.

Gradient Map Next, add a Gradient
Map adjustment layer and choose the
Black, White setting from the list of presets. Click
on the gradient to open the Gradient Editor
and change the black stopper on the left to a
coppery-brown tone. We used ‘#6a5342’. This
gives the photo a sepia, aged colour.

Painted cracks Grab a small irregular
paint brush. We used the Chalk 11 tip
with the size reduced to around 6 pixels. Set the
paint colour to a light grey and carefully draw
some cracks and folds at random points on the
photo. The layer style will appear as you paint.
Finish by setting the blend mode to Screen,
reduce the Opacity to 39% and you’re done.
tal
igi t
D ar

Rich sepia tones

This sepia trick allows for maximum control

01

Level up Begin by adding a Levels
adjustment layer. In the Histogram
palette, pull the outer slider handles in to meet
the edges of the histogram chart. This should
increase the overall contrast of the image. Take
the midpoint slider and move it slightly to the
left to brighten the image a bit so that it will work
when desaturated.

to
Pho it
ed

02

Black and white Next add a
Black and White adjustment layer
over the Levels adjustment. In the Adjustments
palette, look for the drop-down menu near the
top. These are presets used to create different
flavours of black and white effects. Here we used
the Neutral Density settings for our image of the
running horses.

03

Photo Filter Finally, add a Photo Filter
adjustment layer. From the filter dropdown, select the Sepia option. If the colourisation
isn’t strong enough to suit you, increase the
Density slider to enhance the effect. Try the
Preserve Luminosity checkmark both on and off to
see which setting works best for your image.

Fake focal blur

Use a manufactured focal blur to make your subjects stand out

There’s nothing quite like putting focus on a subject by actually
putting focus on that subject. Or more accurately, removing
focus from the areas around the subject. Most photographs
already have a focal blur built into them. It’s what the term ‘in
focus’ means; that the primary subject of the photo is in the
focal setting of the camera’s lens. Different lenses have different
focal lengths creating different effects or focal blurs and one
way to enhance the focus of a photo’s subject is to manufacture
focal blur around it. This technique shows a precise method for
doing just that. A frequently overlooked feature of Photoshop is
the Lens Blur feature, which not only does an outstanding job of
simulating actual focal blurs, but can even be set to read a depth
map that’s been saved to a channel. This allows Photoshop to
calculate a more accurate effect.

01

Isolate the subject Begin by creating
a copy of the Background layer to work
on, then form a selection around the subject
using the selection tool of your choice. In this
statue image we used the Pen tool because
of its supreme accuracy. Once the selection is
done, press Cmd/Ctrl+J to copy the subject to
its own layer, then turn of its visibility.

02

Remove the subject On the
background copy layer, use the
Content Aware Fill feature or the Clone Stamp
tool to roughly remove the subject. Then press
‘Q’ to enter Quick Mask mode and use the
Gradient tool to drag a white to black linear
gradient down from the horizon line to the
subject. Press ‘Q’ again and save the selection
(Select>Save Selection).

n to
ntio ith
attejects w
w
Dra r sub ft blur
you e de
som

03

Lens Blur Go to Filter>Blur>Lens Blur.
In the area labelled Depth Map, set the
Source to the selection you saved in the previous
step. If the blur effect appears backwards, check
the Invert box. Adjust the settings to get a blur
suitable for your image and press OK. Then turn
the visibility of the subject layer back on.

PHOTOSHOP 5 MINUTE TIPS & FIXES

13
5

m
inu
te
fixe
s

tal
igi t
D ar

Photoshop’s sketchbook

your
rt from
Make a with this
s
photo chnique
useful te

Turn a photo into a digital sketch

This technique is ideal for quickly
simulating a lovely, hand-sketched
effect. There are other, more
complicated techniques out there
you could employ that involve a
lot more than just a few minutes’
worth of filter wrangling, and
ultimately we fully encourage you
to develop your own hand skills
so you can create a true sketch
by hand. There’s no tricks or tips
that can ever replace that. But
when it comes to quick, clean
and effective, when you need a
filter-based sketch effect that is
easy and convincing, this tip is
hard to beat!

Top tip: To make the effect even more
realistic, get an image of a sketchbook
and copy and paste your picture into
it with the Multiply blending mode to
make it sit on the page.

01

02

03

04

05

06

Set the sketchbook Begin by creating a
new layer for the sketch paper. Set your
Foreground and Background colours to light
parchment hues that are slightly different from
each other. Go to Filter>Render>Clouds to fill
the layer and then go to Filter>Blur>Gaussian
Blur and blur the pattern until the colours
bleed into each other and look natural.

See the effect Now press Cmd/Ctrl+I
to invert the colours of the layer. Set
the blending mode to Color Burn. Turn off the
visibility of the blurred photo layer to fully see
the effect. Use some soft brush work on a layer
mask attached to the sketch layer to hide any
unwanted lines that are left by simply painting
them away.

14

PHOTOSHOP 5 MINUTE TIPS & FIXES

Black and white effect Duplicate
the Background layer and move
the copy above the parchment layer. Go to
Image>Adjustments>Desaturate and then use
the Brightness/Contrast command to boost the
tones. Go to Filter>Blur>Surface Blur and, using
the preview as a guide, select a setting that blurs
the fine details but retains the lines. We used a
Radius of 4 and a Threshold amount of 12.

Intensify the lines If the sketched lines
look too faint, you can intensify the
effect by duplicating the sketch layer. If this then
makes the effect too strong, pull back on the
opacity of the duplicate layer. In our example
of the kitten we reduced the Opacity to a mere
37% on the duplicate layer.

The sketch edges Duplicate
the blurred layer and go to
Filter>Stylize>Glowing Edges. You’ll want
settings that strike an even balance between
smooth lines and fine details. You don’t want
the edges to appear too strong or busy, as a soft
sketch effect is the goal. We used an Edge Width
of 2, Edge Brightness of 19 and Smoothness of 8.

Shading Turn on the visibility of the
blurred photo layer. Change this layer’s
blending mode to Color Burn and reduce the
Opacity to 50%. Hold down Opt/Alt and press
the ‘Add layer mask’ button to hide the entire
layer. Use a soft brush with white paint on the
mask to reveal areas for the look of shading.
rk
Woar ter
sm

Who needs more history?
Increase your safety net by expanding your history states

Don’t you wish life had a Cmd/Ctrl+Z? We all do. Some of you may be saying “I just wish
Photoshop let you undo more than one step” (Shhhhh. It does. Hold down Shift with
your Cmd/Ctrl+Z and you get 20 steps). If you open up your History palette you can see
the last twenty steps you took in Photoshop. You can easily dial back in time clicking
on any of those steps to return to that point. But what happens when 20 isn’t enough?
Those can disappear quickly when you are painting or using any of the other brushbased tools. Fortunately, 20 is just the default setting in Photoshop. It can be easily
increased for more peace of mind. Remember, though, that there is a performance
trade-off for increased history. Every step of history is another state of the document
Photoshop has to keep track of.

01

Know your history Go to Edit>
Preferences>Performance. Look in the
History & Cache section for the History States. The
default is 20 but it can go up to 1,000. We don’t
recommend going that high as it becomes so
memory intensive that eventually the program’s
performance will become painfully slow.

tal
igi t
D ar

02

Test it out Go ahead and press OK
to commit to the change and open
up a new document. Be sure you have your
History palette open as well. Grab the brush
(or any other tool for that matter) and begin
working. Watch as your History palette fills up to
whatever number you set.

03

Snapshot alternative In the History
palette there’s a small camera icon in
the footer. Pressing this creates a snapshot of the
current state of your document. Clicking on that
snapshot will return the document to that state
regardless of how many steps have gone by. This
serves as an alternative to increasing History states.

Delicious HDR toning
Use a single image to get a stunning HDR effect

High Dynamic Range photography is a recent photographic
trend that demands notice. Whether you love it or hate it, the
effects are impossible to ignore with the ultra vibrant colours
and super crisp details. True HDR requires multiple exposures
from a camera to capture a higher range of light, hence the term.
Exposures are usually bracketed to capture shadow information
as well as highlight information, and then all that is compressed
down into a single image. Technically, this is impossible to do
with a single, limited range photograph. But far be it from us to
allow the laws of reality to stand in the way of trying! The effect
can be approximated using a single image, in fact Photoshop CS5
has a feature actually named HDR Toning that only allows the
use of a single image. The options available in this feature can be
overwhelming, so let’s break them down.

01

Edge Glow Open your photo and go
to Image>Adjustments>HDR Toning.
It’s usually best to start with a preset that is
close to the effect you have in mind and work
from there. We chose the Photorealistic preset
to start with for our picture. In the Edge Glow
section, the Radius value adjusts the size of
the glow and the Strength value adjusts the
visibility. We used 51 and 1.82 respectively.

02

Tone and Detail In the Tone and Detail
area, we suggest starting with the
Shadow slider as it will have one of the biggest
impacts on the image. We used +44. From there,
move to Gamma and Exposure to adjust the
brightness, We used 1.00 and .95. We then set
the Detail to 122 and Highlight to -51.

g
nin
R To
HD urn DR
the t
Use ture toots to H
fea gle sh
sin

03

Colour adjustment In the Color
section, the Vibrance and Saturation
sliders perform similar tasks, but the Vibrance
is more concerned with luminous values
while the Saturation is more concerned with
colour intensity. We used a Vibrance of 6 and a
Saturation of 17. If the colours appear off-kilter, a
Hue/Saturation adjustment layer can bring them
back into line for the perfect HDR effect.

PHOTOSHOP 5 MINUTE TIPS & FIXES

15
Basic correc
Transform your digital
photos with this
collection of essential
tips and tricks to fix
common flaws
18
28
29
30
32
34
37
38
40
42
45
46
48
49
50
52
54
56
57
58
60
64
65
66

16

50 Photoshop tricks
Correct lens distortion
Flip for better composition
Crop and straighten images
Content-Aware Scaling
Control Hue, Saturation
and Lightness
Rescue dull shots with
Brightness/Contrast
Quick Mask
Magic Wand tool
Make quick selections
Making a magic selection
The Extract filter
Fix chromatic aberration
Selectively boost colour
The Patch tool
Spotless backgrounds
Create flawless skin
Remove red eye
Control Unsharp Mask
Use the Color Replacement tool
Fail-safe photo fixes
Add emphasis to eyes
Edit with gradients
Six techniques for perfect pics

PHOTOSHOP 5 MINUTE TIPS & FIXES

42

Learn to m ake
quick se le ct io ns
tions

“There’s always something
new to learn in Photoshop”

60

Fix an y sn ap with
th is se le ct io n of
fa il-safe tricks

57
Sharpe n yo ur
im ag es usin g th e
Uns ha rp Mask tool

58
Rep la ce co lo urs in
yo ur phot os
quick ly an d easily

PHOTOSHO
PHOTOSHOP 5 MINUTE TIPS & FIXES

17
co Ba
rre sic
cti
on
s

N

o matter how long
anyone works with
Photoshop, there’s
always something new to
learn. Even if you’re an imageediting expert, it’s impossible
to remember every little nook
and cranny of Photoshop, and
if you’re a novice then even
some things that may seems
basic can be a real revelation
and save you hours of head
scratching. So, to start this
section we’ve put together
ten pages of tips and tricks
that will speed up your image
editing, give you a whole new
bundle of special effects and
techniques, and some that
might just jog your memory
in time for that next deadlinedriven graphics project.
So, feast your eyes on
this veritable Pandora’s Box
of Photoshop goodness… it
may just save you hours
of frustration!

18

PHOTOSHOP 5 MINUTE TIPS & FIXES

PHOTOSHOP TRICKS
YOU NEED TO KNOW
We’ve gathered our favourite image-editing tips that
are guaranteed to help you improve your pictures
Tip 1
Reflection via
layer masks

Create a reflection by adding a simple gradient to a layer mask
Duplicate the image layer containing the object, and flip it via Edit>Transform>Flip vertical.
Move the reflection into place using the Move tool (‘V’). Add a layer mask, choose the Gradient
tool and drag a black-to-white gradient over the bottom half of the layer mask.

Duplicate the object layer to create a copy of it
on another layer

Flip the copy, position and add a layer mask.
Click on the thumbnail for the Layer Mask

Drag a Black/White gradient vertically over
the duplicated object image, via the mask
Tip 3

Tip 2

Stay safe with Vibrance

Terrific Tattoos!
Create stunning realistic digital
tattoos with a little help from the
Displace filter
Sometimes digital tattoos don’t look
very convincing, simply because they
don’t wrap around the body properly.
However, by using the Displace filter
you can make them really fit the body.
First, design your tattoo on a plain
white background.

01

Displacement Map
Duplicate your body image.
On the duplicate, go to the Channels
palette and click the Red channel.
Select all and then copy. Return to
the Layers palette and paste. Flatten
the image and save it as a PSD file,
naming it Displace.

Increasing Saturation can sometimes
blow out colours; try Vibrance instead
If you’ve got an image that lacks
saturation in some areas, rather than
use the Hue/Saturation command,
try using Image>Adjustments>
Vibrance. The Vibrance command
will increase the saturation of
only the colours in your image
that need it, rather than increasing
saturation globally as the Saturation
command does.

No needles, no regrets –tattoos the Photoshop way

02

Paste the tattoo Return
to the original body image,
open your tattoo image and drag
and drop it into the image. Set the
blending mode for the tattoo layer
to Multiply. Scale and position via
Edit>Transform>Scale.

03

Distort Go to Filter>
Distort Displace. Enter
15 for both scales and click OK.
Locate your Displace file, click on
it and click Open. The tattoo will
now be wrapped around the
body contours. Reduce the layer
Opacity a little if needed.

Tip 4

Easier Eyedropper

“Increasing Saturation can sometimes
blow out colours; try Vibrance instead”
Tip 5
Easy hair
selections

Finally, an easy way to select fly-away hair strands, thanks to the Refine
Edge command in CS5
Make a rough selection using the Quick Selection tool. Click on Refine Edge
in the Options bar. Add a small amount via the Radius slider and choose the
Refine Radius tool. Now brush around the hair outline using this tool at a
suitable size. Check Decontaminate Colours and use the slider to remove any
vestiges of remaining colour. From Output To: choose New Layer With Layer
Mask for perfect results.

Be sure you pick the colour you
really want
In CS5, the Eyedropper tool has a pop-up
sampling ring, making choosing colours
easier. Activate it via the checkbox in the
Options bar.

Quick Colour info

Make a rough selection around your subject and let
Refine Edge do all of the work

Just brush over the stray hairs using the Refine Radius tool and
watch as a perfect hair mask is created for you

Tip 6

You don’t have
to reach for the
Eyedropper get a
colour reading
Once you have the
Info palette on screen
(Window>Info), any
Photoshop tool
will give you a
colour reading within
Use any tool to get a colour reading, the palette.
to get precise info
using Caps Lock

PHOTOSHOP 5 MINUTE TIPS & FIXES

19
co Ba
rre sic
cti
on
s

Tip 7

Levels without Clipping
Don’t risk clipped black and white points when
you’re busy adjusting Levels. Use the Opt/Alt
key as a handy safeguard
Next time you’re adjusting the black and white
points in your image via the Levels command, hold
down the Opt/Alt key as you drag each pointer
beneath the Histogram. Stop dragging when you
see any clipped areas appearing.

Crop overlays Tip 9

Consistent colour across two images

A simple, overlooked command for harmonising the colours in separate images
Image>Adjustments>Match Color will take the overall colours from one image and apply them to
another. Open both the images (the target and source images). Make the target image the active one
and go to Image>Adjustments>Match Color. From the Source: option in the Image Statistics section,
choose the image you want to take the colours from. If you need to adjust the colour change in the
target image, carefully adjust the sliders.

There’s no panic if the colours in two images don’t match, just
use the Match Color command

In CS5, the Crop tool comes complete with a
choice of helpful guides
Once you’ve dragged a crop, go to the Options bar
for the Crop tool and choose from Grid or Rule Of
Thirds crop guide overlays. The grid can be useful
for lining up crops with image elements and Rule Of
Thirds is a great compositional aid.

Use the on-screen adjustment
tool within the Curves dialog for
faster image adjustments
In Photoshop CS4 upwards, you
don’t have to adjust a curve directly.
Choose the on-screen adjustment
tool at the bottom right of the
Curves dialog and simply click and
drag on an area in your image. Drag
up to lighten and down to darken!

20

PHOTOSHOP 5 MINUTE TIPS & FIXES

Apply the colours from your source image to the target
image for a quick edit

Sharpen up
Tip 10
with High Pass

Adjust the layer Opacity to control the amount of
sharpening that’s applied to your image

Clever Curves adjustments

Tip 8

Tip 11

Flexible, non-destructive sharpening via
a layer and the High Pass filter
Open your image and duplicate the
Background Layer (Cmd/Ctrl+J). On the
duplicate layer, go to Filter>Other>High
Pass. Set the Radius to around 10 pixels and
click OK. Change the blending mode for this
layer to Hard Light. Now reduce the Opacity
of this layer until you’re happy with the result.
It’s best to zoom into 100% to visually gauge
the sharpening effect as you reduce the
layer opacity.

Tip
Scrub that!

12

Don’t dial in values within
Photoshop, try scrubbing for
more speed
Wherever you see a value box, such
as the Opacity value in the Layers
palette, next to it you’ll see a text
label. Click and hold on that label
and you can ‘scrub’ rather than
Just click and drag on that text label
fiddling with minute slider pointers. to easily scrub through values
Tip 14

Tip 13

HDR Toning

Texture overlays
Subtle textures can transform your
images in just a few clicks
Copy and paste your texture shot into the
image. Go to Edit>Transform>Scale, and
use the corner handles to scale the texture
to cover the image. Now experiment with
blending modes on the texture layer. Overlay, Paste your texture and choose a blending mode. Finish by
Soft Light and Hard Light work well.
experimenting with adjusting layer opacity

Tip 15
Correct
colour casts

You can easily correct
colour casts within the
Curves dialog
From the Curves
dialog, choose the Grey
Eyedropper. Now carefully
look for an area in your
image which should be
neutral in colour. Click
on this area with the
eyedropper to correct the
colour cast in a single click.

You don’t need to shoot multiple
exposures to create stunning HDR
effects in CS5
The great thing about HDR Toning is
that you only need a single image, not
multiple exposures to create a faux
HDR image. Open your image and go
to Image>Adjustments>HDR Toning.
Creating your effect can be as simple as
choosing one of the supplied HDR effects
from the Preset: option. Even once you’ve
chosen a preset you can adjust every
aspect of the Edge Glow, Tone and Detail
or Colour via the sliders within the dialog.
It’s worth spending a little time adjusting
the Detail slider as this will really amplify
that classic HDR appearance, and increase
the Saturation via the sliders in the Color
section. The Toning Curve gives you the
opportunity to carefully lighten or darken
every tone within the image, just like a
normal Curves adjustment.

Choose the grey eyedropper and click in a part of your image which should be neutral

“The great thing about HDR Toning is that
you only need a single image, not multiple
exposures, to create an HDR effect”
Snappy snapshots

01

Scale the image Double-click
the Background layer and go
to Edit>Transform>Scale. Hold down
the Shift key and resize via one of the
corner handles. Hit enter and duplicate
this layer (Cmd/Ctrl+J).

Create a quick snapshot
effect using layers

Tip 16

Within HDR Toning, you’ll find all the usual HDR
adjustments are at your fingertips

02

Fill and scale the border
layer Cmd/Ctrl-click the lower
layer and go to Edit>Fill, choosing
White. Return to Edit>Transform>Scale
and Shift-drag a corner handle to size
the border. Position the border by
dragging within the Bounding Box. Hit
Enter to commit the transformation.

03

Add a shadow and a base Go to Layer>Layer Style,
choosing Drop Shadow. Adjust the Distance and Size of the
shadow and hit OK. Pasting a wooden texture shot on a layer below
these two can really finish the effect off convincingly.

PHOTOSHOP 5 MINUTE TIPS & FIXES

21
co Ba
rre sic
cti
on
s

Tip 17

Fast, reusable photo edges

Create a simple black and white image. Try
using some Photoshop filters on them

Create and reuse your own photo edges, and drop them over any image
You can create and save black-and-white border files to use again and again. Start with a white
document and paint the window for your image with black, carefully creating good-looking edges.
Now you can drop this image on to a layer over a photo and set the blending mode to Screen. Resize
the layer to fit the image via Edit>Transform>Scale.

Copy and paste the edge file on a layer over
your photo and set the blend mode to Screen

Only the white areas remain, leaving just
the edges showing around the image

Tip 18

Correct perspective

Tinting black
and whites
The Black and White command
also has a tinting function
Go to Image>Adjustments> Black
and White. Choose one of the
Black and White presets, or adjust
the sliders to your liking. Now
check the Tint check box. Choose
the colour of your tint via the Hue
slider and adjust its intensity by
dragging on the Saturation slider.

Tip 20

Magical MiniBridge!

Black and white with just a
to the Black and White comhint of colour, thanks
mand

Tip 21

Mess with Masks

The Bridge’s timesaving little
CS5 brother
In Photoshop CS5, you don’t have to
go use the full-blown version of the
Bridge. Simply go to File>Browse in
Mini-Bridge and then browse within
the workspace.

Control layer masks via their own
dedicated panel to speed up your
masking workflow
When you’ve created a layer mask,
you can Feather it, alter Density or
Invert it via the Masks panel. Go to
Window>Masks and use the sliders.

The Bridge in it’s own self-contained
Photoshop panel. At last!

22

Take control of your Layer Masks via Window>
Masks and feel the power of the panel

PHOTOSHOP 5 MINUTE TIPS & FIXES

The possibilities are endless, so get creative
with edge files and build up a collection!

Tip 19

The Lens Correction filter makes correcting perspective
wonderfully simple
Go to Filter>Distort>Lens Correction. In the bottom left of the
panel, correct vertical perspective by dragging on the slider.
You can also correct
horizontal perspective
with the other slider.
Turning the Grid
on can help with
judging the corrected
perspective. Hit OK
when you’re done to
exit the dialog.

Tip 22

Tip 23

The magic of
Smart Filters

Super-quick
vignettes

Smart Filters allow you to change
the filter settings again and again
Right-click the layer to filter and
choose Convert To Smart Object.
Apply your filter in the usual way. Reedit by double-clicking its smart filter
entry attached to the layer.

Editable Photoshop filters, all thanks to the
versatility of Smart Objects

Take the super-fast route to
effective vignettes
Use the Vignette slider within the Lens
Correction filter. Drag it to the left to
darken, and to the right to lighten.
Control the vignette width with the
Midpoint slider.

For classic vignettes, just rely on the sliders within
the Lens Correction filter
Tip 25

Straighten with
the Crop tool

Tip 2
4
Add a spotlight
for drama

The Crop tool is more versatile than
you might think
Choose the Crop tool and choose Grid
from the Crop Guide Overlay option in
the Options bar. Drag a crop over the
image. Now place your cursor outside
one of the corners on the Crop Box and
drag to rotate the crop, matching the
grid up to a horizontal or vertical within
the image. Adjust the side handles to
your desired crop and hit the Enter key
to commit the crop.

A simple spotlight can add a touch
of drama and focus to still life
compositions
Duplicate the Background Layer (Cmd/
Ctrl+J). Go to Filter>Render>Lighting
Effects. Use the default spotlight, sizing
and positioning it appropriately. Adjust the
darkness around the light by adjusting the
Ambience slider.

Use the default spotlight to throw
some light on your still life images

Curves cross-processed effect

Tip

26

Make adjustments to each of the colour curves to re-create this classic effect
To create this effect, you need to make specific changes to each of the four curves in the RGB image. Go to
Layer>New Adjustment Layer>Curves. Choose the individual curve from the Channels box and place points
on each curve and position them by dragging. Refer to the image below to see each curve shape.

Drag a crop, rotate it, adjust and commit. Job done!

“You can make
adjustments to
each colour curve
to re-create classic
photographic
effects”
Tip 27

Get creative with
Film Grain
Make film grain more adaptable via a filled layer
Use the Grain filter (Filter>Texture>Grain) to add
various film grain effects to your images, but use it
on a separate layer filled with 50% Gray (via Edit>Fill).
Desaturate this layer once you added the grain, and
set the blending mode to Soft Light or Overlay. You
can adjust the grain intensity simply by modifying
If you have fond memories of good old-fashioned
the Opacity of this layer.
snapshots, create them yourself in Photoshop

Black and white
points in the
Curves dialog

Tip

28

You don’t have to use Levels to set
black and white points… you can also do
it in Curves
Drag the lower corner point on the curve
to line up with the left-hand end of the
histogram. Do the same with the upper-right
corner point to correct the white point.

PHOTOSHOP 5 MINUTE TIPS & FIXES

23
co Ba
rre sic
cti
on
s

Big Data

Tip 29

Big Data refers to areas of a layer which lie
outside the canvas area
Sometimes, you’ll have parts of a layer that extend
beyond the edges of the canvas. To see these areas,
go to Image>Reveal All.
Reveal any
‘Big Data’ in
your image via
Image>Reveal
All. Now
you’ll see
any previous
hidden layer
contents

Manage Masks

Don’t go to the Channels palette to duplicate a
layer mask, just drag-and-drop
To copy a layer mask from one image layer to
another, hold down the Opt/Alt key and simply click
and drag the mask thumbnail to the other layer.

Tip 30
Get creative with
Gaussian Blur
Just a simple blur for highimpact fashion shots
Duplicate the Background
Layer (Cmd/Ctrl+J). On the
duplicate layer set the blending
mode to Overlay and go to
Filter>Blur>Gaussian Blur
choosing a Radius of around 20
pixels. Hit OK to apply the filter.
Experiment with other Radius
values for a more subtle effect.

For a touch of real pro-studio effects, try a little Gaussian Blur and a
simple blending,ode

Type in perspective

Tip 32

Opt/Alt-clickdrag is all
that’s need to
duplicate a
mask and add
it to another
image layer

Use Vanishing Point to add type in
perspective to any plane in your image
Create your type. Go to Select>All, followed
by Edit>Copy. Now delete your text layer and
add a new layer. Go to Filter>Vanishing Point.
Click corner points to create a grid following
the plane of the surface. Hit Cmd/Ctrl+V to
paste in the text. Now drag the text into the grid
and position it wherever you want it along the
plane of perspective.

Paint selections

Don’t forget the power of Quick Mask for
creating complex selections
Hit ‘Q’ on the keyboard to enter Quick Mask Mode.
Paint the selection with black, erase it with white. Hit
‘Q’ again to exit.

Create your text with the Type tool and then copy it over to
the clipboard

Quick masks
allow you to
simply paint
complex
selections with
the humble
Brush tool

Click corner points to create a perspective grid within the
Vanishing Point window

Precious selections

You’ll often use a selection more than once, so
make sure to save it
When you created a complex selection, save it via
Select>Save Selection. When you want to use it
again, go to Select>Load Selection.
Don’t risk losing
that complex
selection, make
sure to save it in
case you need it
in the future
Paste the type, drag it into the perspective grid and
position it in perspective by dragging

24

PHOTOSHOP 5 MINUTE TIPS & FIXES

The Vanishing Point filter can work wonders with creating in
extreme perspective
Tip 38
Automatic lens
correction
Take the guesswork out of correcting
lens distortion in CS5
In CS5, you can Auto Correct lens
distortion in the Lens Correction filter.
Choose the Make and Model of your
camera and then choose the appropriate
Lens Profiles to correct distortion without
any of the guesswork.

Tip 35
Artistic
brushed borders
Paint onto a mask to get arty with
borders around your images
Duplicate the Background layer (Cmd/
Ctrl+J). Fill the original background
with a colour of your choice. Via
Edit>Transform>Scale, reduce the size of
the image on the upper layer a little. Add
a mask via Layer>Layer Mask>Reveal All.
Now paint around the edges of the image
with black at 50% Opacity, making sure to
hide any hard edges.

Tip 36
Non-destructive
Dodging and
Burning

Use a simple grey filled layer
for damage-free targeted
tonal adjustments
Add a new layer, and via
Edit>Fill, fill it with 50% Gray.
Set the blending mode to Soft
Light. Paint with a soft brush
at 15% Opacity, using black to
gradually darken and white to
subtly lighten areas in
your image.

Lens Correction now has specific lens profiles built in

Tip 39
Copyright Brush
Create a simple brush to quickly add
copyright tags to your photos
Create you text in black, on a white canvas
with the Type tool. Crop and Flatten your
image. Now go to Edit>Define Brush
Preset. Give your new brush a name and
hit OK. You’ll now find your new brush in
the Brush Picker. Use your new brush at
any size, with any colour.

Neutral Density
impact in CS5
You don’t need a neutral
density filter for your
camera… just do it all
in Photoshop
Use the new Neutral Density
gradient on a layer set to Soft
Light to add impact to skies in
your landscapes.

You can dodge and burn simply by using
the Brush tool with black and white

Try different brushes to create an endless variety of
artful image borders

Tip 37

The new Neutral Density gradient
makes it easy to add impact to skies

“Create a simple brush to
quickly add copyright tags
to your photos”
Tip 40

Content-Aware magic
Use the new Content-Aware features of
Photoshop CS5 for seamless clean-ups
CS5 offers users some fantastic new features, top of
which are the new Content-Aware options. These
allow you to perform nothing short of image-

editing alchemy, with Photoshop replacing pixels
with other information, meaning you can clone
away items in a blink of an eye. Once you get used to
how they work, there’s no turning back! Here’s a look
at the two features.

Content-Aware fill
Make a quick selection around the blemish in your image,
go to Edit>Fill, choose Content-Aware for Contents and just
click OK. Repeat if it doesn’t look good the first time.

Content-Aware
spot healing

Content-Aware is also available for the Spot
Healing Brush in CS5. Just choose it from the
Options bar and then brush over objects to
remove them. Enjoy the best results ever seen
in retouching tools.

Protect your work by creating a quick and simple
brush to stamp your copyright information

PHOTOSHOP 5 MINUTE TIPS & FIXES

25
co Ba
rre sic
cti
on
s

Tip 42

Tip 41

Turn down the noise!
Camera RAW is the best choice for
Noise Removal, even with JPEG images
In the Bridge, right-click the image and
choose Open In Camera Raw. Click the
Detail tab. The Luminance slider is use to
remove Luminance noise (dark speckles),
and the Color slider removes Colour Noise.
Detail slider help to keep edges sharp.

Reshape with Puppet Warp
Puppet Warp is a very powerful tool,
but knowing how best to use it is the key to success
When you’re using Puppet Warp, it’s important that
you not only place pins to move, but that you first
place pins to ‘lock down’ the parts of the image you
want to remain in place and not be affected by the
warping. As the walkthrough below shows, using this
feature correctly allows you to make very fine, targeted
changes, with subtle, undetectable results.

Make your images bend to
magical Puppet Warp tool your whim with the

02
p
Black, white, Ti
43
and colour
Really mix things up by combining
black and white with a splash of colour
The best way to create a selective colour
effect is via a layer mask. Go to Layer>New
Adjustment Layer>Black And White.
Choose one of the Black and White Presets,
or adjust the sliders within the black and
white panel to create a good, strong
black-and-white image. Click on the layer
mask attached to the adjustment layer
and choose the Brush tool, making sure
that Black is your Foreground Color. Now
just paint with black wherever you want to
restore colour from the background layer
beneath. You can hide overpainted areas
by painting back into the mask with white.

01

Lock down Click to place various pins
around and within the object to be
warped. These ‘lock down’ pins will prevent
other areas of the subject being warped.

04
03

Drag to distort Now simply click
and drag of the selected pins to
distort this particular area of the image. You
can select multiple pins by Shift-clicking.

Tip 44
Adjust
multiple
layers

Use a Black
and White
adjustment
layer to
create the
overall
mono
image

Paint on the
adjustment
layer mask
to reveal
to colour
from the
background
beneath

26

PHOTOSHOP 5 MINUTE TIPS & FIXES

Pins for
warping Now
click to place pins
along the feature that
you want to bend,
warp or adjust. You
can activate individual
pins simply by clicking
on them.

Cmd/Ctrl-click multiple
layers before adjusting
Opacity or Fill

Adjust the Opacity
and Fill of multiple
layers at once
In Photoshop CS5, you
can adjust the Opacity
of two or more layers
at once. Cmd/Ctrl-click
multiple layers and
adjust the slider

Add and
subtract
layer At any time you
can add more pins
or delete some. To
delete a pin, right-click
it and then choose
Delete Pin. By carefully
controlling where
pins are placed you’ll
be able to producing
convincing results.

Classic hand tinting

Create classic hand tinted black-and-white images
with the addition of a layer
Add a new layer above your black-and-white image,
setting the blending mode to Color. Use a soft brush
with your chosen colours to paint over the image, for
classic hand tinting.

Tip

45

Add a layer and
start painting
to add hints of
colour to black
and whites
Tip 46
Super-fast high key effect

Simple and effective
skin smoothing

Create a high-key image from the Black channel in
CMYK mode
The classic high key effect can work very well for a
really modern portrait effect, and by duplicating your
image, changing its colour mode and stealing just one
channel, you can create this effect quickly and easily.

Duplicate your image (Image>Duplicate).
On the duplicate image go to
Image>Mode>CMYK. Click on the
Channels palette, click on the Black
channel, Select All and hit Cmd/Ctrl+C
top copy it. Return to your RGB image,
and go to Cmd/Ctrl+V to paste. Flatten
the image and you’re done!

Tip

47

Use the Median filter to effectively smooth skin
Duplicate the Background layer (Cmd/Ctrl+J). Now go
to Filter>Noise>Median. Use a small Radius value, just
enough to remove the unwanted skin texture (you’ll be
able to judge this effect within the preview window).
Hit OK to apply the filter. Now, on this smoothed layer,
apply a layer mask via Layer>Layer Mask>Hide All.
The layer will now be hidden completely. Choose the
Brush tool, click directly on the layer mask thumbnail
and paint over the skin with white at 75% Opacity,
avoiding the eyes, lips and other facial features that
don’t want the smoothing effect. You can make the
final smoothing effect look completely convincing by
reducing the opacity of this layer a little.

ration Tip
Change specific colours via Hue/Satu
With Hue/Saturation you can make specific colour changes as well as global ones
In Hue/Saturation, choose any colour from the Colors drop-down. Now choose the
eyedropper and click the colour in your image you want to change. Just move the Hue
slider to adjust that particular colour.

48
Don’t let exaggerated skin texture spoil your portrait shots

Choose layers by content

Quickly alter
the colour
of an object
using the Hue/
Saturation
command

Reset, don’t cancel

Tip

50

Don’t search for a particular layer. Ctrl/Cmd
-click to choose it
If you are working on multi-layered documents, finding the
one you want can be a nightmare. Choose the Move tool
(‘V’) and Cmd/Ctrl-click on any element in your image to
automatically jump to that layer in the Layers palette. Simple!

Tip 49

If you make a mistake
with an adjustment,
don’t cancel out of it, just
hit Reset
Whenever you’re working
within a dialog box that has
a Cancel button, you can
hold down the Opt/Alt key to
change this to a Reset button.

Holding down the Opt/Alt key
transforms Cancel into Reset

Cmd/Ctrl-click on any element in your image
to select that layer in the Layers palette

PHOTOSHOP 5 MINUTE TIPS & FIXES

27
co B
rre asi
cti c
on
s

Correct lens distortion
This frequent photographic snag is solved within just a matter of minutes

L

ens distortion is most obvious in
architectural photographs, when
the top of the building appears to
be smaller than the bottom.
You can guarantee this type of
distortion when you’re not completely
square on to your subject. But let’s be
honest, this is impossible standing at
ground level and looking upwards.
You’ll also notice lens distortion when
using a wide-angle lens to capture
something that is supposed to be straightedged. And that’s where Photoshop
comes in, with its easy-to-use Lens
Correction filter.
If your image appears to be an
architectural disaster then you’ve got a
case of lens distortion – this five-minute fix
should square-out any problems.

Before

After

Top tip: Using grids and guides over
the top of your image will show exactly
what’s straight or wonky.
THE RIGHT PERSPECTIVE

This could well be the fastest photographic solution in history

01 

Set up grid Open an image that
has plenty of lens distortion and
duplicate its layer in the Layers palette. Go
to Filter>Distort>Lens Correction in the top
menu bar and this will open a new dialog box.
Select the Move Grid tool and shift the grid so
it sits on an edge of the subject in your image.

28

PHOTOSHOP 5 MINUTE TIPS & FIXES

02

Straighten up First use the
Vertical Perspective slider under
Transform to correct the tilt. Try aligning the
tilt correction with the grid. Now adjust the
Remove Distortion slider at the top right of the
box to pinch or expand the pic from its centre.
Move between these two sliders for best
results, then hit OK.

03

Crop down The edges of the image
will now be bowed out of shape. Select
the Crop tool and cut these edges out. Spin and
resize the cropping area to make the subject as
upright as possible. Be prepared to lose areas
of the image due to this cropping, but more
importantly, your image should now have the
right perspective – in under five minutes!
Flip for better
composition

Create symmetrical landscapes
for striking images

F

ormal gardens
use symmetry to plan
planting and make a
pleasing composition for the
eye, but you can never train
nature to conform! And if you
have a formal scene, as we have
here, any imperfections ruin
the dream of a symmetrical
composition. But with a spot
of selecting, copying, pasting
and flipping, you can enjoy the
perfect composition you have
always dreamt of.

Top tip: Use this
technique to expand
horizons and make
panoramic effects.
Simply copy, paste
and shift along.
THREE STEPS TO PERFECT SYMMETRY

Be a digital maestro

01

Divide and conquer Open
your image and then pick the
Rectangular Marquee tool. Zoom into your
image so you can see everything and then click
and drag to select half of the image. We decided
to take the fountain as the centre of the shot and
so cut that in half.

02

Copy cat With the selection
all selected, go to Edit>Copy and
then Edit>Paste. Drag this layer down to
the New Layer icon in the Layers palette
to duplicate. Click the eye icon next to the
Background layer (your original image) to turn
it off. That keeps it safe.

03

Flippin’ good Ensuring you
have the top layer selected, go to
Edit>Transform>Flip Horizontal. The selection
from Step 1 is now back to front. Go to the
Move tool and either hold down Shift and
click-drag to the right, or use the arrow keys to
nudge it along. Make sure the middle lines up
and then bask in the symmetry!

PHOTOSHOP 5 MINUTE TIPS & FIXES

29
co B
rre asi
cti c
on
s

Before

Tips
fixes
Straighten
in PS CS5

CS5 users have
a dedicated
straightening tool.
Well, kind of. Open
your wonky image
and click on the
Eyedropper tool in
the Toolbar. When
the fly-out menu
appears, pick the
Ruler tool. Click and
drag this along an
edge that should be
straight. Let go, scoot
up to the Options
bar and click the
Straighten button.
Your image will be
straightened AND
cropped. If you want
to crop it yourself,
simply hold down
the Opt/Alt key on
your keyboard while
you are clicking the
Straighten button.

Crop and straighten
images
I

A wonky horizon can easily ruin an image, but it’s as easy as
pie to sort these out using Photoshop’s automated tool

n an ideal world we would always take photos with a
tripod carefully set up to ensure that our images were
perfectly straight. But, let’s face it, when you’re out and about
and in the middle of a photographic frenzy, worrying about a minor
thing like a straight horizon isn’t high on the list of priorities. Until you
get home, that is, and look through your images and realise every
one looks as though its contents are clinging on for dear life to avoid
falling out of the frame! It’s a particular problem with landscape
shots where there is a clear horizon that should be straight and
obviously isn’t.

30

PHOTOSHOP 5 MINUTE TIPS & FIXES

Well, worry not, because Photoshop has a tool to sort you out.
Actually there are various tools, depending on what version of
Photoshop you are using. We are concentrating on the Straighten tool
using Photoshop Elements 9, as CS5 now boasts a similar feature. Draw
along the area that should be straight and then wait while it is rotated so
things are nice and level. Easy peasy.
If you haven’t got Elements or CS5, you are not doomed to a lifetime
of wonky scenes; there are a couple of options for doing a similar thing,
so we’ll look at these as well. CS5 is dealt with in the tip box, while earlier
versions of Photoshop are examined from Step 4.
Straighten horizonS with PhotoShoP elementS

make light work of sliding landscapes

01

Set the tool up Open up the image
that you need to straighten. The
wonky horizon is pretty noticeable – we must
have had one leg in a hole! Go to the Toolbar
and pick the Straighten tool, then, in the
Canvas Options menu, select Crop to Remove
Background (earlier versions of Elements will
say Trim Background).

04

02

Drag to straighten The idea is to
drag the Straighten tool across an
edge that should be straight. Most of the time
that will be a horizon line, as is the case here.
Zoom in to the image if you need to (Cmd/Ctrl
and +) and, starting from the left edge, click
and drag the tool across the horizon (keep the
mouse button held down).

in CS or above As mentioned, it is possible to straighten
images in full versions of Photoshop. One way to do this is with
the Measure tool. This is hiding behind the Eyedropper, so click on that
in the Toolbar to get the fly-out menu. Select the Measure tool and then
click and drag across and edge that should be straight.

03

on the straight and narrow As soon
as you let go of the mouse button,
Elements will present a lovely straightened
image for you, all nice and trim. If you’d rather
crop away excess yourself, simply select Crop
to Original Size (this appears as simply Original
Size in earlier versions of Elements) from the
Canvas Options area.

05

rotate the canvas Go to Image>Rotate Canvas>Arbitrary to
call up a window. An angle will be automatically entered – this
comes from the line you drew with the Measure tool. Photoshop will
also have worked out which way your image needs to rotate. Click OK
and then use the Crop tool to trim the edges.

07
06

Straighten with lens Correction
Another way of straightening images
in pre-CS5 versions of Photoshop lies within
the Filters menu. Go to Filter>Distort>Lens
Correction. This will call up a new window.
Go over to the left-hand side and pick the
Straighten icon (second one down).

Draw
across the
horizon With the
tool selected, click
and drag across an
edge that should
be straight (is this
starting to sound
familiar?). As soon
as you let go of the
mouse, Photoshop
will whip your
image around so the
horizon is straight.

PHOTOSHOP 5 minuTe TiPS & fixeS

31
co Ba
rre sic
cti
on
s

ContentAware Scaling
An intelligent method of selectively resizing images

C

ontent-Aware Scaling came into Photoshop in version
CS4. It’s grouped with the Transform tools and acts in the
same way, but with a bonus.
Found in the Edit menu, Content-Aware Scaling not only resizes
your image but also keeps the main subject at its original size. It
resizes all the other areas that have no distinct subject. When you use
the Free Transform tool in Photoshop to adjust an image’s size, the
entire contents are affected. Content-Aware Scaling recognises areas
of similarity such as sky or grass, and only resizes these.
If an image has more than one main subject, for example a
portrait of a group of people, the areas lying between each
person are resized. However, this isn’t always perfect every time, as
Content-Aware Scaling can produce rough patches. This is where
some pixels haven’t been blended smoothly, so there are limits to
the extent of rescaling. It all changes depending on the subject
you’re dealing with.
Using this technique to resize an image saves possible hours of
painstaking cropping, copying and cloning. Combine ContentAware Scaling with selections saved as alpha channels, and you can
protect areas against any distortion.
Read through this guide to discover a solution to distortion
caused by Content-Aware Scaling and how best to use this essential
feature in Photoshop.

Where is it? Content-Aware Scaling
can be found in the Edit menu just
above the other Transform tools such
as Free Transform. Its job is the same,
but it keeps the dimensions of the
main subjects in your image.

After

Content-Aware Scaling

Quick Mask mode

Content-Aware Scaling is only available
in CS4 onwards, and is an alternative to
the Free Transform tool. If you’re looking
to reshape an image to fit a certain frame
without distorting the main subjects,
Content-Aware Scaling is made to do just
that. It’s located under Edit>Content-Aware
Scale. Your image is given markers on all
four of its corners and sides to show the
boundary. By tweaking the settings in the
Options bar it can be set to specific dimensions, to protect skin tones and to
adjust the amount of distortion. By making selections around subjects you
can prevent them being distorted. Practise the three steps on the next page
to learn how to use Content-Aware Scaling with a new alpha channel.

Select the Magic Wand tool and
make a selection around your
subject. Enter Quick Mask mode
by clicking on the thumbnail at
the bottom of the toolbar, then
using the Brush and Eraser tools
you can make your selection
more accurate. Experiment with
other selection methods – for
example try using the Magnetic Lasso tool, which sticks to
the edges of your subject as you run it around the edges. Try
the Pen tool to create a smoother selection by joining points
along an edge. You can then resize these parts or save the
selection (Select>Save Selection).

A fast way to resize

32

PHOTOSHOP 5 MINUTE TIPS & FIXES

Multiple methods of selection
Making Alpha channels
Protecting skin tones If your image
contains people, skin can be protected
from possible distortion. In the Options
bar simply select the button with a
person on it to activate this.

Content Aware Scaling can work with alpha channels to protect
an area from distortion. They save a selection for repeated use,
great for protecting many subjects at once.

01

Make a
selection Use
the Quick Selection
tool to select the
main subject. Use a
small brush for trickier
areas, and use
the Magic Wand
tool to select
multiple subjects
in your image.

Amount adjustment The level of distortion can
be adjusted using the Amount slider. At 100% the
main subjects are protected as much as they can
be when applying Content-Aware Scaling.

02

Save your
selection
When the selection
is complete, head
to Select>Save
Selection. In the
dialog box name your
selection and hit OK.
Open the Channels
palette and you’ll
see it saved there. Hit
Cmd/Ctrl+D.
Locate the
selection
Go to Edit>ContentAware Scale, and
in the Options bar,
under Protect, select
the name of the
channel just made.
Now when you
resize your image
the channel won’t
become distorted.

A closer race We’ve
shortened the distance
between the windsurfers
to make this race closer
and more intense. Notice
none of the windsurfers
have been affected.

03

Before resizing

Protect skin tones

Minimise distortion

Content-Aware Scaling has an
option to retain quality and shape
in skin tones in portrait images.
This is ideal if you want to retain
the background in a portrait that
has a landscape orientation
and you need to change it to
portrait. Select the option from
Edit>Content-Aware Scale, and
in the Options bar click on the
button shaped as a person.
This protects a person’s face from distortion and looking blocky from
overlapping pixels. It also saves you making a selection around a person
each time you want to resize with Content-Aware Scaling.

To minimise any distortion
when you use ContentAware Scaling, simply
adjust the Amount slider
in the Options bar at the
top of the Photoshop
interface. With a value of
100% the adjustment is
more considerate towards
the main subject in your image. However, if you set this to a
lower value such as 10%, the main subject and background
will both be squashed and moved out of shape. Try to
experiment with different values to achieve the correct level of
distortion for your particular image.

Designed for portraits

Improving the look of resizing

PHOTOSHOP 5 MINUTE TIPS & FIXES

33
co B
rre asi
cti c
on
s

Control Hue,
Saturation
andLightness
This clever command can be used to powerful effect
for enhancing colours in your artwork

Tips
fixes
Helping
hand

In Photoshop
CS4 and CS5 the
Hue/Saturation
menu contains
a helpful tool for
changing the
saturation of a
chosen colour.
All that’s
required
is to click on a
colour in your
image and to
drag left or right
to remove or
add saturation.

O

ne of the many colour adjustment tools featured
in Photoshop, the Hue, Saturation and Lightness
sliders are accurate ways for boosting or removing
colours. Found under Image>Adjustments, the controls in
this command can be used for creating different effects, from
sepia toning to boosting the red subjects in your image.
We take a look at a couple of these effects using the Hue
and Saturation adjustments. The Hue slider, for example, can
be used to adjust the entire colour range of an image, or just
a small area of selected colour in your image. That’s exactly
what we’ve done in the step-by-step over the page, also
employing layer masks for tweaking multiple subjects.
The Saturation control changes the intensity of colours,
or can be used for removing colour altogether. This is an
effective method of converting an image to black and white,
without losing tonal detail. It is popular with photographers
looking to quickly remove colour, or for creating a selective
black and white effect.
Mastering all three adjustments can bring dramatic
changes to your artwork. They can help bring more focus to a
subject’s colour to make it stand out from the rest.

Selective black and whites

Reduce or intensify saturation

Inside the Hue/Saturation menu is a list of colour
channels in your image. These can be individually
selected for editing, whether it’s increasing
saturation or turning black and white. It’s a fast
method of experimenting with different looks.

01

Select tool
Open the
Hue/Saturation
menu by going to
Image>Adjustments.
Click on the drop-down
menu of colour channels.
Change the channel to a
specific colour, such
as Yellow.

02

Remove colour
Reduce the
Saturation slider to
-100 to remove all signs
of colour. The range
of colours affected, as
well as yellow, is shown
at the bottom of the
menu between the two
coloured bars.

03

Adding other
colours To
intensify or desaturate
other colours in your
image, choose a different
colour in the drop-down
list, and manipulate
the Saturation. Master
will affect all colours in
your image.

Hue, Saturation or Lightness?

Selective colour adjustment

When you open the command, you’re
presented with three sliders: Hue,
Saturation and Lightness. Knowing
how each one affects your image will
save a lot of potential undoing. The
Hue adjustment shifts the entire colour
range, which can create peculiar results;
the Saturation adjustment reduces the
strength of colour in your image, and
can result in completely black-and-white
images. The last adjustment, Lightness,
adds either black or white to colours for a lighter colour range. All three
adjustments, however, can be applied to a specific colour instead of the
entire image, making these adjustments even more versatile.

The Hue/Saturation command
contains a list of colour
channels, as well as an option
adjust all colour channels
(Master). If your image is of
a sunset, for example, you
may want to boost the red/
orange colour on the horizon, or change the colour of the
sunset altogether. By selecting Red from the list of channels
in the menu, you can shift the Hue slider to change only the
red subjects. The changes may be subtle, but when viewed
as a whole, the difference is very noticeable. Selecting colour
individually creates more contrast between subjects and
makes your image look more dramatic.

Three sliders to adjust light and colour

34

PHOTOSHOP 5 MINUTE TIPS & FIXES

Picking out a colour to enhance
Preset list Inside the Hue/
Saturation dialog there is a list of
Presets containing some of the
most popular styles of art. Select
one of these, and you’ll see your
image change instantly.

Quick colour change By selecting
the small hand symbol inside the menu,
you can click and drag over any colour to
change its colour or the saturation of the
colour. Photoshop automatically selects
the colour range when using this tool.

Colorize an image The Colorize
option is a great way to instantly
add a single colour over your entire
image. Its colour can be changed
using the Hue slider, as well as its
intensity using the Saturation slider.

Colour slider The rainbow of colours
at the base of the menu contain grey
markers. These can be adjusted to
change the spread and feathering of
colour adjustment across the spectrum.

Replacing colours with one tone

Colour pickers

The Hue/Saturation menu has
the option Colorize. By ticking its
box, your image loses all colours
present with a single tone. Sliding
the Hue adjustment changes this
tone to create an abstract look to
your artwork. The Saturation slider
can also be put to good use in this
effect, altering the intensity of
the Colorize tone. Colorize is
useful for creating a traditional
cyanotype image, using a blue from the Hue adjustment slider. Highlights
are tinted blue, as well as shadows shifting in colour. It’s also great for
creating sepia-toned images.

The menu is supplied with
three colour pickers, or
more commonly known
as ‘eyedroppers’. These
eyedroppers become active
when a colour channel is
selected other than Master. The
main Eyedropper tool will pick
out any colour clicked on, so it can be adjusted. The two other
eyedroppers are Add to Sample and Subtract from Sample,
indicated with plus and minus symbols. These are useful
for adding or removing a colour into the mix after making an
adjustment. The colour range affected by adjustments is
shown within the dark grey bar next to the two coloured bars.

Colorize artwork

Adjust a colour with the eyedropper

PHOTOSHOP 5 MINUTE TIPS & FIXES

35
co B
rre asi
cti c
on
s

FROM ONE COLOUR TO THE NEXT

How to alter colour separately across your image

01

Make selection Duplicate the background
layer to work non-destructively. Choose the
Quick Selection tool, or the selection method of your
choice, and set its Diameter to 50px. Make sure AutoEnhance is ticked in the Options bar.

04

Manipulate Hue On the
duplicated background layer, click
on the image’s thumbnail instead of the layer
mask’s. Go to Image>Adjustments>Hue/
Saturation, and slide to the Hue slider to your
desired new colour.

02

Select first object With the Quick
Selection tool, click and drag a
selection over your subject. Click on the Refine
Edge menu in the Options bar, and set Feather
to 1.5px, Expand to +3 and Radius to 2.9px.
This will change depending on the image you
are using.

05

Adjust another Duplicate the
background once more and place
below the previous duplicate layer. Using
the Quick Selection tool, select another
subject to alter. Apply the same Refine Edge
command and hit Add Layer Mask button. Hit
Cmd/Ctrl+D.

03

Add layer mask With
the selection active and
the duplicated background layer
highlighted, click on the Add Layer
Mask button in the Layers palette. This
separates the particular subject from
the rest of the image. Now hit Cmd/
Ctrl+D to remove the selection.

06

Multi-coloured Go into the Hue/
Saturation adjustment again and
adjust the Hue slider to give this subject a
change of colour. The layer above this won’t
be affected, and both subjects can now be
adapted separately.

Useful presets

Quick before/after

Photoshop has a number of preset
effects inside the Hue/Saturation
adjustment menu. These allow you
to apply effects quickly, and you can
even adjust them further to suit your
own image. The list of presets includes
Cyanotype, Increase Saturation,
Yellow Boost and Old Style. Presets
help you achieve popular effects, but
you can even save your own from
inside the menu to reuse on future artwork. Next to the OK button, another
set of options exists: Save, Load and Delete Current Preset. This gives you
control over what you want to do with your favourite effects; you just have to
remember to hit Save before clicking on OK!

The Preview option in the dialog
window can stay on all the time, so
you can see any changes applied
in real-time. However, when you
think you’ve tweaked the Hue,
Saturation and Lightness sliders for
the perfect effect, flick the Preview
option on and off and you can see
the before and after versions of your image. This way there’s
no need to hit OK and then ‘undo’ if you change your mind.
It’s also good practice to duplicate the image’s layer before
applying these effects. Alternatively, apply Hue/Saturation as
a new adjustment layer inside the Layers palette. That way you
can make a quick retreat if anything goes wrong.

Already prepared effects to use

36

PHOTOSHOP 5 MINUTE TIPS & FIXES

Using Preview to your advantage
Rescue dull shots with
Brightness/Contrast
Get to grips with this useful command and pump
some life back into bleak photos

I

t doesn’t matter if you haven’t got elaborate light
setups, reflectors and all sorts – you can still take
good photos at home. Even if, at first glance, the
results are decidedly dodgy. Take our example shot
here. This was taken by a window (it was a cloudy day),
with no other light source and no tripod. It looks too
dark to be of any use, but if we bring the Brightness/
Contrast command into play we can tease out the
colours and tones to end up with a vibrant shot that
could have been taken in a professional studio.

Top tip: Use this technique on
any of your indoor shots. If
you find yourself sticking to
the same settings, record it as Before
an action or turn into a droplet
to run on batches of images.

After

FROM SHADOWY TO SPRIGHTLY

Coax the colour and contrast out from the shadows

01

More brightness Open up
your image and then head up to
Image>Adjustments>Brightness/Contrast.
Move the Brightness slider to +28. Things look
better already – tonally flat, but better.

02

Contrast time Brightness is for
livening up the image and needs to
be teamed with contrast to add depth and
interest. Move the Contrast slider to +15 to do
exactly this. Don’t go too far, though, otherwise
the highlights will blow. Click OK when done.

03

Add some zing The darkness has
been wafted away but we can still
introduce more colour to the image. Go to
Image>Adjustments once more and pick Hue/
Saturation. Select Reds from the Channel dropdown menu and move the Saturation slider
to the right then choose Yellows and do the
same. Much better!

PHOTOSHOP 5 MINUTE TIPS & FIXES

37
co Ba
rre sic
cti
on
s

Isolating objects

The Quick Mask mode is a fantastic way to select objects or people
within a scene. It’s not as fiddly as the Pen tool and is easily erased
if you make a mistake...

01

Activate Open
up an image
in Photoshop and hit
‘Q’ to select the Quick
Mask mode. You can
also activate it by
choosing the grey
box with a white
circle at the bottom of
the toolbar.

Quick Mask
Discover this versatile tool, which
is great for making selections

T

he Quick Mask mode is one of the most versatile
tools you are likely to find within Photoshop’s
expansive toolbox. Its primary use is for isolating areas
that you want left untouched by any adjustments or tweaks.
Quick Mask mode has been around since Photoshop 6.0
and offers a fantastic alternative to the traditional Selection
tools. If you find yourself more partial to using the Paintbrush
rather than the fiddly Pen tool, then this could well become
your ideal selection method.
The Quick Mask mode is activated by clicking on the
square icon that contains a white circle. This is situated at the
bottom of the toolbar alongside the Standard mode (a
white box with a white circle). For instant access, you can
simply hit the letter ‘Q’ on your keyboard and Quick Mask
mode activates.
This is a fantastic feature to help in the creation of a whole
host of effects. Use it to create quick and easy vignettes for
your portraits, paint a Quick Mask on specific colours to
achieve amazing selective colouring results, or simply use it
to protect an area from an image adjustment you’re about
to perform.
If you’ve never used this feature before, we’re certain it will
be in constant use from this day forward!

02

Brush it
on Select
the Brush tool from
the toolbar (‘B’) and
choose a suitable
size using the square
bracket keys. Paint
over everything you
don’t need, using the
Eraser if you make
any mistakes.

03

Enjoy Now
deactivate
the Quick Mask by
hitting ‘Q’. You’ll have
an isolated selection
highlighted by
marching ants. You
are now free to move
this selection, cut it,
copy it and generally
do as you wish!

Change the options

Control the mask

The colour of the mask can often
be hard to see against the other
colours in your image. If this is the
case, simply double-click on the
Quick Mask icon and a dialog box will
appear. Choose a mask colour and
mask opacity here. You will also be
presented with two display options:
Masked Areas and Selected Areas.
The Masked Areas option sets your
masked areas to black (opaque).
Simply paint with more black to add to the mask. Paint with white to add to
your selected area instead. The Selected Areas option is the opposite –
masked areas are white (transparent) and selected areas are black.

For extra control when applying
a Quick Mask, you can mix and
match the hardness of your
brushes. This is ideal for when
you want to cut out a picture of an
animal, for example. Opt for a soft
brush to trace the fur, and choose a
harder brush to mask out the more
defined features. The soft brush
acts as a feather effect and means your final cutout will be
less harsh along the edges. These brush-swapping antics
can all be performed within one Quick Mask session, giving
you ultimate control at speed. This is a far more accurate way
of cutting out, compared to using the Lasso for selections.

Alter the workings of the mask

38

PHOTOSHOP 5 MINUTE TIPS & FIXES

Use brushes for a feathered effect
Get control with brushes You can use any
brush to apply a Quick Mask. We recommend
you use a soft brush for details such as hair
and fur – this will give you a softer, more
subtle selection.

Colour your mask If the colour of your
mask is too similar to the colours within
your image, double-click on the Quick
Mask icon. Now click on the Color swatch
and select a colour. You can adjust the
opacity here as well.

Quick Mask settings
To reverse the way the mask
operates, just double-click on
the Quick Mask icon and select
Masked Areas (masked areas
are black) or Selected Areas
(masked areas are white).

Dialog Hit Match Color and this box
appears. Use the drop-down Source
menu to select your source image.
Ensure Preview is checked to see the
change, and use the Luminance, Color
Intensity and Fade sliders to adjust.

Match Color The Match Color tool is
found in Image>Adjustments>Match
Color. Ensure that both your images are
open in Photoshop first, before selecting
this tool. Once selected, use the dialog
box to create your settings.

Selective colouring

Quick Mask tips

Selective colouring is a fantastic way
to make a dramatic statement in your
images especially in portraits. By
applying a Quick Mask to an area of
colour you wish to preserve, you can
then desaturate the remaining portion
(Image>Adjustments>Desaturate).
Your masked area will retain the original
colour and will look striking against
the black and white background.
Alternatively, you can desaturate your
image first and then isolate specific parts of it, which you can colourise.
This is ideal for old and new photos alike, and is a super-fast effect that
you can play with to perfection.

A handy tip to know is that you
can make a selection with any
of your favourite Selection
tools and then hit ‘Q’ to change
the selection into a mask.
Another top hint – once you
have applied a mask, hit ‘Q’ to
leave the Quick Mask mode,
and your selection will appear in the form of marching ants.
Move this to a new layer by pressing Cmd/Ctrl+J. For a quick
way to invert your mask, simply press Cmd/Ctrl+I. Another
gem, when trying to mask fiddly areas, is to switch to the
Pencil tool for extra precision. In fact, any of the painting tools
can be used when creating a Quick Mask.

Use Quick Mask to pop colours

The little things you should know

PHOTOSHOP 5 MINUTE TIPS & FIXES

39
co Ba
rre sic
cti
on
s

Magic
Wand tool

Making a selection

The Magic Wand is highly versatile and is used to separate areas
of colour. In this three-stepper we make sure you tick every box
when selecting with this tool.

01

Set Tolerance
Select the
Magic Wand in the
toolbar. In the Options
bar, set Tolerance
to 32 to select a
small area of colour.
Tick Anti-Alias and
Contiguous, but leave
Sample All Layers
unchecked.

Discover this versatile tool, which
is great for making selections

M

ost people associate magic wands with
magicians and their showmanship, but
Photoshop has its own Magic Wand tool, and it’s
not used for pulling rabbits out of hats.
The Magic Wand tool is one of Photoshop’s main
Selection tools, and it’s a handy way to customise your
selections. It works
by sectioning off particular colours inside your image. The
selection process is affected by a collection of adjustment
options. In this detailed tool guide we give you a rundown of
the most important adjustments to remember.
The most effective way to use the Magic Wand tool is to
zoom in to your image close enough to see each pixel. Then
the four Selection adjustments – New, Add, Subtract and
Intersect – can be used with more precision.
The Select menu at the top of Photoshop contains all
its hidden adjustments, which affect the way the tool
behaves. These options range from a collection of Modify
adjustments, a Transform Selection option, and among
many others, both Grow and Similar adjustments are found
under the Select menu.
This comprehensive selection tool can be used for
separating two or more subjects, or singling out specific
colours. With all these adjustments and modifications, you
can’t put a foot wrong making selections with Photoshop’s
Magic Wand tool. Let’s have a look at how to use it!

02

Select the
area Click
in the area of colour
you want to mark
off using the Magic
Wand. In the Options
bar are four square
thumbnails: New,
Add, Subtract and
Intersect. Use these to
make your selection.

03

New channel
Ctrl/right-click
in your selection with
the Magic Wand, and
pick Save Selection in
the list. Give it a name,
hit OK and open
the Channels
palette to find your
saved selection.

Quick Mask mode

Adjust Tolerance

A selection is represented by a black
and white dotted line, also known
as ‘marching ants’. Another way to
view the marching ants is in Quick
Mask mode. Select the Edit In Quick
Mask Mode button at the bottom of
the toolbar, and watch the selection
change into a light-red colour cast.
This colour cast allows you to see the
selection in more detail, and you can
add or subtract pixels easily in this
mode. With the Brush and Eraser tools, you can paint or erase the colour
cast to alter the selection. Click on the Quick Mask Mode icon inside the
toolbar to return to Standard editing mode, and to see the marching ants.

The Magic Wand tool works
by selecting pixels of a
similar colour, and it comes
equipped with a Tolerance
adjustment. The Tolerance
of the Magic Wand tool
decides how much of your
image a selection will cover.
The Tolerance is preset to
32, but you can easily change this to suit the size of the area
you want to pick out. Just enter an amount into the Tolerance
adjustment box to change it. The bigger the number, the
larger the area it covers. With the Tolerance set to 32, a
selection spreads across only a small area of a certain colour.

An accurate way to select

40

PHOTOSHOP 5 MINUTE TIPS & FIXES

Increase the spread of a selection
Selection options These four options
let you create a new selection, add
or subtract from a selection, and also
intersect an existing one. With their help
you can make a perfect selection.
Options bar There are three
boxes in the Options bar:
Anti-Alias, which smooths
the edges of a selection;
Contiguous, selecting only
neighbouring pixels; and
Sample All Layers, which
accounts for every layer in
your composition.
Tolerance The Tolerance
adjustment of the Magic
Wand tool lets you choose
the size of the selection
you want to make. The
larger the number, the
more pixels the selection
will cover.

The Magic Wand tool This is found with the
Quick Selection tools and next to the Marquee
Selection tools. The cursor changes to (you
guessed it) a magic wand. You can always
press the ‘W’ key for its shortcut.

Boosting colour We increased the saturation of the
fur in this image. We selected the blue sky first, then
went to Select>Inverse to select the cat. We used a
Tolerance value of 60 for the sky to select a large area.

Magic Wand adjustments

Save a selected area

Once a selection is made you can
change it in two ways. Grow and
Similar are both found under the Select
menu, or you can Ctrl/right-click
anywhere inside a selected area to
find them in a drop-down menu. Grow
makes the selection gradually bigger
and will select the same colours. The
Similar adjustment picks out all the
colours that are similar to the ones
already inside your initial selection,
but it jumps to any part of your image
that is similar. Similar is ideal for
selective black and white techniques.

When you save a
selection as a new
channel, you can adjust
it any way you like at any
stage. To save a selection,
go to Select>Save
Selection. In the dialog
box, set the Document
option to your current
image and give the
channel a new name. Hit OK, and the new channel will appear
in the Channels palette. By selecting its layer, you can then
use the Brush or Eraser tools to add or subtract the selection.
It works in a similar way to the Quick Mask mode.

Experiment with Grow and Similar

Create new channels with the Magic Wand

PHOTOSHOP 5 MINUTE TIPS & FIXES

41
co B
rre asi
cti c
on
s
Tips
fixes
Stock,
textures and
inspiration

All the pictures and
textures used in this
tutorial came from
the stock.XCHNG
website (www.sxc.
hu). This is a great
resource for free
stock images and
textures to use in your
own projects. We
can also use grunge
brushes within our
projects – these are
useful for adding
additional
texture. You’ll
find www.
brusheezy.com/
brushes?search=
grunge very helpful
here. For help on
installing brushes
take a look at www.
brusheezy.com /
videos. For some
inspiration for
your own projects
pop over to www.
designzzz.com /
amazing-grungeartworks-alex/.

Make quick selections
Transform photos by selecting parts of photos and then layer them up for a grunge effect

W

hen we talk about grunge in terms of art we refer to
dirty textures and faded colours, often with a macabre
theme and quality. Using dark tones and white space
to emphasise a picture’s message, grunge has steadily become a
popular form of art.
The artist David Carson, who used non-mainstream photographic
techniques and experimental typography to produce his own ‘dirty’
signature style, is often referred to as ‘the father of grunge’. While
working as art director on a number of magazines, including Ray Gun,
Carson developed layouts that often included distorted mixes of
typeface and fractured images.

42

PHOTOSHOP 5 MINUTE TIPS & FIXES

We can use Photoshop to produce dark grunge-inspired
photomanipulations using a combination of blending modes, brushes
and textures. In this tutorial we won’t be using any custom brushes,
but will spend our time focusing on manipulating a stock photo of a
sunflower with textures and adjustment layers. The tools we’ll use are
the layer blending modes, Quick Selection tool, Marquee selections,
Levels, Selective Color adjustment layer, Hue/Saturation adjustment
layers, masks and clipping masks. But it’s really not as hard as it sounds!
On the internet there are many free Photoshop grunge brushes
available for you to download and install. We will explore some of these
as well as alternative textures and inspirational pictures.
Grab your mouse and imaGes…

It’s time to delve into the world of grunge

01

open your files We start our project
by finding and opening a nice
textured background. This will be the base for
our grunge picture that we’ll build upon. Next,
we find a sunny image of a sunflower and
open that up too.

02

Quick selection tool Locate the
Quick Selection tool in the toolbar – it
may be hidden behind the Magic Wand tool.
You can quickly cycle through the tools by
holding Opt/Alt and left-clicking the icons in
the toolbox. Now we want to set up the tool
in the Options bar, which is found at the top of
the screen.

03

it’s a setup In the Options bar select
the Add To Selection option, which
looks like the Quick Selection tool with a plus
symbol above it. Also set up Brush Size to
around 50 pixels. Make sure that Auto-Enhance
is ticked. Now start to paint over the petals of
the sunflower to select them; stop frequently
to let the selection catch up.

04

mistakes
happen Carry
on with the selection,
moving inwards so
you also choose the
stigma (the centre of the
flower). If by accident
you select something
outside the flower, you
can easily remove this by
using the Subtract From
Selection option – it
looks the same as Add
To Selection but with a
minus symbol. Carefully
click/paint over the parts
you don’t want.

05

Copy and paste Copy the flower (Edit>Copy) into
your grunge document above the background layer
(Edit>Paste), and place it in the centre of the picture. Name this layer
‘Sunflower’. Next, add a Levels and Selective Color adjustment layer
above the Sunflower layer. The adjustment layers can be found by
going to Image>Adjustments in the toolbar.

07

06

Promotion Select both adjustment
layers; promote them to a clipping
layer on the Sunflower layer (Layer>Create
Clipping Mask). Open Levels and make
the Input Levels read 0,1.54, 255. Open the
Selective Color adjustment layer; hit Yellow.
Move the Cyan, Magenta, Yellow sliders left so
they read -100%.

merge
Select the
three layers (Levels,
Color adjustment,
Sunflower) and
merge via Cmd/
Ctrl+E. Name it
‘Sunflower Merged’.
As in step 5, add
and clip a Levels
adjustment layer. Set
the Input levels to
0,0.63,255. Use a softedged brush with
colour set to Black
and randomly mask
some dark colour.

PHOTOSHOP 5 mInuTe TIPS & fIxeS

43
Photoshop 5 minute tips & fixes vol 01   2013  UK

More Related Content

What's hot

PPT Tutorial Assignment
PPT Tutorial AssignmentPPT Tutorial Assignment
PPT Tutorial Assignmentgiancc
 
Power Point Tutorial
Power Point TutorialPower Point Tutorial
Power Point Tutorialapinti
 
Storybook digi class presentation
Storybook digi class presentationStorybook digi class presentation
Storybook digi class presentationdebvell
 
Photoshop the whole thing
Photoshop the whole thingPhotoshop the whole thing
Photoshop the whole thingGareth Hill
 
Digital Photography
Digital PhotographyDigital Photography
Digital Photographybrodeel
 
Cobham Screen Shot
Cobham Screen ShotCobham Screen Shot
Cobham Screen ShotBobBottomley
 
Microsoft® office presentation
Microsoft® office presentationMicrosoft® office presentation
Microsoft® office presentationJames Weagle
 
Training demo
Training demoTraining demo
Training demopje897
 
How to retouch a studio portrait using photoshop
How to retouch a studio portrait using photoshopHow to retouch a studio portrait using photoshop
How to retouch a studio portrait using photoshopClipping Path Specialist
 
Complete FMP Problem Solving
Complete FMP Problem SolvingComplete FMP Problem Solving
Complete FMP Problem SolvingJack Ward
 
Photoshop Lesson 1
Photoshop Lesson 1Photoshop Lesson 1
Photoshop Lesson 1TonyC445
 
Photoshop work
Photoshop work Photoshop work
Photoshop work nelemen
 
Hickman a01-tutorial&quiz
Hickman a01-tutorial&quizHickman a01-tutorial&quiz
Hickman a01-tutorial&quizkylehickman1
 
Instant Photo Overlays
Instant Photo OverlaysInstant Photo Overlays
Instant Photo OverlaysDesignEasy
 
Media evaluation 6
Media evaluation 6Media evaluation 6
Media evaluation 6mwclarke0121
 
Evaluation q6 what have you learnt about technologies
Evaluation q6  what have you learnt about technologiesEvaluation q6  what have you learnt about technologies
Evaluation q6 what have you learnt about technologiesRezamarmulak
 

What's hot (20)

PPT Tutorial Assignment
PPT Tutorial AssignmentPPT Tutorial Assignment
PPT Tutorial Assignment
 
Power Point Tutorial
Power Point TutorialPower Point Tutorial
Power Point Tutorial
 
Storybook digi class presentation
Storybook digi class presentationStorybook digi class presentation
Storybook digi class presentation
 
Photoshop the whole thing
Photoshop the whole thingPhotoshop the whole thing
Photoshop the whole thing
 
Digital Photography
Digital PhotographyDigital Photography
Digital Photography
 
Cobham Screen Shot
Cobham Screen ShotCobham Screen Shot
Cobham Screen Shot
 
Microsoft® office presentation
Microsoft® office presentationMicrosoft® office presentation
Microsoft® office presentation
 
Training demo
Training demoTraining demo
Training demo
 
How to retouch a studio portrait using photoshop
How to retouch a studio portrait using photoshopHow to retouch a studio portrait using photoshop
How to retouch a studio portrait using photoshop
 
Microsoft® Office
Microsoft® OfficeMicrosoft® Office
Microsoft® Office
 
Creative iPhone Editing
Creative iPhone EditingCreative iPhone Editing
Creative iPhone Editing
 
Complete FMP Problem Solving
Complete FMP Problem SolvingComplete FMP Problem Solving
Complete FMP Problem Solving
 
Ps efects
Ps efectsPs efects
Ps efects
 
Photoshop Lesson 1
Photoshop Lesson 1Photoshop Lesson 1
Photoshop Lesson 1
 
Photoshop work
Photoshop work Photoshop work
Photoshop work
 
How to use powerpoint
How to use powerpointHow to use powerpoint
How to use powerpoint
 
Hickman a01-tutorial&quiz
Hickman a01-tutorial&quizHickman a01-tutorial&quiz
Hickman a01-tutorial&quiz
 
Instant Photo Overlays
Instant Photo OverlaysInstant Photo Overlays
Instant Photo Overlays
 
Media evaluation 6
Media evaluation 6Media evaluation 6
Media evaluation 6
 
Evaluation q6 what have you learnt about technologies
Evaluation q6  what have you learnt about technologiesEvaluation q6  what have you learnt about technologies
Evaluation q6 what have you learnt about technologies
 

Viewers also liked

Comic bookcreator2bonus
Comic bookcreator2bonusComic bookcreator2bonus
Comic bookcreator2bonusDaniel kuma
 
Comic bookcreator1bonus
Comic bookcreator1bonusComic bookcreator1bonus
Comic bookcreator1bonusDaniel kuma
 
Curso completo de desenho vol 01 - natureza morta
Curso completo de desenho   vol 01 - natureza mortaCurso completo de desenho   vol 01 - natureza morta
Curso completo de desenho vol 01 - natureza mortapaulojadacosta
 
The Art of Portraiture
The Art of PortraitureThe Art of Portraiture
The Art of PortraitureBrian Anderson
 

Viewers also liked (7)

Comic bookcreator2bonus
Comic bookcreator2bonusComic bookcreator2bonus
Comic bookcreator2bonus
 
Comic bookcreator1bonus
Comic bookcreator1bonusComic bookcreator1bonus
Comic bookcreator1bonus
 
Curso completo de desenho vol 01 - natureza morta
Curso completo de desenho   vol 01 - natureza mortaCurso completo de desenho   vol 01 - natureza morta
Curso completo de desenho vol 01 - natureza morta
 
Drawing faces
Drawing facesDrawing faces
Drawing faces
 
Drawing faces
Drawing facesDrawing faces
Drawing faces
 
The Art of Portraiture
The Art of PortraitureThe Art of Portraiture
The Art of Portraiture
 
Drawing thefemalefigure
Drawing thefemalefigureDrawing thefemalefigure
Drawing thefemalefigure
 

Similar to Photoshop 5 minute tips & fixes vol 01 2013 UK

Jewelry Photo Retouching Using Photoshop
Jewelry Photo Retouching Using PhotoshopJewelry Photo Retouching Using Photoshop
Jewelry Photo Retouching Using PhotoshopMAP Systems (India)
 
Image Processing
Image ProcessingImage Processing
Image Processingtaygage
 
Clipping Path Service-Photo Editor PH
Clipping Path Service-Photo Editor PHClipping Path Service-Photo Editor PH
Clipping Path Service-Photo Editor PHJannatul Suvarna
 
10 photoshop techniques for visualization
10 photoshop techniques for visualization10 photoshop techniques for visualization
10 photoshop techniques for visualizationAniCiije
 
Image Processing Techniques
Image Processing TechniquesImage Processing Techniques
Image Processing TechniquesChris Bailey
 
Photoshop Coaching in Jalandhar
Photoshop Coaching in JalandharPhotoshop Coaching in Jalandhar
Photoshop Coaching in JalandharAnimation Bugs
 
How to Sharpen an Image in Photoshop
How to Sharpen an Image in PhotoshopHow to Sharpen an Image in Photoshop
How to Sharpen an Image in PhotoshopZenith Clipping
 
PaintShop Pro 7 Manual
PaintShop Pro 7 ManualPaintShop Pro 7 Manual
PaintShop Pro 7 ManualLaurel Eddy
 
6 photo editing tips for website image optimization
6 photo editing tips for website image optimization6 photo editing tips for website image optimization
6 photo editing tips for website image optimizationClipping Path Specialist
 
Photoshop Essentials Workshop
Photoshop Essentials WorkshopPhotoshop Essentials Workshop
Photoshop Essentials WorkshopChuck Snyder
 
10 tips for using adobe photoshop
10 tips for using adobe photoshop10 tips for using adobe photoshop
10 tips for using adobe photoshopRayhan Islam
 
10 PowerPoint Hacks to Make Your Decks a Little Less Sucky
10 PowerPoint Hacks to Make Your Decks a Little Less Sucky 10 PowerPoint Hacks to Make Your Decks a Little Less Sucky
10 PowerPoint Hacks to Make Your Decks a Little Less Sucky Andreas Krasser
 
Create a Photo Collage in Photoshop.pdf
Create a Photo Collage in Photoshop.pdfCreate a Photo Collage in Photoshop.pdf
Create a Photo Collage in Photoshop.pdfPinkverge
 
Adobe Photoshop
Adobe PhotoshopAdobe Photoshop
Adobe Photoshopjoelk
 

Similar to Photoshop 5 minute tips & fixes vol 01 2013 UK (20)

Jewelry Photo Retouching Using Photoshop
Jewelry Photo Retouching Using PhotoshopJewelry Photo Retouching Using Photoshop
Jewelry Photo Retouching Using Photoshop
 
Image Processing
Image ProcessingImage Processing
Image Processing
 
Tutorials
TutorialsTutorials
Tutorials
 
Learning Photoshop.pptx
Learning Photoshop.pptxLearning Photoshop.pptx
Learning Photoshop.pptx
 
Photoshop Tutorial
Photoshop TutorialPhotoshop Tutorial
Photoshop Tutorial
 
Clipping Path Service-Photo Editor PH
Clipping Path Service-Photo Editor PHClipping Path Service-Photo Editor PH
Clipping Path Service-Photo Editor PH
 
Photo editing
Photo editingPhoto editing
Photo editing
 
10 photoshop techniques for visualization
10 photoshop techniques for visualization10 photoshop techniques for visualization
10 photoshop techniques for visualization
 
Image Processing Techniques
Image Processing TechniquesImage Processing Techniques
Image Processing Techniques
 
Photoshop Coaching in Jalandhar
Photoshop Coaching in JalandharPhotoshop Coaching in Jalandhar
Photoshop Coaching in Jalandhar
 
How to Sharpen an Image in Photoshop
How to Sharpen an Image in PhotoshopHow to Sharpen an Image in Photoshop
How to Sharpen an Image in Photoshop
 
PaintShop Pro 7 Manual
PaintShop Pro 7 ManualPaintShop Pro 7 Manual
PaintShop Pro 7 Manual
 
6 photo editing tips for website image optimization
6 photo editing tips for website image optimization6 photo editing tips for website image optimization
6 photo editing tips for website image optimization
 
Photoshop Essentials Workshop
Photoshop Essentials WorkshopPhotoshop Essentials Workshop
Photoshop Essentials Workshop
 
10 tips for using adobe photoshop
10 tips for using adobe photoshop10 tips for using adobe photoshop
10 tips for using adobe photoshop
 
10 PowerPoint Hacks to Make Your Decks a Little Less Sucky
10 PowerPoint Hacks to Make Your Decks a Little Less Sucky 10 PowerPoint Hacks to Make Your Decks a Little Less Sucky
10 PowerPoint Hacks to Make Your Decks a Little Less Sucky
 
Create a Photo Collage in Photoshop.pdf
Create a Photo Collage in Photoshop.pdfCreate a Photo Collage in Photoshop.pdf
Create a Photo Collage in Photoshop.pdf
 
Adobe Photoshop
Adobe PhotoshopAdobe Photoshop
Adobe Photoshop
 
Power Point 2007 Get Up To Speed
Power Point 2007  Get Up To SpeedPower Point 2007  Get Up To Speed
Power Point 2007 Get Up To Speed
 
Image processing pro forma
Image processing pro formaImage processing pro forma
Image processing pro forma
 

More from aditya

Kriteria dan Indikator Hutan Kemasyarakatan (SFM)
Kriteria dan Indikator Hutan Kemasyarakatan (SFM)Kriteria dan Indikator Hutan Kemasyarakatan (SFM)
Kriteria dan Indikator Hutan Kemasyarakatan (SFM)aditya
 
Arsenal vs Munchen 20-02-2014 Photoshot by Citra
Arsenal vs Munchen 20-02-2014 Photoshot by CitraArsenal vs Munchen 20-02-2014 Photoshot by Citra
Arsenal vs Munchen 20-02-2014 Photoshot by Citraaditya
 
Premier Guitar - November 2013 USA
Premier Guitar - November 2013  USAPremier Guitar - November 2013  USA
Premier Guitar - November 2013 USAaditya
 
New Scientist - 12 October 2013
New Scientist - 12 October 2013New Scientist - 12 October 2013
New Scientist - 12 October 2013aditya
 
Mens Health - November 2013 USA
Mens Health - November 2013  USAMens Health - November 2013  USA
Mens Health - November 2013 USAaditya
 
Yoga Journal - November 2013 USA
Yoga Journal - November 2013  USAYoga Journal - November 2013  USA
Yoga Journal - November 2013 USAaditya
 
1000 Photoshop Tricks
1000 Photoshop Tricks1000 Photoshop Tricks
1000 Photoshop Tricksaditya
 
UN Redd Programme 2011-2015 Strategy - English
UN Redd Programme 2011-2015 Strategy - EnglishUN Redd Programme 2011-2015 Strategy - English
UN Redd Programme 2011-2015 Strategy - Englishaditya
 
Penerapan Konservasi Tanah Pada Lahan Pasir
Penerapan Konservasi Tanah Pada Lahan PasirPenerapan Konservasi Tanah Pada Lahan Pasir
Penerapan Konservasi Tanah Pada Lahan Pasiraditya
 
Pembangunan partisipatoris dalam pengelolaan daerah aliran sungai
Pembangunan partisipatoris dalam pengelolaan daerah aliran sungaiPembangunan partisipatoris dalam pengelolaan daerah aliran sungai
Pembangunan partisipatoris dalam pengelolaan daerah aliran sungaiaditya
 
Pengukuran debit dan pengambilan
Pengukuran debit dan pengambilanPengukuran debit dan pengambilan
Pengukuran debit dan pengambilanaditya
 
Konservasi Tanah dan Air
Konservasi Tanah dan AirKonservasi Tanah dan Air
Konservasi Tanah dan Airaditya
 

More from aditya (12)

Kriteria dan Indikator Hutan Kemasyarakatan (SFM)
Kriteria dan Indikator Hutan Kemasyarakatan (SFM)Kriteria dan Indikator Hutan Kemasyarakatan (SFM)
Kriteria dan Indikator Hutan Kemasyarakatan (SFM)
 
Arsenal vs Munchen 20-02-2014 Photoshot by Citra
Arsenal vs Munchen 20-02-2014 Photoshot by CitraArsenal vs Munchen 20-02-2014 Photoshot by Citra
Arsenal vs Munchen 20-02-2014 Photoshot by Citra
 
Premier Guitar - November 2013 USA
Premier Guitar - November 2013  USAPremier Guitar - November 2013  USA
Premier Guitar - November 2013 USA
 
New Scientist - 12 October 2013
New Scientist - 12 October 2013New Scientist - 12 October 2013
New Scientist - 12 October 2013
 
Mens Health - November 2013 USA
Mens Health - November 2013  USAMens Health - November 2013  USA
Mens Health - November 2013 USA
 
Yoga Journal - November 2013 USA
Yoga Journal - November 2013  USAYoga Journal - November 2013  USA
Yoga Journal - November 2013 USA
 
1000 Photoshop Tricks
1000 Photoshop Tricks1000 Photoshop Tricks
1000 Photoshop Tricks
 
UN Redd Programme 2011-2015 Strategy - English
UN Redd Programme 2011-2015 Strategy - EnglishUN Redd Programme 2011-2015 Strategy - English
UN Redd Programme 2011-2015 Strategy - English
 
Penerapan Konservasi Tanah Pada Lahan Pasir
Penerapan Konservasi Tanah Pada Lahan PasirPenerapan Konservasi Tanah Pada Lahan Pasir
Penerapan Konservasi Tanah Pada Lahan Pasir
 
Pembangunan partisipatoris dalam pengelolaan daerah aliran sungai
Pembangunan partisipatoris dalam pengelolaan daerah aliran sungaiPembangunan partisipatoris dalam pengelolaan daerah aliran sungai
Pembangunan partisipatoris dalam pengelolaan daerah aliran sungai
 
Pengukuran debit dan pengambilan
Pengukuran debit dan pengambilanPengukuran debit dan pengambilan
Pengukuran debit dan pengambilan
 
Konservasi Tanah dan Air
Konservasi Tanah dan AirKonservasi Tanah dan Air
Konservasi Tanah dan Air
 

Recently uploaded

Unit1_Syllbwbnwnwneneneneneneentation_Sem2.pptx
Unit1_Syllbwbnwnwneneneneneneentation_Sem2.pptxUnit1_Syllbwbnwnwneneneneneneentation_Sem2.pptx
Unit1_Syllbwbnwnwneneneneneneentation_Sem2.pptxNitish292041
 
The spirit of digital place - game worlds and architectural phenomenology
The spirit of digital place - game worlds and architectural phenomenologyThe spirit of digital place - game worlds and architectural phenomenology
The spirit of digital place - game worlds and architectural phenomenologyChristopher Totten
 
Karim apartment ideas 01 ppppppppppppppp
Karim apartment ideas 01 pppppppppppppppKarim apartment ideas 01 ppppppppppppppp
Karim apartment ideas 01 pppppppppppppppNadaMohammed714321
 
world health day 2024.pptxgbbvggvbhjjjbbbb
world health day 2024.pptxgbbvggvbhjjjbbbbworld health day 2024.pptxgbbvggvbhjjjbbbb
world health day 2024.pptxgbbvggvbhjjjbbbbpreetirao780
 
How to Empower the future of UX Design with Gen AI
How to Empower the future of UX Design with Gen AIHow to Empower the future of UX Design with Gen AI
How to Empower the future of UX Design with Gen AIyuj
 
Niintendo Wii Presentation Template.pptx
Niintendo Wii Presentation Template.pptxNiintendo Wii Presentation Template.pptx
Niintendo Wii Presentation Template.pptxKevinYaelJimnezSanti
 
Interior Design for Office a cura di RMG Project Studio
Interior Design for Office a cura di RMG Project StudioInterior Design for Office a cura di RMG Project Studio
Interior Design for Office a cura di RMG Project StudioRMG Project Studio
 
Pearl Disrtrict urban analyusis study pptx
Pearl Disrtrict urban analyusis study pptxPearl Disrtrict urban analyusis study pptx
Pearl Disrtrict urban analyusis study pptxDanielTamiru4
 
Karim apartment ideas 02 ppppppppppppppp
Karim apartment ideas 02 pppppppppppppppKarim apartment ideas 02 ppppppppppppppp
Karim apartment ideas 02 pppppppppppppppNadaMohammed714321
 
Color Theory Explained for Noobs- Think360 Studio
Color Theory Explained for Noobs- Think360 StudioColor Theory Explained for Noobs- Think360 Studio
Color Theory Explained for Noobs- Think360 StudioThink360 Studio
 
办理卡尔顿大学毕业证成绩单|购买加拿大文凭证书
办理卡尔顿大学毕业证成绩单|购买加拿大文凭证书办理卡尔顿大学毕业证成绩单|购买加拿大文凭证书
办理卡尔顿大学毕业证成绩单|购买加拿大文凭证书zdzoqco
 
Map of St. Louis Parks
Map of St. Louis Parks                              Map of St. Louis Parks
Map of St. Louis Parks CharlottePulte
 
simpson-lee_house_dt20ajshsjsjsjsjj15.pdf
simpson-lee_house_dt20ajshsjsjsjsjj15.pdfsimpson-lee_house_dt20ajshsjsjsjsjj15.pdf
simpson-lee_house_dt20ajshsjsjsjsjj15.pdfLucyBonelli
 
Pharmaceutical Packaging for the elderly.pdf
Pharmaceutical Packaging for the elderly.pdfPharmaceutical Packaging for the elderly.pdf
Pharmaceutical Packaging for the elderly.pdfAayushChavan5
 
10 must-have Chrome extensions for designers
10 must-have Chrome extensions for designers10 must-have Chrome extensions for designers
10 must-have Chrome extensions for designersPixeldarts
 
Piece by Piece Magazine
Piece by Piece Magazine                      Piece by Piece Magazine
Piece by Piece Magazine CharlottePulte
 
guest bathroom white and blue ssssssssss
guest bathroom white and blue ssssssssssguest bathroom white and blue ssssssssss
guest bathroom white and blue ssssssssssNadaMohammed714321
 
Iconic Global Solution - web design, Digital Marketing services
Iconic Global Solution - web design, Digital Marketing servicesIconic Global Solution - web design, Digital Marketing services
Iconic Global Solution - web design, Digital Marketing servicesIconic global solution
 
Making and Unmaking of Chandigarh - A City of Two Plans2-4-24.ppt
Making and Unmaking of Chandigarh - A City of Two Plans2-4-24.pptMaking and Unmaking of Chandigarh - A City of Two Plans2-4-24.ppt
Making and Unmaking of Chandigarh - A City of Two Plans2-4-24.pptJIT KUMAR GUPTA
 
group_15_empirya_p1projectIndustrial.pdf
group_15_empirya_p1projectIndustrial.pdfgroup_15_empirya_p1projectIndustrial.pdf
group_15_empirya_p1projectIndustrial.pdfneelspinoy
 

Recently uploaded (20)

Unit1_Syllbwbnwnwneneneneneneentation_Sem2.pptx
Unit1_Syllbwbnwnwneneneneneneentation_Sem2.pptxUnit1_Syllbwbnwnwneneneneneneentation_Sem2.pptx
Unit1_Syllbwbnwnwneneneneneneentation_Sem2.pptx
 
The spirit of digital place - game worlds and architectural phenomenology
The spirit of digital place - game worlds and architectural phenomenologyThe spirit of digital place - game worlds and architectural phenomenology
The spirit of digital place - game worlds and architectural phenomenology
 
Karim apartment ideas 01 ppppppppppppppp
Karim apartment ideas 01 pppppppppppppppKarim apartment ideas 01 ppppppppppppppp
Karim apartment ideas 01 ppppppppppppppp
 
world health day 2024.pptxgbbvggvbhjjjbbbb
world health day 2024.pptxgbbvggvbhjjjbbbbworld health day 2024.pptxgbbvggvbhjjjbbbb
world health day 2024.pptxgbbvggvbhjjjbbbb
 
How to Empower the future of UX Design with Gen AI
How to Empower the future of UX Design with Gen AIHow to Empower the future of UX Design with Gen AI
How to Empower the future of UX Design with Gen AI
 
Niintendo Wii Presentation Template.pptx
Niintendo Wii Presentation Template.pptxNiintendo Wii Presentation Template.pptx
Niintendo Wii Presentation Template.pptx
 
Interior Design for Office a cura di RMG Project Studio
Interior Design for Office a cura di RMG Project StudioInterior Design for Office a cura di RMG Project Studio
Interior Design for Office a cura di RMG Project Studio
 
Pearl Disrtrict urban analyusis study pptx
Pearl Disrtrict urban analyusis study pptxPearl Disrtrict urban analyusis study pptx
Pearl Disrtrict urban analyusis study pptx
 
Karim apartment ideas 02 ppppppppppppppp
Karim apartment ideas 02 pppppppppppppppKarim apartment ideas 02 ppppppppppppppp
Karim apartment ideas 02 ppppppppppppppp
 
Color Theory Explained for Noobs- Think360 Studio
Color Theory Explained for Noobs- Think360 StudioColor Theory Explained for Noobs- Think360 Studio
Color Theory Explained for Noobs- Think360 Studio
 
办理卡尔顿大学毕业证成绩单|购买加拿大文凭证书
办理卡尔顿大学毕业证成绩单|购买加拿大文凭证书办理卡尔顿大学毕业证成绩单|购买加拿大文凭证书
办理卡尔顿大学毕业证成绩单|购买加拿大文凭证书
 
Map of St. Louis Parks
Map of St. Louis Parks                              Map of St. Louis Parks
Map of St. Louis Parks
 
simpson-lee_house_dt20ajshsjsjsjsjj15.pdf
simpson-lee_house_dt20ajshsjsjsjsjj15.pdfsimpson-lee_house_dt20ajshsjsjsjsjj15.pdf
simpson-lee_house_dt20ajshsjsjsjsjj15.pdf
 
Pharmaceutical Packaging for the elderly.pdf
Pharmaceutical Packaging for the elderly.pdfPharmaceutical Packaging for the elderly.pdf
Pharmaceutical Packaging for the elderly.pdf
 
10 must-have Chrome extensions for designers
10 must-have Chrome extensions for designers10 must-have Chrome extensions for designers
10 must-have Chrome extensions for designers
 
Piece by Piece Magazine
Piece by Piece Magazine                      Piece by Piece Magazine
Piece by Piece Magazine
 
guest bathroom white and blue ssssssssss
guest bathroom white and blue ssssssssssguest bathroom white and blue ssssssssss
guest bathroom white and blue ssssssssss
 
Iconic Global Solution - web design, Digital Marketing services
Iconic Global Solution - web design, Digital Marketing servicesIconic Global Solution - web design, Digital Marketing services
Iconic Global Solution - web design, Digital Marketing services
 
Making and Unmaking of Chandigarh - A City of Two Plans2-4-24.ppt
Making and Unmaking of Chandigarh - A City of Two Plans2-4-24.pptMaking and Unmaking of Chandigarh - A City of Two Plans2-4-24.ppt
Making and Unmaking of Chandigarh - A City of Two Plans2-4-24.ppt
 
group_15_empirya_p1projectIndustrial.pdf
group_15_empirya_p1projectIndustrial.pdfgroup_15_empirya_p1projectIndustrial.pdf
group_15_empirya_p1projectIndustrial.pdf
 

Photoshop 5 minute tips & fixes vol 01 2013 UK

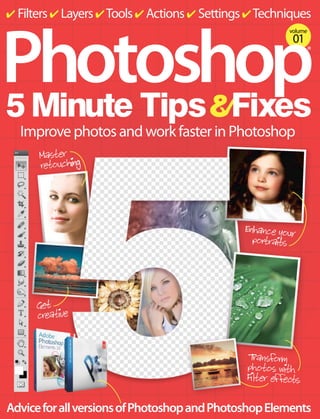
  • 1. ✔ Filters ✔ Layers ✔ Tools ✔ Actions ✔ Settings ✔ Techniques Photoshop 5 Minute Tips Fixes volume 01 ® Improve photos and work faster in Photoshop Master retouching Enhance your portraits Get creative T nsform ra photos with Filter effects Advice for all versions of Photoshop and Photoshop Elements
  • 2.
  • 3. Welcome to Photoshop 5 Minute Tips Fixes P hotoshop is an amazing piece of software that lets us do practically anything with our digital photos. It's easy to get lost for hours, playing around with the tools, tweaking and creating masterpieces. Sometimes, however, you just want to open the program, make the change you need and be finished in minutes. That's exactly what this book is for: making quick fixes and adding creative effects to your photos. Every project in this book can be completed in just five minutes, and there are in-depth guides to Photoshop's essential tools so that you can get more comfortable with using them in a flash. We also look at how you can use automated options to speed up your workflow, as well as customise Photoshop to work exactly as you need it. With over 160 pages of tips, tricks and fixes, it's the ultimate timesaving guide to Photoshop and Photoshop Elements. Enjoy the book.
  • 4.
  • 5. ® Imagine Publishing Ltd Richmond House 33 Richmond Hill Bournemouth Dorset BH2 6EZ % +44 (0) 1202 586200 Website: www.imagine-publishing.co.uk Editor in Chief Jo Cole Editor Julie Bassett Design Danielle Dixon Printed by William Gibbons, 26 Planetary Road, Willenhall, West Midlands, WV13 3XT Distributed in the UK & Eire by Imagine Publishing Ltd, www.imagineshop.co.uk. Tel 01202 586200 Distributed in Australia by Gordon & Gotch, Equinox Centre, 18 Rodborough Road, Frenchs Forest, NSW 2086. Tel + 61 2 9972 8800 Distributed in the Rest of the World by Marketforce, Blue Fin Building, 110 Southwark Street, London, SE1 0SU Disclaimer The publisher cannot accept responsibility for any unsolicited material lost or damaged in the post. All text and layout is the copyright of Imagine Publishing Ltd. Nothing in this magazine may be reproduced in whole or part without the written permission of the publisher. All copyrights are recognised and used specifically for the purpose of criticism and review. Although the magazine has endeavoured to ensure all information is correct at time of print, prices and availability may change. This bookazine is fully independent and not affiliated in any way with the companies mentioned herein. Photoshop is either a registered trademark or trademark of Adobe Systems Incorporated in the United States and/or other countries and is used with express permission. Photoshop 5 minute Tips & Fixes © 2011 Imagine Publishing Ltd ISBN 978-1-908222-4-42
  • 6. Contents 08 After Before minute fixes Get started with this collection of quick-fix tips and tricks Basic corrections 18 28 29 30 32 34 37 38 40 42 45 46 6 50 Photoshop tricks Correct lens distortion Flip for better composition Crop and straighten images Content-Aware Scaling Hue, Saturation and Lightness Brightness/Contrast Quick Mask Magic Wand tool Make quick selections Making a magic selection The Extract filter PHOTOSHOP 5 MINUTE TIPS & FIXES 48 49 50 52 54 56 57 58 60 64 65 66 Fix chromatic aberration Selectively boost colour The Patch tool Spotless backgrounds Create flawless skin Remove red eye Control Unsharp Mask Use the Color Replacement tool Fail-safe photo fixes Add emphasis to eyes Edit with gradients Six techniques for perfect pics 88 Get creative 76 84 85 86 88 90 91 92 100 Creative photo retouching Convert to duotones Add a faded vignette to photos Digital makeup Add textures to photos Create a dreamy photo effect Create a lomo effect Get creative with Blur filters Create a sunset using gradient maps 102 Composing with Smart Objects 104 Circular selections
  • 7. Photoshop 5 Minute Tips Fixes A dd de p t h ures usin g t ext Crea te su perfast sket ch effe cts Icons explained: Before Quick fix: Speedy tricks to transform photos in seconds Tool tricks: In-depth guides to Photoshop’s key tools After 92 119 Before After 105 106 108 109 110 112 114 116 117 118 119 120 Use a gra die nt m a p for a sp lash of co lo ur Set off some digital fireworks Stylish photo frames Use photos in type Quick cross processing Add sparkle to your brushes Create a silhouette in Photoshop Create your own optical art Pop goes Photoshop Colour effects made easy Super-quick paint effects Quick sketch effects 30 digital painting tips 100 42 Work faster 132 136 138 140 142 144 145 146 148 150 151 152 Understanding actions Making droplets Automate your workflow The Preset Manager Working with tool presets Organise with layers Increase History states The Batch command Let’s go scripting Use the Save for Web command Layer up filters Photoshop shortcuts Troubleshooting 156-163 Advice – Elements The most-pressing Photoshop Elements questions answered 164-173 Advice – Photoshop Get help with these answers to common Photoshop queries PHOTOSHOP 5 MINUTE TIPS & FIXES 7
  • 8. 5 m inu te fixe s Shar p detailen Ph effe oto cts minute fixes We round up some of the best edits that you can use to improve your images in a mere five minutes (or less!) W hile there is a lot to be said for settling down to a mammoth Photoshop session where you tinker and tweak an image into pristine glory, there are times when you just want a quick solution. A lot of common problems can be sorted out in minutes. 8 PHOTOSHOP 5 MINUTE TIPS & FIXES Over the next few pages, we are going to be sharing some of the techniques we use when time, patience or concentration is in short supply. We’ll be fixing obvious problems such as dull colour or soft edges in addition to looking at creative solutions for pepping up an image. Sometimes a photo will only ever be okay no matter how bright its colours or how in focus it is. However, by giving it a sketch effect, for example, you can create an entirely different image that has the ability to really stand out. We even have a couple of suggestions for improving your Photoshop workflow, giving you extra time for more creative projects!
  • 9. rk Woar ter sm Spring into action Save time by teaching Photoshop to do repetitive tasks for you Do you find that you end up performing the same tasks time and time again without ever changing any settings? Perhaps something like Auto-tone, Sharpen More and adding a vignette through the Filter>Lens Correction feature. Or maybe there’s a particular type of framing, watermark or signature you like to add to all your photography. Possibly you are tasked with rotating and cropping 300 scanned photos and you can feel your soul being crushed beneath the monotony. Regardless of what it is, if it’s so repetitive you feel like you could train a monkey to do it, then let us be the ones to tell you that Photoshop is smarter than that monkey! Instead of you being the one performing the tasks, define custom actions that can be triggered at a single keystroke and shave precious minutes off your production time. This allows you to focus your creative attention on your design work instead of getting tied up with repetitive button pushing. 01 Is this thing on? Open the Actions palette (Opt/Alt+F9) and select a folder to place your action in or create a new one using the ‘Create a new set’ icon at the bottom. Press the ‘Create new action’ icon also found in the footer of the palette. Give the action a name for easily referring back to it later, and then press the Record button. to Pho it ed 02 One step at a time Carefully go through each step of your process. You don’t need to be quick, but you do need to be accurate. Photoshop isn’t recording time, just menu selections and tool usage. You can watch the steps build up in the Actions palette. When you are finished, press the Stop button in the footer to halt the recording. At the press of a button… Now you can test out the action you have created by hitting the Play button and watching it work. Double-click to the right of the action’s name to get the Action Options box again. Assign a function key using the drop-down menu, and now the entire action can be run at the press of a single button. Correct colour casts Pull a natural hue out of a poorly coloured pic We may not notice the difference between the light generated by a fluorescent bulb and a halogen one, but photographs taken with different light sources will show great differences in colour. This is compensated for by setting the white balance on the camera, or letting a sensor automatically do that for you. Colour casts are usually the result of a photograph taken with an inaccurate white balance setting. This generates an image with a distinct tint due to the error. The way to correct this is to remap the white, grey or black points, as this allows the colours to settle back into the more expected values. Follow the steps below to easily remove all but the most drastic of colour casts and get the tones just right. 01 03 Adjustments are required Begin by adding a Curves adjustment layer. Look for the small icon in the foot of the Layers palette that looks like a circle that is half black and half white. Clicking on that icon activates a list of available adjustment layers, then simply select the Curves option from there. 02 Black and white points In the Adjustments palette to the left of the histogram window you will see three small eyedropper icons. Begin by clicking the black eyedropper and sampling a portion of your image that should be completely black. Likewise, use the white eyedropper in the same way to sample the brightest pixels to set the white point. hues as Get your uld be by they sho lour casts fixing co 03 Kill the colour cast Using the grey eyedropper is the most effective and most difficult step in the process. The goal is to use it to sample a pixel that should be 50% grey. This may take several attempts before getting a good setting. If the first click yields poor results, simply try another area of pixels. Taking the time for a little trial and error is well worth it here. PHOTOSHOP 5 MINUTE TIPS & FIXES 9
  • 10. 5 m inu te fixe s to Pho it ed Better, brighter skies Chase away those grey days with this easy sky repair y y sk gre use let a day – it ’t Donn your s to fix rui dient gra Top tip: Gradients are also useful for improving dull sunset images – pick reds or oranges for the best effect. 01 Select-a-sky Begin by using the Quick Selection tool to select your sky area. If the tool grabs areas of the image you don’t want, hold down the Opt/Alt key and paint over the area to remove from the selection. Depending on your version, the selection can be edited further by using the Refine Edge button if this is needed. to Pho it ed 02 New masked layer Press the ‘Add new layer’ button in the foot of the Layers palette. The selection is automatically converted into a mask. This will limit the effect to the sky, and having it on a new layer protects your original Background layer from any direct alteration. Set this layer’s blending mode to Overlay. 03 Fade away the grey Set your Foreground colour to a nice, bright sky blue. Grab the Gradient tool and use the Foreground to Transparent preset in the Options bar. Make sure the mode is set to Linear, click at the top of your canvas and drag straight down towards the horizon (or your foreground object) to create a blue gradient that fades away. Boost colours and sharpness Transform a shot from dull and blurry to bright and crisp Colour and detail: two elements that can make or break any photo. If one is missing, the other one better be something special to compensate. If both are weak, you know you are in trouble. But all is not lost! This neat little trick can do wonders for a shot that is a little too dull as well as being a bit soft. It can infuse the image with life and give it a pop that demands attention. That being said, it cannot perform miracles. If the photo is devoid of colour and detail, this won’t help. There has to be something there to work with. If that is the case with your image, we encourage you to try this technique out. 01 Pull out the details Create a copy of the Background layer to work with. Go to Filter>Sharpen>Unsharp Mask and work with the settings until you can see some details from the image being revealed. In this example we used an Amount of 72%, Radius of 4.8 pixels and Threshold of 5 levels. Your results may vary depending on the image. 10 PHOTOSHOP 5 MINUTE TIPS & FIXES 02 Add Vibrance Add a Vibrance adjustment layer by clicking the Vibrance icon in the Adjustments palette. Pump up the Vibrance slider, then increase the saturation. Beware of blowing out the colour tones. If needed, use the layer mask that’s automatically added to paint out the adjustment where it is not required. e pop Make an imag ntion by turning atte to the colour 03 Final pop Now create a composite layer on the top of the stack by pressing Cmd/Ctrl+Alt+Shift+E, and then on this new layer go to Filter>Other>High Pass. Enter a setting of 3 pixels and press OK. Change the layer’s blending mode to Overlay to give a final touch of edge sharpening, and your image should be infinitely improved.
  • 11. rk Woar ter sm GPU settings Get the most out of those advanced features by using GPU You may have heard other users rave about some of the slick new features found in Photoshop CS5, only to be confused as to why you can’t seem to find them. We’re talking about features such as the Rotate View tool, Scrubby Zoom, the ability to resize your brush right on the canvas or even that mysterious Repousse tool. All could be hidden from your experience. Perhaps you’ve even checked to make sure you have a graphics card capable of heavy lifting, yet you still seem to be missing out on the joy of these new features. The most likely reason for your deflated performance is because you don’t have your GPU or Graphics Processing Unit set up correctly. All of these features and more rely on something called OpenGL drawing, and they won’t appear without it. Once you do turn it on, it can transform your Photoshop experience in minutes, so read on and we’ll show you what you need to do. 01 Performance preferences Go to Edit> Preferences>Performance and look for the GPU Settings box. It will list your graphics card and you should see a checkbox for Enable OpenGL Drawing. Place a check in that box and then hit the Advanced Settings box. Select a mode of your choice. We recommend Normal. to Pho it ed 02 Give it a whirl You will need to close down any documents you have open in Photoshop and then open them again to take advantage of the newly enabled OpenGL settings. To test if things are working, hold down the R key and then drag your mouse in a circle. The canvas should spin around as you move your cursor. Repousse fun Just to see the true power of the advanced CS5 extended features and OpenGL, try this. Put down some text on your canvas. Make it something big and bold in a large, fat font. Then go to 3D>Repousse>Text Layer to have Photoshop transform your text into a real, honest to goodness 3D object! Remove unwanted elements Clean up photos with the Clone Stamp tool This is the tool that Photoshop is arguably the best known for. It is the technique that tabloids use to remove people from one picture and deftly place them into another. While we don’t condone the practice of personal slander on a celebrity, we fully embrace the idea of altering a photo to create a better shot aesthetically. In this example, we begin with a peaceful and serene beach shot that would be even more peaceful and serene if it didn’t contain the handful of people on the shore line and a tacky, fruit-themed bus cluttering up the horizon. The process for cloning out items is pretty straightforward, but we will say that it does take a practised eye to do it well. The trick is learning where to best set the source point to avoid obvious repetition or paint strokes, but even those can be cleaned up afterwards. 01 03 Clone Stamp setup Begin by creating a copy of the Background layer to work with, then grab the Clone Stamp tool and set the brush tip to a soft round brush. Find an area that looks similar in content and colour value to the area you wish to clone out, then hold down the Opt/Alt key and click once to set the source point for your cloning. 02 ct erfe ur p e yo g the ool at Cre ta usin mp t vis ne Sta Clo Selective source When selecting a source point, use an area that’s easy to match. For example, setting our source point to the horizon makes alignment simple for the new painted area. After setting the source point, Photoshop gives you a helpful overlay on the brush so you can see what pixels you are about to lay down on the image before you commit. 03 Clone away Use short, gentle strokes to remove the unwanted element. If necessary, select another source point to help avoid visible repetition within the image. If the colour tones are not matching up well and your brushstrokes are too obvious, try reducing the brush opacity, set a different source point and then clone out the visible lines for a smooth result. PHOTOSHOP 5 MINUTE TIPS & FIXES 11
  • 12. 5 m inu te fixe s tal igi t D ar in time Travel back ur by giving yo ed look ag image an Easy aged photo effect Age a photo 50 years in five minutes Aged photos have their own special charm and personality. The condition of the photo itself tells a story with the way it fades and cracks with time. It makes you wonder if the story of the photo paper is more interesting than the story of the photograph. We’ll show you how to easily capture that effect quickly and painlessly. This technique makes use of adjustment layers, smart filters and layer styles, so, even though the whole idea is to destroy the photo, this effect is really non-destructive. Grab a photo you want to push back in time and follow along with these steps. Top tip: If you have a photo that you love but that suffers from awkward colour or tonal problems, save yourself editing time by transforming it into an aged image. 01 Smart Object Right-click on the Background layer in the Layers palette and select Convert to Smart Object. Next, create a rectangular selection just inside the frame and press the ‘Add layer mask’ icon (the white circle in a grey box). Add a new layer beneath the photo and fill it with an off-white shade to begin altering the tones of your image. 04 Smart filters Go to the photo Smart Object and add a Gaussian Blur (Filter>Blur>Gaussian Blur) of 4 pixels. Then go to Filter>Noise>Add Noise and set the Amount to 14%, Distribution to Gaussian and check the Monochromatic box. This makes sure the photo doesn’t have that sleek, modern crispness to it. 12 PHOTOSHOP 5 MINUTE TIPS & FIXES 02 03 05 06 Black and white Add a Channel Mixer adjustment layer above the photograph original. Tick the Monochrome box and adjust the sliders to give a high contrast effect. You want blown out highlights and strong shadows to make the photo look faded. Layer styles Next add a new layer to the top of the stack and assign the following layer styles: Drop Shadow with Opacity at 45%, Distance at 12, Spread at 0 and Size at 29; Bevel and Emboss with Style set to Outer Bevel, Depth set to 52%, Size at 9 pixels, Soften at 5 pixels and Highlight/Shadow at 50%. Gradient Map Next, add a Gradient Map adjustment layer and choose the Black, White setting from the list of presets. Click on the gradient to open the Gradient Editor and change the black stopper on the left to a coppery-brown tone. We used ‘#6a5342’. This gives the photo a sepia, aged colour. Painted cracks Grab a small irregular paint brush. We used the Chalk 11 tip with the size reduced to around 6 pixels. Set the paint colour to a light grey and carefully draw some cracks and folds at random points on the photo. The layer style will appear as you paint. Finish by setting the blend mode to Screen, reduce the Opacity to 39% and you’re done.
  • 13. tal igi t D ar Rich sepia tones This sepia trick allows for maximum control 01 Level up Begin by adding a Levels adjustment layer. In the Histogram palette, pull the outer slider handles in to meet the edges of the histogram chart. This should increase the overall contrast of the image. Take the midpoint slider and move it slightly to the left to brighten the image a bit so that it will work when desaturated. to Pho it ed 02 Black and white Next add a Black and White adjustment layer over the Levels adjustment. In the Adjustments palette, look for the drop-down menu near the top. These are presets used to create different flavours of black and white effects. Here we used the Neutral Density settings for our image of the running horses. 03 Photo Filter Finally, add a Photo Filter adjustment layer. From the filter dropdown, select the Sepia option. If the colourisation isn’t strong enough to suit you, increase the Density slider to enhance the effect. Try the Preserve Luminosity checkmark both on and off to see which setting works best for your image. Fake focal blur Use a manufactured focal blur to make your subjects stand out There’s nothing quite like putting focus on a subject by actually putting focus on that subject. Or more accurately, removing focus from the areas around the subject. Most photographs already have a focal blur built into them. It’s what the term ‘in focus’ means; that the primary subject of the photo is in the focal setting of the camera’s lens. Different lenses have different focal lengths creating different effects or focal blurs and one way to enhance the focus of a photo’s subject is to manufacture focal blur around it. This technique shows a precise method for doing just that. A frequently overlooked feature of Photoshop is the Lens Blur feature, which not only does an outstanding job of simulating actual focal blurs, but can even be set to read a depth map that’s been saved to a channel. This allows Photoshop to calculate a more accurate effect. 01 Isolate the subject Begin by creating a copy of the Background layer to work on, then form a selection around the subject using the selection tool of your choice. In this statue image we used the Pen tool because of its supreme accuracy. Once the selection is done, press Cmd/Ctrl+J to copy the subject to its own layer, then turn of its visibility. 02 Remove the subject On the background copy layer, use the Content Aware Fill feature or the Clone Stamp tool to roughly remove the subject. Then press ‘Q’ to enter Quick Mask mode and use the Gradient tool to drag a white to black linear gradient down from the horizon line to the subject. Press ‘Q’ again and save the selection (Select>Save Selection). n to ntio ith attejects w w Dra r sub ft blur you e de som 03 Lens Blur Go to Filter>Blur>Lens Blur. In the area labelled Depth Map, set the Source to the selection you saved in the previous step. If the blur effect appears backwards, check the Invert box. Adjust the settings to get a blur suitable for your image and press OK. Then turn the visibility of the subject layer back on. PHOTOSHOP 5 MINUTE TIPS & FIXES 13
  • 14. 5 m inu te fixe s tal igi t D ar Photoshop’s sketchbook your rt from Make a with this s photo chnique useful te Turn a photo into a digital sketch This technique is ideal for quickly simulating a lovely, hand-sketched effect. There are other, more complicated techniques out there you could employ that involve a lot more than just a few minutes’ worth of filter wrangling, and ultimately we fully encourage you to develop your own hand skills so you can create a true sketch by hand. There’s no tricks or tips that can ever replace that. But when it comes to quick, clean and effective, when you need a filter-based sketch effect that is easy and convincing, this tip is hard to beat! Top tip: To make the effect even more realistic, get an image of a sketchbook and copy and paste your picture into it with the Multiply blending mode to make it sit on the page. 01 02 03 04 05 06 Set the sketchbook Begin by creating a new layer for the sketch paper. Set your Foreground and Background colours to light parchment hues that are slightly different from each other. Go to Filter>Render>Clouds to fill the layer and then go to Filter>Blur>Gaussian Blur and blur the pattern until the colours bleed into each other and look natural. See the effect Now press Cmd/Ctrl+I to invert the colours of the layer. Set the blending mode to Color Burn. Turn off the visibility of the blurred photo layer to fully see the effect. Use some soft brush work on a layer mask attached to the sketch layer to hide any unwanted lines that are left by simply painting them away. 14 PHOTOSHOP 5 MINUTE TIPS & FIXES Black and white effect Duplicate the Background layer and move the copy above the parchment layer. Go to Image>Adjustments>Desaturate and then use the Brightness/Contrast command to boost the tones. Go to Filter>Blur>Surface Blur and, using the preview as a guide, select a setting that blurs the fine details but retains the lines. We used a Radius of 4 and a Threshold amount of 12. Intensify the lines If the sketched lines look too faint, you can intensify the effect by duplicating the sketch layer. If this then makes the effect too strong, pull back on the opacity of the duplicate layer. In our example of the kitten we reduced the Opacity to a mere 37% on the duplicate layer. The sketch edges Duplicate the blurred layer and go to Filter>Stylize>Glowing Edges. You’ll want settings that strike an even balance between smooth lines and fine details. You don’t want the edges to appear too strong or busy, as a soft sketch effect is the goal. We used an Edge Width of 2, Edge Brightness of 19 and Smoothness of 8. Shading Turn on the visibility of the blurred photo layer. Change this layer’s blending mode to Color Burn and reduce the Opacity to 50%. Hold down Opt/Alt and press the ‘Add layer mask’ button to hide the entire layer. Use a soft brush with white paint on the mask to reveal areas for the look of shading.
  • 15. rk Woar ter sm Who needs more history? Increase your safety net by expanding your history states Don’t you wish life had a Cmd/Ctrl+Z? We all do. Some of you may be saying “I just wish Photoshop let you undo more than one step” (Shhhhh. It does. Hold down Shift with your Cmd/Ctrl+Z and you get 20 steps). If you open up your History palette you can see the last twenty steps you took in Photoshop. You can easily dial back in time clicking on any of those steps to return to that point. But what happens when 20 isn’t enough? Those can disappear quickly when you are painting or using any of the other brushbased tools. Fortunately, 20 is just the default setting in Photoshop. It can be easily increased for more peace of mind. Remember, though, that there is a performance trade-off for increased history. Every step of history is another state of the document Photoshop has to keep track of. 01 Know your history Go to Edit> Preferences>Performance. Look in the History & Cache section for the History States. The default is 20 but it can go up to 1,000. We don’t recommend going that high as it becomes so memory intensive that eventually the program’s performance will become painfully slow. tal igi t D ar 02 Test it out Go ahead and press OK to commit to the change and open up a new document. Be sure you have your History palette open as well. Grab the brush (or any other tool for that matter) and begin working. Watch as your History palette fills up to whatever number you set. 03 Snapshot alternative In the History palette there’s a small camera icon in the footer. Pressing this creates a snapshot of the current state of your document. Clicking on that snapshot will return the document to that state regardless of how many steps have gone by. This serves as an alternative to increasing History states. Delicious HDR toning Use a single image to get a stunning HDR effect High Dynamic Range photography is a recent photographic trend that demands notice. Whether you love it or hate it, the effects are impossible to ignore with the ultra vibrant colours and super crisp details. True HDR requires multiple exposures from a camera to capture a higher range of light, hence the term. Exposures are usually bracketed to capture shadow information as well as highlight information, and then all that is compressed down into a single image. Technically, this is impossible to do with a single, limited range photograph. But far be it from us to allow the laws of reality to stand in the way of trying! The effect can be approximated using a single image, in fact Photoshop CS5 has a feature actually named HDR Toning that only allows the use of a single image. The options available in this feature can be overwhelming, so let’s break them down. 01 Edge Glow Open your photo and go to Image>Adjustments>HDR Toning. It’s usually best to start with a preset that is close to the effect you have in mind and work from there. We chose the Photorealistic preset to start with for our picture. In the Edge Glow section, the Radius value adjusts the size of the glow and the Strength value adjusts the visibility. We used 51 and 1.82 respectively. 02 Tone and Detail In the Tone and Detail area, we suggest starting with the Shadow slider as it will have one of the biggest impacts on the image. We used +44. From there, move to Gamma and Exposure to adjust the brightness, We used 1.00 and .95. We then set the Detail to 122 and Highlight to -51. g nin R To HD urn DR the t Use ture toots to H fea gle sh sin 03 Colour adjustment In the Color section, the Vibrance and Saturation sliders perform similar tasks, but the Vibrance is more concerned with luminous values while the Saturation is more concerned with colour intensity. We used a Vibrance of 6 and a Saturation of 17. If the colours appear off-kilter, a Hue/Saturation adjustment layer can bring them back into line for the perfect HDR effect. PHOTOSHOP 5 MINUTE TIPS & FIXES 15
  • 16. Basic correc Transform your digital photos with this collection of essential tips and tricks to fix common flaws 18 28 29 30 32 34 37 38 40 42 45 46 48 49 50 52 54 56 57 58 60 64 65 66 16 50 Photoshop tricks Correct lens distortion Flip for better composition Crop and straighten images Content-Aware Scaling Control Hue, Saturation and Lightness Rescue dull shots with Brightness/Contrast Quick Mask Magic Wand tool Make quick selections Making a magic selection The Extract filter Fix chromatic aberration Selectively boost colour The Patch tool Spotless backgrounds Create flawless skin Remove red eye Control Unsharp Mask Use the Color Replacement tool Fail-safe photo fixes Add emphasis to eyes Edit with gradients Six techniques for perfect pics PHOTOSHOP 5 MINUTE TIPS & FIXES 42 Learn to m ake quick se le ct io ns
  • 17. tions “There’s always something new to learn in Photoshop” 60 Fix an y sn ap with th is se le ct io n of fa il-safe tricks 57 Sharpe n yo ur im ag es usin g th e Uns ha rp Mask tool 58 Rep la ce co lo urs in yo ur phot os quick ly an d easily PHOTOSHO PHOTOSHOP 5 MINUTE TIPS & FIXES 17
  • 18. co Ba rre sic cti on s N o matter how long anyone works with Photoshop, there’s always something new to learn. Even if you’re an imageediting expert, it’s impossible to remember every little nook and cranny of Photoshop, and if you’re a novice then even some things that may seems basic can be a real revelation and save you hours of head scratching. So, to start this section we’ve put together ten pages of tips and tricks that will speed up your image editing, give you a whole new bundle of special effects and techniques, and some that might just jog your memory in time for that next deadlinedriven graphics project. So, feast your eyes on this veritable Pandora’s Box of Photoshop goodness… it may just save you hours of frustration! 18 PHOTOSHOP 5 MINUTE TIPS & FIXES PHOTOSHOP TRICKS YOU NEED TO KNOW We’ve gathered our favourite image-editing tips that are guaranteed to help you improve your pictures Tip 1 Reflection via layer masks Create a reflection by adding a simple gradient to a layer mask Duplicate the image layer containing the object, and flip it via Edit>Transform>Flip vertical. Move the reflection into place using the Move tool (‘V’). Add a layer mask, choose the Gradient tool and drag a black-to-white gradient over the bottom half of the layer mask. Duplicate the object layer to create a copy of it on another layer Flip the copy, position and add a layer mask. Click on the thumbnail for the Layer Mask Drag a Black/White gradient vertically over the duplicated object image, via the mask
  • 19. Tip 3 Tip 2 Stay safe with Vibrance Terrific Tattoos! Create stunning realistic digital tattoos with a little help from the Displace filter Sometimes digital tattoos don’t look very convincing, simply because they don’t wrap around the body properly. However, by using the Displace filter you can make them really fit the body. First, design your tattoo on a plain white background. 01 Displacement Map Duplicate your body image. On the duplicate, go to the Channels palette and click the Red channel. Select all and then copy. Return to the Layers palette and paste. Flatten the image and save it as a PSD file, naming it Displace. Increasing Saturation can sometimes blow out colours; try Vibrance instead If you’ve got an image that lacks saturation in some areas, rather than use the Hue/Saturation command, try using Image>Adjustments> Vibrance. The Vibrance command will increase the saturation of only the colours in your image that need it, rather than increasing saturation globally as the Saturation command does. No needles, no regrets –tattoos the Photoshop way 02 Paste the tattoo Return to the original body image, open your tattoo image and drag and drop it into the image. Set the blending mode for the tattoo layer to Multiply. Scale and position via Edit>Transform>Scale. 03 Distort Go to Filter> Distort Displace. Enter 15 for both scales and click OK. Locate your Displace file, click on it and click Open. The tattoo will now be wrapped around the body contours. Reduce the layer Opacity a little if needed. Tip 4 Easier Eyedropper “Increasing Saturation can sometimes blow out colours; try Vibrance instead” Tip 5 Easy hair selections Finally, an easy way to select fly-away hair strands, thanks to the Refine Edge command in CS5 Make a rough selection using the Quick Selection tool. Click on Refine Edge in the Options bar. Add a small amount via the Radius slider and choose the Refine Radius tool. Now brush around the hair outline using this tool at a suitable size. Check Decontaminate Colours and use the slider to remove any vestiges of remaining colour. From Output To: choose New Layer With Layer Mask for perfect results. Be sure you pick the colour you really want In CS5, the Eyedropper tool has a pop-up sampling ring, making choosing colours easier. Activate it via the checkbox in the Options bar. Quick Colour info Make a rough selection around your subject and let Refine Edge do all of the work Just brush over the stray hairs using the Refine Radius tool and watch as a perfect hair mask is created for you Tip 6 You don’t have to reach for the Eyedropper get a colour reading Once you have the Info palette on screen (Window>Info), any Photoshop tool will give you a colour reading within Use any tool to get a colour reading, the palette. to get precise info using Caps Lock PHOTOSHOP 5 MINUTE TIPS & FIXES 19
  • 20. co Ba rre sic cti on s Tip 7 Levels without Clipping Don’t risk clipped black and white points when you’re busy adjusting Levels. Use the Opt/Alt key as a handy safeguard Next time you’re adjusting the black and white points in your image via the Levels command, hold down the Opt/Alt key as you drag each pointer beneath the Histogram. Stop dragging when you see any clipped areas appearing. Crop overlays Tip 9 Consistent colour across two images A simple, overlooked command for harmonising the colours in separate images Image>Adjustments>Match Color will take the overall colours from one image and apply them to another. Open both the images (the target and source images). Make the target image the active one and go to Image>Adjustments>Match Color. From the Source: option in the Image Statistics section, choose the image you want to take the colours from. If you need to adjust the colour change in the target image, carefully adjust the sliders. There’s no panic if the colours in two images don’t match, just use the Match Color command In CS5, the Crop tool comes complete with a choice of helpful guides Once you’ve dragged a crop, go to the Options bar for the Crop tool and choose from Grid or Rule Of Thirds crop guide overlays. The grid can be useful for lining up crops with image elements and Rule Of Thirds is a great compositional aid. Use the on-screen adjustment tool within the Curves dialog for faster image adjustments In Photoshop CS4 upwards, you don’t have to adjust a curve directly. Choose the on-screen adjustment tool at the bottom right of the Curves dialog and simply click and drag on an area in your image. Drag up to lighten and down to darken! 20 PHOTOSHOP 5 MINUTE TIPS & FIXES Apply the colours from your source image to the target image for a quick edit Sharpen up Tip 10 with High Pass Adjust the layer Opacity to control the amount of sharpening that’s applied to your image Clever Curves adjustments Tip 8 Tip 11 Flexible, non-destructive sharpening via a layer and the High Pass filter Open your image and duplicate the Background Layer (Cmd/Ctrl+J). On the duplicate layer, go to Filter>Other>High Pass. Set the Radius to around 10 pixels and click OK. Change the blending mode for this layer to Hard Light. Now reduce the Opacity of this layer until you’re happy with the result. It’s best to zoom into 100% to visually gauge the sharpening effect as you reduce the layer opacity. Tip Scrub that! 12 Don’t dial in values within Photoshop, try scrubbing for more speed Wherever you see a value box, such as the Opacity value in the Layers palette, next to it you’ll see a text label. Click and hold on that label and you can ‘scrub’ rather than Just click and drag on that text label fiddling with minute slider pointers. to easily scrub through values
  • 21. Tip 14 Tip 13 HDR Toning Texture overlays Subtle textures can transform your images in just a few clicks Copy and paste your texture shot into the image. Go to Edit>Transform>Scale, and use the corner handles to scale the texture to cover the image. Now experiment with blending modes on the texture layer. Overlay, Paste your texture and choose a blending mode. Finish by Soft Light and Hard Light work well. experimenting with adjusting layer opacity Tip 15 Correct colour casts You can easily correct colour casts within the Curves dialog From the Curves dialog, choose the Grey Eyedropper. Now carefully look for an area in your image which should be neutral in colour. Click on this area with the eyedropper to correct the colour cast in a single click. You don’t need to shoot multiple exposures to create stunning HDR effects in CS5 The great thing about HDR Toning is that you only need a single image, not multiple exposures to create a faux HDR image. Open your image and go to Image>Adjustments>HDR Toning. Creating your effect can be as simple as choosing one of the supplied HDR effects from the Preset: option. Even once you’ve chosen a preset you can adjust every aspect of the Edge Glow, Tone and Detail or Colour via the sliders within the dialog. It’s worth spending a little time adjusting the Detail slider as this will really amplify that classic HDR appearance, and increase the Saturation via the sliders in the Color section. The Toning Curve gives you the opportunity to carefully lighten or darken every tone within the image, just like a normal Curves adjustment. Choose the grey eyedropper and click in a part of your image which should be neutral “The great thing about HDR Toning is that you only need a single image, not multiple exposures, to create an HDR effect” Snappy snapshots 01 Scale the image Double-click the Background layer and go to Edit>Transform>Scale. Hold down the Shift key and resize via one of the corner handles. Hit enter and duplicate this layer (Cmd/Ctrl+J). Create a quick snapshot effect using layers Tip 16 Within HDR Toning, you’ll find all the usual HDR adjustments are at your fingertips 02 Fill and scale the border layer Cmd/Ctrl-click the lower layer and go to Edit>Fill, choosing White. Return to Edit>Transform>Scale and Shift-drag a corner handle to size the border. Position the border by dragging within the Bounding Box. Hit Enter to commit the transformation. 03 Add a shadow and a base Go to Layer>Layer Style, choosing Drop Shadow. Adjust the Distance and Size of the shadow and hit OK. Pasting a wooden texture shot on a layer below these two can really finish the effect off convincingly. PHOTOSHOP 5 MINUTE TIPS & FIXES 21
  • 22. co Ba rre sic cti on s Tip 17 Fast, reusable photo edges Create a simple black and white image. Try using some Photoshop filters on them Create and reuse your own photo edges, and drop them over any image You can create and save black-and-white border files to use again and again. Start with a white document and paint the window for your image with black, carefully creating good-looking edges. Now you can drop this image on to a layer over a photo and set the blending mode to Screen. Resize the layer to fit the image via Edit>Transform>Scale. Copy and paste the edge file on a layer over your photo and set the blend mode to Screen Only the white areas remain, leaving just the edges showing around the image Tip 18 Correct perspective Tinting black and whites The Black and White command also has a tinting function Go to Image>Adjustments> Black and White. Choose one of the Black and White presets, or adjust the sliders to your liking. Now check the Tint check box. Choose the colour of your tint via the Hue slider and adjust its intensity by dragging on the Saturation slider. Tip 20 Magical MiniBridge! Black and white with just a to the Black and White comhint of colour, thanks mand Tip 21 Mess with Masks The Bridge’s timesaving little CS5 brother In Photoshop CS5, you don’t have to go use the full-blown version of the Bridge. Simply go to File>Browse in Mini-Bridge and then browse within the workspace. Control layer masks via their own dedicated panel to speed up your masking workflow When you’ve created a layer mask, you can Feather it, alter Density or Invert it via the Masks panel. Go to Window>Masks and use the sliders. The Bridge in it’s own self-contained Photoshop panel. At last! 22 Take control of your Layer Masks via Window> Masks and feel the power of the panel PHOTOSHOP 5 MINUTE TIPS & FIXES The possibilities are endless, so get creative with edge files and build up a collection! Tip 19 The Lens Correction filter makes correcting perspective wonderfully simple Go to Filter>Distort>Lens Correction. In the bottom left of the panel, correct vertical perspective by dragging on the slider. You can also correct horizontal perspective with the other slider. Turning the Grid on can help with judging the corrected perspective. Hit OK when you’re done to exit the dialog. Tip 22 Tip 23 The magic of Smart Filters Super-quick vignettes Smart Filters allow you to change the filter settings again and again Right-click the layer to filter and choose Convert To Smart Object. Apply your filter in the usual way. Reedit by double-clicking its smart filter entry attached to the layer. Editable Photoshop filters, all thanks to the versatility of Smart Objects Take the super-fast route to effective vignettes Use the Vignette slider within the Lens Correction filter. Drag it to the left to darken, and to the right to lighten. Control the vignette width with the Midpoint slider. For classic vignettes, just rely on the sliders within the Lens Correction filter
  • 23. Tip 25 Straighten with the Crop tool Tip 2 4 Add a spotlight for drama The Crop tool is more versatile than you might think Choose the Crop tool and choose Grid from the Crop Guide Overlay option in the Options bar. Drag a crop over the image. Now place your cursor outside one of the corners on the Crop Box and drag to rotate the crop, matching the grid up to a horizontal or vertical within the image. Adjust the side handles to your desired crop and hit the Enter key to commit the crop. A simple spotlight can add a touch of drama and focus to still life compositions Duplicate the Background Layer (Cmd/ Ctrl+J). Go to Filter>Render>Lighting Effects. Use the default spotlight, sizing and positioning it appropriately. Adjust the darkness around the light by adjusting the Ambience slider. Use the default spotlight to throw some light on your still life images Curves cross-processed effect Tip 26 Make adjustments to each of the colour curves to re-create this classic effect To create this effect, you need to make specific changes to each of the four curves in the RGB image. Go to Layer>New Adjustment Layer>Curves. Choose the individual curve from the Channels box and place points on each curve and position them by dragging. Refer to the image below to see each curve shape. Drag a crop, rotate it, adjust and commit. Job done! “You can make adjustments to each colour curve to re-create classic photographic effects” Tip 27 Get creative with Film Grain Make film grain more adaptable via a filled layer Use the Grain filter (Filter>Texture>Grain) to add various film grain effects to your images, but use it on a separate layer filled with 50% Gray (via Edit>Fill). Desaturate this layer once you added the grain, and set the blending mode to Soft Light or Overlay. You can adjust the grain intensity simply by modifying If you have fond memories of good old-fashioned the Opacity of this layer. snapshots, create them yourself in Photoshop Black and white points in the Curves dialog Tip 28 You don’t have to use Levels to set black and white points… you can also do it in Curves Drag the lower corner point on the curve to line up with the left-hand end of the histogram. Do the same with the upper-right corner point to correct the white point. PHOTOSHOP 5 MINUTE TIPS & FIXES 23
  • 24. co Ba rre sic cti on s Big Data Tip 29 Big Data refers to areas of a layer which lie outside the canvas area Sometimes, you’ll have parts of a layer that extend beyond the edges of the canvas. To see these areas, go to Image>Reveal All. Reveal any ‘Big Data’ in your image via Image>Reveal All. Now you’ll see any previous hidden layer contents Manage Masks Don’t go to the Channels palette to duplicate a layer mask, just drag-and-drop To copy a layer mask from one image layer to another, hold down the Opt/Alt key and simply click and drag the mask thumbnail to the other layer. Tip 30 Get creative with Gaussian Blur Just a simple blur for highimpact fashion shots Duplicate the Background Layer (Cmd/Ctrl+J). On the duplicate layer set the blending mode to Overlay and go to Filter>Blur>Gaussian Blur choosing a Radius of around 20 pixels. Hit OK to apply the filter. Experiment with other Radius values for a more subtle effect. For a touch of real pro-studio effects, try a little Gaussian Blur and a simple blending,ode Type in perspective Tip 32 Opt/Alt-clickdrag is all that’s need to duplicate a mask and add it to another image layer Use Vanishing Point to add type in perspective to any plane in your image Create your type. Go to Select>All, followed by Edit>Copy. Now delete your text layer and add a new layer. Go to Filter>Vanishing Point. Click corner points to create a grid following the plane of the surface. Hit Cmd/Ctrl+V to paste in the text. Now drag the text into the grid and position it wherever you want it along the plane of perspective. Paint selections Don’t forget the power of Quick Mask for creating complex selections Hit ‘Q’ on the keyboard to enter Quick Mask Mode. Paint the selection with black, erase it with white. Hit ‘Q’ again to exit. Create your text with the Type tool and then copy it over to the clipboard Quick masks allow you to simply paint complex selections with the humble Brush tool Click corner points to create a perspective grid within the Vanishing Point window Precious selections You’ll often use a selection more than once, so make sure to save it When you created a complex selection, save it via Select>Save Selection. When you want to use it again, go to Select>Load Selection. Don’t risk losing that complex selection, make sure to save it in case you need it in the future Paste the type, drag it into the perspective grid and position it in perspective by dragging 24 PHOTOSHOP 5 MINUTE TIPS & FIXES The Vanishing Point filter can work wonders with creating in extreme perspective
  • 25. Tip 38 Automatic lens correction Take the guesswork out of correcting lens distortion in CS5 In CS5, you can Auto Correct lens distortion in the Lens Correction filter. Choose the Make and Model of your camera and then choose the appropriate Lens Profiles to correct distortion without any of the guesswork. Tip 35 Artistic brushed borders Paint onto a mask to get arty with borders around your images Duplicate the Background layer (Cmd/ Ctrl+J). Fill the original background with a colour of your choice. Via Edit>Transform>Scale, reduce the size of the image on the upper layer a little. Add a mask via Layer>Layer Mask>Reveal All. Now paint around the edges of the image with black at 50% Opacity, making sure to hide any hard edges. Tip 36 Non-destructive Dodging and Burning Use a simple grey filled layer for damage-free targeted tonal adjustments Add a new layer, and via Edit>Fill, fill it with 50% Gray. Set the blending mode to Soft Light. Paint with a soft brush at 15% Opacity, using black to gradually darken and white to subtly lighten areas in your image. Lens Correction now has specific lens profiles built in Tip 39 Copyright Brush Create a simple brush to quickly add copyright tags to your photos Create you text in black, on a white canvas with the Type tool. Crop and Flatten your image. Now go to Edit>Define Brush Preset. Give your new brush a name and hit OK. You’ll now find your new brush in the Brush Picker. Use your new brush at any size, with any colour. Neutral Density impact in CS5 You don’t need a neutral density filter for your camera… just do it all in Photoshop Use the new Neutral Density gradient on a layer set to Soft Light to add impact to skies in your landscapes. You can dodge and burn simply by using the Brush tool with black and white Try different brushes to create an endless variety of artful image borders Tip 37 The new Neutral Density gradient makes it easy to add impact to skies “Create a simple brush to quickly add copyright tags to your photos” Tip 40 Content-Aware magic Use the new Content-Aware features of Photoshop CS5 for seamless clean-ups CS5 offers users some fantastic new features, top of which are the new Content-Aware options. These allow you to perform nothing short of image- editing alchemy, with Photoshop replacing pixels with other information, meaning you can clone away items in a blink of an eye. Once you get used to how they work, there’s no turning back! Here’s a look at the two features. Content-Aware fill Make a quick selection around the blemish in your image, go to Edit>Fill, choose Content-Aware for Contents and just click OK. Repeat if it doesn’t look good the first time. Content-Aware spot healing Content-Aware is also available for the Spot Healing Brush in CS5. Just choose it from the Options bar and then brush over objects to remove them. Enjoy the best results ever seen in retouching tools. Protect your work by creating a quick and simple brush to stamp your copyright information PHOTOSHOP 5 MINUTE TIPS & FIXES 25
  • 26. co Ba rre sic cti on s Tip 42 Tip 41 Turn down the noise! Camera RAW is the best choice for Noise Removal, even with JPEG images In the Bridge, right-click the image and choose Open In Camera Raw. Click the Detail tab. The Luminance slider is use to remove Luminance noise (dark speckles), and the Color slider removes Colour Noise. Detail slider help to keep edges sharp. Reshape with Puppet Warp Puppet Warp is a very powerful tool, but knowing how best to use it is the key to success When you’re using Puppet Warp, it’s important that you not only place pins to move, but that you first place pins to ‘lock down’ the parts of the image you want to remain in place and not be affected by the warping. As the walkthrough below shows, using this feature correctly allows you to make very fine, targeted changes, with subtle, undetectable results. Make your images bend to magical Puppet Warp tool your whim with the 02 p Black, white, Ti 43 and colour Really mix things up by combining black and white with a splash of colour The best way to create a selective colour effect is via a layer mask. Go to Layer>New Adjustment Layer>Black And White. Choose one of the Black and White Presets, or adjust the sliders within the black and white panel to create a good, strong black-and-white image. Click on the layer mask attached to the adjustment layer and choose the Brush tool, making sure that Black is your Foreground Color. Now just paint with black wherever you want to restore colour from the background layer beneath. You can hide overpainted areas by painting back into the mask with white. 01 Lock down Click to place various pins around and within the object to be warped. These ‘lock down’ pins will prevent other areas of the subject being warped. 04 03 Drag to distort Now simply click and drag of the selected pins to distort this particular area of the image. You can select multiple pins by Shift-clicking. Tip 44 Adjust multiple layers Use a Black and White adjustment layer to create the overall mono image Paint on the adjustment layer mask to reveal to colour from the background beneath 26 PHOTOSHOP 5 MINUTE TIPS & FIXES Pins for warping Now click to place pins along the feature that you want to bend, warp or adjust. You can activate individual pins simply by clicking on them. Cmd/Ctrl-click multiple layers before adjusting Opacity or Fill Adjust the Opacity and Fill of multiple layers at once In Photoshop CS5, you can adjust the Opacity of two or more layers at once. Cmd/Ctrl-click multiple layers and adjust the slider Add and subtract layer At any time you can add more pins or delete some. To delete a pin, right-click it and then choose Delete Pin. By carefully controlling where pins are placed you’ll be able to producing convincing results. Classic hand tinting Create classic hand tinted black-and-white images with the addition of a layer Add a new layer above your black-and-white image, setting the blending mode to Color. Use a soft brush with your chosen colours to paint over the image, for classic hand tinting. Tip 45 Add a layer and start painting to add hints of colour to black and whites
  • 27. Tip 46 Super-fast high key effect Simple and effective skin smoothing Create a high-key image from the Black channel in CMYK mode The classic high key effect can work very well for a really modern portrait effect, and by duplicating your image, changing its colour mode and stealing just one channel, you can create this effect quickly and easily. Duplicate your image (Image>Duplicate). On the duplicate image go to Image>Mode>CMYK. Click on the Channels palette, click on the Black channel, Select All and hit Cmd/Ctrl+C top copy it. Return to your RGB image, and go to Cmd/Ctrl+V to paste. Flatten the image and you’re done! Tip 47 Use the Median filter to effectively smooth skin Duplicate the Background layer (Cmd/Ctrl+J). Now go to Filter>Noise>Median. Use a small Radius value, just enough to remove the unwanted skin texture (you’ll be able to judge this effect within the preview window). Hit OK to apply the filter. Now, on this smoothed layer, apply a layer mask via Layer>Layer Mask>Hide All. The layer will now be hidden completely. Choose the Brush tool, click directly on the layer mask thumbnail and paint over the skin with white at 75% Opacity, avoiding the eyes, lips and other facial features that don’t want the smoothing effect. You can make the final smoothing effect look completely convincing by reducing the opacity of this layer a little. ration Tip Change specific colours via Hue/Satu With Hue/Saturation you can make specific colour changes as well as global ones In Hue/Saturation, choose any colour from the Colors drop-down. Now choose the eyedropper and click the colour in your image you want to change. Just move the Hue slider to adjust that particular colour. 48 Don’t let exaggerated skin texture spoil your portrait shots Choose layers by content Quickly alter the colour of an object using the Hue/ Saturation command Reset, don’t cancel Tip 50 Don’t search for a particular layer. Ctrl/Cmd -click to choose it If you are working on multi-layered documents, finding the one you want can be a nightmare. Choose the Move tool (‘V’) and Cmd/Ctrl-click on any element in your image to automatically jump to that layer in the Layers palette. Simple! Tip 49 If you make a mistake with an adjustment, don’t cancel out of it, just hit Reset Whenever you’re working within a dialog box that has a Cancel button, you can hold down the Opt/Alt key to change this to a Reset button. Holding down the Opt/Alt key transforms Cancel into Reset Cmd/Ctrl-click on any element in your image to select that layer in the Layers palette PHOTOSHOP 5 MINUTE TIPS & FIXES 27
  • 28. co B rre asi cti c on s Correct lens distortion This frequent photographic snag is solved within just a matter of minutes L ens distortion is most obvious in architectural photographs, when the top of the building appears to be smaller than the bottom. You can guarantee this type of distortion when you’re not completely square on to your subject. But let’s be honest, this is impossible standing at ground level and looking upwards. You’ll also notice lens distortion when using a wide-angle lens to capture something that is supposed to be straightedged. And that’s where Photoshop comes in, with its easy-to-use Lens Correction filter. If your image appears to be an architectural disaster then you’ve got a case of lens distortion – this five-minute fix should square-out any problems. Before After Top tip: Using grids and guides over the top of your image will show exactly what’s straight or wonky. THE RIGHT PERSPECTIVE This could well be the fastest photographic solution in history 01  Set up grid Open an image that has plenty of lens distortion and duplicate its layer in the Layers palette. Go to Filter>Distort>Lens Correction in the top menu bar and this will open a new dialog box. Select the Move Grid tool and shift the grid so it sits on an edge of the subject in your image. 28 PHOTOSHOP 5 MINUTE TIPS & FIXES 02 Straighten up First use the Vertical Perspective slider under Transform to correct the tilt. Try aligning the tilt correction with the grid. Now adjust the Remove Distortion slider at the top right of the box to pinch or expand the pic from its centre. Move between these two sliders for best results, then hit OK. 03 Crop down The edges of the image will now be bowed out of shape. Select the Crop tool and cut these edges out. Spin and resize the cropping area to make the subject as upright as possible. Be prepared to lose areas of the image due to this cropping, but more importantly, your image should now have the right perspective – in under five minutes!
  • 29. Flip for better composition Create symmetrical landscapes for striking images F ormal gardens use symmetry to plan planting and make a pleasing composition for the eye, but you can never train nature to conform! And if you have a formal scene, as we have here, any imperfections ruin the dream of a symmetrical composition. But with a spot of selecting, copying, pasting and flipping, you can enjoy the perfect composition you have always dreamt of. Top tip: Use this technique to expand horizons and make panoramic effects. Simply copy, paste and shift along. THREE STEPS TO PERFECT SYMMETRY Be a digital maestro 01 Divide and conquer Open your image and then pick the Rectangular Marquee tool. Zoom into your image so you can see everything and then click and drag to select half of the image. We decided to take the fountain as the centre of the shot and so cut that in half. 02 Copy cat With the selection all selected, go to Edit>Copy and then Edit>Paste. Drag this layer down to the New Layer icon in the Layers palette to duplicate. Click the eye icon next to the Background layer (your original image) to turn it off. That keeps it safe. 03 Flippin’ good Ensuring you have the top layer selected, go to Edit>Transform>Flip Horizontal. The selection from Step 1 is now back to front. Go to the Move tool and either hold down Shift and click-drag to the right, or use the arrow keys to nudge it along. Make sure the middle lines up and then bask in the symmetry! PHOTOSHOP 5 MINUTE TIPS & FIXES 29
  • 30. co B rre asi cti c on s Before Tips fixes Straighten in PS CS5 CS5 users have a dedicated straightening tool. Well, kind of. Open your wonky image and click on the Eyedropper tool in the Toolbar. When the fly-out menu appears, pick the Ruler tool. Click and drag this along an edge that should be straight. Let go, scoot up to the Options bar and click the Straighten button. Your image will be straightened AND cropped. If you want to crop it yourself, simply hold down the Opt/Alt key on your keyboard while you are clicking the Straighten button. Crop and straighten images I A wonky horizon can easily ruin an image, but it’s as easy as pie to sort these out using Photoshop’s automated tool n an ideal world we would always take photos with a tripod carefully set up to ensure that our images were perfectly straight. But, let’s face it, when you’re out and about and in the middle of a photographic frenzy, worrying about a minor thing like a straight horizon isn’t high on the list of priorities. Until you get home, that is, and look through your images and realise every one looks as though its contents are clinging on for dear life to avoid falling out of the frame! It’s a particular problem with landscape shots where there is a clear horizon that should be straight and obviously isn’t. 30 PHOTOSHOP 5 MINUTE TIPS & FIXES Well, worry not, because Photoshop has a tool to sort you out. Actually there are various tools, depending on what version of Photoshop you are using. We are concentrating on the Straighten tool using Photoshop Elements 9, as CS5 now boasts a similar feature. Draw along the area that should be straight and then wait while it is rotated so things are nice and level. Easy peasy. If you haven’t got Elements or CS5, you are not doomed to a lifetime of wonky scenes; there are a couple of options for doing a similar thing, so we’ll look at these as well. CS5 is dealt with in the tip box, while earlier versions of Photoshop are examined from Step 4.
  • 31. Straighten horizonS with PhotoShoP elementS make light work of sliding landscapes 01 Set the tool up Open up the image that you need to straighten. The wonky horizon is pretty noticeable – we must have had one leg in a hole! Go to the Toolbar and pick the Straighten tool, then, in the Canvas Options menu, select Crop to Remove Background (earlier versions of Elements will say Trim Background). 04 02 Drag to straighten The idea is to drag the Straighten tool across an edge that should be straight. Most of the time that will be a horizon line, as is the case here. Zoom in to the image if you need to (Cmd/Ctrl and +) and, starting from the left edge, click and drag the tool across the horizon (keep the mouse button held down). in CS or above As mentioned, it is possible to straighten images in full versions of Photoshop. One way to do this is with the Measure tool. This is hiding behind the Eyedropper, so click on that in the Toolbar to get the fly-out menu. Select the Measure tool and then click and drag across and edge that should be straight. 03 on the straight and narrow As soon as you let go of the mouse button, Elements will present a lovely straightened image for you, all nice and trim. If you’d rather crop away excess yourself, simply select Crop to Original Size (this appears as simply Original Size in earlier versions of Elements) from the Canvas Options area. 05 rotate the canvas Go to Image>Rotate Canvas>Arbitrary to call up a window. An angle will be automatically entered – this comes from the line you drew with the Measure tool. Photoshop will also have worked out which way your image needs to rotate. Click OK and then use the Crop tool to trim the edges. 07 06 Straighten with lens Correction Another way of straightening images in pre-CS5 versions of Photoshop lies within the Filters menu. Go to Filter>Distort>Lens Correction. This will call up a new window. Go over to the left-hand side and pick the Straighten icon (second one down). Draw across the horizon With the tool selected, click and drag across an edge that should be straight (is this starting to sound familiar?). As soon as you let go of the mouse, Photoshop will whip your image around so the horizon is straight. PHOTOSHOP 5 minuTe TiPS & fixeS 31
  • 32. co Ba rre sic cti on s ContentAware Scaling An intelligent method of selectively resizing images C ontent-Aware Scaling came into Photoshop in version CS4. It’s grouped with the Transform tools and acts in the same way, but with a bonus. Found in the Edit menu, Content-Aware Scaling not only resizes your image but also keeps the main subject at its original size. It resizes all the other areas that have no distinct subject. When you use the Free Transform tool in Photoshop to adjust an image’s size, the entire contents are affected. Content-Aware Scaling recognises areas of similarity such as sky or grass, and only resizes these. If an image has more than one main subject, for example a portrait of a group of people, the areas lying between each person are resized. However, this isn’t always perfect every time, as Content-Aware Scaling can produce rough patches. This is where some pixels haven’t been blended smoothly, so there are limits to the extent of rescaling. It all changes depending on the subject you’re dealing with. Using this technique to resize an image saves possible hours of painstaking cropping, copying and cloning. Combine ContentAware Scaling with selections saved as alpha channels, and you can protect areas against any distortion. Read through this guide to discover a solution to distortion caused by Content-Aware Scaling and how best to use this essential feature in Photoshop. Where is it? Content-Aware Scaling can be found in the Edit menu just above the other Transform tools such as Free Transform. Its job is the same, but it keeps the dimensions of the main subjects in your image. After Content-Aware Scaling Quick Mask mode Content-Aware Scaling is only available in CS4 onwards, and is an alternative to the Free Transform tool. If you’re looking to reshape an image to fit a certain frame without distorting the main subjects, Content-Aware Scaling is made to do just that. It’s located under Edit>Content-Aware Scale. Your image is given markers on all four of its corners and sides to show the boundary. By tweaking the settings in the Options bar it can be set to specific dimensions, to protect skin tones and to adjust the amount of distortion. By making selections around subjects you can prevent them being distorted. Practise the three steps on the next page to learn how to use Content-Aware Scaling with a new alpha channel. Select the Magic Wand tool and make a selection around your subject. Enter Quick Mask mode by clicking on the thumbnail at the bottom of the toolbar, then using the Brush and Eraser tools you can make your selection more accurate. Experiment with other selection methods – for example try using the Magnetic Lasso tool, which sticks to the edges of your subject as you run it around the edges. Try the Pen tool to create a smoother selection by joining points along an edge. You can then resize these parts or save the selection (Select>Save Selection). A fast way to resize 32 PHOTOSHOP 5 MINUTE TIPS & FIXES Multiple methods of selection
  • 33. Making Alpha channels Protecting skin tones If your image contains people, skin can be protected from possible distortion. In the Options bar simply select the button with a person on it to activate this. Content Aware Scaling can work with alpha channels to protect an area from distortion. They save a selection for repeated use, great for protecting many subjects at once. 01 Make a selection Use the Quick Selection tool to select the main subject. Use a small brush for trickier areas, and use the Magic Wand tool to select multiple subjects in your image. Amount adjustment The level of distortion can be adjusted using the Amount slider. At 100% the main subjects are protected as much as they can be when applying Content-Aware Scaling. 02 Save your selection When the selection is complete, head to Select>Save Selection. In the dialog box name your selection and hit OK. Open the Channels palette and you’ll see it saved there. Hit Cmd/Ctrl+D. Locate the selection Go to Edit>ContentAware Scale, and in the Options bar, under Protect, select the name of the channel just made. Now when you resize your image the channel won’t become distorted. A closer race We’ve shortened the distance between the windsurfers to make this race closer and more intense. Notice none of the windsurfers have been affected. 03 Before resizing Protect skin tones Minimise distortion Content-Aware Scaling has an option to retain quality and shape in skin tones in portrait images. This is ideal if you want to retain the background in a portrait that has a landscape orientation and you need to change it to portrait. Select the option from Edit>Content-Aware Scale, and in the Options bar click on the button shaped as a person. This protects a person’s face from distortion and looking blocky from overlapping pixels. It also saves you making a selection around a person each time you want to resize with Content-Aware Scaling. To minimise any distortion when you use ContentAware Scaling, simply adjust the Amount slider in the Options bar at the top of the Photoshop interface. With a value of 100% the adjustment is more considerate towards the main subject in your image. However, if you set this to a lower value such as 10%, the main subject and background will both be squashed and moved out of shape. Try to experiment with different values to achieve the correct level of distortion for your particular image. Designed for portraits Improving the look of resizing PHOTOSHOP 5 MINUTE TIPS & FIXES 33
  • 34. co B rre asi cti c on s Control Hue, Saturation andLightness This clever command can be used to powerful effect for enhancing colours in your artwork Tips fixes Helping hand In Photoshop CS4 and CS5 the Hue/Saturation menu contains a helpful tool for changing the saturation of a chosen colour. All that’s required is to click on a colour in your image and to drag left or right to remove or add saturation. O ne of the many colour adjustment tools featured in Photoshop, the Hue, Saturation and Lightness sliders are accurate ways for boosting or removing colours. Found under Image>Adjustments, the controls in this command can be used for creating different effects, from sepia toning to boosting the red subjects in your image. We take a look at a couple of these effects using the Hue and Saturation adjustments. The Hue slider, for example, can be used to adjust the entire colour range of an image, or just a small area of selected colour in your image. That’s exactly what we’ve done in the step-by-step over the page, also employing layer masks for tweaking multiple subjects. The Saturation control changes the intensity of colours, or can be used for removing colour altogether. This is an effective method of converting an image to black and white, without losing tonal detail. It is popular with photographers looking to quickly remove colour, or for creating a selective black and white effect. Mastering all three adjustments can bring dramatic changes to your artwork. They can help bring more focus to a subject’s colour to make it stand out from the rest. Selective black and whites Reduce or intensify saturation Inside the Hue/Saturation menu is a list of colour channels in your image. These can be individually selected for editing, whether it’s increasing saturation or turning black and white. It’s a fast method of experimenting with different looks. 01 Select tool Open the Hue/Saturation menu by going to Image>Adjustments. Click on the drop-down menu of colour channels. Change the channel to a specific colour, such as Yellow. 02 Remove colour Reduce the Saturation slider to -100 to remove all signs of colour. The range of colours affected, as well as yellow, is shown at the bottom of the menu between the two coloured bars. 03 Adding other colours To intensify or desaturate other colours in your image, choose a different colour in the drop-down list, and manipulate the Saturation. Master will affect all colours in your image. Hue, Saturation or Lightness? Selective colour adjustment When you open the command, you’re presented with three sliders: Hue, Saturation and Lightness. Knowing how each one affects your image will save a lot of potential undoing. The Hue adjustment shifts the entire colour range, which can create peculiar results; the Saturation adjustment reduces the strength of colour in your image, and can result in completely black-and-white images. The last adjustment, Lightness, adds either black or white to colours for a lighter colour range. All three adjustments, however, can be applied to a specific colour instead of the entire image, making these adjustments even more versatile. The Hue/Saturation command contains a list of colour channels, as well as an option adjust all colour channels (Master). If your image is of a sunset, for example, you may want to boost the red/ orange colour on the horizon, or change the colour of the sunset altogether. By selecting Red from the list of channels in the menu, you can shift the Hue slider to change only the red subjects. The changes may be subtle, but when viewed as a whole, the difference is very noticeable. Selecting colour individually creates more contrast between subjects and makes your image look more dramatic. Three sliders to adjust light and colour 34 PHOTOSHOP 5 MINUTE TIPS & FIXES Picking out a colour to enhance
  • 35. Preset list Inside the Hue/ Saturation dialog there is a list of Presets containing some of the most popular styles of art. Select one of these, and you’ll see your image change instantly. Quick colour change By selecting the small hand symbol inside the menu, you can click and drag over any colour to change its colour or the saturation of the colour. Photoshop automatically selects the colour range when using this tool. Colorize an image The Colorize option is a great way to instantly add a single colour over your entire image. Its colour can be changed using the Hue slider, as well as its intensity using the Saturation slider. Colour slider The rainbow of colours at the base of the menu contain grey markers. These can be adjusted to change the spread and feathering of colour adjustment across the spectrum. Replacing colours with one tone Colour pickers The Hue/Saturation menu has the option Colorize. By ticking its box, your image loses all colours present with a single tone. Sliding the Hue adjustment changes this tone to create an abstract look to your artwork. The Saturation slider can also be put to good use in this effect, altering the intensity of the Colorize tone. Colorize is useful for creating a traditional cyanotype image, using a blue from the Hue adjustment slider. Highlights are tinted blue, as well as shadows shifting in colour. It’s also great for creating sepia-toned images. The menu is supplied with three colour pickers, or more commonly known as ‘eyedroppers’. These eyedroppers become active when a colour channel is selected other than Master. The main Eyedropper tool will pick out any colour clicked on, so it can be adjusted. The two other eyedroppers are Add to Sample and Subtract from Sample, indicated with plus and minus symbols. These are useful for adding or removing a colour into the mix after making an adjustment. The colour range affected by adjustments is shown within the dark grey bar next to the two coloured bars. Colorize artwork Adjust a colour with the eyedropper PHOTOSHOP 5 MINUTE TIPS & FIXES 35
  • 36. co B rre asi cti c on s FROM ONE COLOUR TO THE NEXT How to alter colour separately across your image 01 Make selection Duplicate the background layer to work non-destructively. Choose the Quick Selection tool, or the selection method of your choice, and set its Diameter to 50px. Make sure AutoEnhance is ticked in the Options bar. 04 Manipulate Hue On the duplicated background layer, click on the image’s thumbnail instead of the layer mask’s. Go to Image>Adjustments>Hue/ Saturation, and slide to the Hue slider to your desired new colour. 02 Select first object With the Quick Selection tool, click and drag a selection over your subject. Click on the Refine Edge menu in the Options bar, and set Feather to 1.5px, Expand to +3 and Radius to 2.9px. This will change depending on the image you are using. 05 Adjust another Duplicate the background once more and place below the previous duplicate layer. Using the Quick Selection tool, select another subject to alter. Apply the same Refine Edge command and hit Add Layer Mask button. Hit Cmd/Ctrl+D. 03 Add layer mask With the selection active and the duplicated background layer highlighted, click on the Add Layer Mask button in the Layers palette. This separates the particular subject from the rest of the image. Now hit Cmd/ Ctrl+D to remove the selection. 06 Multi-coloured Go into the Hue/ Saturation adjustment again and adjust the Hue slider to give this subject a change of colour. The layer above this won’t be affected, and both subjects can now be adapted separately. Useful presets Quick before/after Photoshop has a number of preset effects inside the Hue/Saturation adjustment menu. These allow you to apply effects quickly, and you can even adjust them further to suit your own image. The list of presets includes Cyanotype, Increase Saturation, Yellow Boost and Old Style. Presets help you achieve popular effects, but you can even save your own from inside the menu to reuse on future artwork. Next to the OK button, another set of options exists: Save, Load and Delete Current Preset. This gives you control over what you want to do with your favourite effects; you just have to remember to hit Save before clicking on OK! The Preview option in the dialog window can stay on all the time, so you can see any changes applied in real-time. However, when you think you’ve tweaked the Hue, Saturation and Lightness sliders for the perfect effect, flick the Preview option on and off and you can see the before and after versions of your image. This way there’s no need to hit OK and then ‘undo’ if you change your mind. It’s also good practice to duplicate the image’s layer before applying these effects. Alternatively, apply Hue/Saturation as a new adjustment layer inside the Layers palette. That way you can make a quick retreat if anything goes wrong. Already prepared effects to use 36 PHOTOSHOP 5 MINUTE TIPS & FIXES Using Preview to your advantage
  • 37. Rescue dull shots with Brightness/Contrast Get to grips with this useful command and pump some life back into bleak photos I t doesn’t matter if you haven’t got elaborate light setups, reflectors and all sorts – you can still take good photos at home. Even if, at first glance, the results are decidedly dodgy. Take our example shot here. This was taken by a window (it was a cloudy day), with no other light source and no tripod. It looks too dark to be of any use, but if we bring the Brightness/ Contrast command into play we can tease out the colours and tones to end up with a vibrant shot that could have been taken in a professional studio. Top tip: Use this technique on any of your indoor shots. If you find yourself sticking to the same settings, record it as Before an action or turn into a droplet to run on batches of images. After FROM SHADOWY TO SPRIGHTLY Coax the colour and contrast out from the shadows 01 More brightness Open up your image and then head up to Image>Adjustments>Brightness/Contrast. Move the Brightness slider to +28. Things look better already – tonally flat, but better. 02 Contrast time Brightness is for livening up the image and needs to be teamed with contrast to add depth and interest. Move the Contrast slider to +15 to do exactly this. Don’t go too far, though, otherwise the highlights will blow. Click OK when done. 03 Add some zing The darkness has been wafted away but we can still introduce more colour to the image. Go to Image>Adjustments once more and pick Hue/ Saturation. Select Reds from the Channel dropdown menu and move the Saturation slider to the right then choose Yellows and do the same. Much better! PHOTOSHOP 5 MINUTE TIPS & FIXES 37
  • 38. co Ba rre sic cti on s Isolating objects The Quick Mask mode is a fantastic way to select objects or people within a scene. It’s not as fiddly as the Pen tool and is easily erased if you make a mistake... 01 Activate Open up an image in Photoshop and hit ‘Q’ to select the Quick Mask mode. You can also activate it by choosing the grey box with a white circle at the bottom of the toolbar. Quick Mask Discover this versatile tool, which is great for making selections T he Quick Mask mode is one of the most versatile tools you are likely to find within Photoshop’s expansive toolbox. Its primary use is for isolating areas that you want left untouched by any adjustments or tweaks. Quick Mask mode has been around since Photoshop 6.0 and offers a fantastic alternative to the traditional Selection tools. If you find yourself more partial to using the Paintbrush rather than the fiddly Pen tool, then this could well become your ideal selection method. The Quick Mask mode is activated by clicking on the square icon that contains a white circle. This is situated at the bottom of the toolbar alongside the Standard mode (a white box with a white circle). For instant access, you can simply hit the letter ‘Q’ on your keyboard and Quick Mask mode activates. This is a fantastic feature to help in the creation of a whole host of effects. Use it to create quick and easy vignettes for your portraits, paint a Quick Mask on specific colours to achieve amazing selective colouring results, or simply use it to protect an area from an image adjustment you’re about to perform. If you’ve never used this feature before, we’re certain it will be in constant use from this day forward! 02 Brush it on Select the Brush tool from the toolbar (‘B’) and choose a suitable size using the square bracket keys. Paint over everything you don’t need, using the Eraser if you make any mistakes. 03 Enjoy Now deactivate the Quick Mask by hitting ‘Q’. You’ll have an isolated selection highlighted by marching ants. You are now free to move this selection, cut it, copy it and generally do as you wish! Change the options Control the mask The colour of the mask can often be hard to see against the other colours in your image. If this is the case, simply double-click on the Quick Mask icon and a dialog box will appear. Choose a mask colour and mask opacity here. You will also be presented with two display options: Masked Areas and Selected Areas. The Masked Areas option sets your masked areas to black (opaque). Simply paint with more black to add to the mask. Paint with white to add to your selected area instead. The Selected Areas option is the opposite – masked areas are white (transparent) and selected areas are black. For extra control when applying a Quick Mask, you can mix and match the hardness of your brushes. This is ideal for when you want to cut out a picture of an animal, for example. Opt for a soft brush to trace the fur, and choose a harder brush to mask out the more defined features. The soft brush acts as a feather effect and means your final cutout will be less harsh along the edges. These brush-swapping antics can all be performed within one Quick Mask session, giving you ultimate control at speed. This is a far more accurate way of cutting out, compared to using the Lasso for selections. Alter the workings of the mask 38 PHOTOSHOP 5 MINUTE TIPS & FIXES Use brushes for a feathered effect
  • 39. Get control with brushes You can use any brush to apply a Quick Mask. We recommend you use a soft brush for details such as hair and fur – this will give you a softer, more subtle selection. Colour your mask If the colour of your mask is too similar to the colours within your image, double-click on the Quick Mask icon. Now click on the Color swatch and select a colour. You can adjust the opacity here as well. Quick Mask settings To reverse the way the mask operates, just double-click on the Quick Mask icon and select Masked Areas (masked areas are black) or Selected Areas (masked areas are white). Dialog Hit Match Color and this box appears. Use the drop-down Source menu to select your source image. Ensure Preview is checked to see the change, and use the Luminance, Color Intensity and Fade sliders to adjust. Match Color The Match Color tool is found in Image>Adjustments>Match Color. Ensure that both your images are open in Photoshop first, before selecting this tool. Once selected, use the dialog box to create your settings. Selective colouring Quick Mask tips Selective colouring is a fantastic way to make a dramatic statement in your images especially in portraits. By applying a Quick Mask to an area of colour you wish to preserve, you can then desaturate the remaining portion (Image>Adjustments>Desaturate). Your masked area will retain the original colour and will look striking against the black and white background. Alternatively, you can desaturate your image first and then isolate specific parts of it, which you can colourise. This is ideal for old and new photos alike, and is a super-fast effect that you can play with to perfection. A handy tip to know is that you can make a selection with any of your favourite Selection tools and then hit ‘Q’ to change the selection into a mask. Another top hint – once you have applied a mask, hit ‘Q’ to leave the Quick Mask mode, and your selection will appear in the form of marching ants. Move this to a new layer by pressing Cmd/Ctrl+J. For a quick way to invert your mask, simply press Cmd/Ctrl+I. Another gem, when trying to mask fiddly areas, is to switch to the Pencil tool for extra precision. In fact, any of the painting tools can be used when creating a Quick Mask. Use Quick Mask to pop colours The little things you should know PHOTOSHOP 5 MINUTE TIPS & FIXES 39
  • 40. co Ba rre sic cti on s Magic Wand tool Making a selection The Magic Wand is highly versatile and is used to separate areas of colour. In this three-stepper we make sure you tick every box when selecting with this tool. 01 Set Tolerance Select the Magic Wand in the toolbar. In the Options bar, set Tolerance to 32 to select a small area of colour. Tick Anti-Alias and Contiguous, but leave Sample All Layers unchecked. Discover this versatile tool, which is great for making selections M ost people associate magic wands with magicians and their showmanship, but Photoshop has its own Magic Wand tool, and it’s not used for pulling rabbits out of hats. The Magic Wand tool is one of Photoshop’s main Selection tools, and it’s a handy way to customise your selections. It works by sectioning off particular colours inside your image. The selection process is affected by a collection of adjustment options. In this detailed tool guide we give you a rundown of the most important adjustments to remember. The most effective way to use the Magic Wand tool is to zoom in to your image close enough to see each pixel. Then the four Selection adjustments – New, Add, Subtract and Intersect – can be used with more precision. The Select menu at the top of Photoshop contains all its hidden adjustments, which affect the way the tool behaves. These options range from a collection of Modify adjustments, a Transform Selection option, and among many others, both Grow and Similar adjustments are found under the Select menu. This comprehensive selection tool can be used for separating two or more subjects, or singling out specific colours. With all these adjustments and modifications, you can’t put a foot wrong making selections with Photoshop’s Magic Wand tool. Let’s have a look at how to use it! 02 Select the area Click in the area of colour you want to mark off using the Magic Wand. In the Options bar are four square thumbnails: New, Add, Subtract and Intersect. Use these to make your selection. 03 New channel Ctrl/right-click in your selection with the Magic Wand, and pick Save Selection in the list. Give it a name, hit OK and open the Channels palette to find your saved selection. Quick Mask mode Adjust Tolerance A selection is represented by a black and white dotted line, also known as ‘marching ants’. Another way to view the marching ants is in Quick Mask mode. Select the Edit In Quick Mask Mode button at the bottom of the toolbar, and watch the selection change into a light-red colour cast. This colour cast allows you to see the selection in more detail, and you can add or subtract pixels easily in this mode. With the Brush and Eraser tools, you can paint or erase the colour cast to alter the selection. Click on the Quick Mask Mode icon inside the toolbar to return to Standard editing mode, and to see the marching ants. The Magic Wand tool works by selecting pixels of a similar colour, and it comes equipped with a Tolerance adjustment. The Tolerance of the Magic Wand tool decides how much of your image a selection will cover. The Tolerance is preset to 32, but you can easily change this to suit the size of the area you want to pick out. Just enter an amount into the Tolerance adjustment box to change it. The bigger the number, the larger the area it covers. With the Tolerance set to 32, a selection spreads across only a small area of a certain colour. An accurate way to select 40 PHOTOSHOP 5 MINUTE TIPS & FIXES Increase the spread of a selection
  • 41. Selection options These four options let you create a new selection, add or subtract from a selection, and also intersect an existing one. With their help you can make a perfect selection. Options bar There are three boxes in the Options bar: Anti-Alias, which smooths the edges of a selection; Contiguous, selecting only neighbouring pixels; and Sample All Layers, which accounts for every layer in your composition. Tolerance The Tolerance adjustment of the Magic Wand tool lets you choose the size of the selection you want to make. The larger the number, the more pixels the selection will cover. The Magic Wand tool This is found with the Quick Selection tools and next to the Marquee Selection tools. The cursor changes to (you guessed it) a magic wand. You can always press the ‘W’ key for its shortcut. Boosting colour We increased the saturation of the fur in this image. We selected the blue sky first, then went to Select>Inverse to select the cat. We used a Tolerance value of 60 for the sky to select a large area. Magic Wand adjustments Save a selected area Once a selection is made you can change it in two ways. Grow and Similar are both found under the Select menu, or you can Ctrl/right-click anywhere inside a selected area to find them in a drop-down menu. Grow makes the selection gradually bigger and will select the same colours. The Similar adjustment picks out all the colours that are similar to the ones already inside your initial selection, but it jumps to any part of your image that is similar. Similar is ideal for selective black and white techniques. When you save a selection as a new channel, you can adjust it any way you like at any stage. To save a selection, go to Select>Save Selection. In the dialog box, set the Document option to your current image and give the channel a new name. Hit OK, and the new channel will appear in the Channels palette. By selecting its layer, you can then use the Brush or Eraser tools to add or subtract the selection. It works in a similar way to the Quick Mask mode. Experiment with Grow and Similar Create new channels with the Magic Wand PHOTOSHOP 5 MINUTE TIPS & FIXES 41
  • 42. co B rre asi cti c on s Tips fixes Stock, textures and inspiration All the pictures and textures used in this tutorial came from the stock.XCHNG website (www.sxc. hu). This is a great resource for free stock images and textures to use in your own projects. We can also use grunge brushes within our projects – these are useful for adding additional texture. You’ll find www. brusheezy.com/ brushes?search= grunge very helpful here. For help on installing brushes take a look at www. brusheezy.com / videos. For some inspiration for your own projects pop over to www. designzzz.com / amazing-grungeartworks-alex/. Make quick selections Transform photos by selecting parts of photos and then layer them up for a grunge effect W hen we talk about grunge in terms of art we refer to dirty textures and faded colours, often with a macabre theme and quality. Using dark tones and white space to emphasise a picture’s message, grunge has steadily become a popular form of art. The artist David Carson, who used non-mainstream photographic techniques and experimental typography to produce his own ‘dirty’ signature style, is often referred to as ‘the father of grunge’. While working as art director on a number of magazines, including Ray Gun, Carson developed layouts that often included distorted mixes of typeface and fractured images. 42 PHOTOSHOP 5 MINUTE TIPS & FIXES We can use Photoshop to produce dark grunge-inspired photomanipulations using a combination of blending modes, brushes and textures. In this tutorial we won’t be using any custom brushes, but will spend our time focusing on manipulating a stock photo of a sunflower with textures and adjustment layers. The tools we’ll use are the layer blending modes, Quick Selection tool, Marquee selections, Levels, Selective Color adjustment layer, Hue/Saturation adjustment layers, masks and clipping masks. But it’s really not as hard as it sounds! On the internet there are many free Photoshop grunge brushes available for you to download and install. We will explore some of these as well as alternative textures and inspirational pictures.
  • 43. Grab your mouse and imaGes… It’s time to delve into the world of grunge 01 open your files We start our project by finding and opening a nice textured background. This will be the base for our grunge picture that we’ll build upon. Next, we find a sunny image of a sunflower and open that up too. 02 Quick selection tool Locate the Quick Selection tool in the toolbar – it may be hidden behind the Magic Wand tool. You can quickly cycle through the tools by holding Opt/Alt and left-clicking the icons in the toolbox. Now we want to set up the tool in the Options bar, which is found at the top of the screen. 03 it’s a setup In the Options bar select the Add To Selection option, which looks like the Quick Selection tool with a plus symbol above it. Also set up Brush Size to around 50 pixels. Make sure that Auto-Enhance is ticked. Now start to paint over the petals of the sunflower to select them; stop frequently to let the selection catch up. 04 mistakes happen Carry on with the selection, moving inwards so you also choose the stigma (the centre of the flower). If by accident you select something outside the flower, you can easily remove this by using the Subtract From Selection option – it looks the same as Add To Selection but with a minus symbol. Carefully click/paint over the parts you don’t want. 05 Copy and paste Copy the flower (Edit>Copy) into your grunge document above the background layer (Edit>Paste), and place it in the centre of the picture. Name this layer ‘Sunflower’. Next, add a Levels and Selective Color adjustment layer above the Sunflower layer. The adjustment layers can be found by going to Image>Adjustments in the toolbar. 07 06 Promotion Select both adjustment layers; promote them to a clipping layer on the Sunflower layer (Layer>Create Clipping Mask). Open Levels and make the Input Levels read 0,1.54, 255. Open the Selective Color adjustment layer; hit Yellow. Move the Cyan, Magenta, Yellow sliders left so they read -100%. merge Select the three layers (Levels, Color adjustment, Sunflower) and merge via Cmd/ Ctrl+E. Name it ‘Sunflower Merged’. As in step 5, add and clip a Levels adjustment layer. Set the Input levels to 0,0.63,255. Use a softedged brush with colour set to Black and randomly mask some dark colour. PHOTOSHOP 5 mInuTe TIPS & fIxeS 43