Free online examination software tool
•Download as DOCX, PDF•
1 like•2,138 views

A free online examination software tool that you can use for creating online examination for your school,college , institute,company . A very easy to use software. YIndia initiative

Recommended
More Related Content
Recently uploaded
Recently uploaded (20)
Featured
Featured (20)
Free online examination software tool
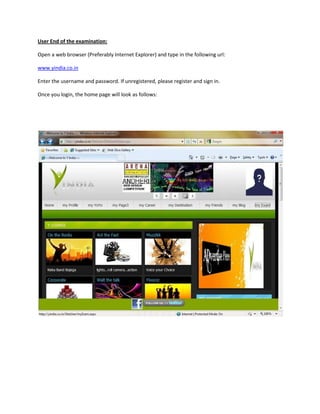
- 1. User End of the examination:<br />Open a web browser (Preferably Internet Explorer) and type in the following url:<br />www.yindia.co.in<br />Enter the username and password. If unregistered, please register and sign in.<br />Once you login, the home page will look as follows:<br />Then click on my exam and you will see the following page:<br />Enter the account ID and password provided to you to search for the relevant tests:<br />For a demo, use Account id – cat<br />Password – yindia<br />All the available tests will appear as follows:<br />Once you click on a test, it will show the exam description, number of sections, instructions, test duration. Etc.<br />Once you start the test, it will look as follows:<br />Click ‘show answer sheet’ to see the answers you have marked till now. It will look as follows:<br />Once the test is over, the result analysis of the candidate will appear as follows:<br />How to create/make a test:<br />Open a web browser (Preferably Internet Explorer) and type in the following url:<br />www.yindia.co.in/examadmin/examadminlogin.aspx<br />Enter the Login name and password as provided to you by yindia.<br />Once you login, you will see a page similar to the one below.<br />Here you click on the option, ‘add new exam’<br />Once you click ‘add new exam’ you see the following page:<br />Here you enter the Exam name and a small description.<br />Once you’re done, click ‘save’.<br />Here you see a checkbox named ‘active’. This is useful when you are editing or creating an exam. If you check ‘active’, the exam will be activated i.e. the students will be able to see the test.<br />If you uncheck the ‘active’ option, the exam cannot be seen by the students. Please remember that it is very crucial that you uncheck this if you do not want your students to view the test right away.<br />Once the exam is created, you add new sections to the exams in a similar fashion as you have added the exam.<br />You can add any number of sections as desired by you.<br />Once you click ‘edit’ beside the section, and then you click ‘add new question’<br />Once you edit the question, this is how it looks:<br />The ‘Analytical Answer’ box you see here is only seen when the students requests for the key. This is added because some questions may require an explanation as to how the answer was derived from the question. The required explanation can be provided here.<br />Continue adding questions this way under the desired sections.<br />Once you’re done setting the questions, save the test and go to ‘Test Master’.<br />There you will find a dropdown filter, pick the desired exam name and the view will be as follows:<br />Once you click edit, it will ask you to fill up the following details:<br />After all the students take the test, to check their results, you click ‘Test Result’ and say ‘view result’ for that specific test.<br />Then it shows the number of people who took the tests and their scores. Click ‘view analysis’ to see the in-depth analysis of that particular student.<br />