
Recommended
More Related Content
Recently uploaded
Recently uploaded (20)
Featured
Featured (20)
Installation of wp
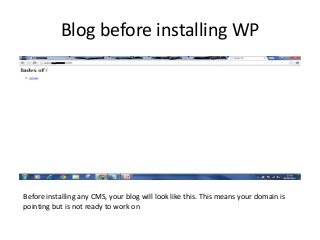
- 1. Blog before installing WP Before installing any CMS, your blog will look like this. This means your domain is pointing but is not ready to work on
- 2. To Install wordpress you have to login into your cpanel from the url given to you by your hosting provider. Cpanel looks like the figure given above. Cpanel is Unix(( linux) based control pane. It provides graphical interface and tools so that you can build your blog easily. You will install your wordpress in this cpanel. And once set up, cpanel can not be removed.
- 3. In Cpanel you will see many options like mail, files, domains, app installer etc. You will go to App installer which is provided in every hosting service for the user ease. In this App installer, you will see many CMS like wordpress, zoomla, drupal like in pic As we are talking about wordpress, you will click on Wordpress option.
- 4. Now you have chosen WP as your CMS. So new window will appear as in above pic Here you can choose the version to download. Newest version is 3.5.2( see above) Now after choosing version, you will simply click on install button provided at top right corner. ( see arrow shown in figure)
- 6. Refer slide 4 Now before you start installing wordpress, you have to fill some details as u can see in slide 4. 1. Choose protocol: In this you have 2 options. http:// and http://www. You can choose anyone but it is good to see when blog url is http://www.blog.com rather than http://blog.com 2. Choose Domain: In this your domain name will already appear as this already added in your hosting. If you have multiple domain, then you will have to choose the right one. 3. In Directory: You will keep it empty because you are installing WP files in root directory not and in any folder. 4. Database name Here, you will write anything related to your domain name. So that you can remember It when you have to check/remove database of your blog. Ex: domain name: blogacious Then database name could be blog. 5. Now, you will write your site name ( domain name without www.) and site Description. Ex: Site Name: Blog Site Description: Thoughts on blog.
- 7. Below Sitename and Site description you will see these options ( above figure) Admin Username: Choose according to you. Admin Password: Choose according to you These will help you in logging in your blog and work into it. It will show you your dashboard from where you work in your blog. Admin Email: your email address. Enter your valid email address so that any notification can be sent to you and you can also communicate with your hosting provider. At last click on install button given at the end.
- 8. Installation & finishing window After pressing install button, you will see these two windows one after other. Now Wordpress has been installed in your blog and your blog is ready to work on.
- 9. After installing WP This is how your blog will look like after installing WP. Your blog is set up and is ready to write on it. You can access your dashboard by the following link www.domainname.com/wp-admin