1. WORKSHEET 48
BO D I L
E T IC
H
/K
Y
IN A ES T
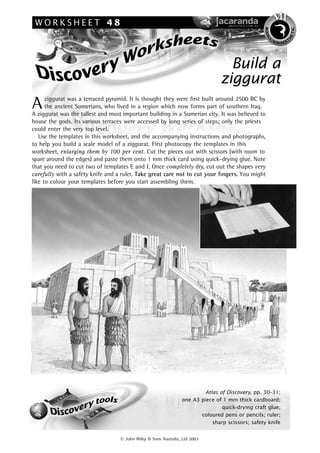
Build a
ziggurat
ziggurat was a terraced pyramid. It is thought they were first built around 2500 BC by
A the ancient Sumerians, who lived in a region which now forms part of southern Iraq.
A ziggurat was the tallest and most important building in a Sumerian city. It was believed to
house the gods. Its various terraces were accessed by long series of steps; only the priests
could enter the very top level.
Use the templates in this worksheet, and the accompanying instructions and photographs,
to help you build a scale model of a ziggurat. First photocopy the templates in this
worksheet, enlarging them by 100 per cent. Cut the pieces out with scissors (with room to
spare around the edges) and paste them onto 1 mm thick card using quick-drying glue. Note
that you need to cut two of templates E and I. Once completely dry, cut out the shapes very
carefully with a safety knife and a ruler. Take great care not to cut your fingers. You might
like to colour your templates before you start assembling them.
Atlas of Discovery, pp. 30–31;
one A3 piece of 1 mm thick cardboard;
quick-drying craft glue;
coloured pens or pencils; ruler;
sharp scissors; safety knife
John Wiley & Sons Australia, Ltd 2003
2. WORKSHEET 48 • page 2
BO D I L
E T IC
H
/K
Y
IN A ES T
Template A
Use a safety blade (or similar) to score along the dotted lines on this and all template pieces (on both sides
of the card). Scoring will help you bend the cardboard pieces into position. Be extremely careful not to
cut your fingers. Also cut very gently so you don’t slice through the card completely.
Bend the sides of template A down along the scored lines. Use a quick-drying glue to join the four corners
securely (on the inside). Be careful not to get glue on the template as the ink will smudge.
Template D
Template C
Template B
Repeat the step above for templates B, C and D. When all four levels
are completely dry, glue assembled piece B so it sits in the middle of
assembled piece A, and so on to the top. Allow to dry.
John Wiley & Sons Australia, Ltd 2003
3. WORKSHEET 48 • page 3
BO D I L
E T IC
H
/K
Y
IN A ES T
Template F
Template E
Template H
Template G
Fold templates E, F, G and H down along the dotted lines.
Gently push assembled templates F, G and
H into the holes in the front of assembled
templates A, B and C respectively. Before
pushing in template F, gently fold the flap
at the top down so that it sits horizontally.
Fold down the sides of template E. Glue the two folded
assembled templates for E to the front wall of template
A, one either side of template F. Glue each piece so that
its vertical edge butts up against template F.
Fold and glue the two templates for I, as you
did for template A. Place these slightly to the
front of each of the template E pieces. Glue the
inside edge against template F.
Template I
John Wiley & Sons Australia, Ltd 2003